一、安装配置
1、依赖配置
编辑项目的 pom.xml 文件,添加如下依赖:
<dependency><groupId>org.springframework.integration</groupId><artifactId>spring-integration-stream</artifactId></dependency><dependency><groupId>org.springframework.integration</groupId><artifactId>spring-integration-mqtt</artifactId></dependency>
2、配置 MQTT 服务器基本信息
编辑项目的 application.properties 文件,增加 MQTT 服务器配置信息:
server.port=10001# 用户名(这里为空)mqtt.username=# 密码(这里为空)mqtt.password=# 推送信息的连接地址,如果有多个,用逗号隔开,如:tcp://127.0.0.1:1883,tcp://x.x.x.x:1883mqtt.host=tcp://x.x.x.x:1883# 生产者连接服务器默认客户端IDmqtt.sender.clientId=mqttProducer# 默认的推送主题,实际可在调用接口时指定mqtt.sender.defaultTopic=hangge# 消费者连接服务器默认客户端ID(这里使用随机数)mqtt.receiver.clientId=${random.value}# 默认的接收主题,实际可在调用接口时指定mqtt.receiver.defaultTopic=hangge
二、实现 MQTT 消息的发送
基础连接配置
package com.gyz.mqtt.config;import org.eclipse.paho.client.mqttv3.MqttConnectOptions;import org.springframework.beans.factory.annotation.Value;import org.springframework.context.annotation.Bean;import org.springframework.context.annotation.Configuration;import org.springframework.integration.mqtt.core.DefaultMqttPahoClientFactory;import org.springframework.integration.mqtt.core.MqttPahoClientFactory;/*** 配置连接** @author gong_yuzhuo*/@Configurationpublic class MqttBaseConfig {/*** 发布的bean名称*/public static final String CHANNEL_NAME_OUT = "mqttOutboundChannel";/** 客户端与服务器之间的连接意外中断,服务器将发布客户端的“遗嘱”消息 */private static final byte[] WILL_DATA;static {WILL_DATA = "offline".getBytes();}@Value("${mqtt.username}")private String username;@Value("${mqtt.password}")private String password;@Value("${mqtt.host}")private String url;@Value("${mqtt.sender.clientId}")private String clientId;@Value("${mqtt.sender.defaultTopic}")private String defaultTopic;@Beanpublic MqttPahoClientFactory factory() {DefaultMqttPahoClientFactory factory = new DefaultMqttPahoClientFactory();MqttConnectOptions options = new MqttConnectOptions();// 设置连接的用户名if (!username.trim().equals("")) {options.setUserName(username);}// 设置连接的密码options.setPassword(password.toCharArray());// 设置连接的地址options.setServerURIs(new String[]{url});// 设置超时时间 单位为秒options.setConnectionTimeout(10);// 设置会话心跳时间 单位为秒 服务器会每隔1.5*20秒的时间向客户端发送心跳判断客户端是否在线// 但这个方法并没有重连的机制options.setKeepAliveInterval(20);// 设置“遗嘱”消息的话题,若客户端与服务器之间的连接意外中断,服务器将发布客户端的“遗嘱”消息。options.setWill("willTopic", WILL_DATA, 2, false);factory.setConnectionOptions(options);return factory;}}
MqttSenderConfig.java(MQTT 消息推送配置类)
package com.gyz.mqtt.config;import org.springframework.beans.factory.annotation.Value;import org.springframework.context.annotation.Bean;import org.springframework.context.annotation.Configuration;import org.springframework.integration.annotation.ServiceActivator;import org.springframework.integration.channel.DirectChannel;import org.springframework.integration.mqtt.core.MqttPahoClientFactory;import org.springframework.integration.mqtt.outbound.MqttPahoMessageHandler;import org.springframework.messaging.MessageChannel;import org.springframework.messaging.MessageHandler;/*** MQTT配置,生产者*/@Configurationpublic class MqttSenderConfig {/*** 发布的bean名称*/public static final String CHANNEL_NAME_OUT = "mqttOutboundChannel";/** 客户端与服务器之间的连接意外中断,服务器将发布客户端的“遗嘱”消息 */private static final byte[] WILL_DATA;static {WILL_DATA = "offline".getBytes();}@Value("${mqtt.username}")private String username;@Value("${mqtt.password}")private String password;@Value("${mqtt.host}")private String url;@Value("${mqtt.sender.clientId}")private String clientId;@Value("${mqtt.sender.defaultTopic}")private String defaultTopic;/*** MQTT信息通道(生产者)*/@Bean(name = CHANNEL_NAME_OUT)public MessageChannel mqttOutboundChannel() {return new DirectChannel();}/*** MQTT消息处理器(生产者)*/@Bean@ServiceActivator(inputChannel = CHANNEL_NAME_OUT)public MessageHandler mqttOutbound(MqttPahoClientFactory factory) {MqttPahoMessageHandler messageHandler = new MqttPahoMessageHandler(clientId,factory);messageHandler.setAsync(true);messageHandler.setDefaultTopic(defaultTopic);return messageHandler;}}
2、IMqttSender(消息推送接口类)
package com.gyz.mqtt.service;import com.gyz.mqtt.config.MqttSenderConfig;import org.springframework.integration.annotation.MessagingGateway;import org.springframework.integration.mqtt.support.MqttHeaders;import org.springframework.messaging.handler.annotation.Header;import org.springframework.stereotype.Component;/*** @author gong_yuzhuo*/@Component@MessagingGateway(defaultRequestChannel = MqttSenderConfig.CHANNEL_NAME_OUT)public interface IMqttSender {/*** 发送信息到MQTT服务器** @param data 发送的文本*/void sendToMqtt(String data);/*** 发送信息到MQTT服务器** @param topic 主题* @param payload 消息主体*/void sendToMqtt(@Header(MqttHeaders.TOPIC) String topic, String payload);/*** 发送信息到MQTT服务器** @param topic 主题* @param QOS 对消息处理的几种机制:* 0 表示的是订阅者没收到消息不会再次发送,消息会丢失。* 1 表示的是会尝试重试,一直到接收到消息,但这种情况可能导致订阅者收到多次重复消息。* 2 多了一次去重的动作,确保订阅者收到的消息有一次。* @param payload 消息主体*/void sendToMqtt(@Header(MqttHeaders.TOPIC) String topic,@Header(MqttHeaders.QOS) int QOS,String payload);}
3、HelloController.java(测试类)
package com.gyz.mqtt.controller;import com.gyz.mqtt.service.IMqttSender;import org.springframework.web.bind.annotation.PathVariable;import org.springframework.web.bind.annotation.RequestMapping;import org.springframework.web.bind.annotation.RestController;import javax.annotation.Resource;/*** 测试发送消息** @author gong_yuzhuo*/@RestControllerpublic class HelloController {/*** 注入发送MQTT的Bean*/@Resourceprivate IMqttSender imqttSender;/*** 发送自定义消息内容(使用默认主题)* @param data*/@RequestMapping("/test1/{data}")public void test1(@PathVariable("data") String data) {imqttSender.sendToMqtt(data);}/*** 发送自定义消息内容,且指定主题* @param topic* @param data*/@RequestMapping("/test2/{topic}/{data}")public void test2(@PathVariable("topic") String topic, @PathVariable("data") String data) {imqttSender.sendToMqtt(topic, data);}}
4、测试运行
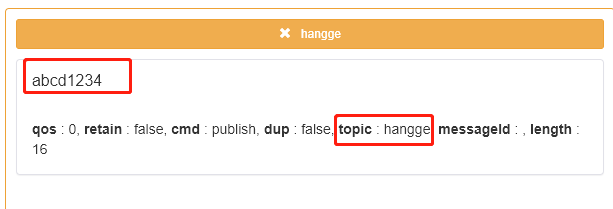
- 项目启动后,使用
MQTTBox订阅“hangge”这个主题,然后使用浏览器访问 http://localhost:10001/test1/abcd1234 可以看到 MQTTBox 这边可以成功接收到发布的消息:
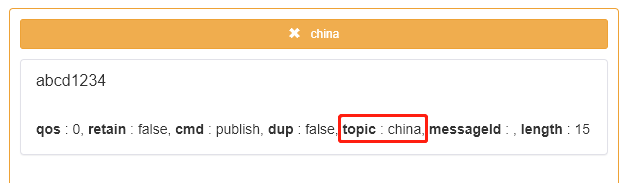
- 接着我们访问 http://localhost:10001/test2/china/abcd1234,这次除了发送自定消息外还指定了主题(china,而不是使用默认主题),MQTTBox 这边订阅该主题并显示结果:
参考文章:

若有收获,就点个赞吧
0 人点赞
