一、启动流程
1. 入口
SpringBoot的启动流程为boot项目中的入口main方法,然后调用SpringApplication对象的run()方法,感觉很神奇,一个main 方法解决了所有的问题,其实际底层进行了很多调用:
@SpringBootApplicationpublic class DavinciServerApplication {public static void main(String[] args) {SpringApplication.run(DavinciServerApplication.class, args);}}
进行跟进到SpringApplication 类中的run()方法,先可以看到对SpringApplication类的解释
* Class that can be used to bootstrap and launch a Spring application from a Java main* method. By default class will perform the following steps to bootstrap your* application:** <ul>* <li>Create an appropriate {@link ApplicationContext} instance (depending on your* classpath)</li>* <li>Register a {@link CommandLinePropertySource} to expose command line arguments as* Spring properties</li>* <li>Refresh the application context, loading all singleton beans</li>* <li>Trigger any {@link CommandLineRunner} beans</li>* </ul>*public class SpringApplication {// 第一步调用public static ConfigurableApplicationContext run(Class<?> primarySource, String... args) {return run(new Class<?>[] { primarySource }, args);}// 第二步调用public static ConfigurableApplicationContext run(Class<?>[] primarySources, String[] args) {return new SpringApplication(primarySources).run(args);}}
从上面的解释可以看到:SpringApplication 这个类被用来引导和启动一个Spring的应用程序从一个Java 的main方法开始。默认的需要按照四个步骤来完成应用程序
- 创建一个 applicationContext 实例
- 注册一个命令行参数
- 重新刷新应用上下文,加载所有的单例对象
- 触发所有的bean对象
2.创建SpringApplication对象
在第一步调用run()方法的过程中,会发现最后是通过创建SpringApplication对象,然后调用该对象的run()方法,在看源码的过程中一定要注意看创建对象时构造方法的内容。SpringApplication 创建对象:
在构造方法中会进行初始化操作。初始化时,会先进行区分环境:非web环境、web环境、reactive环境三种。如下:
在SpringApplication 对象初始化的过程中会有一个比较重要的步骤,就是加载读取“/META-INF”下的spring.factories文件内容,然后通过反射实例化对象,放入到缓存中。跟进代码看一下: ```java // 第一步开始调用方法 getSpringFactoriesInstances(ApplicationContextInitializer.class));// 创建对象public SpringApplication(Class<?>... primarySources) {this(null, primarySources);}// 调用构造方法public SpringApplication(ResourceLoader resourceLoader, Class<?>... primarySources) {this.resourceLoader = resourceLoader;Assert.notNull(primarySources, "PrimarySources must not be null");// 初始化主要加载资源类集合并去重this.primarySources = new LinkedHashSet<>(Arrays.asList(primarySources));// 推断当前的WEB 应用类型,一共有三种:NONE、SERVLET、REACTIVEthis.webApplicationType = WebApplicationType.deduceFromClasspath();// 设置应用上下文初始化器,从“META-INF/spring.factories”读取ApplicationContextInitializer类的实例setInitializers((Collection) getSpringFactoriesInstances(ApplicationContextInitializer.class));// 设置监听器 从“META-INF/spring.factories”读取ApplicationListenersetListeners((Collection) getSpringFactoriesInstances(ApplicationListener.class));this.mainApplicationClass = deduceMainApplicationClass();}
// 第二步,根据传入的类名按照key-value 的方式获取集合,并且通过反射的方式实例化所有类
private
<a name="tjC7V"></a>## 3.启动SpringApplication 创建完成,初始化也完成,就开始真正的启动流程,即调用run()方法```javapublic ConfigurableApplicationContext run(String... args) {// 时间监控StopWatch stopWatch = new StopWatch();stopWatch.start();ConfigurableApplicationContext context = null;Collection<SpringBootExceptionReporter> exceptionReporters = new ArrayList<>();//java.awt.headless是J2SE的一种模式用于在缺少显示屏、键盘或者鼠标时的系统配置,很多监控工具如jconsole 需要将该值设置为true,系统变量默认为trueconfigureHeadlessProperty();//获取spring.factories中的监听器变量,args为指定的参数数组,默认为当前类SpringApplication//第一步:获取并启动监听器SpringApplicationRunListeners listeners = getRunListeners(args);listeners.starting();try {ApplicationArguments applicationArguments = new DefaultApplicationArguments(args);//第二步:构造容器环境ConfigurableEnvironment environment = prepareEnvironment(listeners,applicationArguments);//设置需要忽略的beanconfigureIgnoreBeanInfo(environment);//打印bannerBanner printedBanner = printBanner(environment);//第三步:创建容器context = createApplicationContext();//第四步:实例化SpringBootExceptionReporter.class,用来支持报告关于启动的错误exceptionReporters = getSpringFactoriesInstances(SpringBootExceptionReporter.class,new Class[] { ConfigurableApplicationContext.class }, context);//第五步:准备容器prepareContext(context, environment, listeners, applicationArguments,printedBanner);//第六步:刷新容器refreshContext(context);//第七步:刷新容器后的扩展接口afterRefresh(context, applicationArguments);stopWatch.stop();if (this.logStartupInfo) {new StartupInfoLogger(this.mainApplicationClass).logStarted(getApplicationLog(), stopWatch);}listeners.started(context);callRunners(context, applicationArguments);}catch (Throwable ex) {handleRunFailure(context, ex, exceptionReporters, listeners);throw new IllegalStateException(ex);}try {listeners.running(context);}catch (Throwable ex) {handleRunFailure(context, ex, exceptionReporters, null);throw new IllegalStateException(ex);}return context;}
3.1 获取并启动监听器
3.1.1 获取监听器
// 第一步:获取监听器SpringApplicationRunListeners listeners = getRunListeners(args);// 继续调用创建对象时初始化的方法getSpringFactoriesInstances()// 传入的值为SpringApplicationRunListener,获取得到的对象只有一个Eventprivate SpringApplicationRunListeners getRunListeners(String[] args) {Class<?>[] types = new Class<?>[] { SpringApplication.class, String[].class };return new SpringApplicationRunListeners(logger,getSpringFactoriesInstances(SpringApplicationRunListener.class, types, this, args));}
上面可以看到,args本身默认为空,但是在获取监听器的方法中,getSpringFactoriesInstances( SpringApplicationRunListener.class, types, this, args)将当前对象作为参数,该方法用来获取spring.factories对应的监听器:
# Run Listenersorg.springframework.boot.SpringApplicationRunListener=\org.springframework.boot.context.event.EventPublishingRunListener
整个 springBoot 框架中获取factories的方式统一如下:
spring-core 包里定义了 SpringFactoriesLoader 类,这个类实现了检索 META-INF/spring.factories 文件,并获取指定接口配置的功能。在这个类中定义了两个对外的方法:
loadFactories 根据接口类获取其实现类的实例,这个方法返回的是对象列表。
loadFactoryNames 根据接口获取其接口类的名称,这个方法返回的是类名的列表。
在springboot 中的SpringApplication类中有提供了一个方法获取文件内容,调用的是loadFactoryNames
private <T> Collection<T> getSpringFactoriesInstances(Class<T> type) {return getSpringFactoriesInstances(type, new Class<?>[] {});}private <T> Collection<T> getSpringFactoriesInstances(Class<T> type, Class<?>[] parameterTypes, Object... args) {ClassLoader classLoader = getClassLoader();// Use names and ensure unique to protect against duplicatesSet<String> names = new LinkedHashSet<>(SpringFactoriesLoader.loadFactoryNames(type, classLoader));List<T> instances = createSpringFactoriesInstances(type, parameterTypes, classLoader, args, names);AnnotationAwareOrderComparator.sort(instances);return instances;}
获取得到所有spring.factories文件中的配置类之后通过反射实例后返回上下文中以供使用。
@SuppressWarnings("unchecked")private <T> List<T> createSpringFactoriesInstances(Class<T> type,Class<?>[] parameterTypes, ClassLoader classLoader, Object[] args,Set<String> names) {List<T> instances = new ArrayList<>(names.size());for (String name : names) {try {//装载class文件到内存Class<?> instanceClass = ClassUtils.forName(name, classLoader);Assert.isAssignable(type, instanceClass);Constructor<?> constructor = instanceClass.getDeclaredConstructor(parameterTypes);//主要通过反射创建实例T instance = (T) BeanUtils.instantiateClass(constructor, args);instances.add(instance);}catch (Throwable ex) {throw new IllegalArgumentException("Cannot instantiate " + type + " : " + name, ex);}}return instances;}
因为SpringAppliactionRunListener.calss 对应的监听器是EventPublishingRunListener,在通过反射获取实例该类时会触发EventPublishingRunListener的构造函数:
public EventPublishingRunListener(SpringApplication application, String[] args) {this.application = application;this.args = args;this.initialMulticaster = new SimpleApplicationEventMulticaster();for (ApplicationListener<?> listener : application.getListeners()) {this.initialMulticaster.addApplicationListener(listener);}}
重点来看一下addApplicationListener方法:
@Overridepublic void addApplicationListener(ApplicationListener<?> listener) {synchronized (this.retrievalMutex) {// Explicitly remove target for a proxy, if registered already,// in order to avoid double invocations of the same listener.Object singletonTarget = AopProxyUtils.getSingletonTarget(listener);if (singletonTarget instanceof ApplicationListener) {this.defaultRetriever.applicationListeners.remove(singletonTarget);}//内部类对象this.defaultRetriever.applicationListeners.add(listener);this.retrieverCache.clear();}}
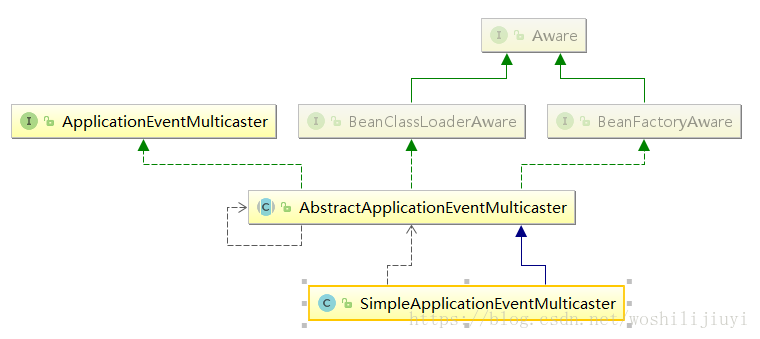
上述方法定义在SimpleApplicationEventMulticaster父类AbstractApplicationEventMulticaster中。关键代码为this.defaultRetriever.applicationListeners.add(listener);,这是一个内部类,用来保存所有的监听器。也就是在这一步,将spring.factories中的监听器传递到SimpleApplicationEventMulticaster中。
继承关系如下:
3.1.2 启动监听器
listeners.starting();获取的监听器为EventPublishingRunListener,从名字可以看出是启动事件发布监听器,主要用来发布启动事件。
@Overridepublic void starting() {//关键代码,这里是创建application启动事件`ApplicationStartingEvent`this.initialMulticaster.multicastEvent(new ApplicationStartingEvent(this.application, this.args));}
EventPublishingRunListener这个是springBoot框架中最早执行的监听器,在该监听器执行started()方法时,会继续发布事件,也就是事件传递。这种实现主要还是基于spring的事件机制。
继续跟进SimpleApplicationEventMulticaster,有个核心方法:
Overridepublic void multicastEvent(final ApplicationEvent event, @Nullable ResolvableType eventType) {ResolvableType type = (eventType != null ? eventType : resolveDefaultEventType(event));for (final ApplicationListener<?> listener : getApplicationListeners(event, type)) {//获取线程池,如果为空则同步处理。这里线程池为空,还未没初始化。Executor executor = getTaskExecutor();if (executor != null) {//异步发送事件executor.execute(() -> invokeListener(listener, event));}else {//同步发送事件invokeListener(listener, event);}}}
这里会根据事件类型ApplicationStartingEvent获取对应的监听器,在容器启动之后执行响应的动作,有如下4种监听器: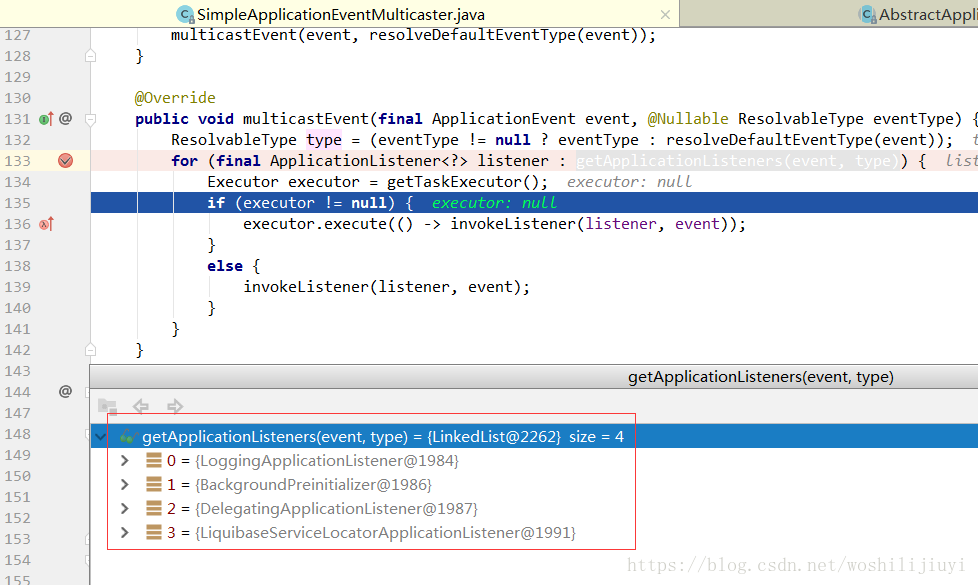
这是springBoot启动过程中,第一处根据类型执行监听器的地方。根据发布的事件类型从上述10种监听器中选择对应的监听器进行事件发布,当然如果继承了 springCloud或者别的框架,就不止10个了。这里选了一个 springBoot 的日志监听器来进行讲解,核心代码如下:
@Overridepublic void onApplicationEvent(ApplicationEvent event) {//在springboot启动的时候if (event instanceof ApplicationStartedEvent) {onApplicationStartedEvent((ApplicationStartedEvent) event);}//springboot的Environment环境准备完成的时候else if (event instanceof ApplicationEnvironmentPreparedEvent) {onApplicationEnvironmentPreparedEvent((ApplicationEnvironmentPreparedEvent) event);}//在springboot容器的环境设置完成以后else if (event instanceof ApplicationPreparedEvent) {onApplicationPreparedEvent((ApplicationPreparedEvent) event);}//容器关闭的时候else if (event instanceof ContextClosedEvent && ((ContextClosedEvent) event).getApplicationContext().getParent() == null) {onContextClosedEvent();}//容器启动失败的时候else if (event instanceof ApplicationFailedEvent) {onApplicationFailedEvent();}}
因为我们的事件类型为ApplicationEvent,所以会执行onApplicationStartedEvent((ApplicationStartedEvent) event)。springBoot会在运行过程中的不同阶段,发送各种事件,来执行对应监听器的对应方法。大同小异,别的监听器执行流程这里不再赘述,后面会有单独的详解。
所有的监听器在运行的过程中需要监听某些事件,各种不同的监听器监听的事件是不一样的,在springapplication对象创建的时候创建了11个对象,但是这11个监听器的功能是不同的,换句话说就是监听的事件是不同的,当开始启动监听器的时候,要判断当前监听器是否能监听该事件,如果可以,正确启动;如果不可以,直接抛弃。
3.2 构造环境
ConfigurableEnvironment environment = prepareEnvironment(listeners, applicationArguments);
继续跟进prepareEnvironment 方法,看一下构造环境的具体细节:
private ConfigurableEnvironment prepareEnvironment(SpringApplicationRunListeners listeners,ApplicationArguments applicationArguments) {//创建环境对象并返回StandardServletEnvironmentConfigurableEnvironment environment = getOrCreateEnvironment();//根据参数设置 PropertySources 和ProfilesconfigureEnvironment(environment, applicationArguments.getSourceArgs());// propertySpurceList 添加configurationPropertiesConfigurationPropertySources.attach(environment);//listeners.environmentPrepared(environment);bindToSpringApplication(environment);if (!this.isCustomEnvironment) {environment = new EnvironmentConverter(getClassLoader()).convertEnvironmentIfNecessary(environment,deduceEnvironmentClass());}ConfigurationPropertySources.attach(environment);return environment;
3.2.1 创建环境对象
来看一下getOrCreateEnvironment()方法,前面已经提到,environment已经被设置了servlet类型,所以这里创建的是环境对象是StandardServletEnvironment。
private ConfigurableEnvironment getOrCreateEnvironment() {if (this.environment != null) {return this.environment;}switch (this.webApplicationType) {case SERVLET:return new StandardServletEnvironment();case REACTIVE:return new StandardReactiveWebEnvironment();default:return new StandardEnvironment();}}
在创建StandardServletEnvironment对象是发现类中并没有构造方法,所以跟踪一下类的继承关系如下:
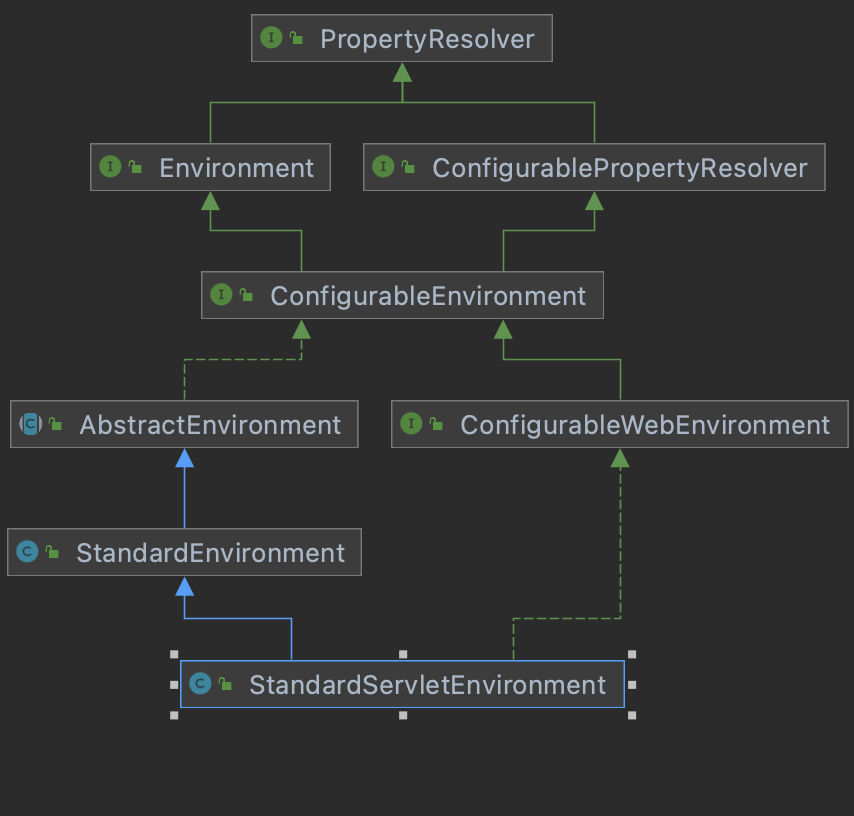
即在创建对象的过程中会调用父类构造方法,然后加载环境配置数据。
// 调用父类构造方法public AbstractEnvironment() {customizePropertySources(this.propertySources);}// 资源配置设置@Overrideprotected void customizePropertySources(MutablePropertySources propertySources) {propertySources.addLast(new StubPropertySource(SERVLET_CONFIG_PROPERTY_SOURCE_NAME));propertySources.addLast(new StubPropertySource(SERVLET_CONTEXT_PROPERTY_SOURCE_NAME));if (JndiLocatorDelegate.isDefaultJndiEnvironmentAvailable()) {propertySources.addLast(new JndiPropertySource(JNDI_PROPERTY_SOURCE_NAME));}super.customizePropertySources(propertySources);}
创建完成StandardServletEnvironment对象创建完成后,返回ConfigurableEnvironment对象,对象中有几个重要属性值:activeProfiles, propertySpurceList,这个集合中主要包含和环境相关的四个对象。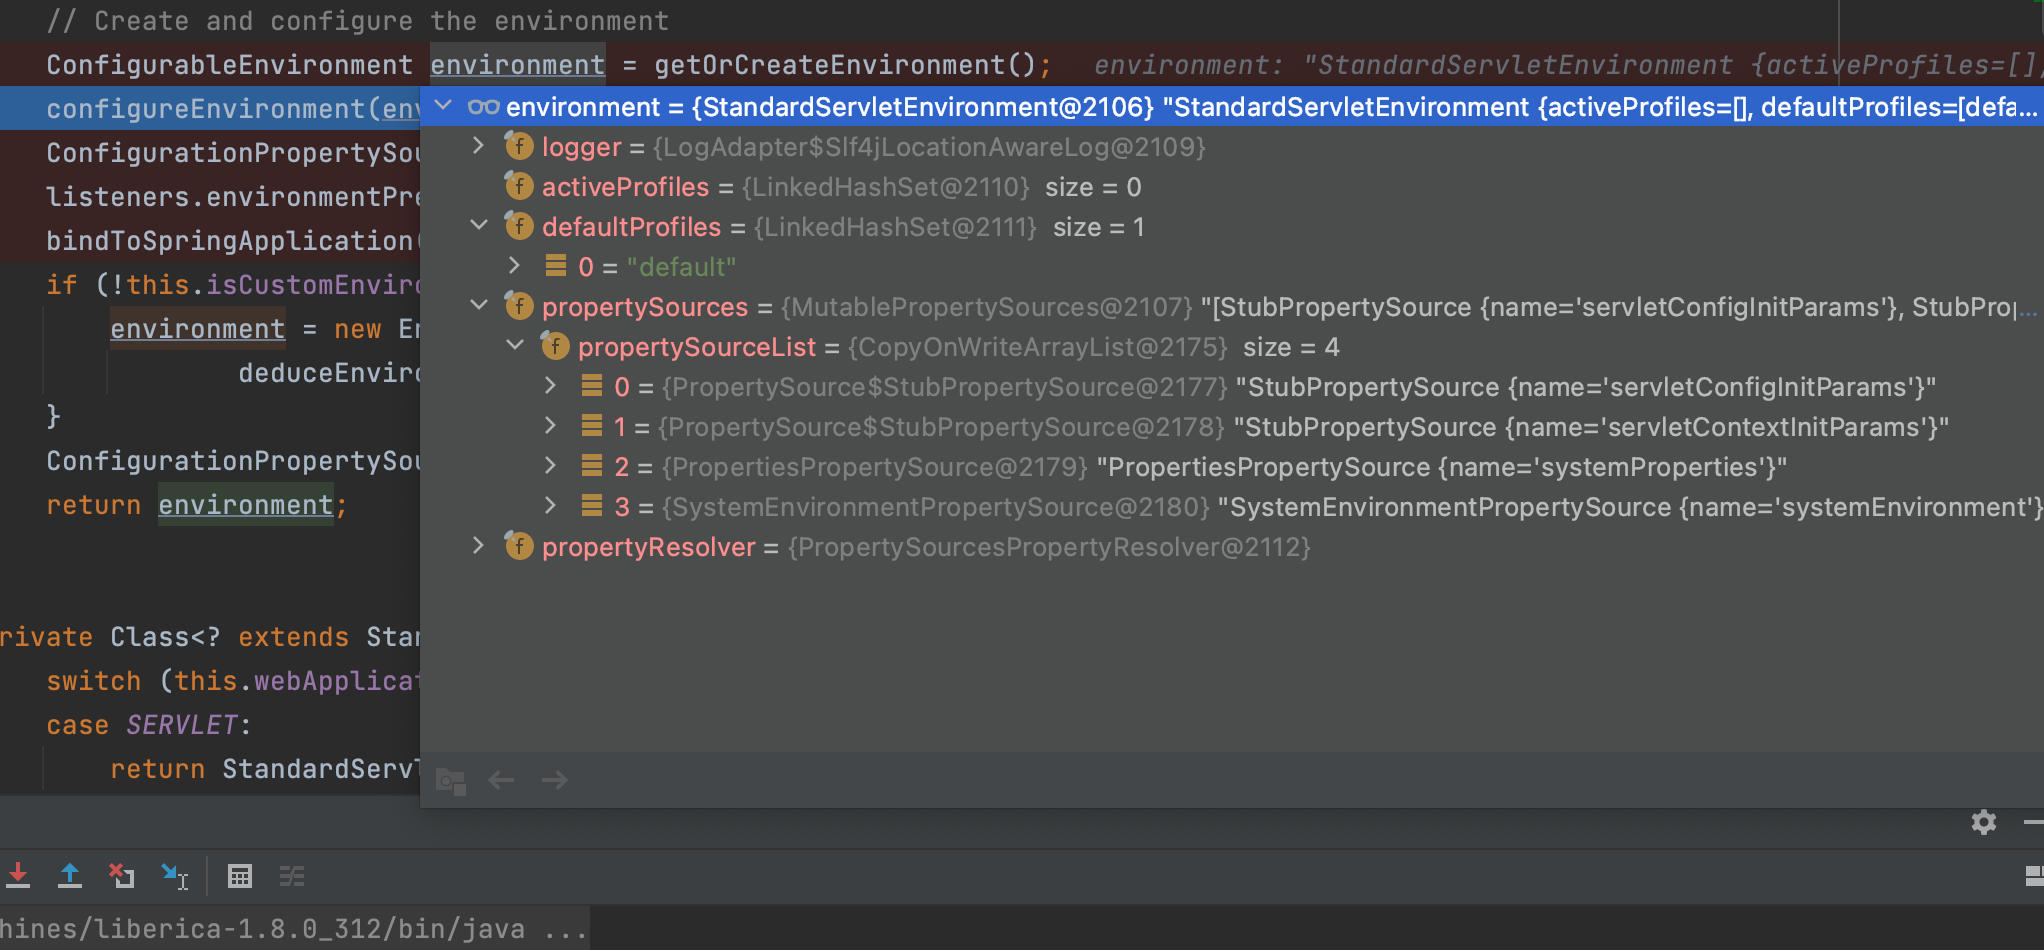
执行到这里,系统变量和环境变量已经被载入到配置文件的集合中,接下来就行解析项目中的配置文件。
3.2.2 发布事件
来看一下listeners.environmentPrepared(environment);上面已经提到了,这里是第二次发布事件。什么事件?
顾名思义,系统环境初始化完成的事件。
发布事件的流程上面已经讲过了,这里不在赘述。来看一下根据事件类型获取到的监听器: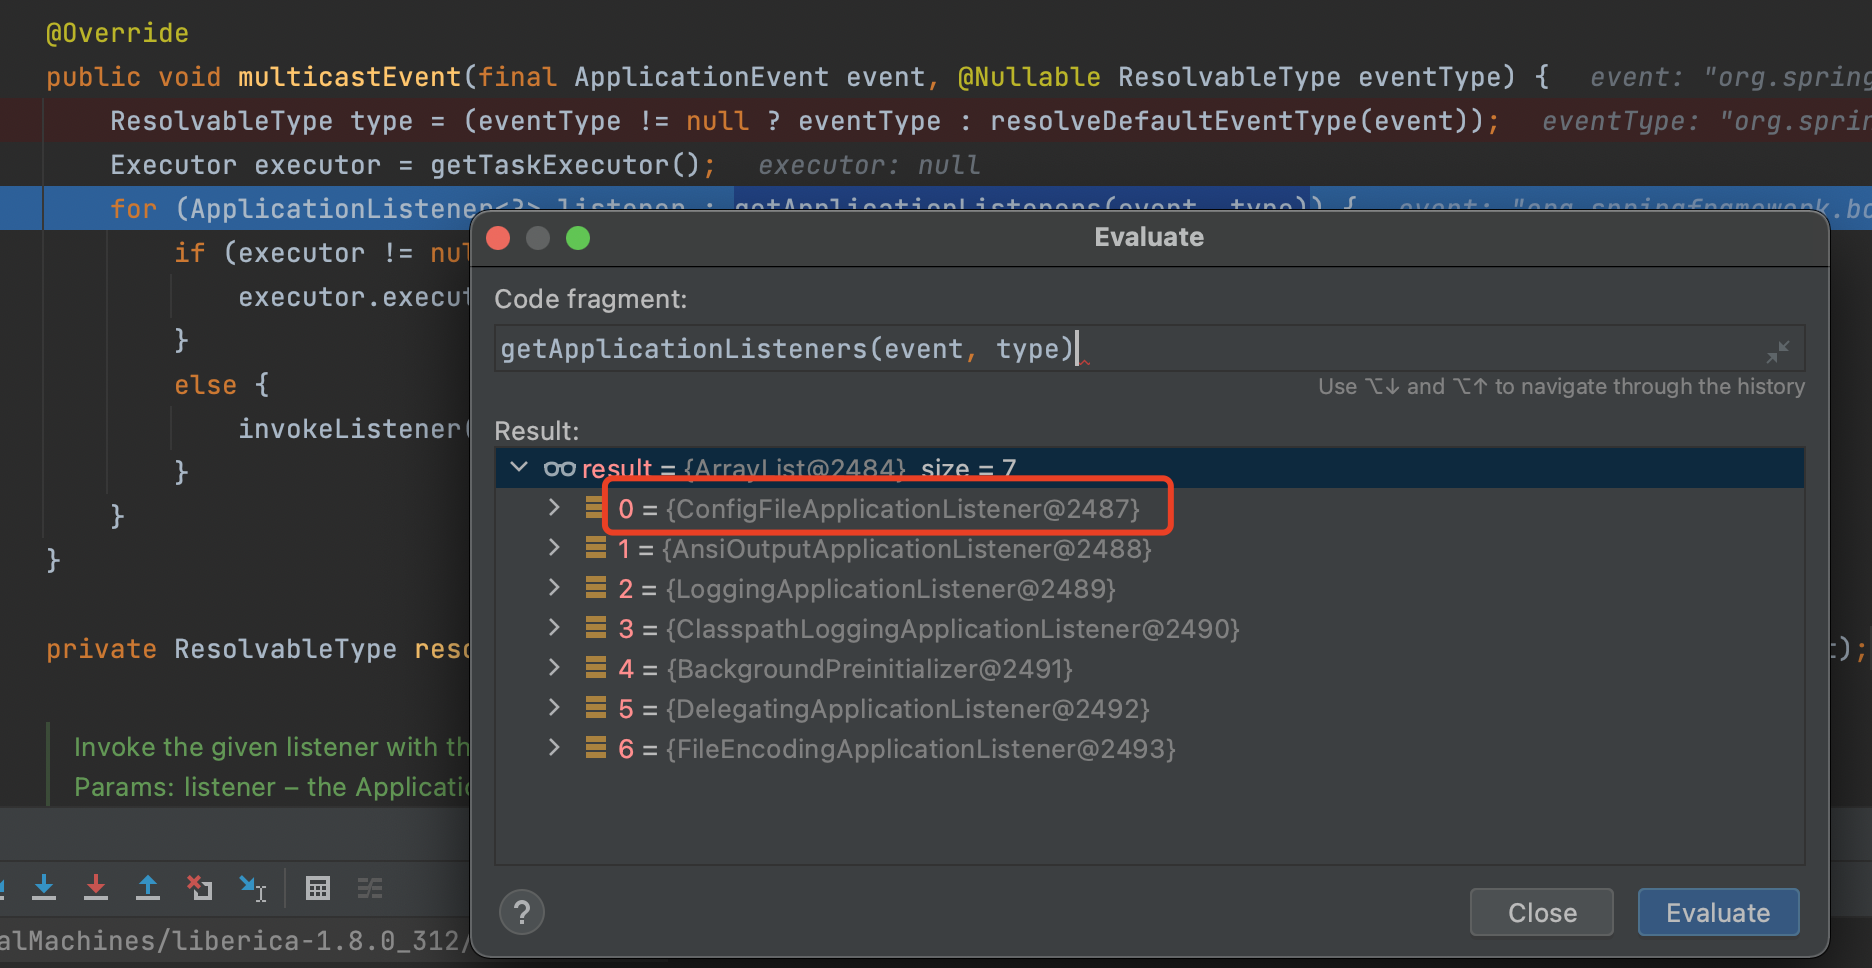
可以看到获取到的监听器和第一次发布启动事件获取的监听器有几个是重复的,这也验证了监听器是可以多次获取,根据事件类型来区分具体处理逻辑。上面介绍日志监听器的时候已经提到。
主要来看一下ConfigFileApplicationListener,该监听器非常核心,主要用来处理项目配置。项目中的 properties 和yml文件都是其内部类所加载。具体来看一下:
首先方法执行入口:
protected void invokeListener(ApplicationListener<?> listener, ApplicationEvent event) {ErrorHandler errorHandler = getErrorHandler();if (errorHandler != null) {try {doInvokeListener(listener, event);}catch (Throwable err) {errorHandler.handleError(err);}}else {doInvokeListener(listener, event);}}//private void doInvokeListener(ApplicationListener listener, ApplicationEvent event) {try {listener.onApplicationEvent(event);}}
通过根据源码可以看到,所有的事件发布都会经过上面的几个方法过程
- this.initialMulticaster .multicastEvent():将给定的应用程序事件多播到适当的监听器。
- invokeListener(listener, event) : 使用给定的事件调用监听器
- doInvokeListener(listener, event) 第2步方法的真正执行操作者
- listener.onApplicationEvent(event): doInvokeListener()方法内部实现
- 调用所有监听器的父类ApplicationListener的onApplicationEvent()方法,根据读取得到的配置文件中的类进入到具体的实现类
在构造环境这个流程根据ConfigFileApplicationListener 这个监听器进行后面具体方法细节实现:
private void onApplicationEnvironmentPreparedEvent(ApplicationEnvironmentPreparedEvent event) {List<EnvironmentPostProcessor> postProcessors = loadPostProcessors();postProcessors.add(this);AnnotationAwareOrderComparator.sort(postProcessors);for (EnvironmentPostProcessor postProcessor : postProcessors) {postProcessor.postProcessEnvironment(event.getEnvironment(), event.getSpringApplication());}}
�首先还是会去读spring.factories 文件,List
# Environment Post Processorsorg.springframework.boot.env.EnvironmentPostProcessor= //一个@FunctionalInterface函数式接口org.springframework.boot.cloud.CloudFoundryVcapEnvironmentPostProcessor,//为springCloud提供的扩展类org.springframework.boot.env.SpringApplicationJsonEnvironmentPostProcessor,//支持json环境变量org.springframework.boot.env.SystemEnvironmentPropertySourceEnvironmentPostProcessor //springBoo2提供的一个包装类,主要将`StandardServletEnvironment`包装成`SystemEnvironmentPropertySourceEnvironmentPostProcessor`对象
在执行完上述三个监听器流程后,ConfigFileApplicationListener会执行该类本身的逻辑。由其内部类Loader加载项目制定路径下的配置文件:
private static final String DEFAULT_SEARCH_LOCATIONS = "classpath:/,classpath:/config/,file:./,file:./config/";
至此,项目的变量配置已全部加载完毕,来一起看一下:�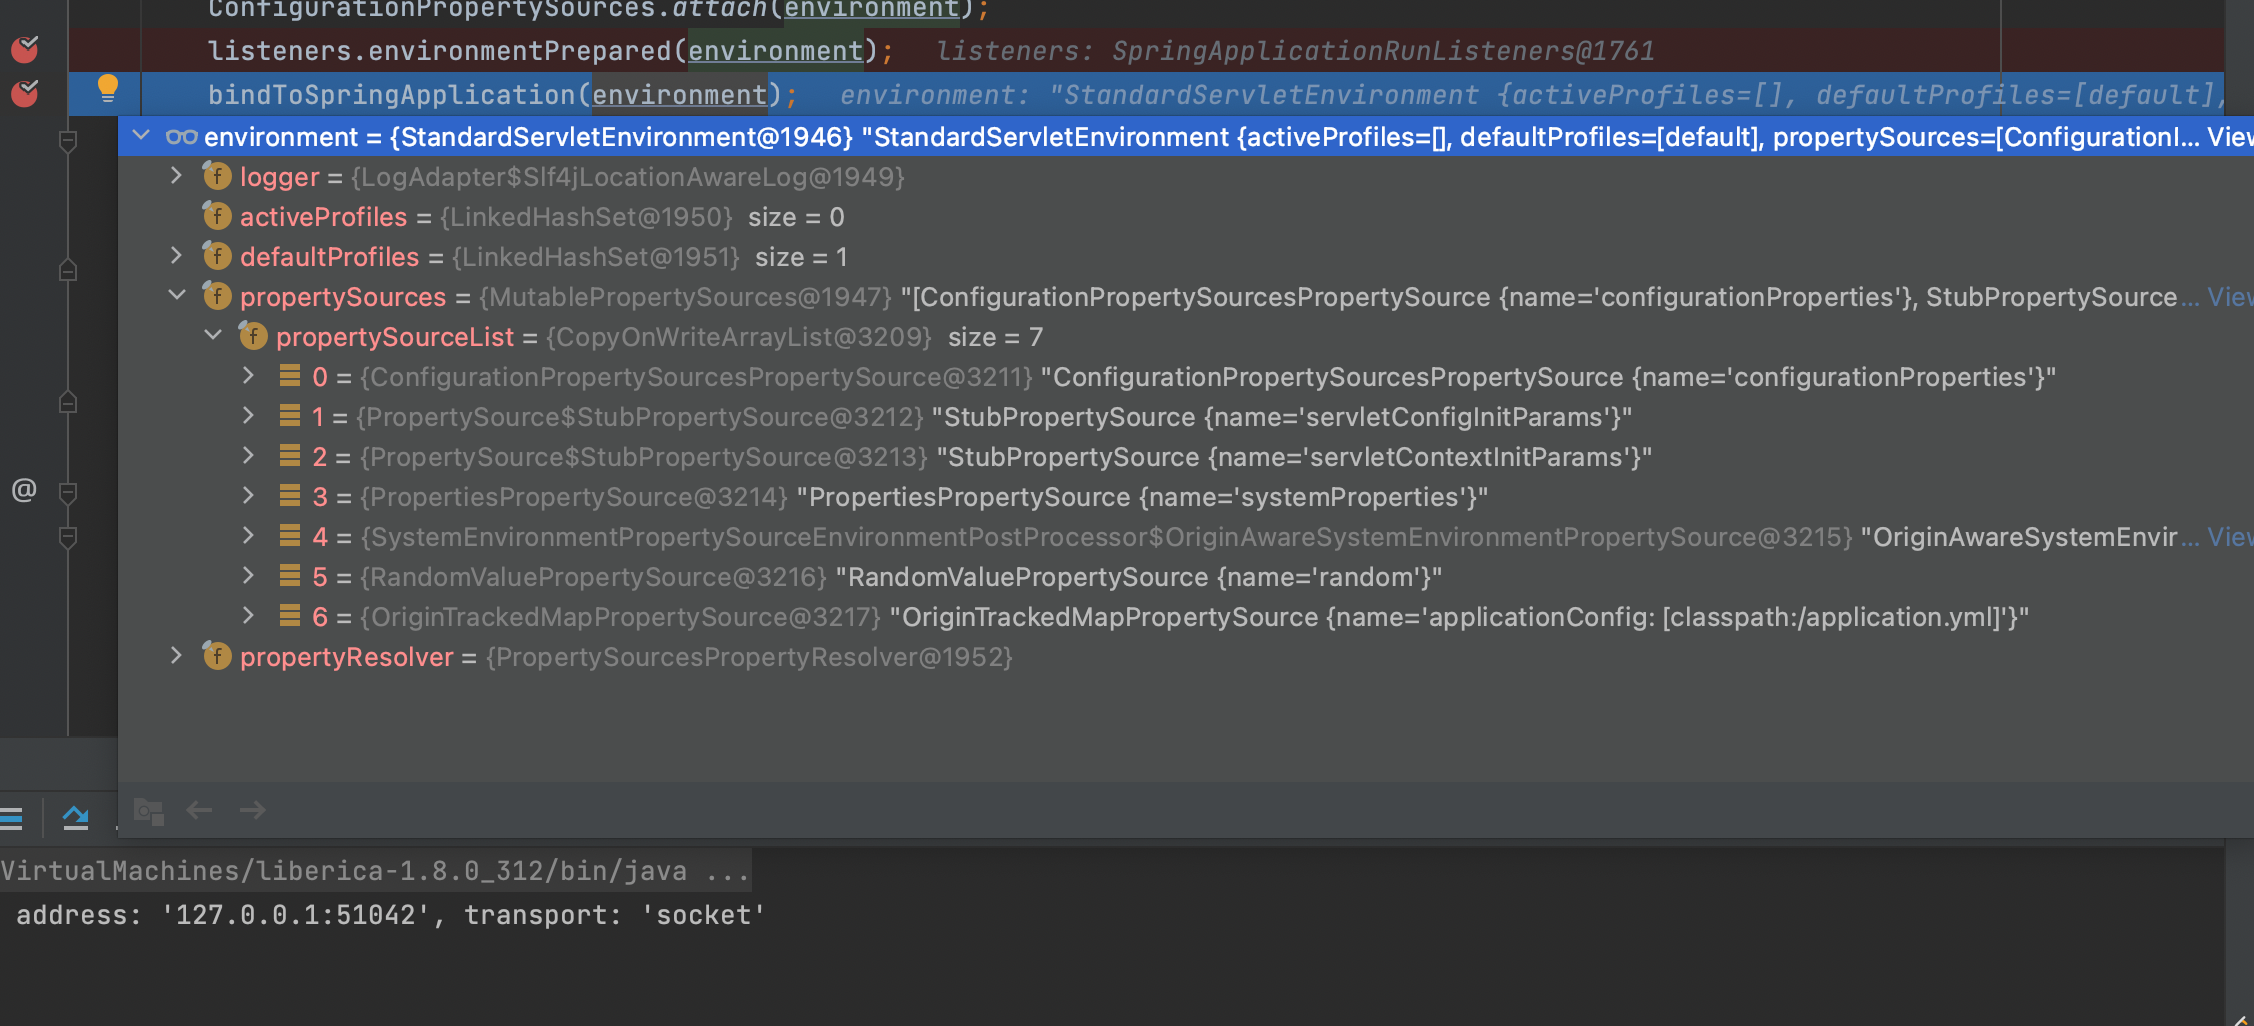
这里一共6个配置文件,取值顺序由上到下。也就是说前面的配置变量会覆盖后面同名的配置变量。项目配置变量的时候需要注意这点。
3.3 创建容器
context = createApplicationContext();
接续跟进方法
protected ConfigurableApplicationContext createApplicationContext() {Class<?> contextClass = this.applicationContextClass;if (contextClass == null) {try {switch (this.webApplicationType) {case SERVLET:contextClass = Class.forName(DEFAULT_SERVLET_WEB_CONTEXT_CLASS);break;case REACTIVE:contextClass = Class.forName(DEFAULT_REACTIVE_WEB_CONTEXT_CLASS);break;default:contextClass = Class.forName(DEFAULT_CONTEXT_CLASS);}}catch (ClassNotFoundException ex) {throw new IllegalStateException("Unable create a default ApplicationContext, please specify an ApplicationContextClass", ex);}}return (ConfigurableApplicationContext) BeanUtils.instantiateClass(contextClass);}
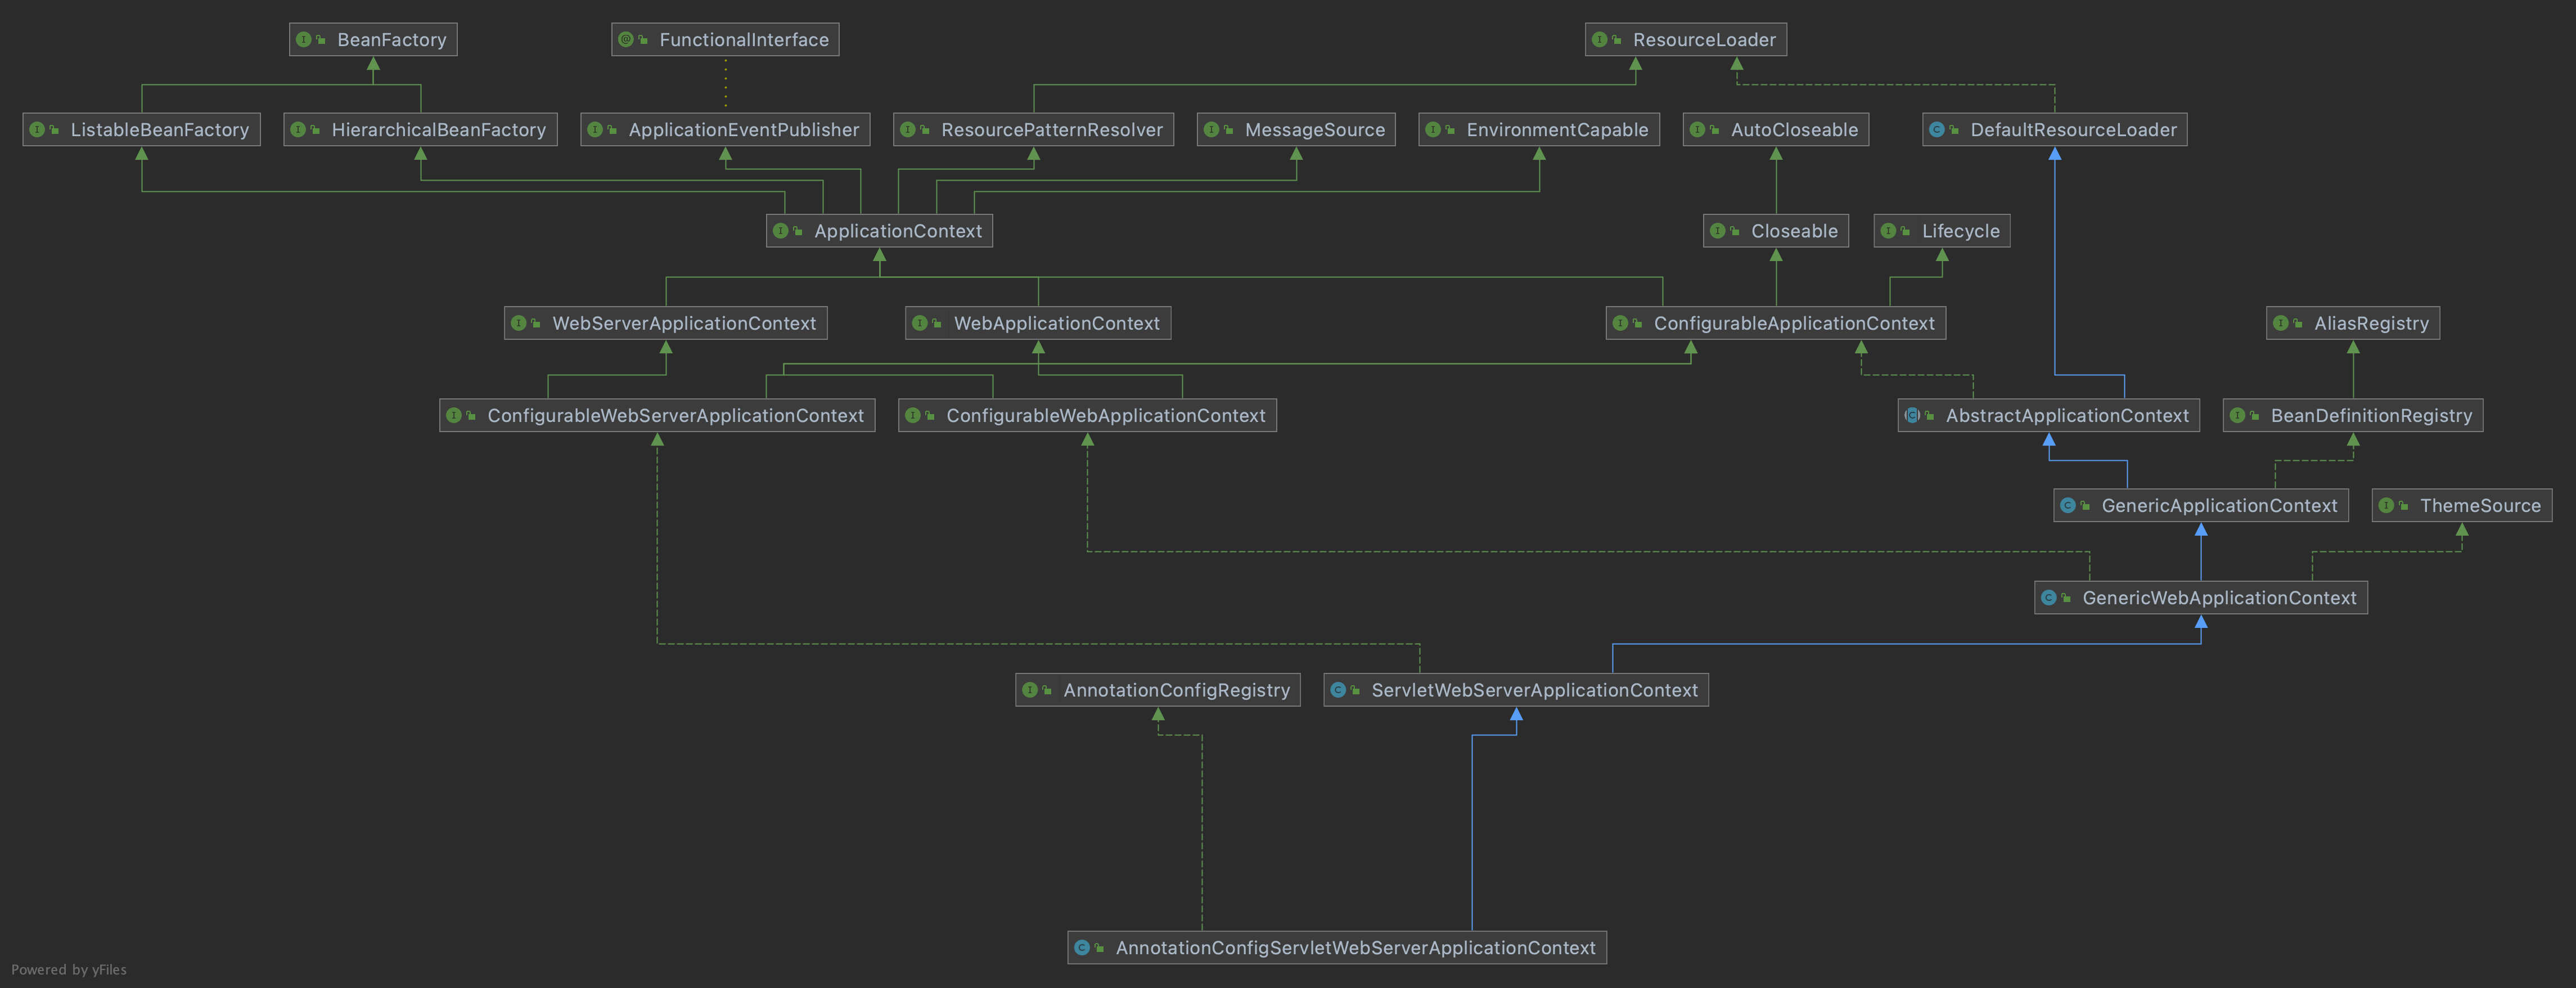
上面可以看出,这里创建容器的类型 还是根据webApplicationType进行判断的,上一篇已经讲述了该变量如何赋值的过程。因为该类型为SERVLET类型,所以会通过反射装载对应的字节码,如下:
/*** The class name of application context that will be used by default for non-web* environments.*/public static final String DEFAULT_CONTEXT_CLASS = "org.springframework.context."+ "annotation.AnnotationConfigApplicationContext";/*** The class name of application context that will be used by default for web* environments.*/public static final String DEFAULT_SERVLET_WEB_CONTEXT_CLASS = "org.springframework.boot."+ "web.servlet.context.AnnotationConfigServletWebServerApplicationContext";/*** The class name of application context that will be used by default for reactive web* environments.*/public static final String DEFAULT_REACTIVE_WEB_CONTEXT_CLASS = "org.springframework."+ "boot.web.reactive.context.AnnotationConfigReactiveWebServerApplicationContext";
该对象是springBoot2创建的容器,后续所有的操作都会基于该容器。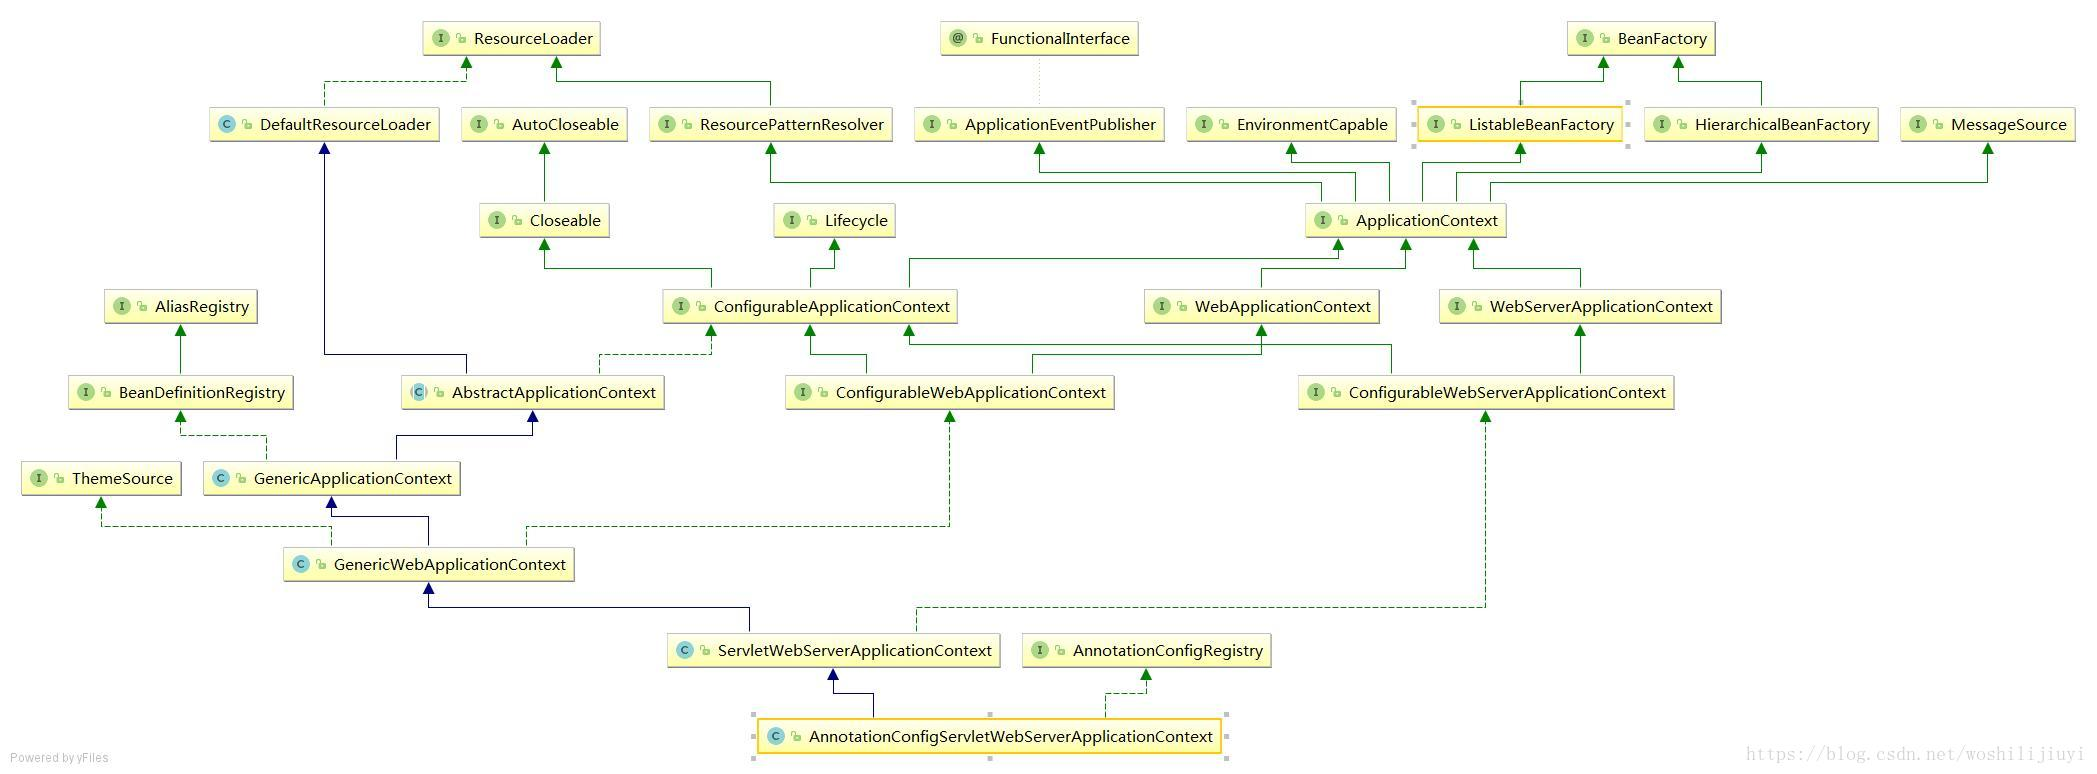
3.4 报告错误信息
exceptionReporters = getSpringFactoriesInstances(SpringBootExceptionReporter.class,new Class[] { ConfigurableApplicationContext.class }, context);
这里还是以同样的方式获取 spring.factories文件中的指定类:
exceptionReporters = getSpringFactoriesInstances(SpringBootExceptionReporter.class,new Class[] { ConfigurableApplicationContext.class }, context);
该类主要是在项目启动失败之后,打印log:
private void reportFailure(Collection<SpringBootExceptionReporter> exceptionReporters,Throwable failure) {try {for (SpringBootExceptionReporter reporter : exceptionReporters) {if (reporter.reportException(failure)) {//上报错误logregisterLoggedException(failure);return;}}}catch (Throwable ex) {// Continue with normal handling of the original failure}if (logger.isErrorEnabled()) {logger.error("Application run failed", failure);registerLoggedException(failure);}}
3.5 准备容器
这一步主要是在容器刷新之前的准备动作。包含一个非常关键的操作:将启动类注入容器,为后续开启自动化配置奠定基础。
prepareContext(context, environment, listeners, applicationArguments, printedBanner);
继续跟进该方法
private void prepareContext(ConfigurableApplicationContext context,ConfigurableEnvironment environment, SpringApplicationRunListeners listeners,ApplicationArguments applicationArguments, Banner printedBanner) {//设置容器环境,包括各种变量context.setEnvironment(environment);//执行容器后置处理postProcessApplicationContext(context);//执行容器中的ApplicationContextInitializer(包括 spring.factories和自定义的实例)applyInitializers(context);//发送容器已经准备好的事件,通知各监听器listeners.contextPrepared(context);//打印logif (this.logStartupInfo) {logStartupInfo(context.getParent() == null);logStartupProfileInfo(context);}// Add boot specific singleton beans//注册启动参数bean,这里将容器指定的参数封装成bean,注入容器context.getBeanFactory().registerSingleton("springApplicationArguments",applicationArguments);//设置bannerif (printedBanner != null) {context.getBeanFactory().registerSingleton("springBootBanner", printedBanner);}// Load the sources//获取我们的启动类指定的参数,可以是多个Set<Object> sources = getAllSources();Assert.notEmpty(sources, "Sources must not be empty");//加载我们的启动类,将启动类注入容器load(context, sources.toArray(new Object[0]));//发布容器已加载事件。listeners.contextLoaded(context);}
来看一下上面的几个核心处理。
1)容器的后置处理:
protected void postProcessApplicationContext(ConfigurableApplicationContext context) {if (this.beanNameGenerator != null) {context.getBeanFactory().registerSingleton(AnnotationConfigUtils.CONFIGURATION_BEAN_NAME_GENERATOR,this.beanNameGenerator);}if (this.resourceLoader != null) {if (context instanceof GenericApplicationContext) {((GenericApplicationContext) context).setResourceLoader(this.resourceLoader);}if (context instanceof DefaultResourceLoader) {((DefaultResourceLoader) context).setClassLoader(this.resourceLoader.getClassLoader());}}}
这里默认不执行任何逻辑,因为beanNameGenerator和resourceLoader默认为空。之所以这样做,是springBoot留给我们的扩展处理方式,类似于这样的扩展,spring中也有很多。
2)加载启动指定类(重点)
这里会将我们的启动类加载spring容器beanDefinitionMap中,为后续springBoot 自动化配置奠定基础,springBoot为我们提供的各种注解配置也与此有关。
load(context, sources.toArray(new Object[0]));
protected void load(ApplicationContext context, Object[] sources) {if (logger.isDebugEnabled()) {logger.debug("Loading source " + StringUtils.arrayToCommaDelimitedString(sources));}BeanDefinitionLoader loader = createBeanDefinitionLoader(getBeanDefinitionRegistry(context), sources);if (this.beanNameGenerator != null) {loader.setBeanNameGenerator(this.beanNameGenerator);}if (this.resourceLoader != null) {loader.setResourceLoader(this.resourceLoader);}if (this.environment != null) {loader.setEnvironment(this.environment);}loader.load();}
这里参数即为我们项目启动时传递的参数:SpringApplication.run(SpringBootApplication.class, args);由于我们指定了启动类,所以上面也就是加载启动类到容器。**
private int load(Class<?> source) {if (isGroovyPresent()&& GroovyBeanDefinitionSource.class.isAssignableFrom(source)) {// Any GroovyLoaders added in beans{} DSL can contribute beans hereGroovyBeanDefinitionSource loader = BeanUtils.instantiateClass(source,GroovyBeanDefinitionSource.class);load(loader);}if (isComponent(source)) {//以注解的方式,将启动类bean信息存入beanDefinitionMapthis.annotatedReader.register(source);return 1;}return 0;}
上面代码中启动类被加载到 beanDefinitionMap中,后续该启动类将作为开启自动化配置的入口,后面一篇文章我会详细的分析,启动类是如何加载,以及自动化配置开启的详细流程。
3)通知监听器,容器已准备就绪
listeners.contextLoaded(context);
3.6 刷新容器
refreshContext(context);
protected void refresh(ApplicationContext applicationContext) {Assert.isInstanceOf(AbstractApplicationContext.class, applicationContext);((AbstractApplicationContext) applicationContext).refresh();}
执行到这里,springBoot相关的处理工作已经结束,接下的工作就交给了spring。详细代码就不贴了
3.7 刷新容器后的扩展接口
protected void afterRefresh(ConfigurableApplicationContext context,ApplicationArguments args) {}
扩展接口,设计模式中的模板方法,默认为空实现。如果有自定义需求,可以重写该方法。比如打印一些启动结束log,或者一些其它后置处理。
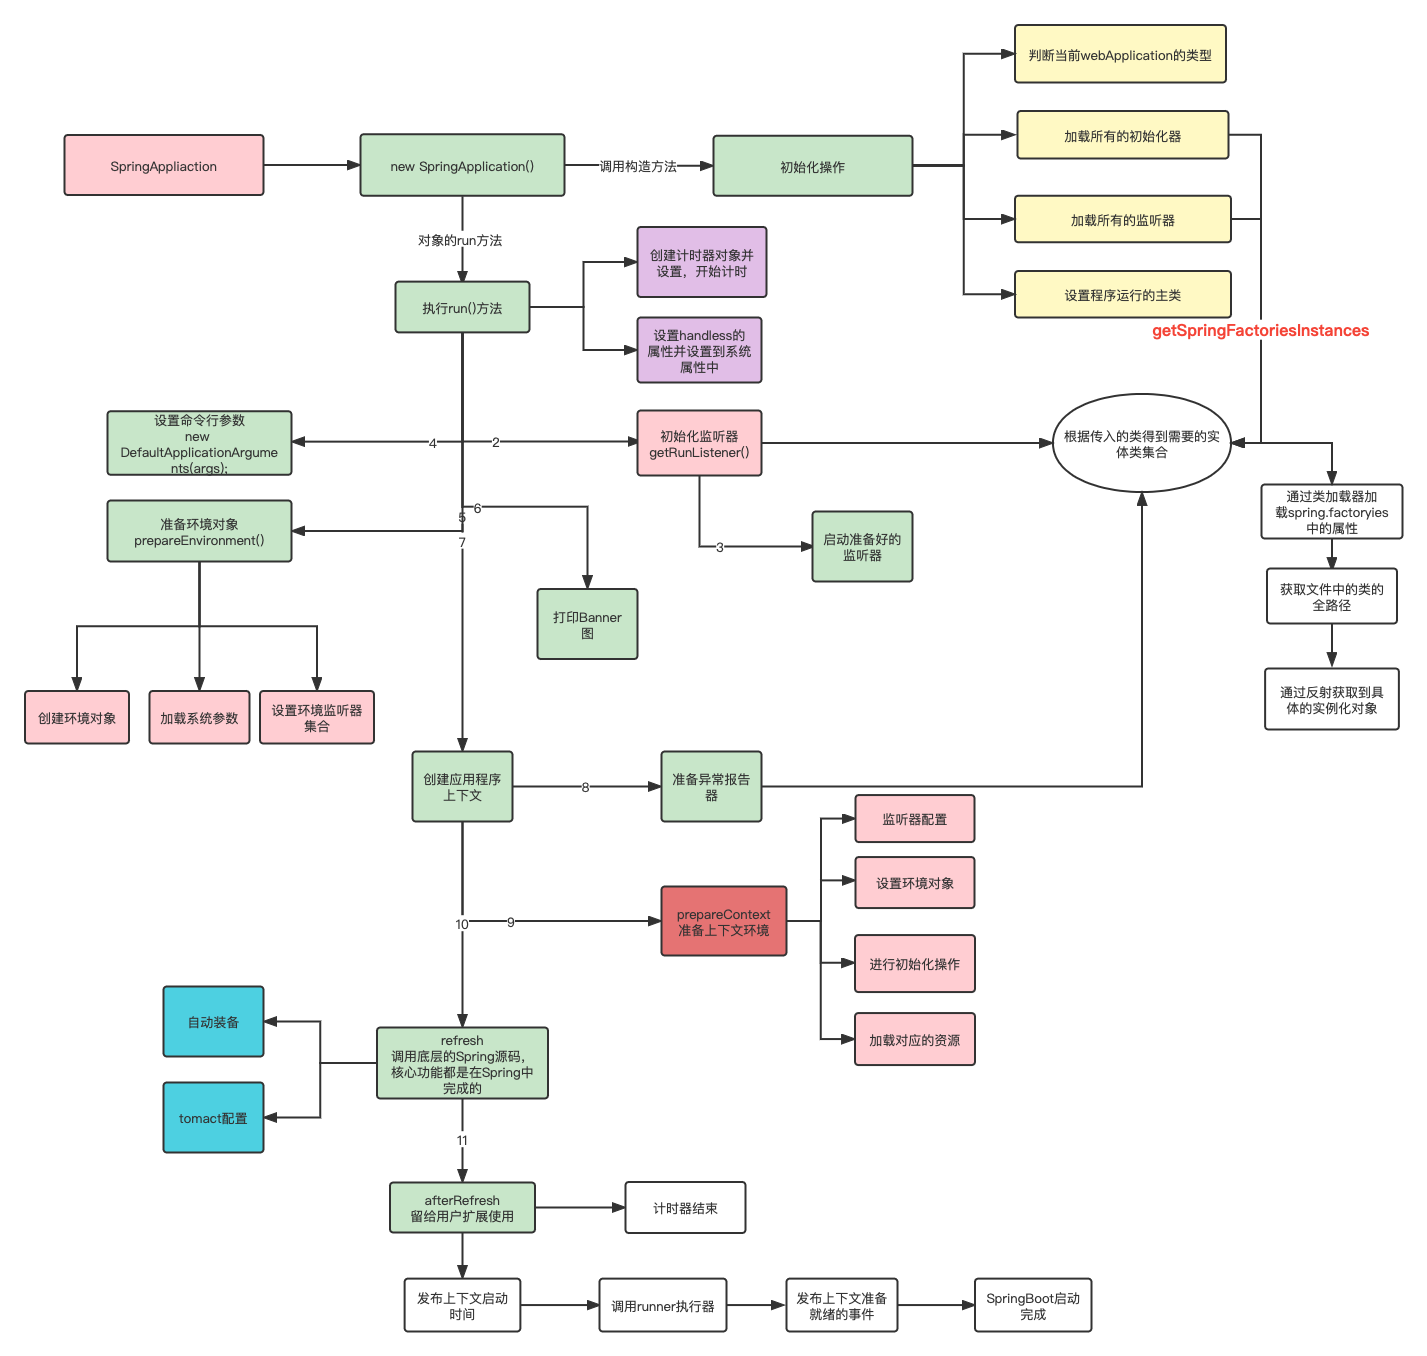
二、启动流程图
二、SpringBoot 自动装配
1、SpringBoot 注解
SpringBoot 整个项目通过一个主类作为整个程序的入口,在这个主类中有个核心的注解:@SpringBootApplication,所有的装配和Bean 初始化都是通过注解进行解析扫描完成的。注解直接关系如下
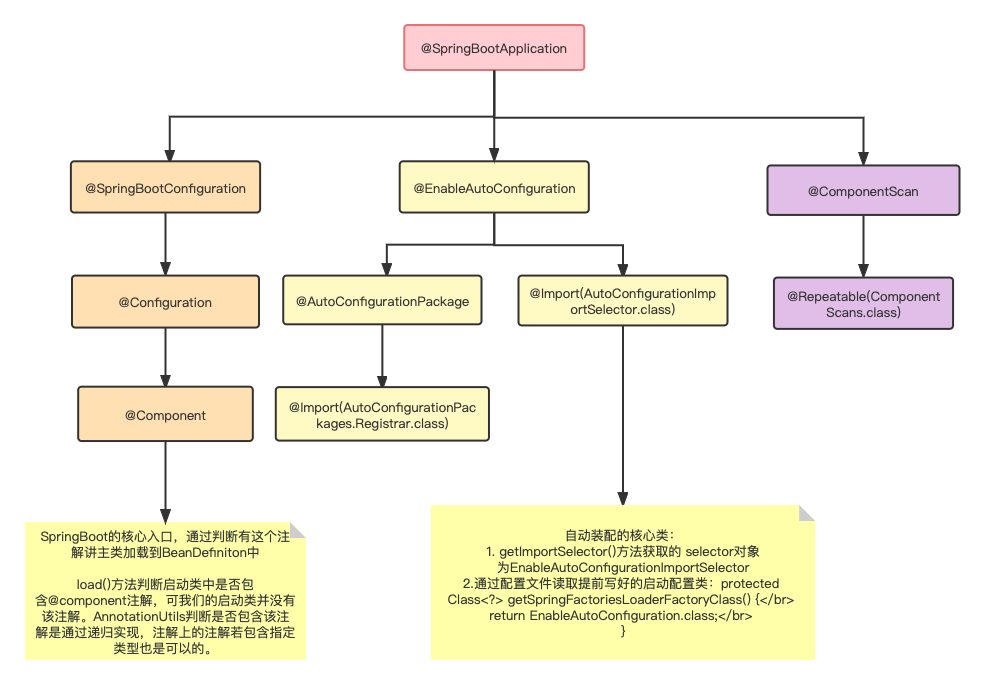
�2、SpringBoot 自动装配流程
1.前置
SpringBoot 最核心的就是自动化配置,整个自动化配置主要包括以下几个核心点:
- spring.factories 配置文件中EnableAutoConfiguration提前配置的配置类
- 入口为启动流程中的 prepareContext()方法中的 load()方法加载主类到Spring容器中进行初始化
- 核心实现逻辑在Spring.refresh()14 个方法中的 invokeBeanFactoryPostProcessor中
- 核心类:AutoConfigurationImportSelector,通过方法调用返回整个项目使用的启动配置类
1.spring.factories 文件的具体类容:@EnableAutoConfiguration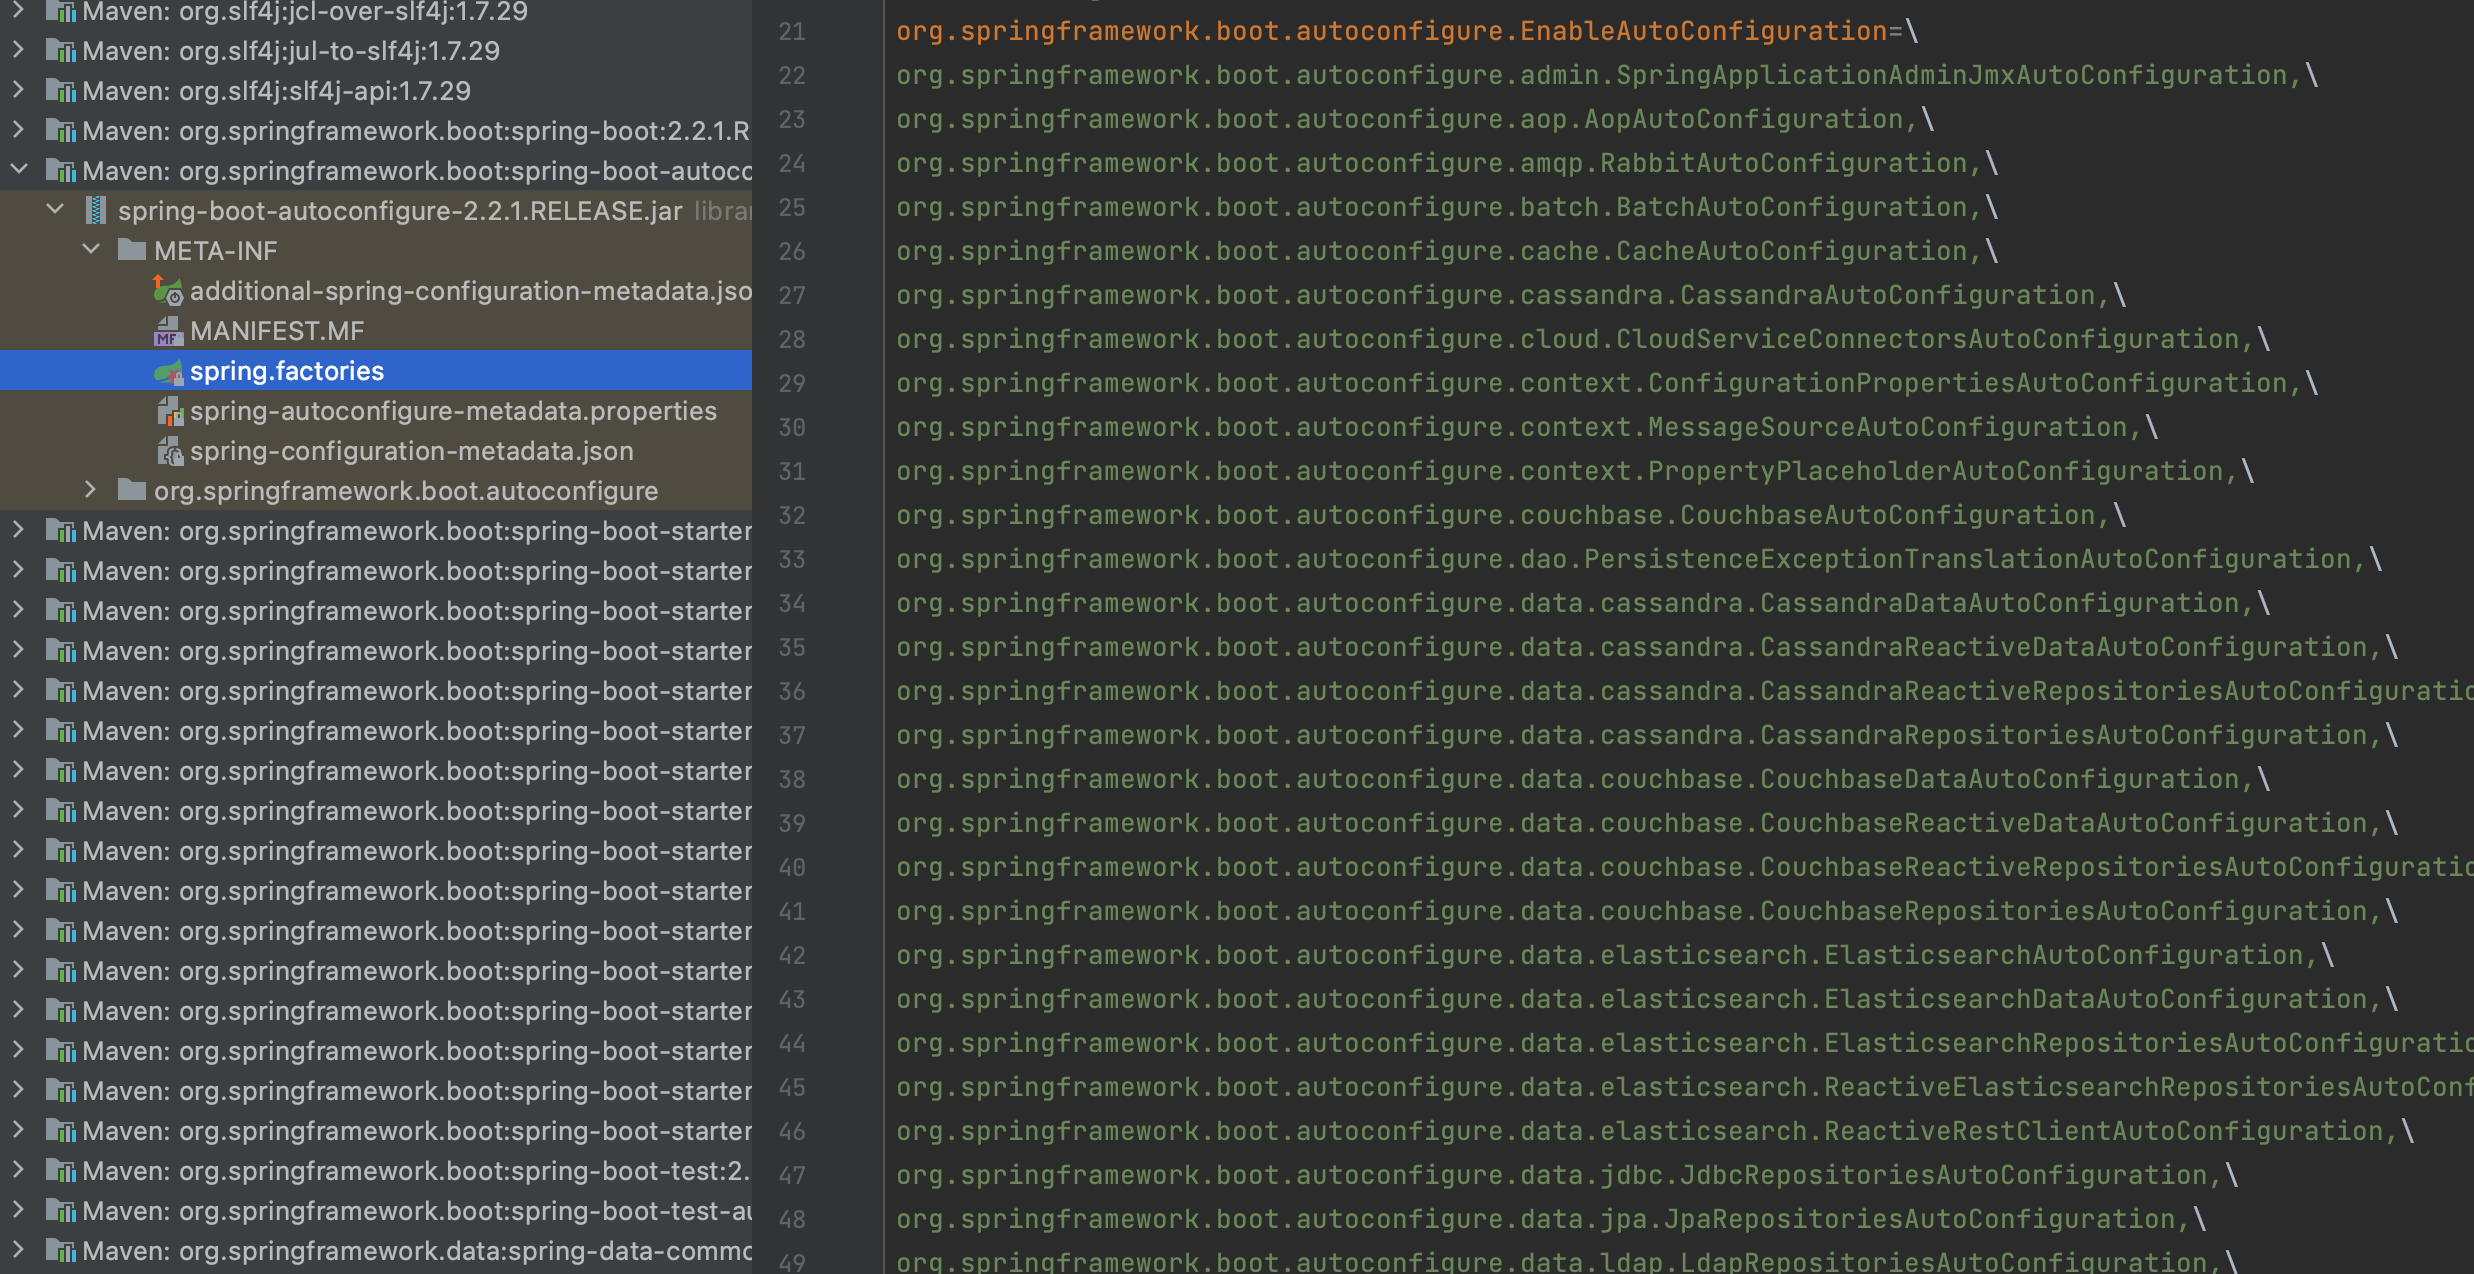
# Initializersorg.springframework.context.ApplicationContextInitializer=\org.springframework.boot.autoconfigure.SharedMetadataReaderFactoryContextInitializer,\org.springframework.boot.autoconfigure.logging.ConditionEvaluationReportLoggingListener# Application Listenersorg.springframework.context.ApplicationListener=\org.springframework.boot.autoconfigure.BackgroundPreinitializer# Environment Post Processorsorg.springframework.boot.env.EnvironmentPostProcessor=\org.springframework.boot.autoconfigure.integration.IntegrationPropertiesEnvironmentPostProcessor# Auto Configuration Import Listenersorg.springframework.boot.autoconfigure.AutoConfigurationImportListener=\org.springframework.boot.autoconfigure.condition.ConditionEvaluationReportAutoConfigurationImportListener# Auto Configuration Import Filtersorg.springframework.boot.autoconfigure.AutoConfigurationImportFilter=\org.springframework.boot.autoconfigure.condition.OnBeanCondition,\org.springframework.boot.autoconfigure.condition.OnClassCondition,\org.springframework.boot.autoconfigure.condition.OnWebApplicationCondition# Auto Configureorg.springframework.boot.autoconfigure.EnableAutoConfiguration=\org.springframework.boot.autoconfigure.admin.SpringApplicationAdminJmxAutoConfiguration,\org.springframework.boot.autoconfigure.aop.AopAutoConfiguration,\org.springframework.boot.autoconfigure.amqp.RabbitAutoConfiguration,\org.springframework.boot.autoconfigure.batch.BatchAutoConfiguration,\org.springframework.boot.autoconfigure.cache.CacheAutoConfiguration,\org.springframework.boot.autoconfigure.cassandra.CassandraAutoConfiguration,\org.springframework.boot.autoconfigure.context.ConfigurationPropertiesAutoConfiguration,\org.springframework.boot.autoconfigure.context.LifecycleAutoConfiguration,\org.springframework.boot.autoconfigure.context.MessageSourceAutoConfiguration,\org.springframework.boot.autoconfigure.context.PropertyPlaceholderAutoConfiguration,\org.springframework.boot.autoconfigure.couchbase.CouchbaseAutoConfiguration,\org.springframework.boot.autoconfigure.dao.PersistenceExceptionTranslationAutoConfiguration,\org.springframework.boot.autoconfigure.data.cassandra.CassandraDataAutoConfiguration,\org.springframework.boot.autoconfigure.data.cassandra.CassandraReactiveDataAutoConfiguration,\org.springframework.boot.autoconfigure.data.cassandra.CassandraReactiveRepositoriesAutoConfiguration,\org.springframework.boot.autoconfigure.data.cassandra.CassandraRepositoriesAutoConfiguration,\org.springframework.boot.autoconfigure.data.couchbase.CouchbaseDataAutoConfiguration,\org.springframework.boot.autoconfigure.data.couchbase.CouchbaseReactiveDataAutoConfiguration,\org.springframework.boot.autoconfigure.data.couchbase.CouchbaseReactiveRepositoriesAutoConfiguration,\org.springframework.boot.autoconfigure.data.couchbase.CouchbaseRepositoriesAutoConfiguration,\org.springframework.boot.autoconfigure.data.elasticsearch.ElasticsearchDataAutoConfiguration,\org.springframework.boot.autoconfigure.data.elasticsearch.ElasticsearchRepositoriesAutoConfiguration,\org.springframework.boot.autoconfigure.data.elasticsearch.ReactiveElasticsearchRepositoriesAutoConfiguration,\org.springframework.boot.autoconfigure.data.elasticsearch.ReactiveElasticsearchRestClientAutoConfiguration,\org.springframework.boot.autoconfigure.data.jdbc.JdbcRepositoriesAutoConfiguration,\org.springframework.boot.autoconfigure.data.jpa.JpaRepositoriesAutoConfiguration,\org.springframework.boot.autoconfigure.data.ldap.LdapRepositoriesAutoConfiguration,\org.springframework.boot.autoconfigure.data.mongo.MongoDataAutoConfiguration,\org.springframework.boot.autoconfigure.data.mongo.MongoReactiveDataAutoConfiguration,\org.springframework.boot.autoconfigure.data.mongo.MongoReactiveRepositoriesAutoConfiguration,\org.springframework.boot.autoconfigure.data.mongo.MongoRepositoriesAutoConfiguration,\org.springframework.boot.autoconfigure.data.neo4j.Neo4jDataAutoConfiguration,\org.springframework.boot.autoconfigure.data.neo4j.Neo4jReactiveDataAutoConfiguration,\org.springframework.boot.autoconfigure.data.neo4j.Neo4jReactiveRepositoriesAutoConfiguration,\org.springframework.boot.autoconfigure.data.neo4j.Neo4jRepositoriesAutoConfiguration,\org.springframework.boot.autoconfigure.data.r2dbc.R2dbcDataAutoConfiguration,\org.springframework.boot.autoconfigure.data.r2dbc.R2dbcRepositoriesAutoConfiguration,\org.springframework.boot.autoconfigure.data.redis.RedisAutoConfiguration,\org.springframework.boot.autoconfigure.data.redis.RedisReactiveAutoConfiguration,\org.springframework.boot.autoconfigure.data.redis.RedisRepositoriesAutoConfiguration,\org.springframework.boot.autoconfigure.data.rest.RepositoryRestMvcAutoConfiguration,\org.springframework.boot.autoconfigure.data.web.SpringDataWebAutoConfiguration,\org.springframework.boot.autoconfigure.elasticsearch.ElasticsearchRestClientAutoConfiguration,\org.springframework.boot.autoconfigure.flyway.FlywayAutoConfiguration,\org.springframework.boot.autoconfigure.freemarker.FreeMarkerAutoConfiguration,\org.springframework.boot.autoconfigure.groovy.template.GroovyTemplateAutoConfiguration,\org.springframework.boot.autoconfigure.gson.GsonAutoConfiguration,\org.springframework.boot.autoconfigure.h2.H2ConsoleAutoConfiguration,\org.springframework.boot.autoconfigure.hateoas.HypermediaAutoConfiguration,\org.springframework.boot.autoconfigure.hazelcast.HazelcastAutoConfiguration,\org.springframework.boot.autoconfigure.hazelcast.HazelcastJpaDependencyAutoConfiguration,\org.springframework.boot.autoconfigure.http.HttpMessageConvertersAutoConfiguration,\org.springframework.boot.autoconfigure.http.codec.CodecsAutoConfiguration,\org.springframework.boot.autoconfigure.influx.InfluxDbAutoConfiguration,\org.springframework.boot.autoconfigure.info.ProjectInfoAutoConfiguration,\org.springframework.boot.autoconfigure.integration.IntegrationAutoConfiguration,\org.springframework.boot.autoconfigure.jackson.JacksonAutoConfiguration,\org.springframework.boot.autoconfigure.jdbc.DataSourceAutoConfiguration,\org.springframework.boot.autoconfigure.jdbc.JdbcTemplateAutoConfiguration,\org.springframework.boot.autoconfigure.jdbc.JndiDataSourceAutoConfiguration,\org.springframework.boot.autoconfigure.jdbc.XADataSourceAutoConfiguration,\org.springframework.boot.autoconfigure.jdbc.DataSourceTransactionManagerAutoConfiguration,\org.springframework.boot.autoconfigure.jms.JmsAutoConfiguration,\org.springframework.boot.autoconfigure.jmx.JmxAutoConfiguration,\org.springframework.boot.autoconfigure.jms.JndiConnectionFactoryAutoConfiguration,\org.springframework.boot.autoconfigure.jms.activemq.ActiveMQAutoConfiguration,\org.springframework.boot.autoconfigure.jms.artemis.ArtemisAutoConfiguration,\org.springframework.boot.autoconfigure.jersey.JerseyAutoConfiguration,\org.springframework.boot.autoconfigure.jooq.JooqAutoConfiguration,\org.springframework.boot.autoconfigure.jsonb.JsonbAutoConfiguration,\org.springframework.boot.autoconfigure.kafka.KafkaAutoConfiguration,\org.springframework.boot.autoconfigure.availability.ApplicationAvailabilityAutoConfiguration,\org.springframework.boot.autoconfigure.ldap.embedded.EmbeddedLdapAutoConfiguration,\org.springframework.boot.autoconfigure.ldap.LdapAutoConfiguration,\org.springframework.boot.autoconfigure.liquibase.LiquibaseAutoConfiguration,\org.springframework.boot.autoconfigure.mail.MailSenderAutoConfiguration,\org.springframework.boot.autoconfigure.mail.MailSenderValidatorAutoConfiguration,\org.springframework.boot.autoconfigure.mongo.embedded.EmbeddedMongoAutoConfiguration,\org.springframework.boot.autoconfigure.mongo.MongoAutoConfiguration,\org.springframework.boot.autoconfigure.mongo.MongoReactiveAutoConfiguration,\org.springframework.boot.autoconfigure.mustache.MustacheAutoConfiguration,\org.springframework.boot.autoconfigure.neo4j.Neo4jAutoConfiguration,\org.springframework.boot.autoconfigure.netty.NettyAutoConfiguration,\org.springframework.boot.autoconfigure.orm.jpa.HibernateJpaAutoConfiguration,\org.springframework.boot.autoconfigure.quartz.QuartzAutoConfiguration,\org.springframework.boot.autoconfigure.r2dbc.R2dbcAutoConfiguration,\org.springframework.boot.autoconfigure.r2dbc.R2dbcTransactionManagerAutoConfiguration,\org.springframework.boot.autoconfigure.rsocket.RSocketMessagingAutoConfiguration,\org.springframework.boot.autoconfigure.rsocket.RSocketRequesterAutoConfiguration,\org.springframework.boot.autoconfigure.rsocket.RSocketServerAutoConfiguration,\org.springframework.boot.autoconfigure.rsocket.RSocketStrategiesAutoConfiguration,\org.springframework.boot.autoconfigure.security.servlet.SecurityAutoConfiguration,\org.springframework.boot.autoconfigure.security.servlet.UserDetailsServiceAutoConfiguration,\org.springframework.boot.autoconfigure.security.servlet.SecurityFilterAutoConfiguration,\org.springframework.boot.autoconfigure.security.reactive.ReactiveSecurityAutoConfiguration,\org.springframework.boot.autoconfigure.security.reactive.ReactiveUserDetailsServiceAutoConfiguration,\org.springframework.boot.autoconfigure.security.rsocket.RSocketSecurityAutoConfiguration,\org.springframework.boot.autoconfigure.security.saml2.Saml2RelyingPartyAutoConfiguration,\org.springframework.boot.autoconfigure.sendgrid.SendGridAutoConfiguration,\org.springframework.boot.autoconfigure.session.SessionAutoConfiguration,\org.springframework.boot.autoconfigure.security.oauth2.client.servlet.OAuth2ClientAutoConfiguration,\org.springframework.boot.autoconfigure.security.oauth2.client.reactive.ReactiveOAuth2ClientAutoConfiguration,\org.springframework.boot.autoconfigure.security.oauth2.resource.servlet.OAuth2ResourceServerAutoConfiguration,\org.springframework.boot.autoconfigure.security.oauth2.resource.reactive.ReactiveOAuth2ResourceServerAutoConfiguration,\org.springframework.boot.autoconfigure.solr.SolrAutoConfiguration,\org.springframework.boot.autoconfigure.sql.init.SqlInitializationAutoConfiguration,\org.springframework.boot.autoconfigure.task.TaskExecutionAutoConfiguration,\org.springframework.boot.autoconfigure.task.TaskSchedulingAutoConfiguration,\org.springframework.boot.autoconfigure.thymeleaf.ThymeleafAutoConfiguration,\org.springframework.boot.autoconfigure.transaction.TransactionAutoConfiguration,\org.springframework.boot.autoconfigure.transaction.jta.JtaAutoConfiguration,\org.springframework.boot.autoconfigure.validation.ValidationAutoConfiguration,\org.springframework.boot.autoconfigure.web.client.RestTemplateAutoConfiguration,\org.springframework.boot.autoconfigure.web.embedded.EmbeddedWebServerFactoryCustomizerAutoConfiguration,\org.springframework.boot.autoconfigure.web.reactive.HttpHandlerAutoConfiguration,\org.springframework.boot.autoconfigure.web.reactive.ReactiveMultipartAutoConfiguration,\org.springframework.boot.autoconfigure.web.reactive.ReactiveWebServerFactoryAutoConfiguration,\org.springframework.boot.autoconfigure.web.reactive.WebFluxAutoConfiguration,\org.springframework.boot.autoconfigure.web.reactive.WebSessionIdResolverAutoConfiguration,\org.springframework.boot.autoconfigure.web.reactive.error.ErrorWebFluxAutoConfiguration,\org.springframework.boot.autoconfigure.web.reactive.function.client.ClientHttpConnectorAutoConfiguration,\org.springframework.boot.autoconfigure.web.reactive.function.client.WebClientAutoConfiguration,\org.springframework.boot.autoconfigure.web.servlet.DispatcherServletAutoConfiguration,\org.springframework.boot.autoconfigure.web.servlet.ServletWebServerFactoryAutoConfiguration,\org.springframework.boot.autoconfigure.web.servlet.error.ErrorMvcAutoConfiguration,\org.springframework.boot.autoconfigure.web.servlet.HttpEncodingAutoConfiguration,\org.springframework.boot.autoconfigure.web.servlet.MultipartAutoConfiguration,\org.springframework.boot.autoconfigure.web.servlet.WebMvcAutoConfiguration,\org.springframework.boot.autoconfigure.websocket.reactive.WebSocketReactiveAutoConfiguration,\org.springframework.boot.autoconfigure.websocket.servlet.WebSocketServletAutoConfiguration,\org.springframework.boot.autoconfigure.websocket.servlet.WebSocketMessagingAutoConfiguration,\org.springframework.boot.autoconfigure.webservices.WebServicesAutoConfiguration,\org.springframework.boot.autoconfigure.webservices.client.WebServiceTemplateAutoConfiguration# Failure analyzersorg.springframework.boot.diagnostics.FailureAnalyzer=\org.springframework.boot.autoconfigure.data.redis.RedisUrlSyntaxFailureAnalyzer,\org.springframework.boot.autoconfigure.diagnostics.analyzer.NoSuchBeanDefinitionFailureAnalyzer,\org.springframework.boot.autoconfigure.flyway.FlywayMigrationScriptMissingFailureAnalyzer,\org.springframework.boot.autoconfigure.jdbc.DataSourceBeanCreationFailureAnalyzer,\org.springframework.boot.autoconfigure.jdbc.HikariDriverConfigurationFailureAnalyzer,\org.springframework.boot.autoconfigure.jooq.NoDslContextBeanFailureAnalyzer,\org.springframework.boot.autoconfigure.r2dbc.ConnectionFactoryBeanCreationFailureAnalyzer,\org.springframework.boot.autoconfigure.r2dbc.MissingR2dbcPoolDependencyFailureAnalyzer,\org.springframework.boot.autoconfigure.r2dbc.MultipleConnectionPoolConfigurationsFailureAnalzyer,\org.springframework.boot.autoconfigure.r2dbc.NoConnectionFactoryBeanFailureAnalyzer,\org.springframework.boot.autoconfigure.session.NonUniqueSessionRepositoryFailureAnalyzer# Template availability providersorg.springframework.boot.autoconfigure.template.TemplateAvailabilityProvider=\org.springframework.boot.autoconfigure.freemarker.FreeMarkerTemplateAvailabilityProvider,\org.springframework.boot.autoconfigure.mustache.MustacheTemplateAvailabilityProvider,\org.springframework.boot.autoconfigure.groovy.template.GroovyTemplateAvailabilityProvider,\org.springframework.boot.autoconfigure.thymeleaf.ThymeleafTemplateAvailabilityProvider,\org.springframework.boot.autoconfigure.web.servlet.JspTemplateAvailabilityProvider# DataSource initializer detectorsorg.springframework.boot.sql.init.dependency.DatabaseInitializerDetector=\org.springframework.boot.autoconfigure.flyway.FlywayMigrationInitializerDatabaseInitializerDetector# Depends on database initialization detectorsorg.springframework.boot.sql.init.dependency.DependsOnDatabaseInitializationDetector=\org.springframework.boot.autoconfigure.batch.JobRepositoryDependsOnDatabaseInitializationDetector,\org.springframework.boot.autoconfigure.quartz.SchedulerDependsOnDatabaseInitializationDetector,\org.springframework.boot.autoconfigure.session.JdbcIndexedSessionRepositoryDependsOnDatabaseInitializationDetector
SPI 机制了解:
https://blog.csdn.net/qq_43522770/article/details/117284372
2.自动装配流程
整体自动准配都是从SpringBootApplicatio注解开始的,所以后面的解释主要从这个注解展开
1)springBoot启动类加载
首先加载启动类到Spring bean容器中的map中,这一步操作是在SpringBoot启动流程中prepareContext()方法中的load(context, sources.toArray(new Object[0]))方法完成。
springboot 程序入口
@SpringBootApplicationpublic class DavinciServerApplication {public static void main(String[] args) {SpringApplication.run(DavinciServerApplication.class, args);}}
springboot 启动流程 run() 方法,中间代码省去,只留使用到的核心方法
public ConfigurableApplicationContext run(String... args) {.......// 加载SpringBoot 启动类到Spring容器中的入口类prepareContext(context, environment, listeners, applicationArguments, printedBanner);// 调用Spring底层实现,真正自动装配的逻辑在这里的一个底层方法中refreshContext(context);.......return context;}
加载启动类,核心方法BeanDefinitionLoader.load(Class<?> source)
跟进代码,最后会执行到**BeanDefinitionLoader.load(Class<?> source)方法中**
```java private int load(Object source) {
Assert.notNull(source, "Source must not be null");//如果是class类型,启用注解类型if (source instanceof Class<?>) {return load((Class<?>) source);}//如果是resource类型,启用xml解析if (source instanceof Resource) {return load((Resource) source);}//如果是package类型,启用扫描包,例如:@ComponentScanif (source instanceof Package) {return load((Package) source);}//如果是字符串类型,直接加载if (source instanceof CharSequence) {return load((CharSequence) source);}throw new IllegalArgumentException("Invalid source type " + source.getClass());
}
继续跟进load(Class<?> resource)方法<br /> 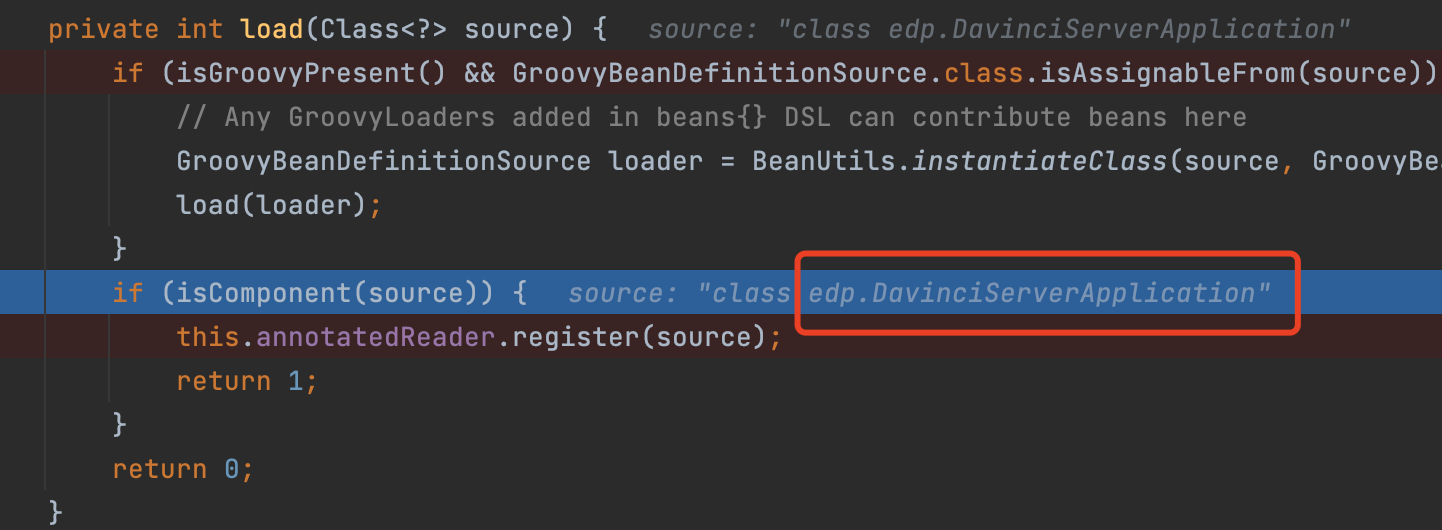<br />上述方法判断启动类中是否包含@component注解,可我们的启动类并没有该注解。继续跟进会发现,AnnotationUtils判断是否包含该注解是通过递归实现,注解上的注解若包含指定类型也是可以的。<br />启动类中包含@SpringBootApplication注解,进一步查找到@SpringBootConfiguration注解,然后查找到@Component注解,注解对应关系见[SpringBoot 注解](SpringBoot 注解)。4. ** 注册bean定义详细到BeanDefinitionMap中为后期初始化bean做准备。**跟进上图截取的代码 annotatedReader.register(source)方法, 最后执行到**AnnotateBeanDefinitionReader.register(source)方法中**```javaprivate <T> void doRegisterBean(Class<T> beanClass, @Nullable String name,@Nullable Class<? extends Annotation>[] qualifiers, @Nullable Supplier<T> supplier,@Nullable BeanDefinitionCustomizer[] customizers) {AnnotatedGenericBeanDefinition abd = new AnnotatedGenericBeanDefinition(beanClass);BeanDefinitionHolder definitionHolder = new BeanDefinitionHolder(abd, beanName);definitionHolder = AnnotationConfigUtils.applyScopedProxyMode(scopeMetadata, definitionHolder, this.registry);BeanDefinitionReaderUtils.registerBeanDefinition(definitionHolder, this.registry);}
如此一来,我们的启动类就被包装成AnnotatedGenericBeanDefinition了,后续启动类的处理都基于该对象。
到此也完成了prepareContext()方法,进入到SpringBoot启动流程中的refreshContext()方法。
2)自动装配入口
从启动流程开始,到Spring的刷新容器为真正的入口。refreshContext() 中层层调用refresh()方法进入到最后执行到Spring.refresh()方法
@Overridepublic void refresh() throws BeansException, IllegalStateException {synchronized (this.startupShutdownMonitor) {// ...invokeBeanFactoryPostProcessors(beanFactory);// ...}
继续跟进 invokeBeanFactoryPostProcessors()方法:
protected void invokeBeanFactoryPostProcessors(ConfigurableListableBeanFactory beanFactory) {//开始执行beanFactoryPostProcessor对应实现类PostProcessorRegistrationDelegate.invokeBeanFactoryPostProcessors(beanFactory, getBeanFactoryPostProcessors());// Detect a LoadTimeWeaver and prepare for weaving, if found in the meantime// (e.g. through an @Bean method registered by ConfigurationClassPostProcessor)if (beanFactory.getTempClassLoader() == null && beanFactory.containsBean(LOAD_TIME_WEAVER_BEAN_NAME)) {beanFactory.addBeanPostProcessor(new LoadTimeWeaverAwareProcessor(beanFactory));beanFactory.setTempClassLoader(new ContextTypeMatchClassLoader(beanFactory.getBeanClassLoader()));}}
首先我们要知道beanFactoryPostProcessor接口是spring的扩展接口,从名字也可以看出,是 beanFactory的扩展接口。在刷新容器之前,该接口可用来修改bean元数据信息。具体实现方式,我们继续跟着上述执行逻辑便知。
继续跟进上面invokeBeanFactoryPostProcessors方法,第一行很关键:
//开始执行beanFactoryPostProcessor对应实现类PostProcessorRegistrationDelegate.invokeBeanFactoryPostProcessors(beanFactory, getBeanFactoryPostProcessors());
一个比较核心的代理类出现了,AbstractApplicationContext委托执行postprocessors任务的工具类。
而在项目启动时会委托什么任务呢?
在Spring 源码中:SpringApplication类中applyInitializers(context)方法,它会将三个默认的内部类加入到 spring 容器DefaultListableBeanFactory中,如下:
//设置配置警告ConfigurationWarningsApplicationContextInitializer$ConfigurationWarningsPostProcessorSharedMetadataReaderFactoryContextInitializer$CachingMetadataReaderFactoryPostProcessorConfigFileApplicationListener$PropertySourceOrderingPostProcessor
来看一下具体任务执行细节,跟进invokeBeanFactoryPostProcessors方法:
public static void invokeBeanFactoryPostProcessors(ConfigurableListableBeanFactory beanFactory, List<BeanFactoryPostProcessor> beanFactoryPostProcessors) {// Invoke BeanDefinitionRegistryPostProcessors first, if any.Set<String> processedBeans = new HashSet<>();if (beanFactory instanceof BeanDefinitionRegistry) {// 将beanFactory 强转为BeanDefinitionRegisrty 对象BeanDefinitionRegistry registry = (BeanDefinitionRegistry) beanFactory;// 创建两个空的对象来设置需要处理的 后置处理器List<BeanFactoryPostProcessor> regularPostProcessors = new ArrayList<>();List<BeanDefinitionRegistryPostProcessor> registryProcessors = new ArrayList<>();// 将两种类型区分分别添加到创建的空集合中分别处理for (BeanFactoryPostProcessor postProcessor : beanFactoryPostProcessors) {if (postProcessor instanceof BeanDefinitionRegistryPostProcessor) {BeanDefinitionRegistryPostProcessor registryProcessor =(BeanDefinitionRegistryPostProcessor) postProcessor;registryProcessor.postProcessBeanDefinitionRegistry(registry);registryProcessors.add(registryProcessor);}else {regularPostProcessors.add(postProcessor);}}// Do not initialize FactoryBeans here: We need to leave all regular beans// uninitialized to let the bean factory post-processors apply to them!// Separate between BeanDefinitionRegistryPostProcessors that implement// PriorityOrdered, Ordered, and the rest.List<BeanDefinitionRegistryPostProcessor> currentRegistryProcessors = new ArrayList<>();// First, invoke the BeanDefinitionRegistryPostProcessors that implement PriorityOrdered.// 调用所有实现PriorityOrdered接口的BeanDefinitionRegistryPostProcessor实现类// 找到所有实现BeanDefinitionRegistryPostProcessor接口bean的beanNameString[] postProcessorNames =beanFactory.getBeanNamesForType(BeanDefinitionRegistryPostProcessor.class, true, false);for (String ppName : postProcessorNames) {// 检测是否实现来PriorityOrdered 接口if (beanFactory.isTypeMatch(ppName, PriorityOrdered.class)) {currentRegistryProcessors.add(beanFactory.getBean(ppName, BeanDefinitionRegistryPostProcessor.class));processedBeans.add(ppName);}}// 按照优先级进行排序操作sortPostProcessors(currentRegistryProcessors, beanFactory);// 添加到 registryProcessors 中,用于最后执行postProcessBeanFactory 方法registryProcessors.addAll(currentRegistryProcessors);invokeBeanDefinitionRegistryPostProcessors(currentRegistryProcessors, registry);currentRegistryProcessors.clear();// Next, invoke the BeanDefinitionRegistryPostProcessors that implement Ordered.postProcessorNames = beanFactory.getBeanNamesForType(BeanDefinitionRegistryPostProcessor.class, true, false);for (String ppName : postProcessorNames) {if (!processedBeans.contains(ppName) && beanFactory.isTypeMatch(ppName, Ordered.class)) {currentRegistryProcessors.add(beanFactory.getBean(ppName, BeanDefinitionRegistryPostProcessor.class));processedBeans.add(ppName);}}sortPostProcessors(currentRegistryProcessors, beanFactory);registryProcessors.addAll(currentRegistryProcessors);invokeBeanDefinitionRegistryPostProcessors(currentRegistryProcessors, registry);currentRegistryProcessors.clear();// Finally, invoke all other BeanDefinitionRegistryPostProcessors until no further ones appear.boolean reiterate = true;while (reiterate) {reiterate = false;postProcessorNames = beanFactory.getBeanNamesForType(BeanDefinitionRegistryPostProcessor.class, true, false);for (String ppName : postProcessorNames) {if (!processedBeans.contains(ppName)) {currentRegistryProcessors.add(beanFactory.getBean(ppName, BeanDefinitionRegistryPostProcessor.class));processedBeans.add(ppName);reiterate = true;}}sortPostProcessors(currentRegistryProcessors, beanFactory);registryProcessors.addAll(currentRegistryProcessors);invokeBeanDefinitionRegistryPostProcessors(currentRegistryProcessors, registry);currentRegistryProcessors.clear();}// Now, invoke the postProcessBeanFactory callback of all processors handled so far.invokeBeanFactoryPostProcessors(registryProcessors, beanFactory);invokeBeanFactoryPostProcessors(regularPostProcessors, beanFactory);}else {// Invoke factory processors registered with the context instance.invokeBeanFactoryPostProcessors(beanFactoryPostProcessors, beanFactory);}// Do not initialize FactoryBeans here: We need to leave all regular beans// uninitialized to let the bean factory post-processors apply to them!String[] postProcessorNames =beanFactory.getBeanNamesForType(BeanFactoryPostProcessor.class, true, false);// Separate between BeanFactoryPostProcessors that implement PriorityOrdered,// Ordered, and the rest.// 定义了存放实现了PriorityOrdered 接口的BeanPostProcessor集合List<BeanFactoryPostProcessor> priorityOrderedPostProcessors = new ArrayList<>();// 定了存放实现了Ordered接口的BeanPostProcessor的name 集合List<String> orderedPostProcessorNames = new ArrayList<>();// 定义存放着普通的BeanPostProcessor的name集合List<String> nonOrderedPostProcessorNames = new ArrayList<>();for (String ppName : postProcessorNames) {if (processedBeans.contains(ppName)) {// skip - already processed in first phase above}else if (beanFactory.isTypeMatch(ppName, PriorityOrdered.class)) {priorityOrderedPostProcessors.add(beanFactory.getBean(ppName, BeanFactoryPostProcessor.class));}else if (beanFactory.isTypeMatch(ppName, Ordered.class)) {orderedPostProcessorNames.add(ppName);}else {nonOrderedPostProcessorNames.add(ppName);}}// First, invoke the BeanFactoryPostProcessors that implement PriorityOrdered.sortPostProcessors(priorityOrderedPostProcessors, beanFactory);invokeBeanFactoryPostProcessors(priorityOrderedPostProcessors, beanFactory);// Next, invoke the BeanFactoryPostProcessors that implement Ordered.List<BeanFactoryPostProcessor> orderedPostProcessors = new ArrayList<>();for (String postProcessorName : orderedPostProcessorNames) {orderedPostProcessors.add(beanFactory.getBean(postProcessorName, BeanFactoryPostProcessor.class));}sortPostProcessors(orderedPostProcessors, beanFactory);invokeBeanFactoryPostProcessors(orderedPostProcessors, beanFactory);// Finally, invoke all other BeanFactoryPostProcessors.List<BeanFactoryPostProcessor> nonOrderedPostProcessors = new ArrayList<>();for (String postProcessorName : nonOrderedPostProcessorNames) {nonOrderedPostProcessors.add(beanFactory.getBean(postProcessorName, BeanFactoryPostProcessor.class));}invokeBeanFactoryPostProcessors(nonOrderedPostProcessors, beanFactory);// Clear cached merged bean definitions since the post-processors might have// modified the original metadata, e.g. replacing placeholders in values...beanFactory.clearMetadataCache();}
来分析一下核心代码:
String[] postProcessorNames =beanFactory.getBeanNamesForType(BeanDefinitionRegistryPostProcessor.class, true, false);
这行代码通过类型BeanDefinitionRegistryPostProcessor获取的处理类名称为:
“org.springframework.context.annotation.internalConfigurationAnnotationProcessor”
而在源码中却搜不到internalConfigurationAnnotationProcessor类,为什么呢?当启动springBoot,创建springBoot容器上下文AnnotationConfigServletWebApplicationContext时,会装配几个默认bean:
public AnnotationConfigServletWebApplicationContext() {//在这里装配this.reader = new AnnotatedBeanDefinitionReader(this);this.scanner = new ClassPathBeanDefinitionScanner(this);}
在执行创建springBoot 上下文:context = createApplicationContext() 对象时生成ConfigurableApplicationContext对象,�然后同时创建AnnotatedBeanDefinitionReader对象,然后调用其构造方法,进行ConfigurationClassPostProcessor设置
public AnnotatedBeanDefinitionReader(BeanDefinitionRegistry registry, Environment environment) {//...AnnotationConfigUtils.registerAnnotationConfigProcessors(this.registry);}
继续跟进会执行registerAnnotationConfigProcessors方法:
public static final String CONFIGURATION_ANNOTATION_PROCESSOR_BEAN_NAME ="org.springframework.context.annotation.internalConfigurationAnnotationProcessor";//将 internalConfigurationAnnotationProcessor 对应的类包装成 RootBeanDefinition 加载到容器if (!registry.containsBeanDefinition(CONFIGURATION_ANNOTATION_PROCESSOR_BEAN_NAME)) {RootBeanDefinition def = new RootBeanDefinition(ConfigurationClassPostProcessor.class);def.setSource(source);beanDefs.add(registerPostProcessor(registry, def, CONFIGURATION_ANNOTATION_PROCESSOR_BEAN_NAME));}
到这里,答案清晰浮现。internalConfigurationAnnotationProcessor为bean名称,容器中真正的类则是ConfigurationClassPostProcessor。
继续后面流程,获取ConfigurationClassPostProcessor后,开始执行BeanDefinitionRegistryPostProcessor:
//开始执行装配逻辑invokeBeanDefinitionRegistryPostProcessors(priorityOrderedPostProcessors, registry);
3)开始执行自动配置逻辑(启动类指定的配置,非默认配置):
首先开始通过一个方法的多个类中调用过程,最后一步到解析过程
#PostProcessorRegistrationDelegate.invokeBeanFactoryPostProcessors()#PostProcessorRegistrationDelegate.invokeBeanDefinitionRegistryPostProcessors()#BeanDefinitionRegistryPostProcessor.postProcessBeanDefinitionRegistryBeanDefinitionRegistryPostProcessor是抽象类,具体实现有子类来实现,SpringBoot中的实现类为ConfigurationClassPostProcessor#ConfigurationClassPostProcessor.processConfigBeanDefinitions()
继续跟进processConfigBeanDefinitions()方法细节: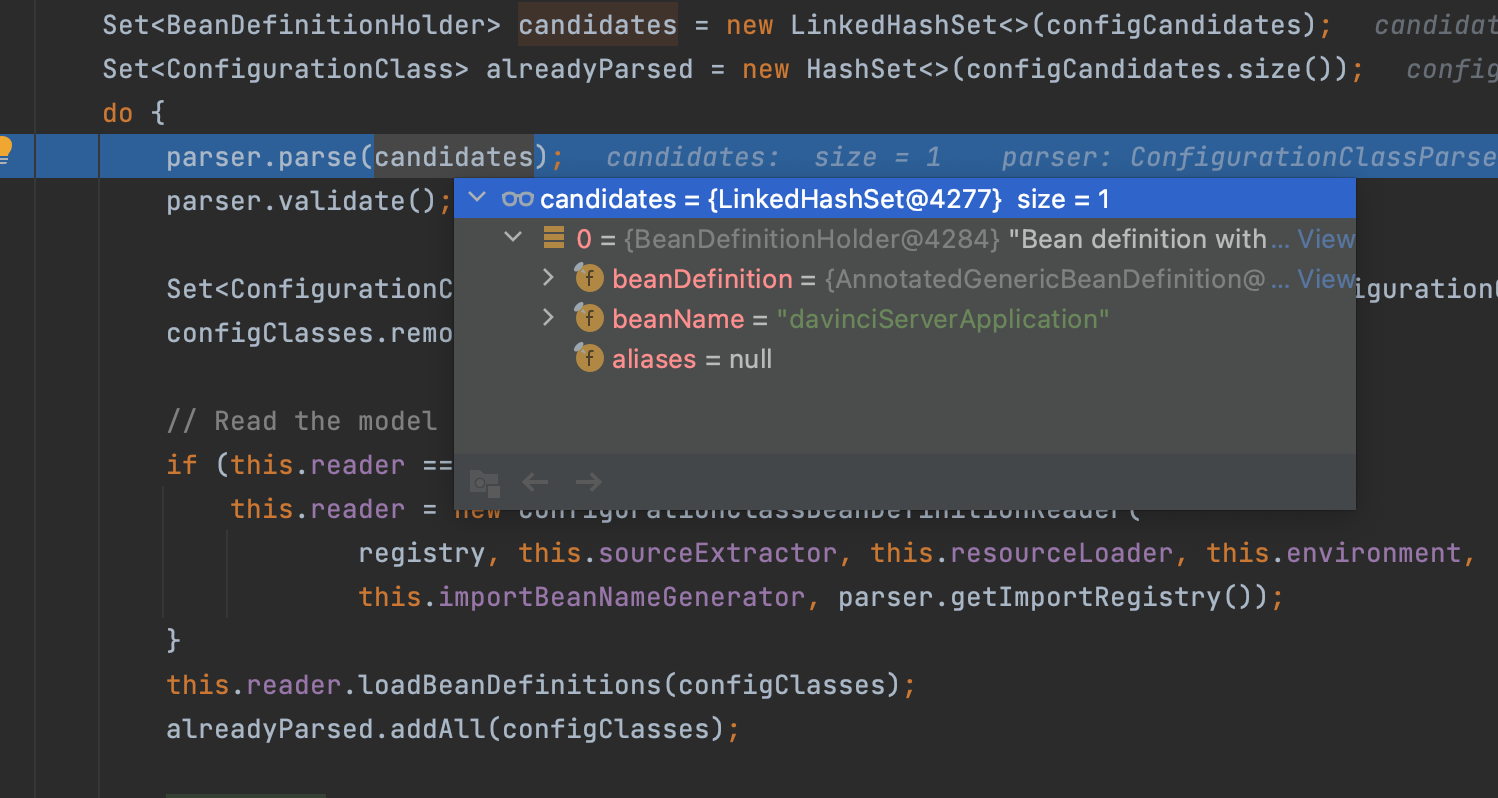
首先获得ConfigurationClassParser,这个是所有配置类的解析类,比较核心。所有的解析逻辑在parser.parse(candidates);中,我们详细的来看一下:
public void parse(Set<BeanDefinitionHolder> configCandidates) {this.deferredImportSelectors = new LinkedList<DeferredImportSelectorHolder>();for (BeanDefinitionHolder holder : configCandidates) {BeanDefinition bd = holder.getBeanDefinition();try {//是否是注解类if (bd instanceof AnnotatedBeanDefinition) {parse(((AnnotatedBeanDefinition) bd).getMetadata(), holder.getBeanName());}else if (bd instanceof AbstractBeanDefinition && ((AbstractBeanDefinition) bd).hasBeanClass()) {parse(((AbstractBeanDefinition) bd).getBeanClass(), holder.getBeanName());}else {parse(bd.getBeanClassName(), holder.getBeanName());}}catch (BeanDefinitionStoreException ex) {throw ex;}catch (Exception ex) {throw new BeanDefinitionStoreException("Failed to parse configuration class [" + bd.getBeanClassName() + "]", ex);}}//执行配置类processDeferredImportSelectors();}
继续跟进parse方法:
protected void processConfigurationClass(ConfigurationClass configClass) throws IOException {//...省略不核心代码// Recursively process the configuration class and its superclass hierarchy.SourceClass sourceClass = asSourceClass(configClass);do {//循环处理bean,如果有父类,则处理父类。直至结束。sourceClass = doProcessConfigurationClass(configClass, sourceClass);}while (sourceClass != null);this.configurationClasses.put(configClass, configClass);}
继续跟进doProcessConfigurationClass方法,该方法可以说是 spring 框架支持注解配置的核心逻辑了:
protected final SourceClass doProcessConfigurationClass(ConfigurationClass configClass, SourceClass sourceClass) throws IOException {//处理内部类逻辑,由于传来的参数是我们的启动类,不含内部类,所以跳过。processMemberClasses(configClass, sourceClass);// Process any @PropertySource annotations//针对属性配置的解析for (AnnotationAttributes propertySource : AnnotationConfigUtils.attributesForRepeatable(sourceClass.getMetadata(), PropertySources.class, org.springframework.context.annotation.PropertySource.class)) {if (this.environment instanceof ConfigurableEnvironment) {processPropertySource(propertySource);}else {logger.warn("Ignoring @PropertySource annotation on [" + sourceClass.getMetadata().getClassName() +"]. Reason: Environment must implement ConfigurableEnvironment");}}//这里是根据启动类 @ComponentScan 注解来扫描项目中的beanAnnotationAttributes componentScan = AnnotationConfigUtils.attributesFor(sourceClass.getMetadata(), ComponentScan.class);if (componentScan != null && !this.conditionEvaluator.shouldSkip(sourceClass.getMetadata(), ConfigurationPhase.REGISTER_BEAN)) {// The config class is annotated with @ComponentScan -> perform the scan immediatelySet<BeanDefinitionHolder> scannedBeanDefinitions =this.componentScanParser.parse(componentScan, sourceClass.getMetadata().getClassName());// Check the set of scanned definitions for any further config classes and parse recursively if necessary//遍历我们项目中的bean,如果是注解定义的bean,则进一步解析for (BeanDefinitionHolder holder : scannedBeanDefinitions) {//判断是否是注解beanif (ConfigurationClassUtils.checkConfigurationClassCandidate(holder.getBeanDefinition(), this.metadataReaderFactory)) {//这里是关键,递归解析。所有的bean,如果有注解,会进一步解析注解中包含的beanparse(holder.getBeanDefinition().getBeanClassName(), holder.getBeanName());}}}// Process any @Import annotations//这里又是一个递归解析,获取导入的配置类。很多情况下,导入的配置类中会同样包含导入类注解。processImports(configClass, sourceClass, getImports(sourceClass), true);// Process any @ImportResource annotations//解析导入的 xml 配置类if (sourceClass.getMetadata().isAnnotated(ImportResource.class.getName())) {AnnotationAttributes importResource = AnnotationConfigUtils.attributesFor(sourceClass.getMetadata(), ImportResource.class);String[] resources = importResource.getAliasedStringArray("locations", ImportResource.class, sourceClass);Class<? extends BeanDefinitionReader> readerClass = importResource.getClass("reader");for (String resource : resources) {String resolvedResource = this.environment.resolveRequiredPlaceholders(resource);configClass.addImportedResource(resolvedResource, readerClass);}}// Process individual @Bean methodsSet<MethodMetadata> beanMethods = sourceClass.getMetadata().getAnnotatedMethods(Bean.class.getName());for (MethodMetadata methodMetadata : beanMethods) {configClass.addBeanMethod(new BeanMethod(methodMetadata, configClass));}// 获取接口中的默认方法,1.8以上的处理逻辑for (SourceClass ifc : sourceClass.getInterfaces()) {beanMethods = ifc.getMetadata().getAnnotatedMethods(Bean.class.getName());for (MethodMetadata methodMetadata : beanMethods) {if (!methodMetadata.isAbstract()) {// A default method or other concrete method on a Java 8+ interface...configClass.addBeanMethod(new BeanMethod(methodMetadata, configClass));}}}// Process superclass, if any//如果该类有父类,则继续返回。上层方法判断不为空,则继续递归执行。if (sourceClass.getMetadata().hasSuperClass()) {String superclass = sourceClass.getMetadata().getSuperClassName();if (!superclass.startsWith("java") && !this.knownSuperclasses.containsKey(superclass)) {this.knownSuperclasses.put(superclass, configClass);// Superclass found, return its annotation metadata and recursereturn sourceClass.getSuperClass();}}// No superclass -> processing is complete//递归实现,superclass为空,则结束递归中的循环return null;}
来看一下获取导入配置类的逻辑:
processImports(configClass, sourceClass, getImports(sourceClass), true);
自定义配置都在 getImports() 中执行。。。。
4)开始执行 SpringBoot 默认配置逻辑
继续回到ConfigurationClassParser中的parse方法,回到该方法的最后一步:
public void parse(Set<BeanDefinitionHolder> configCandidates) {// ...this.deferredImportSelectorHandler.process();}//deferredImportSelectorHandler 是定义在ConfigurationClassParser 类中的一个内部类private final DeferredImportSelectorHandler deferredImportSelectorHandler = new DeferredImportSelectorHandler();
继续跟进process()方法:
public void process() {List<DeferredImportSelectorHolder> deferredImports = this.deferredImportSelectors;this.deferredImportSelectors = null;try {if (deferredImports != null) {DeferredImportSelectorGroupingHandler handler = new DeferredImportSelectorGroupingHandler();deferredImports.sort(DEFERRED_IMPORT_COMPARATOR);deferredImports.forEach(handler::register);handler.processGroupImports();}}finally {this.deferredImportSelectors = new ArrayList<>();}}}//public void processGroupImports() {for (DeferredImportSelectorGrouping grouping : this.groupings.values()) {grouping.getImports().forEach(entry -> {ConfigurationClass configurationClass = this.configurationClasses.get(entry.getMetadata());try {processImports(configurationClass, asSourceClass(configurationClass),asSourceClasses(entry.getImportClassName()), false);}catch (BeanDefinitionStoreException ex) {throw ex;}catch (Throwable ex) {throw new BeanDefinitionStoreException("Failed to process import candidates for configuration class [" +configurationClass.getMetadata().getClassName() + "]", ex);}});}}
getImports()方法中有两个比较核心的方法,第一个proces()方法中听过调用会加载所有的SpringBoot的自动配置类,第二个方法:selectImports(),返回EnableAutoConfigurationImportSelector
public Iterable<Group.Entry> getImports() {for (DeferredImportSelectorHolder deferredImport : this.deferredImports) {this.group.process(deferredImport.getConfigurationClass().getMetadata(),deferredImport.getImportSelector());}return this.group.selectImports();}}
继续跟进this.group.process(), 具体实现类为:AutoConfigurationImportSelector
public void process(AnnotationMetadata annotationMetadata, DeferredImportSelector deferredImportSelector) {Assert.state(deferredImportSelector instanceof AutoConfigurationImportSelector,() -> String.format("Only %s implementations are supported, got %s",AutoConfigurationImportSelector.class.getSimpleName(),deferredImportSelector.getClass().getName()));AutoConfigurationEntry autoConfigurationEntry = ((AutoConfigurationImportSelector) deferredImportSelector).getAutoConfigurationEntry(getAutoConfigurationMetadata(), annotationMetadata);this.autoConfigurationEntries.add(autoConfigurationEntry);for (String importClassName : autoConfigurationEntry.getConfigurations()) {this.entries.putIfAbsent(importClassName, annotationMetadata);}}
继续跟进getAutoConfigurationEntry()方法,在此方法中将会看到加载了SpringBoot 中定义的全部配置类,然后进行排除等处理得到最后真正需要使用的配置类
protected AutoConfigurationEntry getAutoConfigurationEntry(AutoConfigurationMetadata autoConfigurationMetadata,AnnotationMetadata annotationMetadata) {if (!isEnabled(annotationMetadata)) {return EMPTY_ENTRY;}AnnotationAttributes attributes = getAttributes(annotationMetadata);// 获取得到springboot 定义的全部自动配置项List<String> configurations = getCandidateConfigurations(annotationMetadata, attributes);configurations = removeDuplicates(configurations);Set<String> exclusions = getExclusions(annotationMetadata, attributes);checkExcludedClasses(configurations, exclusions);configurations.removeAll(exclusions);configurations = filter(configurations, autoConfigurationMetadata);fireAutoConfigurationImportEvents(configurations, exclusions);return new AutoConfigurationEntry(configurations, exclusions);}
获取得到SpringBoot 在sprig.factories 文件中配置的全部配置项
protected List<String> getCandidateConfigurations(AnnotationMetadata metadata, AnnotationAttributes attributes) {List<String> configurations = SpringFactoriesLoader.loadFactoryNames(getSpringFactoriesLoaderFactoryClass(),getBeanClassLoader());Assert.notEmpty(configurations, "No auto configuration classes found in META-INF/spring.factories. If you "+ "are using a custom packaging, make sure that file is correct.");return configurations;}protected Class<?> getSpringFactoriesLoaderFactoryClass() {// 定义在sprig.factories 中的配置项return EnableAutoConfiguration.class;}
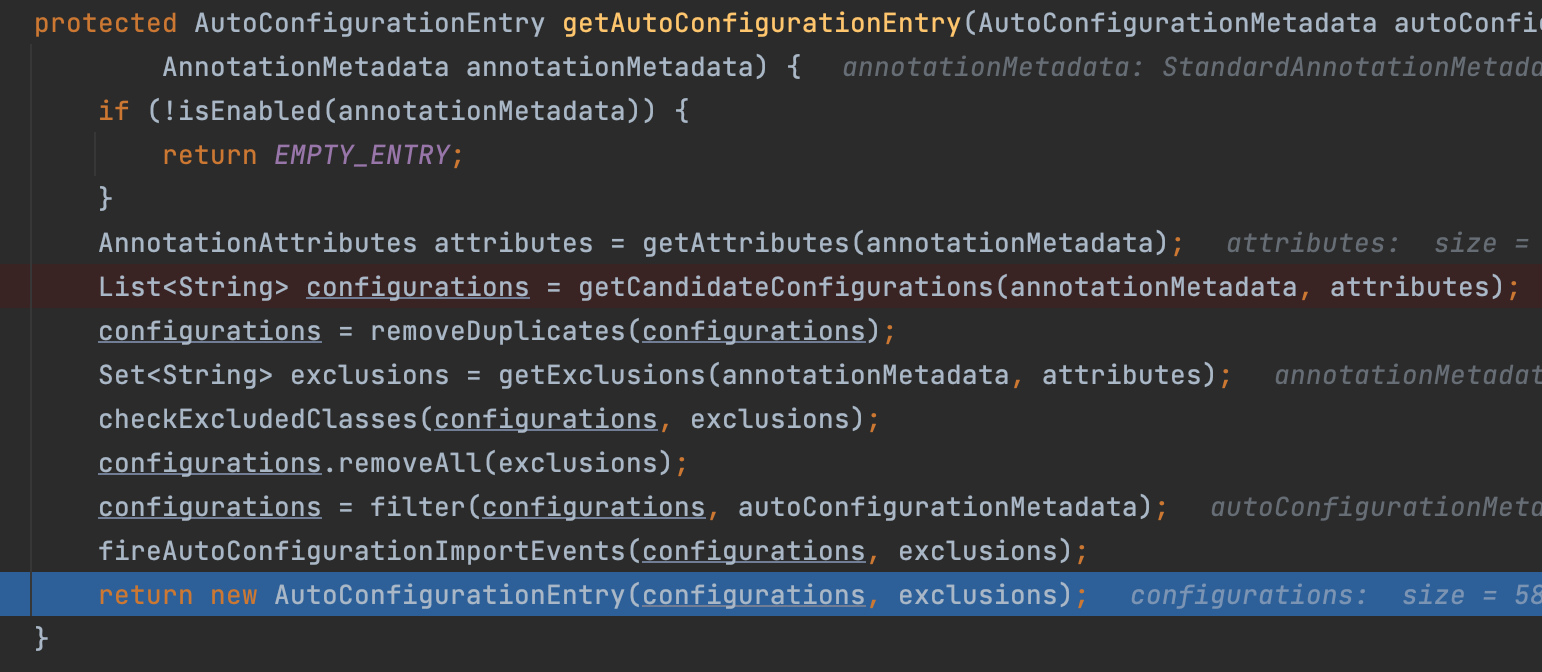
configurations集合大小就是SpringBoot 定义的全部和项目中的自定义对象,从全部124个到处理之后只有58个对象如下图: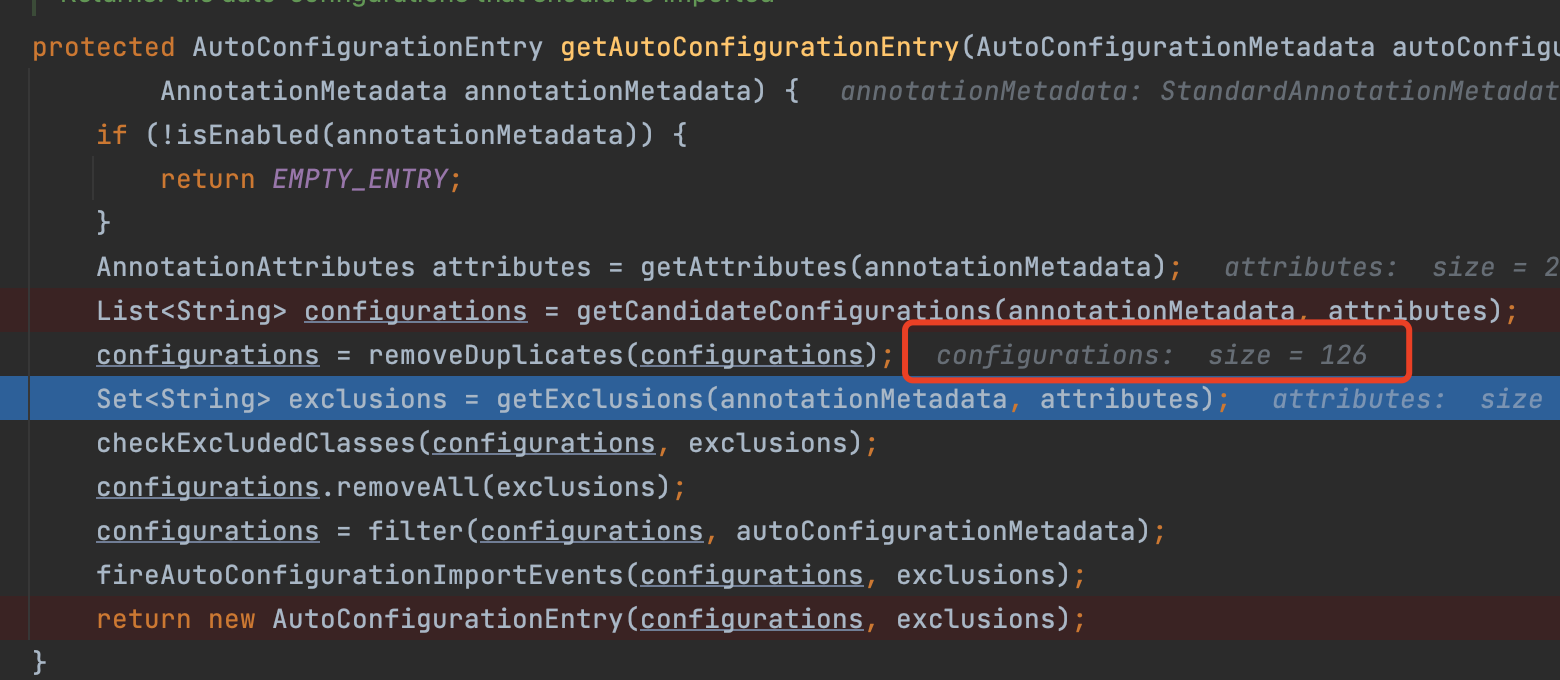
上面分析说过getImports()中有两个核心方法,看完第一个proces()方法,接下来我继续跟进selectImports()方法
public Iterable<Entry> selectImports() {if (this.autoConfigurationEntries.isEmpty()) {return Collections.emptyList();}Set<String> allExclusions = this.autoConfigurationEntries.stream().map(AutoConfigurationEntry::getExclusions).flatMap(Collection::stream).collect(Collectors.toSet());Set<String> processedConfigurations = this.autoConfigurationEntries.stream().map(AutoConfigurationEntry::getConfigurations).flatMap(Collection::stream).collect(Collectors.toCollection(LinkedHashSet::new));processedConfigurations.removeAll(allExclusions);return sortAutoConfigurations(processedConfigurations, getAutoConfigurationMetadata()).stream().map((importClassName) -> new Entry(this.entries.get(importClassName), importClassName)).collect(Collectors.toList());}
最后返回的配置类
�
在获取到springBoot提供的配置后,再次调用processImports方法进行递归解析,根据我们自定义的配置文件,进行选择性配置。
这么多的配置类,不可能全部进行加载,项目也用不了这么多。选择的规则是什么呢?
