- Use With Objects
- https://ramdajs.com/docs/#lensProp Object">https://ramdajs.com/docs/#lensProp Object
- https://ramdajs.com/docs/#view Object">https://ramdajs.com/docs/#view Object
- https://ramdajs.com/docs/#set Object">https://ramdajs.com/docs/#set Object
- https://ramdajs.com/docs/#over Object">https://ramdajs.com/docs/#over Object
Use With Objects

与对象一起使用 镜头聚焦于数据结构的一部分。
它们是可组合的,提供了阅读/更新重点文章的好方法(5分钟(阅读)
希望最后几次练习对你有挑战。现在让我们坐下来,沉浸在更多的理论中。
Lenses focus on a piece of a data structure. They’re composable and provide great ways to read/update the focused piece. (5 min. read)
Hopefully the last few exercises challenged you. Now let’s sit back and soak in some more theory.
https://ramdajs.com/docs/#lensProp Object
String → Lens s a
Lens s a = Functor f => (a → f a) → s → f s
返回焦点为指定属性的镜头。
Parameters
Added in v0.14.0
Returns a lens whose focus is the specified property.
See also view, set, over.
const xLens = R.lensProp('x');R.view(xLens, {x: 1, y: 2}); //=> 1R.set(xLens, 4, {x: 1, y: 2}); //=> {x: 4, y: 2}R.over(xLens, R.negate, {x: 1, y: 2}); //=> {x: -1, y: 2}
https://ramdajs.com/docs/#view Object
Lens s a → s → a
Lens s a = Functor f => (a → f a) → s → f s
Parameters
Added in v0.16.0
Returns a “view” of the given data structure, determined by the given lens. The lens’s focus determines which portion of the data structure is visible.
返回由给定镜头确定的给定数据结构的“视图”。镜头的焦点决定了数据结构的哪一部分是可见的。 另请参见道具、lensIndex、lensProp。
See also prop, lensIndex, lensProp.
const xLens = R.lensProp('x');R.view(xLens, {x: 1, y: 2}); //=> 1R.view(xLens, {x: 4, y: 2}); //=> 4
Lenses
Like the name implies, lenses let you “zoom in” on a particular piece of a data structure.
Getters
Let’s use good ol’ Bobo as an example.
镜头 顾名思义,镜头可以让您“放大”数据结构的特定部分。 吸气剂 让我们以好的ol’Bobo为例。
import { lensProp, view } from 'ramda';const person = {firstName: 'Bobo',lastName: 'Flakes'};const fNameLens = lensProp('firstName');const result = view(fNameLens, person);console.log({ result });
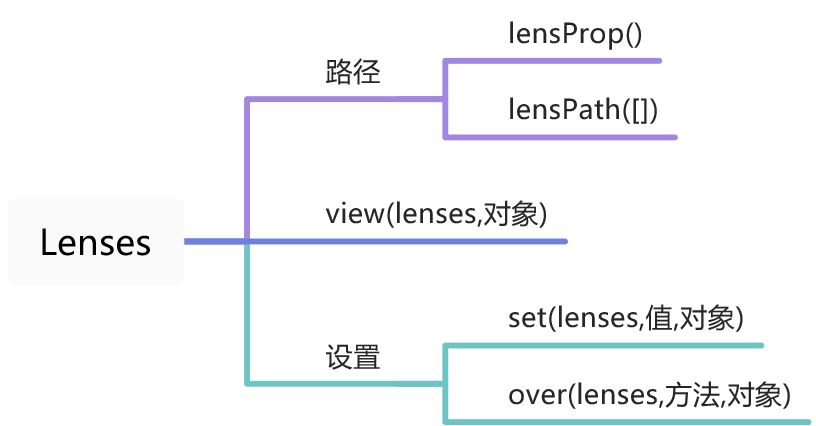
lensProp creates a lens focused on an object’s property. In this case, fNameLens will find any object’s firstName property. Passing it to view with our person returns Bobo’s first name.
lensProp创建聚焦于对象属性的镜头。在本例中,fNameLens将查找任何对象的firstName属性。将其传递给我们的人查看会返回Bobo的名字。
https://ramdajs.com/docs/#set Object
Lens s a → a → s → s
Lens s a = Functor f => (a → f a) → s → f s
Parameters
Added in v0.16.0
Returns the result of “setting” the portion of the given data structure focused by the given lens to the given value.
See also prop, lensIndex, lensProp.
Object
Lens s a → a → s → s
Lens s a = Functor f => (a → f a) → s → f s
Parameters
Added in v0.16.0
Returns the result of “setting” the portion of the given data structure focused by the given lens to the given value.
See also prop, lensIndex, lensProp.
返回将给定数据结构中由给定镜头聚焦的部分“设置”为给定值的结果。
const xLens = R.lensProp('x');R.set(xLens, 4, {x: 1, y: 2}); //=> {x: 4, y: 2}R.set(xLens, 8, {x: 1, y: 2}); //=> {x: 8, y: 2}
Setters
Changing Bobo’s first name is just as easy. Use set with your desired change.
import { lensProp, set } from 'ramda';const person = {firstName: 'Bobo',lastName: 'Flakes'};const fNameLens = lensProp('firstName');const result = set(fNameLens, 'Bobo Jr.', person);console.log({ person });console.log({ result });{ person: { firstName: 'Bobo', lastName: 'Flakes' } }{ result: { firstName: 'Bobo Jr.', lastName: 'Flakes' } }
If you’d like to change it using a function, over can help.
import { concat, lensProp, over } from 'ramda';const person = {firstName: 'Bobo',lastName: 'Flakes'};const fNameLens = lensProp('firstName');const result = over(fNameLens, concat('Mr. '), person);console.log({ person });console.log({ result });{ person: { firstName: 'Bobo', lastName: 'Flakes' } }{ result: { firstName: 'Mr. Bobo', lastName: 'Flakes' } }
Note that set and over didn’t mutate the original person object. Ramda functions don’t mutate their inputs but instead return a new output.
请注意,set和over并没有改变原始person对象。Ramda函数不会改变它们的输入,而是返回一个新的输出。
https://ramdajs.com/docs/#over Object
Lens s a → (a → a) → s → s
Lens s a = Functor f => (a → f a) → s → f s
Parameters
Added in v0.16.0
Returns the result of “setting” the portion of the given data structure focused by the given lens to the result of applying the given function to the focused value.
See also prop, lensIndex, lensProp.
将给定透镜聚焦的给定数据结构部分的“设置”结果返回到将给定函数应用于聚焦值的结果。 另请参见道具、lensIndex、lensProp。
const headLens = R.lensIndex(0);R.over(headLens, R.toUpper, ['foo', 'bar', 'baz']); //=> ['FOO', 'bar', 'baz']
Nested Properties
Lenses are great for safely changing nested properties without a ton of merging code.
Using plain JS, how would you immutably change Bobo’s manager’s last name to “Flakes”? Probably something like this
嵌套属性
镜头非常适合安全地更改嵌套属性,而无需大量合并代码。
使用纯JS,您如何将Bobo经理的姓氏永久更改为“Flakes”?可能是这样的
const person = {firstName: 'Bobo',lastName: 'Flakes',company: 'Fake Inc.',position: {title: 'Front-End Developer',department: {name: 'Product',departmentManager: {firstName: 'Bobo Sr.',lastName: 'Flax'}}}};const correctPerson = {...person,position: {...person.position,department: {...person.position.department,departmentManager: {...person.position.department.departmentManager,lastName: 'Flakes'}}}};const correctedLastName = correctPerson.position.department.departmentManager.lastName;console.log({ correctedLastName });{ correctedLastName: 'Flakes' }
Not too pretty, even with ES6 spread. Let’s try lenses.
不太漂亮,即使有ES6传播。让我们试试隐形眼镜。
import { lensPath, set, view } from 'ramda';const person = {firstName: 'Bobo',lastName: 'Flakes',company: 'Fake Inc.',position: {title: 'Front-End Developer',department: {name: 'Product',departmentManager: {firstName: 'Bobo Sr.',lastName: 'Flax'}}}};const managerLastNameLens = lensPath(['position','department','departmentManager','lastName']);const correctPerson = set(managerLastNameLens, 'Flakes', person);const correctedLastName = view(managerLastNameLens, correctPerson);console.log({ correctedLastName });
Much cleaner. One bonus is that since it’s curried, a single lens can be used to view and update a property. We used managerLastNameLens in both set and view.
干净多了。一个好处是,因为它是curred,一个镜头可以用来查看和更新一个属性。我们在set和view中都使用了managerLastNameLens。

