安装 uwsgi(此路不通)
pip install uwsgi # 安装uwsgi --version # 插件安装版本
AttributeError: module ‘os’ has no attribute ‘uname’
问题原因
在 Windows 上使用 pip 安装 uwsgi 会遇到这个问题。
是因为 uwsgiconfig.py 文件中,os.uname() 是不支持 Windows 系统导致的。
解决方法
- 离线下载 uwsgi:https://pypi.org/project/uWSGI/#files
- 替换以下代码:
```python
被替换(从第5行开始)
import os import re import time uwsgios = os.uname()[0] uwsgi_os_k = re.split(‘[-+]’, os.uname()[2])[0] uwsgi_os_v = os.uname()[3] uwsgi_cpu = os.uname()[4]
替换成(从第5行开始)
import os import re import time import platform uwsgios = platform.uname()[0] uwsgi_os_k = re.split(‘[-+]’, platform.uname()[2])[0] uwsgi_os_v = platform.uname()[3] uwsgi_cpu = platform.uname()[4]
3. 保存后进入 uwsgi 目录,运行 `python setup.py install`4. 如果提示 `Exception: you need a C compiler to build uWSGI` 可参考此小标题并安装 C 编译环境5. 安装完成后再次运行 `python setup.py install`<a name="YPymY"></a>## Exception: you need a C compiler to build uWSGI本机上没有 C 编译环境,需要下载一个编译器,推荐MinGW。<a name="Gtp0j"></a>### 线上安装 MinGW-w64> [https://zhuanlan.zhihu.com/p/76613134](https://zhuanlan.zhihu.com/p/76613134)1. 下载地址:[https://sourceforge.net/projects/mingw-w64/files/Toolchains%20targetting%20Win32/Personal%20Builds/mingw-builds/installer/mingw-w64-install.exe/download](https://sourceforge.net/projects/mingw-w64/files/Toolchains%20targetting%20Win32/Personal%20Builds/mingw-builds/installer/mingw-w64-install.exe/download)2. 打开安装程序,下一步,出现选项时按以下填写(Windows x64),完成后一直下一步: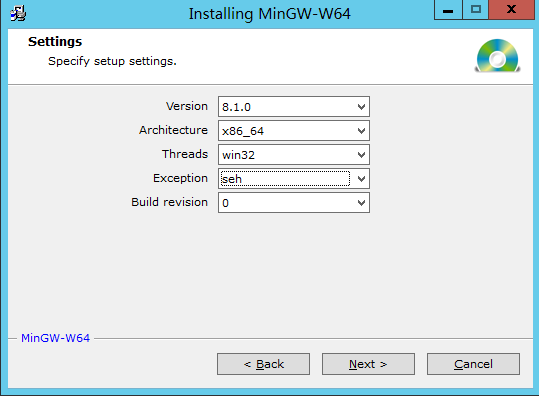3. 如果 Downloading file... 时间过长可以通过以下方式自行安装<a name="sDwzd"></a>### 自行安装 MinGW-w64> [https://zhuanlan.zhihu.com/p/76613134](https://zhuanlan.zhihu.com/p/76613134)1. 下载地址:[https://www.jb51.net/softs/696088.html#downintro2](https://www.jb51.net/softs/696088.html#downintro2)2. 解压文件到安装目录3. 复制安装目录下,`bin` 文件夹地址4. 添加到 PATH 环境变量:1. 右键“计算机”-> 属性 -> 高级系统设置 -> 高级 -> 环境变量2. 用户变量 -> PATH -> 编辑3. 最后输入 `;` + `bin` 文件夹地址4. 一路确定5. 重新打开 Powershell,输入 `gcc -v` 查看是否成功<a name="X9Gp9"></a>### 自行安装 Cygwin(官方推荐)> [https://uwsgi-docs.readthedocs.io/en/latest/SupportedPlatforms.html?highlight=windows](https://uwsgi-docs.readthedocs.io/en/latest/SupportedPlatforms.html?highlight=windows)> [https://blog.csdn.net/lvsehaiyang1993/article/details/81027399](https://blog.csdn.net/lvsehaiyang1993/article/details/81027399)1. 下载地址:[http://www.cygwin.com/setup-x86_64.exe](http://www.cygwin.com/setup-x86_64.exe)2. 选择 直接连接,不选 Proxy3. 在镜像源列表中可添加:`https://mirrors.aliyun.com/cygwin`(参考:[https://cygwin.com/mirrors.html](https://cygwin.com/mirrors.html))4. 选中源后下载,安装选 ALL<a name="i5bdy"></a>## fatal error: <sys/socket.h>: No such file or directory> [https://stackoverflow.com/questions/25736266/fatal-error-sys-socket-h-no-such-file-or-directory-x86-64-w64-mingw32-mode](https://stackoverflow.com/questions/25736266/fatal-error-sys-socket-h-no-such-file-or-directory-x86-64-w64-mingw32-mode)替换成 `winsock2.h`<a name="gWY65"></a># Windows + Nginx 最简单部署1. 程序目录下:`python mange.py runserver`2. `nginx.conf` 设置代理:```nginxserver {listen 8000;server_name localhost;location / {proxy_pass http://127.0.0.1:8000;proxy_read_timeout 600;proxy_set_header Host $host;proxy_set_header X-Real_IP $remote_addr;proxy_set_header X-Forwarded-For $proxy_add_x_forwarded_for;}}
- 开启防火墙规则 8000 端口
- 通过 IP + 8000 端口即可访问

若有收获,就点个赞吧
0 人点赞
