连接到cn psql -h 172.16.0.42 -p 11387 -d postgres -U tbase
一、表
1 创建表
创建shard普通表
create table public.t1(f1 int not null,f2 varchar(20),primary key(f1)) distribute by shard(f1) to group default_group;
shard(f1)表时布键为f1字段,如果没有指定分布键,主键f1做shard key,如果没有指定主键,也没指定分布键,则默认第―个字段为分布键。
distribute by shard(x) 用于指定分布键,数据分布于那个节点就是根据这个字段值来计算分片
to group xxx:指定存储组(每个存储组可以有多个节点)
分布键字段值不能修改,字段长度不能修改,字段类型不能修改。
- 创建shard分区表
create table public.t1_pt (f1 int not null,f2 timestamp not null,f3 varchar(20),primary key(f1)) partition by range (f2)begin (timestamp without time zone '2019-01-01 0:0:0')step (interval '1 month')partitions (3)distribute by shard(f1) to group default_group;
partition by range (x) 用于指定分区键,支持 timesamp,int 类型,数据分布于那个子表就是根据这个字段值来计算分区。begin( xxx )指定开始分区的时间点。
step(xxx)指定分区有周期。
partions(xx)初始化时建立分区子表个数。
增加分区子表的方法 ALTER TABLE public.t1_pt ADD PARTITIONS 2;
创建 shard 冷热分区表
create table public.t1_cold_hot (f1 int not null,f2 timestamp not null,f3 varchar(20),primary key(f1)) partition by range (f2)begin (timestamp without time zone '2017-01-01 0:0:0')step (interval '12 month')partitions (4)distribute by shard(f1,f2)to group default_group cold_group;
Distribute By SHARD(f1,f2) 冷热分区表需要指定两个字段来做路由,分别是分布键和分区键。
to group default_group cold_group 需要指定两个存储组,第一个是热数据存储组,第二个是冷存储组。
创建时间范围冷热分区表需要有两个 group,冷数据的 cold_group 对应的节点需要标识为冷节点
这里连接的是 DN 节点,如果有主备,主备都要连接执行
select pg_set_node_cold_access();
冷热分区表需要在 postgresql.conf 中配置冷热分区时间参数和分区级别
cold_hot_sepration_mode = 'year'enable_cold_seperation = truemanual_hot_date = '2019-01-01'
创建复制表
postgres=# create table public.t1_rep (f1 int not null,f2 varchar(20),primary key(f1)) distribute by replicationto group default_group;
经常要跨库 JOIN 的小数据量表可以考虑使用复制表。
复制表是所有节点都有全量数据,对于大数据量的数据表不适合。
复制表更新性能较低。
注意更新值不要推到 DN 上去计算取值,因为这样可能导致各个 DN 的数据不一致。
2 查看表
注意:以\开头的命令只能在psql里面运行,无法在TStudio和sql工具中使用
- 查看所有表
\dt\dt+
or
SELECT schemaname,tablename FROM pg_tables;
- 查询表结构
输入\d+ 表名,可以显示表结构,分布键信息
\d+ public.t1
或
SELECT a.attnum,a.attname AS field,t.typname AS type,a.attlen AS length,a.atttypmod AS lengthvar,a.attnotnull AS notnull,b.description AS commentFROM pg_class c,pg_attribute aLEFT OUTER JOIN pg_description b ON a.attrelid=b.objoid AND a.attnum = b.objsubid,pg_type tWHERE c.relname = 't1' --tablename: t1and a.attnum > 0and a.attrelid = c.oidand a.atttypid = t.oidORDER BY a.attnum
通过relname=表名 来查询某表的结构
--查询用户表,获取oidSELECT a.oid,a.relname AS name,b.description AS commentFROM pg_class aLEFT OUTER JOIN pg_description b ON b.objsubid=0 AND a.oid = b.objoidWHERE a.relnamespace = (SELECT oid FROM pg_namespace WHERE nspname='public') --用户表一般存储在public模式下AND a.relkind='r'ORDER BY a.relnameSELECT a.attname AS field,t.typname AS type,a.attlen AS length,a.atttypmod AS lengthvar,a.attnotnull AS notnull,b.description AS commentFROM pg_attribute aLEFT OUTER JOIN pg_description b ON a.attrelid=b.objoid AND a.attnum = b.objsubid,pg_type tWHERE a.attnum > 0and a.attrelid = 16768 --oid 通过oid查询对应表表结构and a.atttypid = t.oidORDER BY a.attnum
3、DML 相关操作
3.1 INSERT
- 插入多条记录
CREATE TABLE public.t1_insert_mul (f1 int not null,f2 varchar(20),primary key(f1))distribute by shard(f1)to group default_group;INSERT INTO t1_insert_mul VALUES(1,'Tbase'),(2,'pg');
- 插入更新
create table public.t1_conflict (f1 int not null,f2 varchar(20),primary key(f1)) distribute by shard(f1)to group default_group;# 插入更新insert into t1_conflict values(1,'tbase') ON CONFLICT (f1) DO UPDATE SET f2 = 'tbase';
create table public.t1_conflict (f1 int not null,f2 varchar(20) not null,f3 int ,primary key(f1,f2))distribute by shard(f1) to group default_group;insert into t1_conflict values(1,'tbase',2) ON CONFLICT (f1,f2) DO UPDATE SET f3 = 2;
- 插入返回
create table public.t1_insert_return (f1 int not null,f2 varchar(20) not null default 'tbase',primary key(f1)) distribute by shard(f1)to group default_group;insert into t1_insert_return values(1) returning *;
INSERT 更多的使用方法请参考 Postgresql 用法
http://www.postgres.cn/docs/10/sql-insert.html
3.2 UPDATE
- 基于分布键条件更新
create table public.t1_update_pkey (f1 int not null,f2 varchar(20) not null default 'tbase',f3 varchar(32),primary key(f1))distribute by shard(f1)to group default_group;explain UPDATE t1_update_pkey SET f2='tbase' where f1=1;
性能最优,扩展性好
- 非分布键更新
explain UPDATE t1_update_pkey SET f2='tbase' where f3='pg';
更新语句发往所有节点
- 分区表带分区条件更新
create table public.t1_pt_update (f1 int not null,f2 timestamp not null,f3 varchar(20),primary key(f1)) partition by range (f2)begin (timestamp without time zone '2019-01-01 0:0:0')step (interval '1 month')partitions (2)distribute by shard(f1)to group default_group;explain update t1_pt_updateset f3='tbase'wheref1=1andf2>'2019-01-01'andf2<'2019-02-01';
带分区条件更新,性能最优,扩展性好
- 分区表不带分区条件更新
explain update t1_pt_update set f3='tbase' where f1=1;
需要扫描所有分区子表
- 关联表更新 ```sql create table public.t1_update_join1 ( f1 int not null, f2 varchar(20) not null default ‘tbase’, primary key(f1) )distribute by shard(f1) to group default_group;
create table public.t1_update_join2 ( f1 int not null, f2 varchar(20) not null default ‘tbase’, primary key(f1) )distribute by shard(f1) to group default_group;
update t1_update_join1 set f2=’pg’ from t1_update_join2 where t1_update_join1.f1=t1_update_join2.f1;
表关联更新只能是基于分布键关联- **分布键,分区键不能更新**目前的解决办法“删除旧记录,再新增记录”<br />更多update使用方法参考[http://www.postgres.cn/docs/10/sql-update.html](http://www.postgres.cn/docs/10/sql-update.html)<a name="CKXEA"></a>#### 3.3 **DELETE**- 删除返回记录```sqlcreate table public.t1_delete_return (f1 int not null,f2 varchar(20) not null default 'tbase',primary key(f1))distribute by shard(f1)to group default_group;insert into t1_delete_return values(1,'tbase');delete from t1_delete_return where f1=1 returning *;
- UPDATE 最优使用方法同样适合于 DELETE
DELETE 更多的使用方法见
http://www.postgres.cn/docs/10/sql-delete.html
3.4 SELECT
- 基于分布键查询
create table public.t1_select (f1 int not null,f2 varchar(20) not null default 'tbase',f3 varchar(32), primary key(f1))distribute by shard(f1)to group default_group;explain select * from t1_select where f1=1;
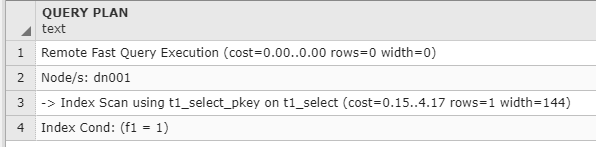
性能最优,扩展性好
- 非分布键查询
explain select * from t1_select where f1<3;
查询语句发往所有节点,然后在 CN 汇总
- 分布键 JOIN 查询 ```sql create table public.t1_select_join1 ( f1 int not null, f2 int,primary key(f1) ) distribute by shard(f1) to group default_group;
create index t1_select_join1_f2_idx on t1_select_join1(f2);
create table public.t1_select_join2 ( f1 int not null, f2 int,primary key(f1) ) distribute by shard(f1) to group default_group;
create index t1_select_join2_f2_idx on t1_select_join2(f2);
```sqlexplain select t1_select_join1.* from t1_select_join1,t1_select_join2where t1_select_join1.f1=t1_select_join2.f1 and t1_select_join1.f1=1;
非分布键 JOIN 查询
explain select * from t1_select_join1,t1_select_join2where t1_select_join1.f1=t1_select_join2.f2 and t1_select_join1.f2=1 ;
3.5 TRUNCATE
普通表 truncate
create table public.t1_delete_truncate (f1 int not null,f2 varchar(20) not null default 'tbase',primary key(f1)) distribute by shard(f1)to group default_group;insert into t1_delete_truncate select t,t::text from generate_series(1,1000000) as t;
truncate table t1_delete_truncate;
- 分区表 truncate
create table public.t1_pt (f1 int not null,f2 timestamp not null,f3 varchar(20),primary key(f1))partition by range (f2)begin (timestamp without time zone '2019-01-01 0:0:0')step (interval '1 month')partitions (3)distribute by shard(f1)to group default_group;
truncate public.t1_pt partition for ('2019-01-01' ::timestamp without time zone);

若有收获,就点个赞吧
0 人点赞
