今天要讨论的问题是数组 slice 的问题。slice 是一个很方便也很强大的功能,不论是python内建的数据类型 list 和 tuple 还是 numpy 的 numpy.ndarray 、pytorch的 torch.Tensor 抑或是 tensorflow 中的数组都支持该功能,但在实现上有差别。本节将主要针对 python内建数据类型 list 和 numpy 数据类型 numpy.ndarray 在进行slice的差别进行说明。
前言
踩这个坑的场景是实现图像裁剪,当时为了更好地自定义就自己动手实现。对于给定的图像,先将图像用 skimage.io 读入 numpy.ndarray 数组,然后将数组输入函数根据需要在图像中裁剪出部分区域,裁剪的部分是以 numpy.ndarray 数组切片(slice)的形式返回的。这种方式后来发现存在Bug,当我们对返回的区域进行修改的时候,原图对应部分也发生了变化,我们希望裁剪出的图像区域与原图保持独立,彼此互不影响。导致这个Bug的原因就是对 numpy.ndarray 切片的使用不当,由于我们在函数内部并没有任何实际创建新 numpy.ndarray 对象的操作,当我们对输入图像进行切片操作的时候,Numpy 默认返回的是 numpy.ndarray 的视图(view),视图只是对原数据的引用,对视图数据的修改会直接反应到原数据上;而 Python 切片操作会创建一个新的对象,新对象与原数据彼此独立。
什么是切片
在 Python 里切片 slice 是一种特殊的类型,构造函数为 slice(start, stop, step) ,其中 start 默认为0,step 默认为1.
type(slice) # 返回<class 'type'>x = slice(10) # 创建终止索引为10的 slice 对象type(x) # 返回<class 'slice'>
slice 对象用于定义如何对序列(sequence)进行切片,在切片操作时索引值在 range(start, stop, step) 内的元素将被取出。Python 内建类型中 list tuple string bytes range 均支持切片操作,其他实现了 __len__() __getitem__() 函数的类型也支持切片操作。
正确使用切片
和其他语言去数组元素的方式一样, Python支持通过元素在序列中的索引进行访问,索引值时0开始的。除常规正常索引值外,Python还 支持使用负索引值对序列进行反向索引 。例如 a=[1,2,3] 是一个普通的 list ,常规正向索引值为 0,1,2 ,其反向索引值为 -1,-2,-3 ,即 a[2] 和 a[-1] 都取值数组的最后一个元素。反向索引很方便,当我们不知道序列长度但又想取最后元素时,直接使用负索引就能快速搞定。
另外,Python序列对象还接受使用 slice 对象作为索引,indices must be integers or slices 。
x = "python"print(x[slice(5)]) # 取前五个字符 "pytho"
Python 序列对象支持简化 slice 对象书写,比如 x[i:j:k] 等价于 x[slice(i, j, k)] ,其中 i, j, k 值都是可选的。下面这段来自Numpy的文档很清楚地描述了各个量的关系:
The basic slice syntax is
i:j:kwhere i is the starting index, j is the stopping index, and k is the step (k is not zero). This selects the m elements (in the corresponding dimension) with index values i, i + k, …, i + (m - 1) k where m=q+r and q and r are the quotient and remainder obtained by dividing j - i by k: j - i = q k + r, so that i + (m - 1) k < j.Negative i and j are interpreted as n + i and n + j where n is the number of elements in the corresponding dimension. Negative k makes stepping go towards smaller indices.
Then, if i is not given it defaults to 0 for k > 0 and n - 1 for k < 0 . If j is not given it defaults to n for k > 0 and -n-1 for k < 0 . If k is not given it defaults to 1. Note that
::is the same as:and means select all indices along this axis.
我们来看个例子:
+---+---+---+---+---+---+| P | y | t | h | o | n |+---+---+---+---+---+---+0 1 2 3 4 5 6-6 -5 -4 -3 -2 -1## 使用正、反向索引x = "python"x[0] # "p"x[5] # "n"x[-1] # "n"x[-3] # "h"## 使用切片对象x[slice(0, 3, 1)] # "pyt"x[slice(None, 3, 1)] # "pyt"x[slice(3)] # "pyt"x[0:3:1] # "pyt"x[:3:1] # "pyt"x[:3] # "pyt"x[::] # "python"x[::-1] # "nohtyp"
Python 切片返回一个新的序列对象,由选区的元素组成 ,新序列对象和原序列对象彼此独立。在Python中我们可以通过对象的ID标识来查看对象是否共享数据。
Python 内建的切片原则只适用于一级序列,对嵌套序列或多为数组无效。
Numpy 切片操作
Numpy数组有很强大的切片能力,支持基本切片操作和高级切片操作。基本切片操作仅是 Python 内建切片在多维数组或嵌套序列上的拓展,通过 基本切片返回的是原数组的视图 。
x[obj] Basic slicing extends Python’s basic concept of slicing to N dimensions. Basic slicing occurs when obj is a slice object (constructed by
start:stop:stepnotation inside of brackets), an integer, or a tuple of slice objects and integers.All arrays generated by basic slicing are always views of the original array.
视图是一种引用,出于时间效率和空间效率考虑的产物,Numpy 中关于视图的解释是:
An array that does not own its data, but refers to another array’s data instead.
一张图弄懂视图和传统拷贝之间的关系 —- 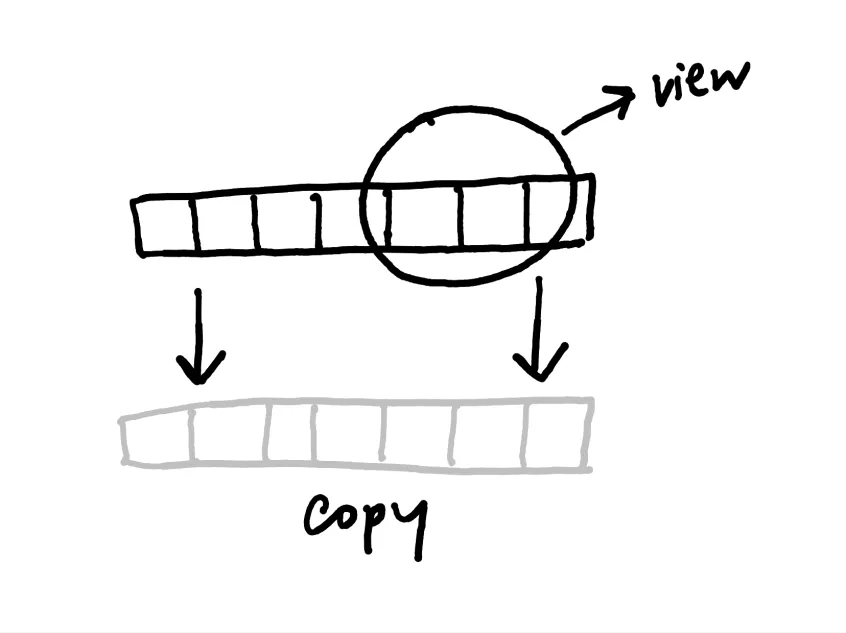
Numpy 还支持高级切片功能,高级切片返回的是数据的拷贝,而不是视图 。关于高级切片Numpy文档是这么说的:
x[obj] Advanced indexing is triggered when the selection object, obj, is a non-tuple sequence object, an ndarray (of data type integer or bool), or a tuple with at least one sequence object or ndarray (of data type integer or bool). There are two types of advanced indexing: integer and Boolean.
Advanced indexing always returns a copy of the data (contrast with basic slicing that returns a view).
关于从视图转为拷贝 :如果你只是想要拷贝,不想因为视图不小心修改了原数据,你总是可以选择调用 np.copy() 函数来生成拷贝数据;如果视图是可运算的数字类型,简单的数学运算也能生成新的拷贝 y= x[obj] + 0 。
Numpy 查看是拷贝还是视图 :视图是和元素组共享内存空间的,拷贝则使用不同的内存空间存相同的数据。要判断一个数组是视图还是拷贝,我们这里给出三种方法
数组的base属性,
b.base is a,True 如果数组b是数组a的视图调用
numpy.may_share_memory(a,b)方法,既然视图共享原数组数据,函数应返回True尝试修改shape属性,视图虽然共享原数组数据,可以通过视图修改原数组数据但不能通过视图修改原数据的shape属性
>>> a = np.zeros((10, 2))# A transpose make the array non-contiguous>>> b = a.T# Taking a view makes it possible to modify the shape without modiying the# initial object.>>> c = b.view()>>> c.shape = (20)AttributeError: incompatible shape for a non-contiguous array
章节重点
Python 切片返回数据拷贝,Numpy切片返回数据视图(一般情况下),通过视图可以修改原数据。Numpy支持高级切片功能,高级切片总是返回数据拷贝。我们可以显式调用 numpy.copy() 函数返回拷贝而不是视图。另外,我们还能通过 base 属性、 may_share_memory 函数 或尝试通过视图修改 shape 属性的方法来判断是视图还是拷贝。
参考资料:

若有收获,就点个赞吧
0 人点赞
