介绍
项目中常用 Webpack 构建 React 项目,但随着项目的依赖和架构越来越臃肿,无论是初始启动调试开发,或者构建依赖包都需要很长的时间,非常影响前端开发时的幸福感。
所以,Vue的作者尤雨溪开发基于原生系统ES模块的构建工具Vite@2,将应用的模块分为 依赖 和 源码 两类进行单独处理。
- 依赖:多数为ESM或者CommonJs模块依赖,例如 node_moduels 中的很多组件库,这些模块在开发时,几乎变化不大,所以Vite会将依赖拆分成大量的小模块系统中,不再进行编译处理。并且 Vite使用 ESBuild 预构建依赖,Esbuild使用Go编写,并且比以 JavaScript 编写的打包器预构建依赖快 10-100 倍。
- 源码:通常包含非JS文件,例如JSX、CSS或者Vue组件,并且变化较大,但不是所有的源码都同时被加载,可能存在路由分割页面代码。
Vite 将会议 原生ESM 方式服务源码,这实际上是让浏览器接管了打包程序的部分工作:Vite 只需要在浏览器请求源码时进行转换并按需提供源码。根据情景动态导入的代码,即只在当前屏幕上实际使用时才会被处理。
1. 基于Bundle包形式的构建开发流程

2. 基于 Native ESM 包形式的构建开发流程:
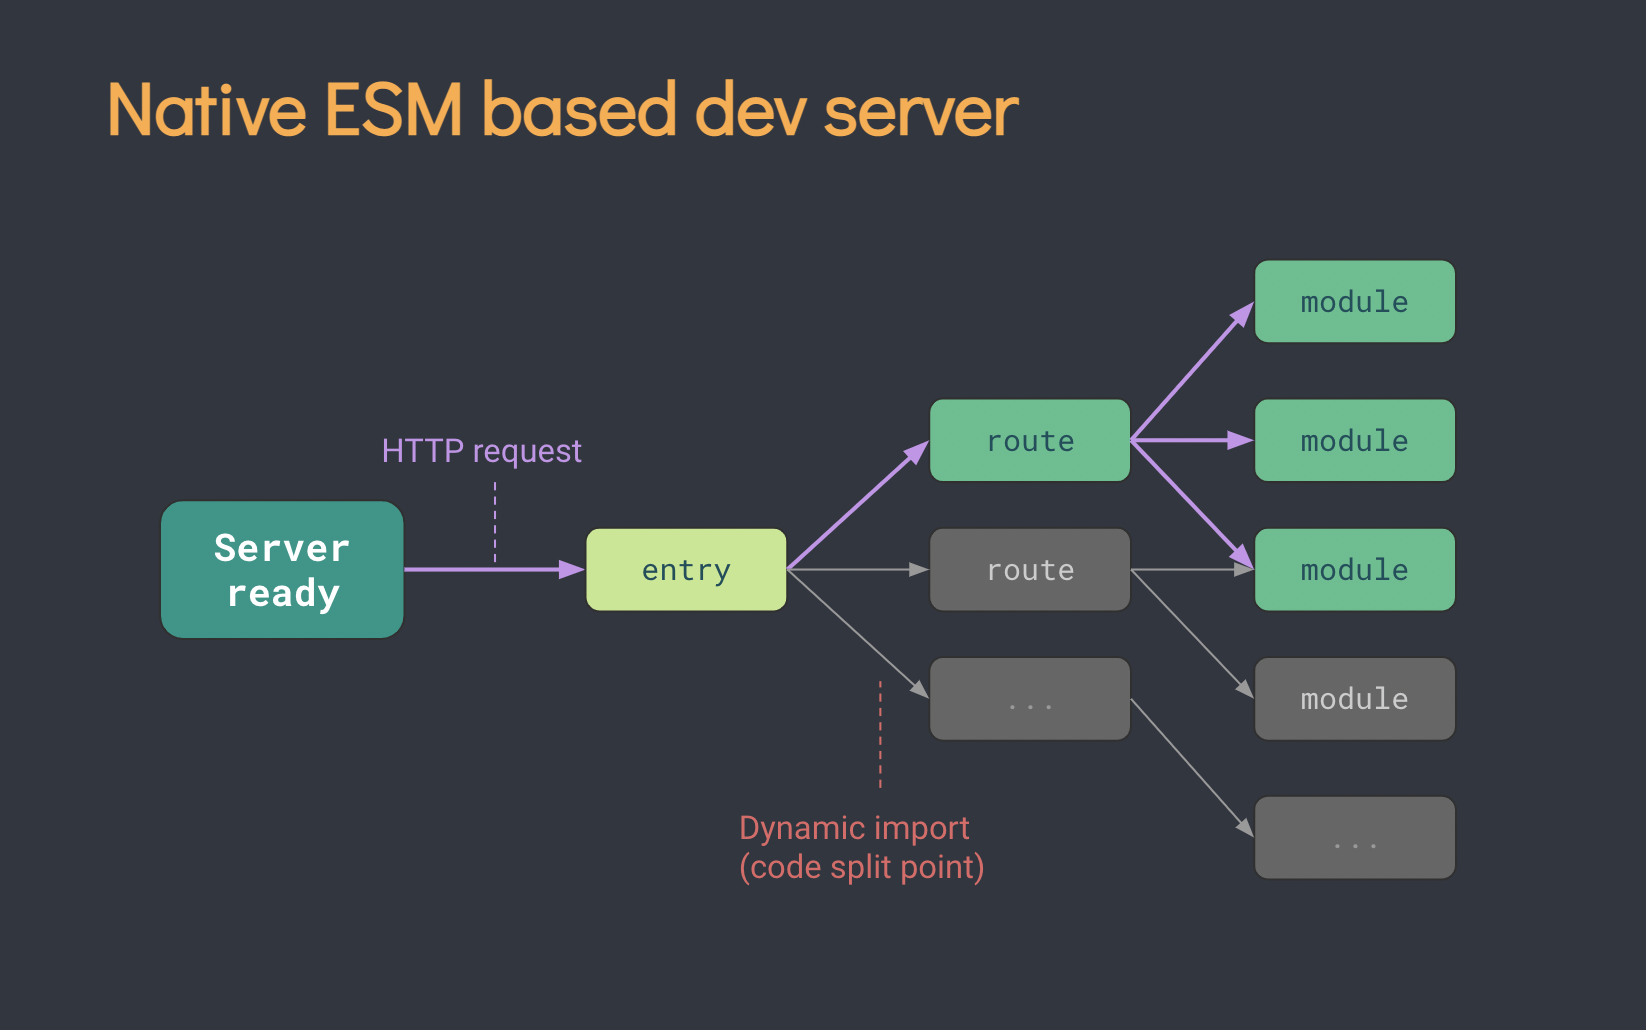
可以看到,使用Vite来处理源码包的构建,可以做到按需取用,按需构建和替换,能够加快构建速度。
开始搭建
环境
- Node12+
- yarn 1.22.10 +
技术栈
使用Vite@2创建React项目,使用的技术栈包含:
- React@17
- React-Router
- Antd@4
- Typescript
- Less —- 处理Antd的主题
- Sass —- 编写样式
工程化配置
其中项目配置包括:
- Antd的动态加载/打包
- Atnd的主题替换
- Alias别名
- 打包路径的更换
- 路由组件懒加载
初始化项目
yarn create @vitejs/app
通过上述命令创建 vite 项目,可以选择使用 react、typescript技术栈。
创建完成后,项目结构如下:
├── README.md├── dist│ ├── assets│ ├── favicon.svg│ ├── index.html│ └── logo.svg├── index.html├── package.json├── public│ ├── favicon.svg│ └── logo.svg├── src│ ├── About│ ├── App│ ├── Index│ ├── Route│ ├── main.tsx│ ├── source│ └── style├── tsconfig.json├── vite.config.ts└── yarn.lock
通过运行:
# 启动 dev 调试$ yarn dev# 启动构建$ yarn build# 启动构建server预览$ yarn server
上述运行完成后,可以感受到基于 Vite 的快速启动/热更新替换的效果,非常快。。。
入口文件
index.html是该 Vite 项目的入口文件, 在项目根目录。
<script type="module" src="/src/main.tsx"></script>
配置 React-Router
安装 react-router-dom 来处理单页面应用逻辑:
$ yarn add react-router-dom -S
- 在
src目录下创建 Route 目录,并创建index.ts文件,内容如下: ```typescript import { lazy } from ‘react’;
// 此处使用 react.lazy 进行组件懒加载 const Index = lazy(() => import(‘../Index’)); const About = lazy(() => import(‘../About’));
const routes = [ { path: “/“, component: Index }, { path: “/about”, component: About } ];
export default routes
2. 在 `src` 目录下分别创建 Index 和 About 组件:About 组件:```typescript// src/About/index.tsximport React from 'react';import { Button } from 'antd';import { useHistory } from "react-router-dom";const About = () => {let history = useHistory();return (<div><h1>about page</h1><Button type="default" onClick={() => {history.push("/");}}>跳转到index page</Button></div>)}export default About;
Index 组件:
// src/Index/index.tsximport React, { useState } from 'react';import { Button } from 'antd';import { useHistory } from "react-router-dom";const Index = () => {let history = useHistory();return (<div className="count" ><h1>Index Page</h1><Button type="default" onClick={() => {history.push("/about");}}> 跳转到about page </Button></div>)}export default Index;
- 在 App.tsx 入口文件中配置路由: ```typescript import React, { Suspense } from ‘react’ import { HashRouter as Router, Switch, Route } from “react-router-dom”; import routes from ‘./Route/index’
export const App = () => {
return (
// React 懒加载组件需要使用 Suspense 包裹才能加载
如上配置,即可完成 单页面 的配置,在构建打包时,也能看到对应的组件进行了分包处理:<br />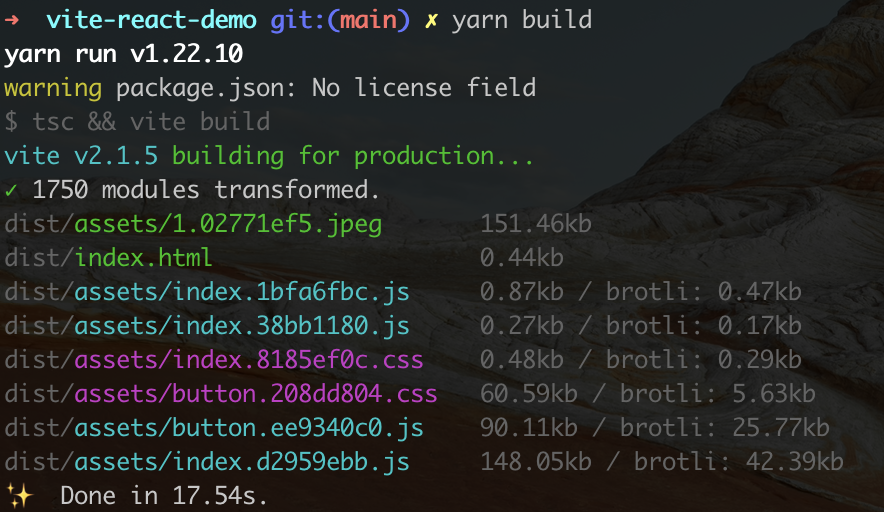<a name="mTPnr"></a>### 配置 Antd安装Antd组件库:```bash$ yarn add antd -S
安装 less 和 vite-plugin-imp:
其中 less 用来处理 antd 组件的默认主题,vite-plugin-imp 用来处理 antd 的样式的按需打包。
$ yarn add less vite-plugin-imp -D
安装完成后,在 vite.config.js 中配置:
import vitePluginImp from "vite-plugin-imp";export default defineConfig({plugins: [// 配置 antd 样式的按需打包vitePluginImp({libList: [{libName: "antd",style: (name) => `antd/es/${name}/style`,},],}),// 其他插件...,],css: {preprocessorOptions: {less: {// 支持内联 JavaScriptjavascriptEnabled: true,// 配置 antd 的主题颜色modifyVars: {"@primary-color": "green",},}},},});
配置完成后,在项目中使用:
import { Button } from 'antd';<Button type="default" onClick={() => {history.push("/about");}}> 跳转到about page </Button>
配置 Alias
在项目的 vite.config.js 中配置别名:
export default defineConfig({plugins: [reactRefresh(),],base: "./",// 配置别名resolve: {alias: {image: "/src/source/image",},}});
在项目中使用:
.bg {width: 200px;height: 200px;margin: 20px 0;background: url("image/1.jpeg") no-repeat center center;background-size: 100%;}
构建输出: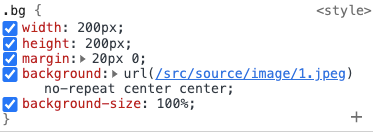
同样的,使用 import 导入语法,路径同样会被替换掉。
插件
如果需要其他插件,可查看Awesome Vite 仓库是否有合适的工具。
体验
经过直观的测试,Vite 的初始启动服务、实时编译替换文件的速度非常的快,经过和内部的项目集成测试,发现整体的速度提升非常明显,能够达到秒级别开发体验。
整个项目搭建完成后,构建的结果也非常满意,其中包含 react+antd+router+sass+ts 的项目构建数据如下: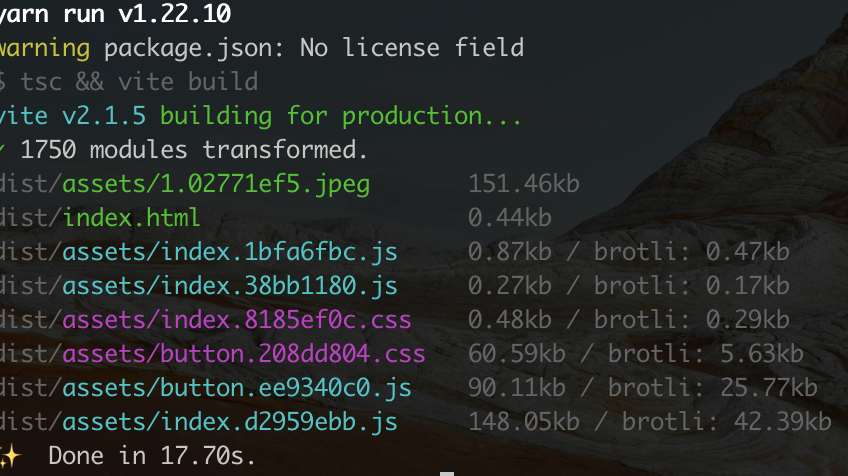
可以看到,主包的大小为148kb,分包的大小也非常小,相比于使用 CRA 搭建的 React 项目,同样的技术栈,包的大小能够减少非常多。
引用

若有收获,就点个赞吧
0 人点赞
