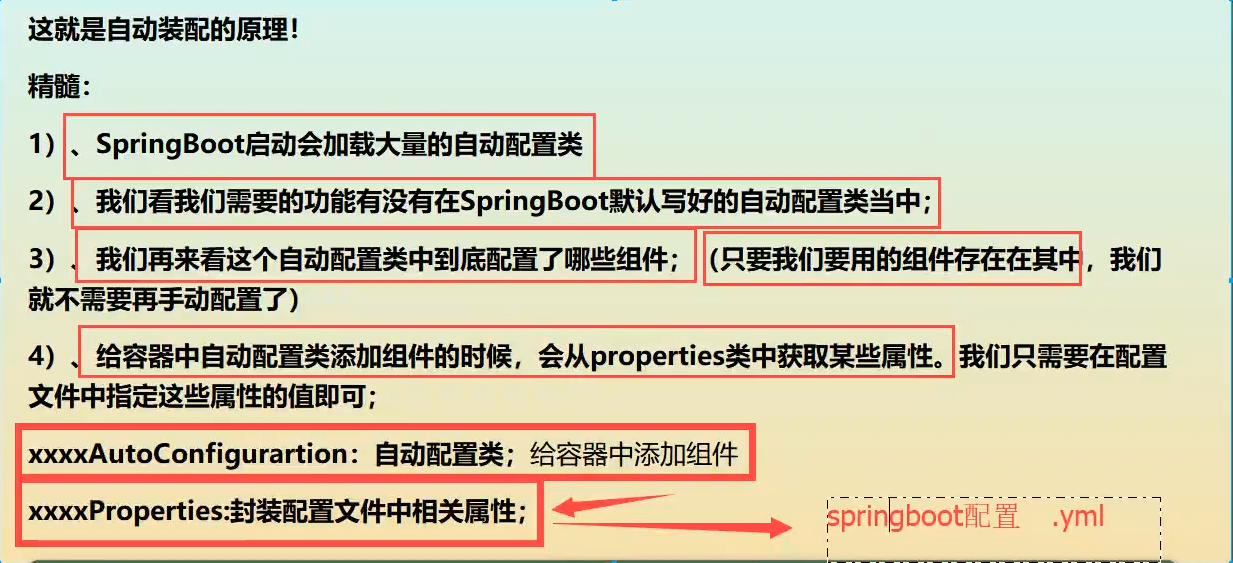
自动装配原理


在我们配置文件中能配置的东西,都存在一个固有的规律: xxxAutoConfiguration: 默认值 xxxProperties和配置文件绑定,我们就可以使用自定义的配置了!
导入一个东西,在项目中搜索xxxProperties,看它的配置,比如ThymeleafProperties
我们可以通过启用 debug=true属性;来让控制台打印自动配置报告,这样我们就可以很方便的知道哪些自动配置类生效;
- Positive matches:@Conditional条件为真,配置类被Spring容器加载。
- Negative matches: @Conditional条件为假,配置类未被Spring容器加载。
- Exclusions: 应用端明确排除加载配置
- Unconditional classes: 自动配置类不包含任何类级别的条件,也就是说,类始终会被自动加载。
一句话总结 :根据当前不同的条件判断(Spring的@Conditional派生注解),决定这个配置类是否生效!
- 一但这个配置类生效;这个配置类就会给容器中添加各种组件;
- 这些组件的属性是从对应的properties类中获取的,这些类里面的每一个属性又是和配置文件绑定的;
- 所有在配置文件中能配置的属性都是在xxxxProperties类中封装着;
- 配置文件能配置什么就可以参照某个功能对应的这个属性类
@ComponentScan和@Import
@ComponentScan会扫描basePackages包内的component,如果不配置basePackages,默认扫描当前包(AnimalScanConfiguration)内的component.
Finally, any new bean added to the animal package will be automatically found by our context. And we still have explicit control over the configurations we are using. @Import is very similar to @ComponentScan, except for the fact that @Import has an explicit approach while @ComponentScan uses an implicit one.
package com.baeldung.importannotation.animal;// imports...@Configuration@ComponentScan(basePackages = "com.baeldung.importannotation.animal")public class AnimalScanConfiguration {}
package com.baeldung.importannotation.zoo;// imports...@Configuration@Import(AnimalScanConfiguration.class)class ZooApplication {}
@EnableAutoConfiguration
自动配置顺序
使用@AutoConfigureBefore调整配置顺序竟没生效?
正确姿势只需要下面两步:
- 把需要自动配置的类挪动到Application扫描不到的包内 (应用的@ComponentSan扫描不到的)
- 当前工程里增加配置META-INF/spring.factories,前后顺序对结果无影响:
- 若你不用@AutoConfigureBefore这个注解,单单就想依赖于spring.factories里的先后顺序的来控制实际的加载顺序,答案是不可以,控制不了
- Spring Boot的自动配置均是通过spring.factories来指定的,它的优先级最低(执行时机是最晚的);通过扫描进来的一般都是你自己自定义的配置类,所以优先级是最高的,肯定在自动配置之前加载
- 从这你应该学到:若你要指定扫描的包名,请千万不要扫描到形如org.springframework这种包名,否则“天下大乱”(当然喽为了防止这种情况出现,Spring Boot做了容错的。它有一个类专门检测这个case防止你配置错了,具体参见ComponentScanPackageCheck默认实现(规避了org.springframework))
- 请尽量不要让自动配置类既被扫描到了,又放在spring.factories配置了,否则后者会覆盖前者,很容易造成莫名其妙的错误
小总结,对于三大注解的正确使用姿势是应该是:请使用在你的自动配置里(一般是你自定义starter时使用),而不是使用在你业务工程中的@Configuration里,因为那会毫无效果。
SpringApplication.run
了解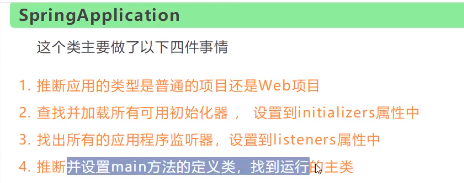
不止运行一个main方法,且开启了一个服务。不像tomcat容器运行,而是进程运行。
- 实例化
- run()
- 监听器
-
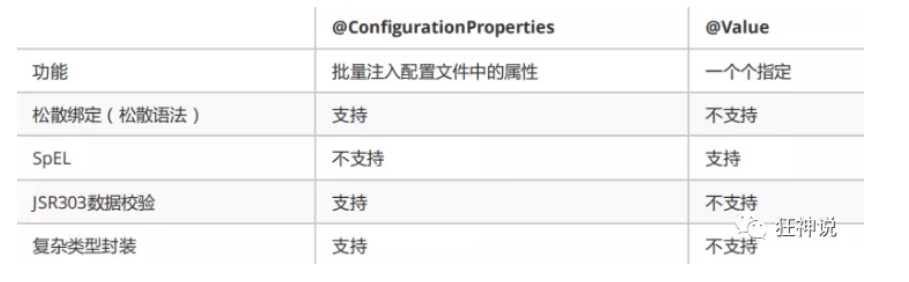
@ConfigurationProperties和@Value的对比
如果我们在某个业务中,只需要获取配置文件中的某个值,可以使用一下 @value;
- 如果说,我们专门编写了一个JavaBean来和配置文件进行一一映射,就直接@configurationProperties,不要犹豫!
- @PropertySource :加载指定的配置文件;(也还是要用@Value SPEL表达式);
- @configurationProperties:默认从全局配置文件中获取值;最大用处是给配置类赋值(对应的是实体类)
- 松散绑定: last-name —— lastName
- SpEL表达式:”${xxx}”
- 复杂类型封装,yml中可以封装对象 , 使用value就不支持
JSR303校验
spring-boot-starter-validation 集成了hibernate-validate
- @Validated
- …
spring-boot-configuration-processor
3.1. Configuring the Annotation ProcessorYou can easily generate your own configuration metadata file from items annotated with @ConfigurationProperties by using the spring-boot-configuration-processor jar. The jar includes a Java annotation processor which is invoked as your project is compiled. With Maven the dependency should be declared as optional, as shown in the following example:
<dependency><groupId>org.springframework.boot</groupId><artifactId>spring-boot-configuration-processor</artifactId><optional>true</optional></dependency>
If you have defined @ConfigurationProperties in your application, make sure to configure the spring-boot-maven-plugin to prevent the repackage goal from adding the dependency into the fat jar:
<project><build><plugins><plugin><groupId>org.springframework.boot</groupId><artifactId>spring-boot-maven-plugin</artifactId><configuration><excludes><exclude><groupId>org.springframework.boot</groupId><artifactId>spring-boot-configuration-processor</artifactId></exclude></excludes></configuration></plugin></plugins></build></project>

若有收获,就点个赞吧
0 人点赞
