1 负载均衡Ribbon
Spring Cloud Netflix Ribbon,客户端负载均衡。
Spring Cloud版本:Hoxton.SR9
openfeignb版本:io.github.openfeign:feign-core:10.10.1
1.1 Ribbon简介
负载均衡是指将负载分摊到多个执行单元上,常见的负载均衡有两种方式:
- 一种是独立进程单元,通过负载均衡策略,将请求转发到不同的执行单元上,例如Ngnix;
- 另一种是将负载均衡逻辑以代码的形式封装到服务消费者的客户端上,服务消费者客户端维护了一份服务提供者的信息列表,有了信息列表,通过负载均衡策略将请求分摊给多个服务提供者,从而达到负载均衡的目的。
Ribbon是Netflix公司开源的一个负载均衡的组件属于上述的第二种方式,是将负载均衡逻辑封装在客户端中,并且运行在客户端的进程里。Ribbon是一个经过了云端测试的IPC库,可以很好地控制HTTP和TCP客户端的负载均衡行为。
在Spring Cloud构建的微服务系统中,Ribbon作为服务消费者的负载均衡器,有两种使用方式,一种是和RestTemplate相结合,另一种是和Feign相结合。Feign已经默认集成了Ribbon,关于Feign的内容将会在下一章进行详细讲解。
Ribbon有很多子模块,但很多模块没有用于生产环境,目前Netflix公司用于生产环境的Ribbon子模块如下。
- ribbon-loadbalancer:可以独立使用或与其他模块一起使用的负载均衡器API。
- ribbon-eureka:Ribbon结合Eureka客户端的API,为负载均衡器提供动态服务注册列表信息。
-
1.2 源码简析Ribbon
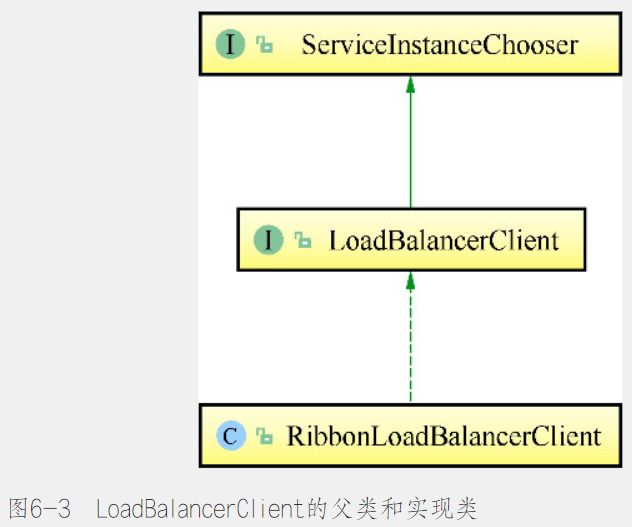
为了深入理解 Ribbon,现在从源码的角度来讲解Ribbon,看它如何和Eureka相结合,并如何和RestTemplate相结合来做负载均衡。首先,跟踪LoadBalancerClient的源码,它是一个接口类,继承了ServiceInstanceChooser,它的实现类为RibbonLoadBalanceClient,它们之间的关系如图6-3所示。
LoadBalancerClient是一个负载均衡的客户端,有如下3种方法。其中有 2 个excute()方法,均用来执行请求,reconstructURI()用于重构Url,代码如下:/*** Represents a client-side load balancer.** @author Spencer Gibb*/public interface LoadBalancerClient extends ServiceInstanceChooser {<T> T execute(String serviceId, LoadBalancerRequest<T> request) throws IOException;/*** Executes request using a ServiceInstance from the LoadBalancer for the specified* service.* @param serviceId The service ID to look up the LoadBalancer.* @param serviceInstance The service to execute the request to.* @param request Allows implementations to execute pre and post actions, such as* incrementing metrics.* @param <T> type of the response* @throws IOException in case of IO issues.* @return The result of the LoadBalancerRequest callback on the selected* ServiceInstance.*/<T> T execute(String serviceId, ServiceInstance serviceInstance,LoadBalancerRequest<T> request) throws IOException;/*** Creates a proper URI with a real host and port for systems to utilize. Some systems* use a URI with the logical service name as the host, such as* http://myservice/path/to/service. This will replace the service name with the* host:port from the ServiceInstance.* @param instance service instance to reconstruct the URI* @param original A URI with the host as a logical service name.* @return A reconstructed URI.*/URI reconstructURI(ServiceInstance instance, URI original);}
ServiceInstanceChooser接口有一个方法用于根据serviceId获取ServiceInstance,即通过服务名来选择服务实例,代码如下:
/*** Chooses a ServiceInstance from the LoadBalancer for the specified service.* @param serviceId The service ID to look up the LoadBalancer.* @return A ServiceInstance that matches the serviceId.*/ServiceInstance choose(String serviceId);
LoadBalancerClient的实现类为RibbonLoadBalancerClient。RibbonLoadBalancerClient是一个非常重要的类,最终的负载均衡的请求处理由它来执行。RibbonLoadBalancerClient的部分源码如下:
public class RibbonLoadBalancerClient implements LoadBalancerClient {.../*** New: Select a server using a 'key'.* @param serviceId of the service to choose an instance for* @param hint to specify the service instance* @return the selected {@link ServiceInstance}*/public ServiceInstance choose(String serviceId, Object hint) {Server server = getServer(getLoadBalancer(serviceId), hint);if (server == null) {return null;}return new RibbonServer(serviceId, server, isSecure(server, serviceId),serverIntrospector(serviceId).getMetadata(server));}// Note: This method could be removed?protected Server getServer(String serviceId) {return getServer(getLoadBalancer(serviceId), null);}protected Server getServer(ILoadBalancer loadBalancer) {return getServer(loadBalancer, null);}protected Server getServer(ILoadBalancer loadBalancer, Object hint) {if (loadBalancer == null) {return null;}// Use 'default' on a null hint, or just pass it on?return loadBalancer.chooseServer(hint != null ? hint : "default");}protected ILoadBalancer getLoadBalancer(String serviceId) {return this.clientFactory.getLoadBalancer(serviceId);}...}
在RibbonLoadBalancerClient的源码中,choose()方法用于选择具体服务实例。该方法通过getServer()方法去获取实例,经过源码跟踪,最终交给ILoadBalancer类去选择服务实例。ILoadBalancer在ribbon-loadbalancer的jar包下,ILoadBalancer是一个接口,该接口定义了一系列实现负载均衡的方法,源码如下:
public interface ILoadBalancer {

 /**
  * Initial list of servers.
  * This API also serves to add additional ones at a later time
  * The same logical server (host:port) could essentially be added multiple times
  * (helpful in cases where you want to give more "weightage" perhaps ..)
  * @param newServers new servers to add
  */
 public void addServers(List<Server> newServers);

 /**
  * Choose a server from load balancer.
  * @param key An object that the load balancer may use to determine which server to return. null if
  *         the load balancer does not use this parameter.
  * @return server chosen
  */
 public Server chooseServer(Object key);

 /**
  * To be called by the clients of the load balancer to notify that a Server is down
  * else, the LB will think its still Alive until the next Ping cycle - potentially
  * (assuming that the LB Impl does a ping)
  * @param server Server to mark as down
  */
 public void markServerDown(Server server);

 /**
  * @deprecated 2016-01-20 This method is deprecated in favor of the
  * cleaner {@link #getReachableServers} (equivalent to availableOnly=true)
  * and {@link #getAllServers} API (equivalent to availableOnly=false).
  *
  * Get the current list of servers.
  *
  * @param availableOnly if true, only live and available servers should be returned
  */
 @Deprecated
 public List<Server> getServerList(boolean availableOnly);

 /**
  * @return Only the servers that are up and reachable.
  */
 public List<Server> getReachableServers();

 /**
  * @return All known servers, both reachable and unreachable.
  */
 public List<Server> getAllServers();
}
其中,addServers()方法用于添加一个Server集合,chooseServer()方法用于根据key去获取Server,markServerDown()方法用于标记某个服务下线,getReachableServers()获取可用的Server集合,getAllServers()获取所有的Server集合。ILoadBalancer的子类为BaseLoadBalancer,BaseLoadBalancer的实现类为DynamicServer- ListLoadBalancer,三者之间的关系如图6-4所示。
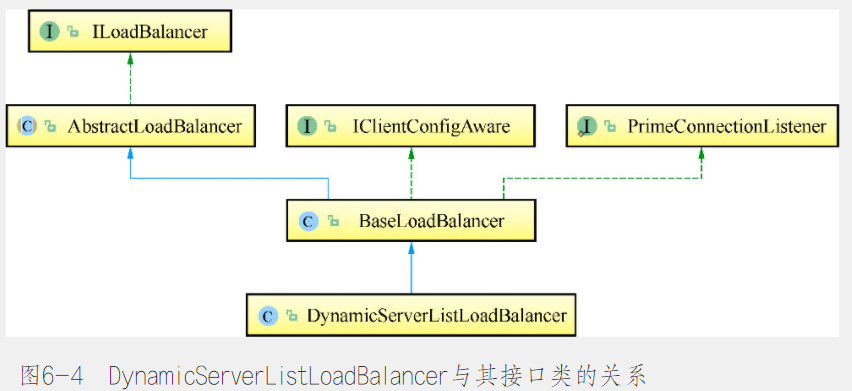
查看DynamicServerListLoadBalancer类的源码,DynamicServerListLoadBalancer需要配置IClientConfig、IRule、IPing、ServerList、ServerListFilter和ILoadBalancer。查看BaseLoadBalancer类的源码,在默认的情况下,实现了如下配置。IClientConfig ribbonClientConfig:DefaultClientConfigImpl IRule ribbonRule:RoundRobinRule IPing ribbonPing:DummyPing ServerList ribbonServerList:ConfigurationBasedServerList ServerListFilter ribbonServerListFilter:ZonePreferenceServerListFilter ILoadBalancer ribbonLoadBalancer:ZoneAwareLoadBalancerIClientConfig用于配置负载均衡的客户端,IClientConfig的默认实现类为DefaultClientConfigImpl。
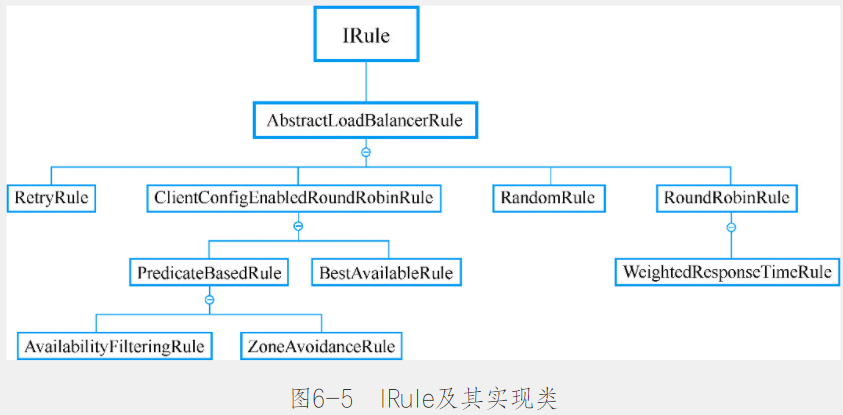
IRule用于配置负载均衡的策略,IRule有3个方法,其中choose()是根据key 来获取server实例的,setLoadBalancer()和getLoadBalancer()是用来设置和获取ILoadBalancer的,它的源码如下:/** * Interface that defines a "Rule" for a LoadBalancer. A Rule can be thought of * as a Strategy for loadbalacing. Well known loadbalancing strategies include * Round Robin, Response Time based etc. * * @author stonse * */ public interface IRule{ /* * choose one alive server from lb.allServers or * lb.upServers according to key * * @return choosen Server object. NULL is returned if none * server is available */ public Server choose(Object key); public void setLoadBalancer(ILoadBalancer lb); public ILoadBalancer getLoadBalancer(); }IRule有很多默认的实现类,这些实现类根据不同的算法和逻辑来处理负载均衡的策略。IRule的默认实现类有以下7种。在大多数情况下,这些默认的实现类是可以满足需求的,如果有特殊的需求,可以自己实现。IRule和其实现类之间的关系如图6-5所示。
BestAvailableRule:选择最小请求数。
- ClientConfigEnabledRoundRobinRule:轮询。
- RandomRule:随机选择一个server。
- RoundRobinRule:轮询选择server。
- RetryRule:根据轮询的方式重试。
- WeightedResponseTimeRule:根据响应时间去分配一个weight,weight越低,被选择的可能性就越低。
- ZoneAvoidanceRule:根据server的zone区域和可用性来轮询选择。
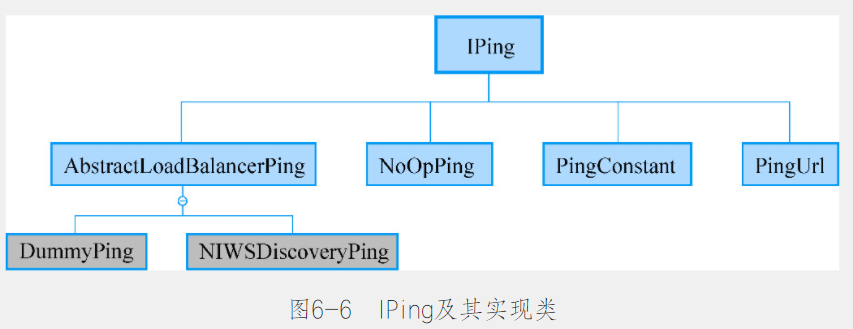
IPing用于向server发送“ping”,来判断该server是否有响应,从而判断该server是否可用。它有一个isAlive()方法,源码如下,:
/**
 * Interface that defines how we "ping" a server to check if its alive
 * @author stonse
 *
 */
public interface IPing {
    /**
     * Checks whether the given <code>Server</code> is "alive" i.e. should be
     * considered a candidate while loadbalancing
     *
     */
    public boolean isAlive(Server server);
}
IPing的实现类有PingUrl、PingConstant、NoOpPing、DummyPing和NIWSDiscoveryPing。它们之间的关系如图6-6所示。
- PingUrl:真实地去ping 某个Url,判断其是否可用。
- PingConstant:固定返回某服务是否可用,默认返回true,即可用。
- NoOpPing:不去ping,直接返回true,即可用。
- DummyPing:直接返回true,并实现了initWithNiwsConfig方法。
- NIWSDiscoveryPing:根据DiscoveryEnabledServer的InstanceInfo的InstanceStatus去判断,如果为InstanceStatus.UP,则可用,否则不可用。
ServerList是定义获取所有server的注册列表信息的接口,它的代码如下:
/**
 * Interface that defines the methods sed to obtain the List of Servers
 * @author stonse
 *
 * @param <T>
 */
public interface ServerList<T extends Server> {

    public List<T> getInitialListOfServers();

    /**
     * Return updated list of servers. This is called say every 30 secs
     * (configurable) by the Loadbalancer's Ping cycle
     *
     */
    public List<T> getUpdatedListOfServers();

}
ServerListFilter接口定义了可根据配置去过滤或者特性动态地获取符合条件的server列表的方法,代码如下:
/**
 * This interface allows for filtering the configured or dynamically obtained
 * List of candidate servers with desirable characteristics.
 *
 * @author stonse
 *
 * @param <T>
 */
public interface ServerListFilter<T extends Server> {

    public List<T> getFilteredListOfServers(List<T> servers);

}
阅读DynamicServerListLoadBalancer的源码,DynamicServerListLoadBalancer的构造函数中有一个initWithNiwsConfig()方法。在该方法中经过一系列的初始化配置,最终执行了restOfInit()方法。DynamicServerListLoadBalancer的部分源码如下:
public class DynamicServerListLoadBalancer<T extends Server> extends BaseLoadBalancer {
    ...
    public DynamicServerListLoadBalancer(IClientConfig clientConfig) {
        initWithNiwsConfig(clientConfig);
    }

    @Override
    public void initWithNiwsConfig(IClientConfig clientConfig) {
        try {
            super.initWithNiwsConfig(clientConfig);
            String niwsServerListClassName = clientConfig.getPropertyAsString(
                    CommonClientConfigKey.NIWSServerListClassName,
                    DefaultClientConfigImpl.DEFAULT_SEVER_LIST_CLASS);

            ServerList<T> niwsServerListImpl = (ServerList<T>) ClientFactory
                    .instantiateInstanceWithClientConfig(niwsServerListClassName, clientConfig);
            this.serverListImpl = niwsServerListImpl;

            if (niwsServerListImpl instanceof AbstractServerList) {
                AbstractServerListFilter<T> niwsFilter = ((AbstractServerList) niwsServerListImpl)
                        .getFilterImpl(clientConfig);
                niwsFilter.setLoadBalancerStats(getLoadBalancerStats());
                this.filter = niwsFilter;
            }

            String serverListUpdaterClassName = clientConfig.getPropertyAsString(
                    CommonClientConfigKey.ServerListUpdaterClassName,
                    DefaultClientConfigImpl.DEFAULT_SERVER_LIST_UPDATER_CLASS
            );

            this.serverListUpdater = (ServerListUpdater) ClientFactory
                    .instantiateInstanceWithClientConfig(serverListUpdaterClassName, clientConfig);

            restOfInit(clientConfig);
        } catch (Exception e) {
            throw new RuntimeException(
                    "Exception while initializing NIWSDiscoveryLoadBalancer:"
                            + clientConfig.getClientName()
                            + ", niwsClientConfig:" + clientConfig, e);
        }
    }
    void restOfInit(IClientConfig clientConfig) {
        boolean primeConnection = this.isEnablePrimingConnections();
        // turn this off to avoid duplicated asynchronous priming done in BaseLoadBalancer.setServerList()
        this.setEnablePrimingConnections(false);
        enableAndInitLearnNewServersFeature();

        updateListOfServers();
        if (primeConnection && this.getPrimeConnections() != null) {
            this.getPrimeConnections()
                    .primeConnections(getReachableServers());
        }
        this.setEnablePrimingConnections(primeConnection);
        LOGGER.info("DynamicServerListLoadBalancer for client {} initialized: {}", clientConfig.getClientName(), this.toString());
    }
    ...
}
在restOfInit()方法中,有一个 updateListOfServers() 的方法,该方法是用来获取所有的ServerList的。
volatile ServerList<T> serverListImpl;

...

@VisibleForTesting
public void updateListOfServers() {
    List<T> servers = new ArrayList<T>();
    if (serverListImpl != null) {
        servers = serverListImpl.getUpdatedListOfServers();
        LOGGER.debug("List of Servers for {} obtained from Discovery client: {}",
                     getIdentifier(), servers);

        if (filter != null) {
            servers = filter.getFilteredListOfServers(servers);
            LOGGER.debug("Filtered List of Servers for {} obtained from Discovery client: {}",
                         getIdentifier(), servers);
        }
    }
    updateAllServerList(servers);
}
进一步跟踪updateListOfServers()方法的源码,最终由serverListImpl.getUpdatedListOfServers()获取所有的服务列表,而 serverListImpl 是ServerList接口的具体实现类。跟踪源码,ServerList的实现类为DiscoveryEnabledNIWSServerList,这个类在ribbon-eureka.jar的com.netflix.niws.loadbalancer包下。其中,DiscoveryEnabledNIWSServerList有 getInitialListOfServers()和getUpdatedListOfServers()方法,具体代码如下:
public class DiscoveryEnabledNIWSServerList extends AbstractServerList<DiscoveryEnabledServer>{
    @Override
    public List<DiscoveryEnabledServer> getInitialListOfServers(){
        return obtainServersViaDiscovery();
    }

    @Override
    public List<DiscoveryEnabledServer> getUpdatedListOfServers(){
        return obtainServersViaDiscovery();
    }
}
继续跟踪可以看到obtainServersViaDiscovery() 方法是根据eurekaClientProvider.get()方法来获取EurekaClient的,再根据EurekaClient来获取服务注册列表信息,代码如下:
public class DiscoveryEnabledNIWSServerList extends AbstractServerList<DiscoveryEnabledServer>{
    private final Provider<EurekaClient> eurekaClientProvider;

    private List<DiscoveryEnabledServer> obtainServersViaDiscovery() {
        List<DiscoveryEnabledServer> serverList = new ArrayList<DiscoveryEnabledServer>();

        if (eurekaClientProvider == null || eurekaClientProvider.get() == null) {
            logger.warn("EurekaClient has not been initialized yet, returning an empty list");
            return new ArrayList<DiscoveryEnabledServer>();
        }

        EurekaClient eurekaClient = eurekaClientProvider.get();
        if (vipAddresses!=null){
            for (String vipAddress : vipAddresses.split(",")) {
                // if targetRegion is null, it will be interpreted as the same region of client
                List<InstanceInfo> listOfInstanceInfo = eurekaClient.getInstancesByVipAddress(vipAddress, isSecure, targetRegion);
                for (InstanceInfo ii : listOfInstanceInfo) {
                    if (ii.getStatus().equals(InstanceStatus.UP)) {

                        if(shouldUseOverridePort){
                            if(logger.isDebugEnabled()){
                                logger.debug("Overriding port on client name: " + clientName + " to " + overridePort);
                            }

                            // copy is necessary since the InstanceInfo builder just uses the original reference,
                            // and we don't want to corrupt the global eureka copy of the object which may be
                            // used by other clients in our system
                            InstanceInfo copy = new InstanceInfo(ii);

                            if(isSecure){
                                ii = new InstanceInfo.Builder(copy).setSecurePort(overridePort).build();
                            }else{
                                ii = new InstanceInfo.Builder(copy).setPort(overridePort).build();
                            }
                        }

                        DiscoveryEnabledServer des = createServer(ii, isSecure, shouldUseIpAddr);
                        serverList.add(des);
                    }
                }
                if (serverList.size()>0 && prioritizeVipAddressBasedServers){
                    break; // if the current vipAddress has servers, we dont use subsequent vipAddress based servers
                }
            }
        }
        return serverList;
    }
    ...
}
其中,eurekaClientProvider的实现类是LegacyEurekaClientProvider,LegacyEurekaClientProvider是一个获取eurekaClient实例的类,其代码如下:
/**
 * A legacy class to provide eurekaclient via static singletons
 */
class LegacyEurekaClientProvider implements Provider<EurekaClient> {

    private volatile EurekaClient eurekaClient;

    @Override
    public synchronized EurekaClient get() {
        if (eurekaClient == null) {
            eurekaClient = DiscoveryManager.getInstance().getDiscoveryClient();
        }

        return eurekaClient;
    }
}
EurekaClient的实现类为DiscoveryClient,在上一章已经分析了。DiscoveryClient具有服务注册、获取服务注册列表等功能。由此可见,负载均衡器是从EurekaClient获取服务列表信息的,并根据IRule的策略去路由,根据IPing去判断服务的可用性。
那么现在还有一个问题,负载均衡器每隔多长时间从Eureka Client获取注册信息呢?在BaseLoadBalancer类的源码中,在BaseLoadBalancer的构造方法开启了一个PingTask任务,代码如下:
public BaseLoadBalancer(String name, IRule rule, LoadBalancerStats stats,
            IPing ping, IPingStrategy pingStrategy) {

        logger.debug("LoadBalancer [{}]:  initialized", name);

        this.name = name;
        this.ping = ping;
        this.pingStrategy = pingStrategy;
        setRule(rule);
        setupPingTask();
        lbStats = stats;
        init();
    }
在setupPingTask()的具体代码逻辑里,开启了ShutdownEnabledTimer的PingTask任务,在默认情况下,变量pingIntervalSeconds的值为10,即每10秒向EurekaClient发送一次心跳“ping”。
protected int pingIntervalSeconds = 10;

void setupPingTask() {
    if (canSkipPing()) {
        return;
    }
    if (lbTimer != null) {
        lbTimer.cancel();
    }
    lbTimer = new ShutdownEnabledTimer("NFLoadBalancer-PingTimer-" + name,
                                       true);
    lbTimer.schedule(new PingTask(), 0, pingIntervalSeconds * 1000);
    forceQuickPing();
}
查看PingTask的源码,PingTask创建了一个Pinger对象,并执行了runPinger()方法。
/**
     * TimerTask that keeps runs every X seconds to check the status of each
     * server/node in the Server List
     *
     * @author stonse
     *
     */
class PingTask extends TimerTask {
    public void run() {
        try {
            new Pinger(pingStrategy).runPinger();
        } catch (Exception e) {
            logger.error("LoadBalancer [{}]: Error pinging", name, e);
        }
    }
}
查看Pinger的runPinger()方法,最终根据pingerStrategy.pingServers(ping, allServers)来获取服务的可用性,如果该返回结果与之前相同,则不向EurekaClient获取注册列表;如果不同,则通知ServerStatusChangeListener服务注册列表信息发生了改变,进行更新或者重新拉取,代码如下:
class Pinger {

        private final IPingStrategy pingerStrategy;

        public Pinger(IPingStrategy pingerStrategy) {
            this.pingerStrategy = pingerStrategy;
        }

        public void runPinger() throws Exception {
            if (!pingInProgress.compareAndSet(false, true)) {
                return; // Ping in progress - nothing to do
            }

            // we are "in" - we get to Ping

            Server[] allServers = null;
            boolean[] results = null;

            Lock allLock = null;
            Lock upLock = null;

            try {
                /*
                 * The readLock should be free unless an addServer operation is
                 * going on...
                 */
                allLock = allServerLock.readLock();
                allLock.lock();
                allServers = allServerList.toArray(new Server[allServerList.size()]);
                allLock.unlock();

                int numCandidates = allServers.length;
                results = pingerStrategy.pingServers(ping, allServers);

                final List<Server> newUpList = new ArrayList<Server>();
                final List<Server> changedServers = new ArrayList<Server>();

                for (int i = 0; i < numCandidates; i++) {
                    boolean isAlive = results[i];
                    Server svr = allServers[i];
                    boolean oldIsAlive = svr.isAlive();

                    svr.setAlive(isAlive);

                    if (oldIsAlive != isAlive) {
                        changedServers.add(svr);
                        logger.debug("LoadBalancer [{}]:  Server [{}] status changed to {}",
                            name, svr.getId(), (isAlive ? "ALIVE" : "DEAD"));
                    }

                    if (isAlive) {
                        newUpList.add(svr);
                    }
                }
                upLock = upServerLock.writeLock();
                upLock.lock();
                upServerList = newUpList;
                upLock.unlock();

                notifyServerStatusChangeListener(changedServers);
            } finally {
                pingInProgress.set(false);
            }
        }
    }
由此可见,LoadBalancerClient是在初始化时向Eureka获取服务注册列表信息,并且每10秒向EurekaClient发送“ping”,来判断服务的可用性。如果服务的可用性发生了改变或者服务数量和之前的不一致,则更新或者重新拉取。LoadBalancerClient有了这些服务注册列表信息,就可以根据具体的IRule的策略来进行负载均衡。
最后,还有一个问题,为什么在RestTemplate类的Bean上加一个@LoadBalance注解就可以使用Ribbon的负载均衡呢?全局搜索(IDEA的快捷键为“Ctrl”+“Shift”+“F”)查看有哪些类用到了 @LoadBalanced注解。通过搜索,可以发现LoadBalancerAutoConfiguration类(LoadBalancer自动配置类)使用到了该注解,LoadBalancerAutoConfiguration类的代码如下:
/**
 * Auto-configuration for blocking client-side load balancing.
 */
@Configuration(proxyBeanMethods = false)
@ConditionalOnClass(RestTemplate.class)
@ConditionalOnBean(LoadBalancerClient.class)
@EnableConfigurationProperties(LoadBalancerRetryProperties.class)
public class LoadBalancerAutoConfiguration {

    @LoadBalanced
    @Autowired(required = false)
    private List<RestTemplate> restTemplates = Collections.emptyList();

    @Autowired(required = false)
    private List<LoadBalancerRequestTransformer> transformers = Collections.emptyList();

    @Bean
    public SmartInitializingSingleton loadBalancedRestTemplateInitializerDeprecated(
            final ObjectProvider<List<RestTemplateCustomizer>> restTemplateCustomizers) {
        return () -> restTemplateCustomizers.ifAvailable(customizers -> {
            for (RestTemplate restTemplate : LoadBalancerAutoConfiguration.this.restTemplates) {
                for (RestTemplateCustomizer customizer : customizers) {
                    customizer.customize(restTemplate);
                }
            }
        });
    }

    @Bean
    @ConditionalOnMissingBean
    public LoadBalancerRequestFactory loadBalancerRequestFactory(
            LoadBalancerClient loadBalancerClient) {
        return new LoadBalancerRequestFactory(loadBalancerClient, this.transformers);
    }

    @Configuration(proxyBeanMethods = false)
    @ConditionalOnMissingClass("org.springframework.retry.support.RetryTemplate")
    static class LoadBalancerInterceptorConfig {

        @Bean
        public LoadBalancerInterceptor loadBalancerInterceptor(
                LoadBalancerClient loadBalancerClient,
                LoadBalancerRequestFactory requestFactory) {
            return new LoadBalancerInterceptor(loadBalancerClient, requestFactory);
        }

        @Bean
        @ConditionalOnMissingBean
        public RestTemplateCustomizer restTemplateCustomizer(
                final LoadBalancerInterceptor loadBalancerInterceptor) {
            return restTemplate -> {
                List<ClientHttpRequestInterceptor> list = new ArrayList<>(
                        restTemplate.getInterceptors());
                list.add(loadBalancerInterceptor);
                restTemplate.setInterceptors(list);
            };
        }

    }

    /**
     * Auto configuration for retry mechanism.
     */
    @Configuration(proxyBeanMethods = false)
    @ConditionalOnClass(RetryTemplate.class)
    public static class RetryAutoConfiguration {

        @Bean
        @ConditionalOnMissingBean
        public LoadBalancedRetryFactory loadBalancedRetryFactory() {
            return new LoadBalancedRetryFactory() {
            };
        }

    }

    /**
     * Auto configuration for retry intercepting mechanism.
     */
    @Configuration(proxyBeanMethods = false)
    @ConditionalOnClass(RetryTemplate.class)
    public static class RetryInterceptorAutoConfiguration {

        @Bean
        @ConditionalOnMissingBean
        public RetryLoadBalancerInterceptor loadBalancerRetryInterceptor(
                LoadBalancerClient loadBalancerClient,
                LoadBalancerRetryProperties properties,
                LoadBalancerRequestFactory requestFactory,
                List<LoadBalancedRetryFactory> loadBalancedRetryFactories) {
            AnnotationAwareOrderComparator.sort(loadBalancedRetryFactories);
            return new RetryLoadBalancerInterceptor(loadBalancerClient, properties,
                    requestFactory, loadBalancedRetryFactories.get(0));
        }

        @Bean
        @ConditionalOnMissingBean
        public RestTemplateCustomizer restTemplateCustomizer(
                final RetryLoadBalancerInterceptor loadBalancerInterceptor) {
            return restTemplate -> {
                List<ClientHttpRequestInterceptor> list = new ArrayList<>(
                        restTemplate.getInterceptors());
                list.add(loadBalancerInterceptor);
                restTemplate.setInterceptors(list);
            };
        }
    }
}
在LoadBalancerAutoConfiguration类中,首先维护了一个被@LoadBalanced修饰的RestTemplate对象的List。在初始化的过程中,通过调用customizer.customize(restTemplate)方法来给RestTemplate增加拦截器LoadBalancerInterceptor。LoadBalancerInterceptor用于实时拦截,在LoadBalancerInterceptor中实现了负载均衡的方法。LoadBalancerInterceptor类的拦截方法的代码如下:
@Override
public ClientHttpResponse intercept(final HttpRequest request, final byte[] body,
                                    final ClientHttpRequestExecution execution) throws IOException {
    final URI originalUri = request.getURI();
    String serviceName = originalUri.getHost();
    Assert.state(serviceName != null,
                 "Request URI does not contain a valid hostname: " + originalUri);
    return this.loadBalancer.execute(serviceName,
                                     this.requestFactory.createRequest(request, body, execution));
}
综上所述,Ribbon的负载均衡主要是通过LoadBalancerClient来实现的,而LoadBalancerClient具体交给了ILoadBalancer来处理,ILoadBalancer通过配置IRule、IPing等,向EurekaClient获取注册列表的信息,默认每10秒向EurekaClient发送一次“ping”,进而检查是否需要更新服务的注册列表信息。最后,在得到服务注册列表信息后,ILoadBalancer根据IRule的策略进行负载均衡。
而RestTemplate 加上@LoadBalance注解后,在远程调度时能够负载均衡,主要是维护了一个被@LoadBalance注解的RestTemplate列表,并给该列表中的RestTemplate对象添加了拦截器。在拦截器的方法中,将远程调度方法交给了Ribbon的负载均衡器LoadBalancerClient去处理,从而达到了负载均衡的目的。
2 声明式远程调用OpenFeign
Spring Cloud OpenFeign(早期称为Feign),封装了Http Client,大大简化了微服务之间调用的实现。
Spring Cloud版本:Hoxton.SR9
openfeignb版本:io.github.openfeign:feign-core:10.10.1
2.1 OpenFeign简介
Feign是以前的名称,自从Feign移交给开源社区管理之后改名了OpenFeign,现在我们一般都是使用的Spring Cloud OpenFeign,虽然名称变了但是核心代码未改变。
Feign受Retrofit、JAXRS-2.0和WebSocket的影响,采用了声明式API接口的风格,将JavaHttp客户端绑定到它的内部。Feign的首要目标是将Java Http 客户端的书写过程变得简单。Feign的源码地址:https://github.com/OpenFeign/feign。
在Feign中使用HttpClient和OkHttp:在Feign中,Client是一个非常重要的组件,Feign最终发送Request请求以及接收Response响应都是由Client组件完成的。Client在Feign源码中是一个接口,在默认情况下,Client的实现类是Client.Default,Client.Default是由HttpURLConnnection来实现网络请求的。另外,Client还支持HttpClient和OkHttp来进行网络请求。
2.2 @FeignClient详解
为了深入理解Feign,下面将从源码的角度来讲解Feign。首先来查看FeignClient注解@FeignClient的源码,其代码如下:
@Target(ElementType.TYPE)
@Retention(RetentionPolicy.RUNTIME)
@Documented
@Inherited
public @interface FeignClient {

    @AliasFor("name")
    String value() default "";

    @Deprecated
    String serviceId() default "";

    String contextId() default "";

    @AliasFor("value")
    String name() default "";

    String qualifier() default "";

    String url() default "";

    boolean decode404() default false;

    Class<?>[] configuration() default {};

    Class<?> fallback() default void.class;

    Class<?> fallbackFactory() default void.class;

    String path() default "";

    boolean primary() default true;
}
FeignClient注解被@Target(ElementType.TYPE)修饰,表示FeignClient注解的作用目标在接口上。@Retention(RetentionPolicy.RUNTIME)注解表明该注解会在Class字节码文件中存在,在运行时可以通过反射获取到。@Documented表示该注解将被包含在Javadoc中。@FeignClient注解用于创建声明式API接口,该接口是RESTful风格的。Feign被设计成插拔式的,可以注入其他组件和Feign一起使用。最典型的是如果Ribbon可用,Feign会和Ribbon相结合进行负载均衡。
在代码中,value()方法和name()方法一样,是被调用的服务的ServiceId。url()方法直接填写硬编码的Url地址。decode404()方法即404是被解码,还是抛异常。configuration()方法指明FeignClient的配置类,默认的配置类为FeignClientsConfiguration类,在缺省的情况下,这个类注入了默认的 Decoder、Encoder和Contract等配置的Bean。fallback()为配置熔断器的处理类。
2.3 FeignClient配置
Feign Client默认的配置类为FeignClientsConfiguration,这个类在spring-cloud-openfeign- core的jar包下。打开这个类,可以发现这个类注入了很多Feign相关的配置Bean,包括FeignRetryer、FeignLoggerFactory和FormattingConversionService等。另外,Decoder、Encoder和Contract这3个类在没有Bean被注入的情况下,会自动注入默认配置的Bean,即ResponseEntityDecoder、SpringEncoder和SpringMvcContract。默认注入的配置如下。
Decoder feignDecoder:ResponseEntityDecoder。Encoder feignEncoder:SpringEncoder
Logger feignLogger:Slf4jLogger
Contract feignContract:SpringMvcContract
Feign.Builder feignBuilder:HystrixFeign.Builder
FeignClientsConfiguration的配置类部分代码如下,@ConditionalOnMissingBean注解表示如果没有注入该类的Bean,那么就会默认注入一个Bean。
@Configuration(proxyBeanMethods = false)
public class FeignClientsConfiguration {
    ...
    @Bean
    @ConditionalOnMissingBean
    public Decoder feignDecoder() {
        return new OptionalDecoder(
                new ResponseEntityDecoder(new SpringDecoder(this.messageConverters)));
    }

    @Bean
    @ConditionalOnMissingBean
    @ConditionalOnMissingClass("org.springframework.data.domain.Pageable")
    public Encoder feignEncoder(ObjectProvider<AbstractFormWriter> formWriterProvider) {
        return springEncoder(formWriterProvider);
    }

    @Bean
    @ConditionalOnClass(name = "org.springframework.data.domain.Pageable")
    @ConditionalOnMissingBean
    public Encoder feignEncoderPageable(
            ObjectProvider<AbstractFormWriter> formWriterProvider) {
        PageableSpringEncoder encoder = new PageableSpringEncoder(
                springEncoder(formWriterProvider));

        if (springDataWebProperties != null) {
            encoder.setPageParameter(
                    springDataWebProperties.getPageable().getPageParameter());
            encoder.setSizeParameter(
                    springDataWebProperties.getPageable().getSizeParameter());
            encoder.setSortParameter(
                    springDataWebProperties.getSort().getSortParameter());
        }
        return encoder;
    }

    @Bean
    @ConditionalOnMissingBean
    public Contract feignContract(ConversionService feignConversionService) {
        return new SpringMvcContract(this.parameterProcessors, feignConversionService);
    }
    ...
}
重写FeignClientsConfiguration类中的Bean,覆盖掉默认的配置Bean,从而达到自定义配置的目的。例如Feign默认的配置在请求失败后,重试次数为0,即不重试(Retryer.NEVER_ RETRY)。现在希望在请求失败后能够重试,这时需要写一个配置 FeignConfig 类,在该类中注入Retryer的Bean,覆盖掉默认的Retryer的Bean,并将FeignConfig 指定为FeignClient 的配置类。FeignConfig 类的代码如下:
@Configuration
public class FeignConfig {
    @Beanpublic Retryer feignRetryer() {
        return new Retryer.Default(100, SECONDS.toMillis(1), 5);
    }
}
在上面的代码中,通过覆盖了默认的Retryer的Bean,更改了该FeignClient的请求失败重试的策略,重试间隔为100毫秒,最大重试时间为1秒,重试次数为5次。
2.4 从源码的角度讲解Feign的工作原理
Feign是一个伪Java Http客户端,Feign不做任何的请求处理。Feign通过处理注解生成Request模板,从而简化了Http API的开发。开发人员可以使用注解的方式定制Request API模板。在发送Http Request请求之前,Feign通过处理注解的方式替换掉Request模板中的参数,生成真正的Request,并交给Java Http客户端去处理。利用这种方式,开发者只需要关注Feign注解模板的开发,而不用关注Http请求本身,简化了Http请求的过程,使得Http请求变得简单和容易理解。
Feign通过包扫描注入FeignClient的Bean,该源码在FeignClientsRegistrar类中。首先在程序启动时,会检查是否有@EnableFeignClients注解,如果有该注解,则开启包扫描,扫描被@FeignClient注解的接口。代码如下:
class FeignClientsRegistrar implements ImportBeanDefinitionRegistrar, ResourceLoaderAware, EnvironmentAware {

    private void registerDefaultConfiguration(AnnotationMetadata metadata,
            BeanDefinitionRegistry registry) {
        Map<String, Object> defaultAttrs = metadata
                .getAnnotationAttributes(EnableFeignClients.class.getName(), true);

        if (defaultAttrs != null && defaultAttrs.containsKey("defaultConfiguration")) {
            String name;
            if (metadata.hasEnclosingClass()) {
                name = "default." + metadata.getEnclosingClassName();
            }
            else {
                name = "default." + metadata.getClassName();
            }
            registerClientConfiguration(registry, name,
                    defaultAttrs.get("defaultConfiguration"));
        }
    }
}
当程序的启动类上有@EnableFeignClients注解。在程序启动后,程序会通过包扫描将有@FeignClient注解修饰的接口连同接口名和注解的信息一起取出,赋给BeanDefinitionBuilder,然后根据BeanDefinitionBuilder得到BeanDefinition,最后将BeanDefinition注入IoC容器中,源码如下:
public void registerFeignClients(AnnotationMetadata metadata,
            BeanDefinitionRegistry registry) {

        LinkedHashSet<BeanDefinition> candidateComponents = new LinkedHashSet<>();
        Map<String, Object> attrs = metadata
                .getAnnotationAttributes(EnableFeignClients.class.getName());
        AnnotationTypeFilter annotationTypeFilter = new AnnotationTypeFilter(
                FeignClient.class);
        final Class<?>[] clients = attrs == null ? null
                : (Class<?>[]) attrs.get("clients");
        if (clients == null || clients.length == 0) {
            ClassPathScanningCandidateComponentProvider scanner = getScanner();
            scanner.setResourceLoader(this.resourceLoader);
            scanner.addIncludeFilter(new AnnotationTypeFilter(FeignClient.class));
            Set<String> basePackages = getBasePackages(metadata);
            for (String basePackage : basePackages) {
                candidateComponents.addAll(scanner.findCandidateComponents(basePackage));
            }
        }
        else {
            for (Class<?> clazz : clients) {
                candidateComponents.add(new AnnotatedGenericBeanDefinition(clazz));
            }
        }

        for (BeanDefinition candidateComponent : candidateComponents) {
            if (candidateComponent instanceof AnnotatedBeanDefinition) {
                // verify annotated class is an interface
                AnnotatedBeanDefinition beanDefinition = (AnnotatedBeanDefinition) candidateComponent;
                AnnotationMetadata annotationMetadata = beanDefinition.getMetadata();
                Assert.isTrue(annotationMetadata.isInterface(),
                        "@FeignClient can only be specified on an interface");

                Map<String, Object> attributes = annotationMetadata
                        .getAnnotationAttributes(FeignClient.class.getCanonicalName());

                String name = getClientName(attributes);
                registerClientConfiguration(registry, name,
                        attributes.get("configuration"));

                registerFeignClient(registry, annotationMetadata, attributes);
            }
        }
    }
注入BeanDefinition之后,通过JDK的代理,当调用Feign Client接口里面的方法时,该方法会被拦截,源码在ReflectiveFeign类,代码如下:
/**
   * creates an api binding to the {@code target}. As this invokes reflection, care should be taken
   * to cache the result.
   */
@SuppressWarnings("unchecked")
@Override
public <T> T newInstance(Target<T> target) {
    Map<String, MethodHandler> nameToHandler = targetToHandlersByName.apply(target);
    Map<Method, MethodHandler> methodToHandler = new LinkedHashMap<Method, MethodHandler>();
    List<DefaultMethodHandler> defaultMethodHandlers = new LinkedList<DefaultMethodHandler>();

    for (Method method : target.type().getMethods()) {
        if (method.getDeclaringClass() == Object.class) {
            continue;
        } else if (Util.isDefault(method)) {
            DefaultMethodHandler handler = new DefaultMethodHandler(method);
            defaultMethodHandlers.add(handler);
            methodToHandler.put(method, handler);
        } else {
            methodToHandler.put(method, nameToHandler.get(Feign.configKey(target.type(), method)));
        }
    }
    InvocationHandler handler = factory.create(target, methodToHandler);
    T proxy = (T) Proxy.newProxyInstance(target.type().getClassLoader(),
                                         new Class<?>[] {target.type()}, handler);

    for (DefaultMethodHandler defaultMethodHandler : defaultMethodHandlers) {
        defaultMethodHandler.bindTo(proxy);
    }
    return proxy;
}
在SynchronousMethodHandler类进行拦截处理,会根据参数生成RequestTemplate对象,该对象是Http请求的模板,代码如下:
@Override
  public Object invoke(Object[] argv) throws Throwable {
    RequestTemplate template = buildTemplateFromArgs.create(argv);
    Options options = findOptions(argv);
    Retryer retryer = this.retryer.clone();
    while (true) {
      try {
        return executeAndDecode(template, options);
      } catch (RetryableException e) {
        try {
          retryer.continueOrPropagate(e);
        } catch (RetryableException th) {
          Throwable cause = th.getCause();
          if (propagationPolicy == UNWRAP && cause != null) {
            throw cause;
          } else {
            throw th;
          }
        }
        if (logLevel != Logger.Level.NONE) {
          logger.logRetry(metadata.configKey(), logLevel);
        }
        continue;
      }
    }
  }
在上述代码中,有一个executeAndDecode()方法,该方法通过RequestTemplate生成Request请求对象,然后用Http Client获取Response,即通过Http Client进行Http请求来获取响应,代码如下:
Object executeAndDecode(RequestTemplate template, Options options) throws Throwable {
    Request request = targetRequest(template);

    if (logLevel != Logger.Level.NONE) {
      logger.logRequest(metadata.configKey(), logLevel, request);
    }

    Response response;
    long start = System.nanoTime();
    try {
      response = client.execute(request, options);
      // ensure the request is set. TODO: remove in Feign 12
      response = response.toBuilder()
          .request(request)
          .requestTemplate(template)
          .build();
    } catch (IOException e) {
      if (logLevel != Logger.Level.NONE) {
        logger.logIOException(metadata.configKey(), logLevel, e, elapsedTime(start));
      }
      throw errorExecuting(request, e);
    }
    long elapsedTime = TimeUnit.NANOSECONDS.toMillis(System.nanoTime() - start);


    if (decoder != null)
      return decoder.decode(response, metadata.returnType());

    CompletableFuture<Object> resultFuture = new CompletableFuture<>();
    asyncResponseHandler.handleResponse(resultFuture, metadata.configKey(), response,
        metadata.returnType(),
        elapsedTime);

    try {
      if (!resultFuture.isDone())
        throw new IllegalStateException("Response handling not done");

      return resultFuture.join();
    } catch (CompletionException e) {
      Throwable cause = e.getCause();
      if (cause != null)
        throw cause;
      throw e;
    }
  }
2.5 在Feign中使用HttpClient和OkHttp
在Feign中,Client是一个非常重要的组件,Feign最终发送Request请求以及接收Response响应都是由Client组件完成的。Client在Feign源码中是一个接口,在默认情况下,Client的实现类是Client.Default,Client.Default是由HttpURLConnnection来实现网络请求的。另外,Client还支持HttpClient和OkHttp来进行网络请求。首先查看FeignRibbonClient的自动配置类FeignRibbonClientAutoConfiguration,该类在工程启动时注入一些Bean,其中注入了一个BeanName为feignClient的Client类型的Bean,代码如下:
@ConditionalOnClass({ ILoadBalancer.class, Feign.class })
@ConditionalOnProperty(value = "spring.cloud.loadbalancer.ribbon.enabled",
        matchIfMissing = true)
@Configuration(proxyBeanMethods = false)
@AutoConfigureBefore(FeignAutoConfiguration.class)
@EnableConfigurationProperties({ FeignHttpClientProperties.class })
// Order is important here, last should be the default, first should be optional
// see
// https://github.com/spring-cloud/spring-cloud-netflix/issues/2086#issuecomment-316281653
@Import({ HttpClientFeignLoadBalancedConfiguration.class,
        OkHttpFeignLoadBalancedConfiguration.class,
        DefaultFeignLoadBalancedConfiguration.class })
public class FeignRibbonClientAutoConfiguration {

}


/**
 * @author Spencer Gibb
 */
@Configuration(proxyBeanMethods = false)
class DefaultFeignLoadBalancedConfiguration {

    @Bean
    @ConditionalOnMissingBean
    public Client feignClient(CachingSpringLoadBalancerFactory cachingFactory,
            SpringClientFactory clientFactory) {
        return new LoadBalancerFeignClient(new Client.Default(null, null), cachingFactory,
                clientFactory);
    }

}
在缺省配置BeanName为FeignClient的Bean的情况下,会自动注入Client.Default这个对象,跟踪Client.Default源码,Client.Default使用的网络请求框架为HttpURLConnection,代码如下:
@Override
public Response execute(Request request, Options options) throws IOException {
    HttpURLConnection connection = convertAndSend(request, options);
    return convertResponse(connection, request);
}
那么,如何在Feign中使用HttpClient的网络请求框架呢?下面继续查看FeignRibbonClientAutoConfiguration的源码中的HttpClientFeignLoadBalancedConfiguration:
@Configuration(proxyBeanMethods = false)
@ConditionalOnClass(ApacheHttpClient.class)
@ConditionalOnProperty(value = "feign.httpclient.enabled", matchIfMissing = true)
@Import(HttpClientFeignConfiguration.class)
class HttpClientFeignLoadBalancedConfiguration {

    @Bean
    @ConditionalOnMissingBean(Client.class)
    public Client feignClient(CachingSpringLoadBalancerFactory cachingFactory,
            SpringClientFactory clientFactory, HttpClient httpClient) {
        ApacheHttpClient delegate = new ApacheHttpClient(httpClient);
        return new LoadBalancerFeignClient(delegate, cachingFactory, clientFactory);
    }

}
从代码@ConditionalOnClass(ApacheHttpClient.class)注解可知道,只需要在pom文件加上HttpClient的Classpath即可。另外需要在配置文件application.yml中配置feign.httpclient.enabled为true,从@ConditionalOnProperty注解可知,这个配置可以不写,因为在默认的情况下就为true。在工程的pom文件加上feign-httpclient的依赖,Feign就会采用HttpClient作为网络请求框架,而不是默认的HttpURLConnection。代码如下:
<dependency>
    <groupId>io.github.openfeign</groupId>
  <artifactId>feign-httpclient</artifactId>
  <version>RELEASE</version>
</dependency>
同理,如果想要Feign中使用Okhttp作为网络请求框架,则只需要在pom文件上加上feign-okhttp的依赖,代码如下:
<dependency>
    <groupId>com.netflix.feign</groupId>
  <artifactId>feign-okhttp</artifactId>
  <version>RELEASE</version>
</dependency>
2.6 Feign是如何实现负载均衡的
FeignRibbonClientAutoConfiguration类配置了Client的类型(包括HttpURLConnection、OkHttp和HttpClient),最终向容器注入的是Client的实现类LoadBalancerFeignClient,即负载均衡客户端。查看LoadBalancerFeignClient类中的execute方法,即执行请求的方法,代码如下:
public class LoadBalancerFeignClient implements Client {
    @Override
    public Response execute(Request request, Request.Options options) throws IOException {
        try {
            URI asUri = URI.create(request.url());
            String clientName = asUri.getHost();
            URI uriWithoutHost = cleanUrl(request.url(), clientName);
            FeignLoadBalancer.RibbonRequest ribbonRequest = new FeignLoadBalancer.RibbonRequest(
                    this.delegate, request, uriWithoutHost);

            IClientConfig requestConfig = getClientConfig(options, clientName);
            return lbClient(clientName)
                    .executeWithLoadBalancer(ribbonRequest, requestConfig).toResponse();
        }
        catch (ClientException e) {
            IOException io = findIOException(e);
            if (io != null) {
                throw io;
            }
            throw new RuntimeException(e);
        }
    }
}
其中有一个executeWithLoadBalancer()方法,即通过负载均衡的方式来执行网络请求,代码如下:
public abstract class AbstractLoadBalancerAwareClient<S extends ClientRequest, T extends IResponse> extends LoadBalancerContext implements IClient<S, T>, IClientConfigAware {
    public T executeWithLoadBalancer(final S request, final IClientConfig requestConfig) throws ClientException {
        LoadBalancerCommand<T> command = buildLoadBalancerCommand(request, requestConfig);

        try {
            return command.submit(
                new ServerOperation<T>() {
                    @Override
                    public Observable<T> call(Server server) {
                        URI finalUri = reconstructURIWithServer(server, request.getUri());
                        S requestForServer = (S) request.replaceUri(finalUri);
                        try {
                            return Observable.just(AbstractLoadBalancerAwareClient.this.execute(requestForServer, requestConfig));
                        }
                        catch (Exception e) {
                            return Observable.error(e);
                        }
                    }
                })
                .toBlocking()
                .single();
        } catch (Exception e) {
            Throwable t = e.getCause();
            if (t instanceof ClientException) {
                throw (ClientException) t;
            } else {
                throw new ClientException(e);
            }
        }

    }
}
在上述代码中,有一个submit()方法,进入submit() 方法的内部可以看出它是LoadBalancerCommand类的方法,代码如下:
public class LoadBalancerCommand<T> {
    public Observable<T> submit(final ServerOperation<T> operation) {
        final ExecutionInfoContext context = new ExecutionInfoContext();

        if (listenerInvoker != null) {
            try {
                listenerInvoker.onExecutionStart();
            } catch (AbortExecutionException e) {
                return Observable.error(e);
            }
        }

        final int maxRetrysSame = retryHandler.getMaxRetriesOnSameServer();
        final int maxRetrysNext = retryHandler.getMaxRetriesOnNextServer();

        // Use the load balancer
        Observable<T> o =
                (server == null ? selectServer() : Observable.just(server))
                .concatMap(new Func1<Server, Observable<T>>() {
                    @Override
                    // Called for each server being selected
                    public Observable<T> call(Server server) {
                        context.setServer(server);
                        final ServerStats stats = loadBalancerContext.getServerStats(server);

                        // Called for each attempt and retry
                        Observable<T> o = Observable
                                .just(server)
                                .concatMap(new Func1<Server, Observable<T>>() {
                                    @Override
                                    public Observable<T> call(final Server server) {
                                        context.incAttemptCount();
                                        loadBalancerContext.noteOpenConnection(stats);

                                        if (listenerInvoker != null) {
                                            try {
                                                listenerInvoker.onStartWithServer(context.toExecutionInfo());
                                            } catch (AbortExecutionException e) {
                                                return Observable.error(e);
                                            }
                                        }

                                        final Stopwatch tracer = loadBalancerContext.getExecuteTracer().start();

                                        return operation.call(server).doOnEach(new Observer<T>() {
                                            private T entity;
                                            @Override
                                            public void onCompleted() {
                                                recordStats(tracer, stats, entity, null);
                                                // TODO: What to do if onNext or onError are never called?
                                            }

                                            @Override
                                            public void onError(Throwable e) {
                                                recordStats(tracer, stats, null, e);
                                                logger.debug("Got error {} when executed on server {}", e, server);
                                                if (listenerInvoker != null) {
                                                    listenerInvoker.onExceptionWithServer(e, context.toExecutionInfo());
                                                }
                                            }

                                            @Override
                                            public void onNext(T entity) {
                                                this.entity = entity;
                                                if (listenerInvoker != null) {
                                                    listenerInvoker.onExecutionSuccess(entity, context.toExecutionInfo());
                                                }
                                            }

                                            private void recordStats(Stopwatch tracer, ServerStats stats, Object entity, Throwable exception) {
                                                tracer.stop();
                                                loadBalancerContext.noteRequestCompletion(stats, entity, exception, tracer.getDuration(TimeUnit.MILLISECONDS), retryHandler);
                                            }
                                        });
                                    }
                                });

                        if (maxRetrysSame > 0)
                            o = o.retry(retryPolicy(maxRetrysSame, true));
                        return o;
                    }
                });

        if (maxRetrysNext > 0 && server == null)
            o = o.retry(retryPolicy(maxRetrysNext, false));

        return o.onErrorResumeNext(new Func1<Throwable, Observable<T>>() {
            @Override
            public Observable<T> call(Throwable e) {
                if (context.getAttemptCount() > 0) {
                    if (maxRetrysNext > 0 && context.getServerAttemptCount() == (maxRetrysNext + 1)) {
                        e = new ClientException(ClientException.ErrorType.NUMBEROF_RETRIES_NEXTSERVER_EXCEEDED,
                                "Number of retries on next server exceeded max " + maxRetrysNext
                                + " retries, while making a call for: " + context.getServer(), e);
                    }
                    else if (maxRetrysSame > 0 && context.getAttemptCount() == (maxRetrysSame + 1)) {
                        e = new ClientException(ClientException.ErrorType.NUMBEROF_RETRIES_EXEEDED,
                                "Number of retries exceeded max " + maxRetrysSame
                                + " retries, while making a call for: " + context.getServer(), e);
                    }
                }
                if (listenerInvoker != null) {
                    listenerInvoker.onExecutionFailed(e, context.toFinalExecutionInfo());
                }
                return Observable.error(e);
            }
        });
    }
}
在上述代码中,有一个selectServer()方法,用于选择服务进行负载均衡,代码如下:
/**
     * Return an Observable that either emits only the single requested server
     * or queries the load balancer for the next server on each subscription
     */
    private Observable<Server> selectServer() {
        return Observable.create(new OnSubscribe<Server>() {
            @Override
            public void call(Subscriber<? super Server> next) {
                try {
                    Server server = loadBalancerContext.getServerFromLoadBalancer(loadBalancerURI, loadBalancerKey);
                    next.onNext(server);
                    next.onCompleted();
                } catch (Exception e) {
                    next.onError(e);
                }
            }
        });
    }
由上述代码可知,最终负载均衡交给loadBalancerContext来处理,即前面讲述的Ribbon,这里不再重复。此时案例的架构图如图7-2所示。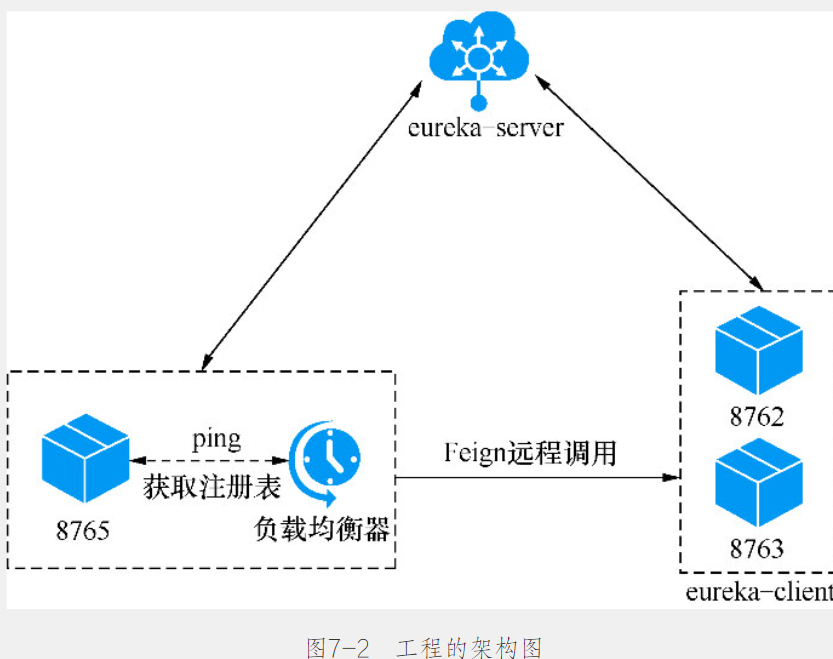
2.7 总结
总的来说,Feign的源码实现过程如下。(1)首先通过@EnableFeignClients注解开启FeignClient的功能。只有这个注解存在,才会在程序启动时开启对@FeignClient注解的包扫描。
(2)根据Feign的规则实现接口,并在接口上面加上@FeignClient注解。
(3)程序启动后,会进行包扫描,扫描所有的@FeignClient的注解的类,并将这些信息注入IoC容器中。
(4)当接口的方法被调用时,通过JDK的代理来生成具体的RequestTemplate模板对象。
(5)根据RequestTemplate再生成Http请求的Request对象。
(6)Request对象交给Client去处理,其中Client的网络请求框架可是HttpURLConnection、HttpClient和OkHttp。
(7)最后Client被封装到LoadBalanceClient类,这个类结合类Ribbon做到了负载均衡。
3 熔断器对比
熔断和降级
熔断和降级是两个比较容易混淆的概念,两者的含义并不相同。
熔断的目的在于应对当前系统依赖的外部系统或者第三方系统的故障。
比如服务A远程调用服务B,服务B此时不可用,服务A调用时间超过断路器指定时间(设置为30000ms),断路器将会中断服务A对这个方法的调用,服务A直接执行后续逻辑;
降级是从系统功能优先级的角度考虑如何应对系统故障,忽略掉熔断的服务,保证服务整体可用。降级的目的在于应对系统自身的故障。
比如上述断路器中断服务A对服务B的调用,意味着此时服务B出现异常调用失败了,而降级就起到了作用,为了更好的用户体验,对服务B调用异常时,通过执行另一种代码逻辑来给用户友好的回复。这也就对应着Hytrix的Fallback处理模式。
熔断和降级在微服务中都是结合使用,一般都是服务A调用服务B断路器开启之后,Fallback降级机制随之被调用,执行一个出现熔断之后的逻辑,熔断和降级保证微服务的可用性和稳定性。
3.1 Sentinel VS Hystrix
3.2 熔断器Hystrix
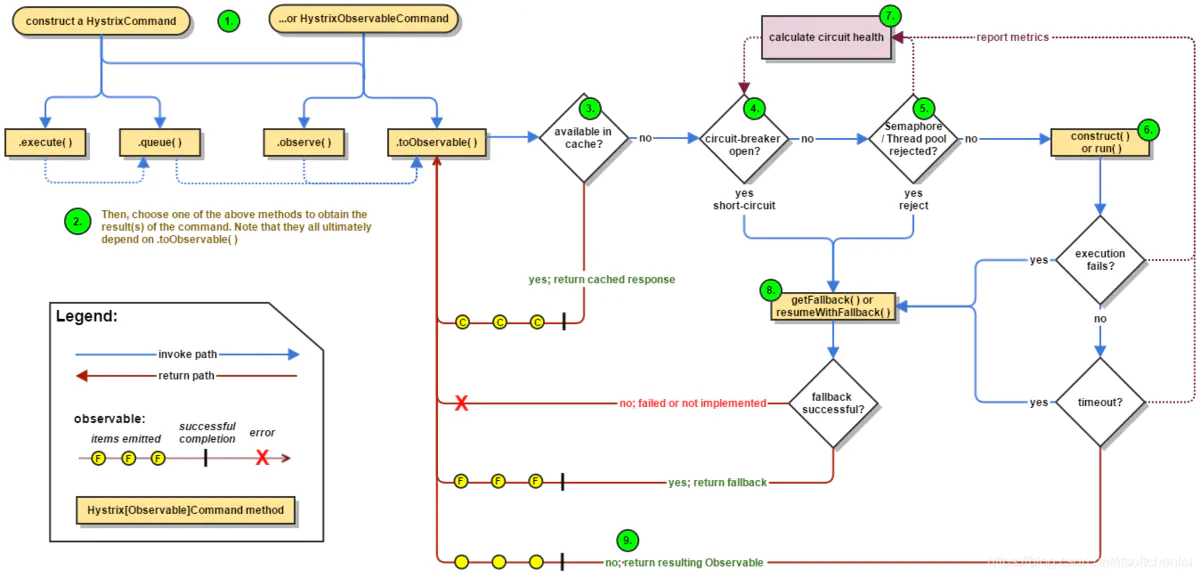
Hystrix运行时流程图-官方
Hystrix 出现以下四种情况,都会去调用 fallback 降级机制:
- 断路器处于打开的状态。
- 资源池已满(线程池+队列 / 信号量)。
- Hystrix 调用各种接口,或者访问外部依赖,比如 MySQL、Redis、Zookeeper、Kafka 等等,出现了任何异常的情况。
- 访问外部依赖的时候,访问时间过长,报了 TimeoutException 异常。
- 第8章 熔断器Hystrix,来源于《深入理解SpringCloud与微服务构建》
4 熔断器Hystrix
4.1 Hystrix简介
在分布式系统中,服务与服务之间的依赖错综复杂,一种不可避免的情况就是某些服务会出现故障,导致依赖于它们的其他服务出现远程调度的线程阻塞。Hystrix是Netflix公司开源的一个项目,它提供了熔断器功能,能够阻止分布式系统中出现联动故障。Hystrix是通过隔离服务的访问点阻止联动故障的,并提供了故障的解决方案,从而提高了整个分布式系统的弹性。4.2 Hystrix解决的问题
在复杂的分布式系统中,可能有几十个服务相互依赖,这些服务由于某些原因,例如机房的不可靠性、网络服务商的不可靠性等,导致某个服务不可用。如果系统不隔离该不可用的服务,可能会导致整个系统不可用。
例如,对于依赖30个服务的应用程序,每个服务的正常运行时间为99.99%,对于单个服务来说,99.99%的可用是非常完美的。
有99.9930= 99.7%的可正常运行时间和0.3%的不可用时间,那么10亿次请求中有3000000次失败,实际的情况可能比这更糟糕。
如果不设计整个系统的韧性,即使所有依赖关系表现良好,单个服务只有0.01%的不可用,由于整个系统的服务相互依赖,最终对整个系统的影响是非常大的。
在微服务系统中,一个用户请求可能需要调用几个服务才能完成。如图8-1所示,在所有的服务都处于可用状态时,一个用户请求需要调用A、H、I和P服务。
当某一个服务,例如服务I,出现网络延迟或者故障时,即使服务A、H和P可用,由于服务I的不可用,整个用户请求会处于阻塞状态,并等待服务I的响应,如图8-2所示。在高并发的情况下,单个服务的延迟会导致整个请求都处于延迟状态,可能在几秒钟就使整个服务处于线程负载饱和的状态。
某个服务的单个点的请求故障会导致用户的请求处于阻塞状态,最终的结果就是整个服务的线程资源消耗殆尽。服务的依赖性会导致依赖于该故障服务的其他服务也处于线程阻塞状态,最终导致这些服务的线程资源消耗殆尽,直到不可用,从而导致整个微服务系统都不可用,即雪崩效应。
为了防止雪崩效应,因而产生了熔断器模型。Hystrix是在业界表现非常好的一个熔断器模型实现的开源组件,它是Spring Cloud 组件不可缺少的一部分。
4.3 Hystrix设计原则
总的来说,Hystrix的设计原则如下。防止单个服务的故障耗尽整个服务的Servlet容器(例如Tomcat)的线程资源。
快速失败机制,如果某个服务出现了故障,则调用该服务的请求快速失败,而不是线程等待。
提供回退(fallback)方案,在请求发生故障时,提供设定好的回退方案。
使用熔断机制,防止故障扩散到其他服务。
提供熔断器的监控组件Hystrix Dashboard,可以实时监控熔断器的状态。4.4 Hystrix工作机制
第2章的图2-5展示了Hystrix的工作机制。首先,当服务的某个API接口的失败次数在一定时间内小于设定的阀值时,熔断器处于关闭状态,该API接口正常提供服务。当该API接口处理请求的失败次数大于设定的阀值时,Hystrix判定该API接口出现了故障,打开熔断器,这时请求该API接口会执行快速失败的逻辑(即fallback回退的逻辑),不执行业务逻辑,请求的线程不会处于阻塞状态。处于打开状态的熔断器,一段时间后会处于半打开状态,并将一定数量的请求执行正常逻辑。剩余的请求会执行快速失败,若执行正常逻辑的请求失败了,则熔断器继续打开;若成功了,则将熔断器关闭。这样熔断器就具有了自我修复的能力。
4.5 RestTemplate和Ribbon使用熔断器
本节以案例的形式讲解如何在RestTemplate和Ribbon作为服务消费者时使用Hystrix熔断器。本节的案例在上一章的案例基础之上进行改造。在上一章的eureka-ribbon-client工程中,我们使用RestTempalte调用了eureka-client 的“/hi”API接口,并用Ribbon做了负载均衡,本节在此基础上增加Hystrix熔断器的功能。首先在工程的pom文件中引用Hystrix的起步依赖spring-cloud-starter-hystrix,代码如下:
然后在Spring Boot的启动类EurekaRibbonClientApplication加上@EnableHystrix注解开启Hystrix的熔断器功能,代码如下:<dependency> <groupId>org.springframework.cloud</groupId> <artifactId>spring-cloud-starter-netflix-hystrix</artifactId> </dependency>
修改RibbonService的代码,在hi()方法上加@HystrixCommand注解。有了@HystrixCommand注解,hi()方法就启用Hystrix熔断器的功能,其中,fallbackMethod为处理回退(fallback)逻辑的方法。在本例中,直接返回了一个字符串。在熔断器打开的状态下,会执行fallback逻辑。fallback的逻辑最好是返回一些静态的字符串,不需要处理复杂的逻辑,也不需要远程调度其他服务,这样方便执行快速失败,释放线程资源。如果一定要在fallback逻辑中远程调度其他服务,最好在远程调度其他服务时,也加上熔断器。案例代码如下:@SpringBootApplication @EnableEurekaClient @EnableHystrixpublic class EurekaRibbonClientApplication { public static void main(String[] args) { SpringApplication.run(EurekaRibbonClientApplication.class, args); } }
依次启动工程eureka-server、eureka-client和eureka-ribbon-client。等所有的工程都启动完毕,在浏览器上访问http://localhost:8764/hi,浏览器会显示:@Service public class RibbonService { @AutowiredRestTemplate restTemplate; @HystrixCommand(fallbackMethod = "hiError") public String hi(String name) { return restTemplate.getForObject("http://eureka-client/hi?name="+name,String.class); } public String hiError(String name) { return "hi,"+name+",sorry,error!"; } }
关闭eureka-client,即它处于不可用的状态,此时eureka-ribbon-client无法调用eureka-client的“/hi”接口,访问http://localhost:8764/hi,浏览器会显示:hi forezp,i am from port:8762
由此可见,当eureka-client不可用时,调用eureka-ribbon-client的“/hi”接口会进入RibbonService类的“/hi”方法中。由于eureka-client没有响应,判定eureka-client不可用,开启了熔断器,最后进入了fallbackMethod的逻辑。当熔断器打开了,之后的请求会直接执行fallbackMethod的逻辑。这样做的好处就是通过快速失败,请求能够得到及时处理,线程不再阻塞。hi,forezp,sorry,error!4.6 Feign上使用熔断器
由于Feign的起步依赖中已经引入了Hystrix的依赖,所以在Feign中使用Hystrix不需要引入任何的依赖。只需要在eureka-feign-client工程的配置文件application.yml中配置开启Hystrix的功能,配置文件application.yml中加以下配置:
然后修改eureka-feign-client工程中的EurekaClientFeign代码,在@FeignClient注解的fallback配置加上快速失败的处理类。该处理类是作为Feign熔断器的逻辑处理类,必须实现被@FeignClient修饰的接口。例如案例中的HiHystrix类实现了接口EurekaClientFeign,最后需要以Spring Bean的形式注入IoC容器中。代码如下:feign.hystrix.enabled: true
HiHystrix作为熔断器的逻辑处理类,需要实现EurekaClientFeign接口,并需要在接口方法sayHiFromClientEureka()里写处理熔断的具体逻辑,同时还需要在HiHystrix类上加@Component注解,注入IoC容器中。代码如下:@FeignClient(value = "eureka-client",configuration = FeignConfig.class,fallback = HiHystrix.class) public interface EurekaClientFeign { @GetMapping(value = "/hi")String sayHiFromClientEureka(@RequestParam(value = "name") String name); }
依次启动工程eureka-server、eureka-client和eureka-feign-client。在浏览器上访问http://localhost:8765/hi,浏览器会显示:@Component public class HiHystrix implements EurekaClientFeign { @Overridepublic String sayHiFromClientEureka(String name) { return "hi,"+name+",sorry,error!"; } }
关闭eureka-client,即它处于不可用的状态,此时eureka-feign-client无法调用eureka-client的“/hi”接口,在浏览器上访问http://localhost:8765/hi,浏览器会显示:hi forezp,i am from port:8762
由此可见,当eureka-client不可用时,eureka-feign-client进入了 fallback的逻辑处理类(即HiHystrix),由这个类来执行熔断器打开时的处理逻辑。hi,forezp,sorry,error!4.7 使用Hystrix Dashboard监控熔断器状态
在微服务架构中,为了保证服务实例的可用性,防止服务实例出现故障导致线程阻塞,而出现了熔断器模型。熔断器的状况反映了一个程序的可用性和健壮性,是一个重要指标。Hystrix Dashboard是监控Hystrix的熔断器状况的一个组件,提供了数据监控和友好的图形化展示界面。本节在上一节的基础上,以案例的形式讲述如何使用Hystrix Dashboard监控熔断器的状态。4.7.1 在RestTemplate中使用HystirxDashboard
改造上一节的工程,首先在eureka-ribbon-client工程的pom文件上加上Actuator的起步依赖、Hystrix Dashboard的起步依赖和Hystrix的起步依赖,这3个依赖是必需的。代码如下:
在程序的启动类EurekaRibbonClientApplication加上@EnableHystrixDashboard开启Hystrix Dashboard的功能,完整的代码如下:<dependency> <groupId>org.springframework.boot</groupId> <artifactId>spring-boot-starter-actuator</artifactId> </dependency> <dependency> <groupId>org.springframework.cloud</groupId> <artifactId>spring-cloud-starter-netflix-hystirx-dashboard</artifactId> </dependency> <dependency> <groupId>org.springframework.cloud</groupId> <artifactId>spring-cloud-starter-netflix-hystirx</artifactId> </dependency>
依次启动工程eureka-server、eureka-client和eureka-ribbon-client,在浏览器上访问http://localhost:8764/hi。然后在浏览器上访问http://localhost:8764/hystrix.stream,浏览器上会显示熔断器的数据指标,如图8-3所示。@SpringBootApplication @EnableEurekaClient @EnableHystrix @EnableHystrixDashboard public class EurekaRibbonClientApplication{ public static void main(String[] args) { SpringApplication.run(EurekaRibbonClientApplication.class, args); } }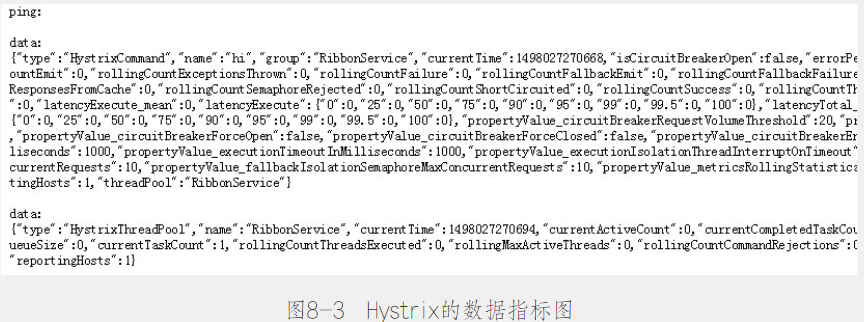
在浏览器上访问http://localhost:8764/hystrix,浏览器显示的界面如图8-4所示。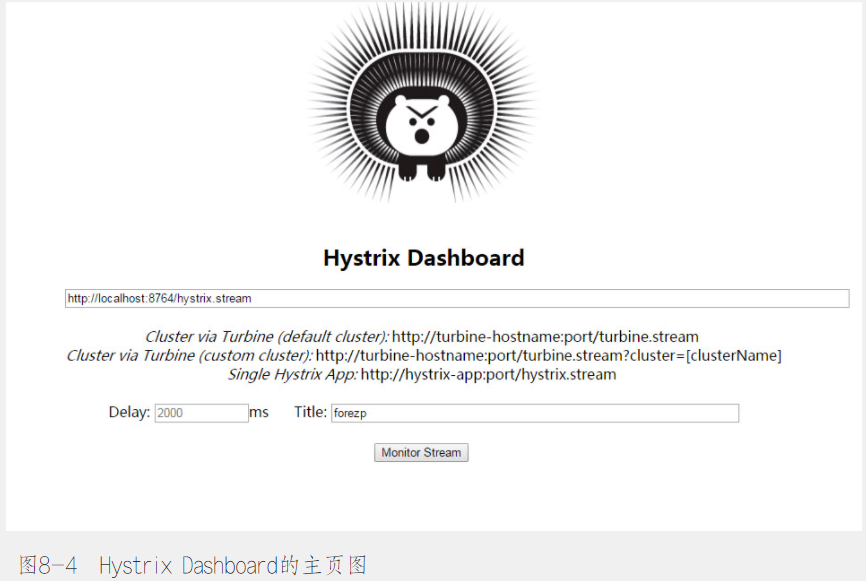
在界面上依次填写http://localhost:8764/hystrix.stream、2000、forezp(这个可以随意填写),单击“monitor”,进入页面,如图8-5所示。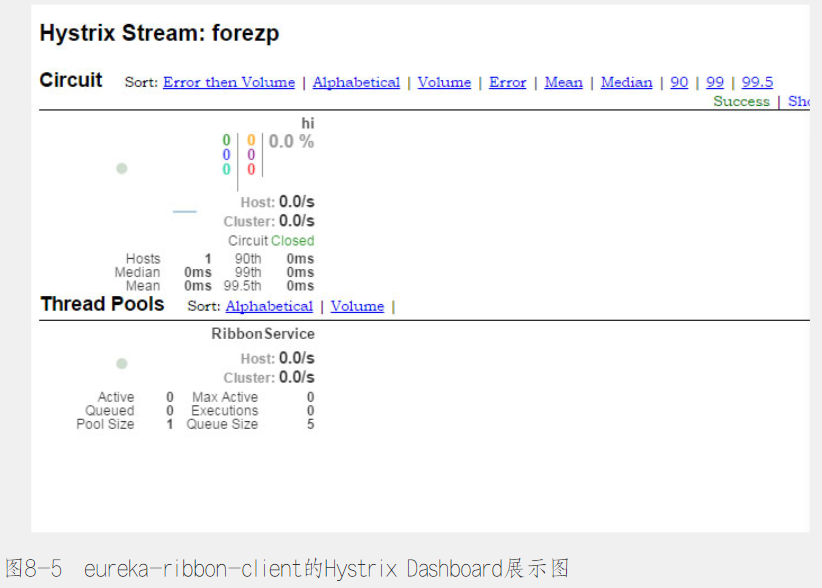
在该页面显示了熔断器的各种数据指标,这些数据指标所表示的含义如图8-6所示,该图来自于Hystrix的官方文档,更多信息可以到GitHub中查阅官方文档。
4.7.2 Feign中使用Hystrix Dashboard
同eureka-ribbon-client类似,eureka-feign-client工程的pom文件需要加上Actuator、Hystrix和Hystrix Dashboard的起步依赖。可能有读者会疑惑:Feign不是自带Hystrix吗?为什么还需要加入spring-cloud-starter-hystrix?这是因为Feign 自带的Hystrix的依赖不是起步依赖。Feign的起步依赖包含的依赖如下:
需要在程序的启动类EurekaFeignClientApplication加上注解@EnableHystrixDashboard开启HystrixDashboard的功能。完整的代码如下:<dependency> <groupId>org.springframework.boot</groupId> <artifactId>spring-boot-starter-actuator</artifactId> </dependency> <dependency> <groupId>org.springframework.cloud</groupId> <artifactId>spring-cloud-starter-netflix-hystirx-dashboard</artifactId> </dependency> <dependency> <groupId>org.springframework.cloud</groupId> <artifactId>spring-cloud-starter-netflix-hystirx</artifactId> </dependency>
只需要上述两步就可以在Feign中开启Hystrix Dashboard的功能。在浏览器上展示Hystrix Dashboard的操作步骤同上一节,本节不再演示。@SpringBootApplication @EnableEurekaClient @EnableFeignClients @EnableHystrixDashboard @EnableHystrix public class EurekaFeignClientApplication { public static void main(String[] args) { SpringApplication.run(EurekaFeignClientApplication.class, args); } }4.8 使用Turbine聚合监控
在使用Hystrix Dashboard组件监控服务的熔断器状况时,每个服务都有一个Hystrix Dashboard主页,当服务数量很多时,监控非常不方便。为了同时监控多个服务的熔断器的状况,Netflix开源了Hystrix的另一个组件Turbine。Turbine用于聚合多个Hystrix Dashboard,将多个Hystrix Dashboard组件的数据放在一个页面上展示,进行集中监控。在上一节的例子上继续进行改造,在主Maven工程下新建一个Module工程,作为Turbine聚合监控的工程,取名为eureka-monitor-client。首先,在工程的pom文件引入工程所需的依赖,包括hystrix dashboard、turbine、actuator和test的起步依赖,完整的代码如下:
然后在工程的配置文件 application加上相关的配置,具体配置代码如下:<dependencies> <dependency> <groupId>org.springframework.boot</groupId> <artifactId>spring-boot-starter-actuator</artifactId> </dependency> <dependency> <groupId>org.springframework.cloud</groupId> <artifactId>spring-cloud-starter-netflix-hystirx-dashboard</artifactId> </dependency> <dependency> <groupId>org.springframework.cloud</groupId> <artifactId>spring-cloud-starter-netflix-hystirx</artifactId> </dependency> <dependency> <groupId>org.springframework.cloud</groupId> <artifactId>spring-cloud-starter-netflix-turbine</artifactId> </dependency> <dependency> <groupId>org.springframework.boot</groupId> <artifactId>spring-boot-starter-test</artifactId> <scope>test</scope> </dependency> </dependencies>
上述配置代码指定了工程的端口号为8769,服务名为service-turbine。turbine.aggregator. app-config配置了需要监控的服务名,如本例中的eureka-ribbon-client和eureka-feign-client。clusterNameExpression默认为服务名的集群,此时用默认的即可。turbine.aggregator.cluster-config可以不写,因为默认就是default。turbine.instanceUrlSuffix必须填写为/histrix.stream,如果不填写,就会从/actuator/hystrix.stream读取。最后指定了服务注册中心的地址为http://localhost:8761/eureka/。spring.application.name: service-turbine server.port: 8769 turbine.combine-host-port: true app-config: eureka-ribbon-client,eureka-feign-client cluster-name-expression: new String("default") aggregator.cluster-config: defaultinstanceUrlSuffix: /hystrix.stream eureka.client.serviceUrl.defaultZone: http://localhost:8761/eureka/
启动工程eureka-server、eureka-client、eureka-ribbon-client和eureka-monitor-client。在浏览器上访问http://localhost:8764/hi?name=forezp和http://localhost:8765/hi?name=forezp。
在浏览器上打开网址http://localhost:8765/hystrix,这个界面为HystrixDashboard 界面。在界面上依次输入监控流的Url地址http://localhost:8769/turbine.stream、监控时间间隔2000毫秒和title,单击“monitor”,可以看到如图8-7所示的界面。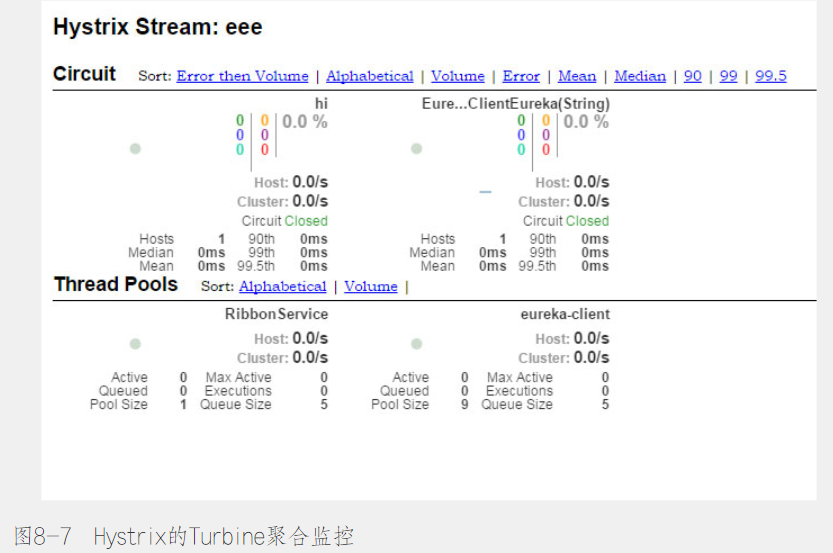
从图8-7中可以看到,这个页面聚合了eureka-ribbon-client和eureka-feign-client的Hystrix Dashboard数据。

若有收获,就点个赞吧
0 人点赞
