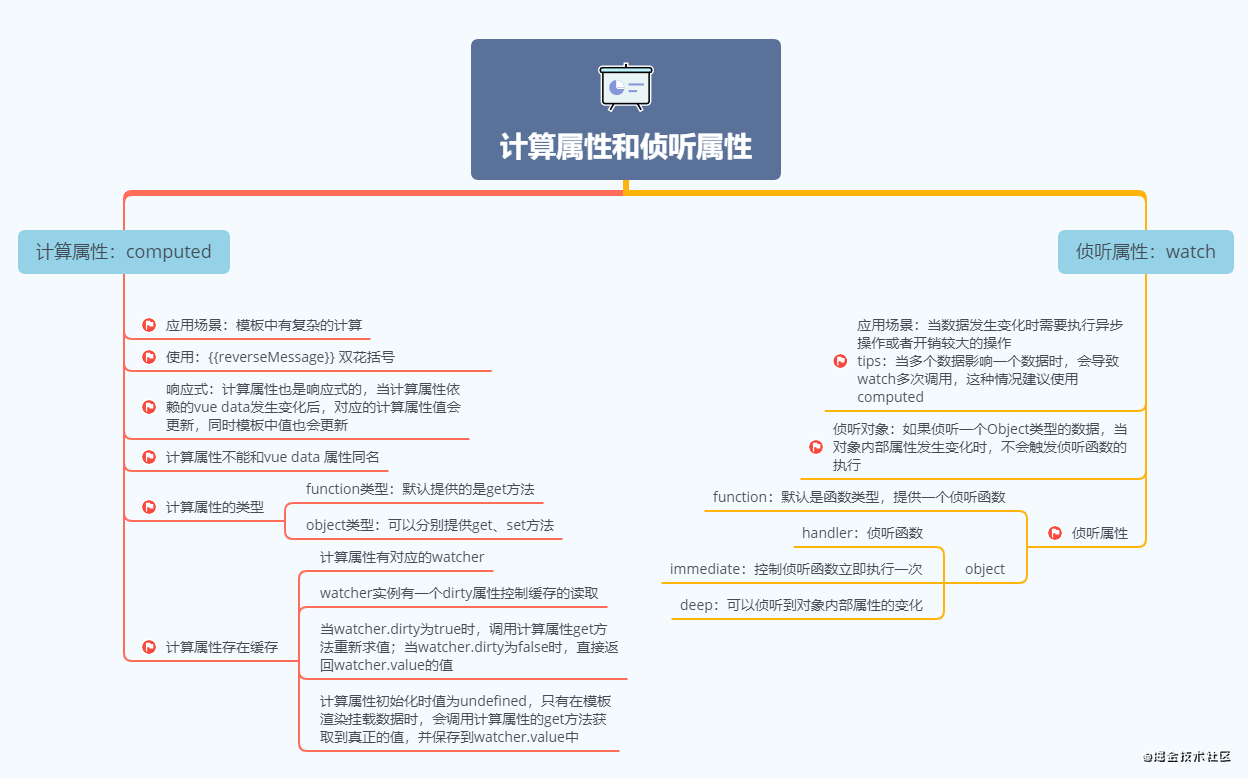
计算属性的set函数
假设兄弟组件共享数据 msg ,我们一般用 Vuex 处理,如下:
import Vue from 'vue';import Vuex from 'vuex';Vue.use(Vuex);const types = {UPDATE_MSG: 'UPDATE_MSG',};const mutations = {[types.UPDATE_MSG](state, payload) {state.msg = payload.msg;},};const actions = {[types.UPDATE_MSG]({ commit }, payload) {commit(types.UPDATE_MSG, payload);},};export default new Vuex.Store({state: {msg: 'Hello world',},mutations,actions,});
需求:兄弟组件共享数据,且数据实时同步,比如在组件 comp1 中使用它,通过改变 comp1 的 msg 值引起 comp2 的 msg 变化,监控数据变化的时候,我们一般是使用watch处理
<template><div class="comp1"><h1>Component 1</h1><input type="text" v-model="msg"></div></template><script>export default {name: 'comp1',data() {const msg = this.$store.state.msg;return {msg,};},watch: {msg(val) {this.$store.dispatch('UPDATE_MSG', { msg: val });},},};</script>
同样对 comp2 做相同修改。当然还得在 src/main.js 中引入:
// main.jsimport Vue from 'vue';import App from './App';import store from './store';Vue.config.productionTip = false;/* eslint-disable no-new */new Vue({store,el: '#app',template: '<App/>',components: { App },});
但是你会发现修改 comp1 中的输入框,通过 vue-devtools 也可查看到 Vuex 中的的 state.msg 的确也跟着变了,但是 comp2 中输入框并没有发生改变,当然这因为我们初始化 msg 时,是直接变量赋值,并未监听 $store.state.msg 的变化,所以两个组件没法实现同步。
解决方案:再添加个 watch 属性,监听 $store.state.msg 改变,重新赋值组件中的 msg 不就行了,确实可以实现,但是这样代码是不是不太优雅,为了一个简单的 msg 同步,我们需要给 data 添加属性,外加两个监听器,这样的实现方式不太优雅,我们对此再次优化,我们直接定义计算属性 msg,然后返回就可以了。
修改 comp1 comp2 如下:
<template><div class="comp1"><h1>Component 1</h1><input type="text" v-model="msg"></div></template><script>export default {name: 'comp1/comp2',computed: {msg: {get() {return this.$store.state.msg;},set(val) {this.$store.dispatch('UPDATE_MSG', { msg: val });},},},};</script>
可以发现 comp1 输入框的值、comp2 输入框的值 和 store 中的值 实现同步更新了。
可配置的 watch
先看一段代码:
// ...watch: {username() {this.getUserInfo();},},methods: {getUserInfo() {const info = {username: 'yugasun',site: 'yugasun.com',};/* eslint-disable no-console */console.log(info);},},created() {this.getUserInfo();},// ...
组件创建的时候,获取用户信息,然后监听用户名,一旦发生变化就重新获取用户信息,这个场景在实际开发中非常常见。那么能不能再优化下呢?
答案是肯定的。其实,我们在 Vue 实例中定义 watcher 的时候,监听属性可以是个对象的,它含有三个属性: deep、immediate、handler,我们通常直接以函数的形式定义时,Vue 内部会自动将该回调函数赋值给 handler,而剩下的两个属性值会默认设置为 false。
这里的场景就可以用到 immediate 属性,将其设置为 true 时,表示创建组件时 handler 回调会立即执行,这样我们就可以省去在 created 函数中再次调用了,实现如下:
<script>export default {watch: {username: {immediate: true,handler: 'getUserInfo',},},methods: {getUserInfo() {const info = {username: 'yugasun',site: 'yugasun.com',};/* eslint-disable no-console */console.log(info);},},}</script>
computed和watch对比

Url改变但组件未变时,created 无法触发的问题
首先默认项目路由是通过 vue-router 实现的,其次我们的路由是类似下面这样的:
// ...const routes = [{path: '/',component: Index,},{path: '/:id',component: Index,},];
公用的组件 src/views/index.vue 代码如下:
<template><div class="index"><router-link :to="{path: '/1'}">挑战到第二页</router-link><br/><router-link v-if="$route.path === '/1'" :to="{path: '/'}">返回</router-link><h3>{{ username }} </h3></div></template><script>export default {name: 'Index',data() {return {username: 'Loading...',};},methods: {getName() {const id = this.$route.params.id;// 模拟请求setTimeout(() => {if (id) {this.username = 'Yuga Sun';} else {this.username = 'yugasun';}}, 300);},},created() {this.getName();},};</script>
两个不同路径使用的是同一个组件 Index,然后 Index 组件中的 getName 函数会在 created 的时候执行,你会发现,让我们切换路由到 /1 时,我们的页面并未改变,created 也并未重新触发
这是因为vue-router会识别出这两个路由使用的是同一个组件,然后会进行复用,所以并不会重新创建组件,那么created周期函数自然也不会触发。
方案一:通常解决办法就是添加 watcher 监听 $route 的变化,然后重新执行 getName 函数。代码如下:
watch: {$route: {immediate: true,handler: 'getName',},},methods: {getName() {const id = this.$route.params.id;// 模拟请求setTimeout(() => {if (id) {this.username = 'Yuga Sun';} else {this.username = 'yugasun';}}, 300);},},
方案二:给 router-view 添加一个 key 属性,这样即使是相同组件,但是如果 url 变化了,Vuejs就会重新创建这个组件。我们直接修改 src/App.vue 中的 router-view 如下:
<router-view :key="$route.fullPath"></router-view>
$attrs 多层组件数据传递
大多数情况下,从父组件向子组件传递数据的时候,我们都是通过 props 实现的,比如下面这个例子:
<!-- 父组件中 --><Comp3:value="value"label="用户名"id="username"placeholder="请输入用户名"@input="handleInput"><!-- 子组件中 --><template><label>{{ label }}<input:id="id":value="value":placeholder="placeholder"@input="$emit('input', $event.target.value)"/></label></template><script>export default {props: {id: {type: String,default: 'username',},value: {type: String,default: '',},placeholder: {type: String,default: '',},label: {type: String,default: '',},},}</script>
但是如果子组件又包含了子组件,而且同样需要传递 id, value, placeholder... 呢?甚至三阶、四阶…呢?那么就需要我们在 props 中重复定义很多遍了。
这个时候就需要 vm.$attrs,官方解释:
包含了父作用域中不作为 prop 被识别 (且获取) 的特性绑定 (class 和 style 除外)。当一个组件没有声明任何 prop 时,这里会包含所有父作用域的绑定 (class 和 style 除外),并且可以通过 v-bind=”$attrs” 传入内部组件—— 在创建高级别的组件时非常有用。
修改代码如下:
<!-- 父组件中 --><Comp3:value="value"label="用户名"id="username"placeholder="请输入用户名"@input="handleInput"><!-- 子组件中 --><template><label>{{ $attrs.label }}<inputv-bind="$attrs"@input="$emit('input', $event.target.value)"/></label></template><script>export default {}</script>
$emit 处理回调
有时候我们会遇到一种场景:子组件向父组件通信,传递事件, vm.$emit (函数)处理完成之后,再处理后面的逻辑。但是 vm.$emit 不支持回调,默认返回的this,也就是组件实例对象。解决方式就是 $parent 。
父组件代码如下:
// tempalte<component:is="componentId"></component>//methodsasync handleRefresh () {await this.getDelayRepaymentInfo()}
子组件代码如下:
async handleRefreshChild() {// await this.$emit('handleRefresh')await this.$parent.handleRefresh()// dosomething...console.log('2、担保人邀请完成 刷新数据', this.guarantorInfo)}
$refs 使用详解
注意:
【使用范围】$refs不能在created生命周期中使用 因为在组件创建时候 该ref还没有绑定元素,
【适用场景】它是非响应的,所以应该避免在模板或计算属性中使用 $refs ,它仅仅是一个直接操作子组件的应急方案
应用一:在DOM元素上使用$refs可以迅速进行dom定位,类似于$(“selectId”),如下
<template><div class="parent"><p ref="testTxt">{{oldMsg}}</p><button @click="changeMsg()">点击修改段落内容</button></div></template><script>export default {data(){return {oldMsg:'这是原有段落数据内容',newMsg:'hello,这是新的段落数据内容!!',}},methods:{changeMsg(){this.$refs.testTxt.innerHTML=this.newMsg;},}}</script>
应用二:通过$refs实现对子组件操作,代码如下:
①使用this.$refs.paramsName能更快的获取操作子组件属性值或函数
parentone.vue 如下:
<template>
    <div class="parent">
        <Childone ref="childItemId"></Childone>
        <p style="color:blue;">{{msgFromChild}}</p>
        <button @click="getChildMsg()">使用$refs获取子组件的数据</button>
    </div>
</template>

<script>
import Childone from './childone'
export default {
    components:{Childone},
    data(){
        return {
            msgFromChild:'',
        }
    },
    methods:{
        getChildMsg(){
            this.msgFromChild=this.$refs.childItemId.childMsg;
        },
    }
}
</script>
childone.vue 如下:
<template>
    <div class="child"></div>
</template>

<script>
export default {
    data(){
        return {
            childMsg:'这是子组件的参数'
        }
    }
}
</script>
扩展到$parent 、$children的使用:
②我们可以使用$children[i].paramsName 来获取某个子组件的属性值或函数,$children返回的是一个子组件数组
这里就只写父组件的代码了,parentone.vue如下:
<template>
    <div class="parent">
        <Childone></Childone>
        <Childtwo></Childtwo>
        <p style="color:blue;">{{msgFromChild}}</p>
        <button @click="getChildMsg()">使用$children来获取子组件的数据</button>
    </div>
</template>

<script>
import Childone from './childone'
import Childtwo from './childtwo'
export default {
    components:{Childone,Childtwo},
    data(){
        return {
            msgFromChild:'',
        }
    },
    methods:{
        getChildMsg(){
            this.msgFromChild=this.$children[1].child2Msg;
        },
    }
}
</script>
③那么子组件怎么获取父组件的数据内容?这需要使用$parent
**
组件数据通信方案总结
组件间不同的使用场景可以分为 3 类,对应的通信方式如下:
- 父子通信:Props / $emit,$emit / $on,Vuex,$attrs / $listeners,provide/inject,$parent / $children&$refs
- 兄弟通信:$emit / $on,Vuex
- 隔代(跨级)通信:$emit / $on,Vuex,provide / inject,$attrs / $listeners

