什么是链表? 之前学习过前两节的数组结构 和 栈和队列结构,我们知道都需要一个固定的大小,当达到这个大小时,我们还要进行动态的扩容,在性能上会有很多的浪费,那么是否有不需要动态扩容的数据结构呢? 当然那就是本章要讲解的链表,链表结构没有固定的大小,通过链式的结构存储数据,但是链表丧失了随机访问的能力.每次访问都要从链表头部遍历.
链表的概念
在之前我们学习过的数组结构以及栈和队列结构,栈和队列其实都是通过数组来实现的,都需要申请一个连续的存储空间,如果申请一个100M空间的数组,当内存的空间没有连续和大小不足时会申请失败.
链表结构,不需要一块连续的存储空间,而是通过 指针 将零散的内存块串联起来.
如下图所示: 数组需要提前申请好空间,很容易造成空间的浪费,而链表不用提前申请好空间,在需要的时候才会申请一块内存空间.
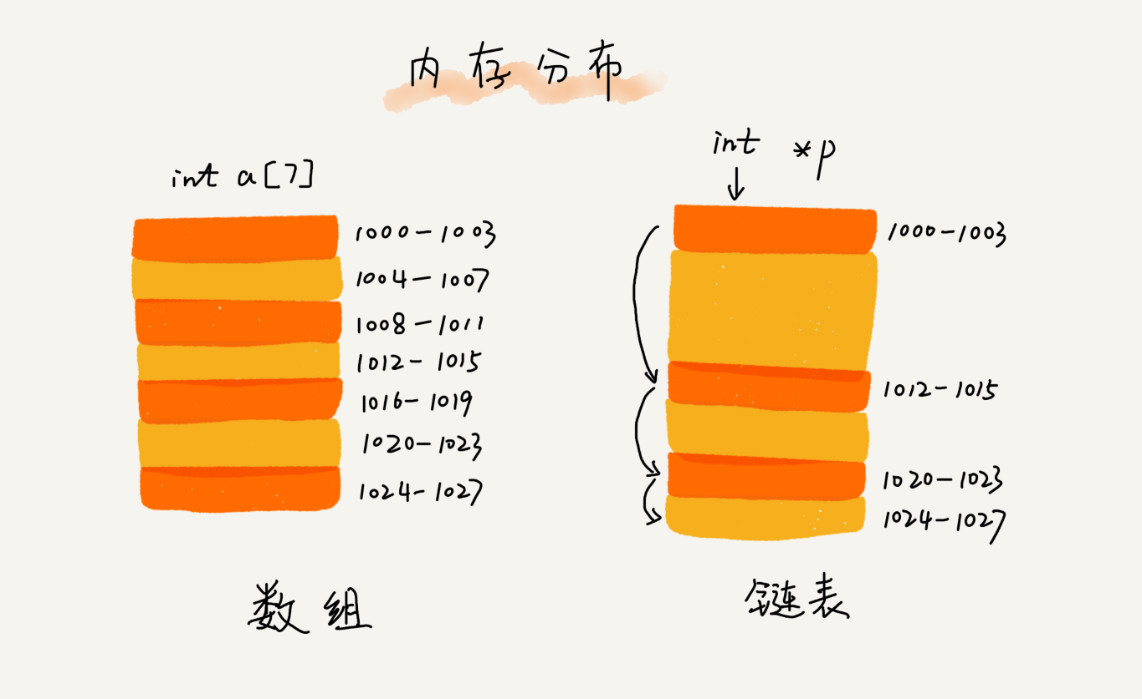
(图片来自:极客时间<数据结构与算法之美>)
链表常见的结构:单链表、双链表、循环链表.在上节栈和队列结构 中,我们也可以使用链表来实现栈和队列.来提高栈和队列的性能
单链表
链表是将零散的 内存块 串联在一起, 内存块 成为链表的节点,为了将所有的节点串联起来,每个节点存储着数据和指向下一个节点的内存地址,也可以叫做 后继指针 .如下图所示,有两个节点比较特殊,头部的节点和尾部的节点,头部节点记录链表的基地址,尾部节点的指针指向了一个空地址.这样就可以对链表进行遍历.
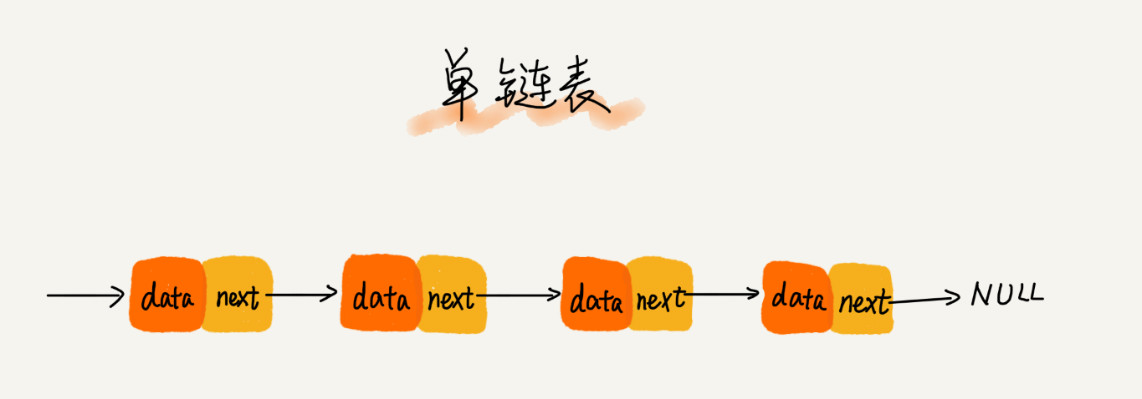
(图片来自:极客时间)
来实现链表的添加、修改、删除操作,代码如下:
首先我们需要一个节点类,节点类中存储数据和指向下一个的节点.然后新建一个虚拟头部节点,值和指针都为NULL
//节点private static class Node<E> {public E e;public Node<E> next;public Node(E e, Node<E> next) {this.e = e;this.next = next;}public Node(Node<E> next) {this(null, next);}public Node(E e) {this(e, null);}}//链表的虚拟头部节点private Node<E> head;private int size;public LinkedList() {this.head = new Node<>(null, null);size = 0;}public int size(){return size;}public boolean isEmpty(){return size == 0;}
添加和删除操作,添加数据的逻辑很简单,我们只需要遍历链表到要添加节点的前一个位置,将指针指向新插入的节点,然后新插入的指针指向后一个节点.而链表的删除操作,需要遍历链表到要删除节点的前一个节点perv,将perv->next 指向要删除节点的下一个节点.然后将要删除节点的下一个节点置为NULL即可.
在上两节讲解的数组操作,在插入和删除,为了保证数据的连续性需要进行大量的搬移操作,所以时间复杂度为O(n),而链表的插入和删除只需要修改相邻节点指针的改变就可以了,时间复杂度为O(1).但是链表的随机性访问就没有那么高效了,需要根据指针一个一个节点的遍历.就好像一个队伍,前面的人都知道自己后面的人是谁,但是要只要第K个人是谁就需要一个一个的往下数了.链表的插入操作每次都需要new Node节点,在性能上也存在一定的损耗.
如下图所示: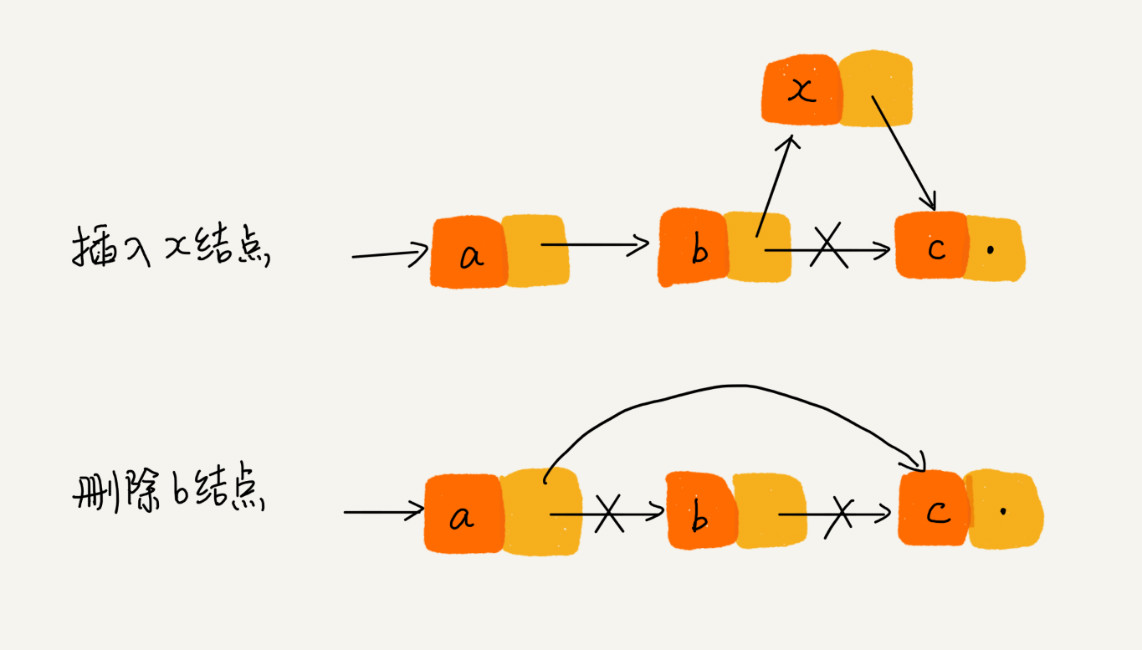
(图片来自:极客时间)
理论讲解完毕,下面我们通过代码来实现链表的插入和删除操作
public void add(E e, int index) {if (index < 0 || index > size)throw new IllegalArgumentException("index > 0 && index < size");Node perv = head;for (int i = 0; i < index; i++) {perv = perv.next;}// Node<E> node = new Node<>(e);// node.next = perv.next;// perv.next = node;perv.next = new Node(e, perv.next);size++;}/*** 添加尾节点* O(n)* @param e*/public void addLast(E e) {add(e, size);}/*** 添加头节点* O(1)* @param e*/public void addFirst(E e) {// Node<E> node = new Node<>(e);// node.next = head;// head = node;add(e, 0);}public E remove(int index) {if (index < 0 && index >= size) {throw new IllegalArgumentException("Remove Error,Illegal index");}Node<E> prev = head;//从0开始查找for (int i = 0; i < index; i++) {prev = prev.next;}Node<E> dNode = prev.next;prev.next = dNode.next;dNode.next = null;size--;return dNode.e;}public E removeFirst() {return remove(0);}public E removeLast() {return remove(size - 1);}//修改某个节点的值,我们只需要遍历找到这个节点然后修改它的值即可public void set(int index, E e) {if (index < 0 && index >= size) {throw new IllegalArgumentException("Set Error,Illegal index");}Node<E> node = head.next;//由于head是虚拟节点 获取下一个节点为头节点for (int i = 0; i < index; i++) {node = node.next;}node.e = e;}
写完之后,我们写一个测试用例(好习惯)来看看链表是否正确
public static void main(String[] args) {LinkedList<Integer> linkedList = new LinkedList<>();for (int i = 0; i < 5; i++) {linkedList.addFirst(i);System.out.println(linkedList);}linkedList.add(266, 2);System.out.println(linkedList);linkedList.set(2,100);System.out.println(linkedList);linkedList.remove(2);System.out.println(linkedList);linkedList.removeFirst();System.out.println(linkedList);linkedList.removeLast();System.out.println(linkedList);}
输出结果:
//头部插入0 -> null1 -> 0 -> null2 -> 1 -> 0 -> null3 -> 2 -> 1 -> 0 -> null4 -> 3 -> 2 -> 1 -> 0 -> null//中间插入4 -> 3 -> 266 -> 2 -> 1 -> 0 -> null//修改某个节点的值4 -> 3 -> 100 -> 2 -> 1 -> 0 -> null//删除节点4 -> 3 -> 2 -> 1 -> 0 -> null3 -> 2 -> 1 -> 0 -> null3 -> 2 -> 1 -> null
链式栈结构
在上述中,讲解了单链表的实现,我们来分析一下单链表的一些操作的时间复杂度.
- 头部插入和头部删除操作,我们只需要修改头节点便可,时间复杂度为O(1)
- 中间某个位置插入和删除,都需要对节点进行遍历,时间复杂度为:O(n)
- 尾部插入和删除,需要对节点遍历到尾部,时间复杂度为O(n)
从上面的结论中,可以看出链表的头部插入和头部删除操作时间复杂度为O(1),速度非常快,那么大家想一想有哪些操作是只对头部进行操作呢?
没错就是栈结构,栈结构是后进先出,在上一节中栈和队列结构 中栈结构应用非常广泛,通过数组来实现的栈结构,对数组的尾部进行插入和删除操作同样时间复杂度为O(1),但是数组是一个固定大小的连续存储空间,当数组大小不够时,需要对数组进行扩容操作,当数组太小时需要对数组进行缩容操作,防止数组占用太多的存储空间,所以用数组实现的栈结构当需要很多数据时,在效率上就不是很高了.
链表来实现栈结构,其实非常简单的,用上面实现的单链表结构,对链表进行头部操作即可.代码如下:
public class LinkedStack<E> implements Stack<E> {private LinkedList<E> linkedList;public LinkedStack() {linkedList = new LinkedList<>();}@Overridepublic void push(E e) {linkedList.addFirst(e);}@Overridepublic E pop() {return linkedList.removeFirst();}@Overridepublic E peek() {return linkedList.getFirst();}@Overridepublic int size() {return linkedList.size();}@Overridepublic boolean isEmpty() {return linkedList.isEmpty();}@Overridepublic String toString() {StringBuilder builder = new StringBuilder();builder.append("Stack:top");builder.append(linkedList);return builder.toString();}}
我们使用上述非常简单的代码,就可以实现非常高性能的栈结构,保持好习惯我们写一个测试用例来测试是否正确.
public static void main(String[] args) {LinkedStack<Integer> linkedStack = new LinkedStack<>();for (int i = 0; i < 5; i++) {linkedStack.push(i);System.out.println(linkedStack);}linkedStack.pop();System.out.println(linkedStack);}输出:Stack:top 0 -> nullStack:top 1 -> 0 -> nullStack:top 2 -> 1 -> 0 -> nullStack:top 3 -> 2 -> 1 -> 0 -> nullStack:top 4 -> 3 -> 2 -> 1 -> 0 -> nullStack:top 3 -> 2 -> 1 -> 0 -> null
下面我们通过一个例子来测试一下,数组实现的栈结构和链表实现的栈结构,性能对比:
// 测试使用q运行opCount个enqueueu和dequeue操作所需要的时间,单位:秒private static double testQueue(Stack<Integer> q, int opCount) {long startTime = System.nanoTime();Random random = new Random();for (int i = 0; i < opCount; i++)q.push(random.nextInt(Integer.MAX_VALUE));for (int i = 0; i < opCount; i++)q.pop();long endTime = System.nanoTime();return (endTime - startTime) / 1000000000.0;}public static void main(String[] args) {int opCount = 1000000;ArrayStack<Integer> arrayQueue = new ArrayStack<>();//0.020double time1 = testQueue(arrayQueue, opCount);System.out.println("ArrayQueue, time: " + time1 + " s");LinkedStack<Integer> loopQueue = new LinkedStack<>();//0.008 链表栈比数组栈性能要高一些,因为数组栈要就行扩容,而链表要不停的new操作,都//存在性能问题 在复杂度上没有巨大的差异double time2 = testQueue(loopQueue, opCount);System.out.println("LoopQueue, time: " + time2 + " s");}输出:ArrayStack, time: 0.020 sLinkedStack, time: 0.008 s
在上述代码中, ArrayStack 和 LinkedStack 分别进行了10万条数据的插入和删除.链表栈比数组栈性能要高一些,因为数组栈要就行扩容,而链表要不停的new操作,都存在性能问题 在复杂度上没有巨大的差异.
链式队列结构
既然链表可以实现栈结构,同样链表也可以实现队列结构, 队列是先进先出结构,所以我们可以通过一个标记尾部的节点来进行队列的入队操作,这样做我们在入队时就已经知道了尾部节点,而不需要进行遍历操作.一个标记的头节点进行队列的出队操作.这样入队和出队时间复杂度都为O(1)
代码实现如下:
public class LinkedQueue<E> implements Queue<E> {//节点private static class Node<E> {public E e;public Node<E> next;public Node(E e, Node<E> next) {this.e = e;this.next = next;}public Node(Node<E> next) {this(null, next);}public Node(E e) {this(e, null);}}private Node<E> head, tail;private int size = 0;public LinkedQueue() {head = null;tail = null;size = 0;}@Overridepublic void enqueue(E e) {if (tail == null) {tail = new Node<>(e, null);head = tail;} else {tail.next = new Node<>(e, null);tail = tail.next;}size++;}@Overridepublic E dequeue() {if (isEmpty()) {throw new IllegalArgumentException("queue is Empty");}Node<E> eNode = head;head = head.next;eNode.next = null;if (head == null) {tail = null;}size--;return eNode.e;}@Overridepublic boolean isEmpty() {return size == 0;}@Overridepublic int size() {return size;}@Overridepublic E getTopQueue() {if (tail != null) {return tail.e;}return null;}}
保持好习惯,我们来用一个测试用例来检测我们的代码是否正确
public static void main(String[] args) {LinkedQueue<Integer> arrayQueue = new LinkedQueue<Integer>();for (int i = 0; i < 6; i++) {arrayQueue.enqueue(i);}System.out.println(arrayQueue);arrayQueue.dequeue();System.out.println(arrayQueue);arrayQueue.enqueue(7);System.out.println(arrayQueue);arrayQueue.dequeue();System.out.println(arrayQueue);}输出:Queue:0 -> 1 -> 2 -> 3 -> 4 -> 5 -> topQueue:1 -> 2 -> 3 -> 4 -> 5 -> topQueue:1 -> 2 -> 3 -> 4 -> 5 -> 7 -> topQueue:2 -> 3 -> 4 -> 5 -> 7 -> top
链式队列结构实现完成后,我们做一个性能对比,在上一节中我们实现了数组队列和循环队列,用我们实现的链式队列和这两个队列进行打擂台,看看哪个性能更好.
// 测试使用q运行opCount个enqueueu和dequeue操作所需要的时间,单位:秒private static double testQueue(Queue<Integer> q, int opCount) {long startTime = System.nanoTime();Random random = new Random();for (int i = 0; i < opCount; i++)q.enqueue(random.nextInt(Integer.MAX_VALUE));for (int i = 0; i < opCount; i++)q.dequeue();long endTime = System.nanoTime();return (endTime - startTime) / 1000000000.0;}public static void main(String[] args) {int opCount = 100000;ArrayQueue<Integer> arrayQueue = new ArrayQueue<>();double time1 = testQueue(arrayQueue, opCount);System.out.println("ArrayQueue, time: " + time1 + " s");LoopQueue<Integer> loopQueue = new LoopQueue<>();double time2 = testQueue(loopQueue, opCount);System.out.println("LoopQueue, time: " + time2 + " s");LinkedQueue<Integer> linkedQueue = new LinkedQueue<>();double time3 = testQueue(linkedQueue, opCount);System.out.println("linkedQueue, time: " + time3 + " s");}输出:ArrayQueue, time: 3.371875371 sLoopQueue, time: 0.015056431 slinkedQueue, time: 0.009146646 s
在上述代码中,我们用一万条数据进行了插入和删除操作,很明显 linkedQueue 的性能要高出 ArrayQueue 和 LoopQueue 很多. 这也充分证明了在编程使用正确的数据结构,有助于我们系统性能的提高.

若有收获,就点个赞吧
0 人点赞
