在说parse之前,我们要先来了解一下ast是什么东东。
在编译型语言的源代码执行之前,通常会经历三个步骤。分别是分词,解析,生成。很多都说js是动态语言,可实际上,js其实也是一门编译型语言,只不过实在运行前非常快速的编译,并且编译过程要复杂的多。
我们先来按照编译器的思维看看一个代码是如何编译的。
一、分词过程
function sum(a,b) {const c = 1;return a+b+c+2;}
如果编译器遇到上述代码,会先将可拆解的部分和节点,拆成最小词法单元。首先这段代码块,会被识别成一个FunctionDeclaration(函数声明)对象。这个函数声明又有哪几部分组成呢?
function关键字指明声明函数,sum是一个Identifier标识符,会被编译器提取成为一个id节点(名字),标识这个函数的局部唯一性。然后我们会看到这个函数又有两个参数,分别又会生成两个param节点,他们都是属于标识符类型(并非声明)。
进入function内部,也就是函数体,会被编译器解析成可执行代码块,即BlcokStament,BlockStament下又有两个节点,一个是VariableDeclaration(变量声明),一个是ReturnStatement(返回代码块)。
_
编译器还会接着往下拆,首先拆这个变量声明const c = 1;首先我们知道了,这个变量声明的类型是const,我们用一个kind属性,来记住他的类型,其他类型还有var和let。再拆,他有一个标识符,名字叫做c。然后右边是一个初始化节点,他的value是1。到此为止,这个变量声明已经拆不下去了。
下面再来拆返回代码块,这个代码会被分析成为一个二元表达式,加减乘除取余与或非这样的操作符处理变量,都会被认为是二元表达式。
到这里,我们可以得出一个结论,代码的关键字,标识符,代码块,操作符等等,所有语言表象上提供给我们的工具,都是可以被拆解成代码单元的。并能被ast描述出来。函数声明,变量声明,参数命名,赋值操作,还有函数调用等等,都是可以通过节点来描述出来的。
二、生成ast。
现在我们来看看这段代码的解析树。
其他的都好理解,返回代码块有些不好理解。
为什么会是上面这种树形结果?因为表达式解析是按照栈结构来解析的,后进先出,所以从右边开发起算,然后每碰到一个操作符,即入栈,直到无操作符为止。
三、代码生成。
既然代码能被抽象成语法树,我们平时做开发,通常都是数据驱动功能,那么编译器也可以根据语法树去生成平台可执行代码的。这个过程,是和语言以及平台息息相关的。每个语言和平台,都会有不同的处理。
和一些强类型语言不同的是,js的编译是在执行前的几毫秒内。所以才会让人忽略掉js本质也是编译语言的事实。
现在既然知道了这个过程,那我们就可以试着去解析出这样的代码,并且转换,babel就是这样做的。其核心思路就是利用各种有效的数据结构(例如栈),逐个字符解析代码,并分析,最后转换。所幸,这部分最复杂最细碎的功能,现在已经有了现成的工具库,babel基于此,webpakc也基于此,uglify也基于此。如果真的要去实现一个分词器+ast生成器,有了思路并不是一件特别难的事,可大量的时间大量的测试是避免不了的,所以我们还是以了解实现思路为主,暂时先站在巨人的肩膀上玩玩。
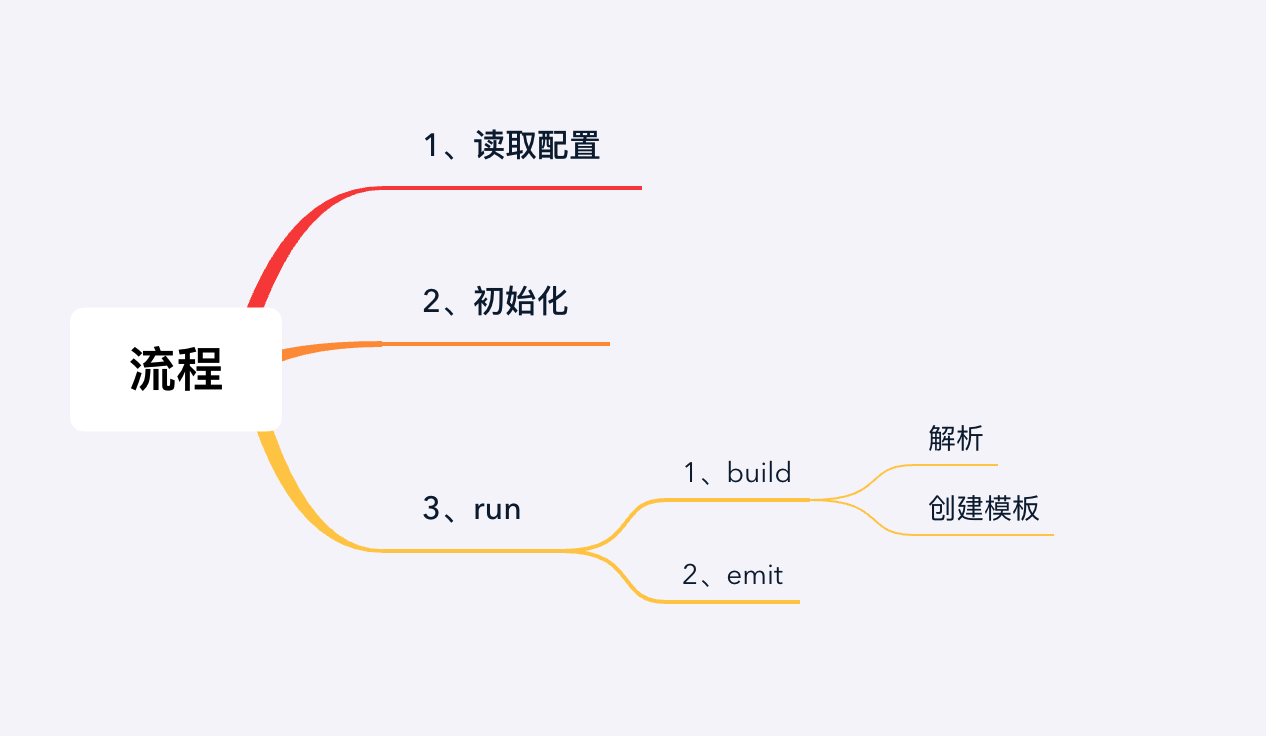
babel所使用底层的库目前是@babel/parse,@babel/traverse,@babel/generaor,@babel/types等,分别负责分词解析ast,遍历ast,构建代码,创建规范节点。
我们通过传入sourceMap的源码,就可以分析出上述的代码,经过遍历转换,最后生成代码,即可实现module的转换与依赖的分析。下面进入代码演示环节
const parser = require('@babel/parser');const { default: traverse } = require('@babel/traverse');const { default: generator } = require('@babel/generator');const { stringLiteral } = require('@babel/types');class Compiler {constructor(config) {// 记录入口文件的idthis.entryId = '';// modulethis.modules = {};// 储存config文件this.config = config;// 找到entryFilethis.entryFile = path.resolve(this.config.entry);// 工作目录this.workspace = path.resolve();}async buildMode(modulePath , entry) {// 读取文件内容const source = await this.getSource(modulePath);// 获取到模块基于工作空间中的相对路径差值// 这部分差值,即是moduleId// 即 /workspace/src - /workspace = ./srcconst moduleName = `./${ path.relative(this.workspace , modulePath) }`;// 获取解析模块依赖,且转换后的源码和依赖。const { sourceCode , dependencies } = this.parse(source , path.dirname(moduleName));this.modules[moduleName] = sourceCode;if (entry) {this.entryId = moduleName;}// 将依赖项,进一步的分析构建,进行递归await Promise.all(dependencies.map(async dep => {await this.buildMode(dep , false);}));}parse(source , parentPath) {// 分词并解析出ast树const ast = parser.parse(source , {sourceType: 'module'});// 依赖listconst dependencies = [];traverse(ast , {// 如果是调用表达式CallExpression(nodePath) {const { node } = nodePath;// 如果声明的名字是require// 函数调用表达式的callee是个标识符对象if (node.callee.name === 'require') {// require函数唯一一个参数即是依赖模块的路径const moduleName = node.arguments[0].value;// 计算出绝对路径const modulePath = path.join(parentPath , moduleName);// 获取后缀const extname = path.extname(moduleName);// 计算相对路径 即sourceModule的keyconst fullModuleName = './' + (extname ? modulePath : modulePath + extname);// 更改命名为__webpack__requirenode.callee.name = '__webpack__require__';// 将参数 改为转换后的字面量node.arguments = [ stringLiteral(fullModuleName) ];dependencies.push(fullModuleName);}} ,VariableDeclaration({ node }) {node.kind = 'var';}});const sourceCode = generator(ast).code;console.log(sourceCode);return {sourceCode ,dependencies ,};}async run() {// 构建await this.buildMode(this.entryFile , true);// 发射文件await this.emitFile();}}
当buildMode方法整个递归结果执行完成后,我们已经生成了初始的sourceModule。但是初始的sourceModule,和我们要实现的代码还有些差。
接下来,就应该把这个文件转成最终的打包文件。执行emitFile方法。
const parser = require('@babel/parser');
const { default: traverse } = require('@babel/traverse');
const { default: generator } = require('@babel/generator');
const { stringLiteral } = require('@babel/types');


class Compiler {

  constructor(config) {
        // 记录入口文件的id
        this.entryId = '';
        // module
        this.modules = {};
        // 储存config文件
        this.config = config;
        // 找到entryFile
        this.entryFile = path.resolve(this.config.entry);
        // 工作目录
        this.workspace = path.resolve();
  }

  async buildMode(modulePath , entry) {
        // 读取文件内容
        const source = await this.getSource(modulePath);
        // 获取到模块基于工作空间中的相对路径差值
        // 这部分差值,即是moduleId
        // 即 /workspace/src - /workspace = ./src
        const moduleName = `./${ path.relative(this.workspace , modulePath) }`;
        // 获取解析模块依赖,且转换后的源码和依赖。
        const { sourceCode , dependencies } = this.parse(source , path.dirname(moduleName));

        this.modules[moduleName] = sourceCode;

        if (entry) {
            this.entryId = moduleName;
        }

        // 将依赖项,进一步的分析构建,进行递归
        await Promise.all(dependencies.map(async dep => {
            await this.buildMode(dep , false);
        }));

  }

  parse(source , parentPath) {
            // 分词并解析出ast树
        const ast = parser.parse(source , {
            sourceType: 'module'
        });
            // 依赖list
        const dependencies = [];
        traverse(ast , {
            // 如果是调用表达式
            CallExpression(nodePath) {
                const { node } = nodePath;
                // 如果声明的名字是require
                  // 函数调用表达式的callee是个标识符对象
                if (node.callee.name === 'require') {
                    // require函数唯一一个参数即是依赖模块的路径
                    const moduleName = node.arguments[0].value;
                    // 计算出绝对路径
                    const modulePath = path.join(parentPath , moduleName);
                    // 获取后缀
                    const extname = path.extname(moduleName);
                    // 计算相对路径 即sourceModule的key
                    const fullModuleName = './' + (extname ? modulePath : modulePath + extname);
                    // 更改命名为__webpack__require
                    node.callee.name = '__webpack__require__';
                    // 将参数 改为转换后的字面量
                    node.arguments = [ stringLiteral(fullModuleName) ];
                    dependencies.push(fullModuleName);
                }
            } ,
            VariableDeclaration({ node }) {
                node.kind = 'var';
            }

        });
        const sourceCode = generator(ast).code;
        console.log(sourceCode);
        return {
            sourceCode ,
            dependencies ,
        };
    }

      replaceModules() {
        return Object.keys(this.modules).map((key) => {
            return `'${ key }': function(module,exports,__webpack__require__) {
                                              ${ this.modules[key] }
                                          } ,`;
        });

    };


    async emitFile() {
                // 拼接dist文件路径
        const main = path.join(this.config.output.path , this.config.output.filename);
        // 替换全部module为webpack的模块化作用域代码
        const newModules = this.replaceModules();
                // 模板变量替换
        const newTemplate = emitFileTemplate.replace("<%=modules%>" , `{${ newModules.join('\n') }}`);
        // 替换入口执行方法
        const code = newTemplate.replace("<%=entryId%>" , JSON.stringify(this.entryId));


        this.assets = {};

        this.assets[main] = code;
          //  写入文件
        return fs.writeFile(main , code);
    }

   async run() {
        // 构建
        await this.buildMode(this.entryFile , true);
        // 发射文件
        await this.emitFile();
    }

}
现在试运行下代码,跑起来了。放在浏览器可用,这个模块化打包机,算是完成了,但接下来,我们还有好多的功能没有实现。
附加
表达式和字面量的区别:
首先,表达式和字面量相同的点是,他们都会产生值。
表达式是要通过rhs结合操作符(二元表达式,三元表达式等)而间接产生的值。
字面量则是直接值,也可以成为直接量。

若有收获,就点个赞吧
0 人点赞
