React.createElement()
这是初学React时重要的api,第一个参数为要创建的元素,第二个参数为对象接收类名或绑定事件,第三个参数开始接收子元素。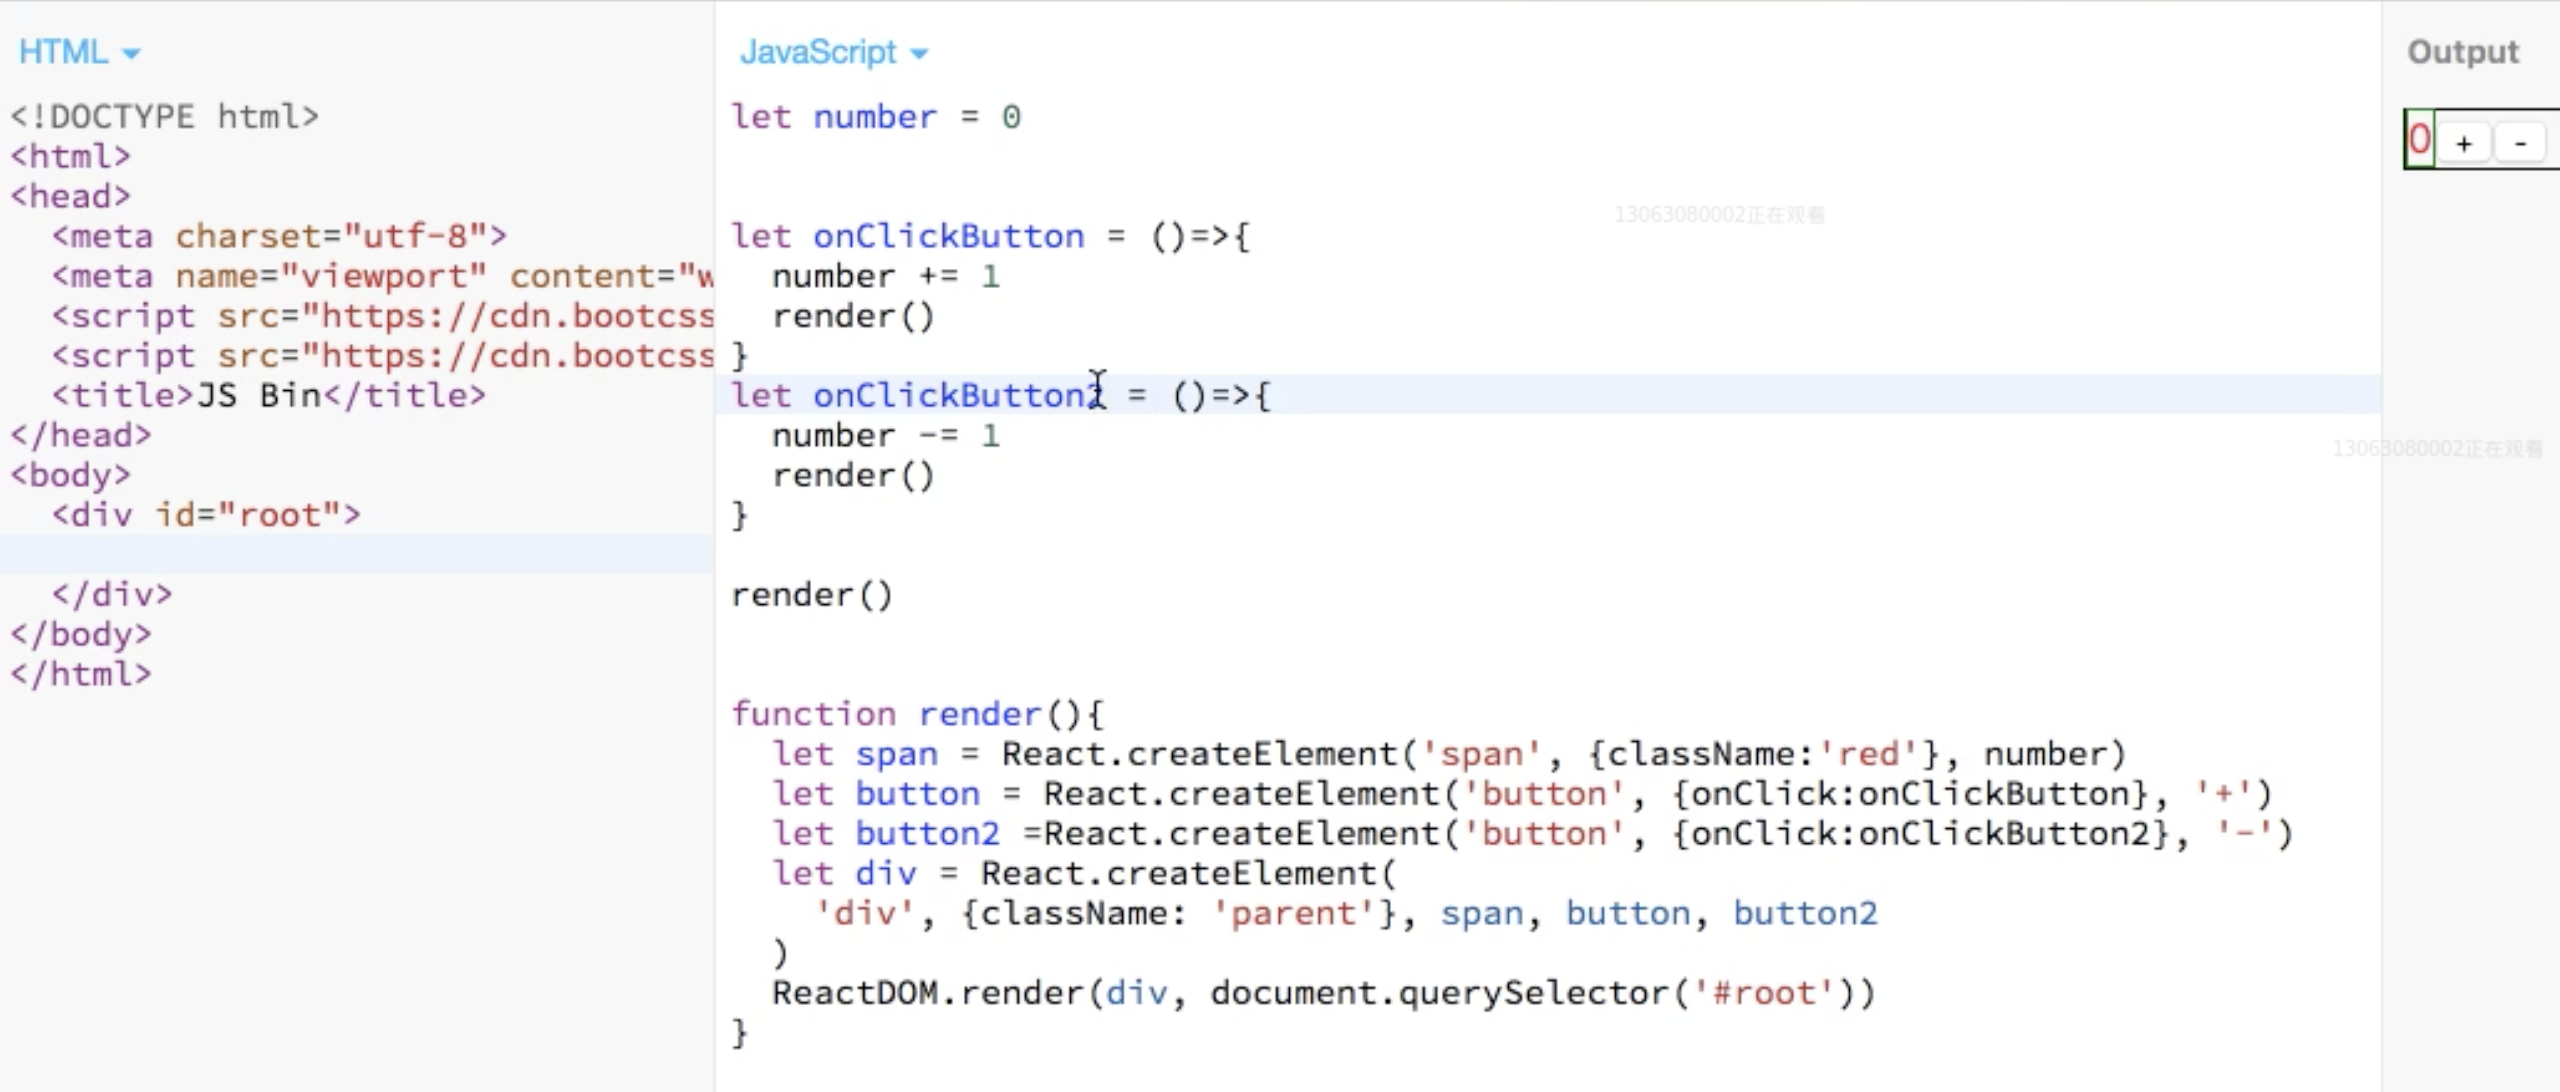
如上,我们借助React提供的CreateElement和render函数,可以很简单的生成视图与标签,不用再像原生JS那样手动获取dom再操作dom。下面动手来优化这个代码。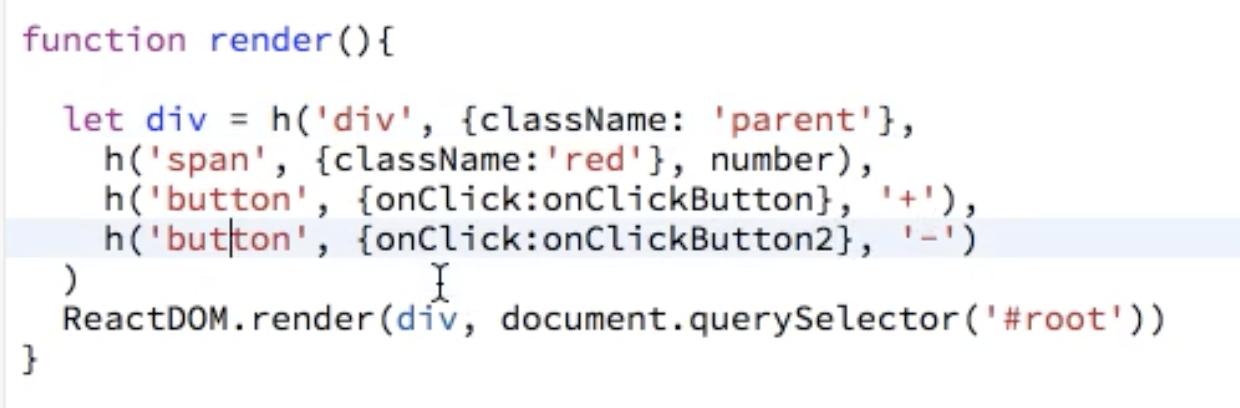
我们很容易的把render函数中临时变量替换掉,减少重复代码。优化到这步,我们发现div的结构和HTML代码很相似,如下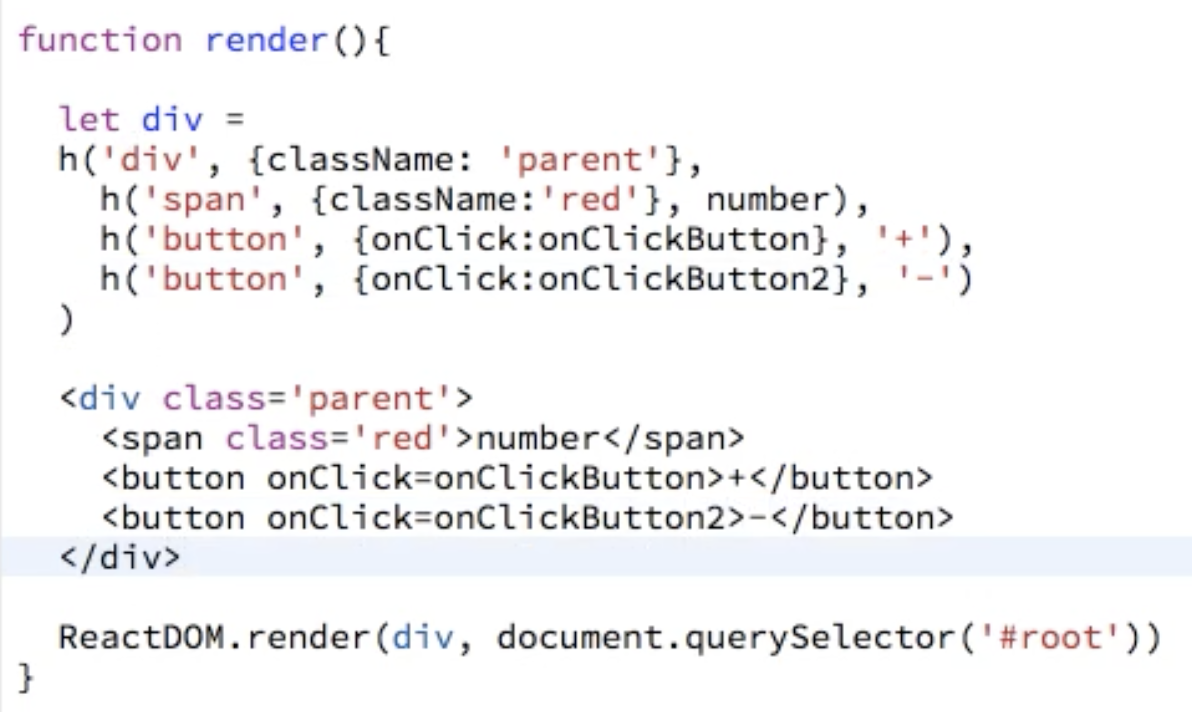
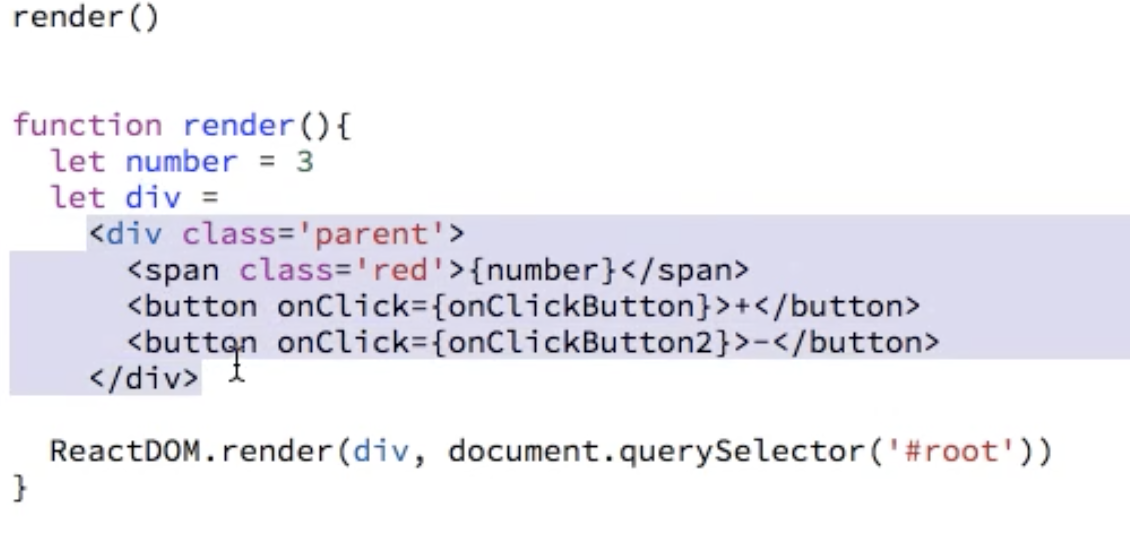
我们现在知道,上图中从下面到上面的语法我们称之为JSX,并且Babel支持将JSX转译为React语法。
jsx
jsx其实就是javascript的一种扩展,其最终会被编译为js,书写起来就像html一样。注意如下:
- React DOM 使用
className和htmlFor来对应class与for; - jsx接收表达式,表达式用{}括起来。中间可以是三元运算等等;
- jsx的样式常用内连的方式,如下
var myStyle = {fontSize: 100,color: '#FF0000'};ReactDOM.render(<h1 style = {myStyle}>菜鸟教程</h1>,document.getElementById('example'));
使用Class语法
- 用class的方式来表达组件,可以隔离作用域,使每个函数组件都有自己的状态。
- 如果组件内部非常纯净,没有需要维护的状态,就可以使用function,反之,使用Class。
```javascript
// 下面这两种组件是完全一样的
// 同时注意,ES6 Class里面可以直接使用props对象参数
function Welcome(props) {
return
Hello, {props.name}
; }
class Welcome extends React.Component { render() { return
Hello, {this.props.name}
; } }
- 完整例子如下```javascriptfunction App(props){return (<div><Box1 name="frank"/><Box2 name="jack"/></div>)}class Box1 extends React.Component{constructor(props){super(props)this.state = { // 在constructor中初始化statenumber: 0}}add(){this.setState({number: this.state.number + 1})}minus(){this.setState({number: this.state.number - 1})this.state.number -= 1render()}render(){ // 在render 函数中访问state的数据return (<div className="red"><span>{this.state.number}</span><button onClick={this.add.bind(this)}>+</button><button onClick={this.minus.bind(this)}>-</button>{this.props.name}</div>)}}class Box2 extends React.Component{constructor(props){super(props)this.state = {number: 0}}add(){this.setState({number: this.state.number + 2})}minus(){this.setState({number: this.state.number - 2})}render(){return (<div className="red"><span>{this.state.number}</span><button onClick={this.add.bind(this)}>+2</button><button onClick={this.minus.bind(this)}>-2</button>{this.props.name}</div>)}}render()function render(){ReactDOM.render(<App/>, // React.createElement(App)document.querySelector('#root'))}
- setstate会自动调用render,执行视图更新,且只会刷新更改的部分。
- https://jsbin.com/nezocuk/2/edit?html,js,output
state
我们已经知道React的组件实际上就是一个函数,而state实质上是函数的私有变量,外部其他组件或者方法都是无法直接访问到内部的state。 而state主要被设计用于维持组件内部私有状态。注意:不能修改state,而必须通过setState!否则直接修改并不会触发组件的render。setState
用来修改state,如果我们按照直觉,在一个方法内直接修改state的状态,如**this**``.state.time = (+``**new**`` ``Date``()),这样其实是不会带来视图的改变的!
React对于setState的定义为请求React修改某个数据,而React的实现则是将对变量的修改放入一个修改队列中,在一个循环之后进行批量更新结果(深入点涉及VDom的更新机制)。所以,这里会造成一个问题,就是setState数据之后立刻进行读取,可能你读取到的数据,并非是已经被更新过的有效值。
setState有多种使用方式,如下:
- 直接赋值 ```javascript import React, { PureComponent } from ‘react’
export default class index extends PureComponent { constructor(props){ super(props) this.state = {name:’demo react’,time:+new Date()} } handleUpdateName () { // this.state.time = (+new Date()) console.log(‘修改前的值’,this.state.time) this.setState({time:+new Date()}) // 此处直接赋值 console.log(‘修改后的值’,this.state.time) let that = this setTimeout(function(){ console.log(‘当前state值’,that.state.time) }) } render() { return (
组件生成时间:{this.state.time}
点击按钮,控制台输出了不同的值,可以观察到`setState`是**采用异步队列**模式的,也就是说多个setState()调用有可能被合并为一次更新,所以不能依赖它的值计算下一次state的更新,记住异步的坑!<br />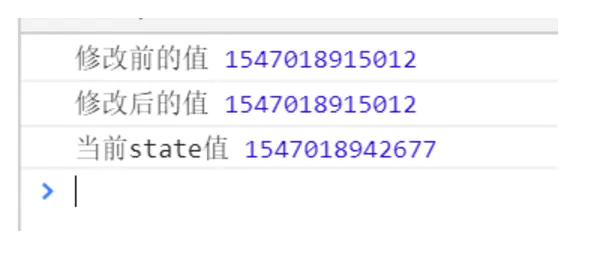2. **赋值完成等待同步完成之后执行回调**现在出现了一个问题,如果我们需要通过等待`setState`修改完成的值之后,应该如何处理?React为我们的`setState`提供了第二个参数`callback`。```javascriptimport React, { PureComponent } from 'react'export default class index extends PureComponent {constructor(props){super(props)this.state = {name:'demo react',time:+new Date()}}handleUpdateName () {// this.state.time = (+new Date())console.log('修改前的值',this.state.time)this.setState({time: +new Date()},(function(){ // 回调函数将在设置状态成功后执行,可以获取最新的state值console.log('当前state值',that.state.time)})console.log('修改后的值',this.state.time)}render() {return (<div>Hello world React!{this.state.name}<p>组件生成时间:{this.state.time}</p><button onClick={this.handleUpdateName.bind(this)}>修改值</button></div>)}}
再次运行,并且点击按钮。我们可以看到控制台输出的值是跟第一个方法是一致的。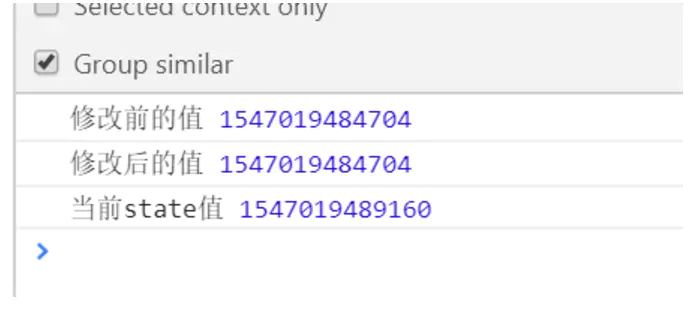
- 通过原始数据进行更新
在某些场景下面,我们可能是新的值是基于上一次的值推算而来,所以React提供了setState传递进方法来进行推算处理。他接受两个参数,第一个为前一个状态,第二个参数为应用更新后的状态(props),如下:
// 不可取this.setState({counter: this.state.counter + this.props.increment,});this.setState((prevState, props) => ({counter: prevState.counter + props.increment}));
import React, { PureComponent } from "react";export default class index extends PureComponent {constructor(props) {super(props);this.state = { name: "demo react", time: +new Date() };}handleUpdateName() {console.log("修改前的值", this.state.time);let that = this;this.setState(oldData => {return { time: oldData.time + 1000 };});console.log("修改后的值", this.state.time);setTimeout(function() {console.log("当前state值", that.state.time);});}render() {return (<div>Hello world React!{this.state.name}<p>组件生成时间:{this.state.time}</p><button onClick={this.handleUpdateName.bind(this)}>修改值</button></div>);}}
props
我们知道,在函数中有带参数的方法,那么props其实就是传入方法中的参数。并且在React中props是只读属性。在使用场景上,是由父组件向子组件传递值的时候使用的。
import React, { PureComponent } from "react";export default class index extends PureComponent {constructor(props) {super(props);}render() {return (<div style={{'background':'#fefefe'}}>{this.props.value||'暂无数据'}</div>);}}
多层props传值,在 ReactDOM.render 定义属性值,传给调用方法 App,再在调用的ES6类调用中用 props.属性直接赋值过去。
var myStyle = {color:'red',textAlign:'center'}class Name extends React.Component {render() {return <h1 style={myStyle}>网站名称:{this.props.name}</h1>;}}class Url extends React.Component {render() {return <h1>网站地址:{this.props.url}</h1>;}}class Nickname extends React.Component {render() {return <h1>网站地址:{this.props.nickname}</h1>;}}function App(props) {return (<div><Name name={props.name}/><Url url={props.url}/><Nickname nickname={props.nickname}/></div>);}ReactDOM.render(<App name={"菜鸟教程"} url={"http://www.runoob.com"} nickname={"Runoob"}/>,document.getElementById('example'));
如何向子组件传值呢?就像给html标签增加属性一样。
<Content value={'我设置了' + this.state.time}/>
这样,组件内部可以通过props读取到value值了。不过React的组件传递中有一个很有趣的属性children,这个的用处传递组件包含的内容。
- children:这个的用处传递组件包含的内容。
```javascript
// index.js
主体Children
// app.js import React, { PureComponent } from “react”;
export default class index extends PureComponent { constructor(props) { super(props); }
render() { return (
<a name="KGK4a"></a>### props和state的区别[https://www.jianshu.com/p/255085c0ddd9](https://www.jianshu.com/p/255085c0ddd9)- props是指组件间传递的一种方式,props自然也可以传递state。由于React的数据流是自上而下的,所以是从父组件向子组件进行传递;另外组件内部的this.props属性是只读的不可修改!- state是组件内部的状态(数据),不能够直接修改,必须要通过setState来改变值的状态,从而达到更新组件内部数据的作用。<a name="KSOVw"></a>###### props和state是经常要结合使用的,父组件的state可以转化为props来为子组件进行传值。在这种情况下,子组件接收的props是只读的,想要改变值,只能通过父组件的state对其进行更改。<br /><a name="tFtvY"></a>### 父子组件通信- 父子元素通信:父元素传一个函数给子元素,子元素调用父元素,调用时可以传递一些额外数据,父元素在子元素上传递事件函数,如`<Track success={this.success1.bind(this)}></Track`,子元素内可以这样调用传递的函数,如`this.props.success('我是参数');`这样就可以调用父元素的success1函数并传递参数,如`success (x) { ...}````javascriptclass App extends React.Component {constructor(props) {super(props)this.state = {msg: '你好'}}changeMsg() {console.log('函数被调用')this.setState({msg: '真好'} ,() => {console.log('修改完毕')})}render() {return (<div><Box msg={this.state.msg} fn={this.changeMsg.bind(this)} /></div>)}}function Box(props) {return (<div><p>我是子组件,我接收到的value是 {props.msg}</p><button onClick={props.fn}>改变</button></div>)}ReactDOM.render(<App />, document.querySelector('#app'));
-
任意两个组件通信:eventbus
发布订阅模式
var lists = {}var eventHub = {on (eventName, fn) { // 订阅if (!lists(eventName)) {lists[eventName] = {};}lists[eventName].push(fn); // 订阅某个事件后,将事件回调函数推入列表中},trigger (eventName, data) {let list = lists[eventName];if (!list) return;for(let i = 0;i < lists.length;i++) {lists[i](data); // 执行列表中所有回调函数}}}
redux
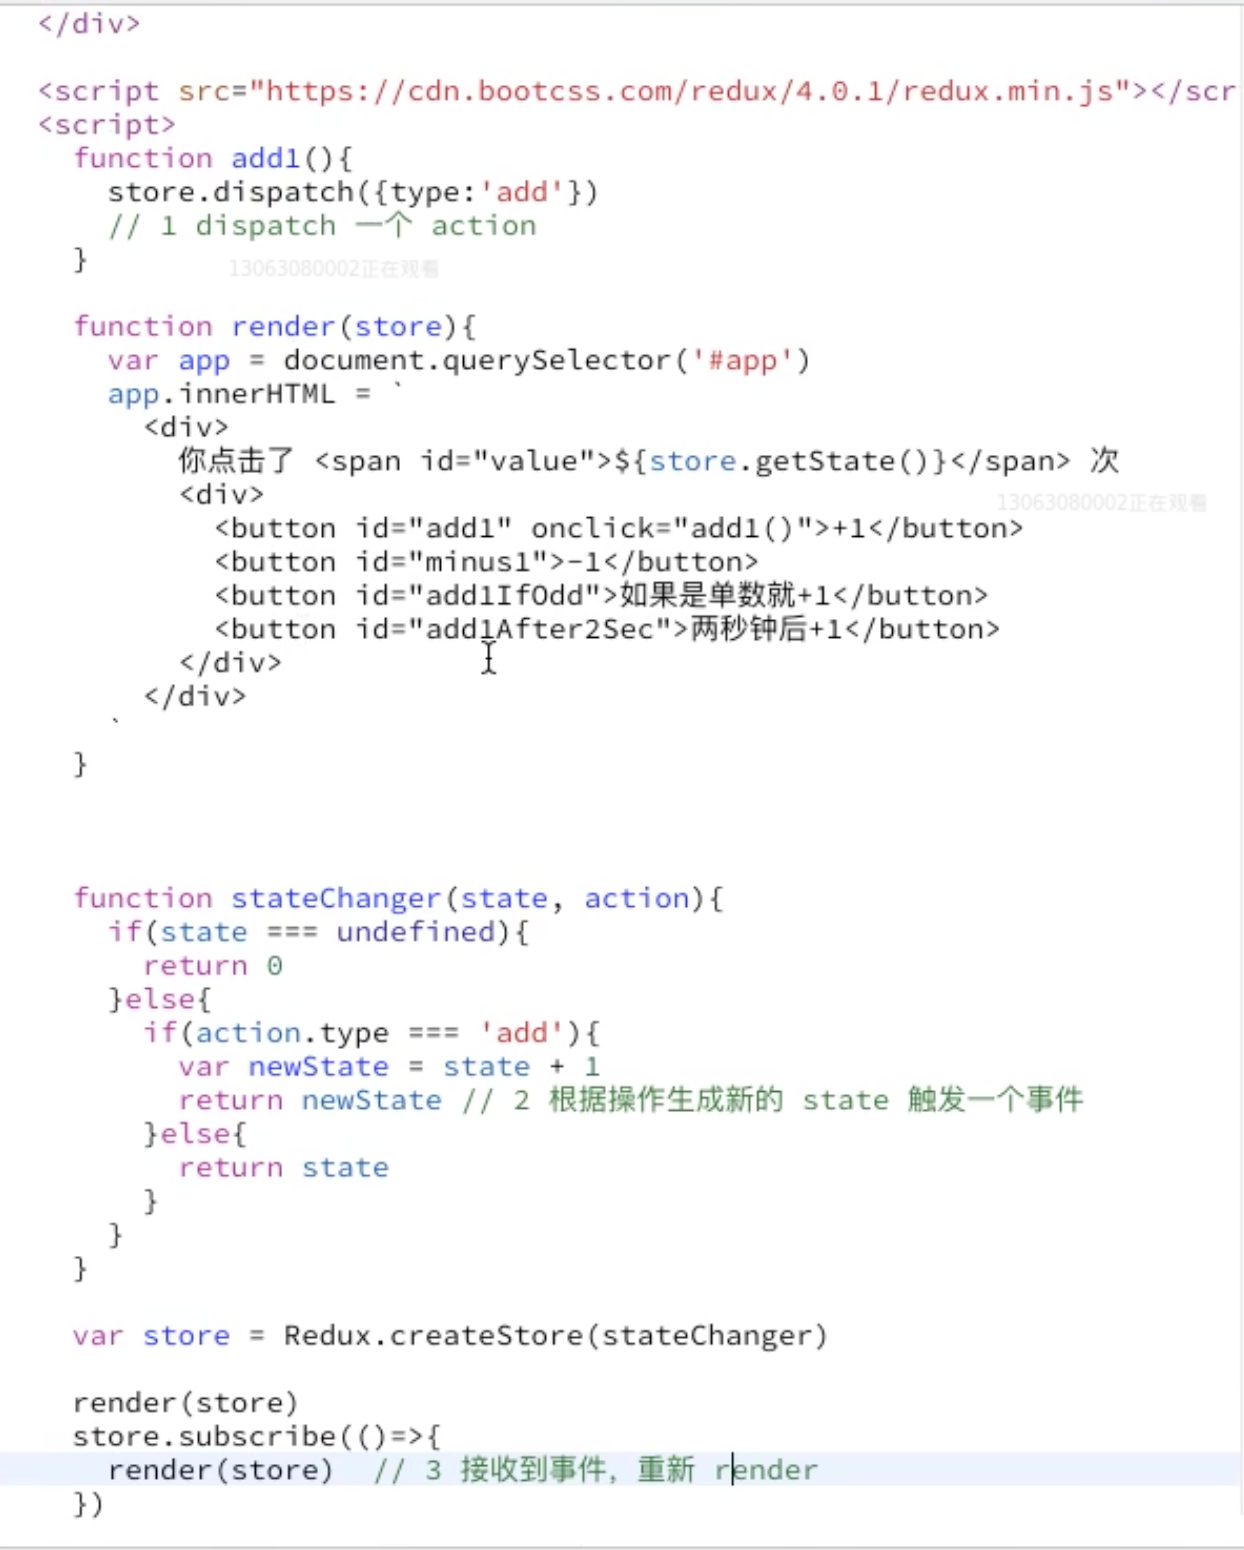
react.createStore(fn),接受一个函数,函数接受两个参数,state和action,函数返回值是新的状态对象
- 在顶层组件中
<App store={store.getState()} />来获取初始的state; - 触发一个action,相当于发布订阅里的trigger,发布一个事件:
store.dispatch({type: '我是一个action', payload: '传递的数据'}); - 触发事件后,由reducers来监听,其本质就是一个函数,相当于管家:let reducers = (state, action) => {…},state为之前的state,action为传递的action,包含type与payload,该函数返回修改的数据
redux的优点

若有收获,就点个赞吧
0 人点赞
