8002117067 徐梓涵 软件工程1702
什么是广播?
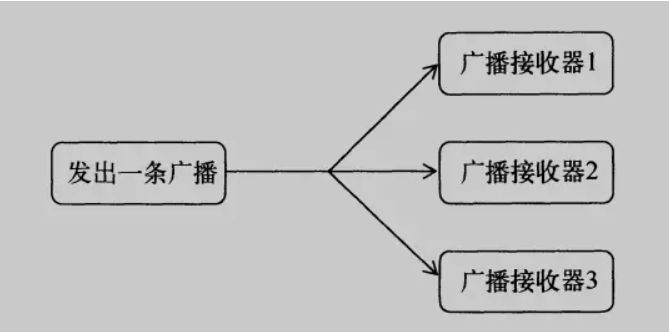
广播分为两大类:标准广播 和 有序广播
- 标准广播
是一种完全异步执行的广播,在广播发出之后,所有的广播接收器几乎都会在同一时刻接受到这条广播消息,因此它们之间没有任何先后顺序可言,这种广播的效率会比较高,但同时也意味着它是无法被拦截的。
- 有序广播
是一种同步执行的广播,在广播发出之后,同一时刻只会有一个广播接收器能够收到这条广播消息,当这个广播接收器中的逻辑执行完毕后,广播才会继续传递。所以此时的广播接受器是有先后顺序的,优先级高的广播接收器就可以先收到广播消息,并且前面的广播接收器还可以截断正在传递的广播,这样后面的广播接收器就无法收到广播消息了。

1.广播与后台服务如何配合使用
这里做一个简单的案例来演示一下广播和后台服务是如何配合使用的:
首先我们使用上次我做的一个简单的服务案例:
就是点击按钮服务启动,再次点击按钮服务关闭:
- MainActivity.java中的按钮启动服务操作:

- MyService.java中的创建服务时候启动我们的通知,这样我们可以清除的知道服务是否启动了,服务是否关闭了:
MyService.java:
@Overridepublic void onCreate() {super.onCreate();//发送广播Intent broadintent = new Intent("com.ncu.servicetest.Broadcast");sendBroadcast(broadintent);}@Overridepublic int onStartCommand(Intent intent, int flags, int startId) {return super.onStartCommand(intent, flags, startId);}@Overridepublic void onDestroy() {super.onDestroy();Intent broadintent = new Intent("com.ncu.servicetest.Broadcast2");sendBroadcast(broadintent);}
- 然后我们需要写通知接收器,来接受我们对于的通知,并且进行相对应的操作:
Broadcast.java:
package com.ncu.servicetest;import android.content.BroadcastReceiver;import android.content.Context;import android.content.Intent;import android.widget.Toast;//写一个接收器广播接收服务启动时候的广播public class Broadcast extends BroadcastReceiver {@Overridepublic void onReceive(Context context, Intent intent) {//发出短消息Toast.makeText(context, "服务启动", Toast.LENGTH_LONG).show();}}
Broadcast2.java:
package com.ncu.servicetest;import android.content.BroadcastReceiver;import android.content.Context;import android.content.Intent;import android.widget.Toast;public class Broadcast2 extends BroadcastReceiver {@Overridepublic void onReceive(Context context, Intent intent) {//发出短消息Toast.makeText(context, "服务关闭", Toast.LENGTH_LONG).show();}}
- 最后不要忘记去AndroidMainfest.java中注册一下,不然是不会被接收通知的:
我觉得安卓中对广播和服务的配合可以用在很多地方,比如服务进行到什么步骤了,可以通过通知机制来进行告知用户,或者比如用户有一个还没有完成的操作需要提醒也可以使用这样的机制。<receiverandroid:name=".Broadcast"android:enabled="true"android:exported="true"><intent-filter><action android:name="com.ncu.servicetest.Broadcast"/></intent-filter></receiver><receiverandroid:name=".Broadcast2"android:enabled="true"android:exported="true"><intent-filter><action android:name="com.ncu.servicetest.Broadcast2"/></intent-filter></receiver>
最后看看项目的演示效果:
当我们点击START SERVICE时候就会发出一个通知来告知用户服务启动了。
当我们点击STOP SERVICE的时候:
当然上面只是简单的案例演示。2.当一个耗时的操作完成操作后,如何利用广播及时通知Activity更新UI:
当我们完成了一个比较耗时的操作之后,我们可以使用广播来对Activiity中的UI进行更新的操作:
首先我们写一个简单的服务来进行不断的发出服务:
MySerView.java: ```xml package com.ncu.uibroadcast;
import android.app.Service; import android.content.Intent; import android.os.IBinder; import android.util.Log;
public class MyService extends Service { public MyService() { } //判断停止的标志 boolean isStop=false;
@Overridepublic IBinder onBind(Intent intent) {// TODO: Return the communication channel to the service.throw new UnsupportedOperationException("Not yet implemented");}public void onCreate(){Log.i("TAG","Services onCreate");super.onCreate();}public void onStart(Intent intent,int startId){Log.i("TAG","Services onStart");super.onStart(intent, startId);new Thread(){//新建线程,每隔1秒发送一次广播,同时把i放进intent传出public void run(){int i=0;while(!isStop){Intent intent=new Intent();intent.putExtra("i", i);i++;intent.setAction("com.ncu.uibroadcast.MyReceiver");//action与接收器相同sendBroadcast(intent);Log.i("TAG",String.valueOf(i));try {sleep(1000);} catch (InterruptedException e) {// TODO Auto-generated catch blocke.printStackTrace();}}}}.start();}@Overridepublic void onDestroy() {Log.i("TAG","Services onDestory");isStop=true;//即使service销毁线程也不会停止,所以这里通过设置isStop来停止线程super.onDestroy();}
}
UI界面进行按钮以及滚动条的设置:<br />activity_main.java:<br />```xml<?xml version="1.0" encoding="utf-8"?><androidx.constraintlayout.widget.ConstraintLayoutxmlns:android="http://schemas.android.com/apk/res/android"xmlns:tools="http://schemas.android.com/tools"xmlns:app="http://schemas.android.com/apk/res-auto"android:layout_width="match_parent"android:layout_height="match_parent"tools:context=".MainActivity"><Buttonandroid:id="@+id/button2"android:layout_width="wrap_content"android:layout_height="wrap_content"android:text="关闭服务"app:layout_constraintBottom_toBottomOf="parent"app:layout_constraintEnd_toEndOf="parent"app:layout_constraintHorizontal_bias="0.755"app:layout_constraintStart_toStartOf="parent"app:layout_constraintTop_toTopOf="parent"app:layout_constraintVertical_bias="0.152" /><TextViewandroid:id="@+id/textView"android:layout_width="wrap_content"android:layout_height="wrap_content"android:text="0"app:layout_constraintBottom_toBottomOf="parent"app:layout_constraintLeft_toLeftOf="parent"app:layout_constraintRight_toRightOf="parent"app:layout_constraintTop_toTopOf="parent" /><ProgressBarandroid:id="@+id/progressBar"style="?android:attr/progressBarStyleHorizontal"android:layout_width="300dp"android:layout_height="11dp"app:layout_constraintBottom_toBottomOf="parent"app:layout_constraintEnd_toEndOf="parent"app:layout_constraintStart_toStartOf="parent"app:layout_constraintTop_toTopOf="parent"app:layout_constraintVertical_bias="0.406" /><Buttonandroid:id="@+id/button"android:layout_width="wrap_content"android:layout_height="wrap_content"android:text="开启服务"app:layout_constraintBottom_toBottomOf="parent"app:layout_constraintEnd_toEndOf="parent"app:layout_constraintHorizontal_bias="0.291"app:layout_constraintStart_toStartOf="parent"app:layout_constraintTop_toTopOf="parent"app:layout_constraintVertical_bias="0.153" /></androidx.constraintlayout.widget.ConstraintLayout>
最后在Activity中写一个广播接收器,并且绑定两个按钮设置监听启动服务以及监听器还有关闭服务以及关闭监听器:
MainActivity.java:
package com.ncu.uibroadcast;import androidx.appcompat.app.AppCompatActivity;import android.content.BroadcastReceiver;import android.content.Context;import android.content.Intent;import android.content.IntentFilter;import android.os.Bundle;import android.view.View;import android.widget.Button;import android.widget.ProgressBar;import android.widget.TextView;public class MainActivity extends AppCompatActivity {Button b1,b2;ProgressBar pb;TextView tv;MyReceiver receiver;@Overrideprotected void onCreate(Bundle savedInstanceState) {super.onCreate(savedInstanceState);setContentView(R.layout.activity_main);b1=(Button)findViewById(R.id.button);b2=(Button)findViewById(R.id.button2);b1.setOnClickListener(new View.OnClickListener() {@Overridepublic void onClick(View v) {startService(new Intent(MainActivity.this, MyService.class));//开始服务receiver=new MyReceiver();//这么写就可以不用再AndroidManifest中注册了,直接可以IntentFilter filter=new IntentFilter();filter.addAction("com.ncu.uibroadcast.MyReceiver");MainActivity.this.registerReceiver(receiver,filter);}});b2.setOnClickListener(new View.OnClickListener() {@Overridepublic void onClick(View v) {stopService(new Intent(MainActivity.this, MyService.class));MainActivity.this.unregisterReceiver(receiver);}//关闭服务});pb=(ProgressBar)findViewById(R.id.progressBar);tv=(TextView)findViewById(R.id.textView);}public class MyReceiver extends BroadcastReceiver {@Overridepublic void onReceive(Context context, Intent intent) {System.out.println("OnReceiver");//广播进行发送到UIBundle bundle=intent.getExtras();int a=bundle.getInt("i");pb.setProgress(a);tv.setText(String.valueOf(a));//处理接收到的内容}}}
最后我们来看一下效果:
启动服务前
启动服务后:
进度条不断加一: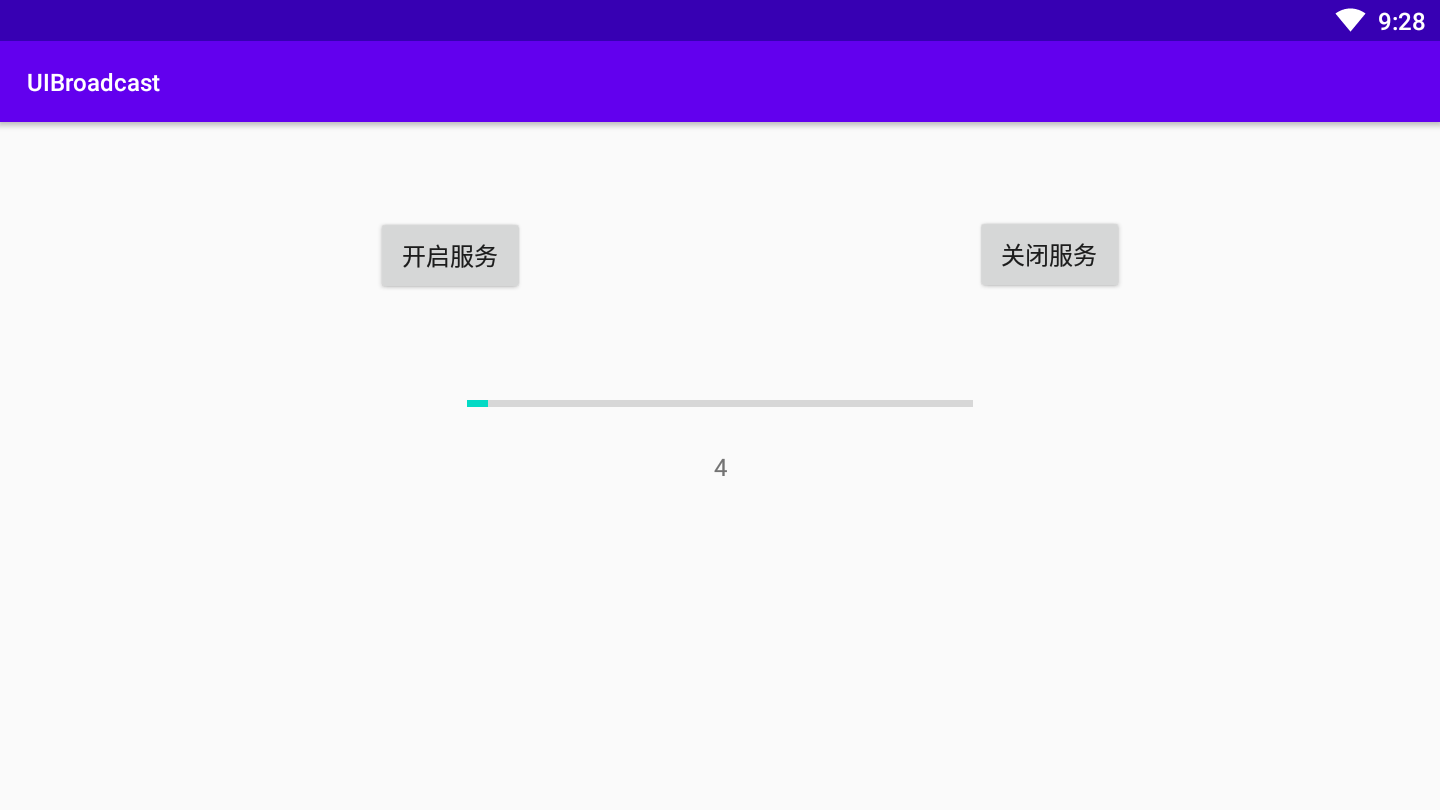
3.在Android老版本中,利用系统广播很容易实现的功能,如App的开机自动启动功能,Android O以后实现起来就没有那么容易,请探究一下Android O以后的变化:
使用静态的系统广播接收的方式:
接收广播处理信息广播接收器
BootCompleteReceiver.java:
package com.ncu.openbroadcast;import android.content.BroadcastReceiver;import android.content.Context;import android.content.Intent;import android.widget.Toast;public class BootCompleteReceiver extends BroadcastReceiver {@Overridepublic void onReceive(Context context, Intent intent) {// TODO: This method is called when the BroadcastReceiver is receiving// an Intent broadcast.//throw new UnsupportedOperationException("Not yet implemented");Toast.makeText(context,"Boot Complete",Toast.LENGTH_LONG).show();}}
AndroidMainifest.xml:权限声明以及接收系统广播:
<?xml version="1.0" encoding="utf-8"?><manifest xmlns:android="http://schemas.android.com/apk/res/android"package="com.ncu.openbroadcast"><uses-permission android:name="android.permission.RECEIVE_BOOT_COMPLETED"></uses-permission><applicationandroid:allowBackup="true"android:icon="@mipmap/ic_launcher"android:label="@string/app_name"android:roundIcon="@mipmap/ic_launcher_round"android:supportsRtl="true"android:theme="@style/AppTheme"><receiverandroid:name=".BootCompleteReceiver"android:enabled="true"android:exported="true"><intent-filter><action android:name="android.intent.action.BOOT_COMPLETED" /><category android:name="android.intent.category.LAUNCHER" /><category android:name="android.intent.category.HOME" /></intent-filter></receiver><activity android:name=".MainActivity"><intent-filter><action android:name="android.intent.action.MAIN" /><category android:name="android.intent.category.LAUNCHER" /></intent-filter></activity></application></manifest>
老版本中测试成功:
网上说新的版本中要将自己程序变成系统程序才可以开机启动: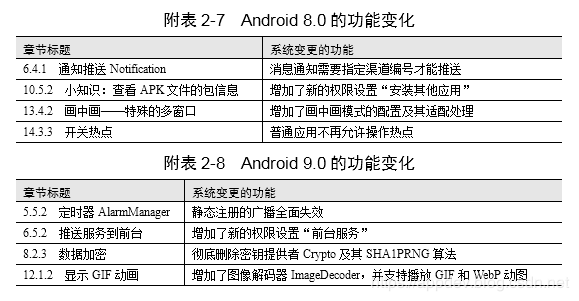
使用系统签名或者使用变成系统程序:
一:
仅仅修改AndroidManifest.xml,接着用系统签名。
1.下载工具到电脑本地:https://github.com/YuqingCN/keytool-importkeypair
2.从源码/build/target/product/security中找到图片中的文件,把一下内容放到keytool-importkeypair目录下。
3.打开终端,cd到上面的目录,执行:keytool-importkeypair -k 签名文件 -p 123456 -pk8 platform.pk8 -cert platform.x509.pem -alias 别名名称
提示:签名文件。可以用AS生成一个自己的签名文件,然后把这个签名文件放到keytool-importkeypair目录下
123456 是密码
4.终端命令执行后,签名文件就带有系统签名了。
5.Android studio 编译app时候使用带有系统签名的文件来签名。
二:
xml中写发如下:主要是红色圈圈部分内容
最后:
把编译出来的app push到系统 system/app 目录下 (复位,即可看到该程序自动运行)。

若有收获,就点个赞吧
0 人点赞
