1.使用注解的方式注册到IOC容器中
<?xml version="1.0" encoding="UTF-8"?><beans xmlns="http://www.springframework.org/schema/beans"xmlns:xsi="http://www.w3.org/2001/XMLSchema-instance"xmlns:context="http://www.springframework.org/schema/context"xsi:schemaLocation="http://www.springframework.org/schema/beans http://www.springframework.org/schema/beans/spring-beans.xsd http://www.springframework.org/schema/context https://www.springframework.org/schema/context/spring-context.xsd"><!--如果想要将自定义的bean对象添加到IOC容器中,需要在类上添加某些注解Spring中包含4个主要的组件添加注解:@Controller:控制器,推荐给controller层添加此注解@Service:业务逻辑,推荐给业务逻辑层添加此注解@Repository:仓库管理,推荐给数据访问层添加此注解@Component:给不属于以上基层的组件添加此注解注意:我们虽然人为的给不同的层添加不同的注解,但是在spring看来,可以在任意层添加任意注解spring底层是不会给具体的层次验证注解,这样写的目的只是为了提高可读性,最偷懒的方式就是给所有想交由IOC容器管理的bean对象添加component注解使用注解需要如下步骤:1、添加上述四个注解中的任意一个2、添加自动扫描注解的组件,此操作需要依赖context命名空间3、添加自动扫描的标签context:component-scan注意:当使用注解注册组件和使用配置文件注册组件是一样的,但是要注意:1、组件的id默认就是组件的类名首字符小写,如果非要改名字的话,直接在注解中添加即可2、组件默认情况下都是单例的,如果需要配置多例模式的话,可以在注解下添加@Scope注解--><!--定义自动扫描的基础包:base-package:指定扫描的基础包,spring在启动的时候会将基础包及子包下所有加了注解的类都自动扫描进IOC容器--><context:component-scan base-package="com.xixi"></context:component-scan><!-- <bean class="com.xixi.controller.UserController" id="userController">--><!-- </bean>--></beans>
UserController
package com.xixi.controller;

import com.xixi.service.IUserService;
import org.springframework.beans.factory.annotation.Autowired;
import org.springframework.stereotype.Controller;

@Controller
public class UserController {

    @Autowired
    private IUserService userService;

    public void test(){
        System.out.println(userService);
    }


}
UserServiceImpl
package com.xixi.service.impl;

import com.xixi.service.IUserService;
import org.springframework.stereotype.Service;

@Service
public class UserServiceImpl implements IUserService {
}
UserDaoImpl
package com.xixi.dao.impl;

import com.xixi.dao.IUserDao;
import org.springframework.stereotype.Repository;

@Repository
public class UserDaoImpl implements IUserDao{
}
2.定义扫描包时要包含的类和不要包含的类
当定义好基础的扫描包后,在某些情况下可能要有选择性的配置是否要注册bean到IOC容器中,此时可以通过如下的方式进行配置。
<?xml version="1.0" encoding="UTF-8"?>
<beans xmlns="http://www.springframework.org/schema/beans"
xmlns:xsi="http://www.w3.org/2001/XMLSchema-instance"
xmlns:context="http://www.springframework.org/schema/context"
xsi:schemaLocation="http://www.springframework.org/schema/beans http://www.springframework.org/schema/beans/spring-beans.xsd http://www.springframework.org/schema/context https://www.springframework.org/schema/context/spring-context.xsd">
<!--
如果想要将自定义的bean对象添加到IOC容器中,需要在类上添加某些注解
Spring中包含4个主要的组件添加注解:
@Controller:控制器,推荐给controller层添加此注解
@Service:业务逻辑,推荐给业务逻辑层添加此注解
@Repository:仓库管理,推荐给数据访问层添加此注解
@Component:给不属于以上基层的组件添加此注解
注意:我们虽然人为的给不同的层添加不同的注解,但是在spring看来,可以在任意层添加任意注解
spring底层是不会给具体的层次验证注解,这样写的目的只是为了提高可读性,最偷懒的方式
就是给所有想交由IOC容器管理的bean对象添加component注解
使用注解需要如下步骤:
1、添加上述四个注解中的任意一个
2、添加自动扫描注解的组件,此操作需要依赖context命名空间
3、添加自动扫描的标签context:component-scan
注意:当使用注解注册组件和使用配置文件注册组件是一样的,但是要注意:
1、组件的id默认就是组件的类名首字符小写,如果非要改名字的话,直接在注解中添加即可
2、组件默认情况下都是单例的,如果需要配置多例模式的话,可以在注解下添加@Scope注解
-->
<!--
定义自动扫描的基础包:
base-package:指定扫描的基础包,spring在启动的时候会将基础包及子包下所有加了注解的类都自动
扫描进IOC容器
use-default-filters 默认是true
-->
<context:component-scan base-package="com.xixi">
<!--排除扫描的注解
<context:exclude-filter> 设置需要排除扫描的选项
<context:include-filter> 设置需要包含扫描的选项
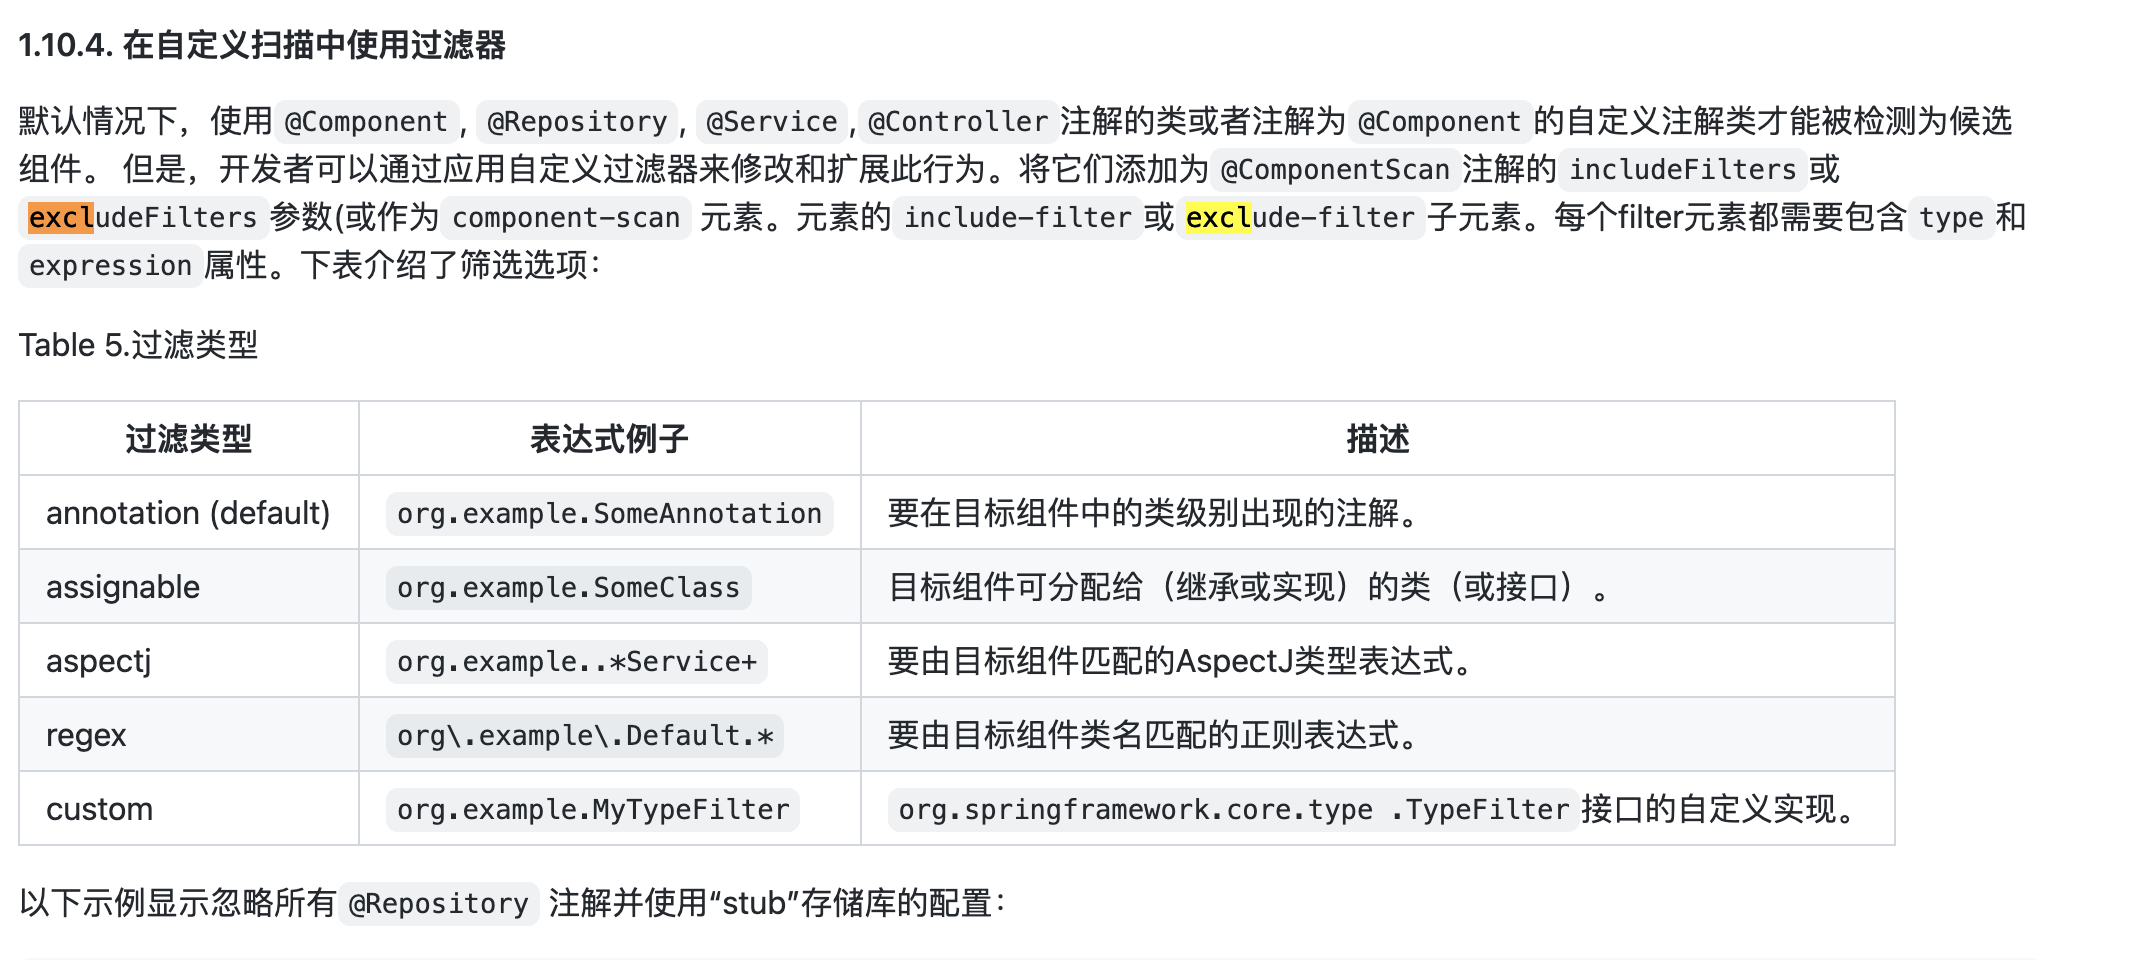
type:1.annotation 默认 根据注解的完整限定名设置排除/包含
assignable org.example.SomeClass 目标组件可分配给(继承或实现)的类(或接口)。
aspectj org.example..*Service+ 要由目标组件匹配的AspectJ类型表达式。
regex org\.example\.Default.* 要由目标组件类名匹配的正则表达式。
custom org.example.MyTypeFilter org.springframework.core.type.TypeFilter接口的自定义实现。
-->
<!-- <context:exclude-filter type="annotation" expression="org.springframework.stereotype.Controller"/>-->
<!-- <context:enclude-filter type="assignable" expression="com.xixi.controller.UserController" />-->
</context:component-scan>
<!-- <bean class="com.xixi.controller.UserController" id="userController">-->
<!-- </bean>-->
</beans>
官方对过滤器的描述
3.@Value 属性注入
package com.xixi;


import org.springframework.beans.factory.annotation.Value;
import org.springframework.stereotype.Component;

@Component
public class User {

    @Value("${mysql.name}")
    private String name;

    public String getName() {
        return name;
    }

    public void setName(String name) {
        this.name = name;
    }
}
package com.xixi;

import org.springframework.beans.factory.annotation.Value;
import org.springframework.stereotype.Component;

@Component
public class Role {

    @Value("#{user.name}")
    private String name;

    public String getName() {
        return name;
    }

    public void setName(String name) {
        this.name = name;
    }
}
4.使用@AUTOWIRD 进行依赖注入
4.1 放在属性上
package com.xixi.controller;

import com.xixi.service.IUserService;
import org.springframework.beans.factory.annotation.Autowired;
import org.springframework.stereotype.Controller;

@Controller
public class UserController {

    @Autowired
    private IUserService userService;

    public void test(){
        System.out.println(userService);
    }


}
注意:当使用AutoWired注解的时候,自动装配的时候是根据类型实现的。
1、如果只找到一个,则直接进行赋值,
2、如果没有找到,则直接抛出异常,
3、如果找到多个,那么会按照变量名作为id继续匹配,
1、匹配上直接进行装配
2、如果匹配不上则直接报异常
解决方案:
2.1 修改实体属性的值去对应
2.2 修改Bean的属性值,@Service(“userService”)
2.3 使用@Qualifier设置强制寻找的名称
2.4 使用@Primary设置其中一个Bean为主要的bean.
2.5 使用泛型作用限定名。
�
4.2 放在方法上
/**
     *@Autowired 也可以写在构造方法上面
     * 默认优先根据参数类型去匹配
     * 如果匹配到多个 根据参数名字去匹配
     **/
    @Autowired
    public UserController(IUserService userService) {
        this.userService = userService;
    }

    /**
     *@Autowired 也可以写在方法上面
     * 默认优先根据参数类型去匹配
     * 如果匹配到多个 根据参数名字去匹配
     **/
    @Autowired
    public void createInstance(IUserService userService){
        this.userService = userService;
    }
5.xml和注解的bean的名称
5.1 xml注解的默认名称为 类名称#0….X
<?xml version="1.0" encoding="UTF-8"?>
<beans xmlns="http://www.springframework.org/schema/beans"
       xmlns:xsi="http://www.w3.org/2001/XMLSchema-instance" xmlns:p="http://www.springframework.org/schema/p"
       xmlns:c="http://www.springframework.org/schema/c" xmlns:context="http://www.springframework.org/schema/context"
       xsi:schemaLocation="http://www.springframework.org/schema/beans http://www.springframework.org/schema/beans/spring-beans.xsd http://www.springframework.org/schema/context https://www.springframework.org/schema/context/spring-context.xsd">

    <bean class="com.xixi.ioc.Tea">
    </bean>
</beans>
如果不设置id属性 默认是全类型类名+#+0
5.2 注解的名称
<?xml version="1.0" encoding="UTF-8"?>
<beans xmlns="http://www.springframework.org/schema/beans"
       xmlns:xsi="http://www.w3.org/2001/XMLSchema-instance" xmlns:p="http://www.springframework.org/schema/p"
       xmlns:c="http://www.springframework.org/schema/c" xmlns:context="http://www.springframework.org/schema/context"
       xsi:schemaLocation="http://www.springframework.org/schema/beans http://www.springframework.org/schema/beans/spring-beans.xsd http://www.springframework.org/schema/context https://www.springframework.org/schema/context/spring-context.xsd">

    <context:component-scan base-package="com.xixi.ioc"></context:component-scan>
</beans>

5.3 setter方法依赖注入其实是根据set方法后面的名称决定的,不是属性名称
 <bean class="com.xixi.ioc.Tea">
        <property name="name2" value="san"></property>
    </bean>
实体类:
package com.xixi.ioc;

import org.springframework.stereotype.Component;

@Component
public class Tea {

    private String name;

    public String getName() {
        return name;
    }

    public void setName2(String name) {
        this.name = name;
    }

    @Override
    public String toString() {
        return "Tea{" +
                "name='" + name + '\'' +
                '}';
    }
}
6.自动装配的注解@AutoWired,@Resource
在使用自动装配的时候,出了可以使用@AutoWired注解之外,还可以使用@Resource注解,大家需要知道这两个注解的区别。<br /> 1、@AutoWired:是spring中提供的注解,@Resource:是jdk中定义的注解,依靠的是java的标准<br /> 2、@AutoWired默认是按照类型进行装配,默认情况下要求依赖的对象必须存在,@Resource默认是按照名字进行匹配的,同时可以指定name属性。<br /> 3、@AutoWired只适合spring框架,而@Resource扩展性更好
7.对象初始化方法和容器销毁方法
   @PostConstruct
    public void init(){
        System.out.println("对象初始化。。。。。。。。。。。。。。。。");
    }

    @PreDestroy
    public void destory(){
        System.out.println("容器被销毁。。。。。。。。。。。。。。。。");
    }

若有收获,就点个赞吧
0 人点赞
