一、前言
最近在学习工作流,记录学习随笔 。
二、先跑起来
1、创建spring boot项目
使用spring boot 2.2.2版本
<parent><groupId>org.springframework.boot</groupId><artifactId>spring-boot-starter-parent</artifactId><version>2.2.2.RELEASE</version><relativePath/></parent>
2、接入activi6.0
引入pom文件
<dependency><groupId>org.activiti</groupId><artifactId>activiti-spring-boot-starter-basic</artifactId><version>6.0.0</version></dependency><dependency><groupId>org.springframework.boot</groupId><artifactId>spring-boot-starter</artifactId></dependency><dependency><groupId>org.springframework.boot</groupId><artifactId>spring-boot-starter-test</artifactId><scope>test</scope></dependency><dependency><groupId>com.baomidou</groupId><artifactId>mybatis-plus-boot-starter</artifactId><version>3.4.1</version></dependency><dependency><groupId>mysql</groupId><artifactId>mysql-connector-java</artifactId></dependency>
application.yml 配置
spring:datasource:url: jdbc:mysql://localhost:3306/activiti?useSSL=true&characterEncoding=UTF-8&serverTimezone=UTC&nullCatalogMeansCurrent=trueusername: rootpassword: 123456activiti:check-process-definitions: falsedatabase-schema-update: true
tips:提前创建好空白数据库:activiti
运行springboot 项目
由于springboot 2.0版本依赖了security 组件,但是POM中没有引入,所以会报错
java.lang.IllegalArgumentException: Could not find class [org.springframework.boot.autoconfigure.security.SecurityAutoConfiguration]at org.springframework.util.ClassUtils.resolveClassName(ClassUtils.java:327)at org.springframework.core.annotation.TypeMappedAnnotation.adapt(TypeMappedAnnotation.java:483)at org.springframework.core.annotation.TypeMappedAnnotation.getValue(TypeMappedAnnotation.java:403)at org.springframework.core.annotation.TypeMappedAnnotation.asMap(TypeMappedAnnotation.java:288)at org.springframework.core.annotation.AbstractMergedAnnotation.asAnnotationAttributes(AbstractMergedAnnotation.java:193)at org.springframework.core.type.AnnotatedTypeMetadata.getAnnotationAttributes(AnnotatedTypeMetadata.java:106)at org.springframework.context.annotation.AnnotationConfigUtils.attributesFor(AnnotationConfigUtils.java:285)
解决办法:不导入SpringBoot Security组件
@SpringBootApplication(exclude ={org.activiti.spring.boot.SecurityAutoConfiguration.class,SecurityAutoConfiguration.class})public class StudyActivitApplication {public static void main(String[] args) {SpringApplication.run(StudyActivitApplication.class, args);}}
运行成功之后,会自动创建基础表
三、实践
1、准备工作
1.1、安装BPMN流程设计插件 actiBPM
tips:idea最新版本中搜索不到,需要自己去网上下载这个插件,然后安装到iea中去。

1.2、流程运行步骤说明
定义流程 -> 发布流程 ->启动流程 ->执行流程->结束
- 定义流程:提前设计好流程图,比如请假流程,报销流程
- 发布流程:这个时候解析流程文件,把相关数据保存到数据库表中
- 启动流程:以流程xml中的 id 为key 来启动流程,会生成对应的流程实例、流程任务
- 执行流程:流程启动后,会为每个流程中的节点生成任务,执行流程则是执行流转中的节点任务
1.3、核心表
- act_re_deployment 流程定义部署表
- act_re_procdef 流程定义的相关信息(从流程文档中解析出来的数据)
- act_ru_execution 流程实例表
- act_ru_task 实例任务表
- act_ru_variable 流程实例参数
- act_hi_comment 任务执行批注
1.4、准备测试用户表
CREATE TABLE `study_user` (`id` bigint(0) NOT NULL AUTO_INCREMENT,`user_id` bigint(0) NOT NULL DEFAULT 0,`user_name` varchar(50) CHARACTER SET utf8mb4 COLLATE utf8mb4_general_ci NOT NULL DEFAULT '',`role_name` varchar(50) CHARACTER SET utf8mb4 COLLATE utf8mb4_general_ci NOT NULL DEFAULT '',`role_type` int(0) NOT NULL DEFAULT 0,`is_valid` int(0) NOT NULL DEFAULT 1,`update_time` datetime(0) NOT NULL DEFAULT CURRENT_TIMESTAMP(0) ON UPDATE CURRENT_TIMESTAMP(0),`create_time` datetime(0) NOT NULL DEFAULT CURRENT_TIMESTAMP(0),PRIMARY KEY (`id`) USING BTREE,UNIQUE INDEX `un_index_userId`(`user_id`) USING BTREE) ENGINE = InnoDB ROW_FORMAT = Dynamic;
初始化数据
INSERT INTO `study_user`(user_id,user_name,role_type,role_name) VALUES ( 1, '何大虾', 1,'员工');INSERT INTO `study_user`(user_id,user_name,role_type,role_name) VALUES ( 2, '何主管', 2,'主管');INSERT INTO `study_user`(user_id,user_name,role_type,role_name) VALUES ( 3, '何经理', 3,'总经理');INSERT INTO `study_user`(user_id,user_name,role_type,role_name) VALUES ( 4, '何大虾', 10,'BOSS');INSERT INTO `study_user`(user_id,user_name,role_type,role_name) VALUES ( 5, '员工A', 1,'员工');INSERT INTO `study_user`(user_id,user_name,role_type,role_name) VALUES ( 6, '王主管', 2,'主管');INSERT INTO `study_user`(user_id,user_name,role_type,role_name) VALUES ( 7, '王人事', 5,'人事');
2、简单申请流程
2.1、定义请假流程
流程思路:员工提交申请->主管审批->经理审批
设计流程图:
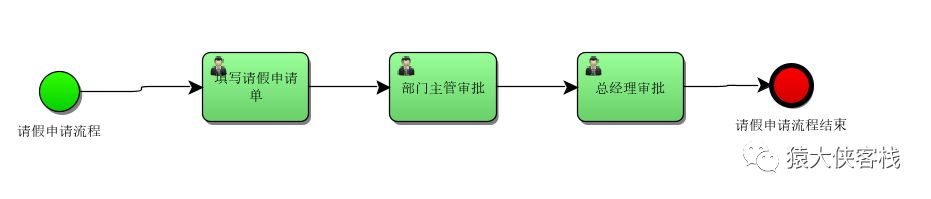
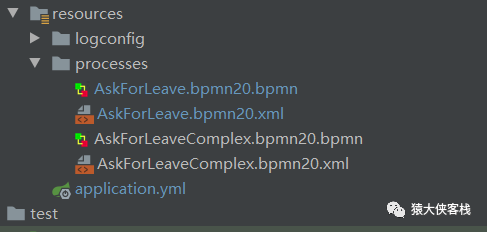
文件保存在processes下
对应流程xml:
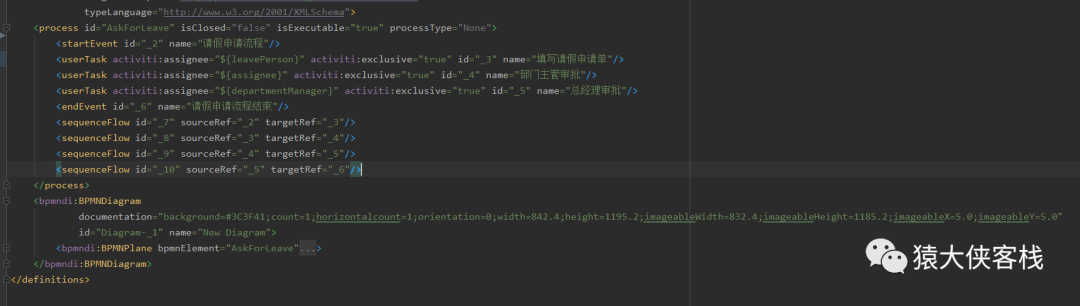
${}占位符代表流程中的参数,在流程运行中传入
比如这里:activiti:assignee=”${leavePerson}” 代表谁提交的申请,在申请流程的时候传入参数
<userTask activiti:assignee="${leavePerson}" activiti:exclusive="true" id="_3" name="填写请假申请单"/><userTask activiti:assignee="${assignee}" activiti:exclusive="true" id="_4" name="部门主管审批"/><userTask activiti:assignee="${departmentManager}" activiti:exclusive="true" id="_5" name="总经理审批"/>
2.2、发布流程
流程定义好之后,需要把该流程发布到流程引擎中
/*** 发布流程*/@Testpublic void deployProcessTest() {processService.deploy(FlowTypeEnum.ASK_FOR_LEAVE);}
public void deploy(FlowTypeEnum flowTypeEnum) {String filePath=String.format("%s/%s.bpmn20.xml", ActivitiProcessContext.PROCESS_DIRECTORY,flowTypeEnum.getCode());Deployment deployment = repositoryService.createDeployment().addClasspathResource(filePath).name(flowTypeEnum.getDesc()).deploy();ProcessDefinition processDefinition = repositoryService.createProcessDefinitionQuery().deploymentId(deployment.getId()).singleResult();System.out.println(String.format("发布流程 [%s] with id [%s],发布时间:[%s]" ,processDefinition.getName(),processDefinition.getId(),deployment.getDeploymentTime()));}
FlowTypeEnum 是流程枚举类型,以便发布其他的流程
/*** 流程类型枚举*/public enum FlowTypeEnum {ASK_FOR_LEAVE("AskForLeave", "请假申请"),ASK_FOR_LEAVE_COMPLEX("AskForLeaveComplex", "请假申请");private String code;private String desc;private FlowTypeEnum(String code, String desc) {this.code = code;this.desc = desc;}public String getCode() {return this.code;}public String getDesc() {return this.desc;}}
数据库变化
act_re_deployment中 会插入一条流程部署信息数据

act_re_procdef 中会插入流程的定义数据

act_re_procdef表中的key对应流程xml中的id

act_ge_bytearray 中以二进制的数据把流程文档xml文件保存到数据库中,同时自动生成一张图片数据

2.3、提交请假申请
先看下员工数据
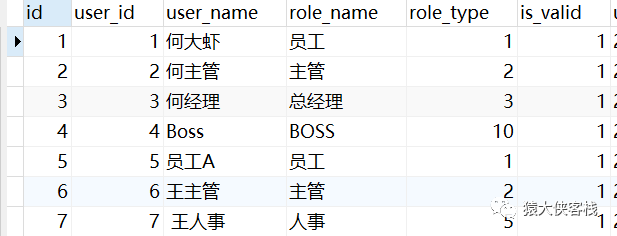
何大虾提交请假申请->何主管审批->何经理审批
@Overridepublic void startApply(Integer userId) {identityService.setAuthenticatedUserId(userId.toString());Map<String, Object> variables = new HashMap<>();variables.put("leavePerson",userId);variables.put("assignee",2);variables.put("departmentManager",3);//提交申请ProcessInstance instance = runtimeService.startProcessInstanceByKey(FlowTypeEnum.ASK_FOR_LEAVE.getCode(),variables);log.info("创建申请实例,instanceId:{},processIntanceId:{}", instance.getId(),instance.getProcessInstanceId());}
提交申请之后,会返回实例Id,可以把这个实例Id和申请人的关系保存在自己的业务表中,以便扩展自己的业务
数据库变化
actru_execution 实例表会插入两条数据,表中的PROC_DEF_ID对应act_re_procdef 流程定义表中的ID

actru_task 任务表会生成一条任务,ASSIGNEE 为1对应 何大虾的任务

2.4、执行任务
何大虾完成任务 任务Id:320009
/*** 完成任务*/@Testpublic void completeTaskTest(){String taskId="320009";//任务完成之后,就会把该任务删除,之后生成下一节点的任务。对应表(act_ru_task)//taskService.addComment(taskId,null,"保终身体");taskService.complete(taskId);}
任务完成之后,会删除当前何大虾的任务,同时自动产生下一节点的任务,ASSIGNEE_ 为2对应何主管的审批任务

何主管完成任务,任务Id:322502,生成ASSIGNEE_ 为3对应何经理的审批任务

何经理完成任务,同时添加批注
/*** 完成任务*/@Testpublic void completeTaskTest(){String taskId="325002";String comment="下个月不用来了";//任务完成之后,就会把该任务删除,之后生成下一节点的任务。对应表(act_ru_task)taskService.addComment(taskId,null,comment);taskService.complete(taskId);}
可以看到插入了一条批注信息

任务完成后,后面已经没有节点了,则流程已结束,这个时候会删除运行时流程任务数据 (act_ru_task ),删除运行时流程实例数据 act_ru_execution
2.5、历史流程数据
历史的流程数据都在流程历史表中,即acthi开头的表
历史流程节点数据 act_hi_actinst
从startEvent一直到endEvent的节点数据

历史申请的流程数据 act_hi_procinst

历史流程节点数据 act_hi_taskinst

这些数据都可以通过流程引擎提供的HistoryService 来查询
3、 复杂申请流程
上面简单的申请流程中,审批人是写死的,但是实际情况一般是申请后动态去分配相应的审批人员。下面来实践一个稍微复杂点的流程
3.1、接入数据层
添加mybatis-plus引用,版本:3.4.1
<dependency><groupId>com.baomidou</groupId><artifactId>mybatis-plus-boot-starter</artifactId><version>${mybatis-plus.version}</version></dependency>
这里有个注意点activiti 6.0.0中引入了低版本的mybatis,会和mybatis-plus中的冲突,导致报错,所有需要排除掉activiti中的mybatis
<dependency><groupId>org.activiti</groupId><artifactId>activiti-spring-boot-starter-basic</artifactId><version>${activiti.version}</version><!--和mybatis-plus的版本产生冲突报错,需要移除mybatis--><exclusions><exclusion><artifactId>mybatis</artifactId><groupId>org.mybatis</groupId></exclusion></exclusions></dependency>
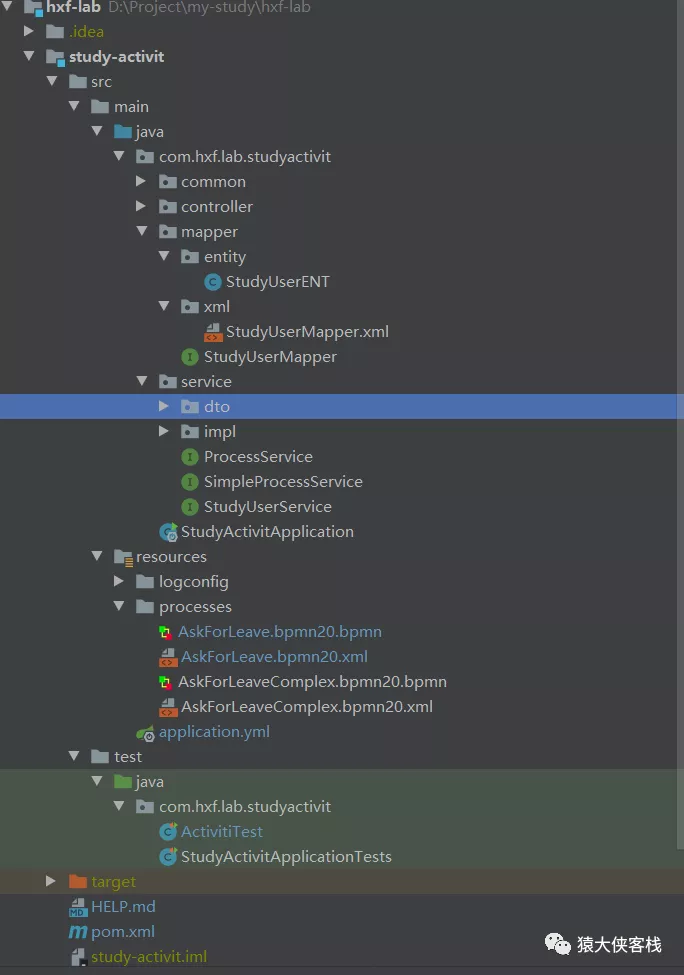
使用mybatis-plus-generator 自动生成study-user 相关的数据层文件,加入之后的项目结构
3.2、定义请假流程
流程思路:员工提交请假->找一个主管职位同事审批->假如请假天数大于三天则找一个总经理职位同事审批,之后再抄送一位人事职位的同事,假如请假天数小于3天则直接抄送人事。
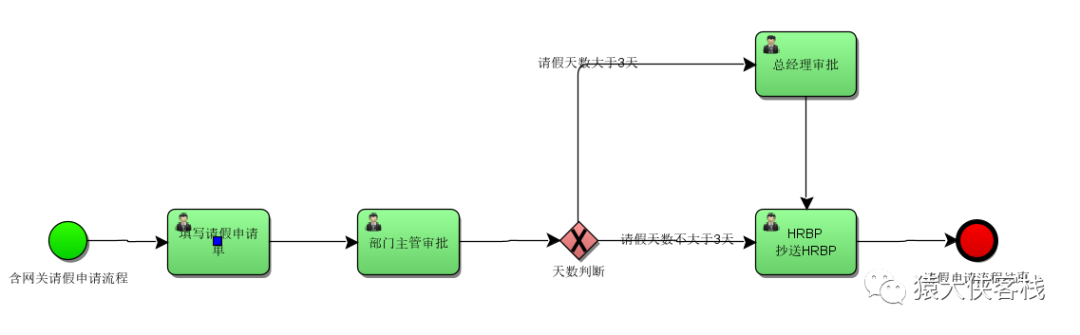
流程文档中添加动态获取审批人方法和请假天数参数
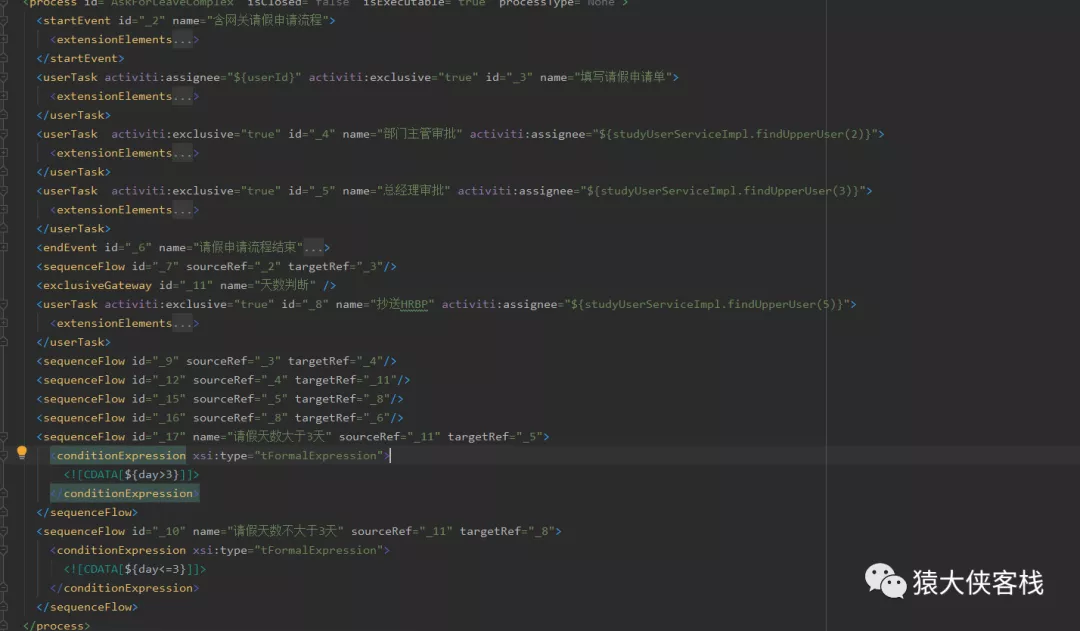
studyUserServiceImpl.findUpperUser(2) 根据角色实时查询到人来作为审批人
3.3、发布流程
发布流程跟上述事例一样,略过。
3.4、提交6天请假申请
何大虾提交6天请假申请
/*** 复杂请假申请*/@Testpublic void applyComplexTest() {Integer userId = 1;simpleProcessService.startApplyComplex(userId, 6);}
@Overridepublic void startApplyComplex(Integer userId,Integer days) {Map<String, Object> variables = new HashMap<>();variables.put("userId",userId);variables.put("day",days);variables.put("myprocessListener",myProcessListener);variables.put("mytaskListener",myTaskListener);ProcessInstance instance = runtimeService.startProcessInstanceByKey(FlowTypeEnum.ASK_FOR_LEAVE_COMPLEX.getCode(),variables);log.info("创建申请实例,instanceId:{},processIntanceId:{}", instance.getId(),instance.getProcessInstanceId());}
注入任务监听器,监听任务的执行,同时打印出审批人详细信息
@Component@Slf4jpublic class MyTaskListener implements Serializable, TaskListener {private static final long serialVersionUID = 1L;private Expression message;@Overridepublic void notify(DelegateTask delegateTask) {//不能直接注入StudyUserService studyUserService = SpringBeanUtils.getBean(StudyUserService.class);log.info("任务监听器:事件名称-{},Id-{},name-{},审批人-{},备注:{}", delegateTask.getEventName(), delegateTask.getId(), delegateTask.getName(), delegateTask.getAssignee(), message.getExpressionText());Long userId = Convert.toLong(delegateTask.getAssignee(), 0L);if (userId > 0) {StudyUserENT userENT = studyUserService.find(userId);log.info("审批人明细:{}", JSON.toJSONString(userENT));}}}
tips:事件监听需要提前在流程xml中进行定义埋点,才有效。比如这里在部门主管审批分配人员和任务产生进行埋点监听<userTask activiti:exclusive="true" id="_4" name="部门主管审批" activiti:assignee="${studyUserServiceImpl.findUpperUser(2)}"><extensionElements><activiti:taskListener delegateExpression="${mytaskListener}" event="create"><activiti:field name="message"><activiti:string><![CDATA[任务启动]]></activiti:string></activiti:field></activiti:taskListener><activiti:taskListener delegateExpression="${mytaskListener}" event="assignment"><activiti:field name="message"><activiti:string><![CDATA[分配人员]]></activiti:string></activiti:field></activiti:taskListener></extensionElements></userTask>
3.5、执行任务
何大虾完成任务,自动查找到审批人何主管,同时把任务分给何主管


何主管完成任务,因为请假天数大于3,所以这个时候,产生了一条经理审批的任务,符合预期。


后续流程不再演示了,直接走完。
3.6、2天请假流程测试
提交2天的申请流程,之后全部完成,对比历史任务信息,可以看到请假6天产生了4个任务,请假2天产生了3个人,说明审批是按照预设的流程图进行流转

四、源码
activiti 6.0.0官方开发文档
https://www.activiti.org/userguide/
数据库说明
http://lucaslz.com/2016/11/15/java/activiti/activiti-db-5-22/#more
源码
关注 公众号 猿大侠的客栈 回复 hxf-lab 即可获取源代码


若有收获,就点个赞吧
0 人点赞
