随着对前端功能和性能的不断提高,前端早就不是一段内嵌于页面的一段JS代码了。已经进化为一个系统复杂的工程了。
下面我就结合element3组件库的搭建经验。带大家搭建一个mini版组件库。
https://github.com/hug-sun/mini-element
一、前端工程化是什么
前端工程化大体可以分为四个方面内容。
模块化
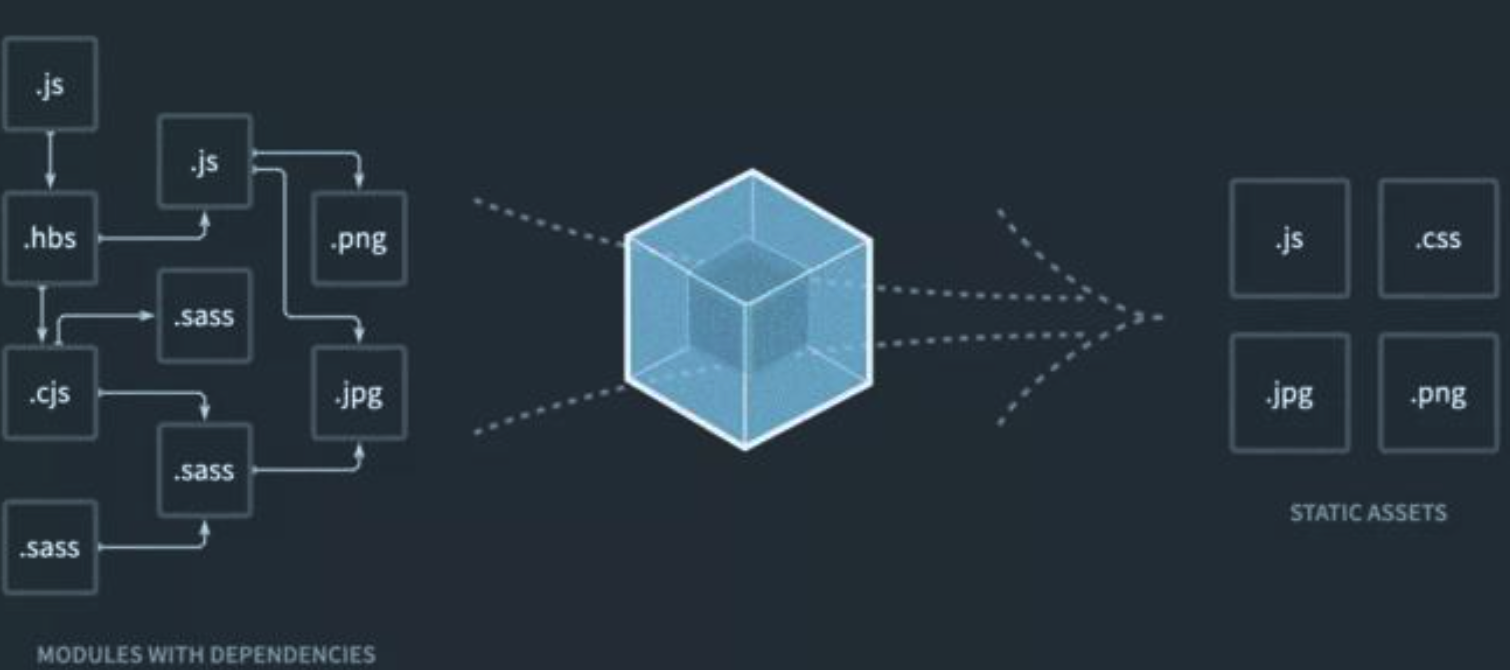
一个文件分拆为多个互相依赖的文件,最后进行统一打包和加载,保证高效多人协作。- JS模块 CMD AMD CommonJS 及 ES6 Module
- CSS模块 Sass Less Stylus
- 资源模块化 文件、CSS、图片通过JS进行统一依赖关联
组件化
相对于文件的拆分,组件是对于UI层面的拆分,每一个组件需要包括对应的CSS、图片、JS逻辑、视图模板等并且能完成一个独立的功能。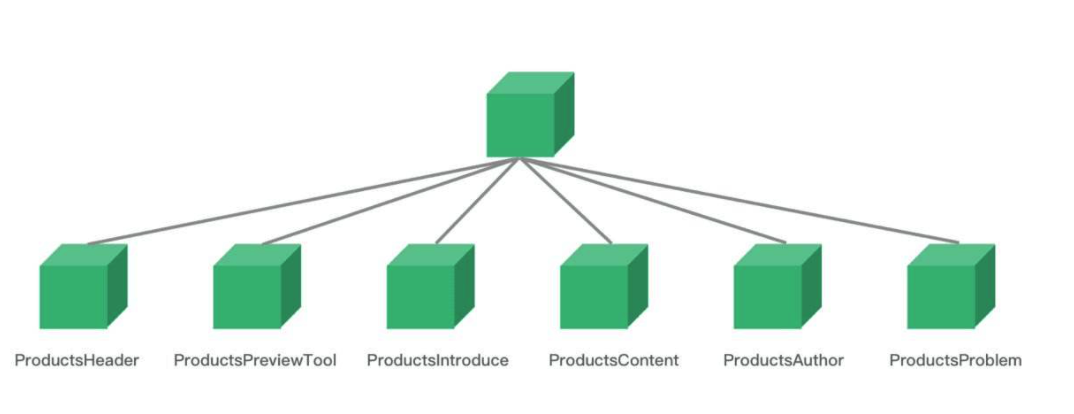
- 自动化

- 调试
- 编译
- 部署
- 测试
- 文档化
- 规范性

1.1 项目目录结构
.├── build # 编译脚本├── coverage # 覆盖率报告├── examples # 代码范例├── lib # CSS样式 编译后├── node_modules├── packages # 组件代码├── rollup-plugin-vue├── scripts # 脚本 发布、提交信息检查├── src # 通用代码├── test # 测试└── types # TS类型定义
1.2 文件命名规范
.├── button│ ├── Button.vue # 组件SFC│ ├── __tests__│ │ └── Button.spec.js # 测试文件│ └── index.js # 组件入口
1.3 代码样式规范(ESLint)
# .eslintrc.jsmodule.exports = {root: true,env: {browser: true,es2020: true,node: true,jest: true},globals: {ga: true,chrome: true,__DEV__: true},extends: ['plugin:json/recommended','plugin:vue/vue3-essential','eslint:recommended','@vue/prettier'],parserOptions: {parser: 'babel-eslint'},rules: {'no-console': process.env.NODE_ENV === 'production' ? 'warn' : 'off','no-debugger': process.env.NODE_ENV === 'production' ? 'warn' : 'off','prettier/prettier': 'error'}}
# .eslintignoresrc/utils/popper.jssrc/utils/date.jsexamples/play*.shnode_moduleslibcoverage*.md*.scss*.woff*.ttfsrc/index.jsdist
yarn add eslintyarn add eslint-formatter-prettyyarn add eslint-plugin-jsonyarn add eslint-plugin-prettieryarn add eslint-plugin-vueyarn add @vue/eslint-config-prettieryarn add babel-eslintyarn add prettier
package.json
{"scripts": {"lint": "eslint --no-error-on-unmatched-pattern --ext .vue --ext .js --ext .jsx packages/**/ src/**/ --fix",},}
1.6 Git版本规范
分支管理
一般项目分主分支(master)和其他分支。
当有团队成员要开发新功能(Feather)或改 BUG(Fix) 时,就从 master 分支开一个新的分支。
比如你修改一个Bug应该用bug的编号作为分支(例:[Fix:12323])
Commit规范
- 内容规范
<type>(<scope>): <subject><BLANK LINE><body><BLANK LINE><footer>复制代码
大致分为三个部分(使用空行分割):
- 标题行: 必填, 描述主要修改类型和内容
- 主题内容: 描述为什么修改, 做了什么样的修改, 以及开发的思路等等
- 页脚注释: 可以写注释,BUG 号链接
- type: commit 的类型
- feat: 新功能、新特性
- fix: 修改 bug
- perf: 更改代码,以提高性能
- refactor: 代码重构(重构,在不影响代码内部行为、功能下的代码修改)
- docs: 文档修改
- style: 代码格式修改, 注意不是 css 修改(例如分号修改)
- test: 测试用例新增、修改
- build: 影响项目构建或依赖项修改
- revert: 恢复上一次提交
- ci: 持续集成相关文件修改
- chore: 其他修改(不在上述类型中的修改)
- release: 发布新版本
- workflow: 工作流相关文件修改
- scope: commit 影响的范围, 比如: route, component, utils, build…
- subject: commit 的概述
- body: commit 具体修改内容, 可以分为多行.
- footer: 一些备注, 通常是 BREAKING CHANGE 或修复的 bug 的链接.
示例
fix(修复BUG)
如果修复的这个BUG只影响当前修改的文件,可不加范围。如果影响的范围比较大,要加上范围描述。
例如这次 BUG 修复影响到全局,可以加个 global。如果影响的是某个目录或某个功能,可以加上该目录的路径,或者对应的功能名称。
// 示例1fix(global):修复checkbox不能复选的问题// 示例2 下面圆括号里的 common 为通用管理的名称fix(common): 修复字体过小的BUG,将通用管理下所有页面的默认字体大小修改为 14px// 示例3fix: value.length -> values.length复制代码
feat(添加新功能或新页面)
feat: 添加网站主页静态页面这是一个示例,假设对点检任务静态页面进行了一些描述。这里是备注,可以是放BUG链接或者一些重要性的东西。复制代码
chore(其他修改)
chore 的中文翻译为日常事务、例行工作,顾名思义,即不在其他 commit 类型中的修改,都可以用 chore 表示。
chore: 将表格中的查看详情改为详情复制代码
其他类型的 commit 和上面三个示例差不多,就不说了。
自动化提交验证
验证 git commit 规范,主要通过 git 的 pre-commit 钩子函数来进行。当然,你还需要下载一个辅助工具来帮助你进行验证。
下载辅助工具
npm i -D husky
在 package.json 加上下面的代码
"husky": {"hooks": {"pre-commit": "npm run lint","commit-msg": "node script/verify-commit.js","pre-push": "npm test"}}复制代码
然后在你项目根目录下新建一个文件夹 script,并在下面新建一个文件 verify-commit.js,输入以下代码:
const msgPath = process.env.HUSKY_GIT_PARAMSconst msg = require('fs').readFileSync(msgPath, 'utf-8').trim()const commitRE = /^(feat|fix|docs|style|refactor|perf|test|workflow|build|ci|chore|release|workflow)(\(.+\))?: .{1,50}/if (!commitRE.test(msg)) {console.log()console.error(`不合法的 commit 消息格式。请查看 git commit 提交规范:https://github.com/woai3c/Front-end-articles/blob/master/git%20commit%20style.md`)process.exit(1)}复制代码
现在来解释下各个钩子的含义:
"pre-commit": "npm run lint",在git commit前执行npm run lint检查代码格式。"commit-msg": "node script/verify-commit.js",在git commit时执行脚本verify-commit.js验证 commit 消息。如果不符合脚本中定义的格式,将会报错。"pre-push": "npm test",在你执行git push将代码推送到远程仓库前,执行npm test进行测试。如果测试失败,将不会执行这次推送。
/scripts/verifyCommit.js
// Invoked on the commit-msg git hook by yorkie.const chalk = require('chalk')const msgPath = process.env.GIT_PARAMSconst msg = require('fs').readFileSync(msgPath, 'utf-8').trim()const commitRE = /^(revert: )?(feat|fix|docs|dx|style|refactor|perf|test|workflow|build|ci|chore|types|wip|release)(\(.+\))?(.{1,10})?: .{1,50}/const mergeRe = /^(Merge pull request|Merge branch)/if (!commitRE.test(msg)) {if (!mergeRe.test(msg)) {console.log(msg)console.error(` ${chalk.bgRed.white(' ERROR ')} ${chalk.red(`invalid commit message format.`)}\n\n` +chalk.red(` Proper commit message format is required for automated changelog generation. Examples:\n\n`) +` ${chalk.green(`feat(compiler): add 'comments' option`)}\n` +` ${chalk.green(`fix(v-model): handle events on blur (close #28)`)}\n\n` +chalk.red(` See https://github.com/vuejs/vue-next/blob/master/.github/commit-convention.md for more details.\n`))process.exit(1)}}
2. 模块化与组件化
npm init -y
https://github.com/cuixiaorui/course-vue3-test/tree/main/chapters/two 参考资料
2.1 编写Buttun组件
yarn add vue@next
/packages/button/Button.vue
<template><buttonclass="el-button"@click="handleClick":disabled="buttonDisabled || loading":autofocus="autofocus":type="nativeType":class="[type ? 'el-button--' + type : '',buttonSize ? 'el-button--' + buttonSize : '',{'is-disabled': buttonDisabled,'is-loading': loading,'is-plain': plain,'is-round': round,'is-circle': circle,},]"><i class="el-icon-loading" v-if="loading"></i><i :class="icon" v-if="icon && !loading"></i><span v-if="$slots.default"><slot></slot></span></button></template><script>import { computed, inject, toRefs, unref, getCurrentInstance } from "vue";export default {name: "ElButton",props: {type: {type: String,default: "default",},size: {type: String,default: "",},icon: {type: String,default: "",},nativeType: {type: String,default: "button",},loading: Boolean,disabled: Boolean,plain: Boolean,autofocus: Boolean,round: Boolean,circle: Boolean,},emits: ["click"],setup(props, ctx) {const { size, disabled } = toRefs(props);const buttonSize = useButtonSize(size);const buttonDisabled = useButtonDisabled(disabled);const handleClick = (evt) => {ctx.emit("click", evt);};return {handleClick,buttonSize,buttonDisabled,};},};const useButtonSize = (size) => {const elFormItem = inject("elFormItem", {});const _elFormItemSize = computed(() => {return unref(elFormItem.elFormItemSize);});const buttonSize = computed(() => {return (size.value ||_elFormItemSize.value ||(getCurrentInstance().proxy.$ELEMENT || {}).size);});return buttonSize;};const useButtonDisabled = (disabled) => {const elForm = inject("elForm", {});const buttonDisabled = computed(() => {return disabled.value || unref(elForm.disabled);});return buttonDisabled;};</script>
2.2 集成Babel
yarn add babelyarn add babel-plugin-syntax-dynamic-importyarn add babel-plugin-syntax-jsxyarn add babel-preset-envyarn add @babel/plugin-proposal-optional-chainingyarn add @babel/preset-envyarn add @vue/babel-plugin-jsx
新建.babelrc文件
{"presets": [["@babel/preset-env", { "targets": { "node": "current" } }]],"plugins": ["syntax-dynamic-import",["@vue/babel-plugin-jsx"],"@babel/plugin-proposal-optional-chaining","@babel/plugin-proposal-nullish-coalescing-operator"],"env": {"utils": {"presets": [["env",{"loose": true,"modules": "commonjs","targets": {"browsers": ["> 1%", "last 2 versions", "not ie <= 8"]}}]],"plugins": [["module-resolver",{"root": ["element-ui"],"alias": {"element-ui/src": "element-ui/lib"}}]]},"test": {"plugins": ["istanbul"],"presets": [["env", { "targets": { "node": "current" } }]]},"esm": {"presets": [["@babel/preset-env", { "modules": false }]]}}}
2.2 集成VTU
安装依赖
yarn add jest# 此版本这个支持Vue3.0yarn add vue-jest@5.0.0-alpha.5yarn add babel-jestyarn add @vue/compiler-sfc@3.0.2yarn add @vue/test-utils@nextyarn add typescript
jest.config.js
module.exports = {testEnvironment: 'jsdom', // 默认JSdomroots: ['<rootDir>/src','<rootDir>/packages',], //transform: {'^.+\\.vue$': 'vue-jest', // vue单文件'^.+\\js$': 'babel-jest' // esm最新语法 import},moduleFileExtensions: ['vue', 'js', 'json', 'jsx', 'ts', 'tsx', 'node'],testMatch: ['**/__tests__/**/*.spec.js'],// 别名moduleNameMapper: {'^element-ui(.*)$': '<rootDir>$1','^main(.*)$': '<rootDir>/src$1'}}
/packages/button/tests/Button.spec.js
import Button from "../Button.vue";import { mount } from "@vue/test-utils";it("content", () => {const Comp = {template: `<div><Button>默认按钮</Button></div>`,};const wrapper = mount(Comp, {global: {components: {Button,},},});expect(wrapper.findComponent({ name: "ElButton" }).text()).toContain("默认按钮");});describe("size", () => {it("should have a el-button--mini class when set size prop value equal to mini", () => {const wrapper = mount(Button, {props: {size: "mini",},});expect(wrapper.classes()).toContain("el-button--mini");});it("should have a el-button--mini class by elFormItem ", () => {const wrapper = mount(Button, {global: {provide: {elFormItem: {elFormItemSize: "mini",},},},});expect(wrapper.classes()).toContain("el-button--mini");});it("should have a el-button--mini class by $ELEMENT value ", () => {const wrapper = mount(Button, {global: {config: {globalProperties: {$ELEMENT: {size: "mini",},},},},});expect(wrapper.classes()).toContain("el-button--mini");});});it("type", () => {const wrapper = mount(Button, {props: {type: "primary",},});expect(wrapper.classes()).toContain("el-button--primary");});it("plain", () => {const wrapper = mount(Button, {props: {plain: true,},});expect(wrapper.classes()).toContain("is-plain");});it("round", () => {const wrapper = mount(Button, {props: {round: true,},});expect(wrapper.classes()).toContain("is-round");});it("circle", () => {const wrapper = mount(Button, {props: {circle: true,},});expect(wrapper.classes()).toContain("is-circle");});it("loading", () => {const wrapper = mount(Button, {props: {loading: true,},});expect(wrapper.find(".el-icon-loading").exists()).toBe(true);expect(wrapper.classes()).toContain("is-loading");});describe("icon", () => {it("should show icon element", () => {const wrapper = mount(Button, {props: {icon: "el-icon-edit",},});expect(wrapper.find(".el-icon-edit").exists()).toBe(true);});it("should not show icon element when set loading prop equal to true", () => {const wrapper = mount(Button, {props: {loading: true,icon: "el-icon-edit",},});expect(wrapper.find(".el-icon-edit").exists()).toBe(false);});});describe("click", () => {it("should emit click event ", () => {const wrapper = mount(Button);wrapper.trigger("click");expect(wrapper.emitted("click")).toBeTruthy();});it("should not emit click event when disabled equal to true", () => {const wrapper = mount(Button, {props: {disabled: true,},});wrapper.trigger("click");expect(wrapper.emitted("click")).toBeFalsy();});it("should not emit click event when elForm disabled equal to true", () => {const wrapper = mount(Button, {global: {provide: {elForm: {disabled: true,},},},});wrapper.trigger("click");expect(wrapper.emitted("click")).toBeFalsy();});it("should not emit click event when loading prop equal to true", () => {const wrapper = mount(Button, {props: {loading: true,},});wrapper.trigger("click");expect(wrapper.emitted("click")).toBeFalsy();});});it("native-type", () => {const wrapper = mount(Button, {props: {nativeType: "button",},});expect(wrapper.attributes("type")).toBe("button");});
测试
"test": "jest --runInBand", # 序列化执行
2.4 样式打包
yarn add gulpyarn add gulp-autoprefixeryarn add gulp-sassyarn add gulp-cssmin# cp-cliyarn add cp-cliyarn add tslib
/bin/gen-cssfile
package.json
"build:theme": "gulp build --gulpfile packages/theme-chalk/gulpfile.js && cp-cli packages/theme-chalk/lib lib/theme-chalk",
2.4 Rollup打包
https://www.rollupjs.com/ Rollup中文网 https://juejin.im/post/6844903731343933453 使用 rollup 打包 JS
yarn add rollupyarn add rollup-plugin-peer-deps-externalyarn add rollup-plugin-scssyarn add rollup-plugin-terseryarn add rollup-plugin-vueyarn add @rollup/plugin-node-resolveyarn add @rollup/plugin-commonjsyarn add @rollup/plugin-jsonyarn add @rollup/plugin-replaceyarn add @rollup/plugin-babelyarn add rollup-plugin-vue
Package.json
"build:next": "rollup -c",
import pkg from './package.json'// 等 rollup-plugin-vue 发版后在切换官方版// 暂时先用本地的 rollup-plugin-vue// 修复了 render 函数的编译问题,但是还没发版// import vuePlugin from 'rollup-plugin-vue'const vuePlugin = require('./rollup-plugin-vue/index')import scss from 'rollup-plugin-scss'import peerDepsExternal from 'rollup-plugin-peer-deps-external'import resolve from '@rollup/plugin-node-resolve'import commonjs from '@rollup/plugin-commonjs'import json from '@rollup/plugin-json'import replace from '@rollup/plugin-replace'import babel from '@rollup/plugin-babel'import { terser } from 'rollup-plugin-terser'const name = 'Element3'const createBanner = () => {return `/*!* ${pkg.name} v${pkg.version}* (c) ${new Date().getFullYear()} kkb* @license MIT*/`}const createBaseConfig = () => {return {input: 'src/entry.js',external: ['vue'],plugins: [peerDepsExternal(),babel(),resolve({extensions: ['.vue', '.jsx']}),commonjs(),json(),vuePlugin({css: true}),scss()],output: {sourcemap: false,banner: createBanner(),externalLiveBindings: false,globals: {vue: 'Vue'}}}}function mergeConfig(baseConfig, configB) {const config = Object.assign({}, baseConfig)// pluginif (configB.plugins) {baseConfig.plugins.push(...configB.plugins)}// outputconfig.output = Object.assign({}, baseConfig.output, configB.output)return config}function createFileName(formatName) {return `dist/element3-ui.${formatName}.js`}// es-bundleconst esBundleConfig = {plugins: [replace({__DEV__: `(process.env.NODE_ENV !== 'production')`})],output: {file: createFileName('esm-bundler'),format: 'es'}}// es-browserconst esBrowserConfig = {plugins: [replace({__DEV__: true})],output: {file: createFileName('esm-browser'),format: 'es'}}// es-browser.prodconst esBrowserProdConfig = {plugins: [terser(),replace({__DEV__: false})],output: {file: createFileName('esm-browser.prod'),format: 'es'}}// cjsconst cjsConfig = {plugins: [replace({__DEV__: true})],output: {file: createFileName('cjs'),format: 'cjs'}}// cjs.prodconst cjsProdConfig = {plugins: [terser(),replace({__DEV__: false})],output: {file: createFileName('cjs.prod'),format: 'cjs'}}// globalconst globalConfig = {plugins: [replace({__DEV__: true,'process.env.NODE_ENV': true})],output: {file: createFileName('global'),format: 'iife',name}}// global.prodconst globalProdConfig = {plugins: [terser(),replace({__DEV__: false})],output: {file: createFileName('global.prod'),format: 'iife',name}}const formatConfigs = [esBundleConfig,esBrowserProdConfig,esBrowserConfig,cjsConfig,cjsProdConfig,globalConfig,globalProdConfig]function createPackageConfigs() {return formatConfigs.map((formatConfig) => {return mergeConfig(createBaseConfig(), formatConfig)})}export default createPackageConfigs()
2.3 编写Entry入口
3. 自动化
3.1 文档自动化
文档自动化其实就是根据代码自动生成开发文档。比如element3项目中的。
https://element3-ui.com/
其实可以用StoryBook。
这个我们后面写专题更新。大家保持关注。
3.2 规范检查
yarn add husky
.huskyrc
{"hooks": {"pre-commit": "npm run lint","commit-msg": "node scripts/verifyCommit.js","pre-push": "npm run test"},}
3.4 回归测试
GitHub Action
.github/workflows/main.yml
3.3 持续集成CI
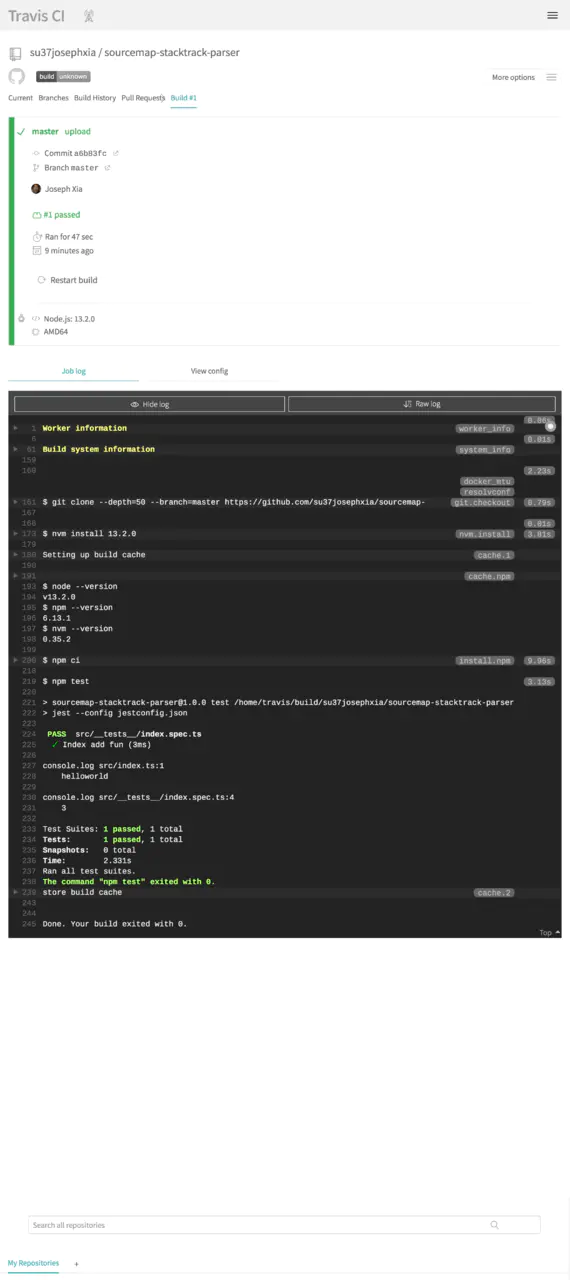
Travis CI 提供的是持续集成服务,它仅支持 Github,不支持其他代码托管。它需要绑定 Github 上面的项目,还需要该项目含有构建或者测试脚本。只要有新的代码,就会自动抓取。然后,提供一个虚拟机环境,执行测试,完成构建,还能部署到服务器。只要代码有变更,就自动运行构建和测试,反馈运行结果。确保符合预期以后,再将新代码集成到主干。
这个项目需要Travis在提交后自动进行测试并且向codecov提供测试报告。
- 测试
- 报告分析
登录TravicCI网站
登录https://www.travis-ci.org/网站
使用github账号登录系统
配置.travis.yml
运行自动化测试框架
language: node_js # 项目语言,node 项目就按照这种写法就OK了node_js:- 13.2.0 # 项目环境cache: # 缓存 node_js 依赖,提升第二次构建的效率directories:- node_modulestest:- npm run test # 运行自动测试框架
参考教程:Travis CI Tutorial
上传配置到github
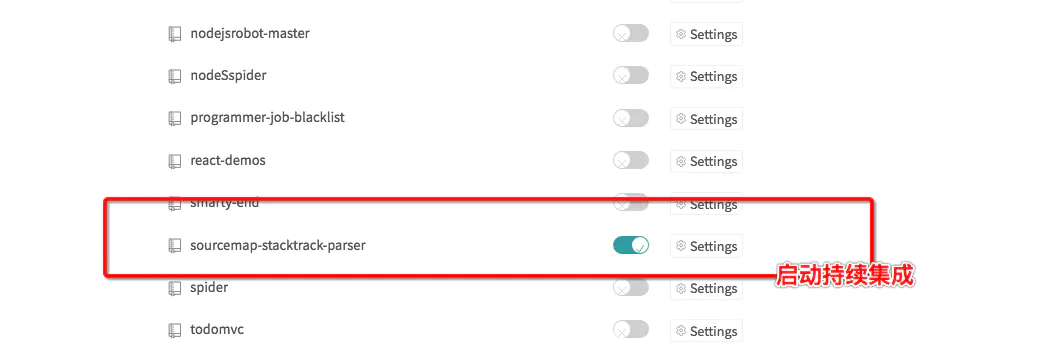
启动持续集成
通过github账号登录travis
获取持续集成通过徽标
将上面 URL 中的 {GitHub 用户名} 和 {项目名称} 替换为自己项目的即可,最后可以将集成完成后的 markdown 代码贴在自己的项目上
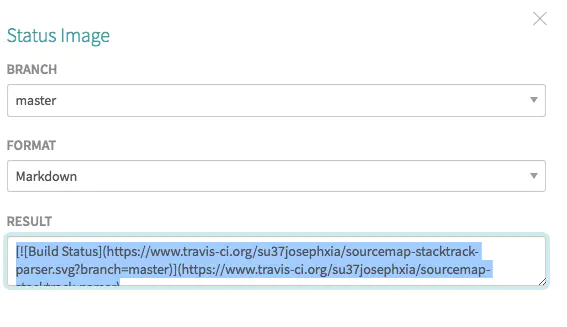
http://img.shields.io/travis/{GitHub 用户名}/{项目名称}.svg复制代码
3.5 持续交付CD - 上传Npm库
创建发布脚本
publish.sh
#!/usr/bin/env bashnpm config get registry # 检查仓库镜像库npm config set registry=http://registry.npmjs.orgecho '请进行登录相关操作:'npm login # 登陆echo "-------publishing-------"npm publish # 发布npm config set registry=https://registry.npm.taobao.org # 设置为淘宝镜像echo "发布完成"exit
执行发布
./publish.sh复制代码
填入github用户名密码后
3.7 覆盖率测试Codecov
Codecov是一个开源的测试结果展示平台,将测试结果可视化。Github上许多开源项目都使用了Codecov来展示单测结果。Codecov跟Travis CI一样都支持Github账号登录,同样会同步Github中的项目。
yarn add codecov
"scripts": {...,"codecov": "codecov"}
4. 其他
4.1 标准的README文档
4.2 开源许可证
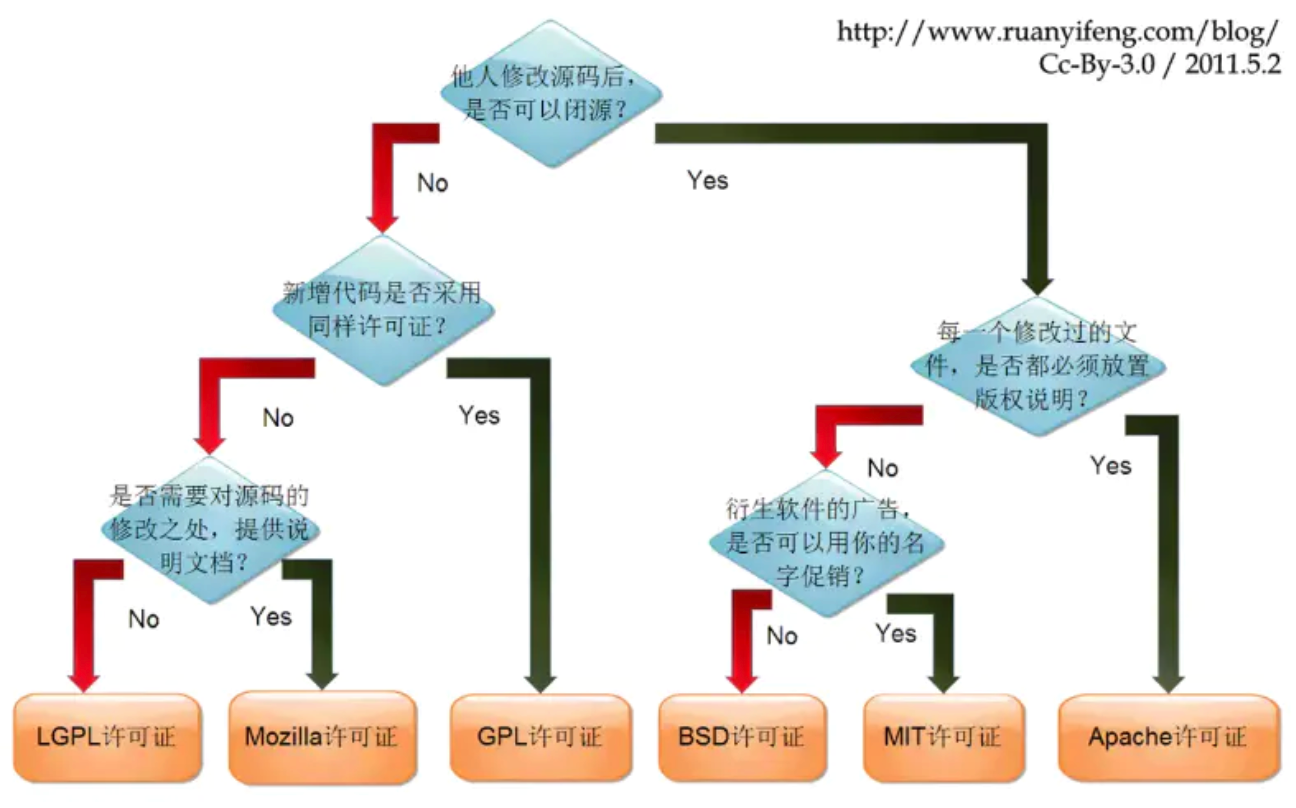
每个开源项目都需要配置一份合适的开源许可证来告知所有浏览过我们的项目的用户他们拥有哪些权限,具体许可证的选取可以参照阮一峰前辈绘制的这张图表:
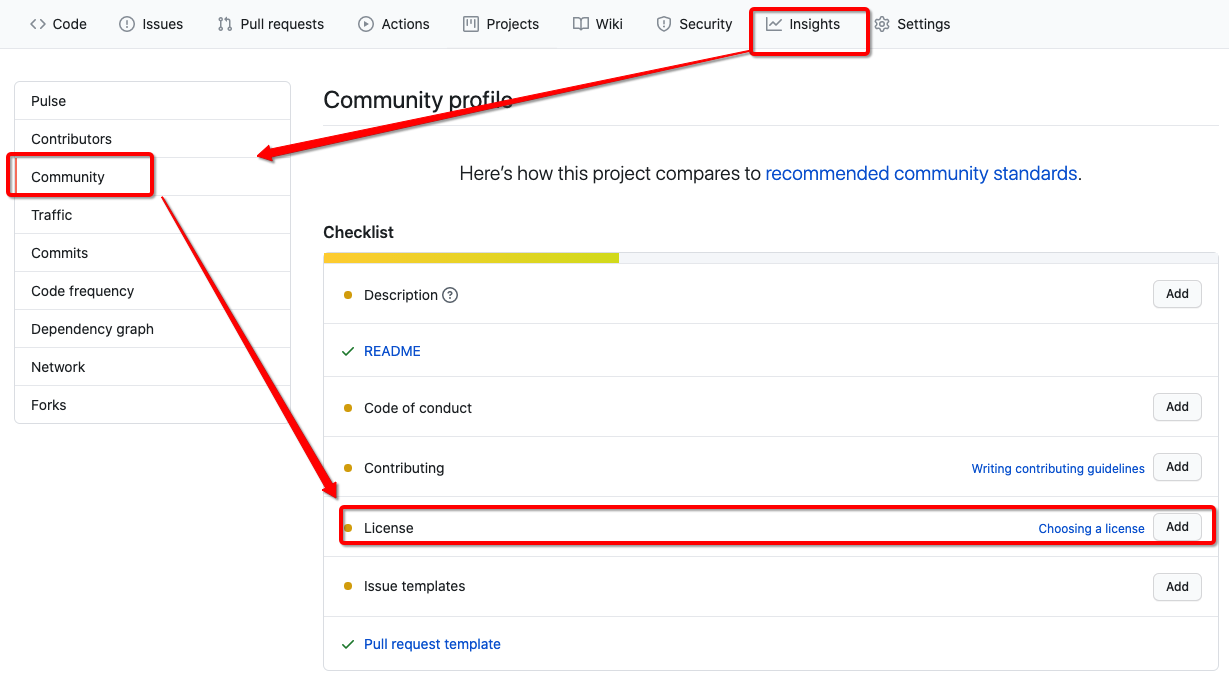
那我们又该怎样为我们的项目添加许可证了?其实 Github 已经为我们提供了非常简便的可视化操作: 我们平时在逛 github 网站的时候,发现不少项目都在 README.md 中添加徽标,对项目进行标记和说明,这些小图标给项目增色不少,不仅简单美观,而且还包含清晰易懂的信息。
- 打开我们的开源项目并切换至 Insights 面板
- 点击 Community 标签
- 如果您的项目没有添加 License,在 Checklist 里会提示您添加许可证,点击 Add 按钮就进入可视化操作流程了
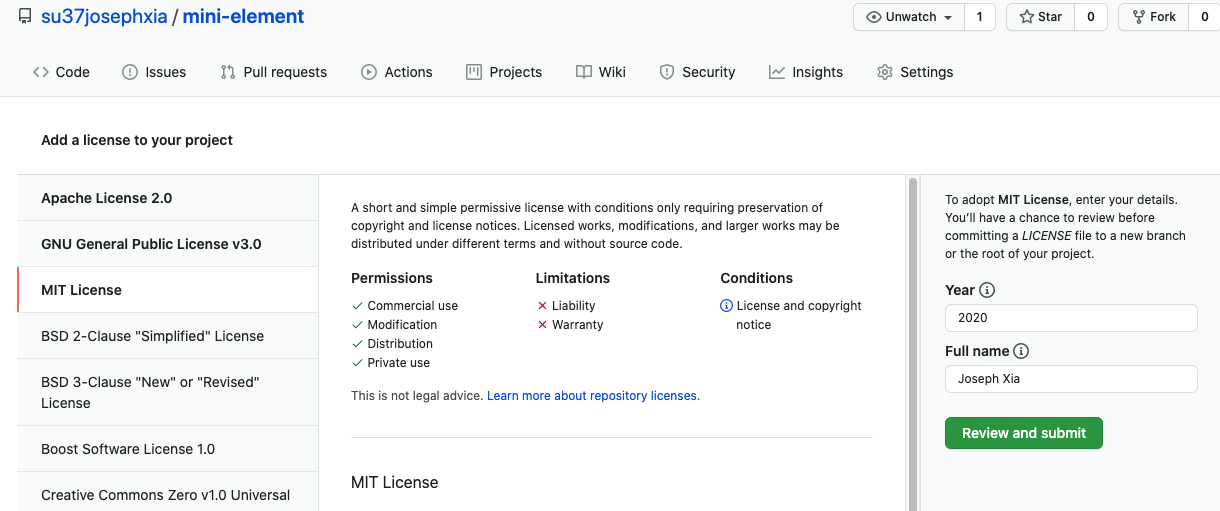
4.3 申请开源徽标 (Badge)
三、附录
3.1 Vue组件与插件
<!DOCTYPE html><html lang="en"><head><meta charset="UTF-8" /><meta name="viewport" content="width=device-width, initial-scale=1.0" /><meta http-equiv="X-UA-Compatible" content="ie=edge" /><title>Document</title><script src="/node_modules/vue/dist/vue.global.js"></script><script src="/dist/element3-ui.global.js"></script><link href="/lib/theme-chalk/index.css" rel="stylesheet" /><style></style></head><body><div id="app"></div><script>const { createApp, reactive, computed, watchEffect } = Vue;const MyButton = {name: "MyButton",data: function () {return {count: 0,};},template:'<button v-on:click="count++">You clicked me {{ count }} times.</button>',};// 添加插件MyButton.install = (app) => app.component("MyButton", MyButton);// 组件库const Element = {MyButton,install: app => {app.use(MyButton)}}const MyComponent = {template: `<my-button />`,};createApp(MyComponent)// .use(MyButton).use(Element).mount("#app");</script></body></html>
3.2 rollup打包

rollup是一款小巧的javascript模块打包工具,更适合于库应用的构建工具;可以将小块代码编译成大块复杂的代码,基于ES6 modules,它可以让你的 bundle 最小化,有效减少文件请求大小,vue在开发的时候用的是webpack,但是最后将文件打包在一起的时候用的是 rollup.js
首次发表在个人博客
Button
/src/MyButton.js
export default {name: "MyButton",data: function () {return {count: 0,};},template:'<button v-on:click="count++">You clicked me {{ count }} times.</button>',};
入口
/src/entry.js
import MyButton from "./MyButton";import SfcButton from "./SfcButton.vue";import JsxButton from "./JsxButton.vue";// 添加插件MyButton.install = (app) => app.component("MyButton", MyButton);SfcButton.install = (app) => app.component("SfcButton", SfcButton);JsxButton.install = (app) => app.component("JsxButton", JsxButton);// 组件库const Element = {MyButton,SfcButton,JsxButton,install: (app) => {app.use(MyButton);app.use(SfcButton);app.use(JsxButton);},};export default Element;
格式声明
https://juejin.im/post/6885542715782594568 AMD CMD UMD区别
- amd – 异步模块定义,用于像 RequireJS 这样的模块加载器
- cjs – CommonJS,适用于 Node 和 Browserify/Webpack
- es – 将软件包保存为 ES 模块文件
- iife – 一个自动执行的功能,适合作为
<script>标签。(如果要为应用程序创建一个捆绑包,您可能想要使用它,因为它会使文件大小变小。) - umd – 通用模块定义,以 amd,cjs 和 iife 为一体
const vuePlugin = require("../../rollup-plugin-vue/index");import babel from "@rollup/plugin-babel";// import vuePlugin from "rollup-plugin-vue";const es = {input: "src/entry.js",output: {file: "dist/index.js",name: "Element",format: "iife",globals: {vue: "Vue",},},external: ["vue"],plugins: [babel(),vuePlugin({css: true,}),],};import { terser } from "rollup-plugin-terser";const minEs = {input: "src/entry.js",external: ["vue"],output: {file: "dist/index.min.js",name: "Element",format: "umd",},plugins: [babel(),vuePlugin({css: true,}),terser(),],};const cjs = {input: "src/entry.js",external: ["vue"],output: {file: "dist/index.cjs.js",name: "Element",format: "cjs",},plugins: [babel(),vuePlugin({css: true,}),],};export default [es, minEs, cjs];
测试页面
<!DOCTYPE html><html lang="en"><head><meta charset="UTF-8" /><meta name="viewport" content="width=device-width, initial-scale=1.0" /><meta http-equiv="X-UA-Compatible" content="ie=edge" /><title>Document</title><script src="/node_modules/vue/dist/vue.global.js"></script><script src="dist/index.js"></script><style></style></head><body><div id="app"></div><script>const { createApp, reactive, computed, watchEffect } = Vue;const MyComponent = {template: `<my-button /><sfc-button /><jsx-button />`,};createApp(MyComponent).use(Element).mount("#app");</script></body></html>
单文件组件
<template><button>Sfc 666</button></template><script>export default {name: "SfcButton",};</script>
const vuePlugin = require("../../rollup-plugin-vue/index");// import vuePlugin from "rollup-plugin-vue";# pluginvuePlugin({css: true,}),
JSX支持
jsx的定义
JSX 是一种类似于 XML 的 JavaScript 语法扩展 JSX 不是由引擎或浏览器实现的。相反,我们将使用像 Babel 这样的转换器将 JSX 转换为常规 JavaScript。基本上,JSX 允许我们在 JavaScript 中使用类似 HTML 的语法。
jsx的优势
- 可以将 模版分离 这样模版的每个部分更加独立,又可以随机的组合,复用性更高。相比与组件的组合,粒度更细
- 使用 js 可配置每项要渲染的 dom,更加动态可配置化
import babel from "@rollup/plugin-babel";# pluginbabel(),
<script>export default {name: "JsxButton",render() {return <button>JSX 666</button>;},};</script>
3.3 Vue-cli插件开发

若有收获,就点个赞吧
0 人点赞
