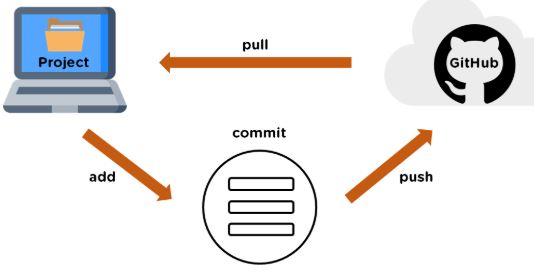
GitHub
菜鸟教程:
[https://www.runoob.com/git/git-remote-repo.html](https://www.runoob.com/git/git-remote-repo.html)
W3Cschool:
[https://www.w3cschool.cn/githubcn/](https://www.w3cschool.cn/githubcn/)
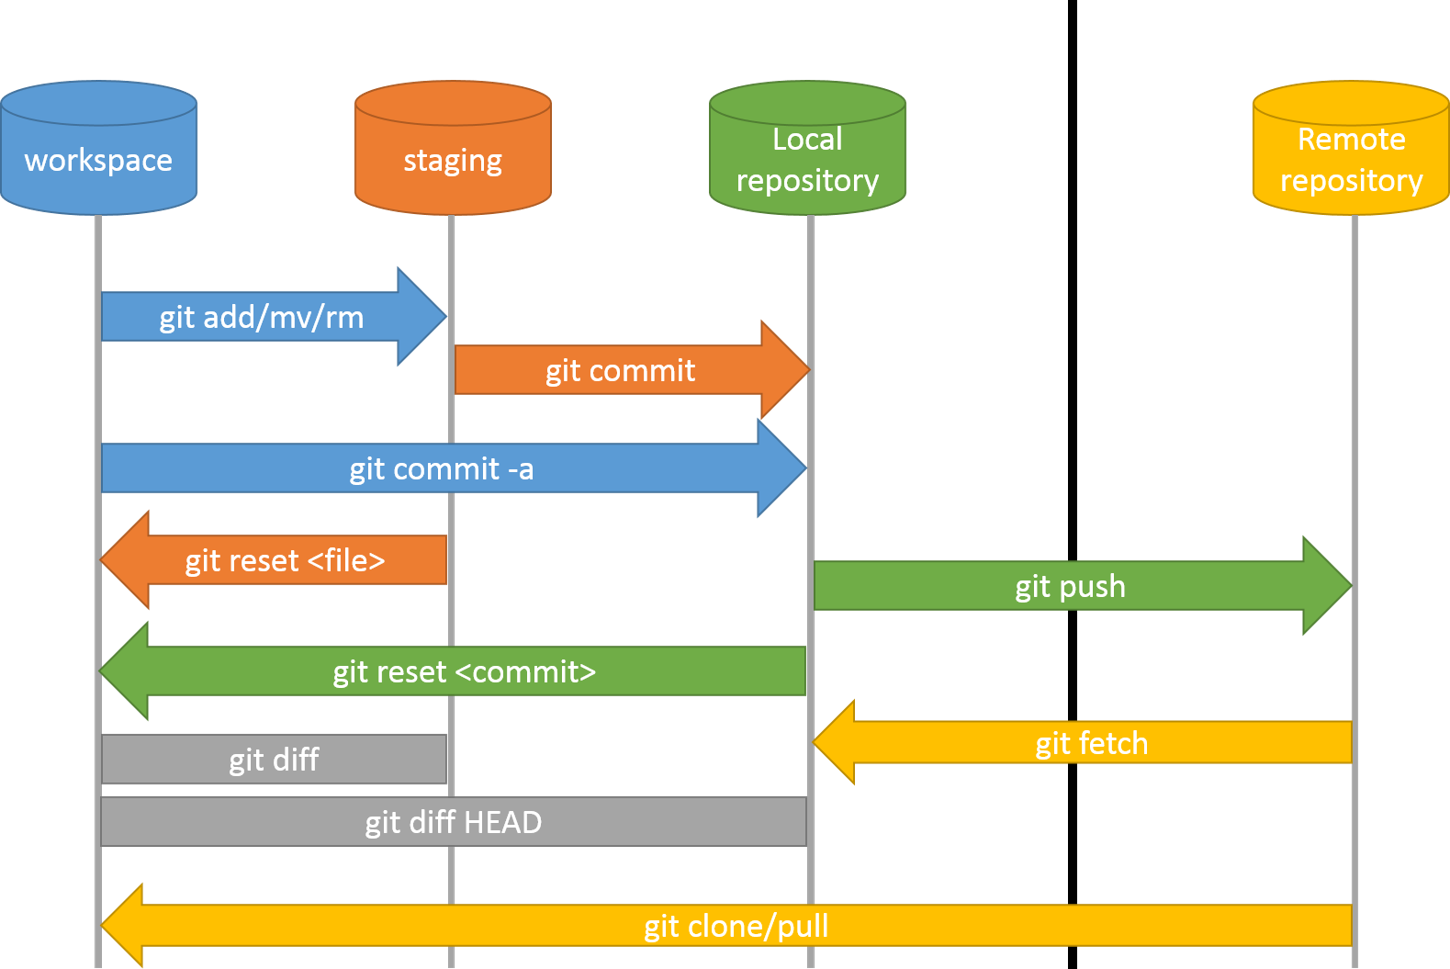
命令格式
添加一个新的远程仓库,可以指定一个简单的名字,以便将来引用,命令格式如下:
git remote add [shortname] [url] # 命令格式git remote add origin git@gitee.com:huangpw/huangpw.git # 使用格式
注册Github账号
官方地址:
[https://github.com/](https://github.com/)
生成 SSH Key
打开 Git Bash 。
粘贴下面的文本,替换为您的 GitHub 电子邮件地址。
$ ssh-keygen -t rsa -C "youremail@example.com"$ ssh-keygen -t ed25519 -C "your_email@example.com"
后面的 your_email@youremail.com 改为你在 Github 上注册的邮箱,之后会要求确认路径和输入密码。
我们这使用默认的一路回车(三次回车)就行。
成功的话,会在 ~/ 下生成 .ssh 文件夹,进去,打开 id_rsa.pub,复制里面的 key。
$ ssh-keygen -t rsa -C "1042850644@qq.com"Generating public/private rsa key pair.Enter file in which to save the key (/Users/tianqixin/.ssh/id_rsa): # 直接回车Enter passphrase (empty for no passphrase): # 直接回车Enter same passphrase again: # 直接回车Your identification has been saved in /Users/tianqixin/.ssh/id_rsa.Your public key has been saved in /Users/tianqixin/.ssh/id_rsa.pub.The key fingerprint is:SHA256:MDKVidPTDXIQoJwoqUmI4LBAsg5XByBlrOEzkxrwARI 429240967@qq.comThe key's randomart image is:+---[RSA 3072]----+|E*+.+=**oo ||%Oo+oo=o. . ||%**.o.o. ||OO. o o ||+o+ S ||. || || || |+----[SHA256]-----+
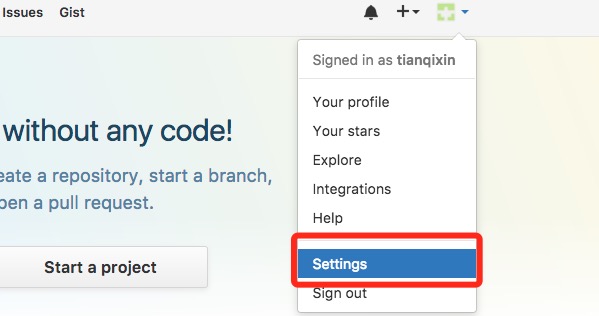
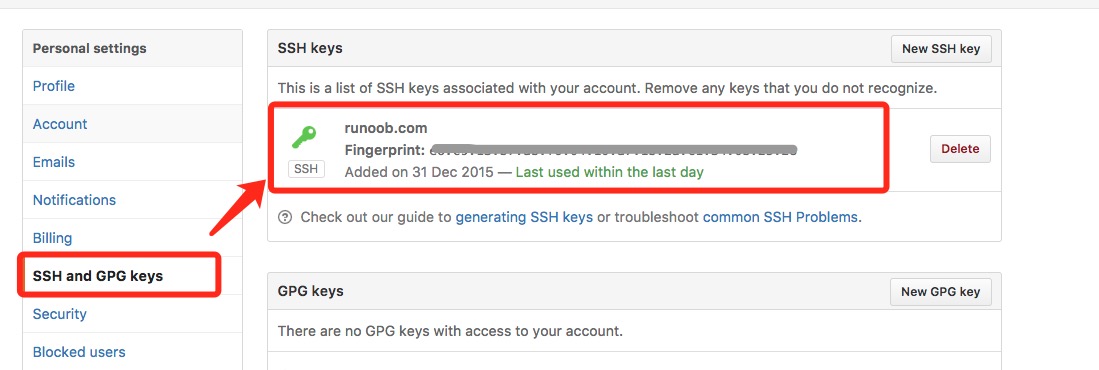
回到 github 上,进入 Account => Settings(账户配置)。
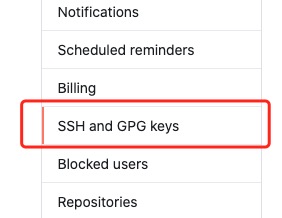
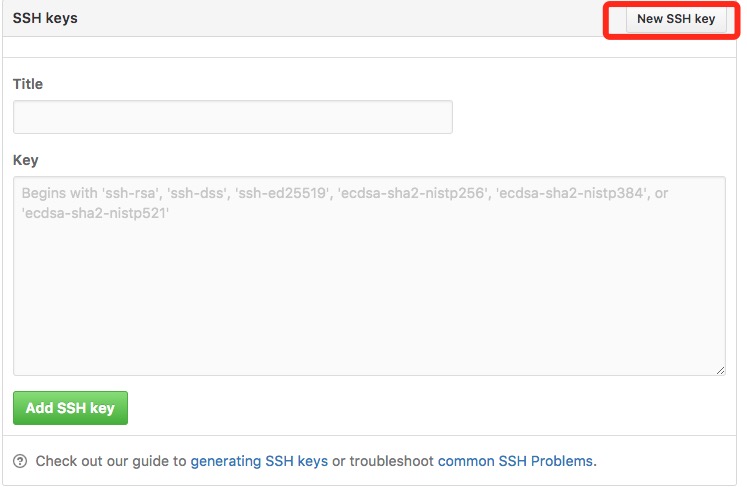
左边选择 SSH and GPG keys,
然后点击 New SSH key 按钮,
title 设置标题,可以随便填,粘贴在你电脑上生成的 key。
添加成功后界面,如下所示。
为了验证是否成功,输入以下命令:
$ ssh -T git@github.comThe authenticity of host 'github.com (52.74.223.119)' can't be established.RSA key fingerprint is SHA256:nThbg6kXUpJWGl7E1IGOCspRomTxdCARLviKw6E5SY8.Are you sure you want to continue connecting (yes/no/[fingerprint])? yes # 输入 yesWarning: Permanently added 'github.com,52.74.223.119' (RSA) to the list of known hosts.Hi tianqixin! You've successfully authenticated, but GitHub does not provide shell access. # 成功信息
以上命令,说明我们已成功连上 Github。
添加远程库
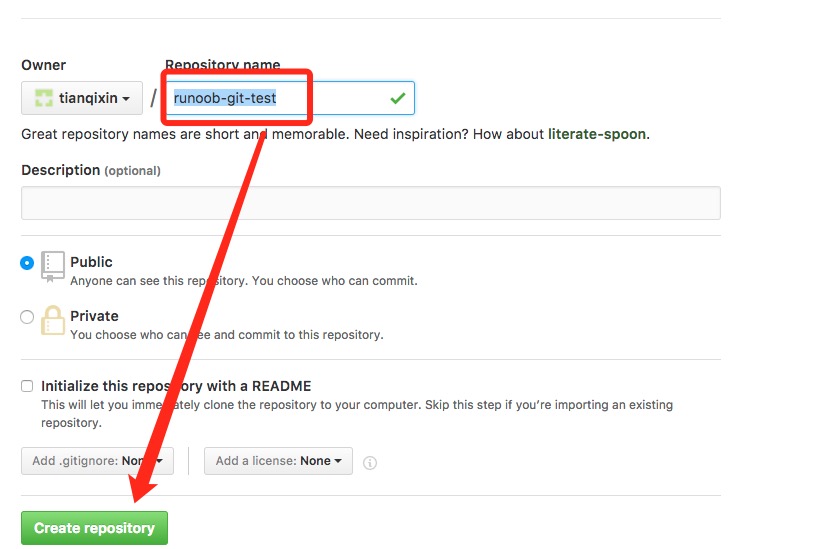
右上角,点击” New repository “ 如下图所示:

之后在在Repository name 填入 runoob-git-test(远程仓库名) ,其他保持默认设置,
点击”Create repository”按钮,就成功地创建了一个新的Git仓库:
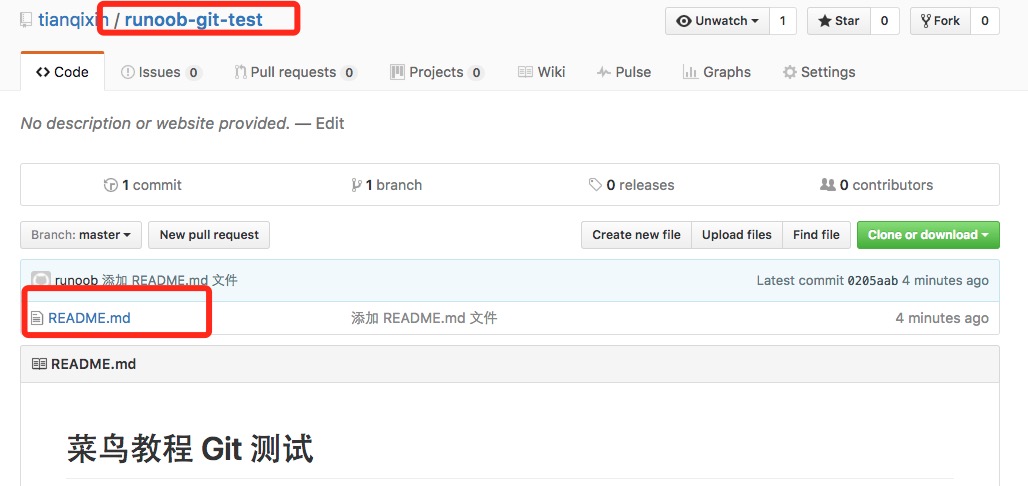
创建成功后,显示如下信息:

以上信息告诉我们可以从这个仓库克隆出新的仓库,也可以把本地仓库的内容推送到GitHub仓库。
现在,我们根据 GitHub 的提示,在本地的仓库下运行命令:
$ mkdir runoob-git-test # 创建测试目录$ cd runoob-git-test/ # 进入测试目录$ echo "# 菜鸟教程 Git 测试" >> README.md # 创建 README.md 文件并写入内容$ ls # 查看目录下的文件README$ git init # 初始化$ git add README.md # 添加文件$ git commit -m "添加 README.md 文件" # 提交并备注信息[master (root-commit) 0205aab] 添加 README.md 文件1 file changed, 1 insertion(+)create mode 100644 README.md# 提交到 Github$ git remote add origin git@github.com:tianqixin/runoob-git-test.git$ git push -u origin master
以上命令,请根据你在Github成功创建新仓库的地方复制,而不是根据我提供的命令,因为我们的Github用户名不一样,仓库名也不一样。
接下来我们返回 Github 创建的仓库,就可以看到文件已上传到 Github上:
查看当前的远程库
要查看当前配置有哪些远程仓库,可以用命令:
git remote # 查看当前的远程库
实例
$ git remote # 查看当前的远程库origin$ git remote -v # 显示所有远程仓库origin git@github.com:tianqixin/runoob-git-test.git (fetch)origin git@github.com:tianqixin/runoob-git-test.git (push)
执行时加上 -v 参数,你还可以看到每个别名的实际链接地址。
提取远程仓库
Git 有两个命令用来提取远程仓库的更新。
1、从远程仓库下载新分支与数据:
git fetch
该命令执行完后需要执行 git merge 远程分支到你所在的分支。
2、从远端仓库提取数据并尝试合并到当前分支:
git merge
该命令就是在执行 git fetch 之后紧接着执行 git merge 远程分支到你所在的任意分支。
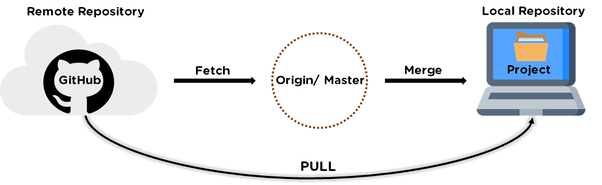
假设你配置好了一个远程仓库,并且你想要提取更新的数据,你可以首先执行 git fetch [alias] 告诉 Git 去获取它有你没有的数据,然后你可以执行 git merge [alias]/[branch] 以将服务器上的任何更新(假设有人这时候推送到服务器了)合并到你的当前分支。
接下来我们在 Github 上点击” README.md” 并在线修改它:
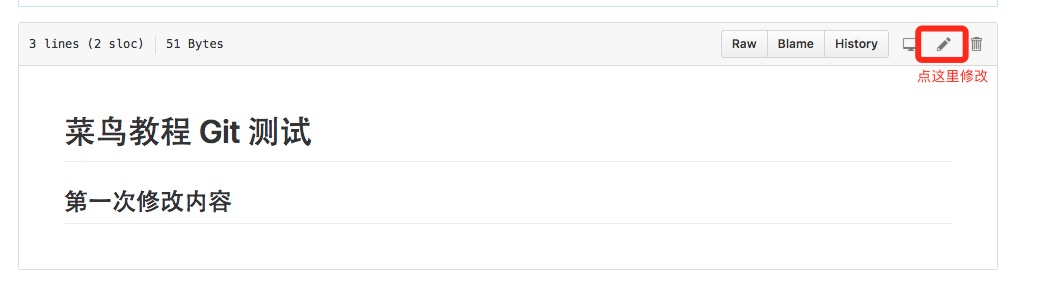
然后我们在本地更新修改。
$ git fetch origin # 更新远程跟踪分支remote: Counting objects: 3, done.remote: Compressing objects: 100% (2/2), done.remote: Total 3 (delta 0), reused 0 (delta 0), pack-reused 0Unpacking objects: 100% (3/3), done.From github.com:tianqixin/runoob-git-test0205aab..febd8ed master -> origin/master
以上信息”0205aab..febd8ed master -> origin/master” 说明 master 分支已被更新,我们可以使用以下命令将更新同步到本地:
$ git merge origin/master # 表示在当前分支上,合并origin/masterUpdating 0205aab..febd8edFast-forwardREADME.md | 1 +1 file changed, 1 insertion(+)
查看 README.md 文件内容:
$ cat README.md# 菜鸟教程 Git 测试## 第一次修改内容
推送到远程仓库
推送你的新分支与数据到某个远端仓库命令:
git push [alias] [branch]
以上命令将你的 [branch] 分支推送成为 [alias] 远程仓库上的 [branch] 分支,实例如下。
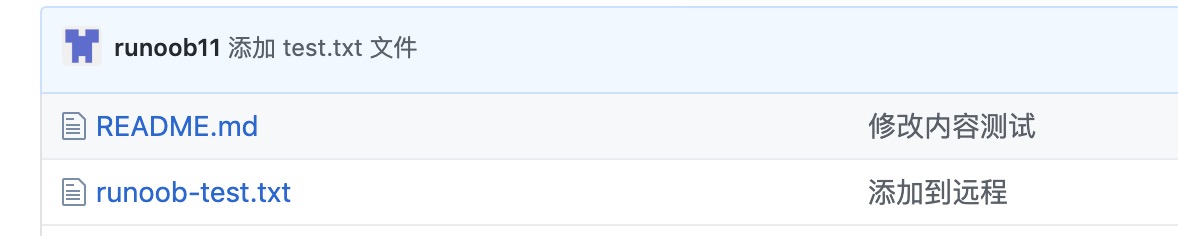
$ touch runoob-test.txt # 添加文件$ git add runoob-test.txt # 提交暂存区$ git commit -m "添加到远程" # 提交本地仓库master 69e702d] 添加到远程1 file changed, 0 insertions(+), 0 deletions(-)create mode 100644 runoob-test.txt$ git push origin master # 推送到 Github
重新回到我们的 Github 仓库,可以看到文件已经提交上来了:
删除远程仓库
删除远程仓库你可以使用命令:
git remote rm [别名]
实例
$ git remote -v # 显示所有远程仓库origin git@github.com:tianqixin/runoob-git-test.git (fetch)origin git@github.com:tianqixin/runoob-git-test.git (push)# 添加仓库 origin2$ git remote add origin2 git@github.com:tianqixin/runoob-git-test.git$ git remote -v # 显示所有远程仓库origin git@github.com:tianqixin/runoob-git-test.git (fetch)origin git@github.com:tianqixin/runoob-git-test.git (push)origin2 git@github.com:tianqixin/runoob-git-test.git (fetch)origin2 git@github.com:tianqixin/runoob-git-test.git (push)# 删除仓库 origin2$ git remote rm origin2$ git remote -v # 显示所有远程仓库origin git@github.com:tianqixin/runoob-git-test.git (fetch)origin git@github.com:tianqixin/runoob-git-test.git (push)

若有收获,就点个赞吧
0 人点赞
