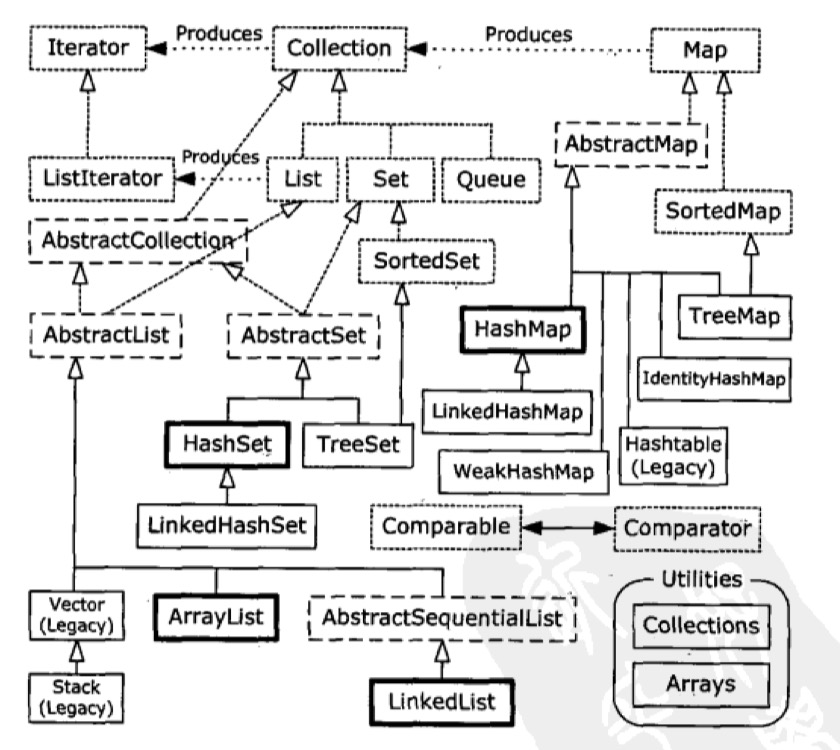
17.1 完整的集合分类

ArrayList源码分析
- ArrayList是一种集合类,其底层基于数组实现,所以查找操作可在O(1)的时间范围内实现
- ArrayList允许空值和重复元素
- 当向ArrayList中添加的元素数量大于其底层数组容量时,其会通过扩容机制生成一个新的数组
构造器:
/*** 默认初始容量大小*/private static final int DEFAULT_CAPACITY = 10;private static final Object[] DEFAULTCAPACITY_EMPTY_ELEMENTDATA = {};/***默认构造函数,使用初始容量10构造一个空列表(无参数构造)*/public ArrayList() {this.elementData = DEFAULTCAPACITY_EMPTY_ELEMENTDATA;}/*** 带初始容量参数的构造函数。(用户自己指定容量)*/public ArrayList(int initialCapacity) {if (initialCapacity > 0) {//初始容量大于0//创建initialCapacity大小的数组this.elementData = new Object[initialCapacity];} else if (initialCapacity == 0) {//初始容量等于0//创建空数组this.elementData = EMPTY_ELEMENTDATA;} else {//初始容量小于0,抛出异常throw new IllegalArgumentException("Illegal Capacity: "+initialCapacity);}}/***构造包含指定collection元素的列表,这些元素利用该集合的迭代器按顺序返回*如果指定的集合为null,throws NullPointerException。*/public ArrayList(Collection<? extends E> c) {elementData = c.toArray();if ((size = elementData.length) != 0) {// c.toArray might (incorrectly) not return Object[] (see 6260652)if (elementData.getClass() != Object[].class)elementData = Arrays.copyOf(elementData, size, Object[].class);} else {// replace with empty array.this.elementData = EMPTY_ELEMENTDATA;}}
构造器总结:
- 以无参数构造方法创建 ArrayList 时,实际上初始化赋值的是一个空数组。当真正对数组进行添加元素操作时,才真正分配容量。即向数组中添加第一个元素时,数组容量扩为 10。
- JDK7 new无参构造的ArrayList对象时,直接创建了长度是10的Object[]数组elementData 。jdk7中的ArrayList的对象的创建类似于单例的饿汉式,而jdk8中的ArrayList的对象的创建类似于单例的懒汉式。
ArrayList扩容机制
/*** 要分配的最大数组大小*/private static final int MAX_ARRAY_SIZE = Integer.MAX_VALUE - 8;/*** ArrayList扩容的核心方法。*/private void grow(int minCapacity) {// oldCapacity为旧容量,newCapacity为新容量int oldCapacity = elementData.length;//将oldCapacity 右移一位,其效果相当于oldCapacity /2,//我们知道位运算的速度远远快于整除运算,整句运算式的结果就是将新容量更新为旧容量的1.5倍,int newCapacity = oldCapacity + (oldCapacity >> 1);//然后检查新容量是否大于最小需要容量,若还是小于最小需要容量,那么就把最小需要容量当作数组的新容量,if (newCapacity - minCapacity < 0)newCapacity = minCapacity;// 如果新容量大于 MAX_ARRAY_SIZE,进入(执行) `hugeCapacity()` 方法来比较 minCapacity 和 MAX_ARRAY_SIZE,//如果minCapacity大于最大容量,则新容量则为`Integer.MAX_VALUE`,否则,新容量大小则为 MAX_ARRAY_SIZE 即为 `Integer.MAX_VALUE - 8`。if (newCapacity - MAX_ARRAY_SIZE > 0)newCapacity = hugeCapacity(minCapacity);// minCapacity is usually close to size, so this is a win:elementData = Arrays.copyOf(elementData, newCapacity);}
扩充机制总结:
int newCapacity = oldCapacity + (oldCapacity >> 1),所以 ArrayList 每次扩容之后容量都会变为原来的 1.5 倍左右(oldCapacity 为偶数就是 1.5 倍,否则是 1.5 倍左右)
**
插入元素
/** 在元素序列尾部插入 */public boolean add(E e) {// 1. 检测是否需要扩容ensureCapacityInternal(size + 1); // Increments modCount!!// 2. 将新元素插入序列尾部elementData[size++] = e;return true;}/** 在元素序列 index 位置处插入 */public void add(int index, E element) {rangeCheckForAdd(index);// 1. 检测是否需要扩容ensureCapacityInternal(size + 1); // Increments modCount!!// 2. 将 index 及其之后的所有元素都向后移一位System.arraycopy(elementData, index, elementData, index + 1,size - index);// 3. 将新元素插入至 index 处elementData[index] = element;size++;}
插入元素总结:
对于在元素序列尾部插入,这种情况比较简单,只需两个步骤即可:
- 检测数组是否有足够的空间插入
- 将新元素插入至序列尾部
如果是在元素序列指定位置(假设该位置合理)插入,则情况稍微复杂一点,需要三个步骤:
- 检测数组是否有足够的空间
- 将 index 及其之后的所有元素向后移一位
- 将新元素插入至 index 处
删除元素
/** 删除指定位置的元素 */public E remove(int index) {rangeCheck(index);modCount++;// 返回被删除的元素值E oldValue = elementData(index);int numMoved = size - index - 1;if (numMoved > 0)// 将 index + 1 及之后的元素向前移动一位,覆盖被删除值System.arraycopy(elementData, index+1, elementData, index,numMoved);// 将最后一个元素置空,并将 size 值减1elementData[--size] = null; // clear to let GC do its workreturn oldValue;}E elementData(int index) {return (E) elementData[index];}/** 删除指定元素,若元素重复,则只删除下标最小的元素 */public boolean remove(Object o) {if (o == null) {for (int index = 0; index < size; index++)if (elementData[index] == null) {fastRemove(index);return true;}} else {// 遍历数组,查找要删除元素的位置for (int index = 0; index < size; index++)if (o.equals(elementData[index])) {fastRemove(index);return true;}}return false;}/** 快速删除,不做边界检查,也不返回删除的元素值 */private void fastRemove(int index) {modCount++;int numMoved = size - index - 1;if (numMoved > 0)System.arraycopy(elementData, index+1, elementData, index,numMoved);elementData[--size] = null; // clear to let GC do its work}
删除元素总结:
以第一个删除方法为例,删除一个元素步骤如下:
- 获取指定位置 index 处的元素值
- 将 index + 1 及之后的元素向前移动一位
- 将最后一个元素置空,并将 size 值减 1
- 返回被删除值,完成删除操作
LinkedList源码分析
- LinkedList是一个实现了List接口和Deque接口的双端链表
- LinkedList底层的链表结构使它支持高效的插入和删除操作,另外它实现了Deque接口,使得LinkedList类也具有队列的特性; LinkedList不是线程安全的。和 ArrayList 一样,LinkedList 也支持空值和重复值。
- 由于 LinkedList 基于链表实现,存储元素过程中,无需像 ArrayList 那样进行扩容。但有得必有失,LinkedList 存储元素的节点需要额外的空间存储前驱和后继的引用。
查找元素:
public E get(int index) {checkElementIndex(index);return node(index).item;}Node<E> node(int index) {/** 则从头节点开始查找,否则从尾节点查找* 查找位置 index 如果小于节点数量的一半,*/if (index < (size >> 1)) {Node<E> x = first;// 循环向后查找,直至 i == indexfor (int i = 0; i < index; i++)x = x.next;return x;} else {Node<E> x = last;for (int i = size - 1; i > index; i--)x = x.prev;return x;}}
查找元素总结:
- 如果查找位置小于节点数的一半,则从头节点开始找
- 如果查找位置大于等于节点数一半,则从尾节点向前找
插入元素:
/** 在链表尾部插入元素 */public boolean add(E e) {linkLast(e);return true;}/** 在链表指定位置插入元素 */public void add(int index, E element) {checkPositionIndex(index);// 判断 index 是不是链表尾部位置,如果是,直接将元素节点插入链表尾部即可if (index == size)linkLast(element);elselinkBefore(element, node(index));}/** 将元素节点插入到链表尾部 */void linkLast(E e) {final Node<E> l = last;// 创建节点,并指定节点前驱为链表尾节点 last,后继引用为空final Node<E> newNode = new Node<>(l, e, null);// 将 last 引用指向新节点last = newNode;// 判断尾节点是否为空,为空表示当前链表还没有节点if (l == null)first = newNode;elsel.next = newNode; // 让原尾节点后继引用 next 指向新的尾节点size++;modCount++;}/** 将元素节点插入到 succ 之前的位置 */void linkBefore(E e, Node<E> succ) {// assert succ != null;final Node<E> pred = succ.prev;// 1. 初始化节点,并指明前驱和后继节点final Node<E> newNode = new Node<>(pred, e, succ);// 2. 将 succ 节点前驱引用 prev 指向新节点succ.prev = newNode;// 判断尾节点是否为空,为空表示当前链表还没有节点if (pred == null)first = newNode;elsepred.next = newNode; // 3. succ 节点前驱的后继引用指向新节点size++;modCount++;}
插入元素总结:
- LinkedList分别有两个指针指向两端,**两端均可插入元素**
- 一开始创建链表时前后指针指向都是空的。只有插入第一个元素后,前后指针才有指向
删除元素:
public boolean remove(Object o) {if (o == null) {for (Node<E> x = first; x != null; x = x.next) {if (x.item == null) {unlink(x);return true;}}} else {// 遍历链表,找到要删除的节点for (Node<E> x = first; x != null; x = x.next) {if (o.equals(x.item)) {unlink(x); // 将节点从链表中移除return true;}}}return false;}public E remove(int index) {checkElementIndex(index);// 通过 node 方法定位节点,并调用 unlink 将节点从链表中移除return unlink(node(index));}/** 将某个节点从链表中移除 */E unlink(Node<E> x) {// assert x != null;final E element = x.item;final Node<E> next = x.next;final Node<E> prev = x.prev;// prev 为空,表明删除的是头节点if (prev == null) {first = next;} else {// 将 x 的前驱的后继指向 x 的后继prev.next = next;// 将 x 的前驱引用置空,断开与前驱的链接x.prev = null;}// next 为空,表明删除的是尾节点if (next == null) {last = prev;} else {// 将 x 的后继的前驱指向 x 的前驱next.prev = prev;// 将 x 的后继引用置空,断开与后继的链接x.next = null;}// 将 item 置空,方便 GC 回收x.item = null;size--;modCount++;return element;}
删除元素总结:
删除元素步骤如下:
- 将待删除节点 x 的前驱的后继指向 x 的后继
- 将待删除节点 x 的前驱引用置空,断开与前驱的链接
- 将待删除节点 x 的后继的前驱指向 x 的前驱
- 将待删除节点 x 的后继引用置空,断开与后继的链接
HashMap
JDK1.8 之前 HashMap 由 数组+链表 组成的,数组是 HashMap 的主体,链表则是主要为了解决哈希冲突而存在的 JDK1.8 之后 HashMap 的组成多了红黑树,在满足下面两个条件之后,会执行链表转红黑树操作,用来加快搜索速度
- 链表长度大于阈值(默认为 8)
- HashMap 数组长度超过 64
- 源码分析还需后期深入研究…

