快速开始
方式一、官网下载
使用在线地址:https://start.spring.io/,配置Spring Boot项目,配置完成后下载到本地使用idea导入项目。
方式二、使用idea快速生成

项目结构

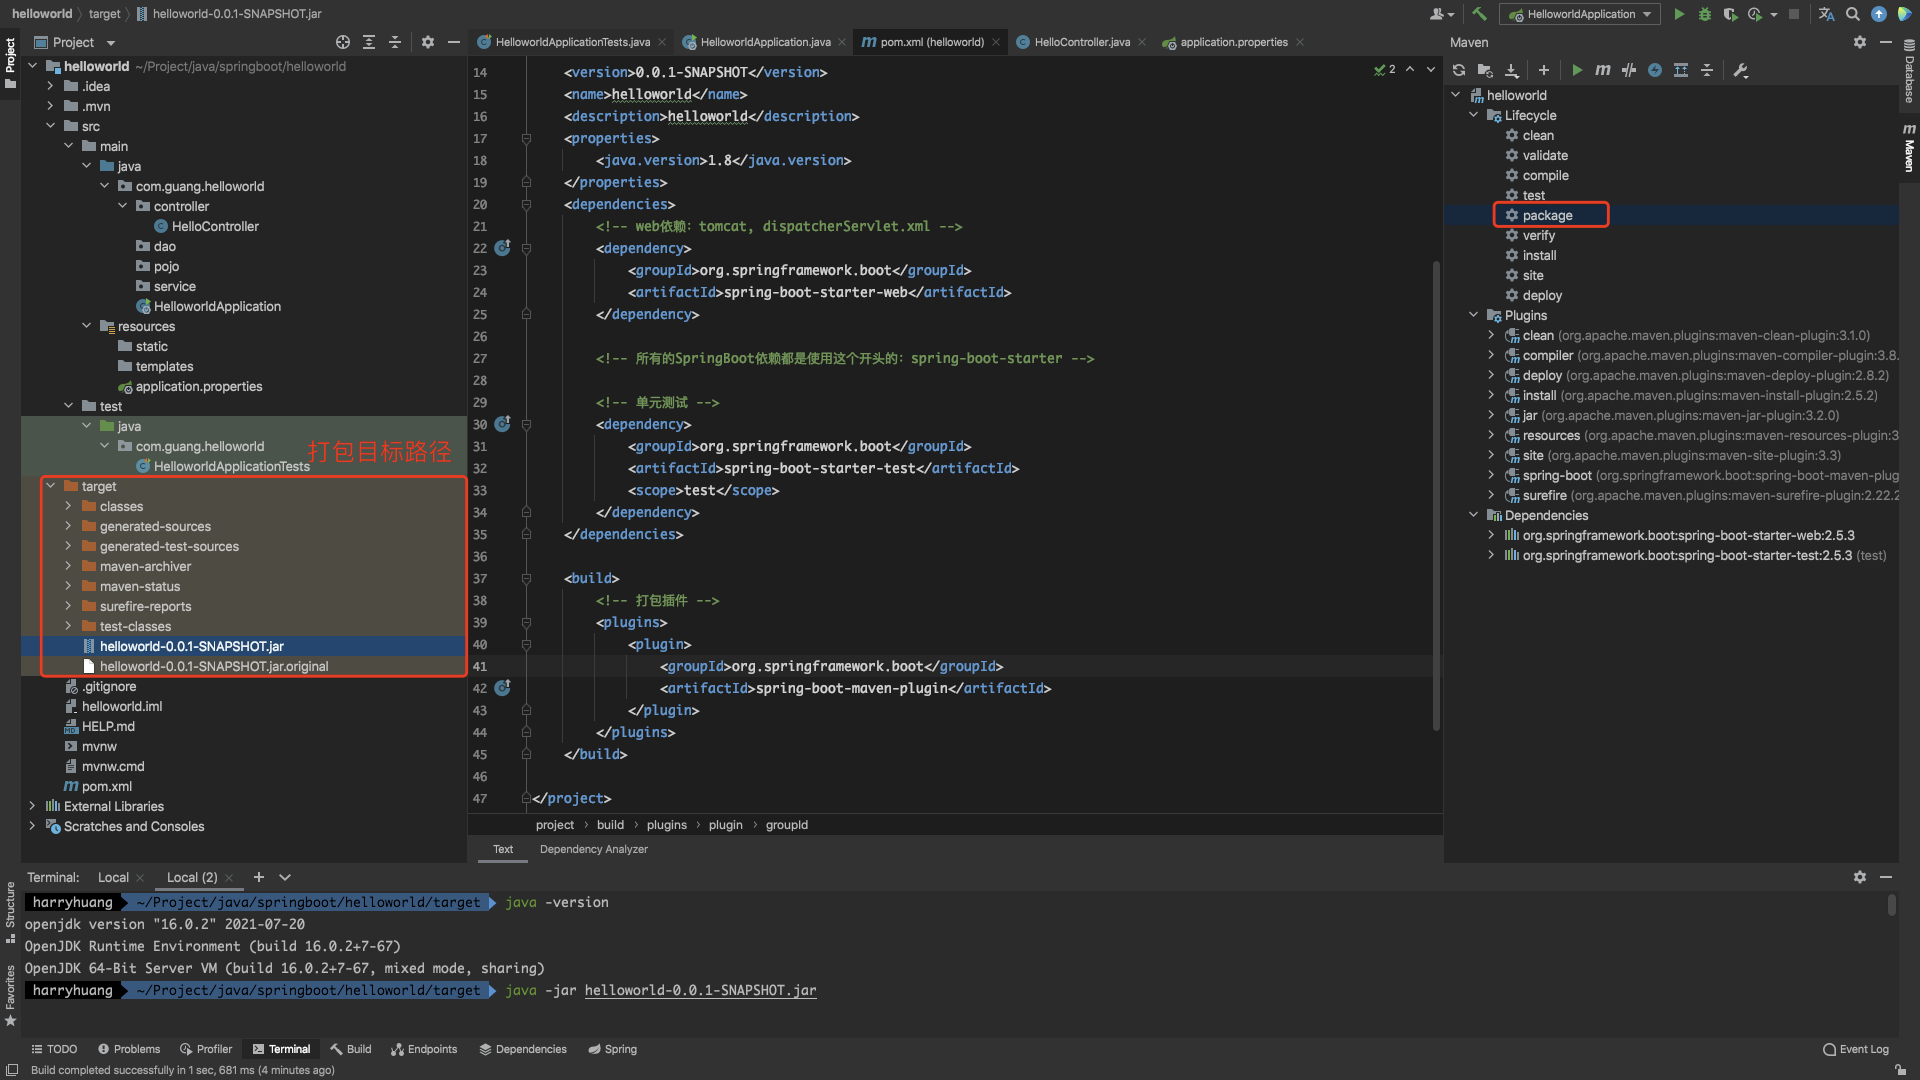
SpringBoot 常用设置
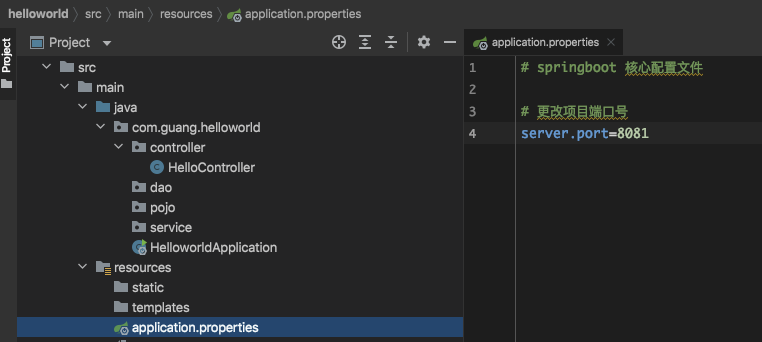
修改端口号
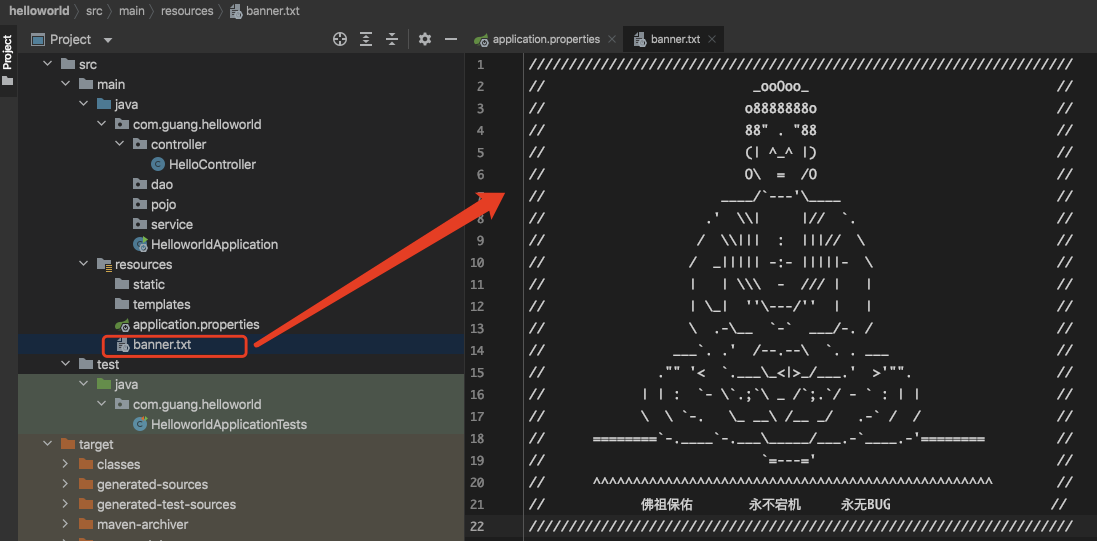
自定义banner
原理初探
自动装配原理
pom.xml
- spring-boot-dependencies:核心依赖在父工程
- 我在写或者引入一些SpringBoot依赖的时候,不需要指定版本,就因为有这些版本仓库
启动器
<!-- 启动器 --><!-- web依赖:tomcat, dispatcherServlet.xml --><dependency><groupId>org.springframework.boot</groupId><artifactId>spring-boot-starter-web</artifactId></dependency><!-- 所有的SpringBoot依赖都是使用这个开头的:spring-boot-starter -->
- 启动器:说白了就是SpringBoot的启动场景
- 比如spring-boot-starter-web,它就会帮我们自动导入web环境所有的依赖
- SpringBoot会将所有的功能场景,都变成一个个的启动器
- 我们要使用什么功能,就只需要找到对应的启动器就可以了
SpringBoot官方启动器地址:
https://docs.spring.io/spring-boot/docs/2.5.3/reference/html/using.html#using.build-systems.starters
主程序
import org.springframework.boot.SpringApplication;import org.springframework.boot.autoconfigure.SpringBootApplication;// SpringBoot程序的主入口// @SpringBootApplication:标注这个类是一个SpringBoot的应用@SpringBootApplicationpublic class HelloworldApplication {public static void main(String[] args) {// 将SpringBoot应用启动SpringApplication.run(HelloworldApplication.class, args);}}
@SpringBootApplication
@SpringBootConfiguration:SpringBoot的配置
- @Configuration:Spring配置类
- @Component:说明也是一个spring的组件
@EnableAutoConfiguration:自动配置
- @AutoConfigurationPackage:自动配置包
- @Import(AutoConfigurationPackages.Registrar.class):自动配置
包注册
- @Import(AutoConfigurationPackages.Registrar.class):自动配置
- @Import(AutoConfigurationImportSelector.class):自动配置导入选择
整合JDBC
整合Mybatis
整合Redis
SpringBoot操作数据:spring-data,例如:jpa、jdbc、mongodb、redis
说明:在SpringBoot2.x之后,原来使用的jedis被替换了lettuce
- jedis:采用直接,多个线程操作的话,是不安全的,如果想避免可使用jedis pool连接池。 更像BIO模式。
lettuc:采用netty异步调用,实例可以在多个线程中进行共享,不存在线程不安全的情况,可以减少线程数量。更像Nio模式。
原理解析
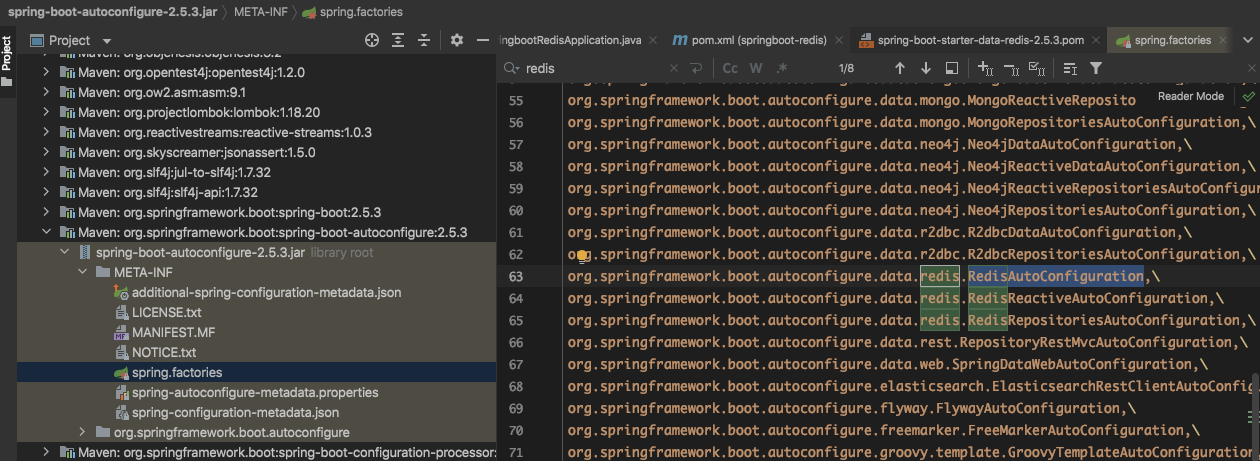
SpringBoot所有配置类,都有一个自动配置类,redis的为:RedisAutoConfiguration。
自动配置类都会绑定一个properties配置文件,redis的为:RedisProperties。RedisProperties配置
public class RedisProperties {/*** Database index used by the connection factory.*/private int database = 0;/*** Connection URL. Overrides host, port, and password. User is ignored. Example:* redis://user:password@example.com:6379*/private String url;/*** Redis server host.*/private String host = "localhost";/*** Login username of the redis server.*/private String username;/*** Login password of the redis server.*/private String password;/*** Redis server port.*/private int port = 6379;/*** Whether to enable SSL support.*/private boolean ssl;/*** Read timeout.*/private Duration timeout;/*** Connection timeout.*/private Duration connectTimeout;/*** Client name to be set on connections with CLIENT SETNAME.*/private String clientName;/*** Type of client to use. By default, auto-detected according to the classpath.*/private ClientType clientType;...}
RedisAutoConfiguration
```java @Configuration(proxyBeanMethods = false) @ConditionalOnClass(RedisOperations.class) @EnableConfigurationProperties(RedisProperties.class) @Import({ LettuceConnectionConfiguration.class, JedisConnectionConfiguration.class }) public class RedisAutoConfiguration {
@Bean @ConditionalOnMissingBean(name = “redisTemplate”) // 我们可以自定义redisTemplate来替换这个默认的模板 @ConditionalOnSingleCandidate(RedisConnectionFactory.class) public RedisTemplate
/*默认的RedisTemplate没有过多的设置,redis对象都是需要序列化两个泛型都是<Object,Object>的类型,我们后面使用需要强制转换<String Object>*/RedisTemplate<Object, Object> template = new RedisTemplate<>();template.setConnectionFactory(redisConnectionFactory);return template;
}
// 由于String是redis中最常用的类型,所以单独提出来一个bean@Bean@ConditionalOnMissingBean@ConditionalOnSingleCandidate(RedisConnectionFactory.class)public StringRedisTemplate stringRedisTemplate(RedisConnectionFactory redisConnectionFactory) {StringRedisTemplate template = new StringRedisTemplate();template.setConnectionFactory(redisConnectionFactory);return template;}
}
<a name="vp9Kw"></a>### 整合测试<a name="szun4"></a>#### 导入依赖```xml<!-- pom.xml --><dependency><groupId>org.springframework.boot</groupId><artifactId>spring-boot-starter-data-redis</artifactId></dependency>
配置连接
# application.ymlspring:# 配置redisredis:host: localhostport: 6379lettuce:pool:max-active: 8
测试
@SpringBootTestclass SpringbootRedisApplicationTests {@Autowiredprivate RedisTemplate redisTemplate;@Testvoid contextLoads() {/*redisTemplate 操作不同的数据类型opsForValue 操作字符串 类似StringopsForList 操作List 类似ListopsForSetopsForHashopsForZSetopsForGeoopsForHyperLogLog除了基本的操作,常用的方法都可以直接通过redisTemplate操作,例如事务、基本的CRUD等*/// 获取redis的连接对象,一般很少用// RedisConnection connection = redisTemplate.getConnectionFactory().getConnection();// connection.flushDb();// connection.flushAll();redisTemplate.opsForValue().set("myKey", "harry中文名字");System.out.println(redisTemplate.opsForValue().get("myKey"));}}
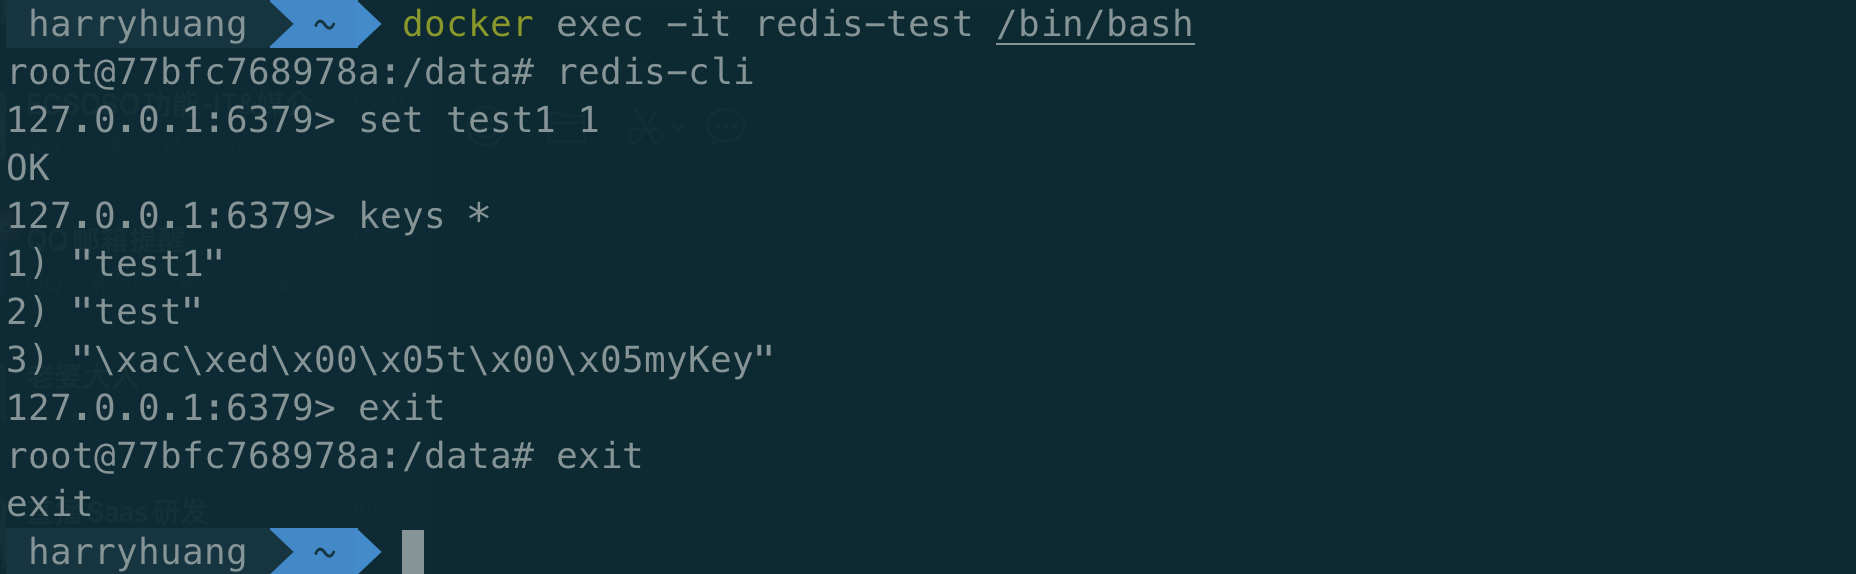
通过 redis-cli 连接测试使用 redis 服务
docker exec -it redis-test /bin/bashredis-cli
自定义RedisTemplate
package com.kuang.config;import com.fasterxml.jackson.annotation.JsonAutoDetect;import com.fasterxml.jackson.annotation.PropertyAccessor;import com.fasterxml.jackson.databind.ObjectMapper;import org.springframework.context.annotation.Bean;import org.springframework.context.annotation.Configuration;import org.springframework.data.redis.connection.RedisConnectionFactory;import org.springframework.data.redis.core.RedisTemplate;import org.springframework.data.redis.serializer.Jackson2JsonRedisSerializer;import org.springframework.data.redis.serializer.StringRedisSerializer;@Configurationpublic class RedisConfig {// 自定义 redisTemplate@Beanpublic RedisTemplate<String, Object> redisTemplate(RedisConnectionFactory redisConnectionFactory) {RedisTemplate<String, Object> template = new RedisTemplate<>();template.setConnectionFactory(redisConnectionFactory);// Json序列化配置Jackson2JsonRedisSerializer<Object> jackson2JsonRedisSerializer = new Jackson2JsonRedisSerializer(Object.class);ObjectMapper om = new ObjectMapper();om.setVisibility(PropertyAccessor.ALL, JsonAutoDetect.Visibility.ANY);om.enableDefaultTyping(ObjectMapper.DefaultTyping.NON_FINAL);jackson2JsonRedisSerializer.setObjectMapper(om);// String的序列化StringRedisSerializer stringRedisSerializer = new StringRedisSerializer();// key采用String的序列化方式template.setKeySerializer(stringRedisSerializer);// hash的key也采用String的序列化方式template.setHashKeySerializer(stringRedisSerializer);// value序列化方式采用jacksontemplate.setValueSerializer(jackson2JsonRedisSerializer);// hash的value序列化方式采用jacksontemplate.setHashValueSerializer(jackson2JsonRedisSerializer);template.afterPropertiesSet();return template;}}
SpringSecurity(安全)
在web开发中,安全第一位!过滤器,拦截器~
功能性需求:否
做网站:安全应该在什么时候考虑?设计之初!
shiro、SpringSecurity
认证、授权
权限
- 功能权限
- 访问权限
- 菜单权限
- … 拦截器,过滤器:大量的原生代码~ 冗余
任务
异步任务
package com.kuang.controller;import com.kuang.service.AsyncService;import org.springframework.beans.factory.annotation.Autowired;import org.springframework.web.bind.annotation.RequestMapping;import org.springframework.web.bind.annotation.RestController;@RestControllerpublic class AsyncController {@AutowiredAsyncService asyncService;@RequestMapping("/hello")public String hello() {asyncService.hello();return "ok";}}
package com.kuang.service;import org.springframework.scheduling.annotation.Async;import org.springframework.stereotype.Service;@Servicepublic class AsyncService {// 告诉Spring这是一个异步的方法@Asyncpublic void hello() {try {Thread.sleep(3000);} catch (InterruptedException e) {e.printStackTrace();}System.out.println("数据正在处理...");}}
定时任务
package com.kuang.service;import org.springframework.scheduling.annotation.Scheduled;import org.springframework.stereotype.Service;@Servicepublic class ScheduleService {// cron 表达式// 秒 分 时 日 月 周几@Scheduled(cron = "0 * * * * 0-7")public void hello() {System.out.println("hello, 被执行了~");}}
邮件发送(邮件任务)
spring:mail:username: 732150595@qq.compassword: ******host: smtp.qq.comproperties:mail:smtp:ssl:enable: true # 开启加密验证,qq邮箱特有
package com.kuang;import org.junit.jupiter.api.Test;import org.springframework.beans.factory.annotation.Autowired;import org.springframework.boot.test.context.SpringBootTest;import org.springframework.mail.SimpleMailMessage;import org.springframework.mail.javamail.JavaMailSender;import org.springframework.mail.javamail.JavaMailSenderImpl;import org.springframework.mail.javamail.MimeMessageHelper;import javax.mail.MessagingException;import javax.mail.internet.MimeMessage;import java.io.File;@SpringBootTestclass Springboot05MybatisApplicationTests {@AutowiredJavaMailSenderImpl mailSender;@Testvoid testSimpleMail() {// 一个简单的邮件SimpleMailMessage mailMessage = new SimpleMailMessage();mailMessage.setSubject("你好啊!我是SpringBoot发的邮件!");mailMessage.setText("我正在学习SpringBoot,要一起吗?");mailMessage.setFrom("732150595@qq.com");mailMessage.setTo("huangxubo23@gmail.com");mailSender.send(mailMessage);}@Testvoid testMimeMail() throws MessagingException {// 一个复杂的邮件MimeMessage mimeMessage = mailSender.createMimeMessage();// 组装MimeMessageHelper helper = new MimeMessageHelper(mimeMessage, true);helper.setSubject("你好啊!我是SpringBoot发的复杂邮件");helper.setText("<h2 style='color:red'>我正在学习SpringBoot,要一起吗?</h2>", true);// 附件helper.addAttachment("OG-Spring.png", new File("/Users/harryhuang/Downloads/OG-Spring.png"));helper.setFrom("732150595@qq.com");helper.setTo("huangxubo23@gmail.com");mailSender.send(mimeMessage);}/*** 邮件发送发放封装* @param html* @param subject* @param text* @throws MessagingException*/public void sendMail(Boolean html, String subject, String text) throws MessagingException {// 一个复杂的邮件MimeMessage mimeMessage = mailSender.createMimeMessage();// 组装MimeMessageHelper helper = new MimeMessageHelper(mimeMessage, html);helper.setSubject(subject);helper.setText(text, html);// 附件helper.addAttachment("OG-Spring.png", new File("/Users/harryhuang/Downloads/OG-Spring.png"));helper.setFrom("732150595@qq.com");helper.setTo("huangxubo23@gmail.com");mailSender.send(mimeMessage);}}
集成Swagger
- 了解Swagger的作用和概念
- 了解前后端分离
- 在SpringBoot中集成Swagger
背景介绍
前后端分离
后端时代:前端只用管理静态页面;模板引擎 JSP =》后端是主力
前后端分离时代:
- 后端:后端控制层、服务层、数据访问层
- 前端:前端控制层、视图层
- 前后端相对独立,松耦合
- 前后端可以部署在不同的服务器上
产生一个问题:
- 前后端集成联调,前端人员和后端人员无法做到“及时协商,尽早解决”,最终导致问题集中爆发
解决方案:
- 首先指定schema(计划的提纲),实时更新最新API,降低集成的风险
- 早些年:制定word计划文档
- 前后端分离:
- 前端测试后端接口:postman
- 后端提供接口,需要实时更新最新的消息及改动
Swagger简介
- 号称世界上最流行的Api框架
- ResetFul Api文档在线自动生成工具=》Api文档与API定义同步更新
- 直接运行,可以在线测试API接口
- 支持多种语言:Java、PHP…
在项目使用Swagger需要springbox
- swagger2
- swagger-ui
SpringBoot集成Swagger
- 新建一个SpringBoot web项目
- 导入Swagger相关依赖
```xml
io.springfox springfox-swagger2 2.10.5
3. 编写一个ResetFul API工程3. 配置Swagger=》Config```javapackage com.kuang.config;import org.springframework.context.annotation.Configuration;import springfox.documentation.swagger2.annotations.EnableSwagger2WebFlux;@Configuration@EnableSwagger2WebFluxpublic class SwaggerConfig {}
- 测试运行
配置Swagger
Swagger的bean示例Docket

若有收获,就点个赞吧
0 人点赞
