Docker is an open platform for developing, shipping, and running applications.
Docker是一个用于开发、发布和运行应用程序的开放平台。也可以简单的理解为 Docker 是一个可以部署、运行项目的容器。
容器、操作系统级虚拟化
Docker 是基于 Linux 的高效、敏捷、轻量级的容器(轻量虚拟)方案。它的特点:高效的利用系统资源、快速的启动时间、一致的运行环境、持续交付和部署、更轻松的迁移。
| 虚拟化技术 | 代表 |
|---|---|
| 完全虚拟化 | VMware Workstation、VirtualBox |
| 硬件辅助虚拟化 | InterVT AMD-V |
| 超虚拟化 | Xen |
| 操作系统级 | Docker LXC容器 |
Docker 对比传统虚拟机
| 特性 | 容器 | 虚拟机 |
|---|---|---|
| 启动 | 秒级 | 分钟级 |
| 硬盘使用 | 一般为 MB | 一般为 GB |
| 性能 | 接近原生 | 弱于原生 |
| 系统支持量 | 单机支持上千个容器 | 一般几十个 |
Docker安装
这里主要介绍两种安装方式,一种是本地开发电脑 Mac 上的安装,一种是服务器 Ubuntu 上的安装
Mac本地安装
到官方网站下载 Docker Desktop for Mac 安装即可。安装完成后,命令行输入 docker,如果不是 command not found,就表示安装成功了。
在 docker 上运行一个 nginx 应用看看效果
# 创建一个 www 目录mkdir www# 在该目录下创建一个 index.html 文件,内容为 hello dockerecho "hello docker" >> www/index.html# 使用 Docker 运行# 这里要用到 nginx,要先下载镜像到本地# 防止 Unable to find image 'nginx:latest' locallydocker pull nginx# 运行# 将本地的 8000 端口,映射到容器的 80 端口# 将当前目录下的 www 目录,映射到容器 /usr/share/nginx/html 目录# 容器里 nginx 服务端口为 80,默认目录为 /usr/share/nginx/htmldocker run -p 8000:80 -v $PWD/www:/usr/share/nginx/html nginx# docker run --help# Usage:docker run [OPTIONS] IMAGE [COMMAND] [ARG...]# Run a command in a new container# -p, --publish list,Publish a container's port(s) to the host 将容器的端口发布到主机# -v, --volume list,Bind mount a volume 绑定挂载卷(可以简单理解为磁盘、分区)# $PWD 当前目录,nginx 为镜像
这样,通过 [http://127.0.0.1:8000](http://127.0.0.1:8000) 就可以看到 hello docker 了
Ubuntu服务器安装
下面使用一台全新的腾讯云 云服务器来尝试安装 Docker,系统为 Ubuntu Sever 18.04.1 LTS 64位。
# 登录到远程服务器,我这里默认的用户是 unbuntu# 如果是 root 用户ssh root@xx.xx.xx.xx# unbuntu 用户,执行命令时需要 sudossh unbuntu@xx.xx.xx.xx# apt升级sudo apt-get update# 添加相关软件包sudo apt-get install \apt-transport-https \ca-certificates \curl \software-properties-common# 下载软件包的合法性,需要添加软件源的 GPG 密钥curl -fsSL https://mirrors.ustc.edu.cn/docker-ce/linux/ubuntu/gpg | sudo apt-key add -# source.list 中添加 Docker 软件源sudo add-apt-repository \"deb [arch=amd64] https://mirrors.ustc.edu.cn/docker-ce/linux/ubuntu \$(lsb_release -cs) \stable"# 安装 Docker CEsudo apt-get updatesudo apt-get install docker-ce# 启动 Docker CEsudo systemctl enable docker # 添加docker服务sudo systemctl start docker # 启动docker# 建立 docker 用户组(可选,如果只有root用户,可以加一个)sudo groupadd dockersudo usermod -aG docker $USER# 测试命令是否生效docker
镜像加速
为了加快镜像下载速度,可以使用第三方镜像
- 阿里云加速器(需登录账号获取) 暂不推荐
- Azure 中国镜像 https://dockerhub.azk8s.cn
- 七牛云加速器 https://reg-mirror.qiniu.com
# sudo vi /etc/docker/daemon.json{"registry-mirrors": ["https://dockerhub.azk8s.cn","https://reg-mirror.qiniu.com"]}# 重启dockersudo systemctl daemon-reloadsudo systemctl restart docker
运行简单Nginx服务
# 拉取官方镜像 - 面向docker的只读模板docker pull nginx # 可能会等很久,下载慢# 查看镜像docker images nginx# 启动镜像mkdir wwwecho 'hello docker!!' >> www/index.html# 启动# www目录里面放一个index.html# -p 端口映射 8000:80 ,将服务器的8000端口,映射到docker虚拟机里nginx服务的80端口# $PWD/www 当前目录下的www,: 映射到 nginx 默认的路径下,使用镜像名字为 nginxdocker run -p 8000:80 -v $PWD/www:/usr/share/nginx/html nginx# 后台启动# -d 以 daemon 后台守护进程执行,返回 uuiddocker run -p 80:80 -v $PWD/www:/usr/share/nginx/html -d nginx# 查看运行中的容器,如果要查看全部加 -a,容器id的前3位就可以操作该容器。# List containers,-a Show all containers (default shows just running)docker ps# 停止docker stop ff6# 开启docker start ff6# 进入docker内部伪终端,可以看容器内部文件系统docker exec -it ff6 /bin/bash# 删除镜像docker rm ff6
Docker运行过程
基本概念
- 镜像(Image),面向Docker的只读模板,其中包含创建Docker容器的说明。An image is a read-only template with instructions for creating a Docker container.
- 容器(Container),镜像的运行实例。A container is a runnable instance of an image.
- 仓库 (Registry),存储镜像的服务器
命令运行过程,如下图
- 运行 docker pull,从镜像服务器拉取镜像到本地
- 运行 docker run,将镜像实例化,放到容器列表列执行
- 运行 docker build,创建一个镜像
Dockerfile 定制镜像
To build your own image, you create a Dockerfile with a simple syntax for defining the steps needed to create the image and run it. Each instruction in a Dockerfile creates a layer in the image. When you change the Dockerfile and rebuild the image, only those layers which have changed are rebuilt. This is part of what makes images so lightweight, small, and fast, when compared to other virtualization technologies.
要构建自己的镜像,您可以使用简单的语法创建一个 Dockerfile 文件,用于定义创建镜像并运行它所需的步骤。 Dockerfile中的每条指令都会在映像中创建一个层。 当您更改 Dockerfile 并重新构建镜像时,仅重建那些已更改的层。 与其他虚拟化技术相比,这是使镜像如此轻量,小和快速的部分原因。
定制自己的web服务
# 创建一个测试的文件夹mkdir my_nginx# 在 myNginx 下创建 Dockerfile 文件,并写入内容vi my_nginx/Dockerfile# Dockerfile 内容,从 nginx 镜像开始,在nginx目录下新增一个页面FROM nginx:latestRUN echo '<h1>Hello, my_nginx!</h1>' > /usr/share/nginx/html/index.html# 进入 myNginxcd my_nginx# 定制镜像# -t tag list,Name and optionally a tag in the 'name:tag' formatdocker build -t my_nginx:v1 . # nginx定义镜像名,v1版本# 运行镜像docker run -p 80:80 my_nginx:v1
这样访问 127.0.0.1 就可以看到 Hello, my_nginx! 了
定制 Node.js 镜像
先创建一个新的 Node.js 项目,目录为 nodeapp
# 创建 nodeapp,并初始化一个简单的项目mkdir nodeappcd nodeappnpm init -ynpm i koa -svi app.js
app.js代码如下
// app.jsconst Koa = require('koa')const app = new Koa()app.use(ctx => {ctx.body = 'Hello Node.js'})app.listen(3000, () => {console.log('app started at http://localhost:3000/')})
为当前 Node.js 项目定制 Docker 镜像
# 在当前目录创建Dockerfilevi Dockerfile# Dockerfile 内容FROM node:10-alpineADD . /app/WORKDIR /appRUN npm installEXPOSE 3000CMD ["node", "app.js"]
具体解释
# Dockerfile# 制定node镜像的版本FROM node:10-alpine# 移动当前目录下面的文件到app目录下ADD . /app/# 进入到app目录下面,类似cdWORKDIR /app# 安装依赖RUN npm install# 对外暴露的端口EXPOSE 3000# 程序启动脚本CMD ["node", "app.js"]
构建镜像并运行
# 定制镜像docker build -t nodeapp:v1 .# 运行,-d 后台运行Run container in background and print container IDdocker run -p 3000:3000 -d nodeapp:v1# 返回64位uuid 1f8c4b917efb92c313...# 停止服务docker stop 1f8
定制PM2镜像
PM2 - 利用多核资源
# .dockerignorenode_modules
pm2配置文件
// process.ymlapps:script: app.jsinstances: 2watch: trueenv:NODE_ENV: production
Dockerfile
# Dockerfile# pm2在docker中使用命令为pm2-runtimeFROM keymetrics/pm2:latest-alpineWORKDIR /usr/src/appADD . /usr/src/appRUN npm config set registry https://registry.npm.taobao.org/ && \npm iEXPOSE 3000CMD ["pm2-runtime", "start", "process.yml"]
定制镜像
# 定制镜像docker build -t mypm2 .# 运行docker run -p 3000:3000 -d mypm2
docker-compose
Compose项目是 Docker 官方的开源项目,负责实现对 Docker 容器集群的快速编排,一次性可以启动多个镜像。
docker-compose:Define and run multi-container applications with Docker. 使用 Docker 定义或运行多个容器应用。
安装
# ubuntu需要安装,Mac不需要apt install docker-compose
测试
mkdir helloworldcd helloworldvi docker-compose.yml# docker-compose.yml 文件内容version: '3.1'services:hello-world:image: hello-world# 运行 docker-compose Create and start containersdocker-compose up
注意,如果是 ubuntu 服务器,会报 Couldn't connect to Docker daemon at http+docker://localunixsocket - is it running? 的错误,解决方法如下:
docker-compose up# ERROR: Couldn't connect to Docker daemon at http+docker://localunixsocket - is it running?# If it's at a non-standard location, specify the URL with the DOCKER_HOST environment variable.# 将当前用户加入docker组sudo gpasswd -a ${USER} docker# Adding user ubuntu to group dockersudo su # 切换到 rootsu ubuntu # 切回 ubuntu 再次执行即可docker-compose up
参考: 解决 ERROR: Couldn’t connect to Docker daemon at http+docker://localunixsocket - is it running? | CSDN
同时启用mongo、mongo-express两个镜像服务
# 新建一个项目mkdir mongocd mongovi docker-compose.yml# docker-compose.ymlversion: '3.1'services:mongo:image: mongorestart: alwaysports:- 27017:27017mongo-express:image: mongo-expressrestart: alwaysports:- 8000:8081# 运行docker-compose up
在浏览器打开 http://127.0.0.1:8000/ 就可以看到 mongo 客户端了
docker-compose up运行的都是旧代码,有缓存的问题
当包含有 Dockfile 需要 build 的情况,比如 node 项目。如果代码有改动,重新运行 docker-compose up,那么他还会是旧的代码,并没有刷新。
就算不使用 docker-compose up --force-recreate 也不管用,还要加 —build,才会将修改后的代码重新build
# 重新创建容器,重新builddocker-compose up --force-recreate --build
参考:2019-11-07 史上大坑:使用docker-compose自动更新代码到容器 | 简书
前端后分离项目整体运行与部署
使用 docker-compose 运行部署多个镜像,一次性部署前端后代码以及mysql
- nginx 用于部署前端构建后的 dist 目录
- mysql-db 用于启动 mysql 服务
- app-pm2 用于部署 backend 目录下的 node 服务端项目
# docker-compose.ymlversion: '3.1'services:nginx:restart: alwaysimage: nginxports:- 80:80volumes:- ./nginx/conf.d/:/etc/nginx/conf.d- ./dist:/var/www/html/mysql-db:container_name: mysqlimage: mysqlenvironment:MYSQL_ROOT_PASSWORD: 'you passowrd'restart: alwaysports:- 3306:3306expose:- 3306volumes:- ./backend/dao:/docker-entrypoint-initdb.d/ # 挂载数据初始化sql脚本app-pm2:container_name: app-pm2# 构建容器build: ./backendports:- 8700:8700depends_on:- mysql-db
nginx部署前端项目
使用 nginx 镜像
- 自定义 nginx 配置,将前端目录下的 nginx/conf.d/docker.conf 映射到 docker 容器的 nginx 默认配置目录
- 将当前目录下的 dist 目录,映射到 nginx 默认目录
# docker-compose.yml nginx 部分nginx:restart: alwaysimage: nginxports:- 80:80volumes:- ./nginx/conf.d/:/etc/nginx/conf.d- ./dist:/var/www/html/
./nginx/conf.d/docker.conf
server {listen 80;location / {root /var/www/html;index index.html index.htm;}}
mysql镜像
开启 mysql 服务,设置一个连接密码,用于本地 mac、以及 docker 里的其他镜像实例去连接该数据库
# docker-compose.yml mysql 部分mysql-db:container_name: mysqlimage: mysqlenvironment:MYSQL_ROOT_PASSWORD: 'you passowrd' # 密码restart: alwaysports:- 3306:3306expose:- 3306volumes:- ./backend/dao:/docker-entrypoint-initdb.d/ # 挂载数据初始化sql脚本
注意几个坑的问题
1. 允许外部 Host 连接,进入 mysql 镜像内部做修改,ubuntu默认ok,mac本地不可以,需要做如下修改
# docker ps 查看到 mysql 镜像id 为 46e4xxx 后,进入该镜像docker exec -it 46e4 /bin/bash# 连接到 mysqlmysql -uroot -p# 操作mysql> use mysqlmysql> select Host,User from user;+-----------+------------------+| Host | User |+-----------+------------------+| % | root | # Host为 % 比是正常的| localhost | mysql.infoschema || localhost | mysql.session || localhost | mysql.sys || localhost | root |+-----------+------------------+5 rows in set (0.00 sec)# mac系统下,如果有则修改mysql> update user set host='%' where user='root' and host='localhost';
2. 无法使用socket方式连接到数据库,提示:ERROR 2002 (HY000): Can’t connect to local MySQL server through socket ‘/tmp/mysql.sock’
一般 mysql 连接方式有两种,使用过 mac Sequel Pro app 的应该都知道
- mysql -uroot -p 属于 Socket 连接
- mysql -uroot -p -h127.0.0.1 加了-h参数,属于TCP/IP连接
可能是由于 docker 端口映射的问题,我们无法使用 Socket 方式连接,会一直报上面的错误。这种情况下,我们加上 -h127.0.0.1 参数即可正常访问,暂时没找到其他解决方法。
3. 其他 docker 镜像(node项目)连接该 mysql 镜像连接不上
- mac环境下报错
Error: connect ECONNREFUSED 127.0.0.1:3306 - ubuntu服务器环境报错
ConnectionError [SequelizeConnectionError]: connect ETIMEDOUT
主要是因为 node服务的镜像实例与mysql镜像实例之间相互独立,node镜像实例里代码连接 127.0.0.1:3306 是无法访问到 mysql 镜像实例的,需要相关联
这里有个临时解决方法,就是先后台运行,然后通过 docker ps 查看对应的 镜像ID,再根据镜像ID,使用 docker inspect 镜像ID 查看 mysql 镜像对应的 IP ,然后将代码里的 host 改为该 IP 即可。这个IP可能是动态的,比如从mac到Ubuntu系统,是不一样的。所以它只是临时解决方案,如果IP变更了,代码也要修改 ,具体步骤如下
# 后台运行docker-compose up --force-recreate --build -ddocker ps# CONTAINER ID IMAGE# 4248f7c1d71b nginx# 6a6b527f3193 zuo11com_app-pm2# 46e47b6cc227 mysqldocker inspect 46e4# "Gateway": "172.18.0.1",# "IPAddress": "172.18.0.2",
修改 node 中修改 mysql 连接,重新运行 docker-compose up --force-recreate --build -d
this.sequelize = new Sequelize('ibd', 'root', '1234567Abc,.', {host: '172.18.0.1', // Gateway IP, docker从一个镜像访问里另一个镜像(mysql)// host: 'localhost', // 默认情况dialect: 'mysql', // 'mysql' | 'mariadb' | 'postgres' | 'mssql' 之一})
2020/10/06更新,一劳永逸解决方法:host 直接写mysql对应的镜像名 “mysql-db” 即可。由于都是运行在一个docker环境里,即使不使用 links,使用 mysql-db 也会映射到对应 mysql 镜像的 IPAddress。
这里又会有另外一个问题,original: Error: connect ECONNREFUSED 172.26.0.3:3306,可以看到 mysql-db 这个 host 名并不是解析到 mysql 镜像的 Gateway 网关地址,而是镜像的 IPAddress。
这个问题的原因在于,node服务 depends_on mysql服务,但并不一定是等 mysql 镜像完全加载好才开始连接。所以 node 的 mysql 连接程序需要有错误重试的逻辑。如果出错,每隔2秒再重新连接。过个 5-10 秒,mysql 镜像完全初始化好,重连就正常了。
// mysql 重连逻辑// 初始化数据库async init() {try {// 建立连接// 参数分别为: database, username, password, configthis.sequelize = new Sequelize('数据库名', 'root', '密码', {host: 'mysql-db', // docker从一个镜像访问里另一个镜像(mysql)dialect: 'mysql', // 'mysql' | 'mariadb' | 'postgres' | 'mssql' 之一})// 测试连接,使用 .authenticate() 函数来测试连接await this.sequelize.authenticate() // 如果连接异常,会走catch的逻辑this.createConfigModel()} catch (e) {console.log(e)// 失败重连,fix dcoker-compose 连不上mysql容器// original: Error: connect ECONNREFUSED 172.26.0.3:3306// depends_on 并不代表 mysql 数据库完全初始化好再启动当前服务setTimeout(()=> {this.init()},2000)}}
4. 在 mysql 镜像执行 当前目录下的 .sql 文件**
# 后台运行# docker-compose up --force-recreate --build -d# 可以使用 docker-compose logs 查看日志# docker ps 查看mysql镜像id# 在 mysql 镜像里,批量执行当前目录下的 .sql 文件docker exec -i mysql镜像id sh -c 'exec mysql -h127.0.0.1 -uroot -p数据库密码' < ./xxx.sql
node pm2服务端部署
部署并运行 backend 下的镜像,会 build 执行该项目下的 Dockfile
# docker-compose.yml node pm2 部分app-pm2:container_name: app-pm2# 构建容器build: ./backendports:- 3000:3000depends_on:- mysql-db
./backend/Dockfile
FROM keymetrics/pm2:latest-alpineWORKDIR /usr/src/appADD . /usr/src/appRUN npm config set registry https://registry.npm.taobao.org/ && \npm iEXPOSE 3000CMD ["pm2-runtime", "start", "process.yml"]
使用vscode Deploy插件部署项目到Ubuntu
假设项目名为 test_demo,目录结构如下
backendfrontendnginxdocker-compose.yml
在 test_demo 当前目录下创建一个 .vscode/settings.json 文件
{"deploy": {"packages": [{"files": ["**/*",],"exclude": ["node_modules/**",".git/**",".vscode/**","**/node_modules/**",],"deployOnSave": false}],"targets": [{"type": "sftp","name": "TencentServer",// 服务器地址,注意我这里是ubuntu用户名,还可能是root"dir": "/home/ubuntu/test_demo","host": "服务器ip地址","port": 22,"user": "ubuntu",// 也可以使用 ssh key登录// "privateKey": "/Users/guoqzuo/.ssh/id_rsa","password": "服务器密码",}],},}
这样,假设你的服务器ip密码都是正确的。那么在 vscode 里右键对应的目录,选择 Deploy current file /folder 就可以部署到服务器了。
把 frontend、backend、nginx、docker-compose.yml 等必须要的文件部署到 服务器后,在服务器执行对应的 docker-compose up 命令即可。
注意,腾讯云/阿里云等服务器一般有配置安全组,一般访问服务器的 3000端口,80端口等可能会被限制,需要在入规则里,开放对应的端口
**
使用github Webhooks做持续集成,自动化部署
在上面的例子中,我们知道当我们写好 docker-compose.yml 后,再运行 docker-compose up 即可开启多个服务。持续集成可以做到提交代码后自动部署最新代码。
整个过程如下:
- 提交新的内容到github仓库,github仓库接收到push事件,触发对应的 webhooks 事件,向设置的一个 URL 发送 POST 请求。
- 专门用一个node接口来接收该请求。接收到请求后,如果是 master 分支的 push 事件,用 node 执行 shell 脚本(.sh 文件)
- 本地 shell 脚本用于 git pull 最新代码,并重新使用 docker-compose up 部署最新代码
配置github webhooks
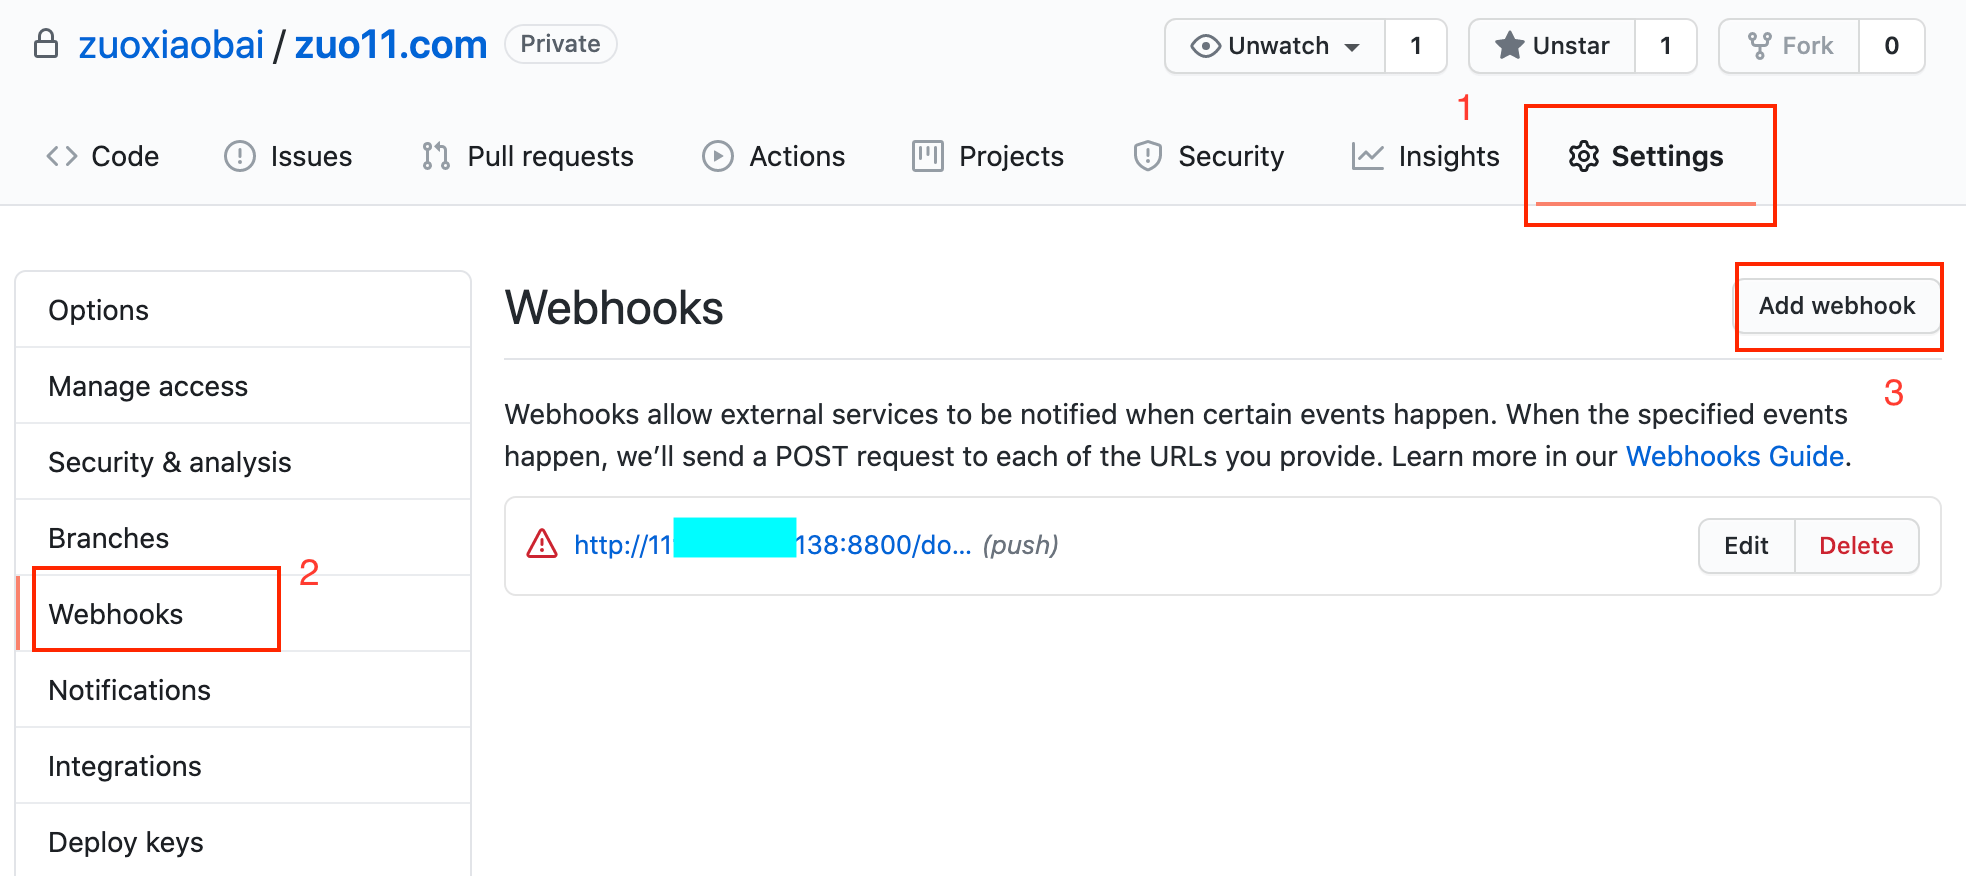
将项目文件放到 github 仓库,然后在对应的仓库,setting、选择 webhooks,添加 webhooks,如下图
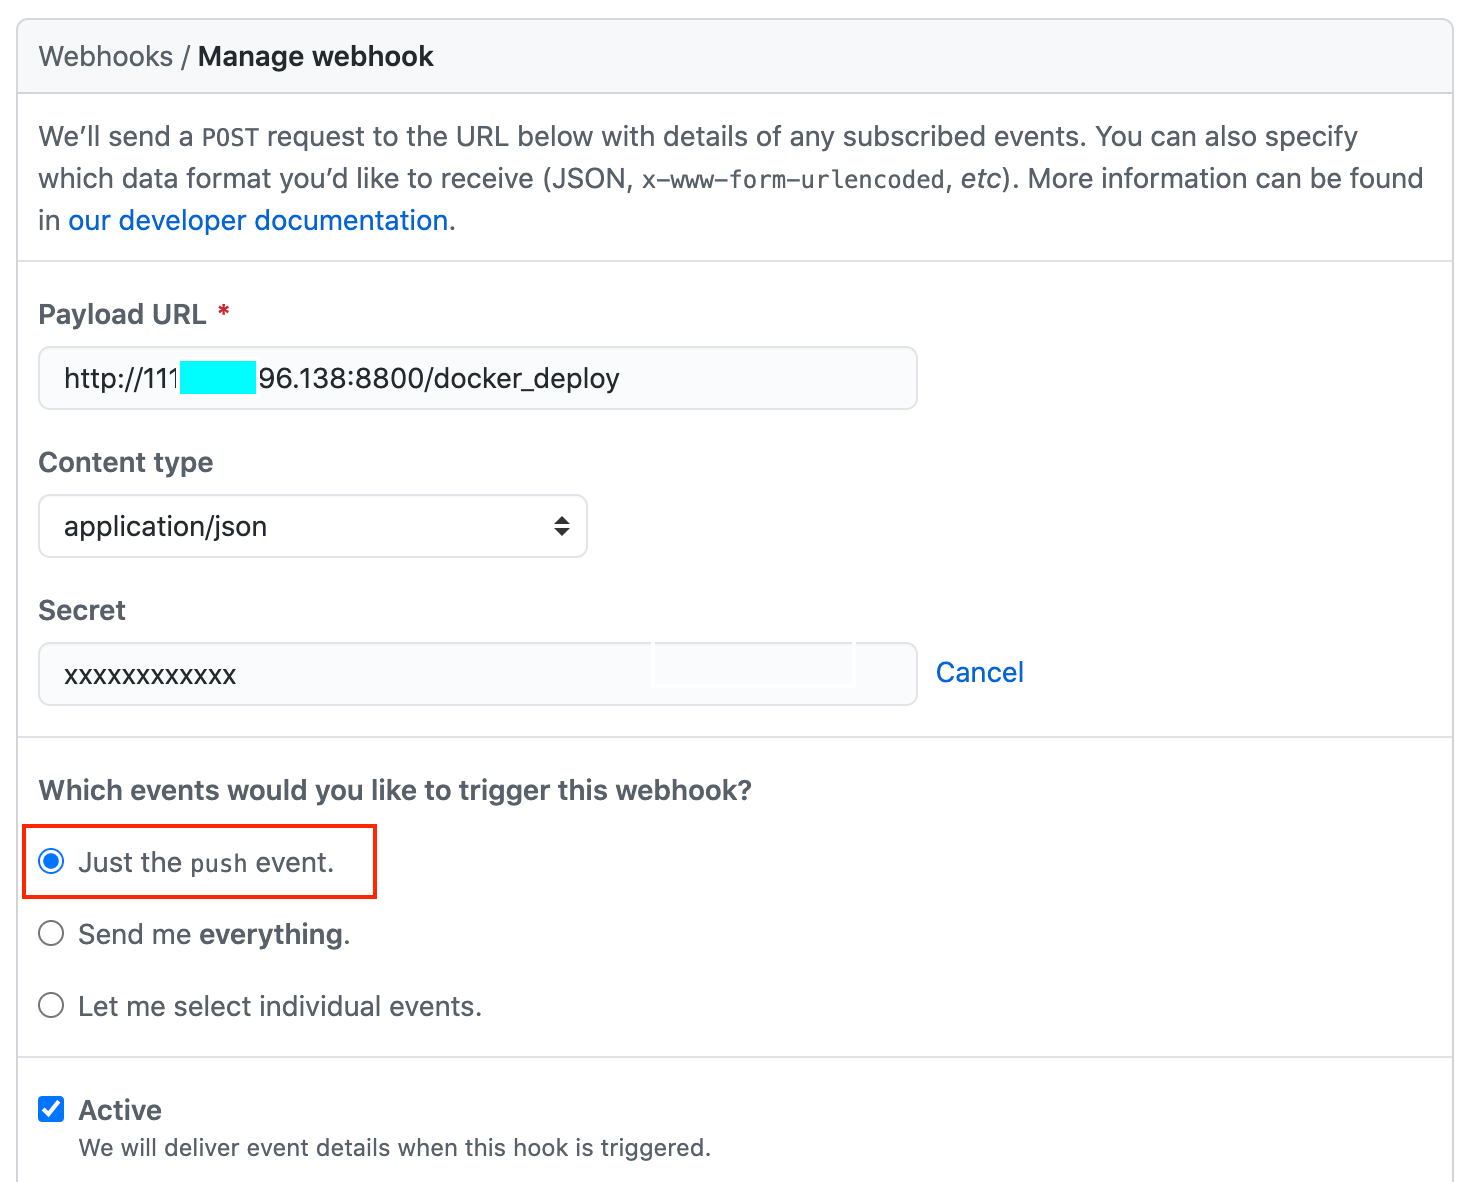
新建一个 webhooks,有下面几个字段
- Payload URL:
[http://www.xxx.com:8800/docker_deploy](http://www.xxx.com:8800/docker_deploy),发送post请求的地址,你自己的服务器要处理该请求。测试时可以用 IP 地址 - Content type: application/json,发送数据类型,一般选json,方便处理
- secret: xxx 秘钥,做验证用,接口处理是需要使用
- which events would you like to trigger this webhook? 触发该接口的时机我们选择仅 push 时触发
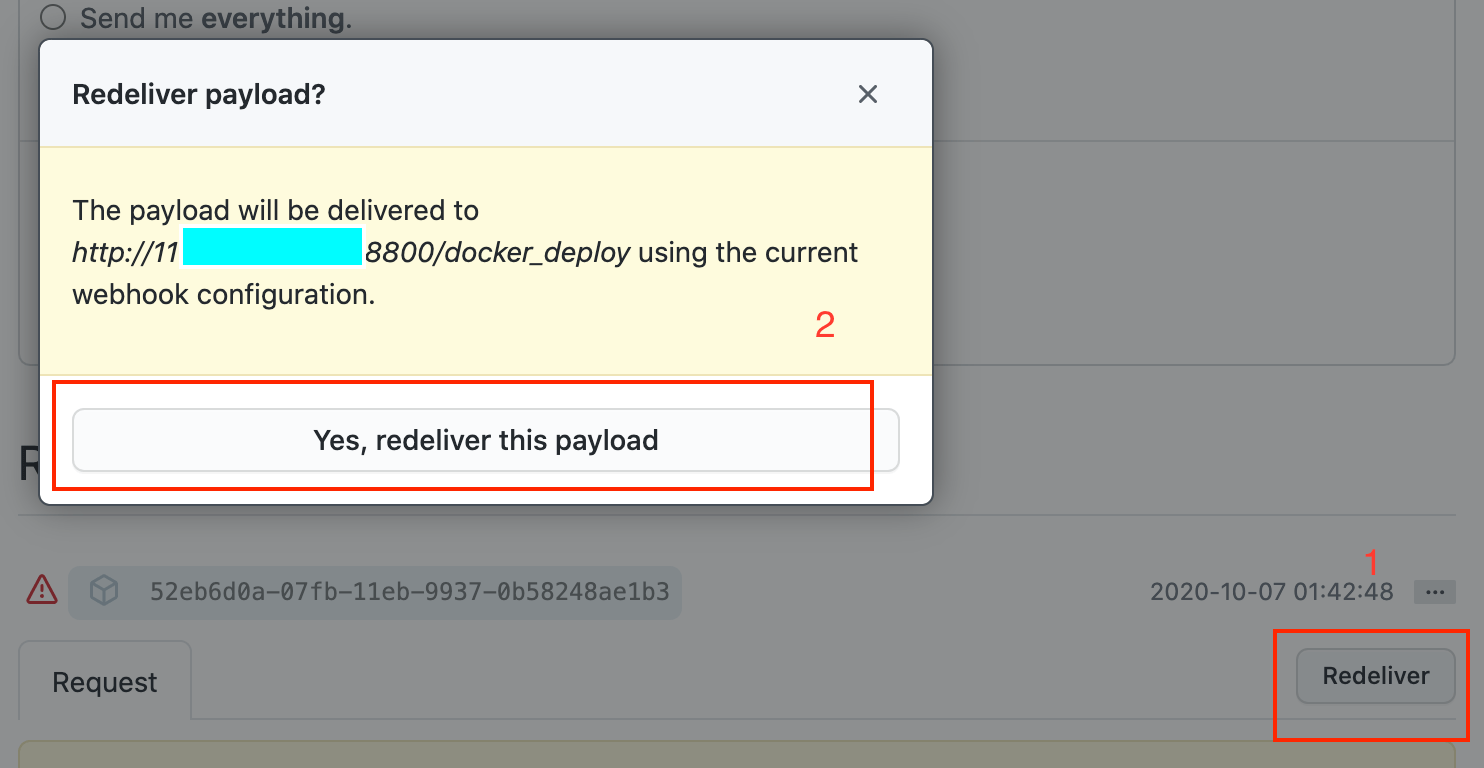
新增 webhooks 后,可以发测试请求,点击 redeliver 弹窗提示后再点击确认,这样就可以调试接口了。如下图
写node接口来处理webhooks请求
我们用一个简单的 nodejs 文件,在 8800 端口新建一个接口来处理 github webhooks 的请求,先写一个简单的测试 js
// webhook.jsconst http = require('http')const createHandler = require('github-webhook-handler')const handler = createHandler({path:'/docker_deploy',secret:'xxx' // 之间设置的秘钥})http.createServer((req,res) => {handler(req,res,err => {res.statusCode = 404res.end('no such location')})}).listen(8800, () => {console.log('Webhook listen at 8800')})handler.on('error',err => {console.error('Error',err.message)})// 接收所有事件(包括push事件)打印日志handler.on('*',event => {console.log('Received * ',event.payload)})
我们要在服务器跑起这个服务需要先在 ubuntu 系统上安装 node/npm
# 默认安装方法sudo apt-get install -y nodejssudo apt install npm# ubuntu 安装node版本过低,怎么解决node -v # v8.10.0npm -v # 3.5.2# 将node升级到最新稳定版sudo npm cache clean -fsudo npm install -g nsudo n stablePATH="$PATH" # 立即在终端生效# 再查看版本就是最新稳定版了node -v # v12.18.4npm -v # 6.14.6
参考:使用apt-get install安装node.js导致安装成低版本的解决方案 | CSDN
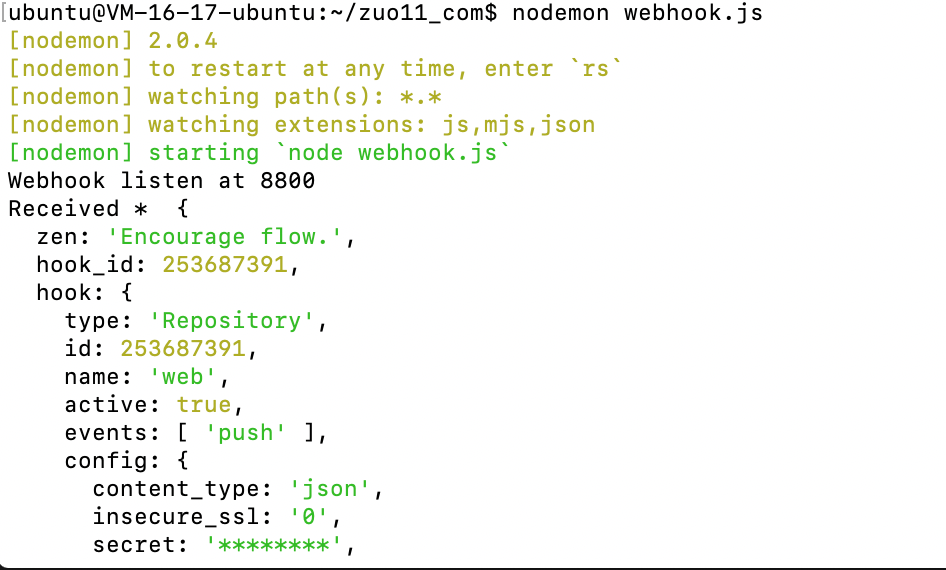
注意 npm init 一个 package.json,并安装 github-webhook-handler 模块,再 nodemon webhook.js 开启服务,也可以把 nodemon webhook.js 使用 pm2 来管理。然后再在 github webhooks 里触发测试请求,当看到 Received * log,即表示接收成功,如下图:
sh脚本:拉取最新代码,重新部署
这里已经知道如何接收事件了,我们再在 webhook.js 里加入执行 shell 脚本的代码
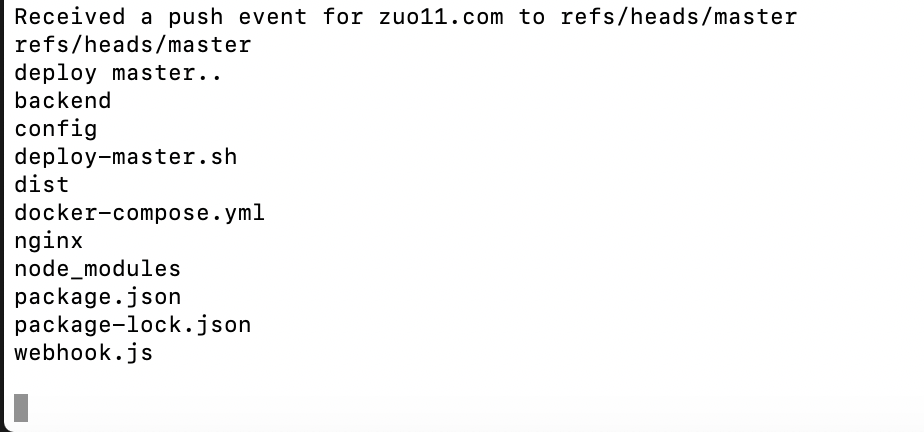
// 使用子进程执行命令function run_cmd(cmd, args, callback) {var spawn = require('child_process').spawn;var child = spawn(cmd, args);var resp = "";child.stdout.on('data', function (buffer) { resp += buffer.toString(); });child.stdout.on('end', function () { callback(resp) });}// 接收到 push 事件时,执行 sh ./deploy-master.shhandler.on('push', function (event) {console.log('Received a push event for %s to %s', event.payload.repository.name, event.payload.ref);// 分支判断,如果是masterif(event.payload.ref === 'refs/heads/master'){console.log('deploy master..')run_cmd('sh', ['./deploy-master.sh'], function(text){ console.log(text) });}})
在当前目录新建一个 deploy-master.sh 文件,内容先只有 ls,用于测试,修改代码后,再次测试,如下图,ls执行成功过即表示代码正常。
注意,1. 模拟请求可能会拿不到 event.payload.ref 的值,需要出发真实的 push 请求才有 2.如果 deploy-master.sh 没有可执行权限,那么就需要执行 chmod +x 文件名,来给他加可执行权限
修改部署脚本
# 测试# ls# deploy-master.shecho "Start Deploy"# 获取最新版代码git pull# 停止原先的镜像实例(容器)docker-compose down# 重新build,创建实例化镜像(容器)docker-compose up -d --force-recreate --build
这里要注意 git pull 的问题。我们这里要放弃之间 vscode 插件部署的方法,要使用 git pull 的方式来更新部署代码,这样才不会有冲突。
这里我们要先在 ubuntu 系统里 git clone github的仓库,建议使用 ssh 的方法, 使用 ssh-keygen -t rsa -C "xxx@qq.com" 生成公钥私钥,然后再把公钥配置到 github 个人账号 setting 里的 ssh keys里面。就可以使用 ssh 地址正常拉取了。
这样就可以实现提交代码到master分支就自动部署最新代码了

