Vue是一个前端js框架,由前谷歌华人尤雨溪开发
Vue近几年来特别的受关注,三年前的时候angularJS霸占前端JS框架市场很长时间,接着react框架横空出世,因为它有一个特性是虚拟DOM,从性能上碾轧angularJS,这个时候,vue1.0悄悄的问世了,它的优雅,轻便也吸引了一部分用户,开始收到关注,16年中旬,VUE2.0问世,这个时候vue不管从性能上,还是从成本上都隐隐超过了react,火的一塌糊涂。
学习vue是现在前端开发者必备的一个技能。
vue特点与mvvm
渐进式
vue是渐进式JavaScript框架 用到什么功能,只需要引入什么功能模块
- 如果只是简单的将数据与视图进行关联渲染,只需要引入vue即可实现声明式渲染
- 如果后续多个地方用到轮播图效果,那么我们可以借助vue的组件化思想进行封装
- 如果要做前端SPA单页路由,需要引入第三方插件vue-router实现路由功能
- 如果涉及多组件之间的状态管理维护,需要引入第三方插件vuex实现状态管控
- 如果项目最终上线、团队开发等需要引入webpack等构建工具进行项目打包、构建、迭代操作

主张弱
Vue可以在任意其他类型的项目中使用,使用成本较低,更灵活,主张较弱,在Vue的项目中也可以轻松融汇其他的技术来开发,并且因为Vue的生态系统特别庞大,可以找到基本所有类型的工具在vue项目中使用
vue特点
易用(使用成本低),灵活(生态系统完善,适用于任何规模的项目),高效(体积小,优化好,性能好)
Vue是一个MVVM的js框架,但是,Vue 的核心库只关注视图层,开发者关注的只是m-v的映射关系

MV*模式(MVC/MVP/MVVM)
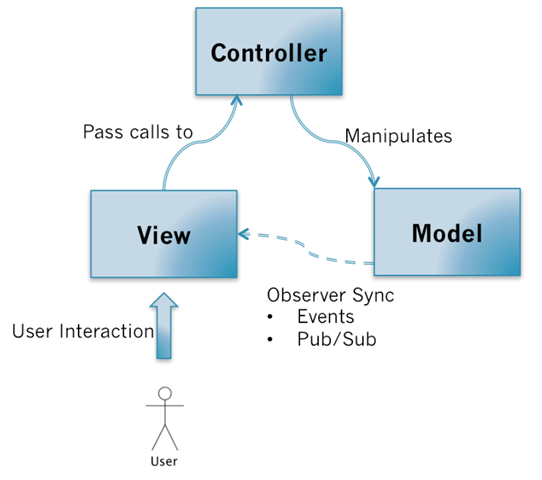
MVC
Model View Controller
用户对View操作以后,View捕获到这个操作,会把处理的权利交移给 Controller;Controller会对来自View数据进行预处理、决定调用哪个Model的接口;然后由Model执行相关的业务逻辑(数据请求); 当Model变更了以后, View通过观察者模式收到Model变更的消息以后,然后重新更新界面。
问题:model发生变化,view通过观察者模式监控model改变,从而渲染最新视图。这就导致View强依赖特定的 Model层
MVP
Model View Presenter
MVP 模式将 Controller 改名为 Presenter,同时改变了通信方向。
和MVC模式一样,用户对View的操作都会从View交移给Presenter。 Presenter会执行相应的应用程序逻辑,并且对Model进行相应的操作;而这时候Model执行完业务逻辑以后,也是通过观察者模式把自己变更的消息传递出去,但是是传给Presenter而不是View。Presenter获取到Model变更的消息以后,通过View提供的接口更新界面。
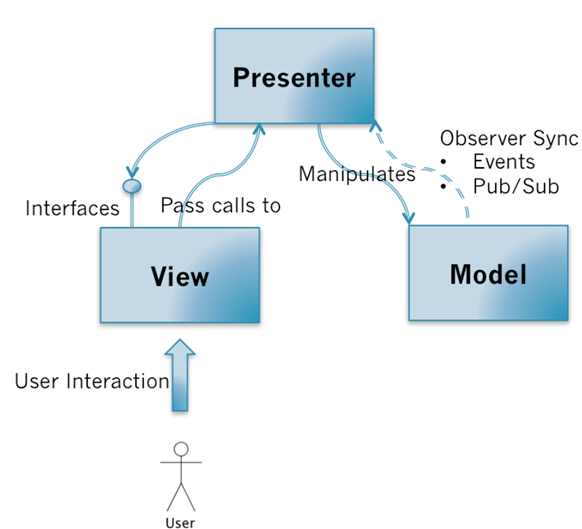
各部分之间的通信,都是双向的
View与Model不发生联系,都是通过Presenter进行传递
View 非常薄,不部署任何业务逻辑,称为"被动视图"(Passive View),即没有任何主动性。而 Presenter非常厚,所有逻辑都部署在那里。
Model->View的手动同步逻辑麻烦,维护困难
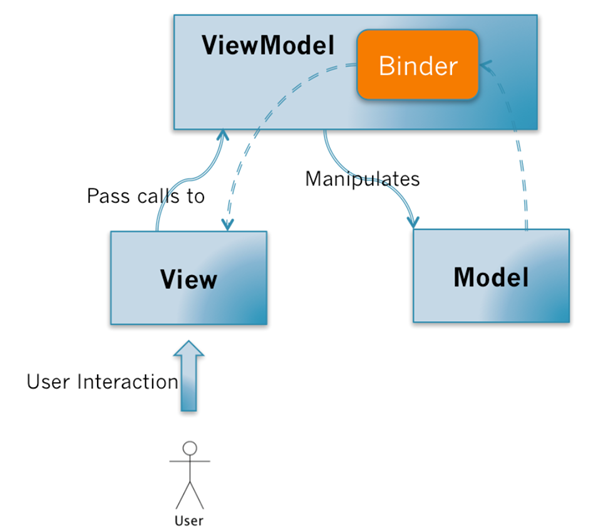
MVVM
Model View ViewModel
MVVM的调用关系和MVP一样。但是,在ViewModel当中会有一个叫 Binder。你只需要在View的模版语法中,指令式地声明View上的显示的内容是和Model的哪一块数据进行绑定即可。 当ViewModel对Model进行更新的时候,Binder会自动把数据更新到View上去;当用户对View进行操作(例如表单输入),Binder也会自动的把数据更新到Model上去。这种方式称为:双向数据绑定。
它采用双向绑定:View的变动,自动反映在 ViewModel,反之亦然
Vue的使用
Vue不支持IE8,因为使用了ES5的很多特性
Object.defineProperty(_data,”msg”,{get(),set()})
- 可以直接通过script标签来引入vue.js,有开发版本和生产版本,开发版本一般我们在开发项目的时候引入,当最后开发完成上线的时候引入生产版本,开发版本没有压缩的,并且有很多提示,而生产版本全部删掉了
直接下载并用
方法2:
如果设计图是640的图,这个时候我们知道它是照着i5来的,我们现在假设世界上所有的手机都是320的,也就是每一个人用的都是i5,在这个理想的情况下,因为手机都一样,尺寸都一样,和pc端的固定布局也就一样了
假设有一个在640的图上我们量得的宽度是320,因为是二倍图,所以我们知道,它的实际宽度是160px,这样的话,我们直接给这个设置设置width:160px就可以了,这个时候,我们玩个花子,不要单纯的使用px来设置,用rem来设置,例如,我可以将rem设置为100px,这样的,刚才的盒子设置为width:1.6rem,算法就是 量的宽度/(dpr*100) = 要设置的rem值
这样我们就可以开心的开发,量一个尺寸,除个2,再小数点推两位,设置就行了,但是我们也知道,手机的尺寸并不可能都是320,这样的话,没有关系,我们可以根据一个比例来算rem到底设置为多少
在手机宽度为320的时候,我们设置的1rem=100px,所以有一个比例 b = 100/320
那么在W宽度的手机上,1rem应该是多少呢?设为x 那么x/w = b
得到x = w/3.2
那么就不要写死html的fontsize为100了。而是用js去设置:
document.documentElement.style.fontSize = document.documentElement.clientWidth/3.2 + ‘px’
这样,我们就可以得到一个自适应的rem
常见的需要注意的问题
- 1px边框
在移动端中,如果给元素设置一个像素的边框的话,那么在手机上看起来是会比一个像素粗的。
解决方法:使用伪类元素模拟边框,使用transform缩放
.a::after{content: '';display: block;width: 100%;height: 1px;background: #333;position: absolute;left: 0;bottom: 0;transform: scaleY(0.5)}
- 响应式图片
在移动端中,图片的处理应该是很谨慎的,假设有一张图片本身的尺寸是X宽,设置和包裹它的div一样宽,如果是div宽度小于图片宽度没有问题,但是如果div宽度大于图片的宽度,图片被拉伸失真
解决方法:让图片最大只能是自己的宽度
img{max-width: 100%;display: block;margin: 0 auto;}
移动端webkit
移动端的浏览器的内核百分之99都是webkit内核
移动端事件
移动端中的事件和PC的事件有一些是不同的,例如,mouse部分事件在移动端里没有了
取而代之的是touch事件:
touchstart/touchmove/touchend/touchcancel
添加事件的时候可以用ontouchstart,但是有的时候很可能失效,建议使用addEventListener的方式
touchcancel比较少见,在系统取消触摸的时候触发
touch事件对象里面的属性和mouse的略有不同,例如在mouse事件里可以直接从事件对象里取出pageX,clientX,screenX
touch事件对象里有touches,changedTouches,targetTouches三个属性,上面保存着关键的位置信息
它们里面保存的是触发事件的手指的信息,但是要注意,虽然三个里面保存的信息看似都一样,但是在touchend事件里,只能使用changedTouches
作业:使用touch事件完成拖拽
click的300ms延迟问题
在移动端中,click事件是生效的,但是它有一个问题,点击之后会有300ms的延迟响应
原因:safari是最早做出这个机制的,因为在移动端里,浏览器需要等待一段事件来判断此次用户操作是单击还是双击,所以就有click300ms的延迟机制,Android也很快就有了
不用click,用自定义事件tap
tap是需要自定义的:如果用户执行了touchstart在很短的时间又触发了touchend,且两次的距离很小,而且不能触发touchmove
使用zepto类库的时候,里面自带tap事件,,但是需要在zepto.js后面加上一段js
zepto官网;Touch模块
百度有一款touch.js的插件教程
hammer.js也是一个手势事件库文档引入fastclick库来解决
点透bug的产生
点透bug有一个特定的产生情况:
当上层元素是tap事件,且tap后消失,下层元素是click事件。这个时候,tap上层元素的时候就会触发下层元素的click事件
解决方式:
- 上下层都是tap事件,缺点:a标签等元素本身就是自带的click事件,更改为tap比较困难
- 缓动动画,让上层元素消失的时候不要瞬间消失,而是以动画的形式消失,事件超过300ms就可以了
- 使用中间层,添加一个透明的中间元素,给它添加click事件并消失,这个时候接收点透的是透明的中间层
- 使用fastclick
移动端测试
- 使用chrome浏览器有移动设备模拟功能,在这里可以做一些模拟测试,但是要注意的是,毕竟不是真机,会有一些测试不到的问题
- 手机连接上电脑的无线,总之使其在同一个网络里,然后就可以通过ip访问
需要测试的浏览器:
chrome,firefox,UC,百度,QQ,微信,Android,safari
移动端交互
动画效果全部使用css3
JQ生成二维码
可以使用jquery.qrcode.js插件,可以快速的生成基于canvas绘制的二维码
兼容查阅网站
can i use ,在这里可以查看很多属性、api的兼容性
十五. vue-router
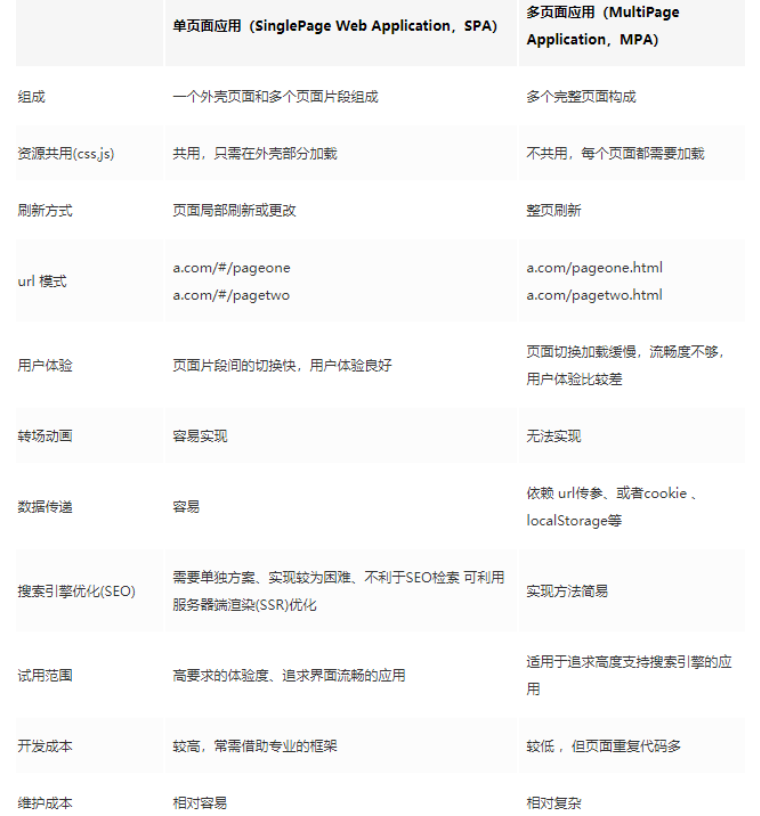
现在的应用都流行SPA应用(single page application)
传统的项目大多使用多页面结构,需要切换内容的时候我们往往会进行单个html文件的跳转,这个时候受网络、性能影响,浏览器会出现不定时间的空白界面,用户体验不好
单页面应用就是用户通过某些操作更改地址栏url之后,动态的进行不同模板内容的无刷新切换,用户体验好。
Vue中会使用官方提供的vue-router插件来使用单页面,原理就是通过检测地址栏变化后将对应的路由组件进行切换(卸载和安装)
SPA vs MPA
简单路由实现
cnpm install vue-router -S
- 引入vue-router,如果是在脚手架中,引入VueRouter之后,需要通过Vue.use来注册插件
src/router/index.js
import Vue from 'vue'import Router from 'vue-router'Vue.use(Router)
- 创建router路由器
new Router({routes:[{path:"/home",component:Home}]})
- 创建路由表并配置在路由器中
var routes = [{path,component}//path为路径,component为路径对应的路由组件]new Router({routes})
- 在根实例里注入router,目的是为了让所有的组件里都能通过this.
route来使用路由的相关功能api
import router from "./router/index.js"new Vue({el: '#app',router,template: '<App/>',components: { App }})
- 利用router-view来指定路由切换的位置
- 使用router-link来创建切换的工具,会渲染成a标签,添加to属性来设置要更改的path信息,且会根据当前路由的变化为a标签添加对应的router-link-active/router-link-exact-active(完全匹配成功)类名
<router-link to="/main">main</router-link><router-link to="/news">news</router-link>.router-link-active{color:red;}
路由的懒加载
懒加载也叫延迟加载,即在需要的时候进行加载,随用随载。在单页应用中,如果没有应用懒加载,运用webpack打包后的文件将会异常的大,造成进入首页时,需要加载的内容过多,延时过长,不利于用户体验,而运用懒加载则可以将页面进行划分,需要的时候加载页面,可以有效的分担首页所承担的加载压力,减少首页加载用时。
非按需加载则会把所有的路由组件块的js包打在一起。当业务包很大的时候建议用路由的按需加载(懒加载)。
按需加载会在页面第一次请求的时候,把相关路由组件块的js添加上;
{path: '/about',name: 'about',component: () => import('@/views/About') //采用了路由懒加载方式}
多级路由
在创建路由表的时候,可以为每一个路由对象创建children属性,值为数组,在这个里面又可以配置一些路由对象来使用多级路由,注意:一级路由path前加’/‘
const routes = [{path:'/main',component:AppMain},{path:'/news',component:AppNews,children:[{path:'inside',component:AppNewsInside},{path:'outside',component:AppNewsOutside}]},]
二级路由组件的切换位置依然由router-view来指定(指定在父级路由组件的模板中)
<router-link to='inside'>inside</router-link><router-link to='outside'>outside</router-link><router-view></router-view>
默认路由和重定向
当我们进入应用,默认像显示某一个路由组件,或者当我们进入某一级路由组件的时候想默认显示其某一个子路由组件,我们可以配置默认路由:
{path:'',component:Main}
当我们需要进入之后进行重定向到其他路由的时候,或者当url与路由表不匹配的时候:
{path:'/',redirect:'/main'}///...放在最下面{path:'*',redirect:'/main'},
命名路由
我们可以给路由对象配置name属性,这样的话,我们在跳转的时候直接写name:main就会快速的找到此name属性对应的路由,不需要写大量的urlpath路径了
<router-linkv-for="nav in navs":key="nav.id":to="{name:nav.name}">{{nav.title}}</router-link>{path:"guonei",component:Guonei,name:"guonei"},{path:"guoji",component:()=>import("@/views/Guoji"),name:"guoji"}
动态路由匹配
有的时候我们需要在路由跳转的时候跟上参数,路由传参的参数主要有两种:路由参数、queryString参数
路由参数需要在路由表里设置
{path:'/detail/:id',component:Detail}
上面的代码就是给User路由配置接收id的参数,多个参数继续在后面设置
在组件中可以通过this.$route.params来使用
queryString参数不需要在路由表设置接收,直接设置?后面的内容,在路由组件中通过this.$route.query接收
prop将路由与组件解耦
在组件中接收路由参数需要this.$route.params.id,代码冗余,现在可以在路由表里配置props:true
{path:'detail/:id',component:AppNewsDetail,name:'detail',props:true}
在路由自己中可以通过props接收id参数去使用了
props:[‘id’]
声明式导航 router-link
组件支持用户在具有路由功能的应用中(点击)导航。 通过 to 属性指定目标地址,默认渲染成带有正确链接的 标签,可以通过配置 tag 属性生成别的标签.。另外,当目标路由成功激活时,链接元素自动设置一个表示激活的 CSS 类名。
router-link的to属性,默认写的是path(路由的路径),可以通过设置一个对象,来匹配更多
:to='{name:"detail",params:{id:_new.id},query:{content:_new.content}}'
name是要跳转的路由的名字,也可以写path来指定路径,但是用path的时候就不能使用params传参,params是传路由参数,query传queryString参数
replace属性可以控制router-link的跳转不被记录
active-class属性可以控制路径切换的时候对应的router-link渲染的dom添加的类名
编程式导航
有的时候需要在跳转前进行一些动作,router-link直接跳转,需要在方法里使用$router的方法
this.$router.push() push/replace/go/back等
路由模式
为了构建SPA(单页面应用),需要引入前端路由系统,这也就是Vue-router存在的意义。前端路由的核心,就在于 ——— 改变视图的同时不会向后端发出请求。
路由有两种模式:hash、history,默认会使用hash模式,但是如果url里不想出现丑陋hash值,在new VueRouter的时候配置mode值为history来改变路由模式,本质使用H5的histroy.pushState方法来更改url,不会引起刷新.
history模式,会出现404 的情况,需要后台配置。
因为我们的应用是个单页客户端应用,如果后台没有正确的配置,当用户在浏览器直接访问 http://oursite.com/user/id 就会返回 404,这就不好看了。
所以呢,你要在服务端增加一个覆盖所有情况的候选资源:如果 URL 匹配不到任何静态资源,则应该返回同一个 index.html 页面,这个页面就是你 app 依赖的页面。
https://www.cnblogs.com/leyan/p/8677274.html
hash模式背后原理: 其实就是调用了window.onhashchange方法 hash值的切换
history模式的原理: 本质使用H5的histroy.pushState方法来更改url
hash模式和history模式的区别
- hash模式较丑,history模式较优雅
- pushState设置的新URL可以是与当前URL同源的任意URL;而hash只可修改#后面的部分,故只可设置与当前同文档的URL
- pushState设置的新URL可以与当前URL一模一样,这样也会把记录添加到栈中;而hash设置的新值必须与原来不一样才会触发记录添加到栈中
- pushState通过stateObject可以添加任意类型的数据到记录中;而hash只可添加短字符串
- pushState可额外设置title属性供后续使用
- hash兼容IE8以上,history兼容IE10以上
- history模式需要后端配合将所有访问都指向index.html,否则用户刷新页面,会导致404错误
路由守卫
在某些情况下,当路由跳转前或跳转后、进入、离开某一个路由前、后,需要做某些操作,就可以使用路由钩子来监听路由的变化
全局路由钩子:
router.beforeEach((to, from, next) => {//会在任意路由跳转前执行,next一定要记着执行,不然路由不能跳转了console.log('beforeEach')console.log(to,from)next()})//router.afterEach((to, from) => {//会在任意路由跳转后执行console.log('afterEach')})
单个路由钩子:
只有beforeEnter,在进入前执行,to参数就是当前路由
routes: [{path: '/foo',component: Foo,beforeEnter: (to, from, next) => {// ...}}]
路由组件钩子:
beforeRouteEnter (to, from, next) {// 在渲染该组件的对应路由被 confirm 前调用// 不!能!获取组件实例 `this`// 因为当守卫执行前,组件实例还没被创建},beforeRouteUpdate (to, from, next) {// 在当前路由改变,但是该组件被复用时调用// 举例来说,对于一个带有动态参数的路径 /foo/:id,在 /foo/1 和 /foo/2 之间跳转的时候,// 由于会渲染同样的 Foo 组件,因此组件实例会被复用。而这个钩子就会在这个情况下被调用。// 可以访问组件实例 `this`},beforeRouteLeave (to, from, next) {// 导航离开该组件的对应路由时调用// 可以访问组件实例 `this`}
十六. 阿里云服务器
操作系统:Centos 64位 7.6 (给予linux命令)
用户名都叫做root!
1.改密码 重启实例 233243 (改密码后需要重启实例才会有效!!)
2.远程控制 记录一个密码! ( git黑窗口 ssh root@公网IP 47.96.0.211)
3.配置安全组 1/60000 0.0.0.0/0 (ls cd / )
4.安装node.js
现在可以使用yum命令安装Node.js了。
sudo yum install nodejs
解决办法:(升级node最新稳定版本)
npm install -g n
n stable
(升级node为最新的版本了 需要重新开启黑窗口)
5.安装nginx服务器(静态服务器)
https://www.linuxidc.com/Linux/2016-09/134907.htm
/software/niginx-1.10.3.tar.gz
cd software
tar -zxvf nginx-1.10.3.tar.gz
cd nginx-1.10.3
./configure make make install
6.装好了之后直接访问公网 47.96.0.211
/usr/local/nginx/html/ ===> 文件存放位置
npm install pm2 -g (全局安装pm2)
pm2 list
pm2 start ./bin/www —name = “名称”
pm2 delete id 删除
pm2 stop id 停掉
pm2 restart id 重启
部署线上接口
1)本地运行express-pro项目,开启本地数据库,配合postman接口进行调试,测验OK了。
2)远程创建 node-pro
- 不要忘记执行
. npm install nodemon -g
. npm i
3)想要长期挂起服务,需要安装pm2
npm instal pm2 -gpm2 start ./bin/www --name "express接口"后续 pm2的命令:pm2 start 启动服务idpm2 delete 删除服务idpm2 restart 重启服务id
4)直接用postman进行接口测试
[http://公网IP:3000/api/user/loginin](http://xn--IP-xz4cq45o:3000/api/user/loginin) (post请求 username/password)
十七. 卖座项目
一. Films轮播图的实现
安装swiper插件
npm view swiper versions
yarn add swiper@5.2.0
main.js入口文件中引入css样式:
//引入swiper的样式import "swiper/css/swiper.min.css"
components/swiper/SwiperCom
<template><div :class="cName" class="swiper-container"><div class="swiper-wrapper"><slot></slot> <!--接受外部传入的不同的swiper-slide--></div><div class="swiper-pagination"></div></div></template><script>export default {props:{cName:String}}</script><style></style>
Films.vue中调用SwiperCom组件
<SwiperCom cName="film-banner"><divclass="swiper-slide"v-for="banner in banners":key="banner.bannerId"><img :src="banner.imgUrl"/></div></SwiperCom>
created(){axios.get("https://m.maizuo.com/gateway?type=2&cityId=310100&k=3273444",{headers:{'X-Client-Info': '{"a":"3000","ch":"1002","v":"5.0.4","e":"15894678874376571676907"}','X-Host': 'mall.cfg.common-banner'}}).then(res=>{//接口轮播图只返回了一条数据,又给其动态插入一条this.banners = [...res.data.data,{bannerId:"001",imgUrl:"xxx"}]//必须等到数据改变了,真实dom生成好了之后,才能进行实例化操作! nextTick会调中进行this.$nextTick(()=>{new Swiper(".film-banner",{loop:true,pagination:{el:".swiper-pagination"}})})})}
<style lang="scss" scoped>.swiper-slide{img{width:100%;height:200px;}}/*添加了scoped属性后,样式只能影响当前组件,如果后续希望引入的第三方插件内部样式也会受到影响,需要使用deep实现scoped穿透问题。*//deep/ .swiper-pagination-bullet-active{background: greenyellow;}</style>
后续会用到卖座的很多接口,不防将其进行封装,后续调用的时候就比较容易了。
utils/http.js
import axios from "axios"const instance = axios.create({baseURL: 'https://m.maizuo.com',timeout: 5000,headers: { 'X-Client-Info': '{"a":"3000","ch":"1002","v":"5.0.4","e":"15894678874376571676907"}'}});export default instance;
import instance from "@/utils/http"instance.get("/gateway?type=2&cityId=310100&k=3273444",{headers:{'X-Host': 'mall.cfg.common-banner'}})
二. 通用样式与rem设置
src/stylesheets
main.scss
//引入基本样式@import "_base.scss";//引入重置样式@import "./_reset.scss";//引入通用样式@import "./_commons.scss";
main.js中引入main.scss文件:
//引入main.scss样式import "@/stylesheets/main.scss"
rem的动态计算
document.documentElement.style.fontSize =document.documentElement.clientWidth / 3.75 + "px"window.onresize = function(){document.documentElement.style.fontSize =document.documentElement.clientWidth / 3.75 + "px"}
tabbar的底部图标设置
index.html里面引入iconfont.css文件
<!--通过link标签引入--><link rel="stylesheet" href="<%= BASE_URL %>iconfont/iconfont.css">
<i class="iconfont" :class="nav.icon"></i>{{nav.title}}navList:[{id:1,title:"电影",path:"/films",icon:"icon-all"},{id:2,title:"影院",path:"/cinema",icon:"icon-video"},{id:3,title:"我的",path:"/center",icon:"icon-account"}]
解决1px边框问题:
Tabbar.vue
//引入border-1的scss文件@import "@/stylesheets/border-1.scss";ul{// border-top:1px solid #ccc;@include border-top(1px,#ccc);position: fixed;width: 100%;height: 0.5rem;bottom: 0;display: flex;li{line-height: 0.25rem;flex: 1;text-align: center;display: flex;flex-direction: column;}}<ul class="border-1px">
三. 登录功能实现
3-1 login页面获取token令牌
loginin(){axios.post("/info/api/user/loginin",{username:"张三",password:"123"}).then(res=>{console.log(res)})}
devServer: {proxy: {'/info': {target: 'http://47.96.0.211:3000',changeOrigin:true,pathRewrite:{"^/info":""}}},overlay: {warnings: false,errors: false}},
通过配置devServer中proxy配置,进行开发环境的正向代理配置。
3-2 axios封装
utils/http.js
import axios from "axios"//关联的都是基于卖座的接口const instance = axios.create({baseURL: 'https://m.maizuo.com',timeout: 5000,headers: { 'X-Client-Info': '{"a":"3000","ch":"1002","v":"5.0.4","e":"15894678874376571676907"}'}});//关联的是 http://47.96.0.211:3000 的接口请求const instance2 = axios.create({baseURL:"/info",timeout:5000})export {instance,instance2};
注意: Films里面更改引入方式!
import {instance} from "@/utils/http"
Login里面:
import {instance2} from "@/utils/http"export default {methods:{loginin(){instance2.post("/api/user/loginin",{username:"张三",password:"123"}).then(res=>{console.log(res)})}}}
axios可以通过设置请求与响应拦截器进行接口处理:
//在发送请求之前做一个请求之前的拦截instance2.interceptors.request.use(config=>{console.log("1.config====>",config)return config})//获取数据后,后端会给前端进行响应,做一个响应后的拦截instance2.interceptors.response.use(res=>{if(res.data.flag){ //如果后端认为OKreturn res.data.data}else{return Promise.reject("出错了...")}})
loginin(){instance2.post("/api/user/loginin",{username:"张三2",password:"123"}).then(res=>{console.log("3.login===>",res)}).catch(err=>{console.log(err)})}
loginin(){instance2.post("/api/user/loginin",{username:"张三",password:"123"}).then(res=>{console.log("3.login===>",res)localStorage.setItem("token",res.token)this.$router.push("/center")}).catch(err=>{console.log(err)})}
之前仅是采用路由守卫拦截登录,但是会有问题!token令牌过了失效期之后,还是会永久的存在用户本地里面,所以仍然是登录的那种状态,所以需要进行axios拦截了。
Center
created(){//需要进行接口请求了,验证token身份是否是合法的instance2.post("/api/user/isloginin",{},{headers:{"X-Access-Token" : localStorage.getItem("token")}}).then(res=>{}).catch(err=>{ //说明token已经失效了this.$router.push("/login")})}
//在发送请求之前做一个请求之前的拦截//可以在发送请求之前,就可以在它的请求头上面携带token传给后端。instance2.interceptors.request.use(config=>{if(localStorage.getItem("token")){config.headers["X-Access-Token"] = localStorage.getItem("token")}return config})
首先采用了路由守卫进行路由拦截,进入到路由的时候从本地存储读token令牌,看看是否存在,如果存在就认为登录了。但是后续发现token可能失效了,但是token一直存在本地存储,所以遇到这个问题,需要使用axios拦截器进行实现。
axios拦截器请求之前的拦截,响应之后的拦截。一般会在请求拦截器上面的headers,会携带本地token发送给后端,后续后端就会进行验证,将一些对应的状态码给我们前端进行返回。然后我们的前端可以在响应拦截器里面,根据返回的状态码进行具体判断,然后进行一些具体的业务逻辑的实现。
四. 布局正在热映
<div class="nowplaying"><divclass="film-item"v-for="data in dataList":key="data.filmId"><img :src="data.poster" alt=""><div class="content"><h4>{{data.name}}</h4><p>观众评分:{{data.grade}}</p><!-- <p>主演:<span v-for="actor in data.actors" :key="actor.name">{{actor.name}}</span></p> --><p>主演:{{data.actors | actorsFilter}}</p></div></div></div>
data(){return {dataList:[]}},created(){instance.request({url:"/gateway?cityId=310100&pageNum=1&pageSize=10&type=1&k=2421852",headers:{'X-Host': 'mall.film-ticket.film.list'}}).then(res=>{console.log(res)this.dataList = res.data.data.films})}
<style lang="scss" scoped>.nowplaying{padding:.15rem;}.film-item{display: flex;margin-bottom: .2rem;img{width:.66rem;height:.86rem;}.content{padding-left: .1rem;}}</style>
后续对于主演,采用filter过滤器的方式进行演员数据的过滤
import Vue from "vue"Vue.filter("actorsFilter",(actors,options=' ')=>{//过滤器必须要有返回值!return actors.map(item=>item.name).join(options)})
<p>主演:{{data.actors | actorsFilter}}</p>
可以将其放入到utils/filters中,然后在main.js中引入加载。
//引入filterimport "@/utils/filters"
后面发现了正在热映与即将上映的内部的film-item结构是差不多一致的,所以可以采用组件复用解决。
components/film-item/index.vue
<template><div class="film-item"><img :src="data.poster" alt=""><div class="content"><h4>{{data.name}}</h4><p>观众评分:{{data.grade}}</p><p>主演:{{data.actors | actorsFilter}}</p></div></div></template><script>export default {props:["data"]}</script><style lang="scss" scoped>.film-item{display: flex;margin-bottom: .2rem;img{width:.66rem;height:.86rem;}.content{padding-left: .1rem;}}</style>
Nowplaying.vue
<template><div class="film"><divv-for="data in dataList":key="data.filmId"><FilmItem :data="data"/></div></div></template><script>import FilmItem from "@/components/film-item"import {instance} from "@/utils/http"export default {components:{FilmItem},}</script><style lang="scss" scoped>.film{padding:.15rem;}</style>
ComingSoon
<template><div class="film"><divv-for="data in dataList":key="data.filmId"><FilmItem :data="data"/></div></div></template>
五. 跳转到详情页面
可以采用声明式导航router-link实现,跳转到详情页面
<template><div class="film"><router-linkv-for="data in dataList":key="data.filmId":to="'/detail/'+data.filmId"tag="div"><FilmItem type="nowplaying" :data="data"/></router-link></div></template>
对于时间的处理,采用了moment插件实现时间的格式化。
import moment from "moment"moment.locale('zh-cn'); //设置当前时间中文//过滤时间的Vue.filter("time",time=>{let date = time*1000return moment(date).format("YYYY-MM-DD dddd")})
六. 详情页面布局
6-1 折叠动画
<div><div class="detail" v-if="filmInfo"><img class="poster" :src="filmInfo.poster" width="100%" alt=""><div class="filmInfo-con"><h4>{{filmInfo.name}} <span>{{filmInfo.item.name}}</span></h4><p>{{filmInfo.category}}</p><p>{{filmInfo.premiereAt | time}}</p><p class="grade">{{filmInfo.grade}}分</p><p>{{filmInfo.nation}} | {{filmInfo.runtime}}分钟</p><p ref="p" style="height:120px;overflow:hidden;transition: all .3s linear;" :class="{'synopsis':toggle}" >{{filmInfo.synopsis}}</p><i @click="toggle=!toggle" class="iconfont" :class="toggle?'icon-moreunfold':'icon-less'"></i></div></div><img v-else src="../assets/timg.gif" width="100%" alt=""></div>
data(){return {filmInfo:null,toggle:true}},
.synopsis{height: 30px !important;background: #f6f6f6;box-shadow: 2px 9px 8px #ccc;}.iconfont{position: absolute;left: 50%;transform: translateX(-50%);}
6-2 轮播图的封装
<div style="padding:.1rem 0 .1rem .1rem;"><h4>演职人员</h4><SwiperCom cName="actors"><divv-for="data in filmInfo.actors":key="data.name"class="swiper-slide"><div class="actor-con"><img class="actor-img" :src="data.avatarAddress" alt=""><p>{{data.name}}</p></div></div></SwiperCom><h4>剧照</h4><SwiperCom cName="photos"><divv-for="data in filmInfo.photos":key="data"class="swiper-slide"><div><img class="photo-img" :src="data" alt=""></div></div></SwiperCom></div>
created(){instance.get(`/gateway?filmId=${this.$route.params.id}&k=2352279`,{headers:{'X-Host': 'mall.film-ticket.film.info'}}).then(res=>{console.log(res)this.filmInfo = res.data.data.filmthis.$nextTick(()=>{new Swiper(".actors",{slidesPerView: 4,spaceBetween: 15,})new Swiper(".photos",{slidesPerView: 2.3,spaceBetween: 10,})})})},
6-3 头部实现
<div class="detailtitle"><i class="iconfont icon-back"></i><span>金刚川</span></div>
.detailtitle{height: .44rem;line-height: .44rem;width: 100%;position: fixed;background: #fff;left: 0;top: 0;text-align: center;i{position: absolute;left:14px;}}
mounted(){window.onscroll = function(){//获取滚动距离console.log(document.documentElement.scrollTop)}},beforeDestroy(){window.onscroll = null;},
但是如果后续很多地方都会用到类似的效果,那么都得去在组件写mounted,beforeDestroy.
因为操作dom,可以通过自定义指令来去实现。
utils/directives.js
import Vue from "vue"//创建自定义指令 v-titleVue.directive("title",{//插入到dom之后的钩子函数inserted(el,binding){el.style.opacity = 0binding.value = binding.value || 50window.onscroll = function(){let sTop = document.documentElement.scrollTop || document.body.scrollTop;if(sTop>binding.value){el.style.opacity = 1}else{el.style.opacity = 0}}},unbind(el){ //指令与dom元素解绑的时候,需要清空一些事件window.onscroll = null}})
需要在main.js引入
//引入directivesimport "@/utils/directives"
<div class="detailtitle" v-title><i class="iconfont icon-back"></i><span>金刚川</span></div>
6-4 剧照实现
detail/Photos.vue
<template><div class="photos">剧照页面....</div></template><script>export default {}</script><style lang="scss" scoped>.photos{position: fixed;width:100%;height:100%;top:0;left:0;background: #fff;z-index: 10;}</style>
发现剧照的头部与详情页面中的头部结构都是一致的,可以封装一下头部组件。
components/m-title
<template><div class="detailtitle"><i class="iconfont icon-back"></i><span>金刚川</span></div></template><script>export default {}</script><style lang="scss" scoped>.detailtitle{height: .44rem;line-height: .44rem;width: 100%;position: fixed;background: #fff;left: 0;top: 0;text-align: center;transition: all .3s linear;i{position: absolute;left:14px;}}</style>
考虑到很多地方用到这个组件,所以可以将其封装为全局组件,这样的话,任何地方直接用就可以。
src/utils/globalComp.js
import Vue from "vue"import Title from "@/components/m-title"//全局注册组件 mz-titleVue.component("mz-title",Title)
main.js里面引入globalComp
//引入globalCompimport "@/utils/globalComp"
可以给mz-title传递一个属性,那边就可以接收到,进行渲染了。
detail.vue
<mz-title :name="filmInfo.name" v-title></mz-title>
title.vue
<template><div class="detailtitle"><i class="iconfont icon-back"></i><span>{{name}}</span></div></template><script>export default {props:["name"]}</script>
photos.vue
<mz-title name="剧照"></mz-title>
点击头部的返回按钮,进行返回操作。
<template><div class="detailtitle"><i @click="back" class="iconfont icon-back"></i><span>{{name}}</span></div></template><script>export default {props:["name"],methods:{back(){//需要返回上一页this.$router.back()}}}</script>
但是,如果点击的是剧照的返回,仍然是返回上一页。所以不能这样写!
可以通过子父组件通信(触发事件) 点击返回的时候,具体的事件逻辑行为交给父组件去实现。
Detail
<mz-title @change="back" :name="filmInfo.name" v-title></mz-title>
methods:{back(){this.$router.back()}},
Photos
<mz-title name="剧照" @change="back2"></mz-title>
methods:{back2(){//找到Photos的父组件Detail,让其更改自身的数据isShowthis.$parent.isShow = false}}
Title
back(){//可以触发绑定在自身上面的change事件 <mz-title @change="back"></mz-title>this.$emit("change")}
也可以改成以下方式:
Detail.vue
<!--调用剧照组件--><Photos v-show="isShow"><mz-title name="剧照" @change="back2"></mz-title></Photos>back2(){this.isShow = false},
<div class="photos"><slot></slot></div>
实现了Photos布局:
Detail
<!--调用剧照组件--><Photos v-show="isShow" :photos="filmInfo.photos"><mz-title :name="`剧照(${filmInfo.photos.length})`" @change="back2"></mz-title></Photos>
Photos
https://www.cnblogs.com/hellocd/p/10443237.html
<template><div class="photos"><slot></slot><ul><liv-for="item in photos":key="item"><img :src="item"/></li></ul></div></template><script>export default {props:["photos"],}</script><style lang="scss" scoped>.photos{position: fixed;width:100%;height:100%;top:0;left:0;background: #fff;z-index: 10;ul{position: relative;top:50px;display: flex;flex-wrap: wrap;li{width:33.33333333%;height:1.24rem;padding: 2px;}img{width:100%;height:100%;}}}</style>
七. 切换路由的转场动画
发现卖座的路由切换有转场动画,所以借助transition标签,实现路由切换的动画效果。
app.vue
<!--vue-router中提供了router-view,用来显示具体的路由视图组件--><transition name="app" mode="out-in"><router-view></router-view></transition>
<style lang="scss" scoped>.app-enter-active{animation: move .66s;}.app-leave-active{animation: move .66s reverse;}@keyframes move{0%{transform: translateY(40px);opacity: 0;}100%{transform: translateY(0px);opacity: 1;}}</style>
八. 影院的布局与渲染
8-1 请求影院数据与布局
<div class="cinema"><div class="title"><div class="left">上海</div><div class="center">影院</div><div class="right"><i class="iconfont icon-search"></i></div></div><div class="select"><div>全城</div><div>App订票</div><div>最近去过</div></div><!--遍历影院数据--><div class="cinemalist"><ul><liv-for="data in cinemaList":key="data.cinemaId"><h4>{{data.name}}</h4><p>{{data.address}}</p></li></ul></div></div>
async created(){let res = await instance("/gateway?cityId=310100&ticketFlag=1&k=5979448",{headers:{'X-Host': 'mall.film-ticket.cinema.list'}})console.log("res=========>",res.data.data.cinemas)this.cinemaList = res.data.data.cinemas}
<style lang="scss" scoped>.cinemalist{margin-top: 0.98rem;li{padding: .15rem;p{overflow: hidden;text-overflow: ellipsis;white-space: nowrap;width: 80%;}}}.title{height: .44rem;background: #fff;display: flex;line-height: .44rem;justify-content: space-between;padding: 0 0.2rem;position: fixed;width: 100%;left: 0;top: 0;}.select{height: .44rem;display: flex;background: #fff;line-height: .44rem;justify-content: space-around;position: fixed;width: 100%;left: 0;top: .44rem;}</style>
8-2 影院区域的获取
computed:{//获取电影的区域cinemaArea(){let newArr = this.cinemaList.map(item=>{return item.districtName})//需要对重复的数组进行数组去重let arr = new Set(newArr)return ["全城",...arr]}},
<!--影院所在的区域--><div class="area"><ul><liv-for="data in cinemaArea":key="data">{{data}}</li></ul></div>
.area{position: fixed;top:.8rem;background: #fff;left:0;width: 100%;z-index: 10;padding: 10px;ul{display: flex;flex-wrap: wrap;li{width: 22%;text-align: center;padding: .06rem 0;border: 1px solid #f6f6f6;margin: .05rem;font-size: 12px;}}}
点击城市的时候,需要定义currentArea这个字段,然后再去搞一个计算属性,根据currentArea这个字段的改变,而去重新生成一个新的数组,页面进行遍历。
data(){return {cinemaList:[],isAreaShow:false, //默认不显示影院区域currentArea:"全城" //刚开始的区域}},
<!--影院所在的区域--><div class="area" v-show="isAreaShow"><ul><liv-for="data in cinemaArea":key="data"@click="handleArea(data)">{{data}}</li></ul></div>
methods:{handleArea(area){//需要进行过滤的操作// this.cinemaList = this.cinemaList.filter(item=>{// if(item.districtName === area){// return true// }// return false// })this.currentArea = area}},
computed:{//获取电影的区域cinemaArea(){......},//这个计算属性依赖于currentArea变化,只要currentArea改变了,计算属性会重新计算filterCinemaArea(){return this.cinemaList.filter(item=>{if(item.districtName === this.currentArea){return true}return false})}},
<!--遍历影院数据--><div class="cinemalist"><ul><liv-for="data in filterCinemaArea":key="data.cinemaId"><h4>{{data.name}}</h4><p>{{data.address}}</p></li></ul></div>
实现点击了区域切换样式,细节调整。
handleArea(area){this.currentArea = area//消失选择区域的框this.isAreaShow = false}
选择区域的时候,需要添加class叫做active
<!--影院所在的区域--><div class="area" v-show="isAreaShow"><ul><liv-for="data in cinemaArea":key="data"@click="handleArea(data)":class="{active:data === currentArea}">{{data}}</li></ul></div>
.area{position: fixed;top:.8rem;background: #fff;left:0;width: 100%;z-index: 10;padding: 10px;ul{display: flex;flex-wrap: wrap;li{width: 22%;text-align: center;padding: .06rem 0;border: 1px solid #f6f6f6;margin: .05rem;font-size: 12px;&.active{ //给每个li上面添加了active的样式border-color: orange;}}}}
<div class="select"><div :class="isAreaShow?'active':''" @click="isAreaShow=!isAreaShow">{{currentArea}}</div><div>App订票</div><div>最近去过</div></div>
.select{height: .44rem;display: flex;background: #fff;line-height: .44rem;justify-content: space-around;position: fixed;width: 100%;left: 0;top: .44rem;.active{color:orange;}}
8-3 search的tabbar的实现
router/index.js
{path:"/cinema/search",component:()=>import("@/views/Search")},
<div class="right" @click="toSearch"><i class="iconfont icon-search"></i></div>toSearch(){//通过编程式导航的方式实现路由跳转this.$router.push("/cinema/search")}
跳过去之后,发现Search界面是没有底部的。所以可以借助vuex实现。
安装vuex yarn add vuex
store/index.js
import Vue from "vue"import Vuex from "vuex"Vue.use(Vuex) // Vue.use(VueRouter)//创建sore仓库let store = new Vuex.Store({})export default store;
最后,在主入口main.js文件中进行引入
import store from "./store"new Vue({router, //目的? 为了让每个组件可以访问到路由相关的api($route | $router)store, //目的 为了让每个组件可以访问到store相关的apirender: h => h(App)}).$mount('#app')
需要定义共享状态isTabbarShow
//创建sore仓库let store = new Vuex.Store({state:{ //多组件之间的共享状态存在state中isTabbarShow:true},mutations:{ //内部可以写很多同步的更改state的方法show(state){state.isTabbarShow = true},hide(state){state.isTabbarShow = false}}})
App.vue中使用vuex的共享状态isTabbarShow
<Tabbar v-show="$store.state.isTabbarShow"></Tabbar>
但是在Search页面进入的时候,不能有底部了,离开的时候有底部。所以需要更改isTabbarShow的标识。但是在vuex中,只能通过mutations来去同步的更改vuex的状态,所以需要提前在mutations里面定义好同步更改状态的方法。在组件中通过commit来去触发具体的mutations的方法。
created(){//需要将vuex的state的isTabbarShow变成false -- 需要触发mutations里面的hide方法this.$store.commit("hide")},beforeDestroy(){this.$store.commit("show")}
8-4 search的数据请求
本来在Cinema页面中,进行了异步请求获取数据了。然后进入到Search中,我们可以不需要再去请求拿数据了。
需要定义数据cinemaList
state:{ //多组件之间的共享状态存在state中isTabbarShow:true,cinemaList:[]}
actions:{ //提供了很多进行异步操作的方法async getCinemaListAction(context){let res = await instance("/gateway?cityId=310100&ticketFlag=1&k=5979448",{headers:{'X-Host': 'mall.film-ticket.cinema.list'}})context.commit("setCinemaList",res.data.data.cinemas)}},
mutations:{ //内部可以写很多同步的更改state的方法.....setCinemaList(state,cinemas){state.cinemaList = cinemas}}
Cinema.vue中的created函数中,通过dispatch触发getCinemaListAction
created(){//先要触发store的action方法this.$store.dispatch("getCinemaListAction")}
然后在Cinema页面中,获取vuex的状态cinemaList.
cinemaArea(){let newArr = this.$store.state.cinemaList.map(item=>{return item.districtName})//需要对重复的数组进行数组去重let arr = new Set(newArr)return ["全城",...arr]},filterCinemaArea(){if(this.currentArea === "全城") return this.$store.state.cinemaList;return this.$store.state.cinemaList.filter(item=>{if(item.districtName === this.currentArea){return true}return false})}
再去Search.vue页面中看一下,数据是否存在。发现数据仍然是存在的。
https://www.cnblogs.com/qdkfyym/p/11289233.html
如果在search页面中,直接刷新一下,会发现vuex的数据没有了?
原因是因为vuex的数据是存在内存里面的,但是如果浏览器一刷新的话,内存里面的数据就会恢复默认值了。
vuex 与 localStorage区别?
Search.vue
created(){//如果vuex中的状态没有数据,则需要自己请求数据if(this.$store.state.cinemaList.length === 0){this.$store.dispatch("getCinemaListAction")}this.$store.commit("hide")},
Cinema.vue
created(){//先要触发store的action方法if(this.$store.state.cinemaList.length === 0){this.$store.dispatch("getCinemaListAction")}}
8-5 Search获取5条数据
computed:{getCinemaListFive(){return this.$store.state.cinemaList.slice(0,5)}},
<p>离你最近</p><ul><liv-for="data in getCinemaListFive":key="data.cinemaId">{{data.name}}</li></ul>
8-6 Search界面的搜索功能
data(){return {searchVal:""}},
<div class="query"><input type="text" v-model="searchVal"><span>取消</span><div v-show="searchVal"><ul><liv-for="data in searchCinemaData":key="data.cinemaId">{{data.name}}</li></ul></div></div>
后续通过计算属性,内部根据查询的结果,进行数组的过滤匹配。
//按照名字搜,按照名字大写,按照地址搜索searchCinemaData(){return this.$store.state.cinemaList.filter(item=>item.name.includes(this.searchVal) ||item.name.toUpperCase().includes(this.searchVal.toUpperCase())|| item.address.toUpperCase().includes(this.searchVal.toUpperCase()))}
点击取消,返回上一页
<span @click="back">取消</span>
methods:{back(){this.$router.back()}},
8-7 vuex中getters获取5条数据
本来在Search.vue中通过getCinemaListFive计算属性获取5条数据。但是如果后续很多地方都需要获取vuex的这个5条数据,每个地方都需要写一次,就比较麻烦。
我们可以采用vuex中提供了getters去实现。就类似于计算属性一样,依赖性依赖于vuex的状态。
getters:{getCinemaListFive(state){ //依赖于cinemaList的变化,建立永久性缓存。return state.cinemaList.slice(0,5)},},
<p>离你最近</p><ul><liv-for="data in $store.getters.getCinemaListFive":key="data.cinemaId">{{data.name}}</li></ul>
8-8 vuex中的辅助函数
mapState
mapState辅助函数就是用来方便的获取vuex中的所管理的状态,本来获取状态需要通过this.$store.state.xxx.
import {mapState} from "vuex"computed:{...mapState(["cinemaList"]), //mapState这个方法返回对象,需要通过扩展运算符才可以运行//获取电影的区域cinemaArea(){let newArr = this.cinemaList.map(item=>{ //this.$store.state.cinemaListreturn item.districtName})//需要对重复的数组进行数组去重let arr = new Set(newArr)return ["全城",...arr]},filterCinemaArea(){if(this.currentArea === "全城") return this.cinemaList;return this.cinemaList.filter(item=>{if(item.districtName === this.currentArea){return true}return false})}}
mapGetters
mapGetters辅助函数就是为了方便的获取vuex中的getters,用法与mapState基本一致。
import {mapGetters} from "vuex"computed:{...mapGetters(["getCinemaListFive"]), //本来: this.$store.getters.getCinemaListFivesearchCinemaData(){....}},
<p>离你最近</p><ul><liv-for="data in getCinemaListFive":key="data.cinemaId">{{data.name}}</li></ul>
modules划分模块
首先store这个实例是唯一的,不能拆分store.只能对其内容模块进行拆分
store/module/cinema.js
import {instance} from "@/utils/http"const cinema = {namespaced:true,//开启命名空间state:{cinemaList:[]},getters:{getCinemaListFive(state){ //依赖于cinemaList的变化,建立永久性缓存。return state.cinemaList.slice(0,5)}},actions:{async getCinemaListAction({commit}){let res = await instance("/gateway?cityId=310100&ticketFlag=1&k=5979448",{headers:{'X-Host': 'mall.film-ticket.cinema.list'}})commit("setCinemaList",res.data.data.cinemas)}},mutations:{setCinemaList(state,cinemas){state.cinemaList = cinemas}}}export default cinema;
store/module/tabbar.js
const tabbar = {namespaced:true,//开启命名空间state:{isTabbarShow:true},mutations:{show(state){state.isTabbarShow = true},hide(state){state.isTabbarShow = false}}}export default tabbar
store/index.js
import Vue from "vue"import Vuex from "vuex"import cinema from "./module/cinema"import tabbar from "./module/tabbar"Vue.use(Vuex)//创建sore仓库let store = new Vuex.Store({modules:{cinema,tabbar}})export default store;
这样改完之后,页面报错。需要通过模块名字获取对应的状态,与调用对应的mutations与actions方法。
Cinema.vue
computed:{...mapState("cinema",["cinemaList"]),
created(){//先要触发store的action方法if(this.cinemaList.length === 0){this.$store.dispatch("cinema/getCinemaListAction")}}
前提是必须要开启命名空间才可以,否则内部找不到模块!!namespaced:true
Search.vue
import {mapGetters,mapState} from "vuex"computed:{...mapState("cinema",["cinemaList"]), //需要从cinema模块里面获取cinemaList这个状态...mapGetters("cinema",["getCinemaListFive"]),//需要从cinema模块里面获取five这个getterssearchCinemaData(){return this.cinemaList.filter(item=>item.name.includes(this.searchVal) ||item.name.toUpperCase().includes(this.searchVal.toUpperCase()) || item.address.toUpperCase().includes(this.searchVal.toUpperCase()))}},
created(){if(this.cinemaList.length === 0){ //如果vuex中的状态没有数据,则需要请求cinema模块的actionthis.$store.dispatch("cinema/getCinemaListAction")}this.$store.commit("tabbar/hide") //触发tabbar模块的hide这个mutations方法},beforeDestroy(){this.$store.commit("tabbar/show") //触发tabbar模块的show这个mutations方法}
App.vue
import {mapState} from "vuex"computed:mapState("tabbar",["isTabbarShow"])
<Tabbar v-show="isTabbarShow"></Tabbar>
mapActions
为了在页面中快速的调用vuex中的action方法,用法跟上述两个方法类似,但是写在methods里面。
Cinema.vue
import {mapState,mapActions} from "vuex"
methods:{...mapActions("cinema",["getCinemaListAction"]),handleArea(area){},toSearch(){}},
created(){//先要触发store的action方法if(this.cinemaList.length === 0){this.getCinemaListAction()}}
mapMutations
mapMutations作用就是为了方便调用vuex中的mutations方法,使用方式与mapActions一致。
Search.vue
import {mapGetters,mapState,mapActions,mapMutations} from "vuex"
methods:{...mapActions("cinema",["getCinemaListAction"]),...mapMutations("tabbar",["show","hide"]),back(){this.$router.back()}},
created(){if(this.cinemaList.length === 0){ //如果vuex中的状态没有数据,则需要自己请求数据this.getCinemaListAction()}this.hide()},beforeDestroy(){this.show()}
九. 项目中采用Vant 组件库
9-1 项目引入vant组件库
yarn add vant
yarn add babel-plugin-import -D
babel.config.js文件添加如下配置:
module.exports = {presets: ['@vue/cli-plugin-babel/preset'],plugins: [['import', {libraryName: 'vant',libraryDirectory: 'es',style: true}, 'vant']]}
main.js文件,引入vant的样式
import 'vant/lib/index.css';
9-2 Search页面中使用Search组件
后续重新启动服务,Search.vue中引入相应的vant的组件。
import { Search } from 'vant';import Vue from "vue"Vue.use(Search);
<van-searchv-model="searchVal"show-actionplaceholder="输入影城名称"@cancel="back"/>
9-3 Login页面中使用Form组件
import Vue from 'vue';import { Form,Field,Button,Toast } from 'vant';Vue.use(Form).use(Field).use(Button)
<van-form @submit="onSubmit"><van-fieldv-model="username"name="用户名"label="用户名"placeholder="请输入用户名...":rules="[{ required: true, message: '请填写用户名' }]"/><van-fieldv-model="password"type="password"name="密码"label="密码"placeholder="请输入密码...":rules="[{ validator: asyncValidator,required: true, message: '请填写密码' }]"/><div style="margin: 16px;"><van-button round block type="info" native-type="submit">提交</van-button></div></van-form>
methods:{// 异步校验函数返回 PromiseasyncValidator(val) {return new Promise((resolve) => {Toast.loading('验证中...');setTimeout(() => {Toast.clear();resolve(/^\d{1,4}$/.test(val));}, 1000);});},onSubmit(){instance2.post("/api/user/loginin",{username:this.username,password:this.password}).then(res=>{localStorage.setItem("token",res.token)this.$router.push("/center")}).catch(err=>{console.log(err)})}}
后续引入Dialog进行相关的错误信息的展示!
import { Form,Field,Button,Toast,Dialog } from 'vant';
onSubmit(){instance2.post("/api/user/loginin",{username:this.username,password:this.password}).then(res=>{localStorage.setItem("token",res.token)this.$router.push("/center")}).catch(err=>{Dialog.alert({title: '错误!',message: err})})},onFailed(){Dialog.alert({title: '注意了!',message: '用户名或者密码填写错误',theme: 'round-button',}).then(() => {this.username = ""this.password = ""});}
9-4 nowplaying中采用List进行上拉加载数据
import { List,Cell } from 'vant';import Vue from "vue"Vue.use(List).use(Cell)
<van-listv-model="loading":finished="finished"finished-text="没有更多了"@load="onLoad"offset="50"><van-cell v-for="item in dataList" :key="item.filmId" :title="item.name" /></van-list>
data(){return {dataList:[],loading: false, //加载的状态finished: false, //加载结束了,没有更多数据需要设置成truepageNum: 1 //第一页}},methods:{onLoad(){ //初始化的时候执行 | 滚动到底部还有50px时候才会执行 (offset=50)instance.request({url:"/gateway?cityId=310100&pageNum="+this.pageNum+"&pageSize=10&type=1&k=2421852",headers:{'X-Host': 'mall.film-ticket.film.list'}}).then(res=>{//采用数组的concat合并this.dataList = this.dataList.concat(res.data.data.films)//加载需要结束了this.loading = false//数据全部加载完毕if(this.pageNum * 10 >= res.data.data.total){this.finished = true;}//让页码加一this.pageNum++})}}
<van-listv-model="loading":finished="finished"finished-text="没有更多了"@load="onLoad"offset="50"><router-linkv-for="data in dataList":key="data.filmId":to="'/detail/'+data.filmId"tag="div"><FilmItem type="nowplaying" :data="data"/></router-link></van-list>
utils/filters.js
//过滤演员的过滤器Vue.filter("actorsFilter",(actors,options=' ')=>{if(actors){return actors.map(item=>item.name).join(options)}else{return "暂无主演"}})
9-5 实现了Search内容组件复用
views/cinema/Item.vue
<template><li><h4>{{data.name}}</h4><p>{{data.address}}</p></li></template><script>export default {props:["data"]}</script><style lang="scss" scoped>li{padding: .15rem;p{overflow: hidden;text-overflow: ellipsis;white-space: nowrap;width: 80%;}}</style>
Cinema.vue
import Item from "./cinema/Item"
components:{Item},
<!--遍历影院数据--><div class="cinemalist"><ul><!-- <liv-for="data in filterCinemaArea":key="data.cinemaId"><h4>{{data.name}}</h4><p>{{data.address}}</p></li> --><Item v-for="data in filterCinemaArea" :key="data.cinemaId" :data="data"/></ul></div>
Search.vue
import Item from "./cinema/Item"
components:{Item},
<div v-show="searchVal"><ul><!-- <liv-for="data in searchCinemaData":key="data.cinemaId">{{data.name}}</li> --><Item v-for="data in searchCinemaData" :key="data.cinemaId" :data="data"/></ul></div>
十. 选择城市功能
10-1 城市界面布局
创建City页面
需要在router/index.js里面配置路由
{path:"/city",component:() => import('@/views/City'),}
在Cinema.vue中,实现了toPage方法,进行跳转目标地址。
<div class="title"><div class="left" @click="toPage('/city')">上海</div><div class="center">影院</div><div class="right" @click="toPage('/cinema/search')"><i class="iconfont icon-search"></i></div></div>
toPage(path){//通过编程式导航的方式实现路由跳转this.$router.push(path)}
接下来可以借助vant组件库里面提供的IndexBar索引栏这个组件实现城市的布局。
后续dataList需要变成:dataList:[{index:”A”,list:[“鞍山”]}]
<van-index-bar><div v-for="(data,index) in dataList" :key="index"><van-index-anchor :index="data.index" /><van-cell v-for="(item,index) in data.list" :key="index" :title="item" /></div></van-index-bar>
接下来,可以通过异步请求获取数据
created(){this.hide()instance.get("/gateway?k=3752071",{headers:{'X-Host': 'mall.film-ticket.city.list'}}).then(res=>{// console.log(res.data.data.cities)//需要对数据进行处理this.filterDataList(res.data.data.cities)})},
methods:{...mapMutations("tabbar",["show","hide"]),filterDataList(cities){//生成26个大写字母let letterArr = []let cityArr = []for(let i=65;i<=90;i++){letterArr.push(String.fromCharCode(i))}//需要将字母与数据进行匹配for(let i=0;i<letterArr.length;i++){//从26个字母里面遍历匹配,查询cities里面符合要求的城市列表,如果匹配上了,就把匹配好的城市对象放入tempArr返回let tempArr = cities.filter(item=>item.pinyin.substring(0,1).toUpperCase() === letterArr[i])if(tempArr.length >0){cityArr.push({index:letterArr[i],list: tempArr})//push到indexList中this.indexList.push(letterArr[i])}}this.dataList = cityArr}},
<template><van-index-bar :index-list="indexList"><div v-for="(data,index) in dataList" :key="index"><van-index-anchor :index="data.index" /><van-cell v-for="(item,index) in data.list" :key="index" :title="item.name" /></div></van-index-bar></template>
右边自定义索引,需要通过 index-list这个属性才可以。
10-2 城市需要vuex管理
点击城市
<van-cell @click="clickCity(item)" v-for="(item,index) in data.list" :key="index" :title="item.name" />
clickCity(city){// alert(city.name)// 需要设置vuex的对应的状态// 返回上一级页面},
不仅在City这个页面中知道点击了哪个城市,最终返回到Cinema页面的时候,也需要知道点击是哪个城市。所以通过vuex进行城市的管理。
src/store/module/citye.js
const city = {namespaced:true,state:{cityName:"上海" //定义一个共享状态},mutations:{setCityName(state,name){ //用来更改状态的state.cityName = name;}}}export default city;
let store = new Vuex.Store({modules:{cinema,tabbar,city}})
clickCity(city){// alert(city.name)// 需要设置vuex的对应的状态this.setCityName(city.name)// 返回上一级页面this.$router.back()},...mapMutations("tabbar",["show","hide"]),...mapMutations("city",["setCityName"]),
然后返回到CInema页面的时候,需要从vuex中获取cityName这个状态。
computed:{...mapState("cinema",["cinemaList"]),...mapState("city",["cityName"]),
<div class="left" @click="toPage('/city')">{{cityName}}</div>
虽然城市的名字已经改了,但是下面的数据还是之前的上海的数据?为什么?
之前在cinema.js的actions里面,规定了城市的id就是上海的id.
cinema.js里面:
actions:{//需要外部传入不同的城市id,用来请求不同的城市的影院数据了async getCinemaListAction({commit},cityId){let res = await instance(`/gateway?cityId=${cityId}&ticketFlag=1&k=5979448`,{headers:{'X-Host': 'mall.film-ticket.cinema.list'}})commit("setCinemaList",res.data.data.cinemas)}},
Cinema.vue
created(){//先要触发store的action方法if(this.cinemaList.length === 0){this.getCinemaListAction("310100")}}
结果是OK的!但是城市id肯定不能这样传,后续也得需要往vuex中村cityId这个状态。
city.js
const city = {namespaced:true,state:{cityName:"上海",cityId:"310100"},mutations:{setCityName(state,name){state.cityName = name;},setCityId(state,id){state.cityId = id}}}export default city;
Cinema.vue中使用vuex的city状态:
created(){//先要触发store的action方法if(this.cinemaList.length === 0){this.getCinemaListAction(this.cityId)}}
City.vue
clickCity(city){// alert(city.name)// 需要设置vuex的对应的状态this.setCityName(city.name)this.setCityId(city.cityId)// 返回上一级页面this.$router.back()}
改完城市名字与对应的ID了,但是返回到Cinema的时候,发现数据还是之前的上海的数据?
原因是因为在created函数中,进行了cinemaList这个数据长度的判断,因为最开始的时候获取的上海的数据,那么cinemaList就有长度了,所以后续当你进行城市切换的时候,再返回到Cinema.vue页面中,内部又会created,发现里面有上海的数据了,所以就不会去派发请求了。
解决方案就是当你点击城市的时候,需要将vuex的cinemaList这个状态数组变成空,后续选择完毕城市后,回到Cinema页面的时候,进入created,内部判断cinemaList已经是空数组了,就会从vuex中获取点击后的cityId,将其请求action.
...mapMutations("cinema",["setCinemaList"]),toPage(path){if(path === "/city"){ //要切换城市了//需要将vuex中的cinemaList数组进行清空this.setCinemaList([])}//通过编程式导航的方式实现路由跳转this.$router.push(path)}
采用vant组件里面Toast,显示加载中:
import Vue from 'vue';import { Toast } from 'vant';Vue.use(Toast);
created(){//先要触发store的action方法if(this.cinemaList.length === 0){//请求的时候需要显示loadingToast.loading({message: '加载中...',forbidClick: true,loadingType: 'spinner',duration:0});this.getCinemaListAction(this.cityId).then(res=>{//数据请求回来了之后,进行toast关闭Toast.clear()})}}
Nowplaying:
created(){instance.get(`/gateway?type=2&cityId=${this.cityId}&k=3273444`,{headers:{'X-Host': 'mall.cfg.common-banner'}}).then(res=>{if(res.data.data) this.banners = [...res.data.data,{bannerId:"001",imgUrl:""}]this.$nextTick(()=>{new Swiper(".film-banner",{loop:true,pagination:{el:".swiper-pagination"}})})})}
<SwiperCom cName="film-banner" v-if="banners.length>0"><divclass="swiper-slide"v-for="banner in banners":key="banner.bannerId"><img :src="banner.imgUrl"/></div></SwiperCom>
Detail.vue
<h4 @click="isShow=true">剧照</h4><SwiperCom cName="photos"><divv-for="(data,index) in filmInfo.photos":key="data"class="swiper-slide"@click="clickImg(filmInfo.photos,index)"><div><img class="photo-img" :src="data" alt=""></div></div></SwiperCom>
clickImg(images,index){ImagePreview({images,startPosition: index,closeable: true,closeIconPosition:"top-left",closeIcon :"https://ss1.bdstatic.com/70cFuXSh_Q1YnxGkpoWK1HF6hhy/it/u=132113556,1364405903&fm=26&gp=0.jpg"})},
10-3 vuex的持久化
vuex的数据是存在内存中的,浏览器一旦刷新的话,数据就会消失了,还是以最初的初始值为准。
vuex与localstorage进行同步。
我们可以采用 vuex-persistedstate
yarn add vuex-persistedstate@3.0.0
store/index.js
import Vue from "vue"import Vuex from "vuex"import cinema from "./module/cinema"import tabbar from "./module/tabbar"import city from "./module/city"import createPersistedState from "vuex-persistedstate";Vue.use(Vuex)//创建sore仓库let store = new Vuex.Store({modules:{cinema,tabbar,city},plugins: [createPersistedState({reducer:data=>{return {city:data.city}}})]})export default store;
vuex vs localStorage 区别!
1.区别:vuex存储在内存,localstorage(本地存储)则以文件的方式存储在本地,永久保存;sessionstorage( 会话存储 ) ,临时保存。localStorage和sessionStorage只能存储字符串类型,对于复杂的对象可以使用ECMAScript提供的JSON对象的stringify和parse来处理
2.应用场景:vuex用于组件之间的传值,localstorage,sessionstorage则主要用于不同页面之间的传值。
3.永久性:当刷新页面(这里的刷新页面指的是 —> F5刷新,属于清除内存了)时vuex存储的值会丢失,sessionstorage_页面关闭后就清除掉了,_localstorage不会。

若有收获,就点个赞吧
0 人点赞
