一. 课题:2022年大厂必备docker与微服务实战
目录:
- docker的理念与最新版的安装及维护
- docker与centos9-stream结合
- 实战: MySQL主从复制docker实现版
- 实战:docker轻量级可视化工具Portainer
- 实战: docker容器监控:CAdvisor+InfluxDB+Granfana
正文:
docker的理念与安装
1. 安装docker
# wget https://mirrors.aliyun.com/docker-ce/linux/centos/docker-ce.repo -O /etc/yum.repos.d/docker-ce.repo
2. 查看docker的 版本
yum list docker-ce —showduplicates | sort -r
3. 开始安装
二. 实战: docker实现 MySQL主从复制
下载MySQL镜像
[root@k8s-master ~]# docker pull mysql:5.75.7: Pulling from library/mysql72a69066d2fe: Pull complete93619dbc5b36: Pull complete99da31dd6142: Pull complete626033c43d70: Pull complete37d5d7efb64e: Pull completeac563158d721: Pull completed2ba16033dad: Pull complete0ceb82207cd7: Pull complete37f2405cae96: Pull completee2482e017e53: Pull complete70deed891d42: Pull completeDigest: sha256:f2ad209efe9c67104167fc609cca6973c8422939491c9345270175a300419f94Status: Downloaded newer image for mysql:5.7docker.io/library/mysql:5.7
创建MySQL-master并创建配置文件
[root@k8s-master ~]# docker run -p 3307:3306 --name mysql-master \-v /mydata/mysql-master/log:/var/log/mysql \-v /mydata/mysql-master/data:/var/lib/mysql \-v /mydata/mysql-master/conf:/etc/mysql \-e MYSQL_ROOT_PASSWORD=root \-d mysql:5.7cc88521bb0baea9f75c86fefb41dfa44cb3c4398f7e11885c9b9d873be6b93f9[root@k8s-master ~]# cd /mydata/mysql-master/conf/[root@k8s-master conf]# vim my.cnf[root@k8s-master conf]# grep -v ^# my.cnf[mysqld]server_id=101binlog-ignore-db=mysqllog-bin=mall-mysql-binbinlog_cache_size=1Mbinlog_format=mixedexpire_logs_days=7slave_skip_errors=1062
关于配置文件的注释:
[root@k8s-master conf]# cat my.cnf[mysqld]## 设置server_id,同一局域网中需要唯一server_id=101## 指定不需要同步的数据库名称binlog-ignore-db=mysql## 开启二进制日志功能log-bin=mall-mysql-bin## 设置二进制日志使用内存大小(事务)binlog_cache_size=1M## 设置使用的二进制日志格式(mixed,statement,row)binlog_format=mixed## 二进制日志过期清理时间。默认值为0,表示不自动清理。expire_logs_days=7## 跳过主从复制中遇到的所有错误或指定类型的错误,避免slave端复制中断。## 如:1062错误是指一些主键重复,1032错误是因为主从数据库数据不一致slave_skip_errors=1062
重启master
[root@k8s-master conf]# docker restart mysql-mastermysql-master[root@k8s-master conf]# docker psCONTAINER ID IMAGE COMMAND CREATED STATUS PORTS NAMEScc88521bb0ba mysql:5.7 "docker-entrypoint.s…" 4 minutes ago Up 3 seconds 33060/tcp, 0.0.0.0:3307->3306/tcp, :::3307->3306/tcp mysql-master[root@k8s-master conf]#
进入master创建数据和数据同步用户
[root@k8s-master conf]# docker exec -it mysql-master /bin/bashroot@cc88521bb0ba:/# mysql -prootmysql: [Warning] Using a password on the command line interface can be insecure.Welcome to the MySQL monitor. Commands end with ; or \g.Your MySQL connection id is 2Server version: 5.7.36-log MySQL Community Server (GPL)Copyright (c) 2000, 2021, Oracle and/or its affiliates.Oracle is a registered trademark of Oracle Corporation and/or itsaffiliates. Other names may be trademarks of their respectiveowners.Type 'help;' or '\h' for help. Type '\c' to clear the current input statement.mysql> CREATE USER 'slave'@'%' IDENTIFIED BY '123456';Query OK, 0 rows affected (0.01 sec)mysql> GRANT REPLICATION SLAVE, REPLICATION CLIENT ON *.* TO 'slave'@'%';Query OK, 0 rows affected (0.00 sec)mysql> exitBye
新建从服务器
a/mysql-slave/log:/var/log/mysql \> -v /mydata/mysql-slave/data:/var/lib/mysql \> -v /mydata/mysql-slave/conf:/etc/mysql \> -e MYSQL_ROOT_PASSWORD=root \> -d mysql:5.715514af9443fce00c9c6f3cc182ad210440a0052e54123a9516503d23a6bc7bb[root@k8s-master conf]# cd /mydata/mysql-slave/conf/[root@k8s-master conf]# vim my.cnf[root@k8s-master conf]# grep -v ^# my.cnf[mysqld]server_id=102binlog-ignore-db=mysqllog-bin=mall-mysql-slave1-binbinlog_cache_size=1Mbinlog_format=mixedexpire_logs_days=7slave_skip_errors=1062relay_log=mall-mysql-relay-binlog_slave_updates=1read_only=1
配置文件解析:
[mysqld]## 设置server_id,同一局域网中需要唯一server_id=102## 指定不需要同步的数据库名称binlog-ignore-db=mysql## 开启二进制日志功能,以备Slave作为其它数据库实例的Master时使用log-bin=mall-mysql-slave1-bin## 设置二进制日志使用内存大小(事务)binlog_cache_size=1M## 设置使用的二进制日志格式(mixed,statement,row)binlog_format=mixed## 二进制日志过期清理时间。默认值为0,表示不自动清理。expire_logs_days=7## 跳过主从复制中遇到的所有错误或指定类型的错误,避免slave端复制中断。## 如:1062错误是指一些主键重复,1032错误是因为主从数据库数据不一致slave_skip_errors=1062## relay_log配置中继日志relay_log=mall-mysql-relay-bin## log_slave_updates表示slave将复制事件写进自己的二进制日志log_slave_updates=1## slave设置为只读(具有super权限的用户除外)read_only=1
重启从服务器
[root@k8s-master conf]# docker restart mysql-slavemysql-slave
在主服务器查看同步状态
[root@k8s-master conf]# docker exec -it mysql-master bashroot@cc88521bb0ba:/# mysql -prootmysql: [Warning] Using a password on the command line interface can be insecure.Welcome to the MySQL monitor. Commands end with ; or \g.Your MySQL connection id is 3Server version: 5.7.36-log MySQL Community Server (GPL)Copyright (c) 2000, 2021, Oracle and/or its affiliates.Oracle is a registered trademark of Oracle Corporation and/or itsaffiliates. Other names may be trademarks of their respectiveowners.Type 'help;' or '\h' for help. Type '\c' to clear the current input statement.mysql> show master status;+-----------------------+----------+--------------+------------------+-------------------+| File | Position | Binlog_Do_DB | Binlog_Ignore_DB | Executed_Gtid_Set |+-----------------------+----------+--------------+------------------+-------------------+| mall-mysql-bin.000001 | 617 | | mysql | |+-----------------------+----------+--------------+------------------+-------------------+1 row in set (0.00 sec)
进入从服务器配置主从同步
[root@k8s-master conf]# docker exec -it mysql-slave /bin/bashroot@15514af9443f:/# mysql -prootmysql: [Warning] Using a password on the command line interface can be insecure.Welcome to the MySQL monitor. Commands end with ; or \g.Your MySQL connection id is 2Server version: 5.7.36-log MySQL Community Server (GPL)Copyright (c) 2000, 2021, Oracle and/or its affiliates.Oracle is a registered trademark of Oracle Corporation and/or itsaffiliates. Other names may be trademarks of their respectiveowners.Type 'help;' or '\h' for help. Type '\c' to clear the current input statement.mysql> change master to master_host='192.168.3.71', master_user='slave', master_password='123456', master_port=3307, master_log_file='mall-mysql-bin.000001', master_log_pos=617, master_connect_retry=30;Query OK, 0 rows affected, 2 warnings (0.01 sec)mysql>
查看主从状态
mysql> show slave status \G;*************************** 1. row ***************************Slave_IO_State:Master_Host: 192.168.3.71Master_User: slaveMaster_Port: 3307Connect_Retry: 30Master_Log_File: mall-mysql-bin.000001Read_Master_Log_Pos: 617Relay_Log_File: mall-mysql-relay-bin.000001Relay_Log_Pos: 4Relay_Master_Log_File: mall-mysql-bin.000001Slave_IO_Running: NoSlave_SQL_Running: No
可以看到现在还没开始,需要开启主从同步。
mysql> start slave;Query OK, 0 rows affected (0.02 sec)mysql> show slave status \G;*************************** 1. row ***************************Slave_IO_State: Waiting for master to send eventMaster_Host: 192.168.3.71Master_User: slaveMaster_Port: 3307Connect_Retry: 30Master_Log_File: mall-mysql-bin.000001Read_Master_Log_Pos: 617Relay_Log_File: mall-mysql-relay-bin.000002Relay_Log_Pos: 325Relay_Master_Log_File: mall-mysql-bin.000001Slave_IO_Running: YesSlave_SQL_Running: Yes
可以看到 主从同步已经开始,然后我们来测试下
插入数据测试
主服务上创建数据
mysql> create database db02;Query OK, 1 row affected (0.00 sec)mysql> use db02Database changedmysql> create table zmedu(id int,name varchar(28));Query OK, 0 rows affected (0.05 sec)mysql> insert into zmedu values(1,'zhang');Query OK, 1 row affected (0.02 sec)mysql> select * from zmedu;+------+-------+| id | name |+------+-------+| 1 | zhang |+------+-------+1 row in set (0.00 sec)mysql>
从服务器查询数据
mysql> show databases;+--------------------+| Database |+--------------------+| information_schema || db02 || mysql || performance_schema || sys |+--------------------+5 rows in set (0.00 sec)mysql> use db02Reading table information for completion of table and column namesYou can turn off this feature to get a quicker startup with -ADatabase changedmysql> select * from zmedu;+------+-------+| id | name |+------+-------+| 1 | zhang |+------+-------+1 row in set (0.00 sec)mysql>
到现在为止,主从已经同步了。
三. 实战:docker轻量级可视化工具Portainer
Portainer 是一款轻量级的应用,它提供了图形化界面,用于方便地管理Docker环境,包括单机环境和集群环境。
‘pɔ:teinə
docker启动portainer容器
[root@k8s-master ~]# docker run -d -p 8000:8000 -p 9000:9000 --name portainer --restart=always -v /var/run/docker.sock:/var/run/docker.sock -v portainer_data:/data portainer/portainerUnable to find image 'portainer/portainer:latest' locallylatest: Pulling from portainer/portainer94cfa856b2b1: Pull complete49d59ee0881a: Pull completea2300fd28637: Pull completeDigest: sha256:fb45b43738646048a0a0cc74fcee2865b69efde857e710126084ee5de9be0f3fStatus: Downloaded newer image for portainer/portainer:latest18032a097618298fc4f3140a72cfb282537448fdb1125aa2de52e7899eb107eb
查看已经启动的容器
[root@k8s-master ~]# docker psCONTAINER ID IMAGE COMMAND CREATED STATUS PORTS NAMES18032a097618 portainer/portainer "/portainer" 52 seconds ago Up 49 seconds 0.0.0.0:8000->8000/tcp, :::8000->8000/tcp, 0.0.0.0:9000->9000/tcp, :::9000->9000/tcp portainer5a735193e74a redis:6.0.8 "docker-entrypoint.s…" 21 minutes ago Up 21 minutes
通过网页端登陆
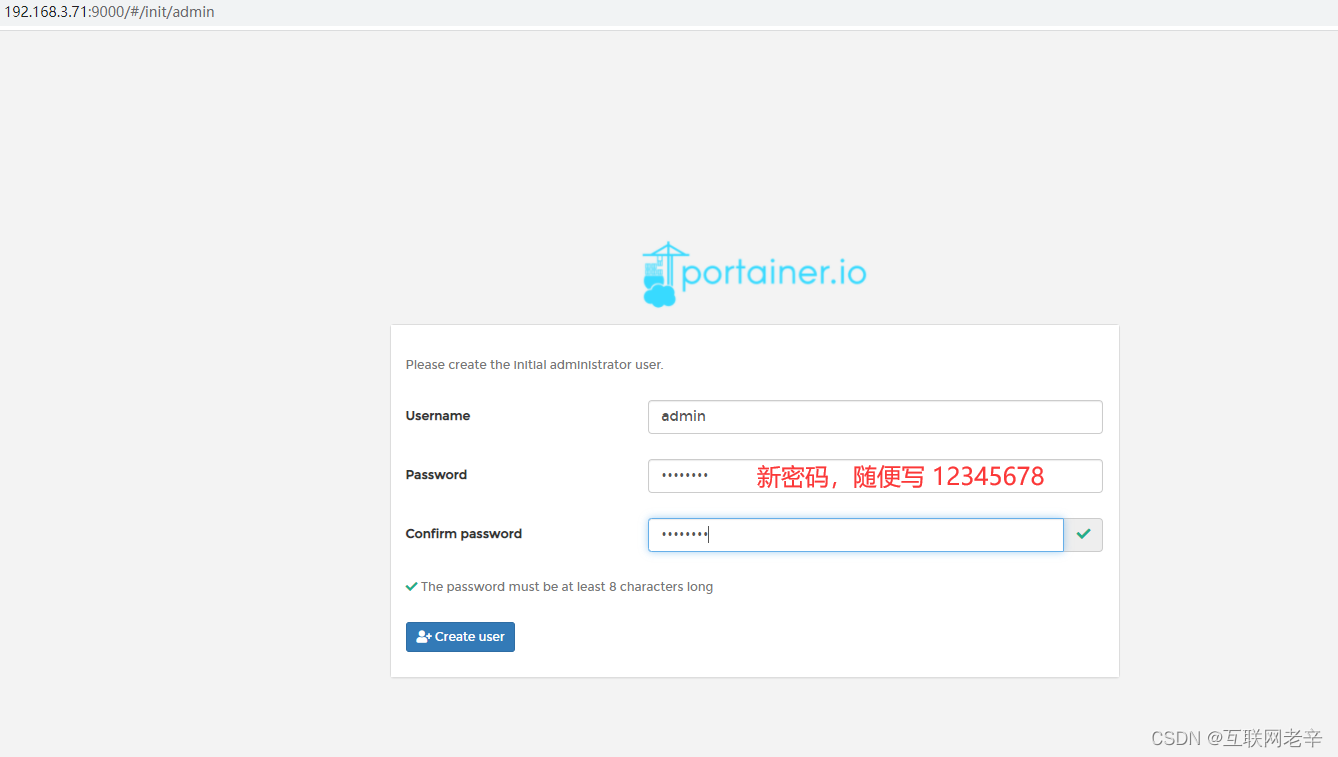
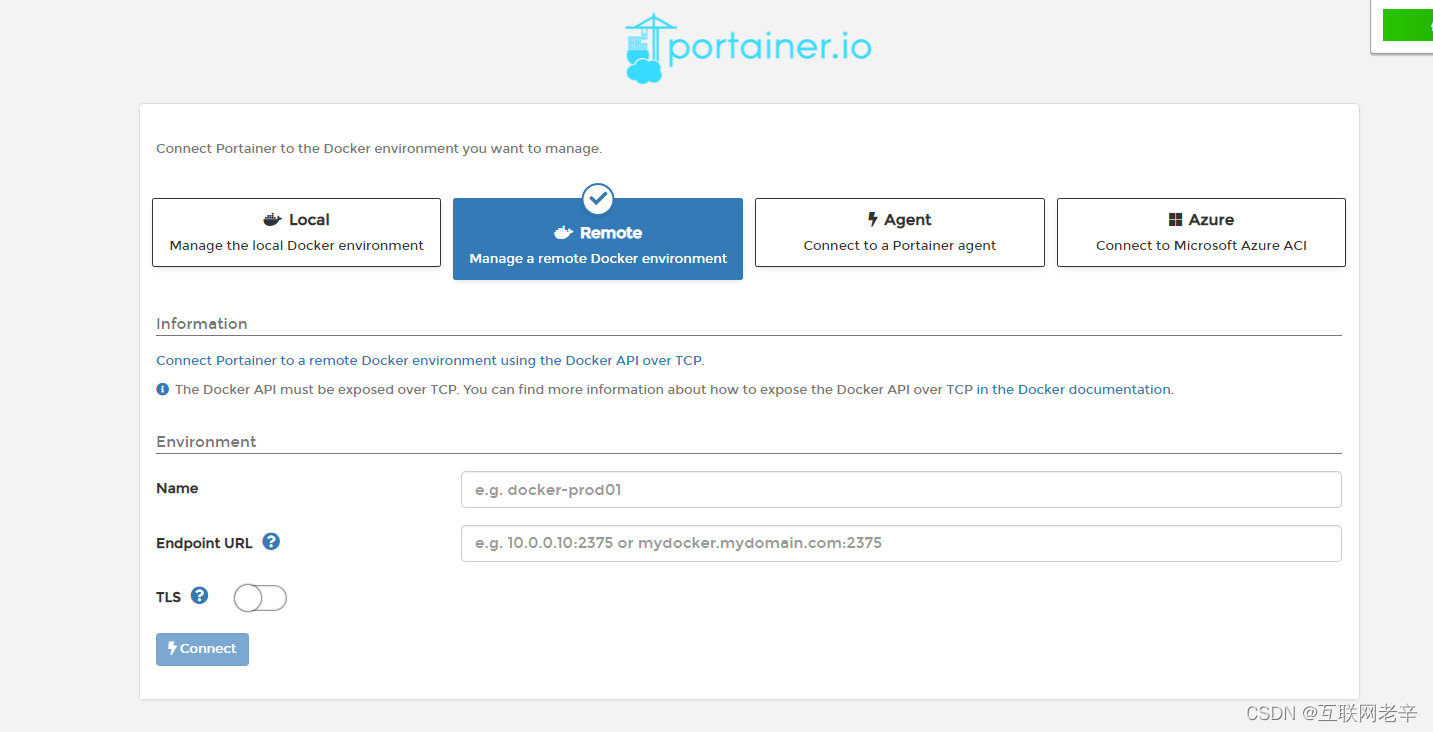
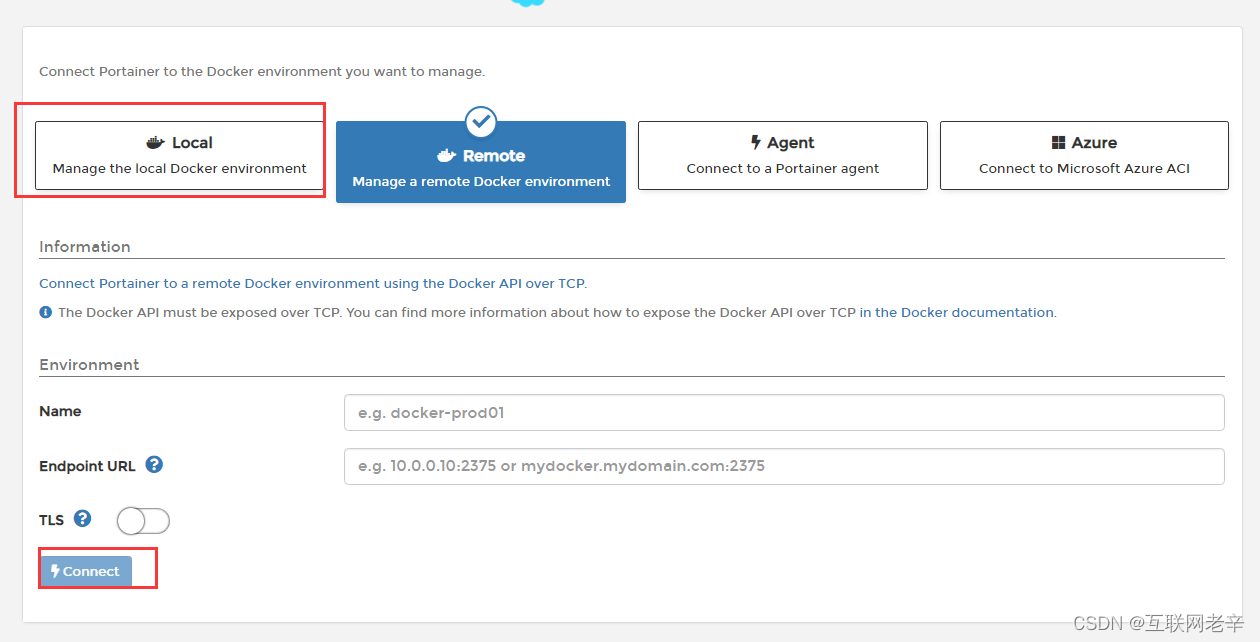
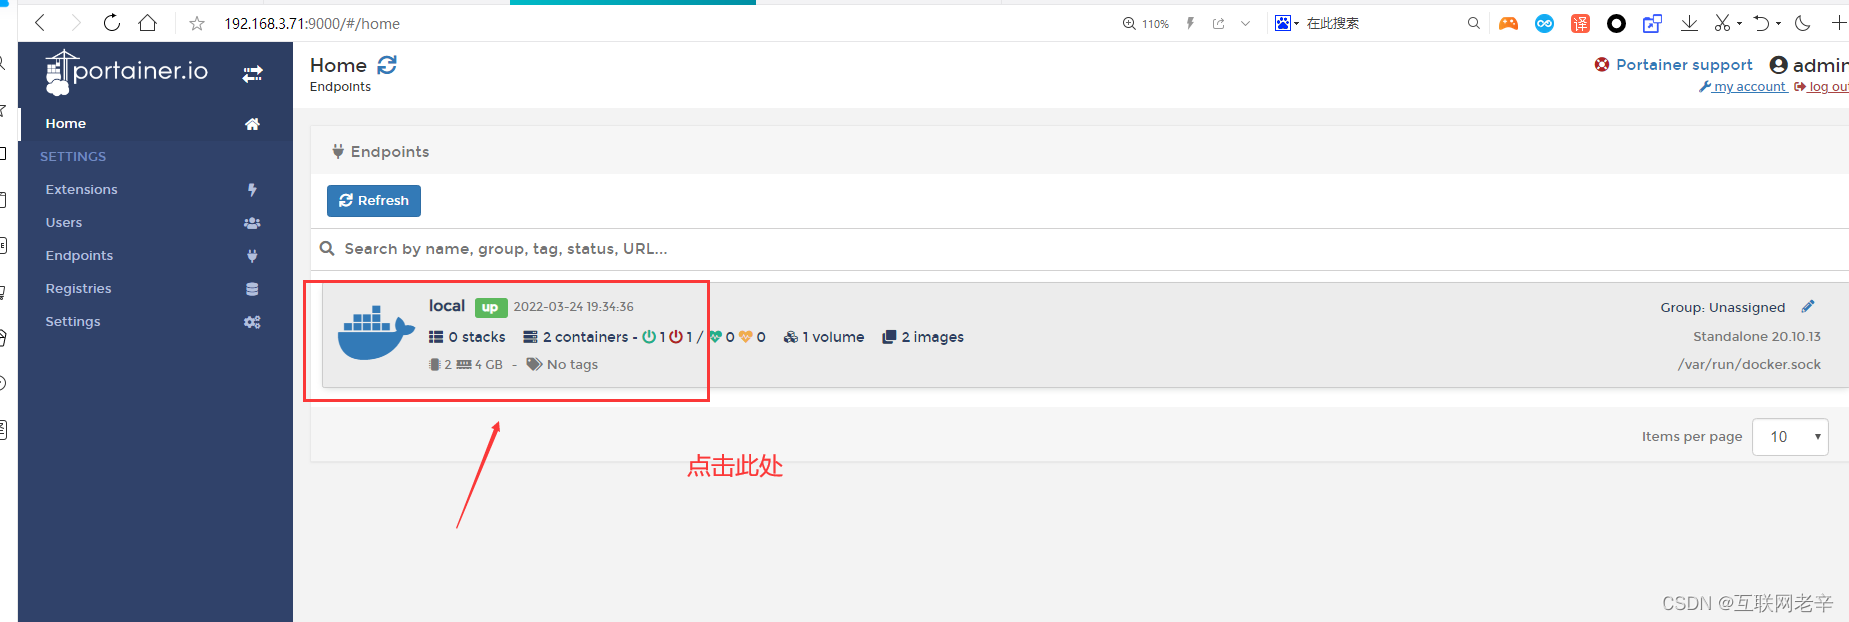
到现在为止我们可以看到dashboard里面的监控项了
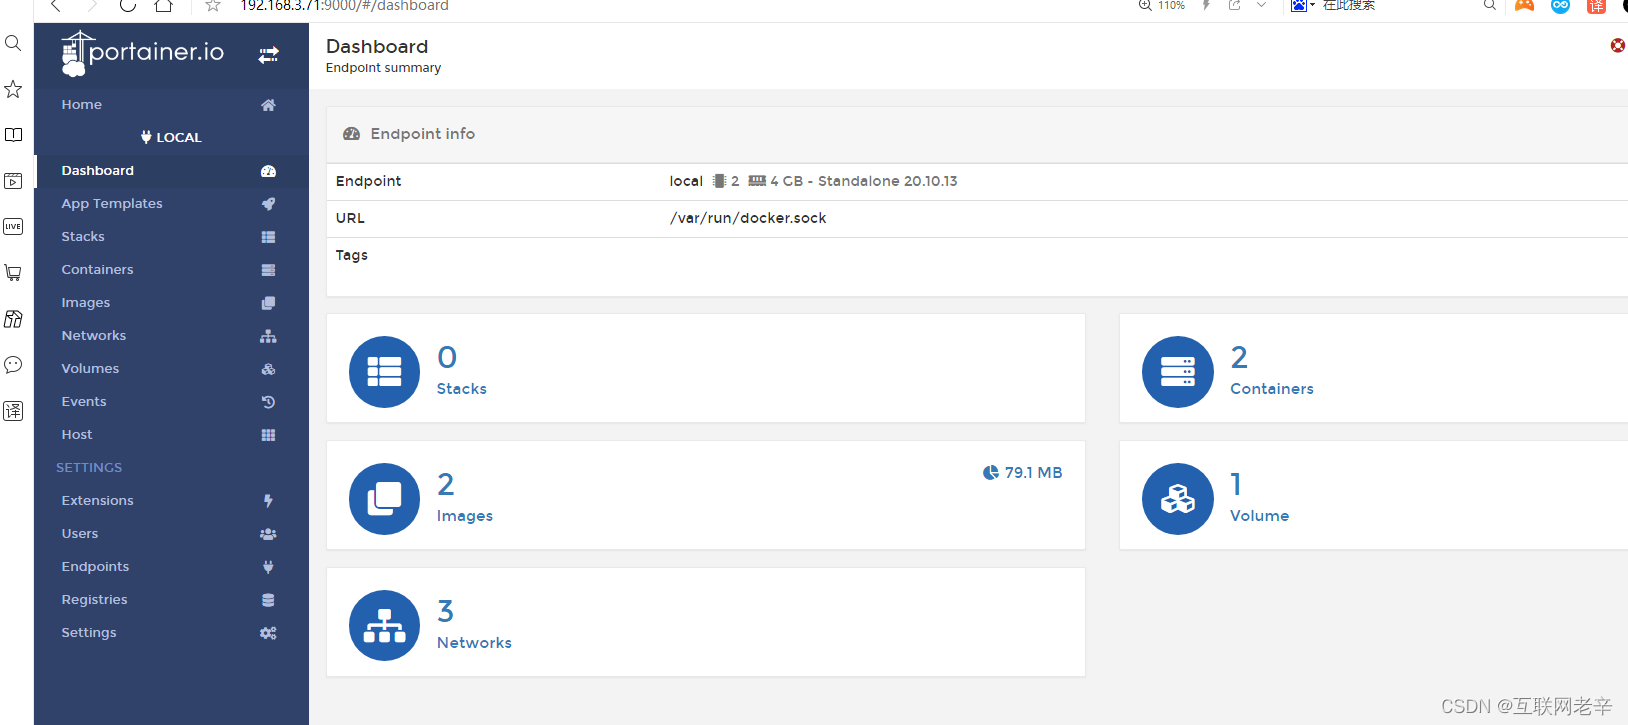
这里的监控项,与系统中用命令查到的一致
[root@k8s-master ~]# docker system dfTYPE TOTAL ACTIVE SIZE RECLAIMABLEImages 2 2 79.1MB 0B (0%)Containers 2 1 0B 0BLocal Volumes 1 1 131.9kB 0B (0%)Build Cache 0 0 0B 0B
可以在后台进行相应的管理
启动容器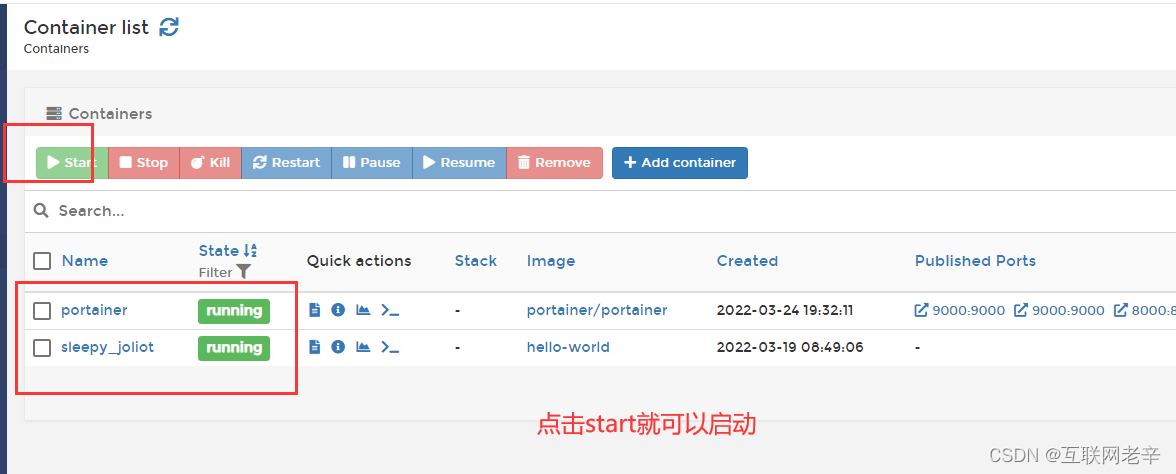
总结
使用这个工具,再也不需要命令行了,直接在网站上点点点就可以了。

