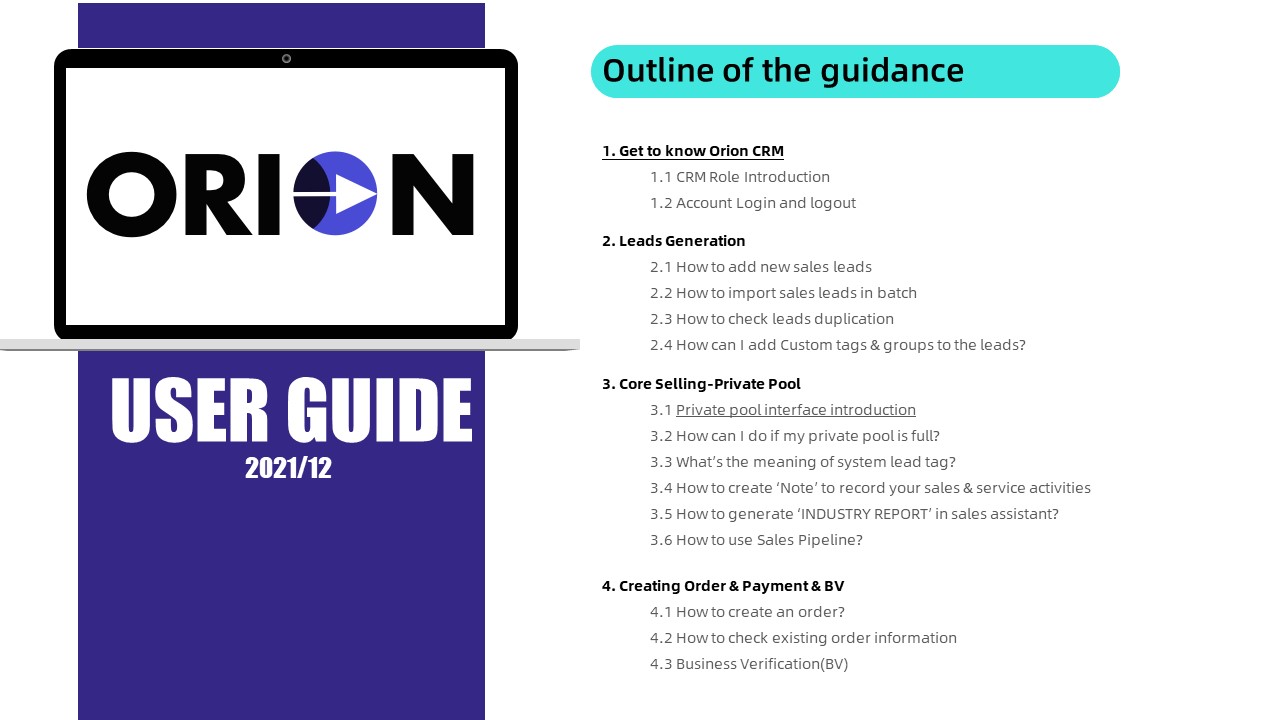
- Introduction
- 1. Get to Know Orion CRM
- 2. Leads Generation
- 3. Core Selling-Private Pool
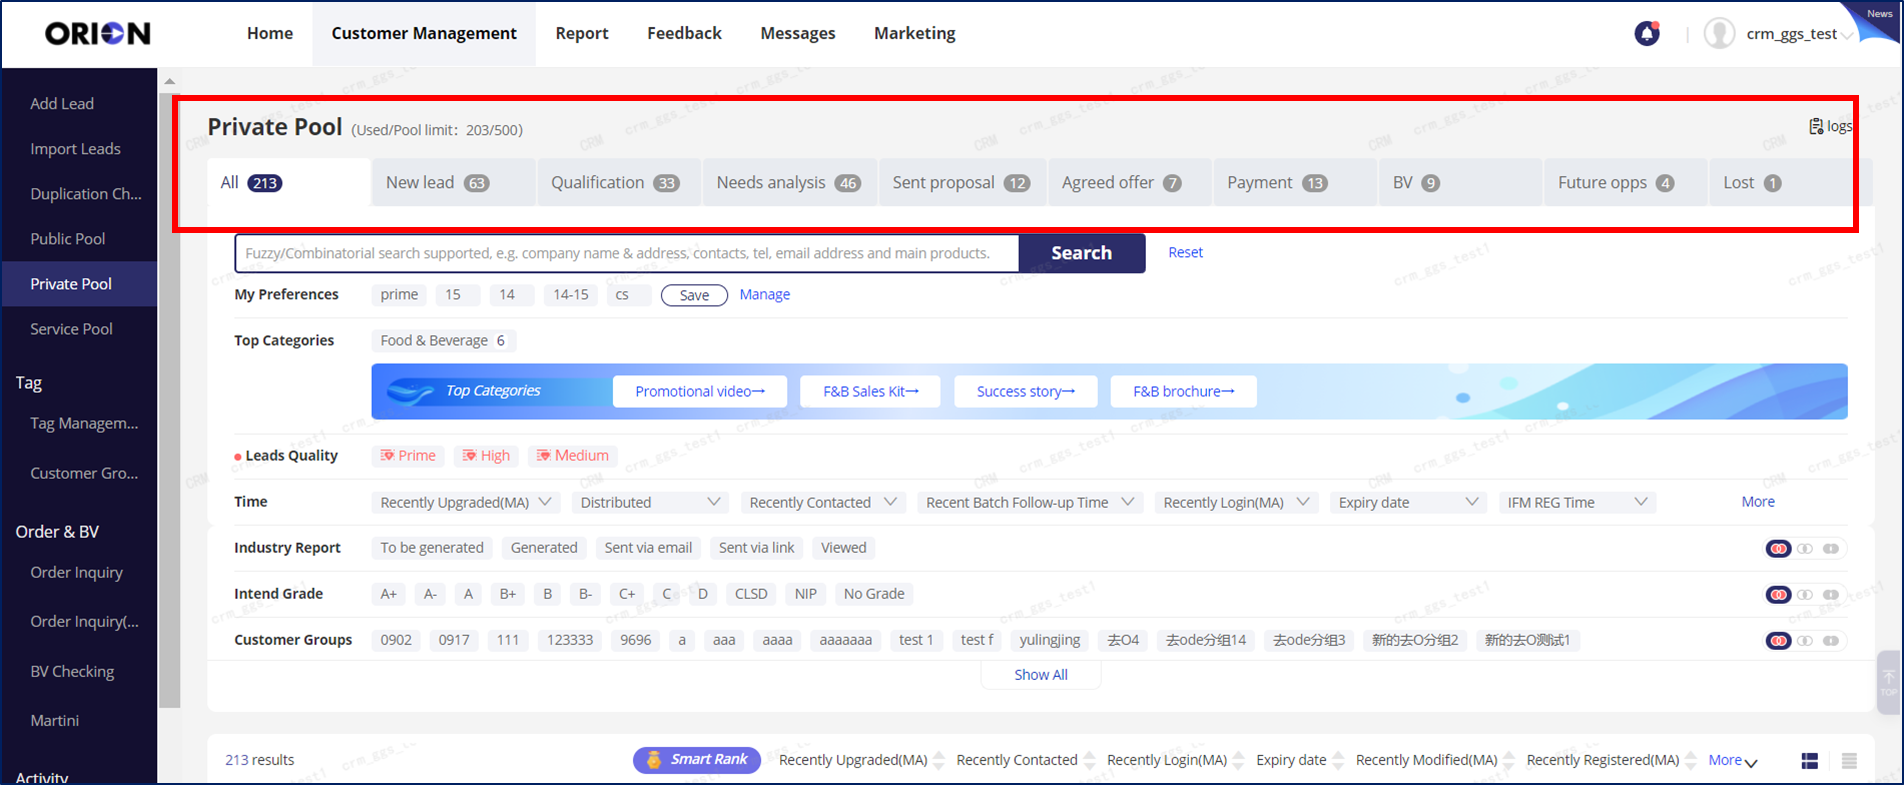
- 3.1 Private pool interface introduction
- 3.2 How can I do if my private pool is full?
- 3.3 What’s the meaning of system lead tag?
- 3.4 How to create ‘Note’ to record your sales & service activities
- 3.5 How to use Sales Assistant 2.0 Version?
- Feature Updates
- Sales Assistant 2.0 Demo
- How to utilize Sales Assistant 2.0 Version
- 3.5.1 After needs analysis of the opportunities, normally sales will have an overview of the opportunities and get to send some proper sales materials to attract the cutstomers’ attention
- 3.5.2 Start customizing the content to your potential customers
- 3.5.3 Generate/Save/Share/Send the materials
- 3.5.4 Share the materials to social media
- 3.5.4 Check the data
- Appendix:Report page introduction
- 3.6 How to use Sales Pipeline?
- 4. Creating Order & Payment & BV
- 5. Managing in-service customers
- 6. Email
Introduction
1. Get to Know Orion CRM

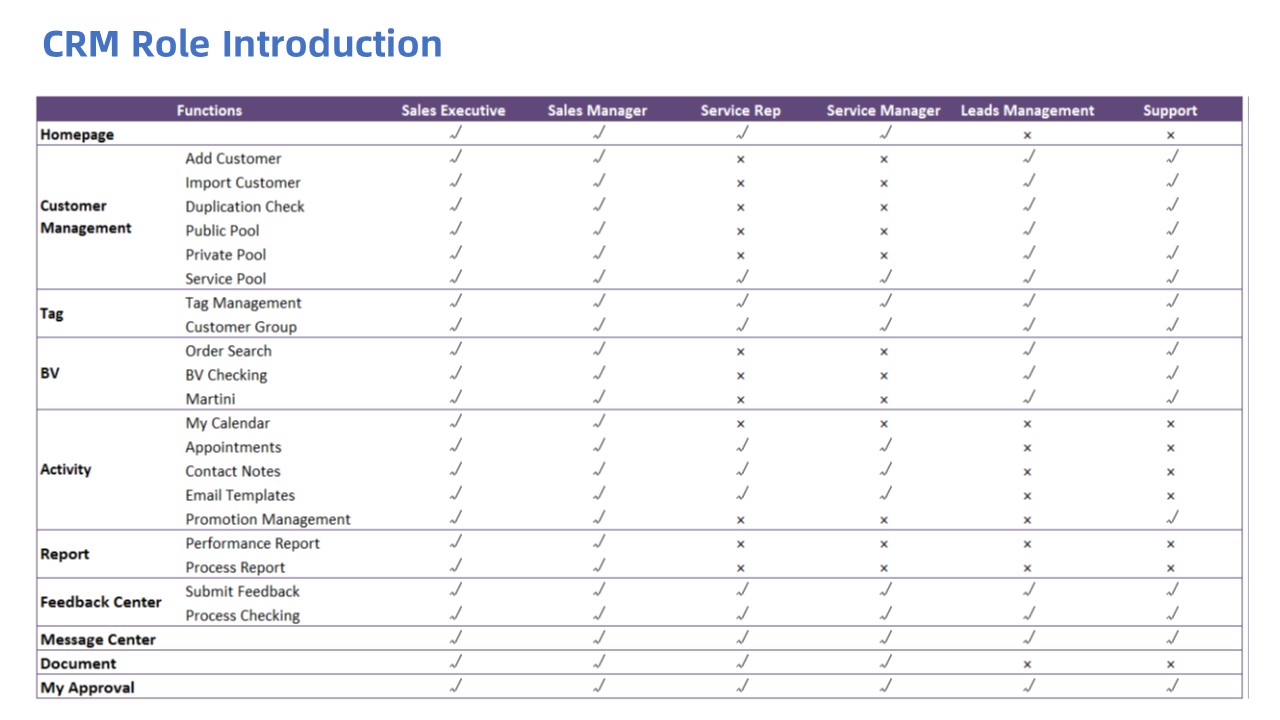
1.1 CRM Role Introduction
1.2 Account Login and logout
- 1.Visit CRM system: https://crm.alibaba-inc.com/crmagent/romeo/private-sea.html
- 2.Input your CRM account and Password, and then click “Login”.
- 3.Login successfully, and then you’ll see the homepage of the CRM.

2. Leads Generation

2.1 How to add new sales leads
There are 3 ways to add sales leads:
*No matter which way you are using to add leads, please confirm you have enough leads storage space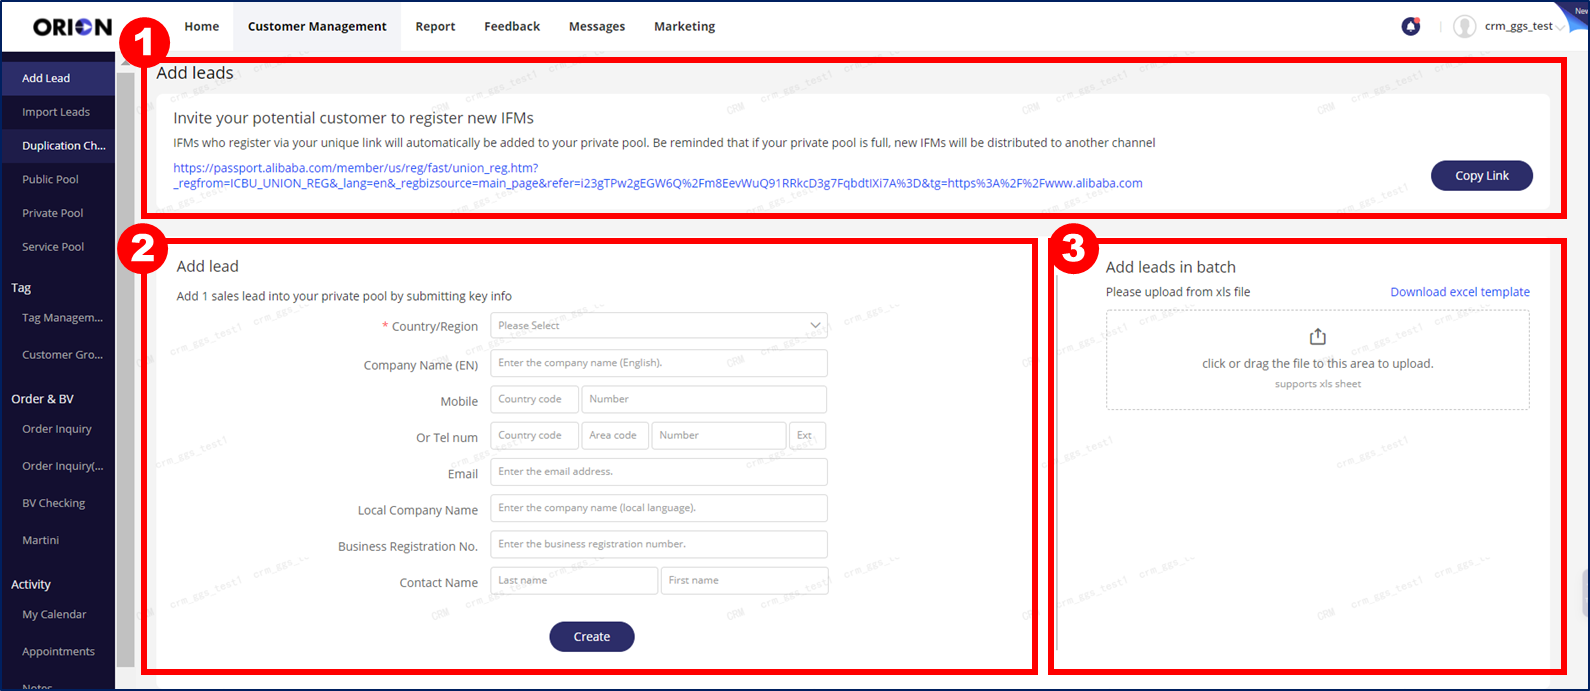
- To add leads by register invitation link
Invite your potential customer to register new IFMs.IFMs who register via your unique link will automatically be added to your private pool. Be reminded that if your private pool is full, new IFMs will be distributed to another channel
Detail steps: https://www.yuque.com/fy22/yhtep2/ocgag0
- To add 1 sales lead by submitting key info
Customer will flow into your private pool
Key info include:
- Country/Region
- Company Name (EN)
- Phone Number(Mobile or Tel)
- Email Address
- To add sales leads by batch
Click to download templete, fill the template and confirm to upload.
- If you use this way with sales manager role, all added leads will flow into the public pool of the organization you using
- If you use this way with sales executive role, all added leads will flow into your private pool
2.2 How to check leads duplication
1.Before adding sales leads into ORION CRM, please check the duplicates first.
2.Enter one of the following field to check the duplicate. (‘Email’/‘Company name’/‘Member ID’/‘Phone’/‘BR No.’)
3.If the Sales Leads already exists, ORION CRM will prohibit it from adding.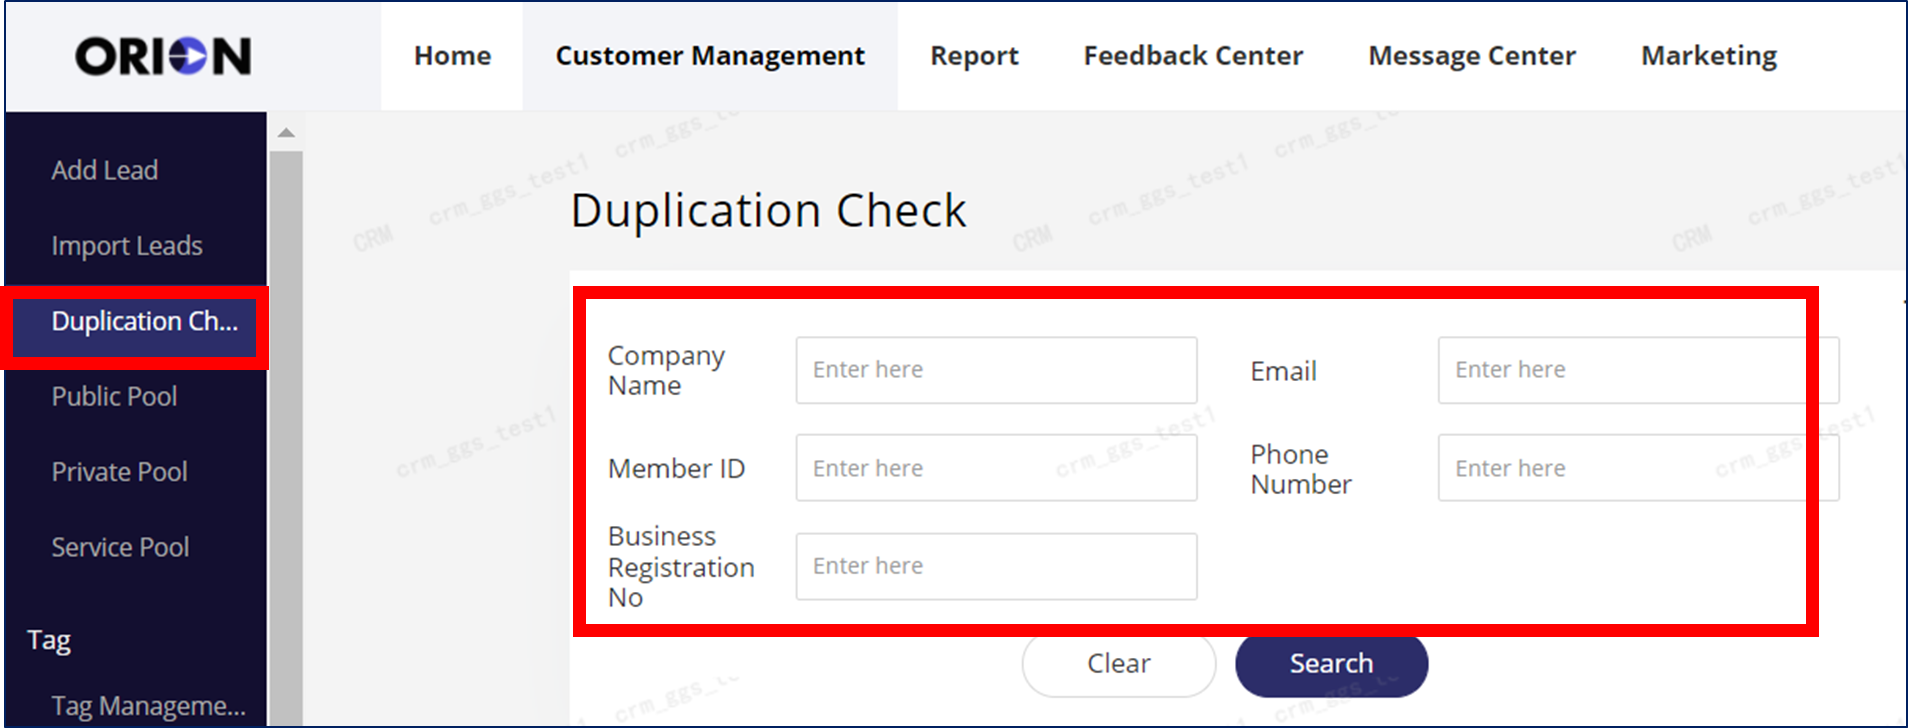
2.3 How can I add Custom tags & groups to the leads?
1.Select the customers and then click on ‘Modify Tags’ or ‘Bulk tagging’
2.Click on ‘New Label’ if no available tags are showing there
3.Create labels by filling in the blanks
4.Back to previous page and choose the added tag, then click ‘Confirm’ to submit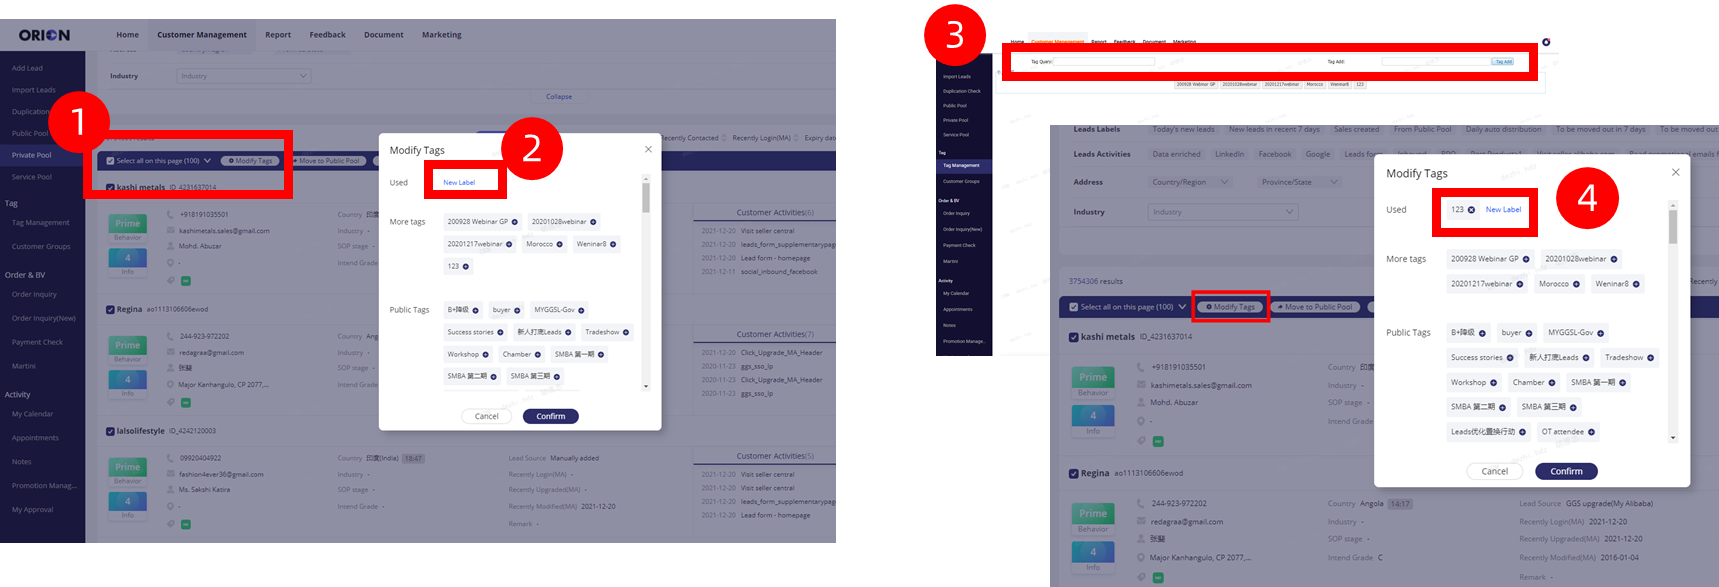
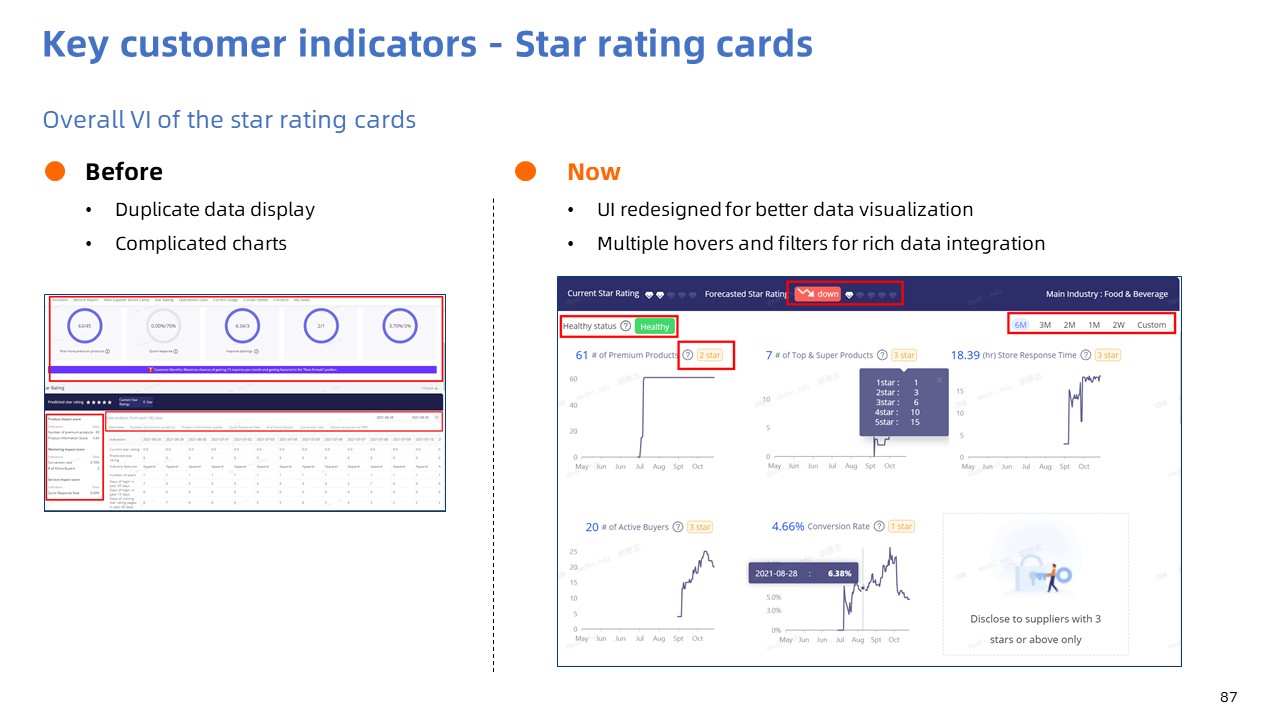
3. Core Selling-Private Pool
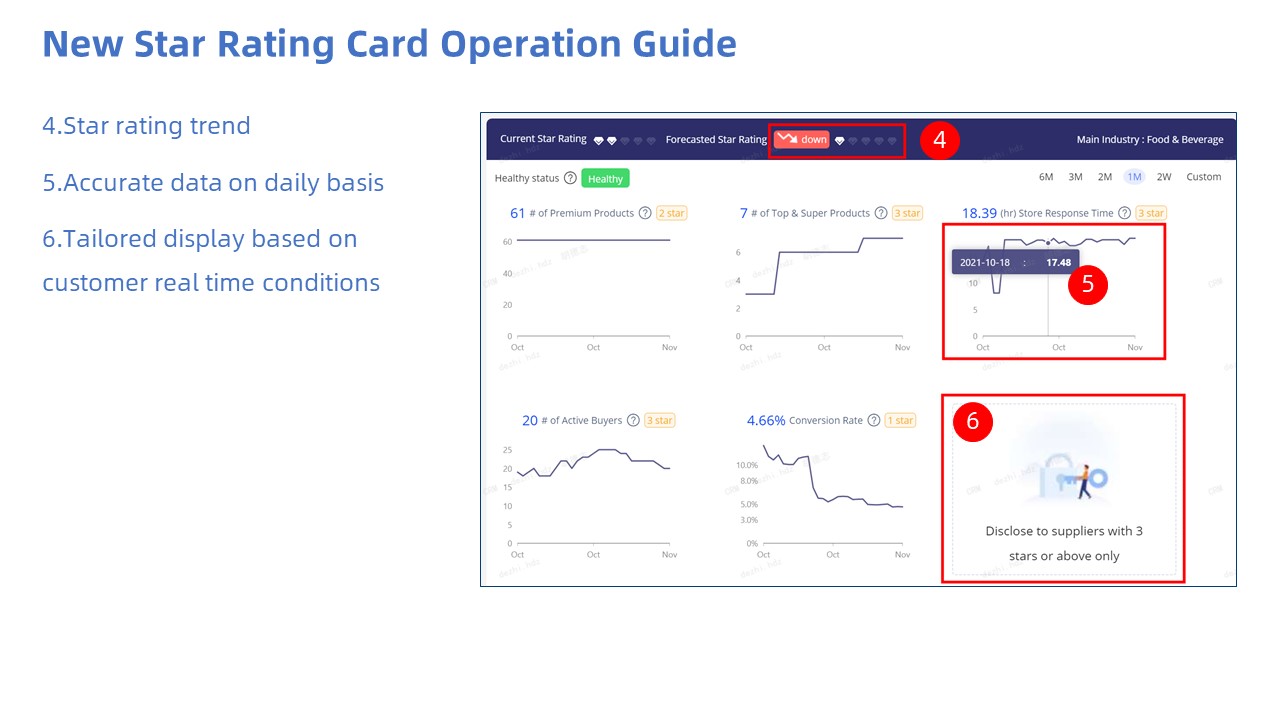
3.1 Private pool interface introduction
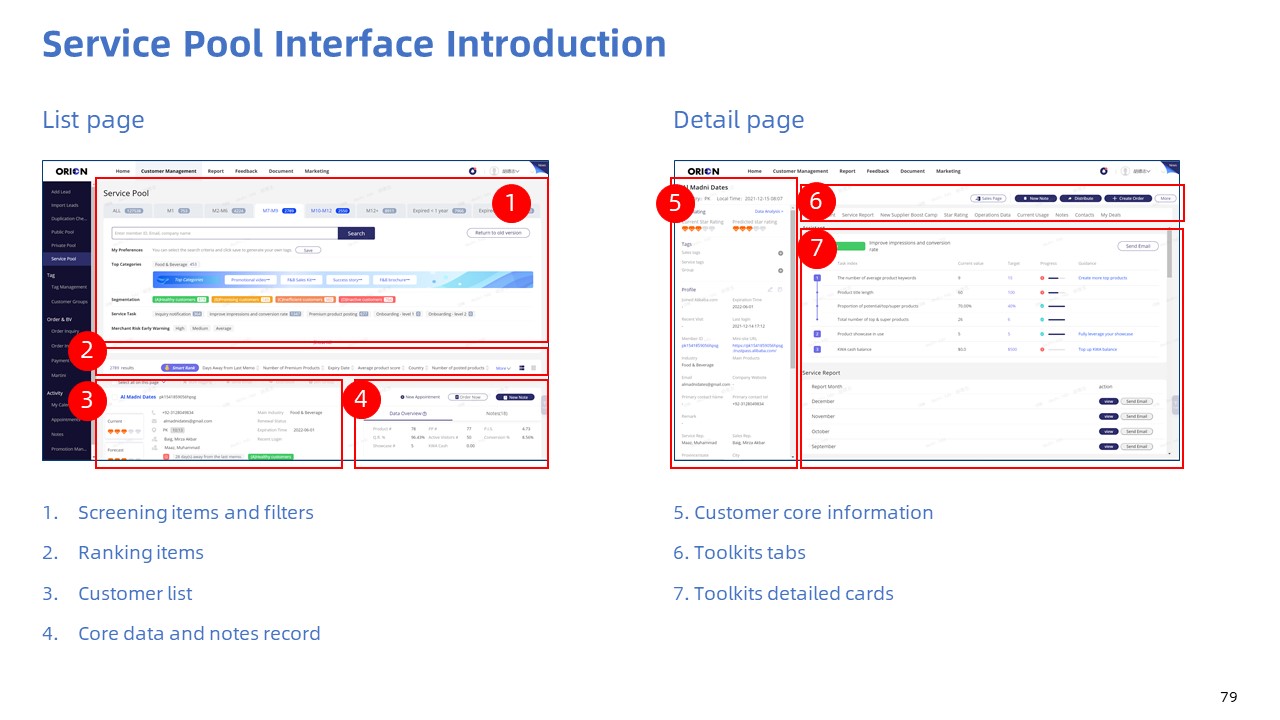
3.1.1 How Private Pool listing page looks like?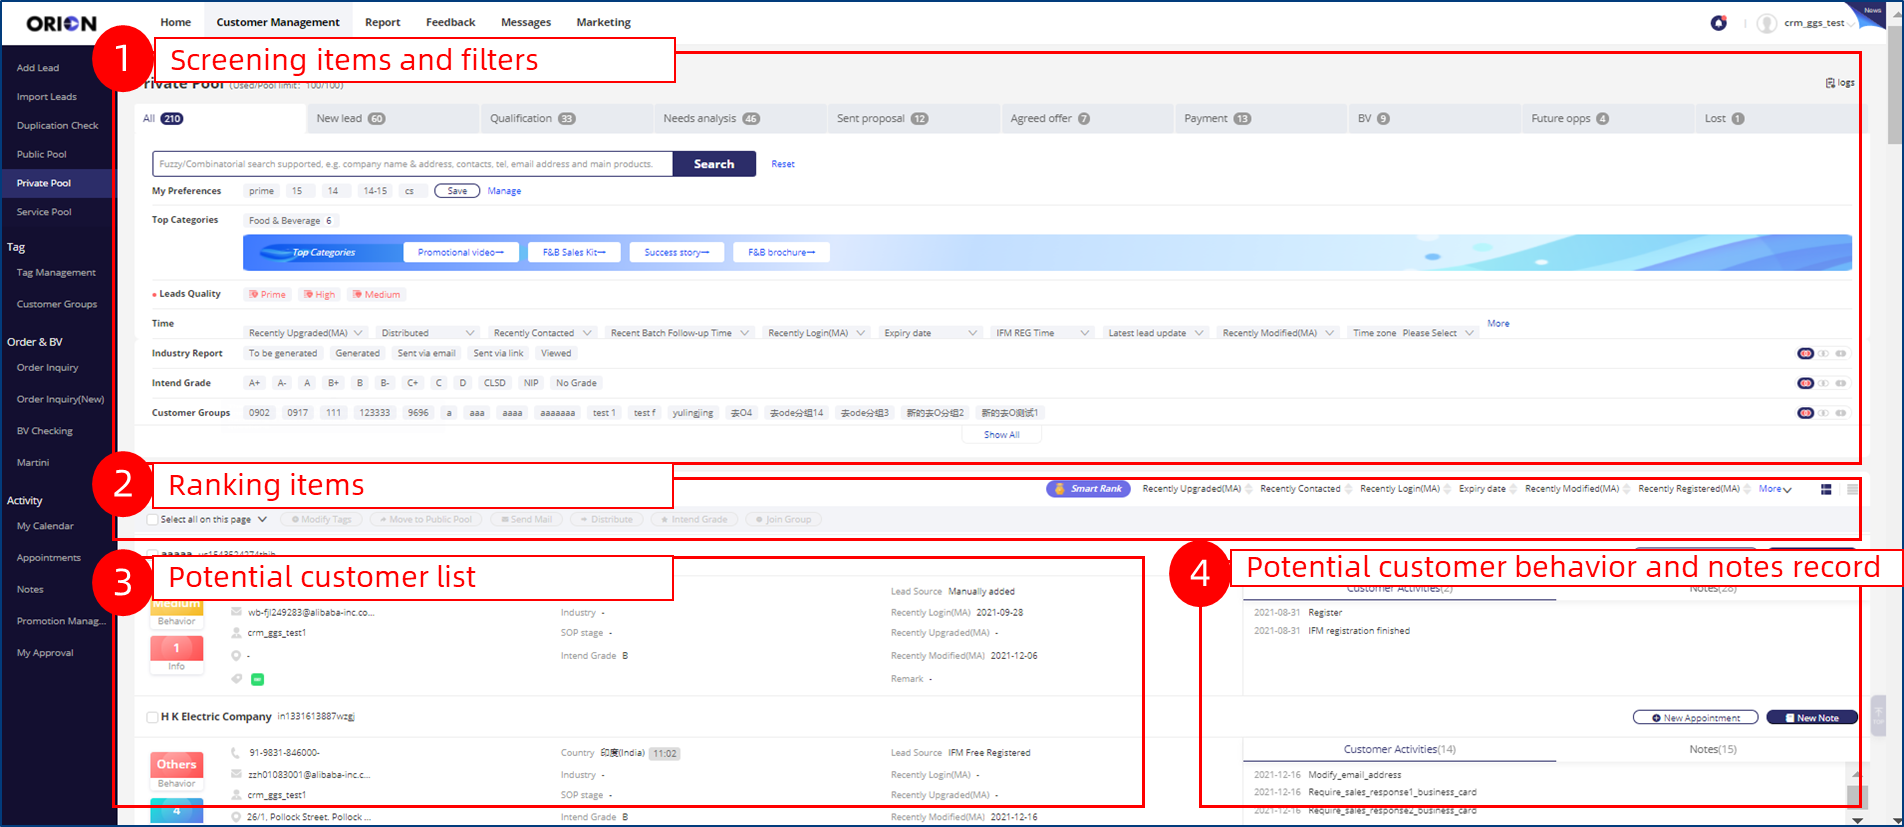
3.1.2 How Private Pool detail page looks like?
3.1.3 Two list views in listing page
1.Click the button to choose different type of list view.
2.Loose list view: The sales lead information is presented in a loose arrangement.
3.Compact list view: The clue information is presented in the form of a list.
4.Click the button to customize column entries.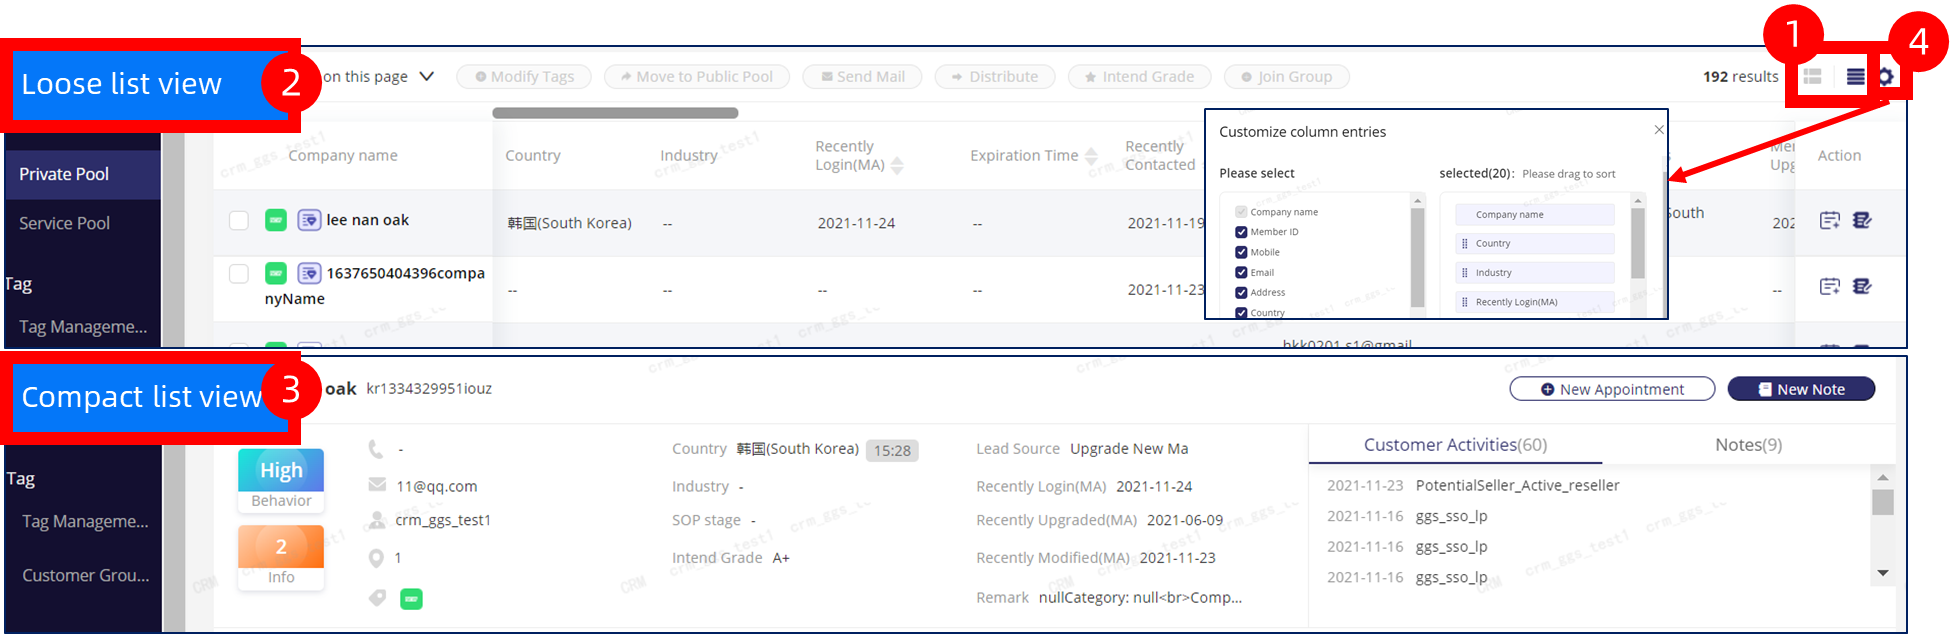
3.2 How can I do if my private pool is full?
The definition of ‘Pool Limit’: Pool Limit is the maximum number of your private pool.
For example: Used/Pool limit: 186/1000.
1.’1000’ means you could add up to 1000 sales leads into your private pool.
2.’176’ means you’ve already added 176 sales leads.
Don’t worry even if the Pool limit is occupied, you can release the quota by removing the sales leads to public pool.
NOTE: Customers in the service do not occupy the quota.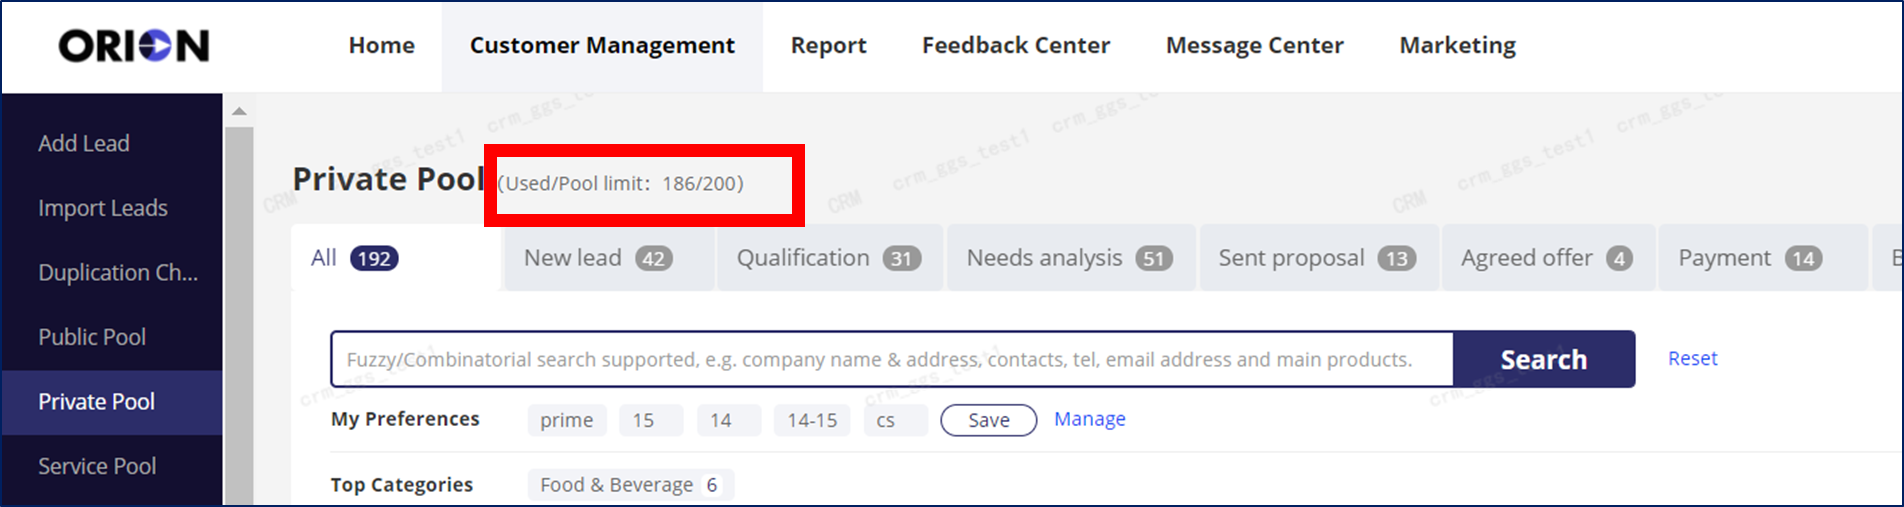
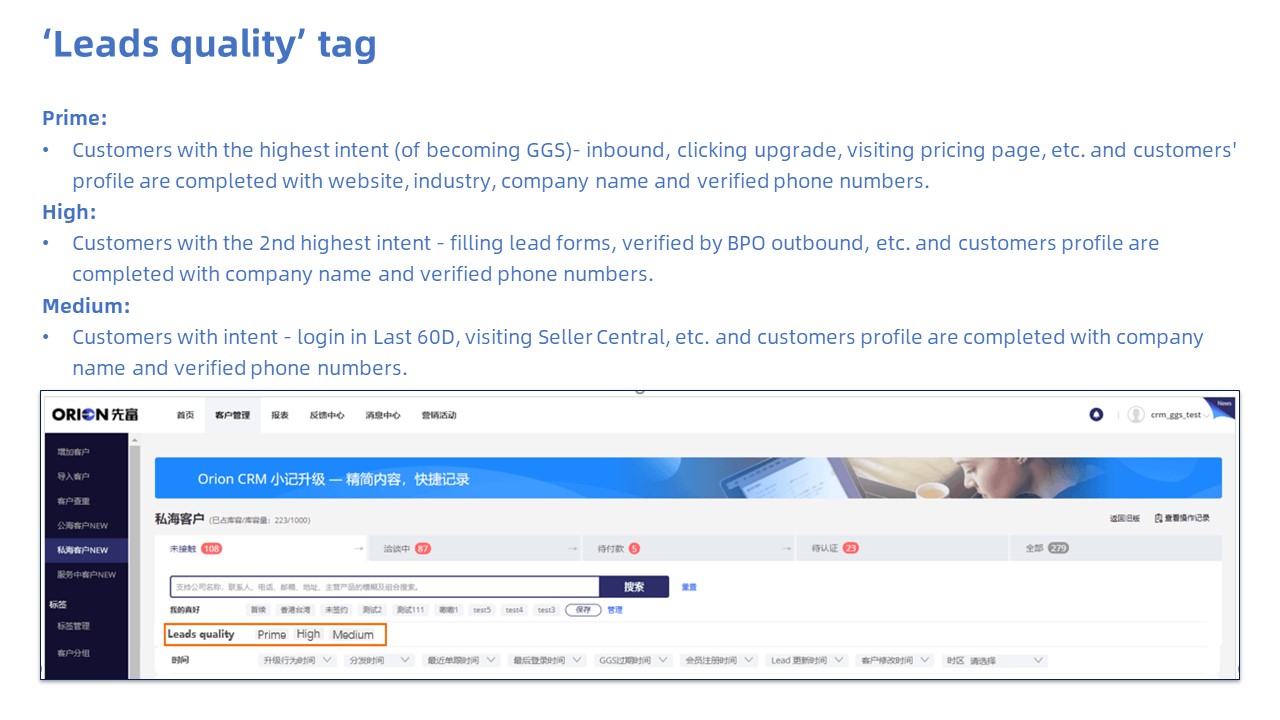
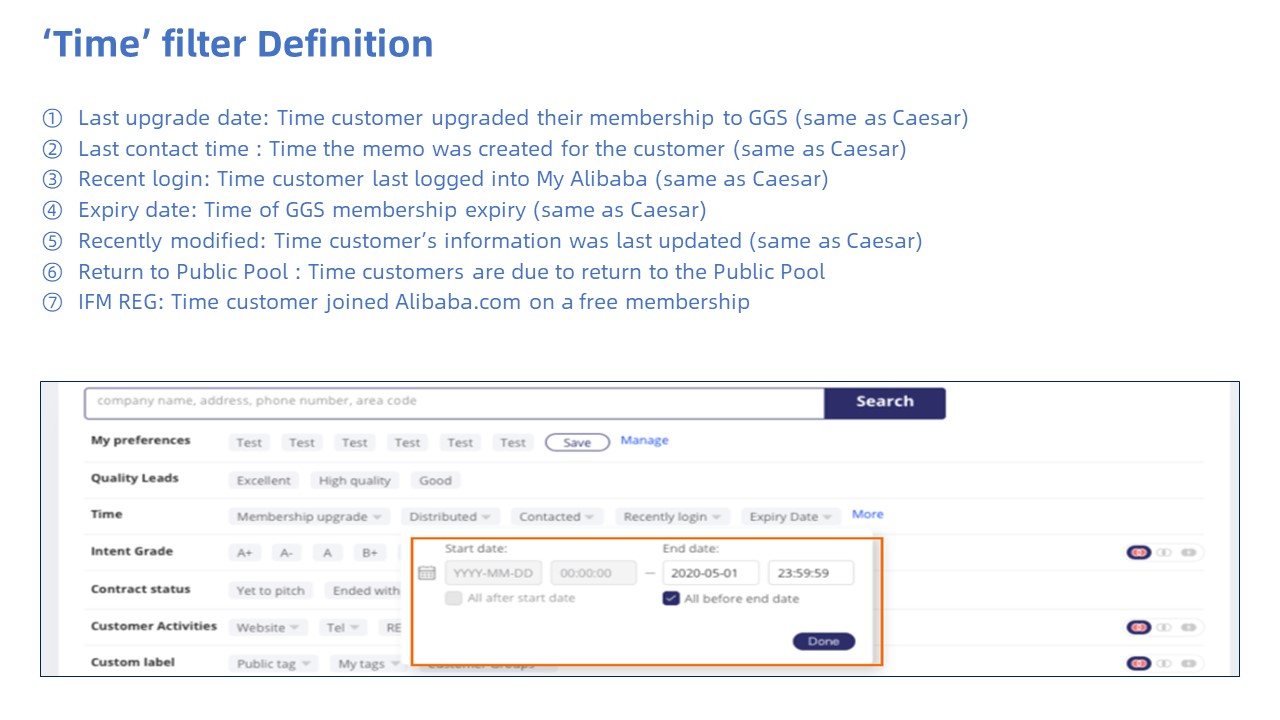
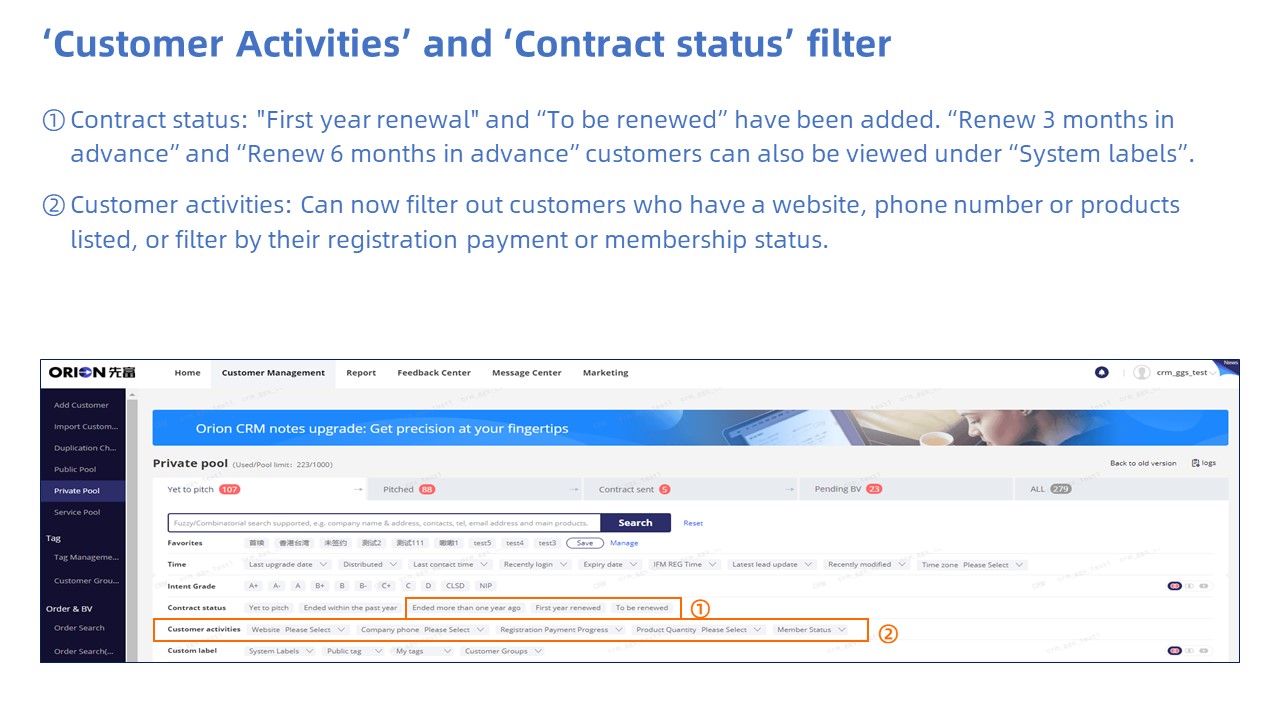
3.3 What’s the meaning of system lead tag?


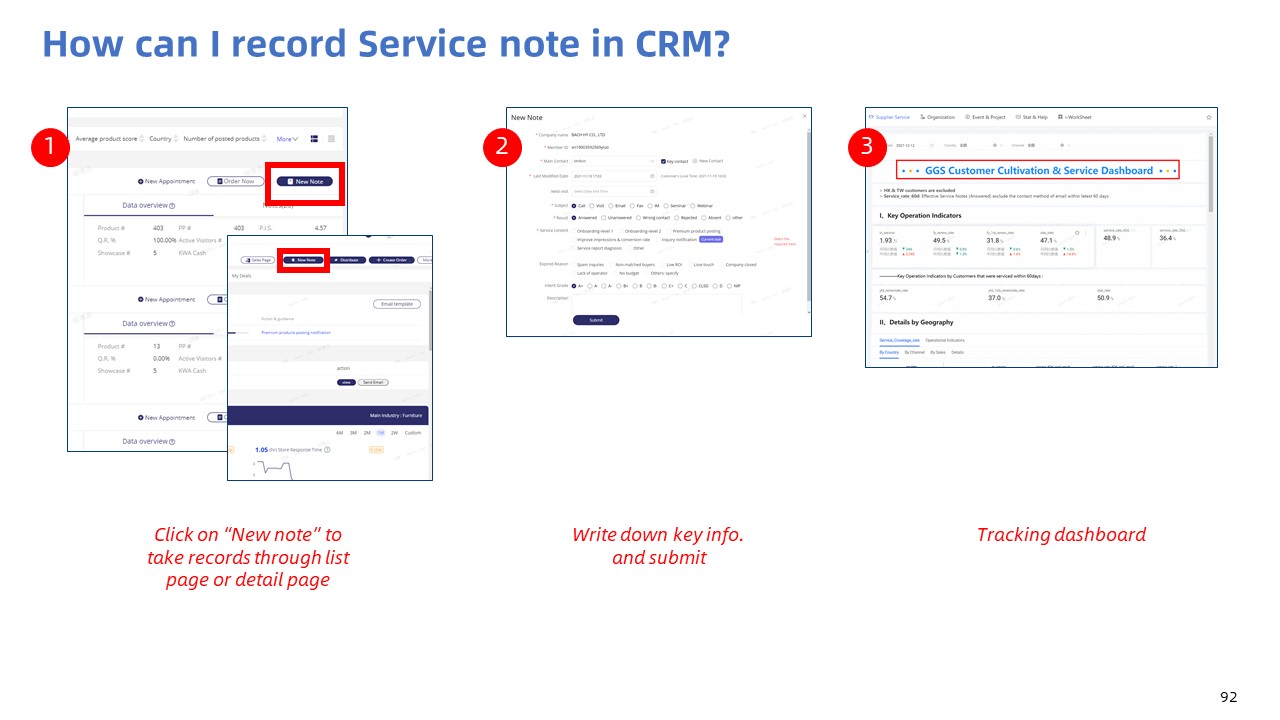
3.4 How to create ‘Note’ to record your sales & service activities

3.4.1 Record ‘Note’
Operations:
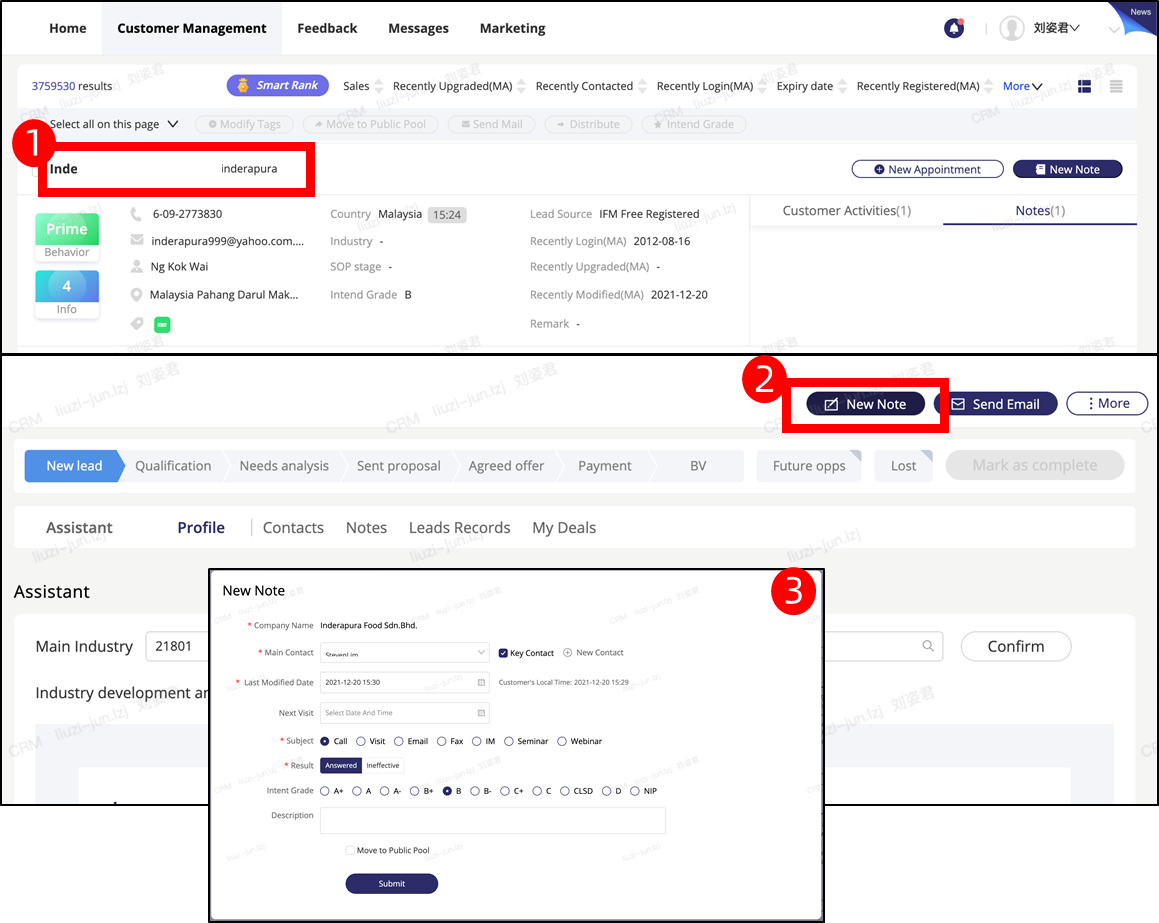
- Choose Customers name into the detail page and click New Note.
- Fulfill the description box with words if necessary.
Benefits:
- You can remember the customer’s situation by recording, and then you will be able to follow up the customer more efficiently and accurately next time.
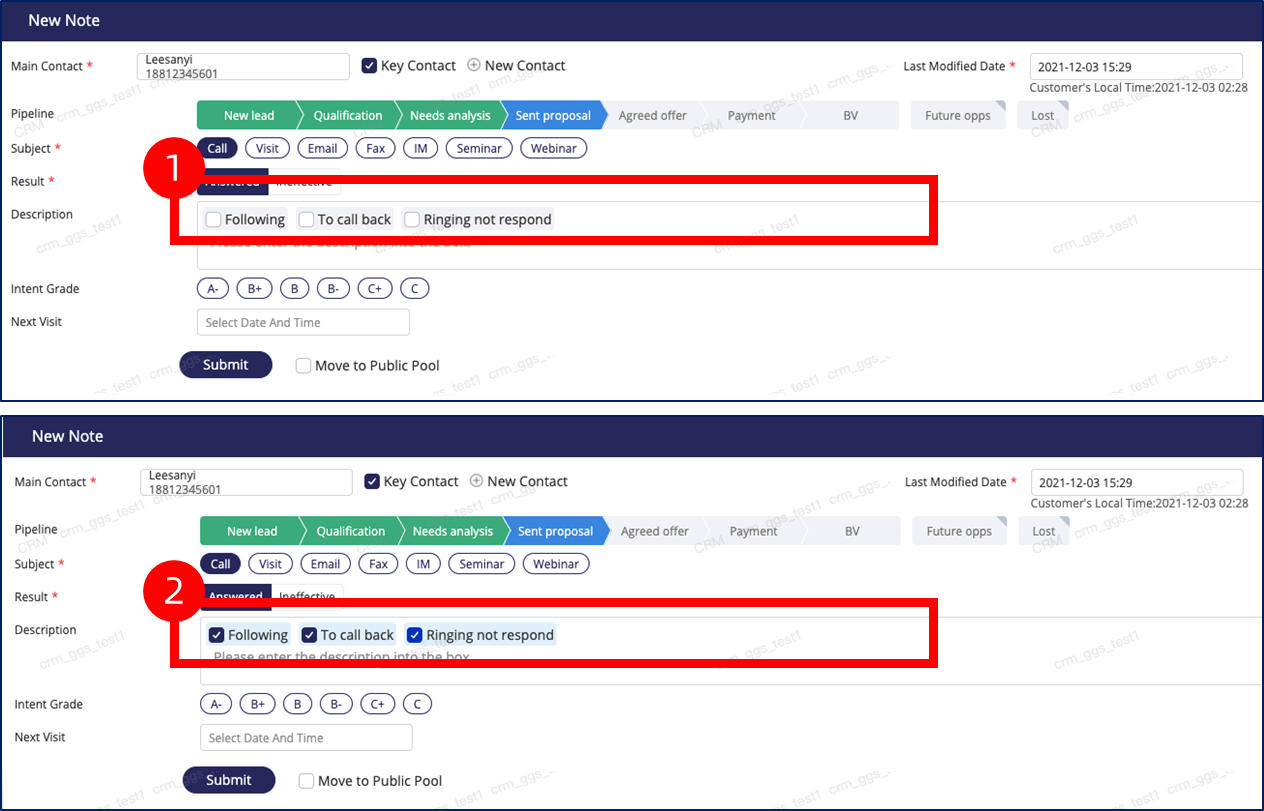
3.4.2 Pre-set Description
Operations:
- Choose pre-set descriptions.
- Fulfill the description box with words if necessary.
Note:
- Pilot countries include Vietnam/Pakistan/India
- phrases will change based on the requirements of country teams.
Benefits:
- Reduce the time for Sales Rep. to enter repetitive descriptions and improve operational efficiency.
3.4.3 Check ‘Notes’
1.Sales and Sales Managers can search for Pre-set Descriptions on the Note Page.
2.Pre-set descriptions will be displayed in different color.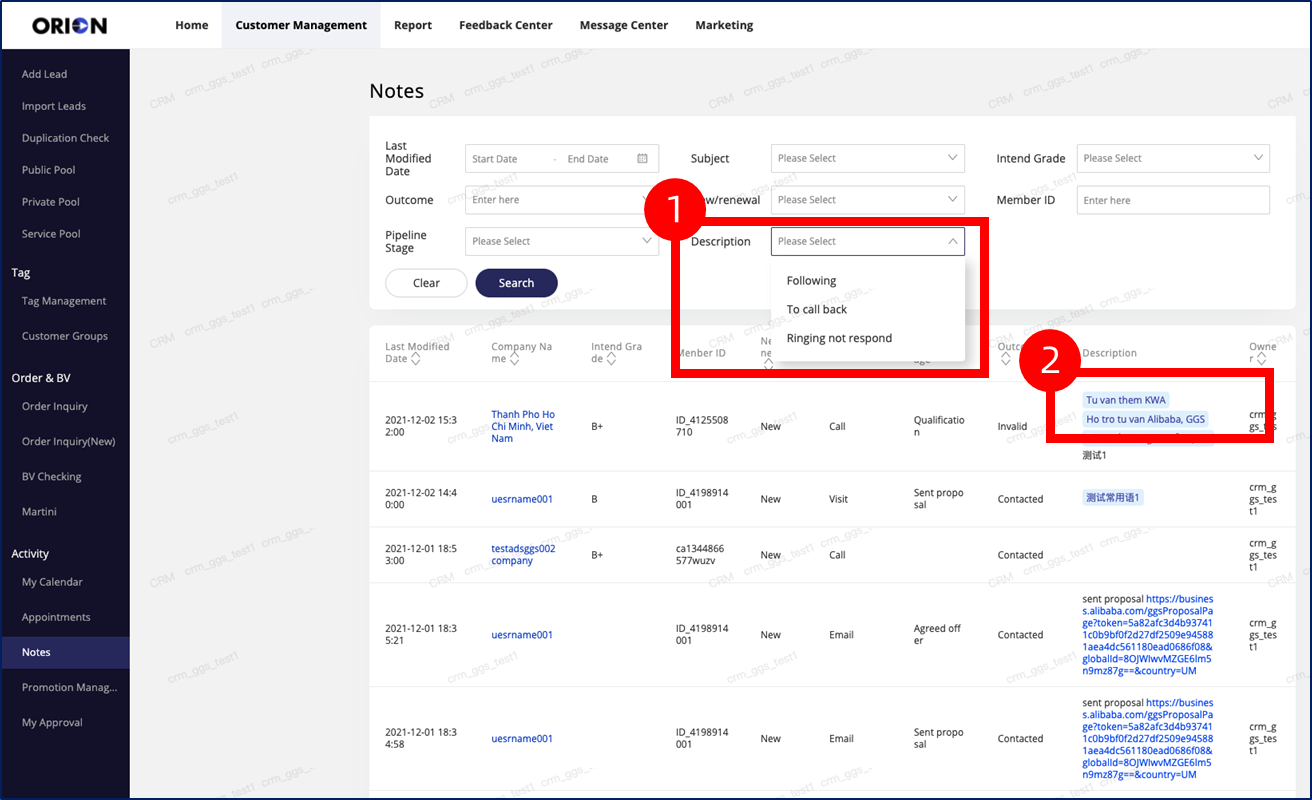
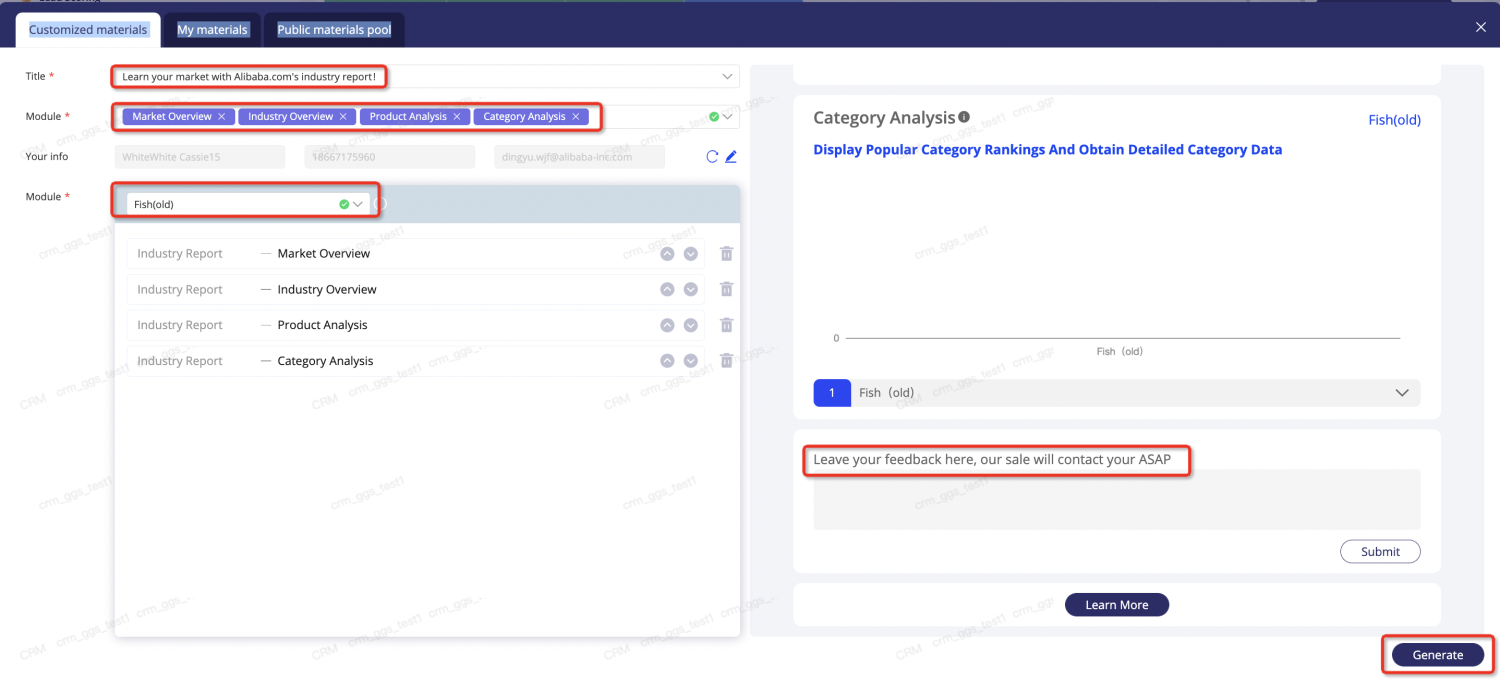
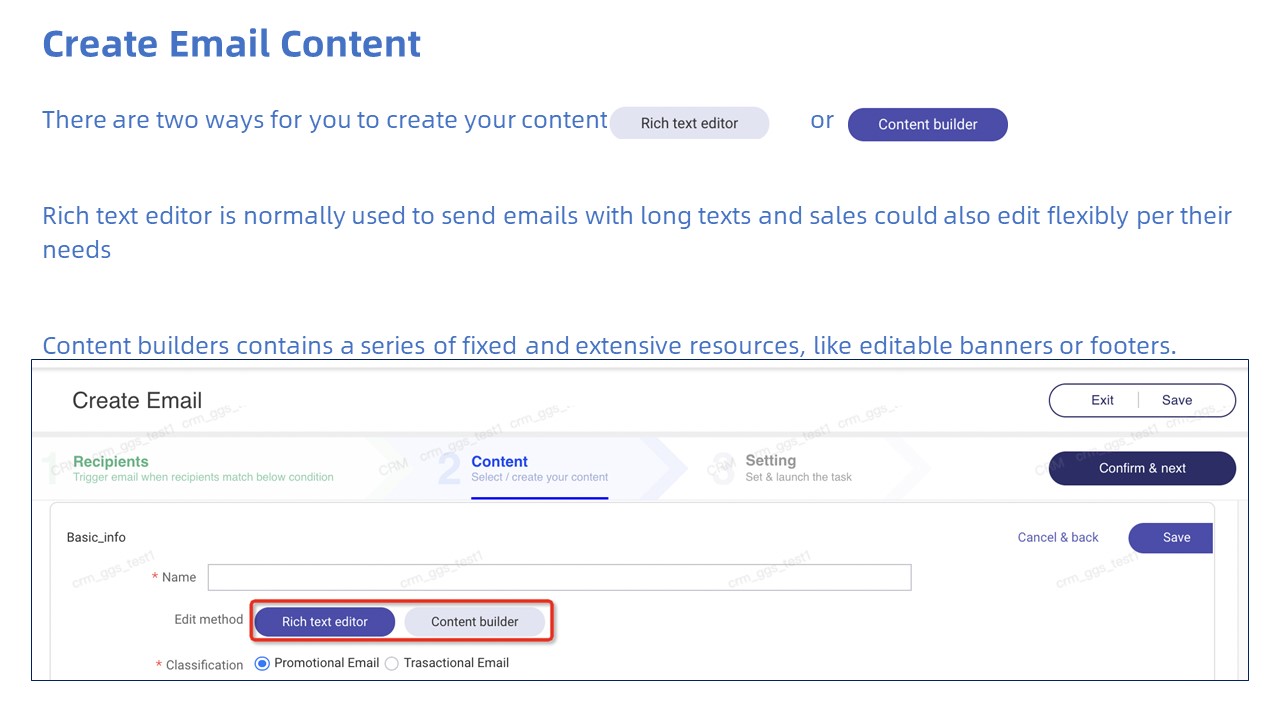
3.5 How to use Sales Assistant 2.0 Version?

Sales Assistant’s function has been fully upgraded to 2.0 Version on April, 2022.
Feature Updates
Fully upgrade to sales-kit customize tool:Before, sales could only send the whole industry report or proposal to the potential customers. Now sales get to flexibly select the minimum modules and customize the materials per the potential customers’ actual needs
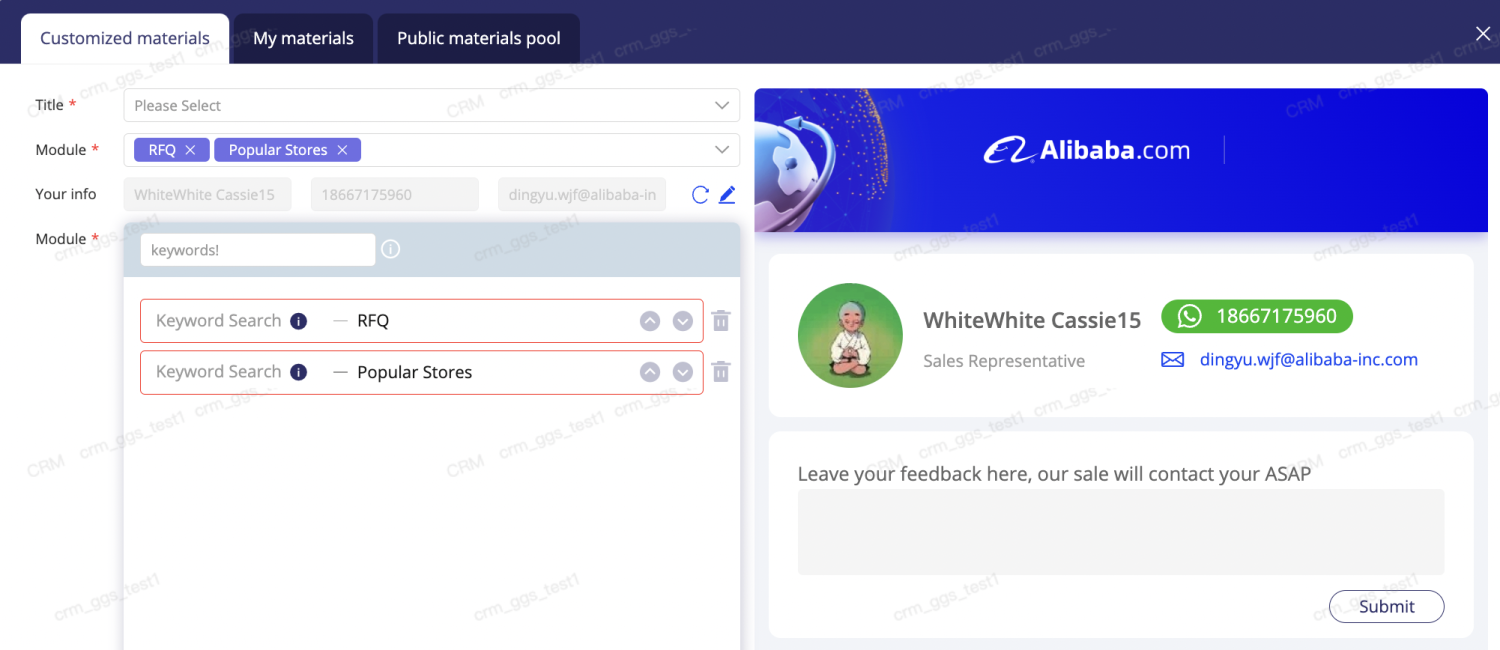
Add the Keyword Search section and seller stories section:Keyword search section includes RFQ and Polular Stores modules. Input the product keywords to find the best three RFQs or Popular stores ranked by annual revenue. Seller stories section support sales’ filtering by industry and customers’ country
Sales Assistant 2.0 Demo
How to utilize Sales Assistant 2.0 Version
3.5.1 After needs analysis of the opportunities, normally sales will have an overview of the opportunities and get to send some proper sales materials to attract the cutstomers’ attention
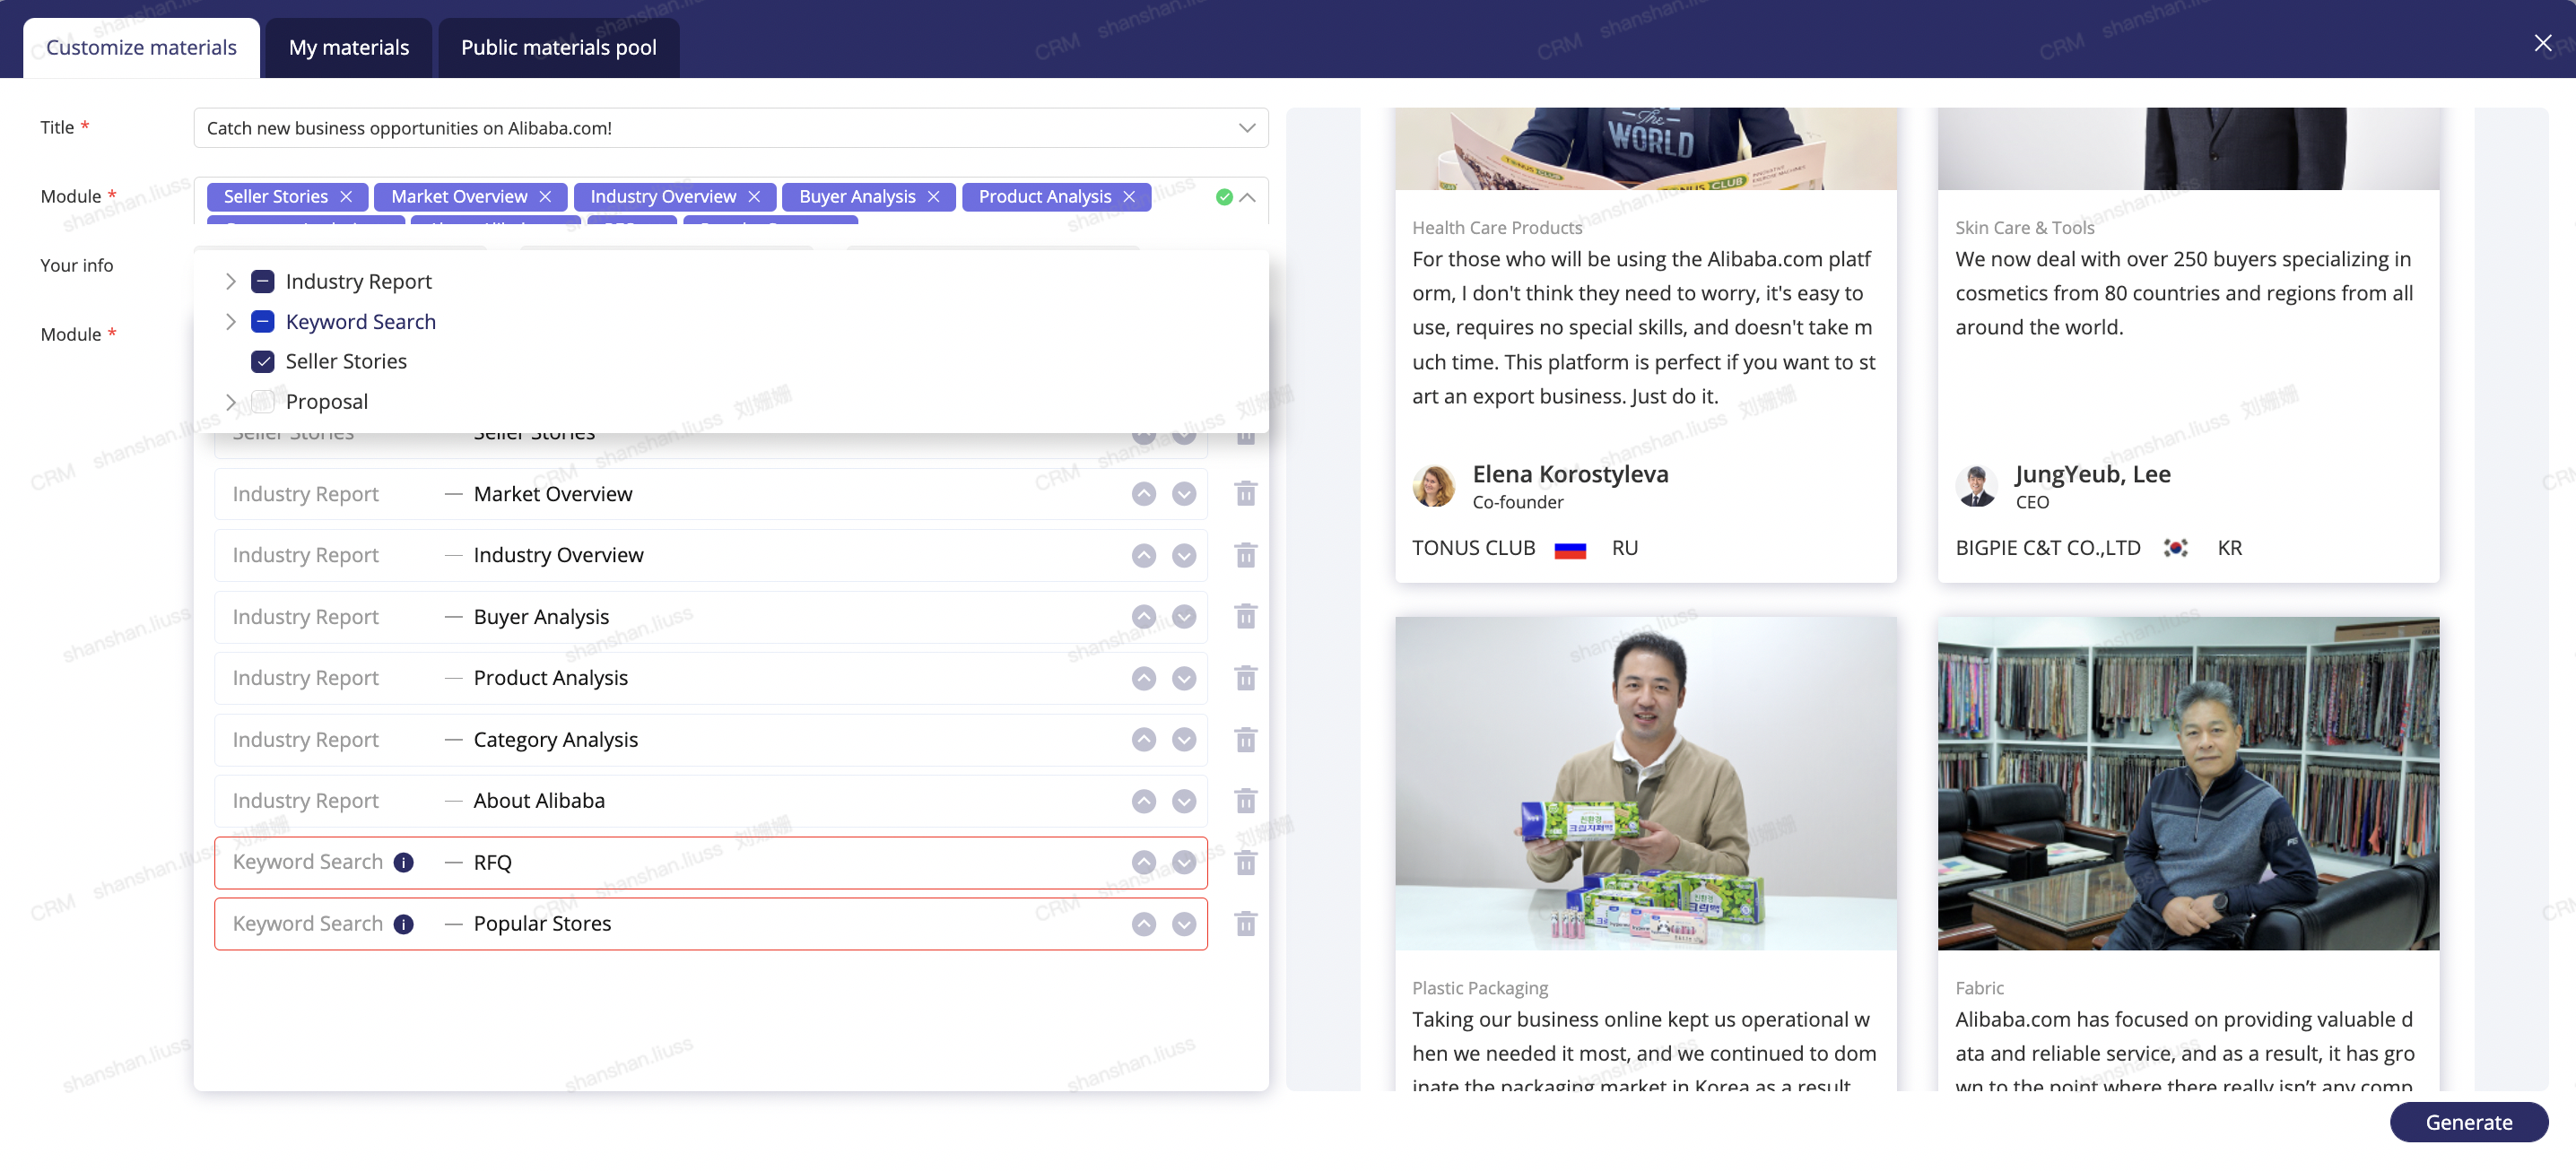
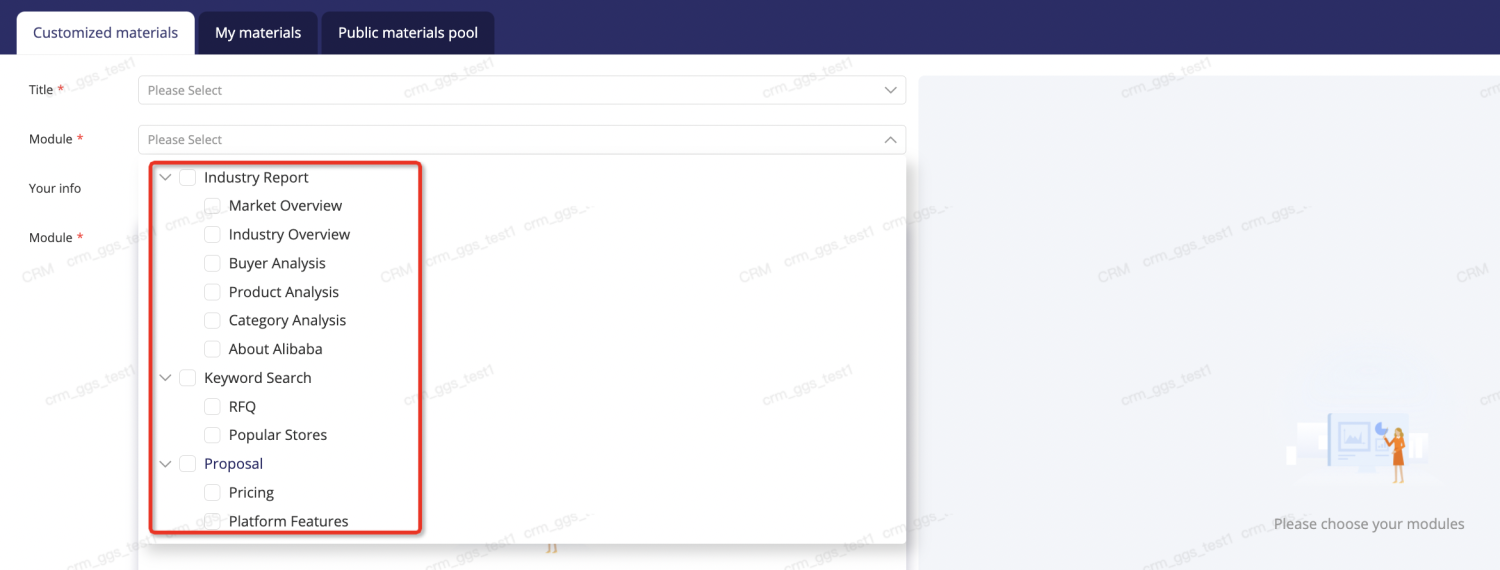
There are 5 templates in total for sales to select seperately or in whole and all the templates are divided into several minimum modules:
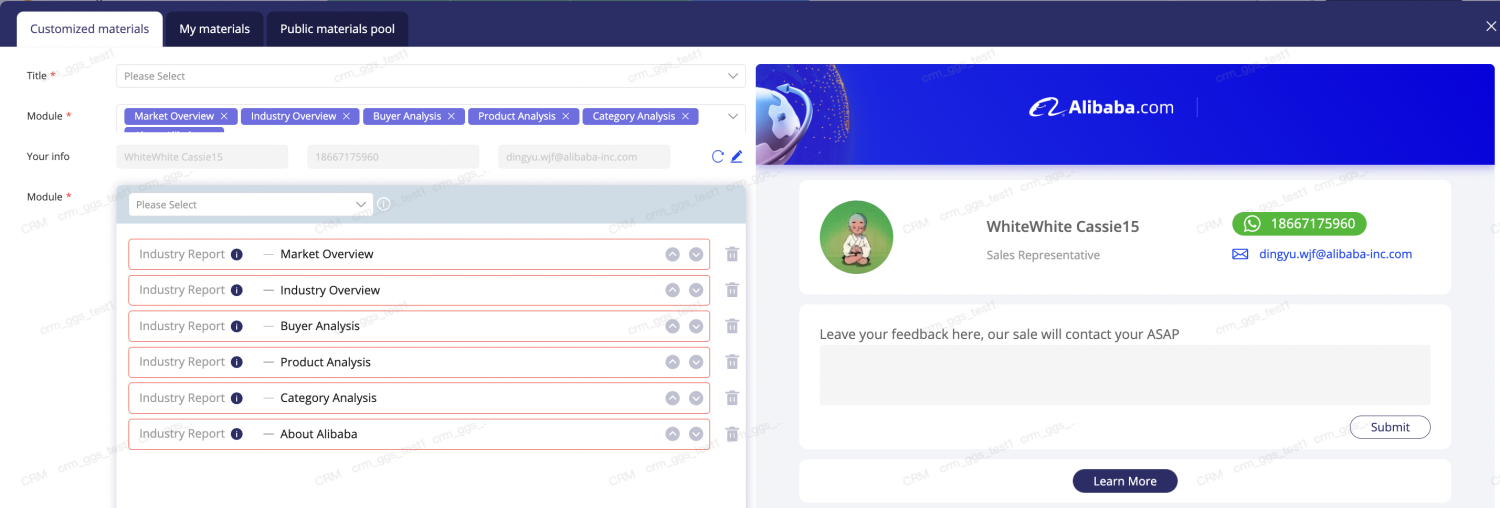
1) Industry Report includes minimum modules like Market Overview/Industry Overview/Buyer Analysis/Product Analysis/Category Analysis modules/About Alibaba
2) Keyword Search includes RFQ and Popular Stores
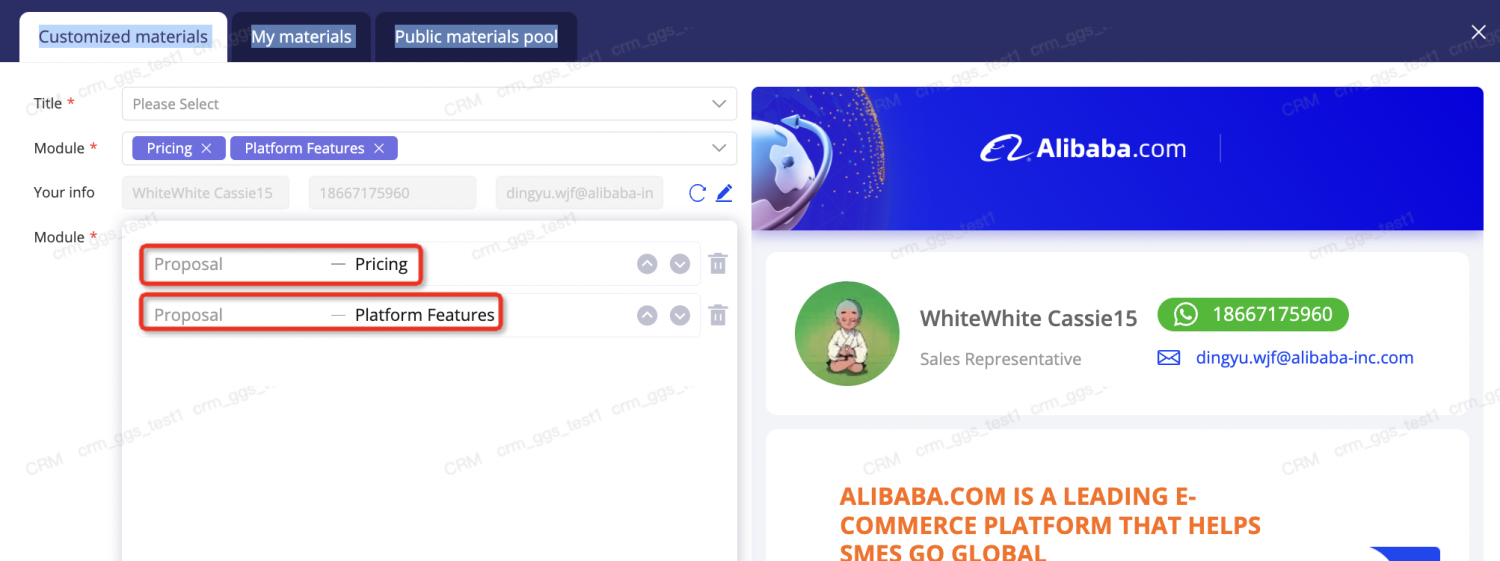
- Proposal includes Pricing and Platform Features
- Seller stories includes only one part

- Choose “Cutomize materials”, you will see all the templates including Industry Report/Keyword Search/Proposal/Seller stories
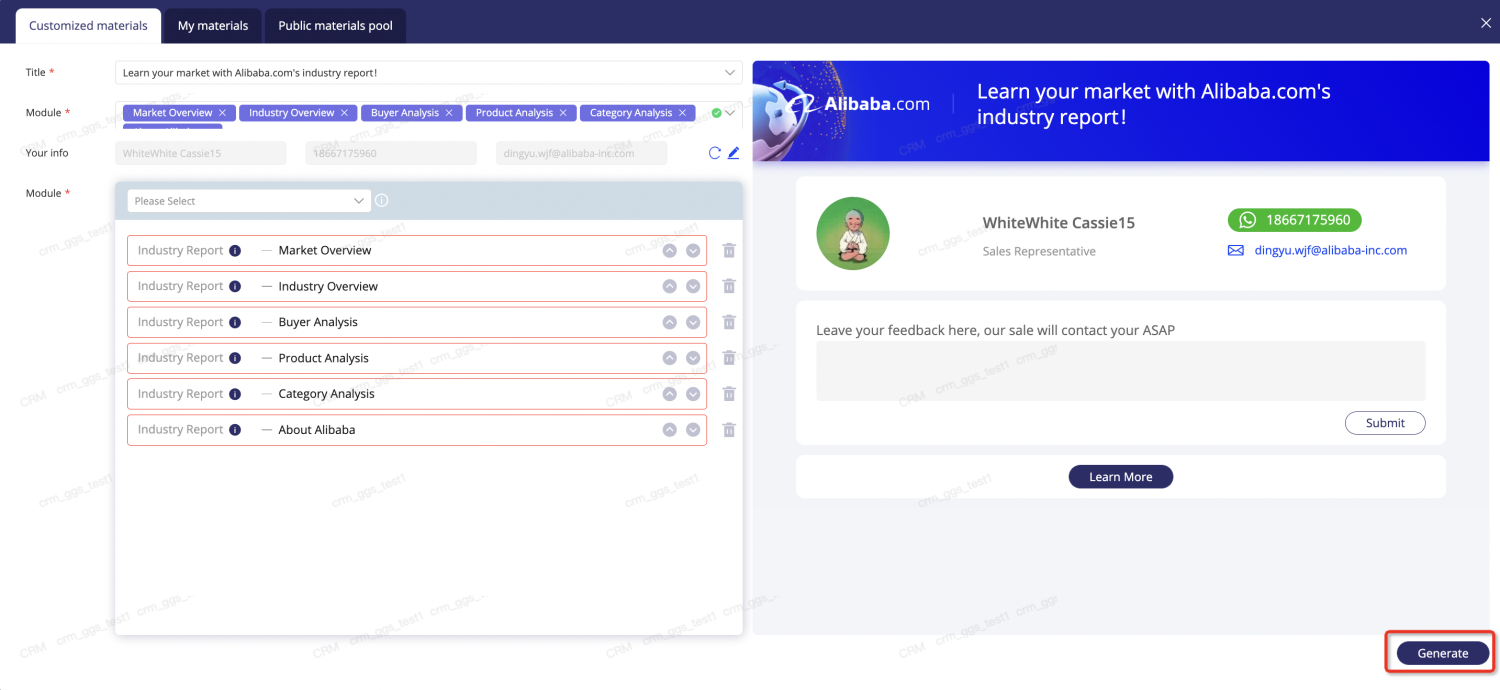
3.5.2 Start customizing the content to your potential customers
1)Select a title fit for your content
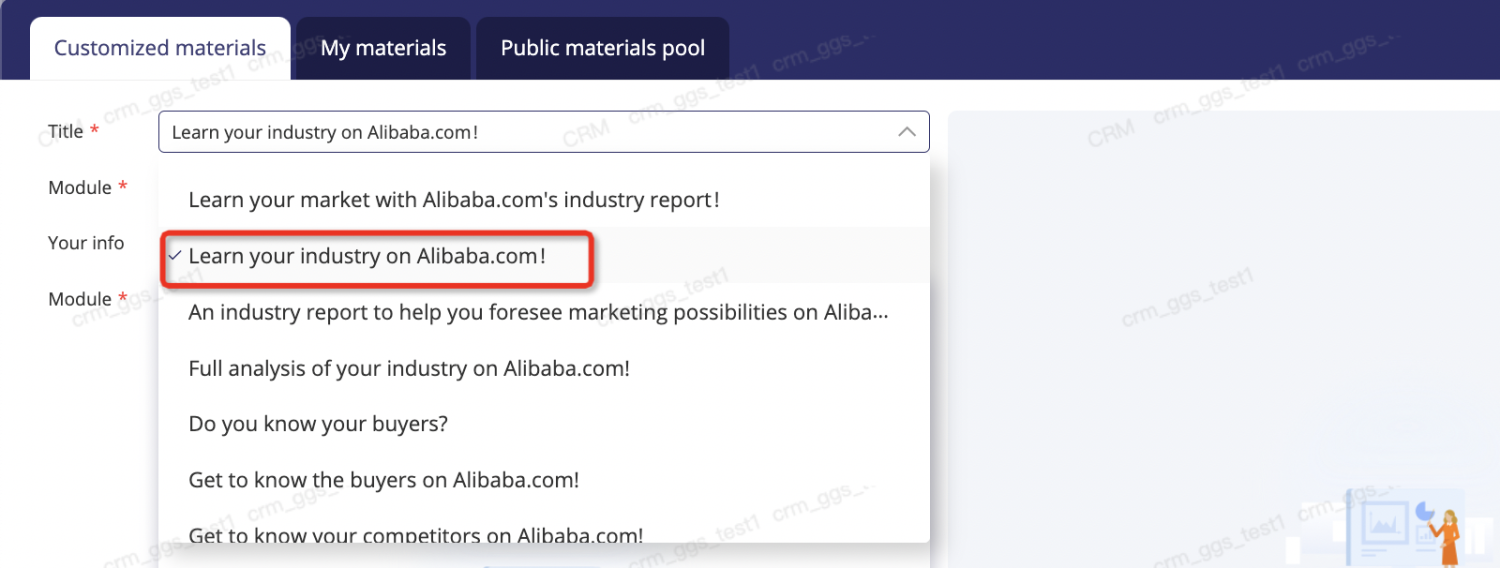
Notice:
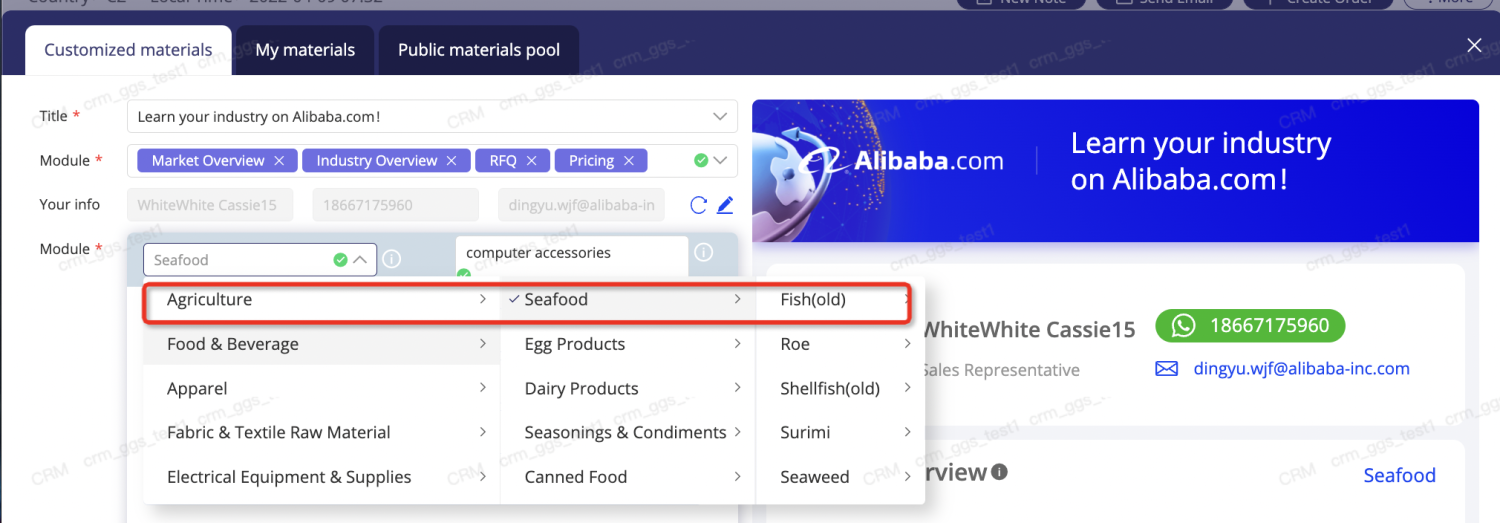
To utilize any of the industry report modules, it is necessary to select the category,otherwise the module will not show at the left column
To utilize any of the Keyword Search Modules, it is necessary to input the product keyword at the left column
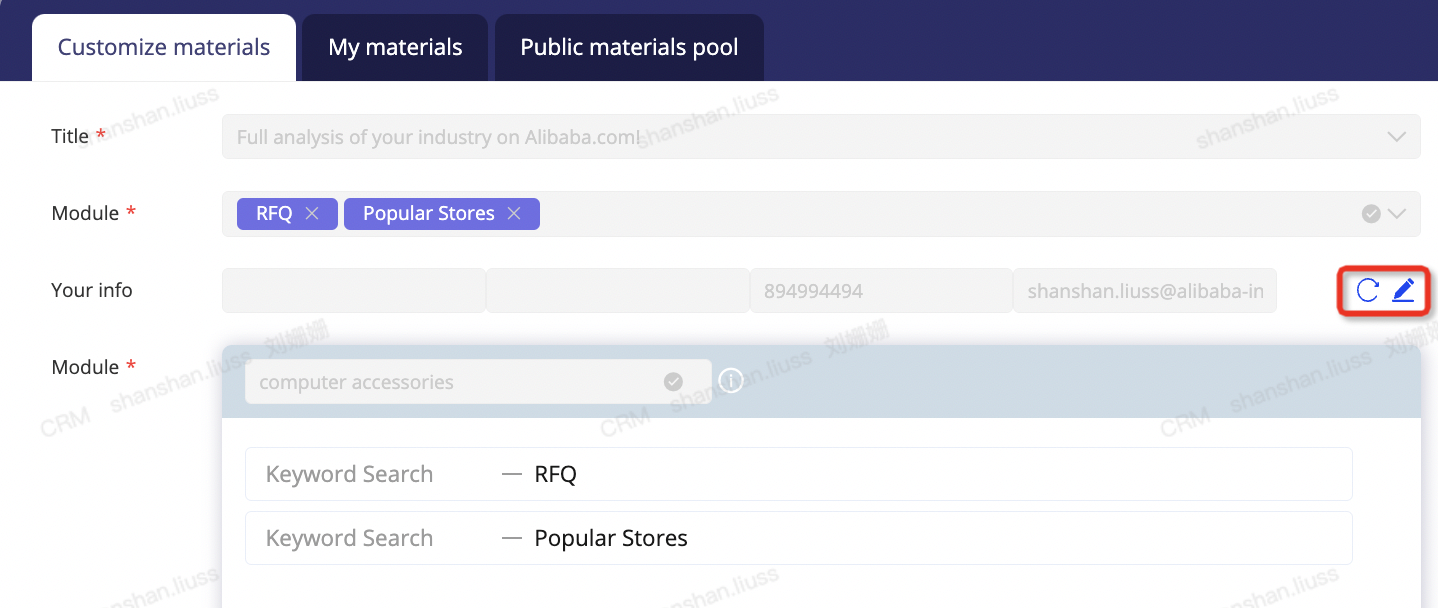
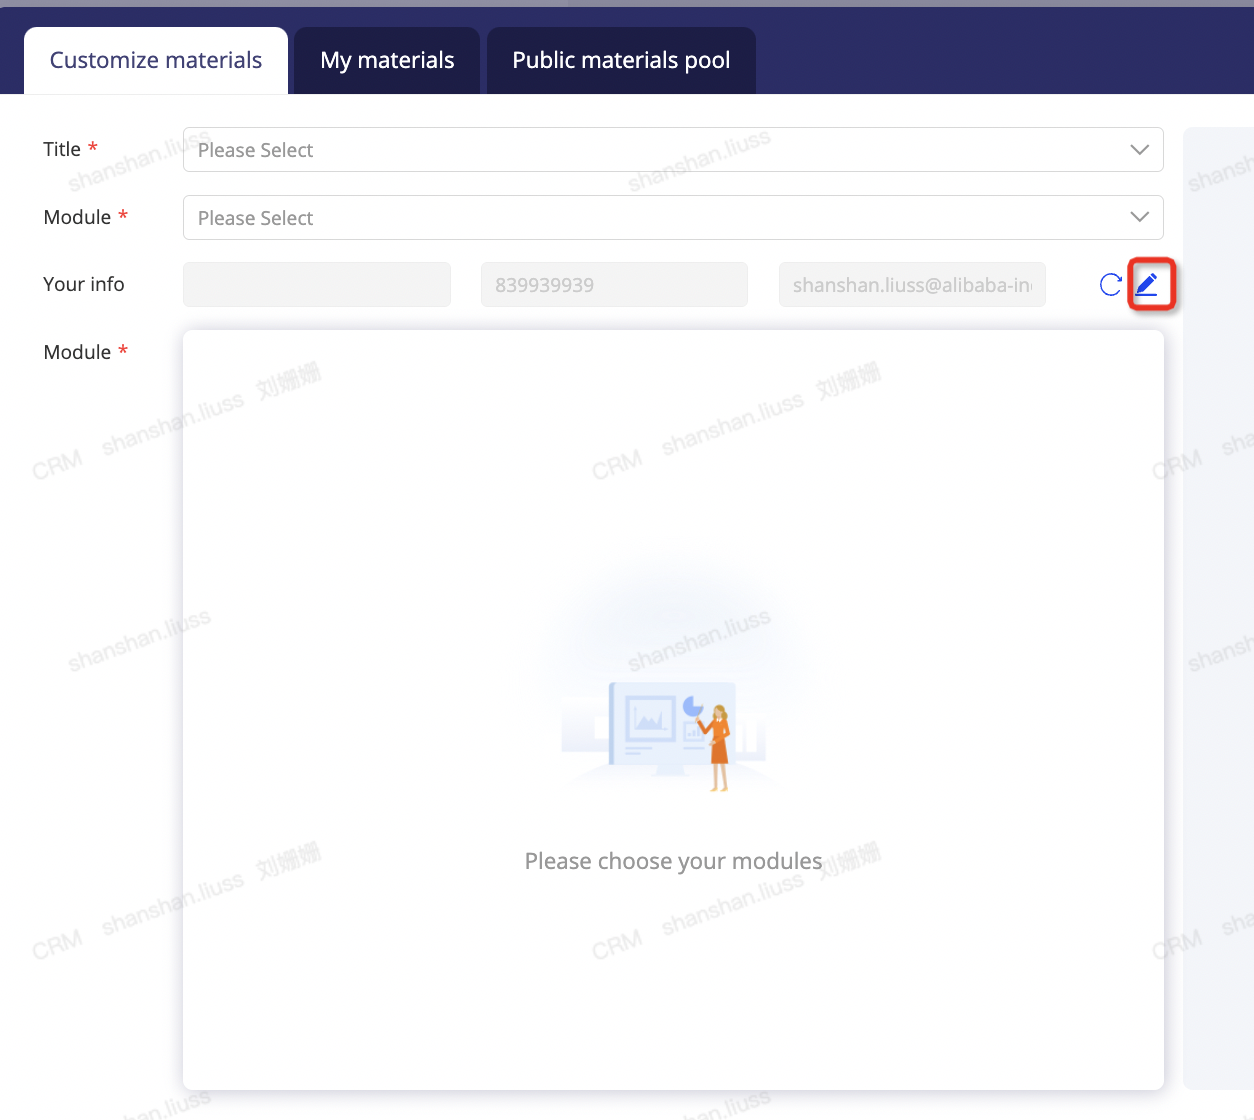
3.5.3 Edit the info of your business card(click here to know how to utilize the business card) if you need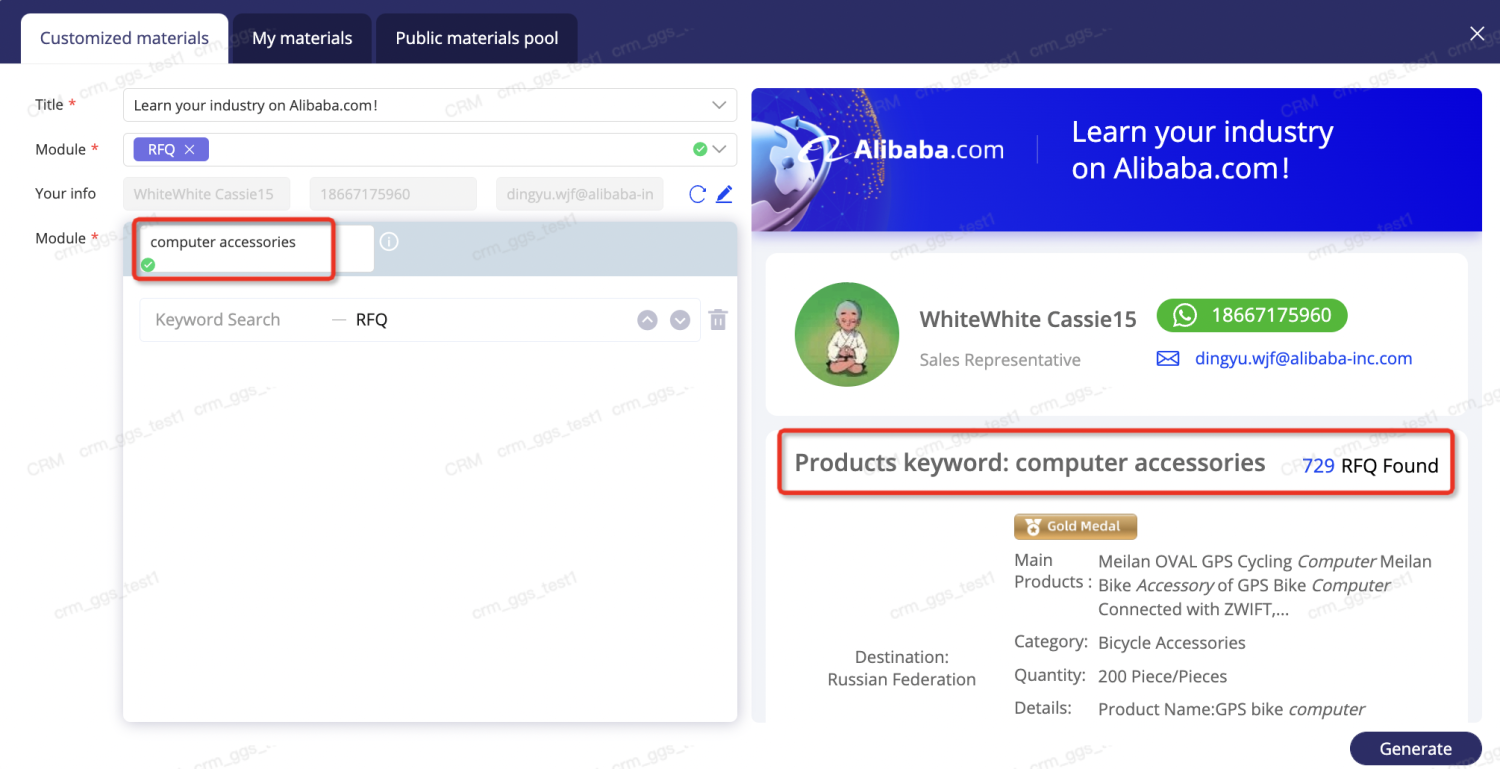
2.Select the modules you need
3.Re-check and preview the content, adjust the order if necessary
Notice: Any suggestions, you could leave a message at the end of the content.
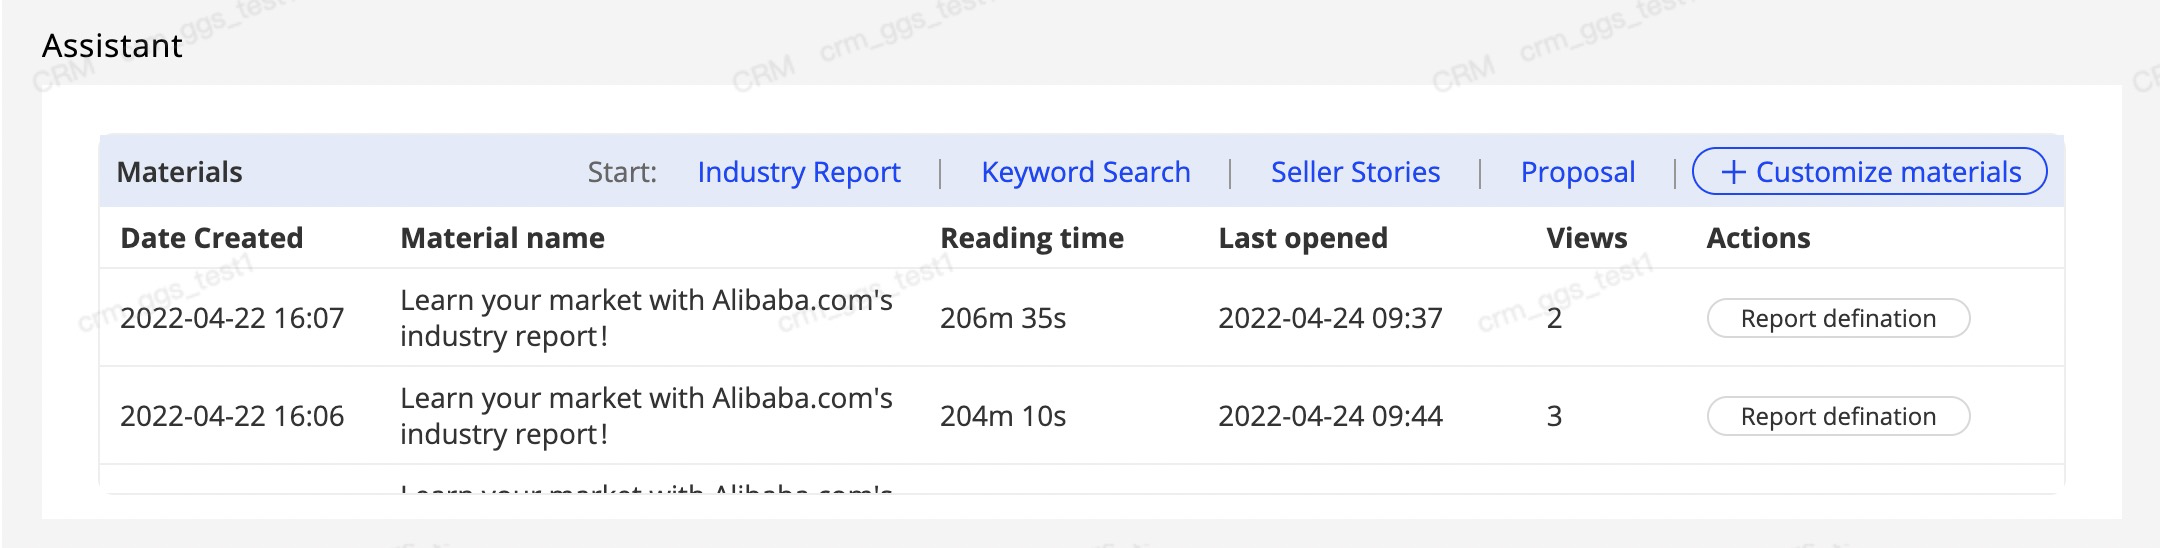
3.5.3 Generate/Save/Share/Send the materials
1.Generate the materials
2.Save the materials to your private pool/public pool or both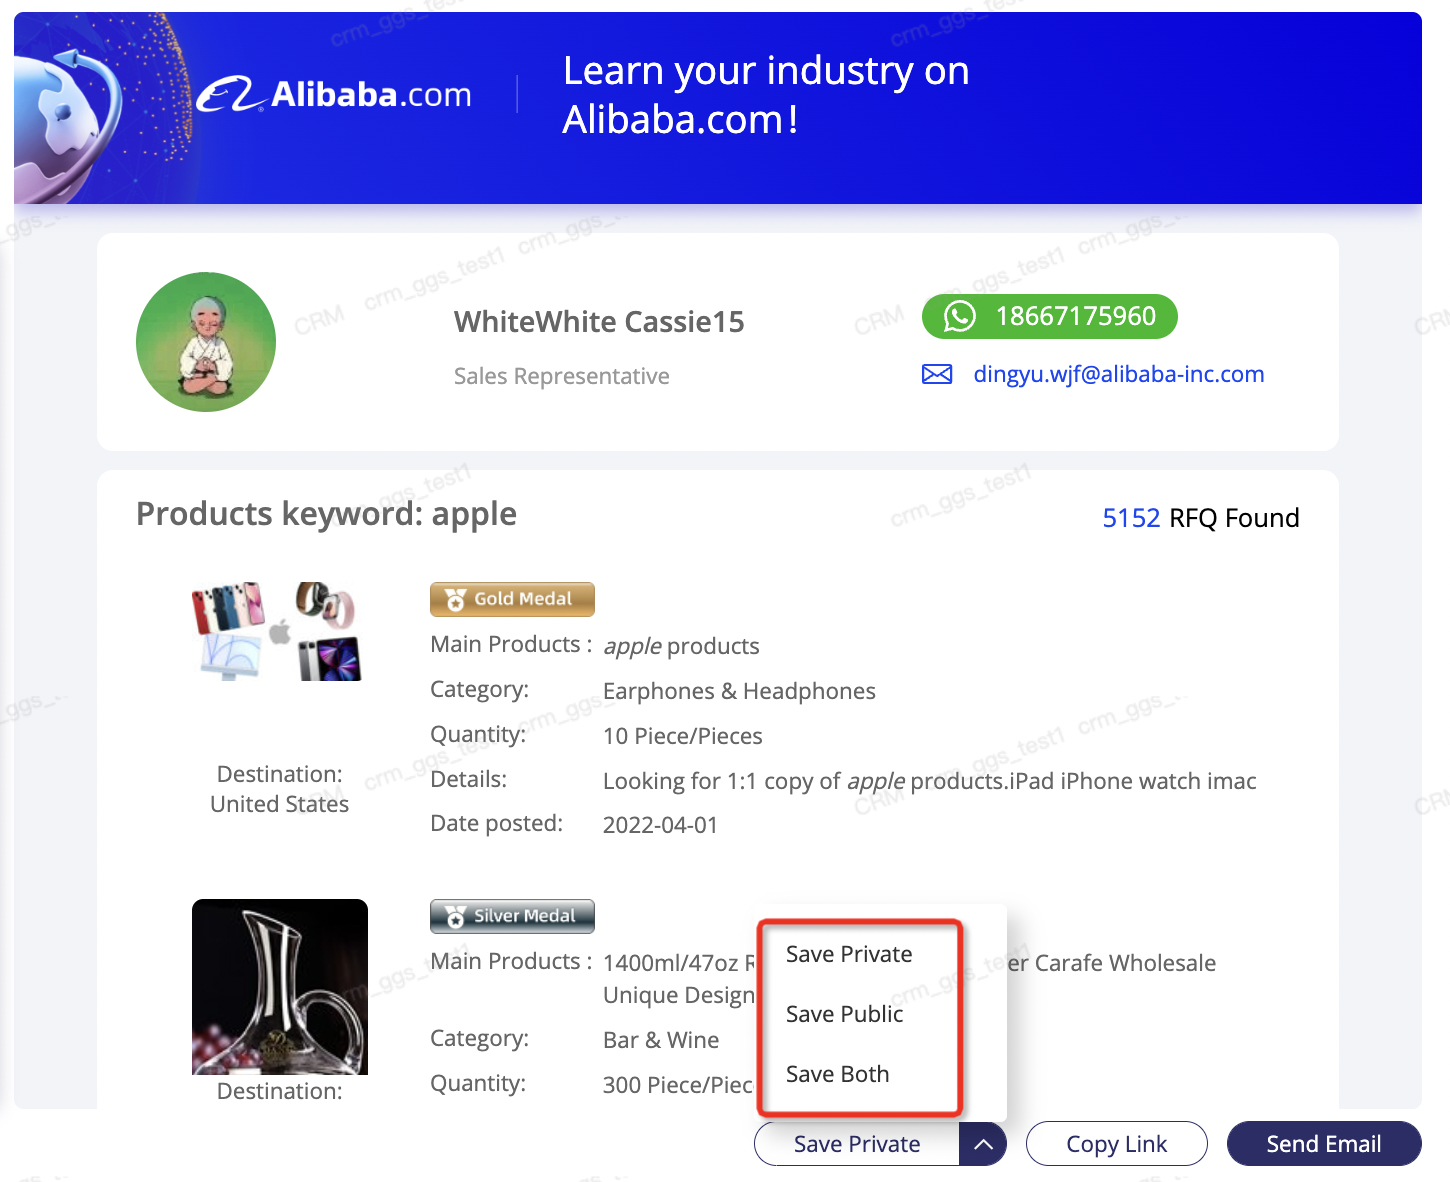
3.Copy link to share with the customers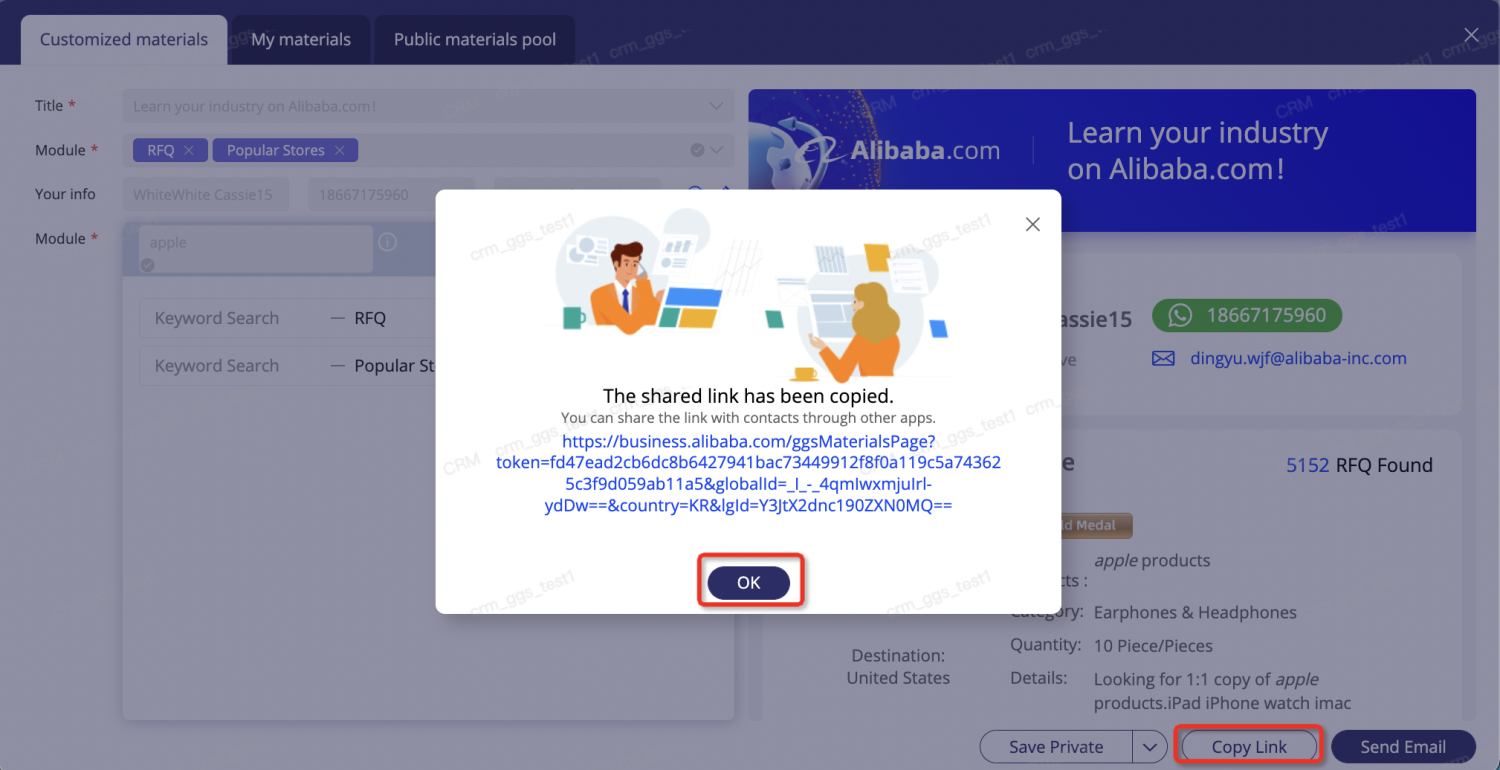
4.Send materials to customer’s email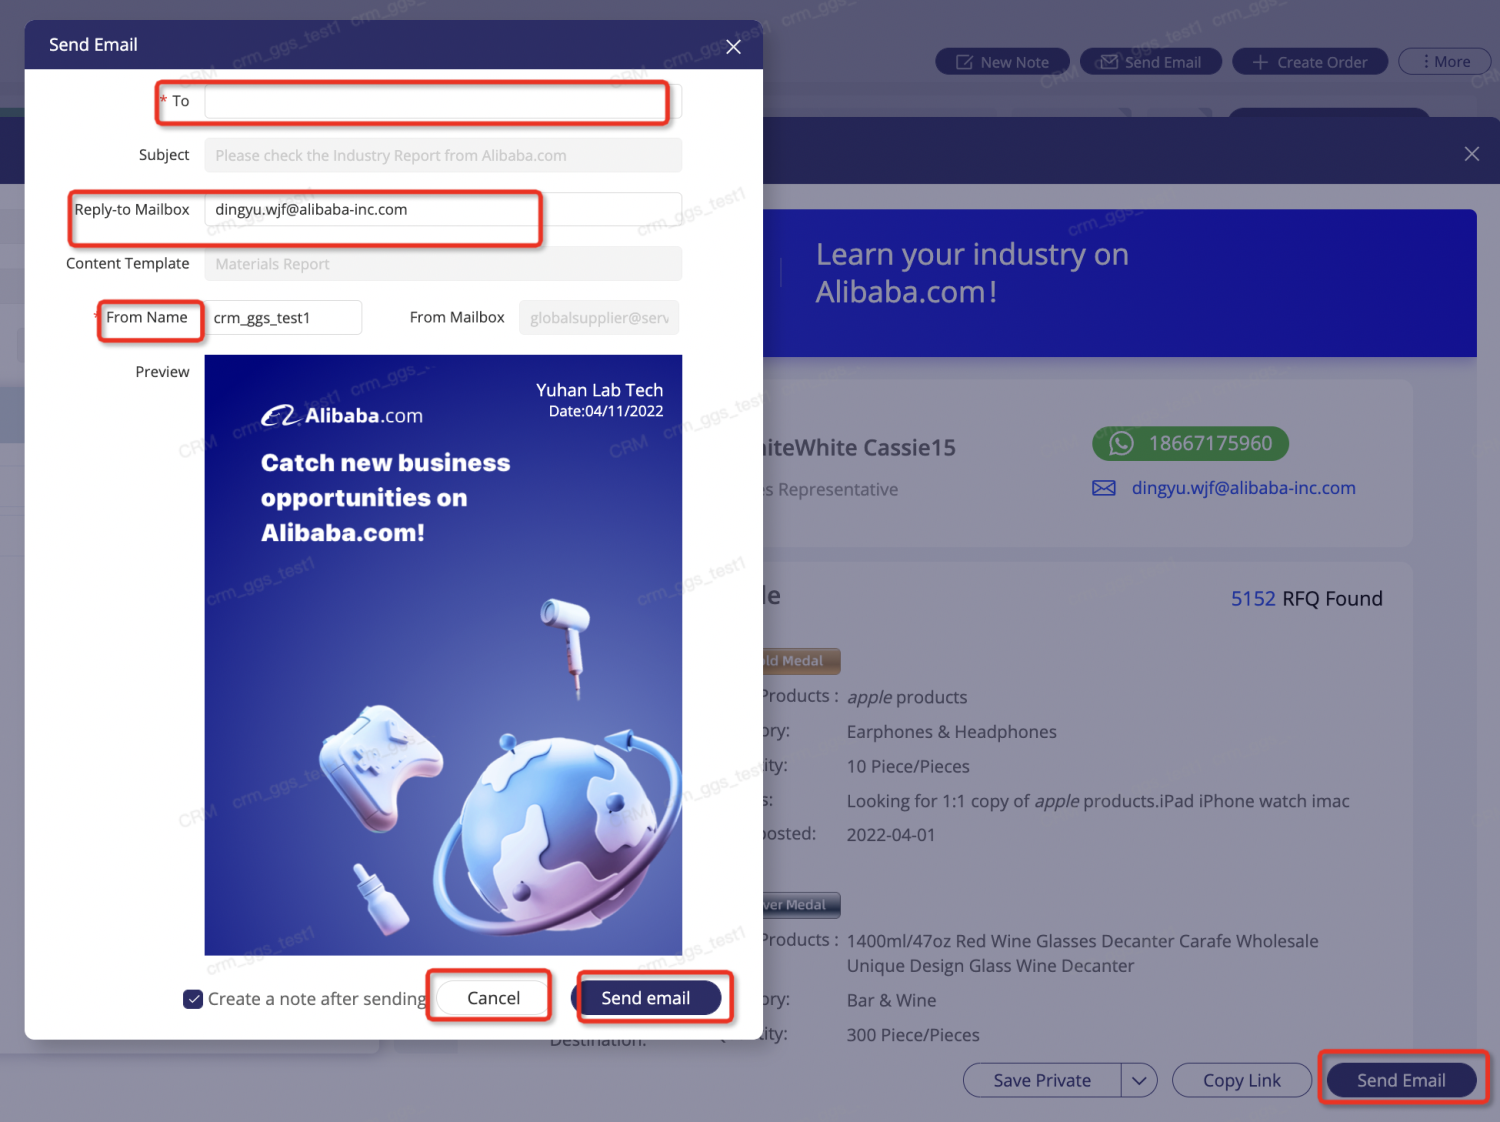
- Select contact from contact list.
- Default mailbox is the Alibaba email of the sales. Support editing if necessary.
- Default sender name is the user name of the CRM. Support editing if necessary.
- Company name of the potential customer will show in the cover
- Create a note after sending automatically .
Notice:Once the materials are generated, it cannot be revised again.
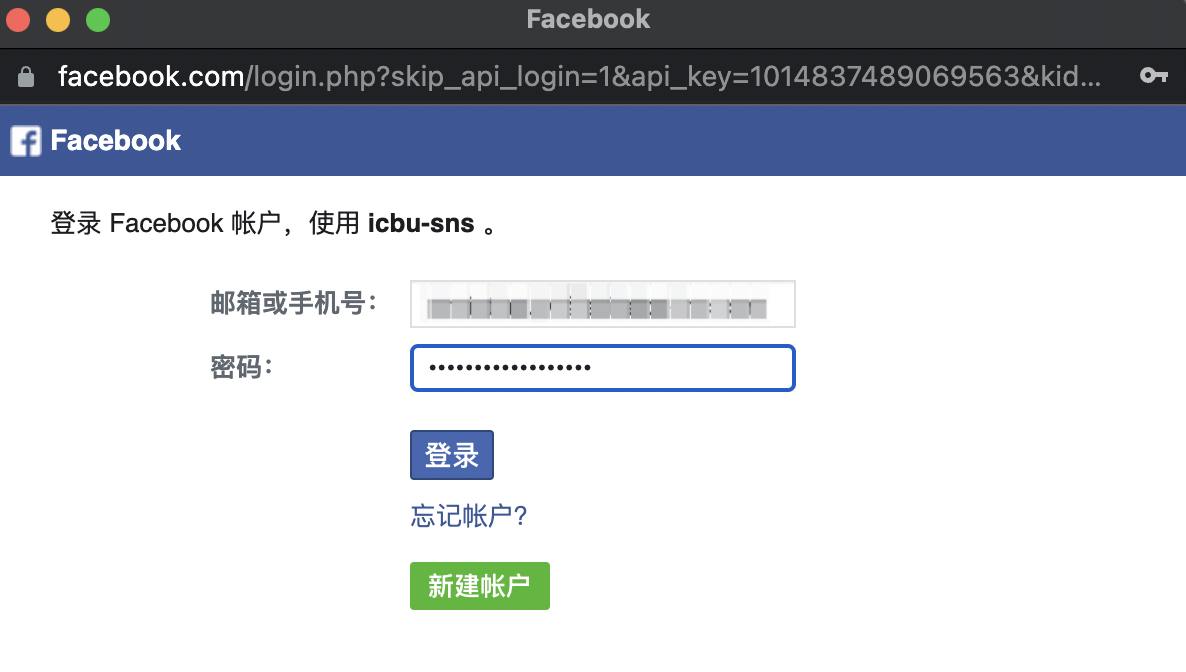
3.5.4 Share the materials to social media
- Click #Edit Sales Business Card#
- Connect your Facebook account
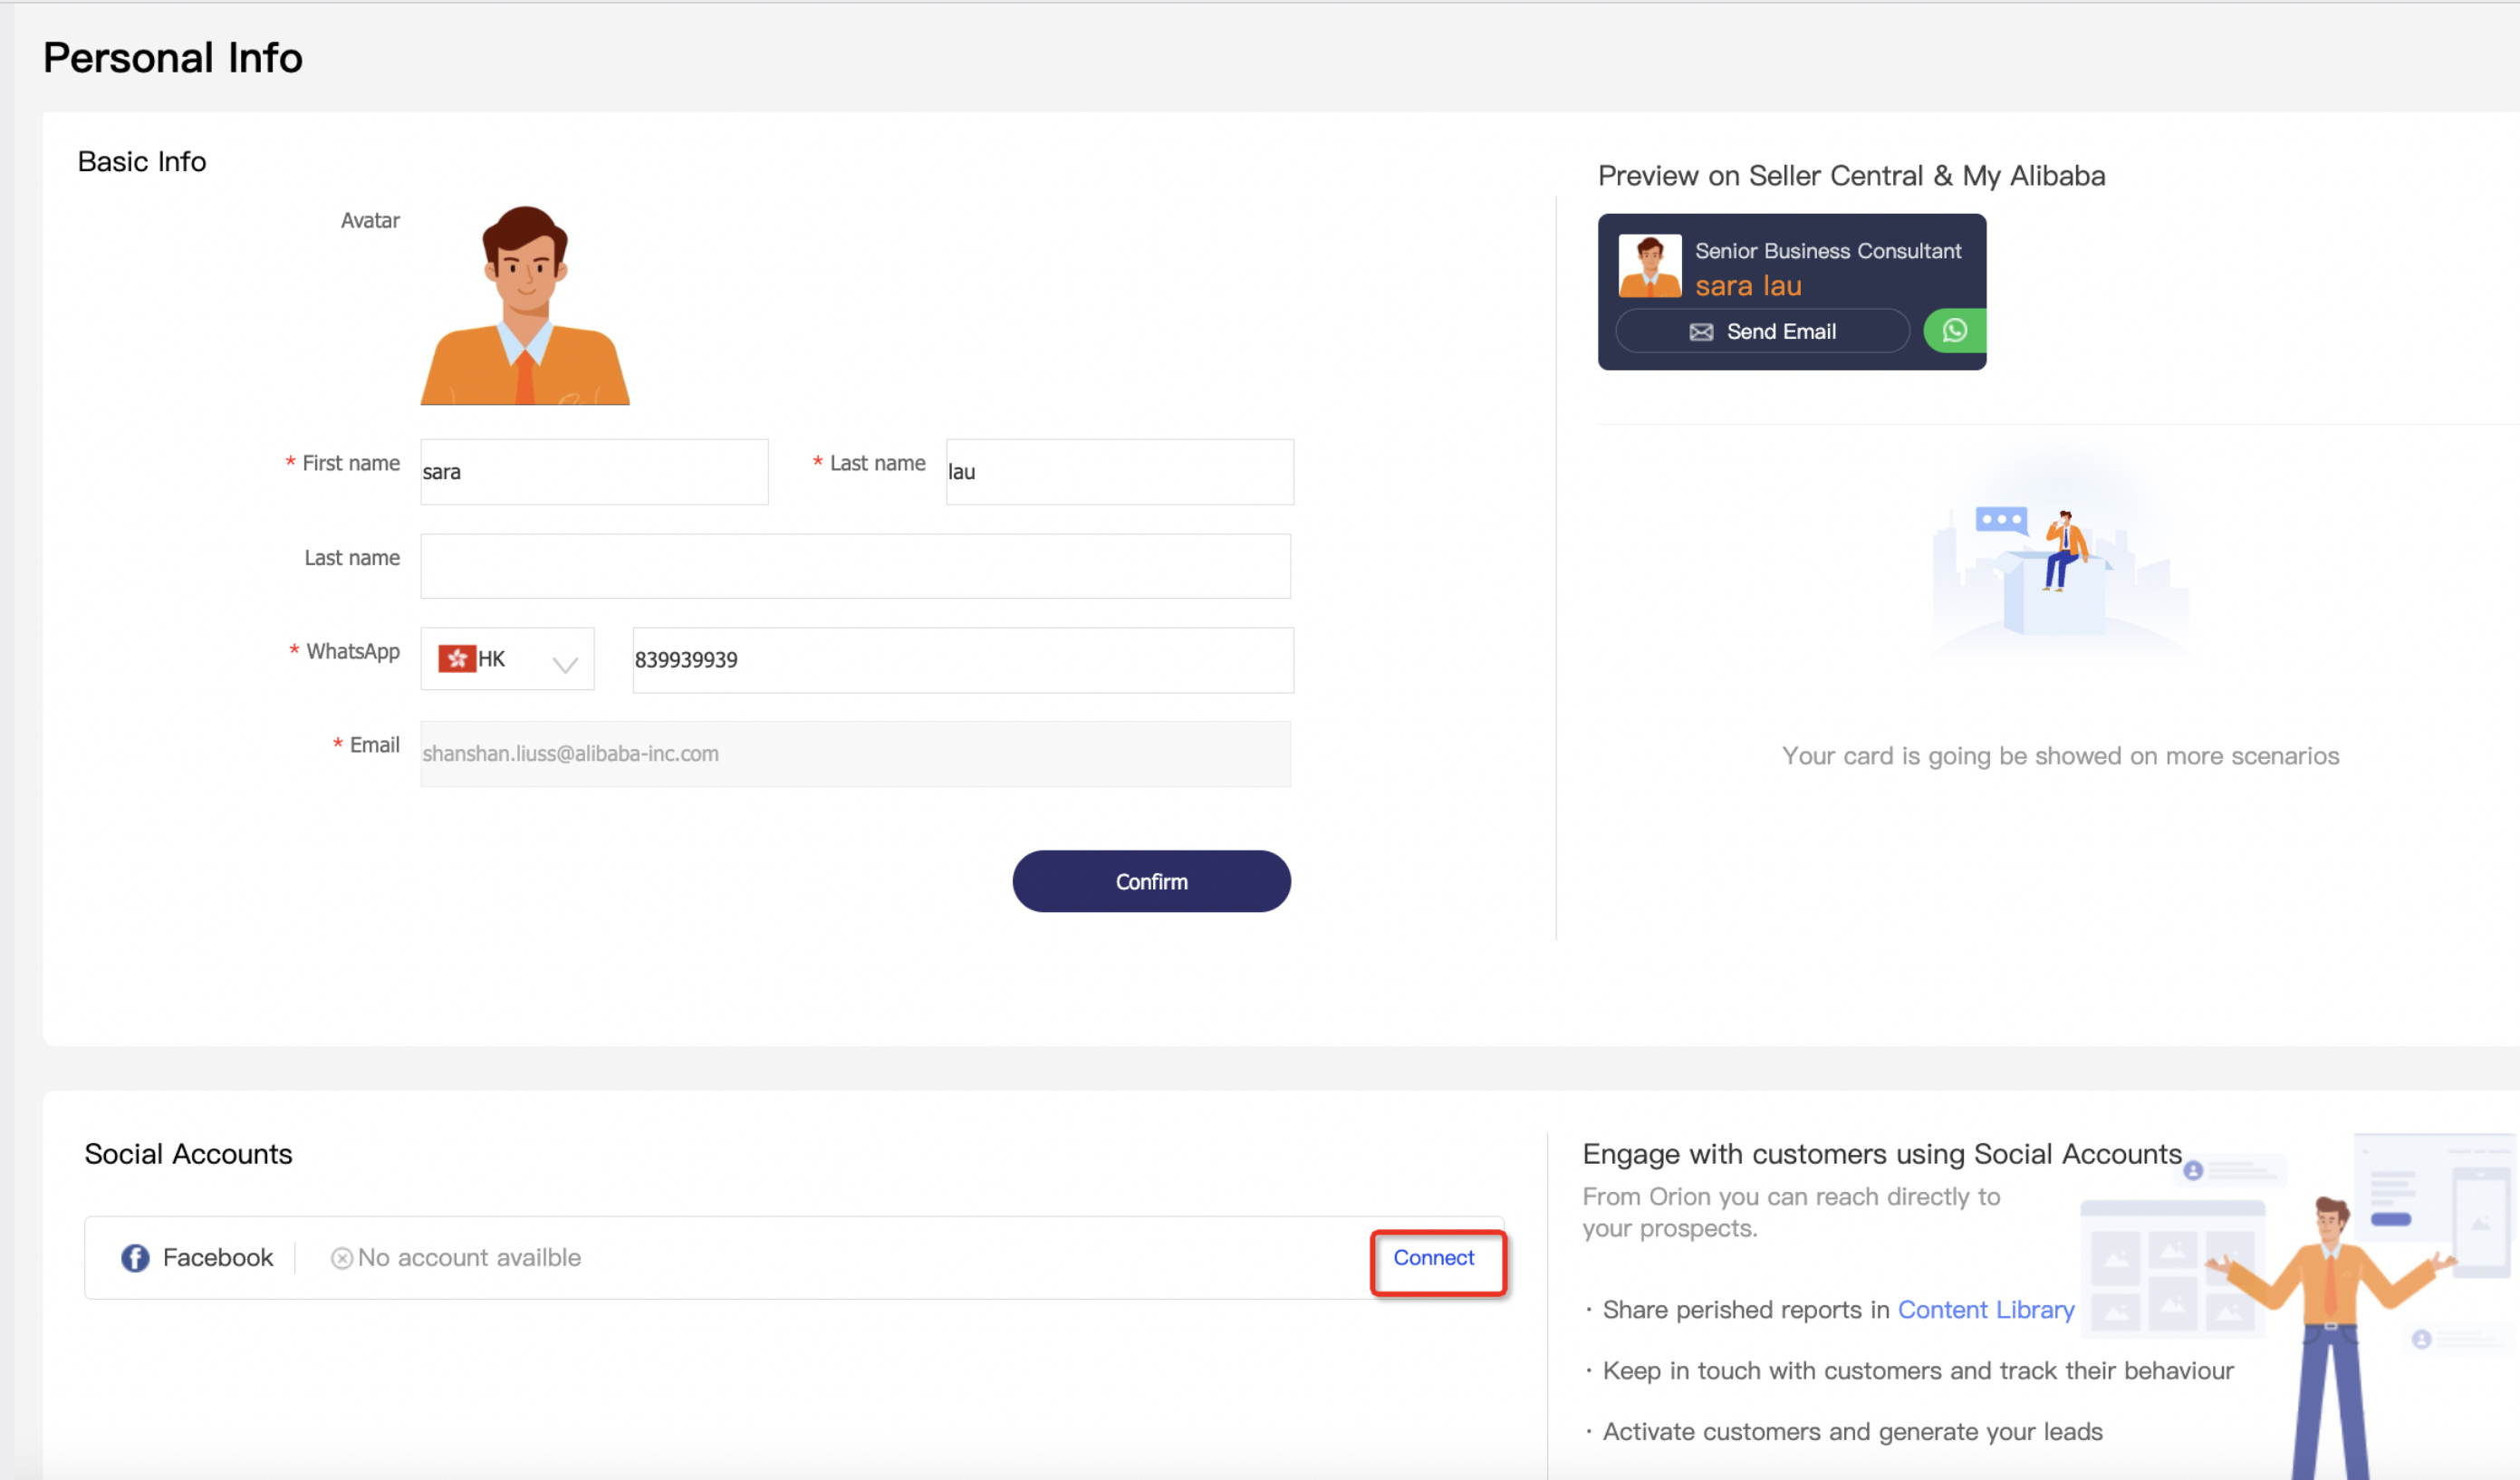
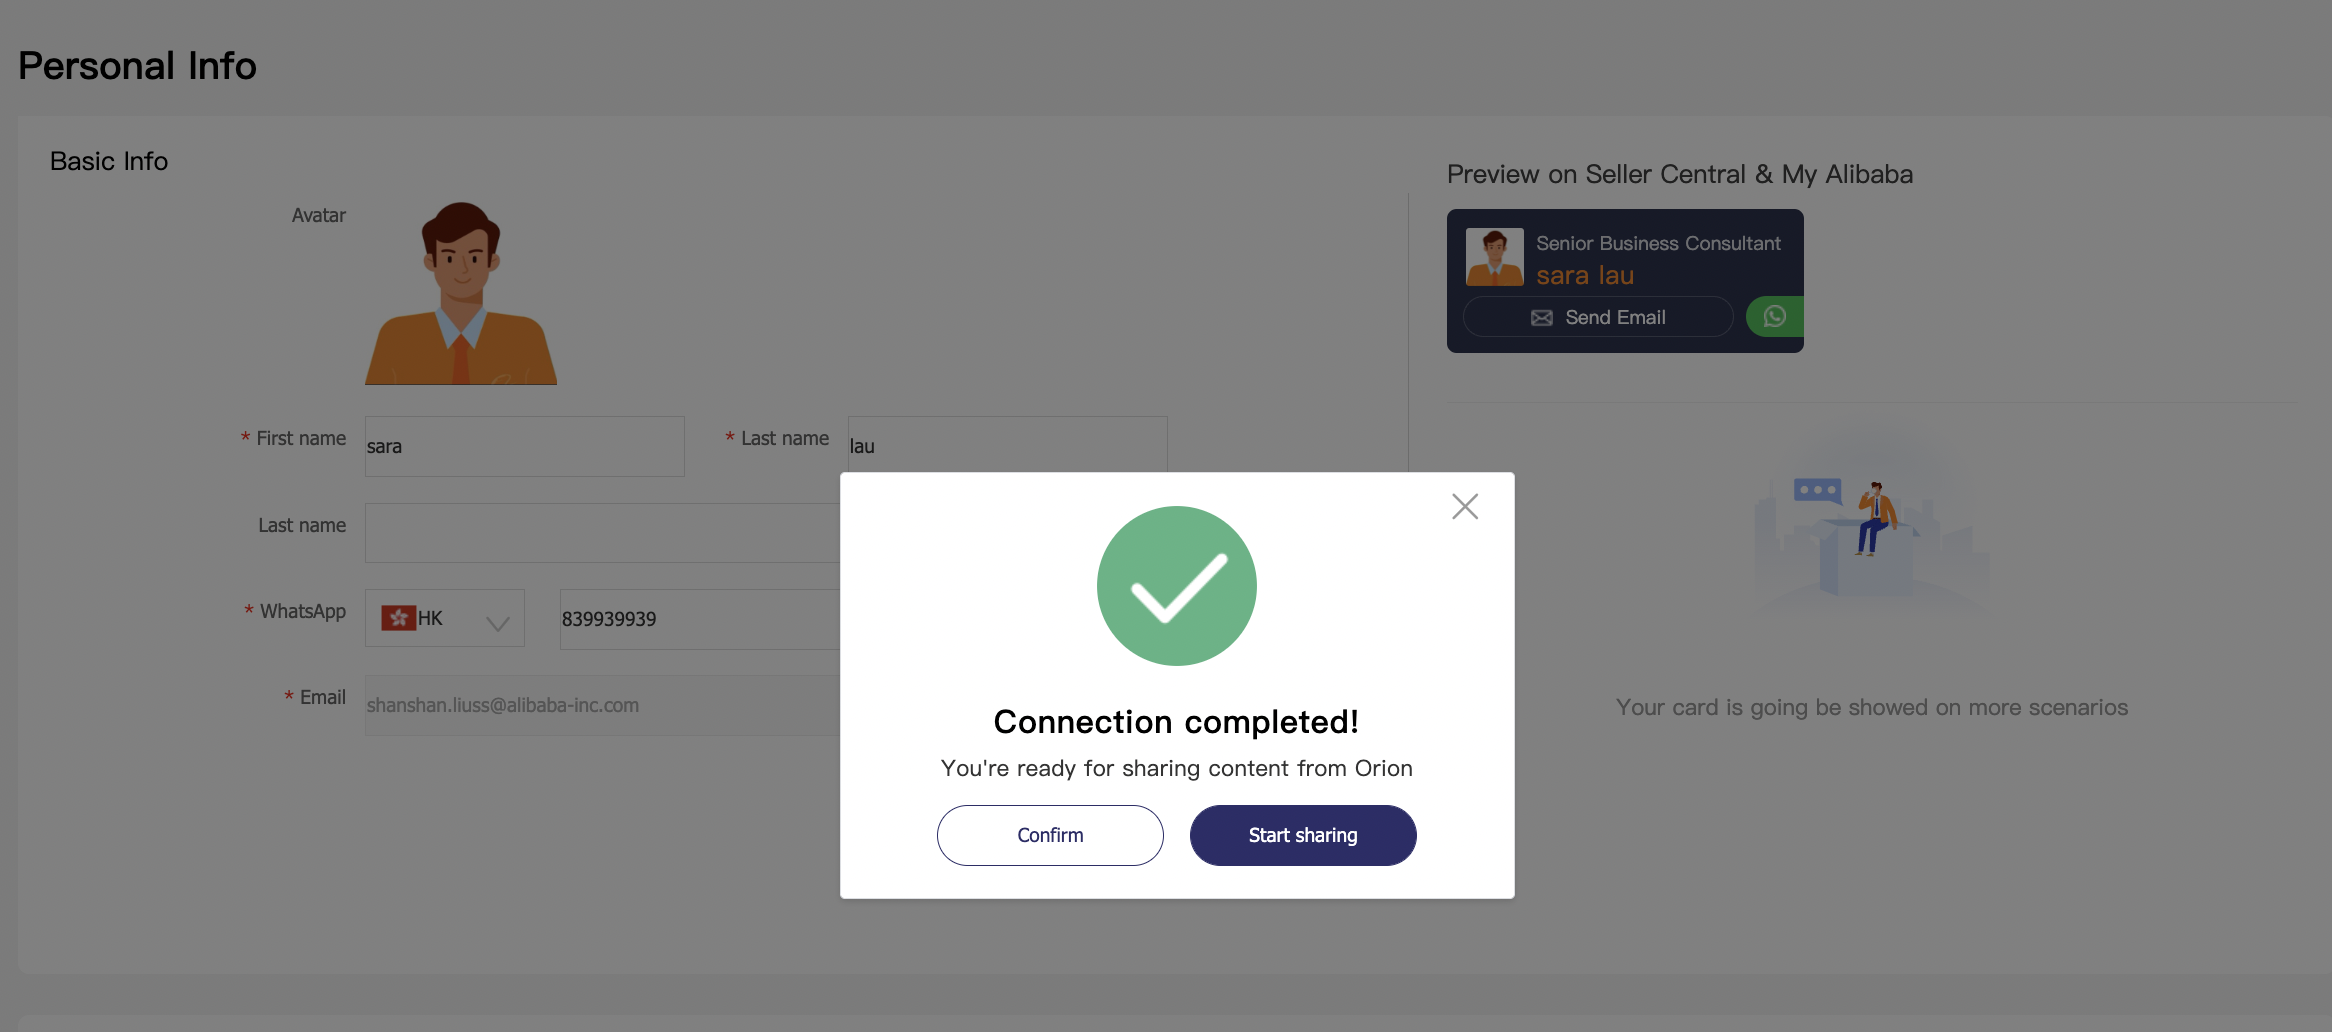
- Click “Start sharing” and enter the interface of “Content Library”
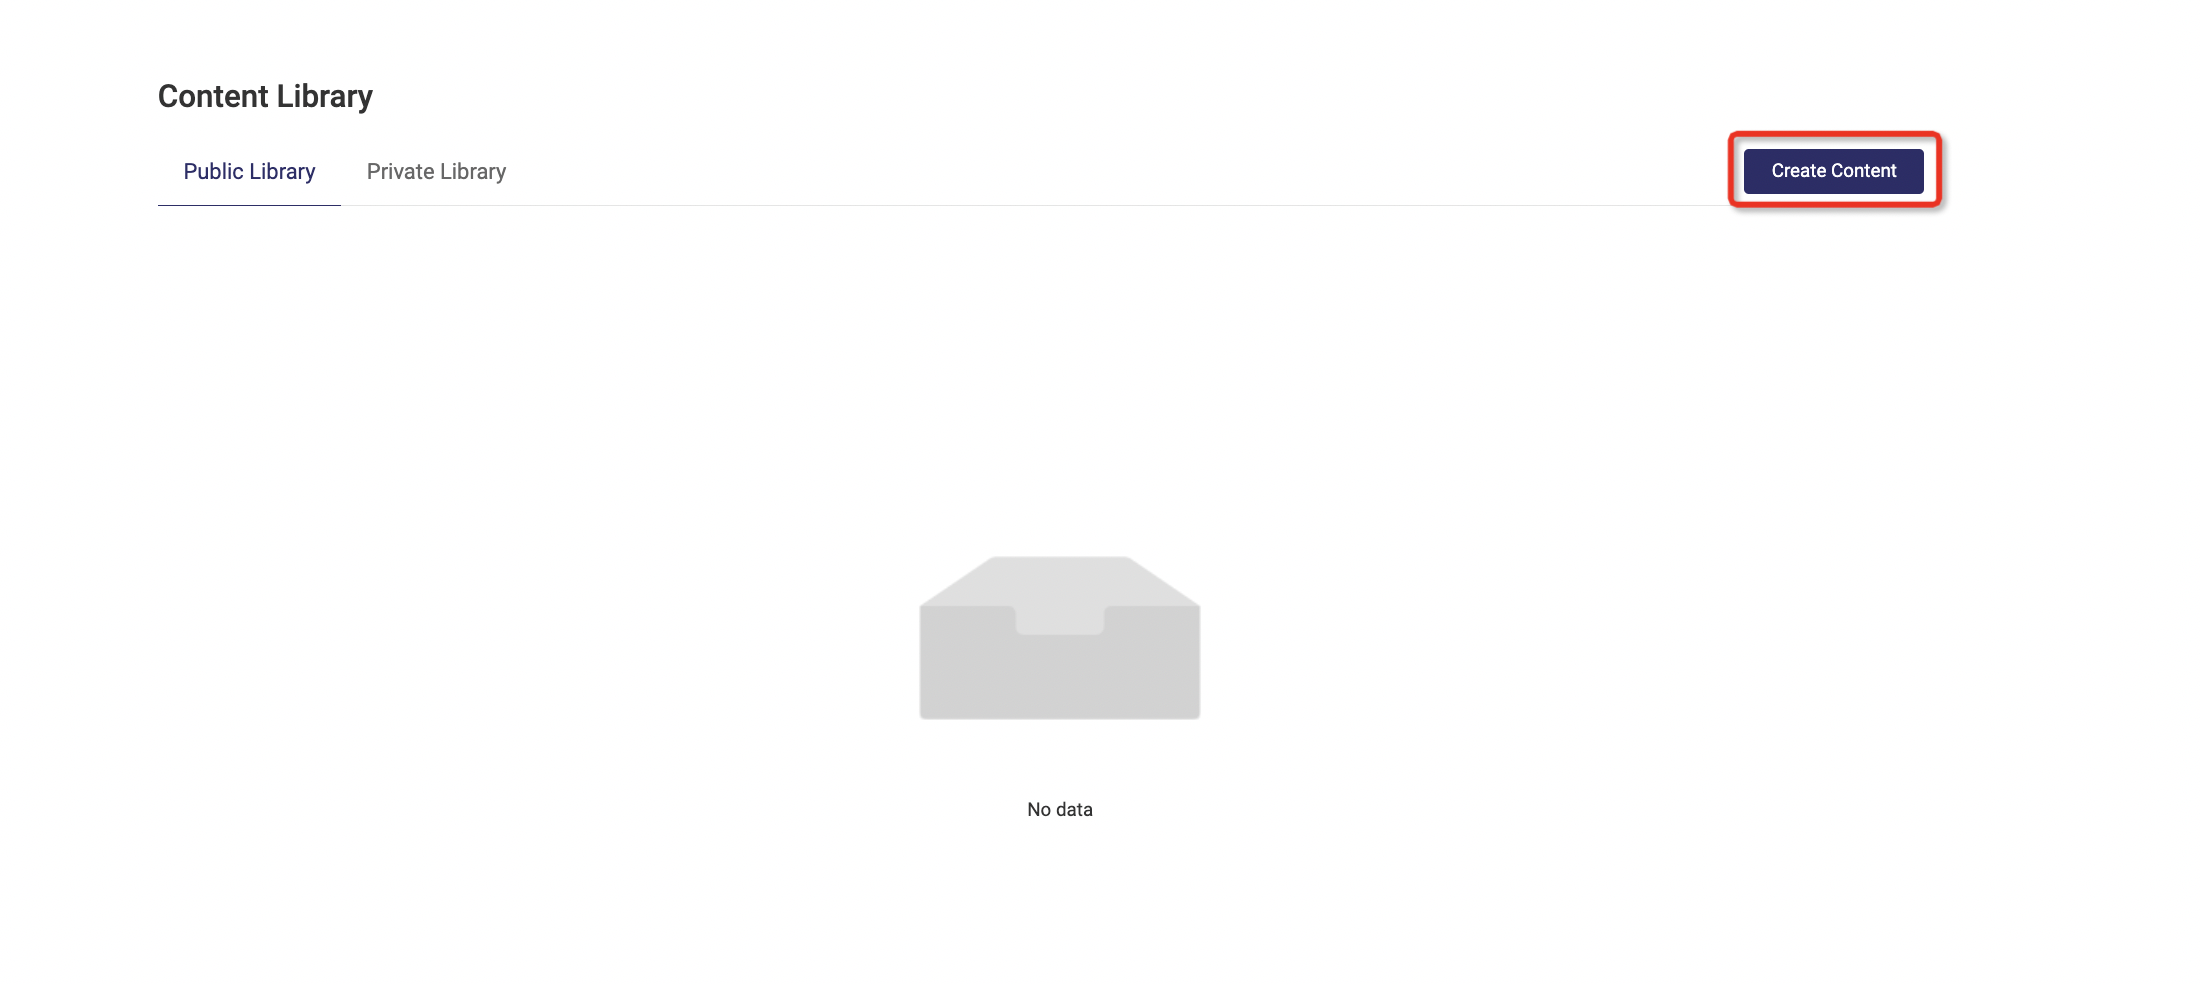
- Users could choose to share the content in his/her Private Library or in Public Library or Create Content in Sales assistant
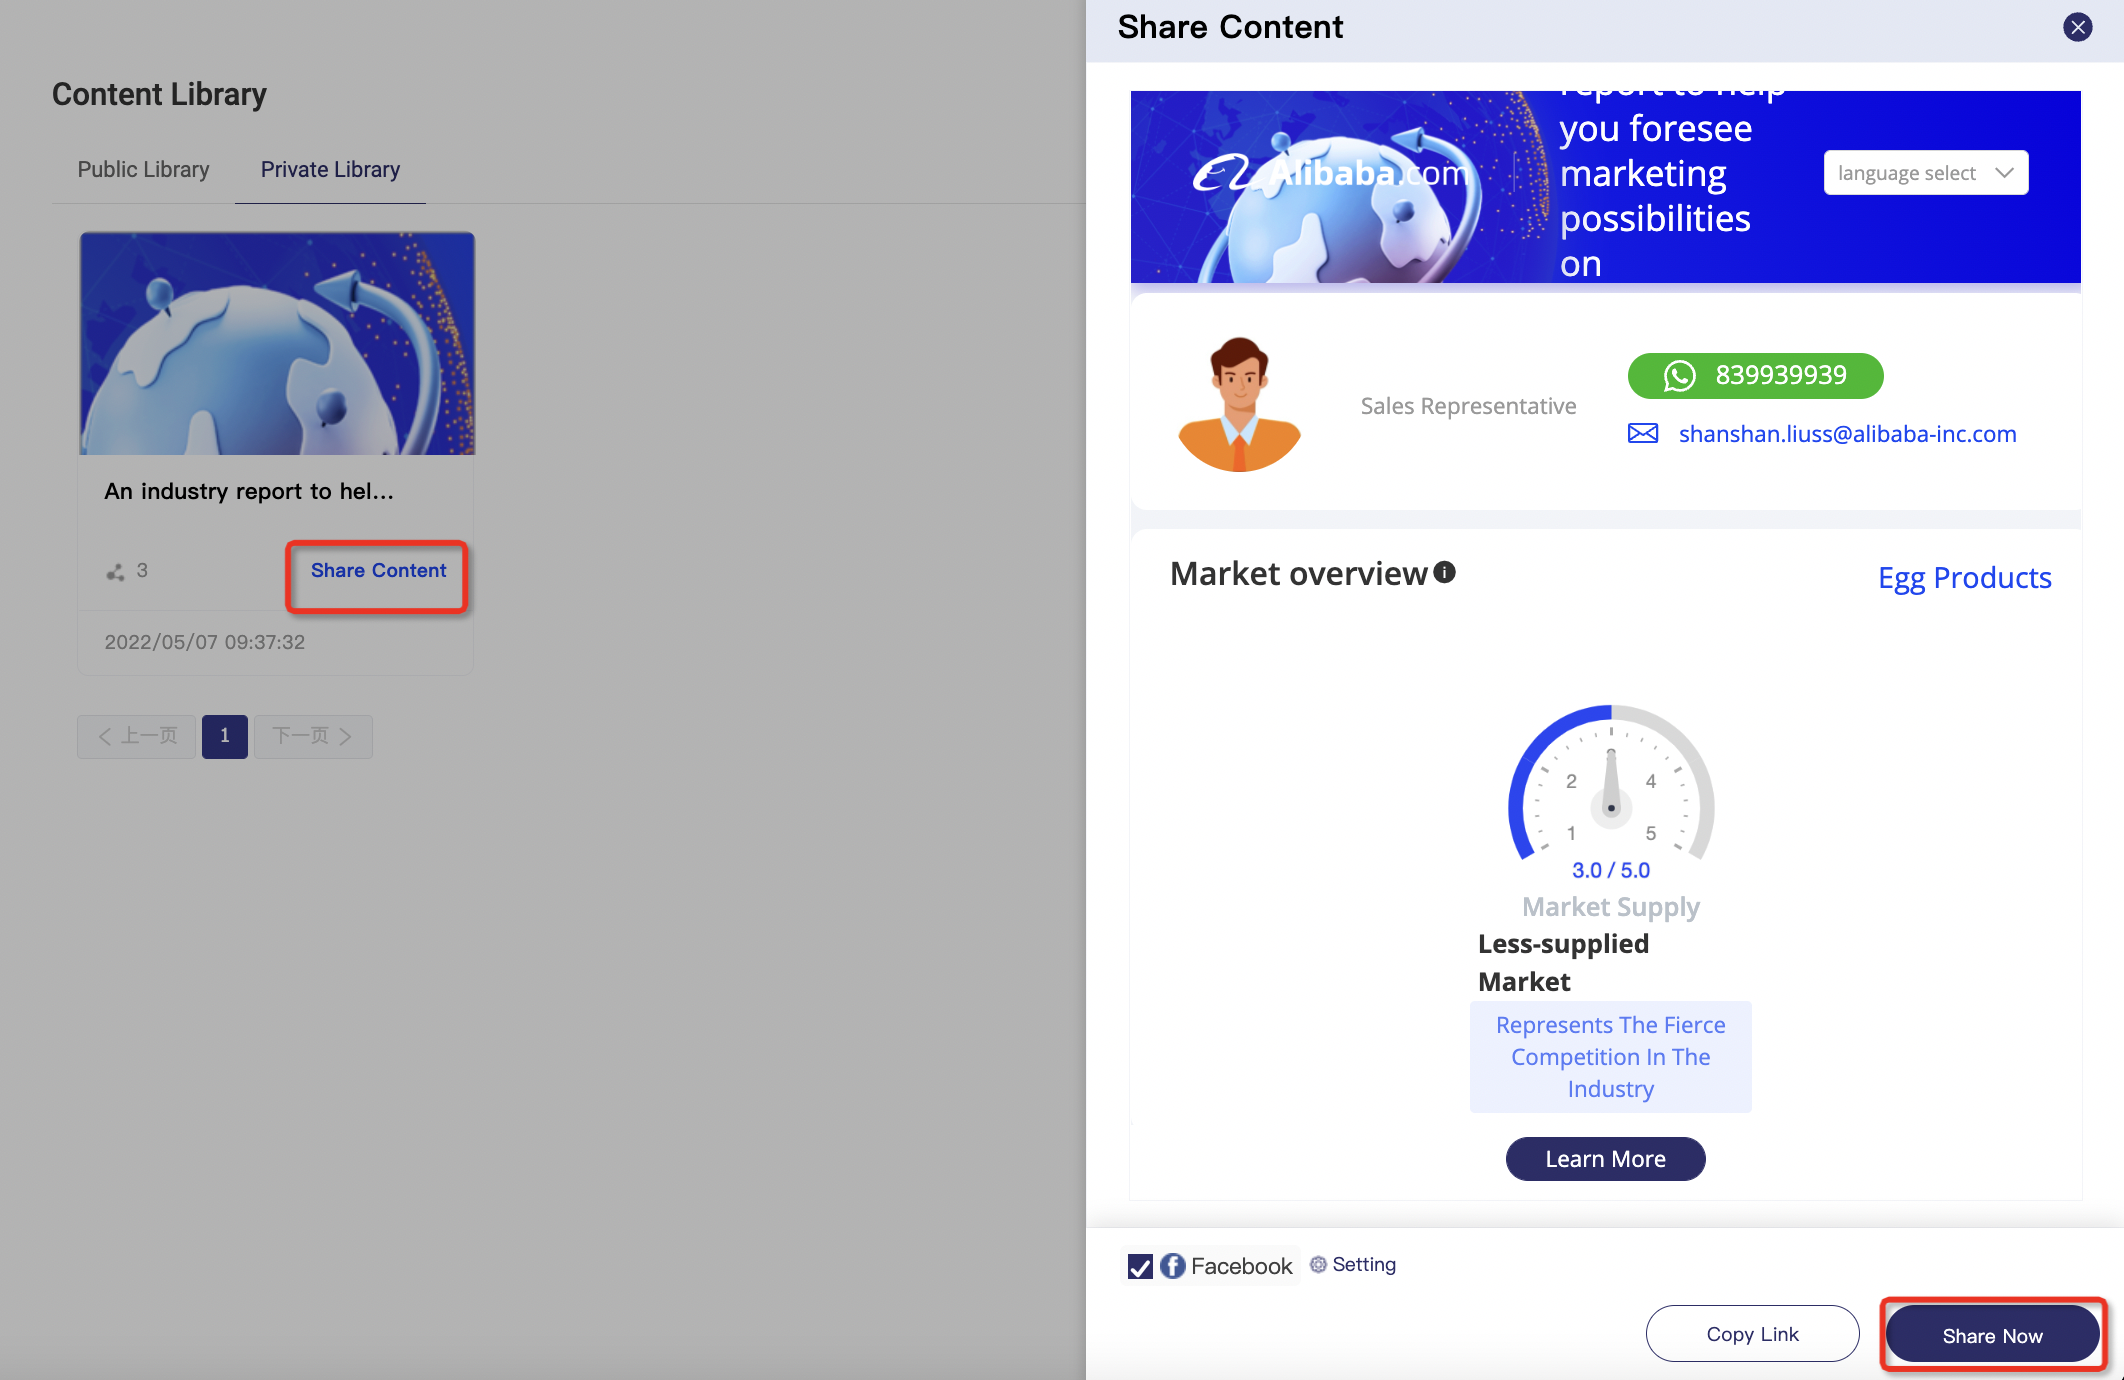
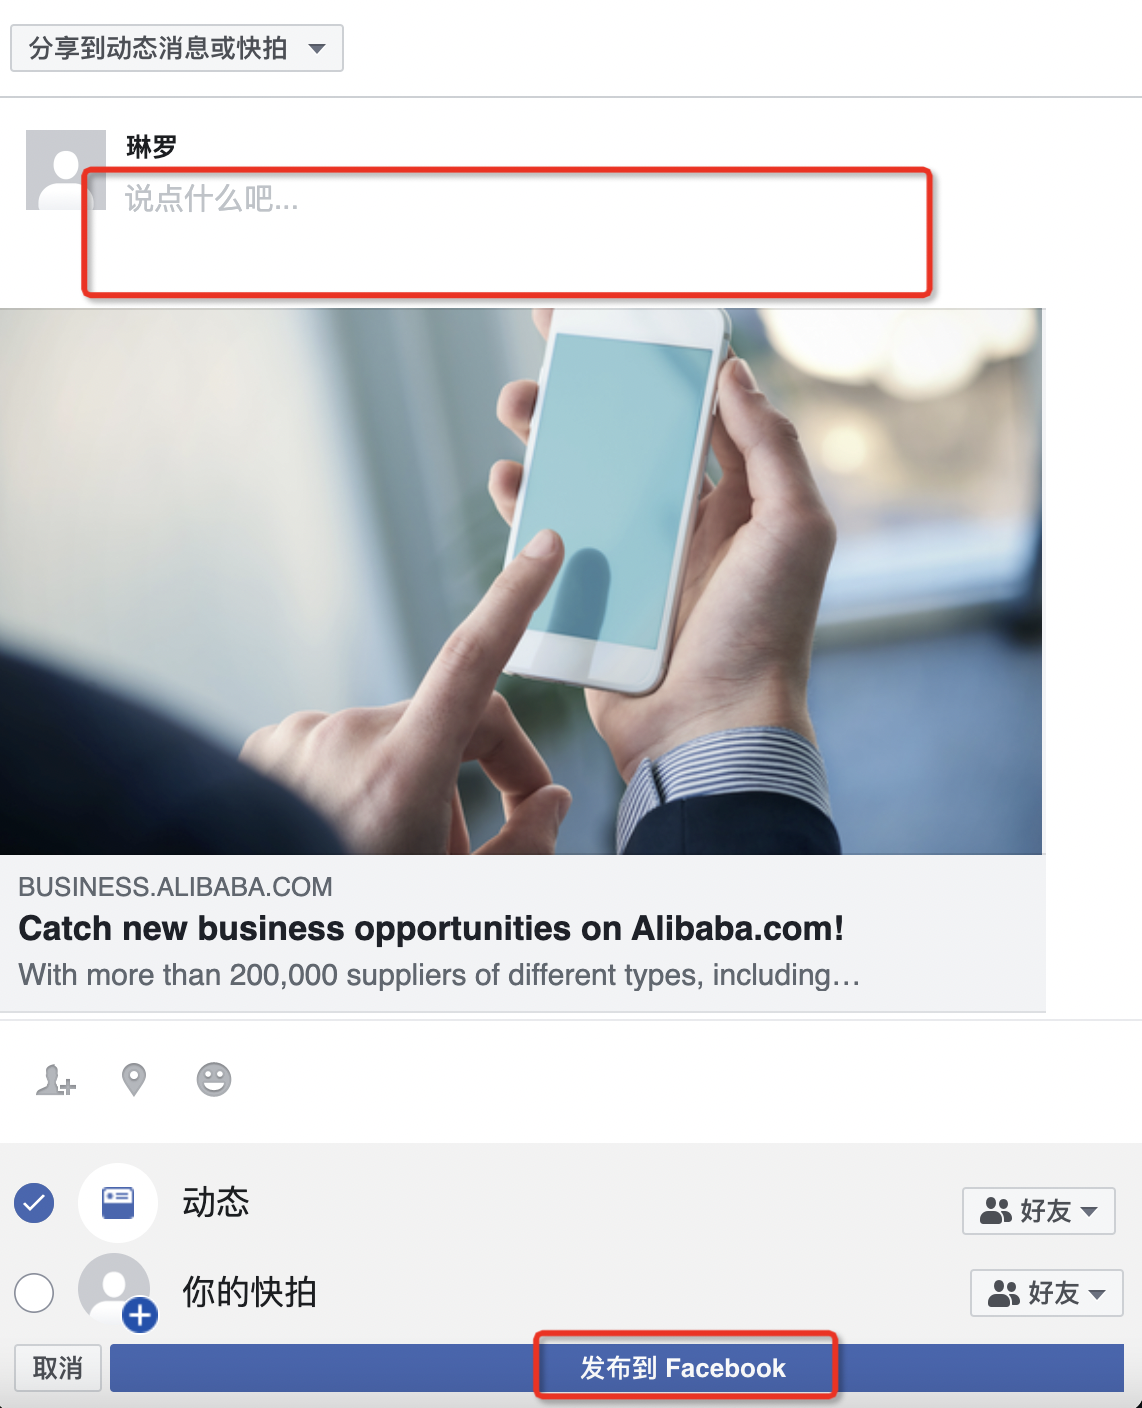
- Click “Share Now”, type the words and share on your facebook
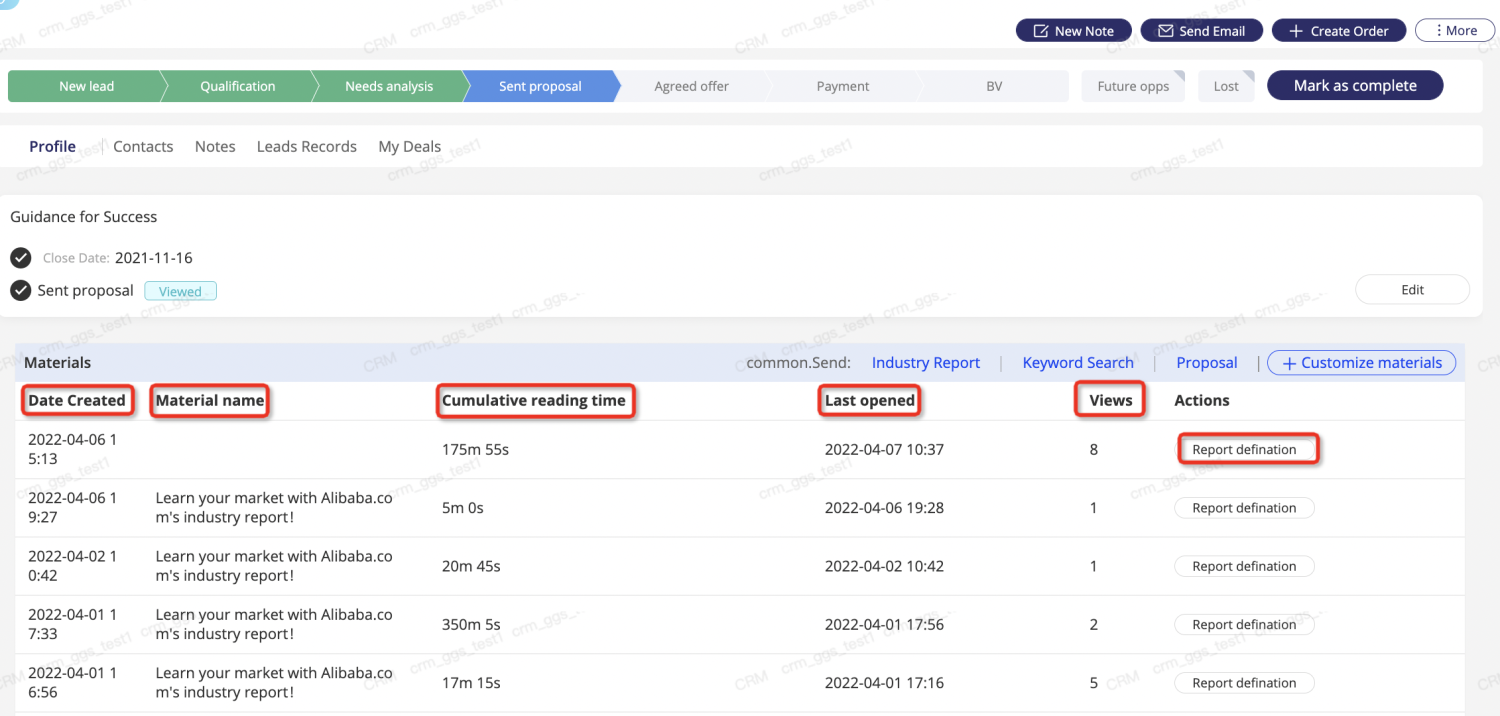
3.5.4 Check the data
Here you could check the customers’ cumulative reading time/last opened time/views to help evaluate the effect of the materials.
Appendix:Report page introduction
A.Market Overview
‘Market Overview’ to show market capacity/market growth rate/market supply of the selected industry.
B.Industry Overview
‘Industry Overview’ to show seller index/product index/opportunity index of the selected industry.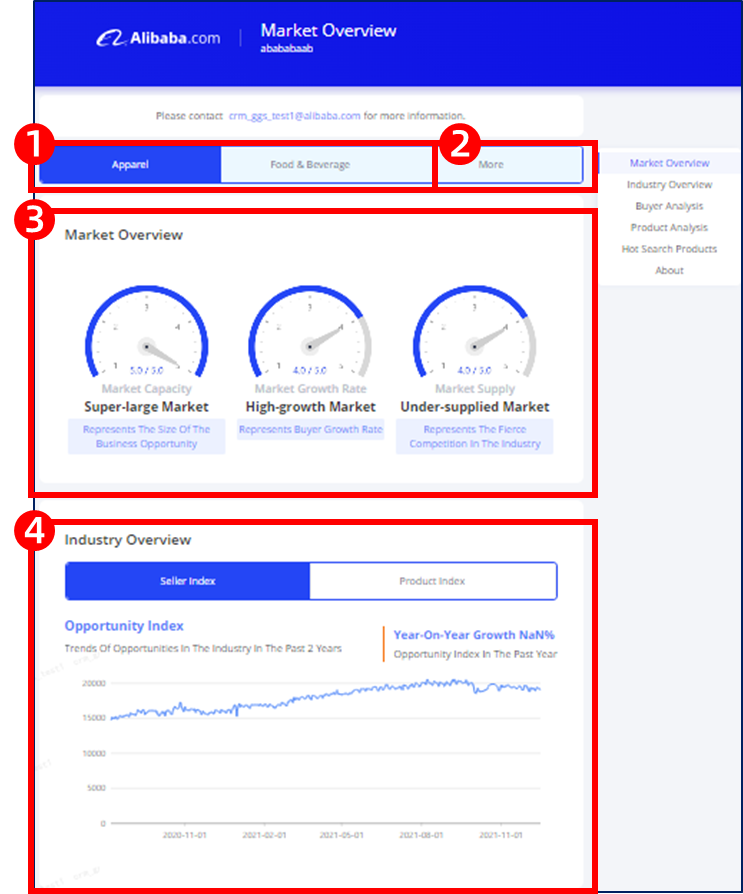
C.Buyer Analysis
Use a world map to show the buyer’s country distribution
Top 10 buyer countries.
Distribution of identified buyers.
D.Product Analysis
Hot search keywords and high-growth keywords of the month
Hot search products(include MOQ)
E.Category Analysis
Display Popular Category Rankings And Obtain Detailed Category Data
Note:Please be noted that CRM system will send message to corresponding sales rep. once the potential customer click the arrow in the red box.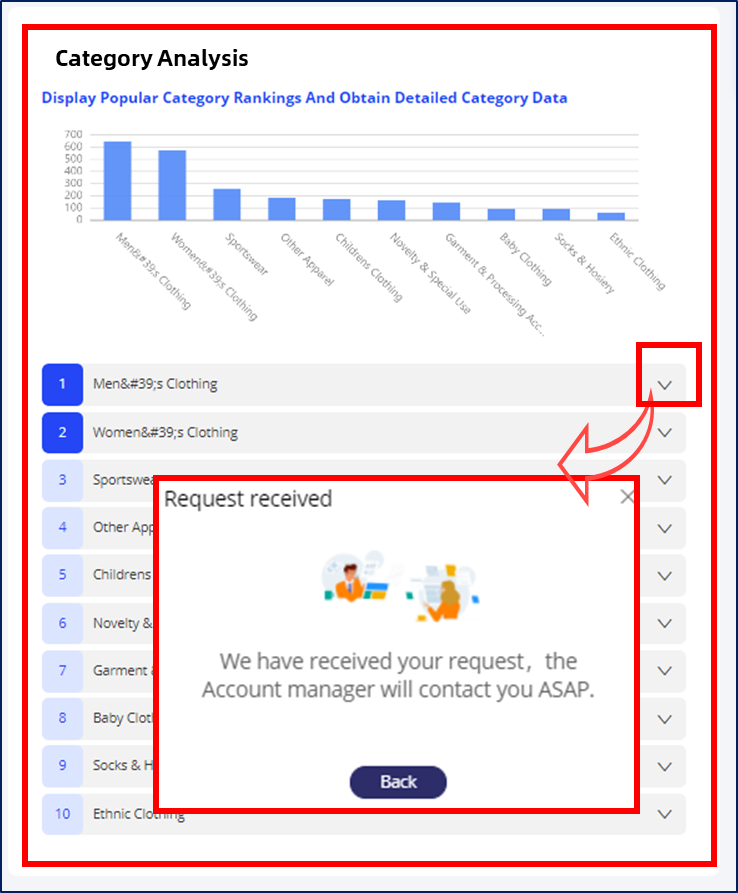
Add selections of Industry Report in Listing page.
Selections include ‘To be generated’ ,’Generated’ , ‘Sent’, and etc.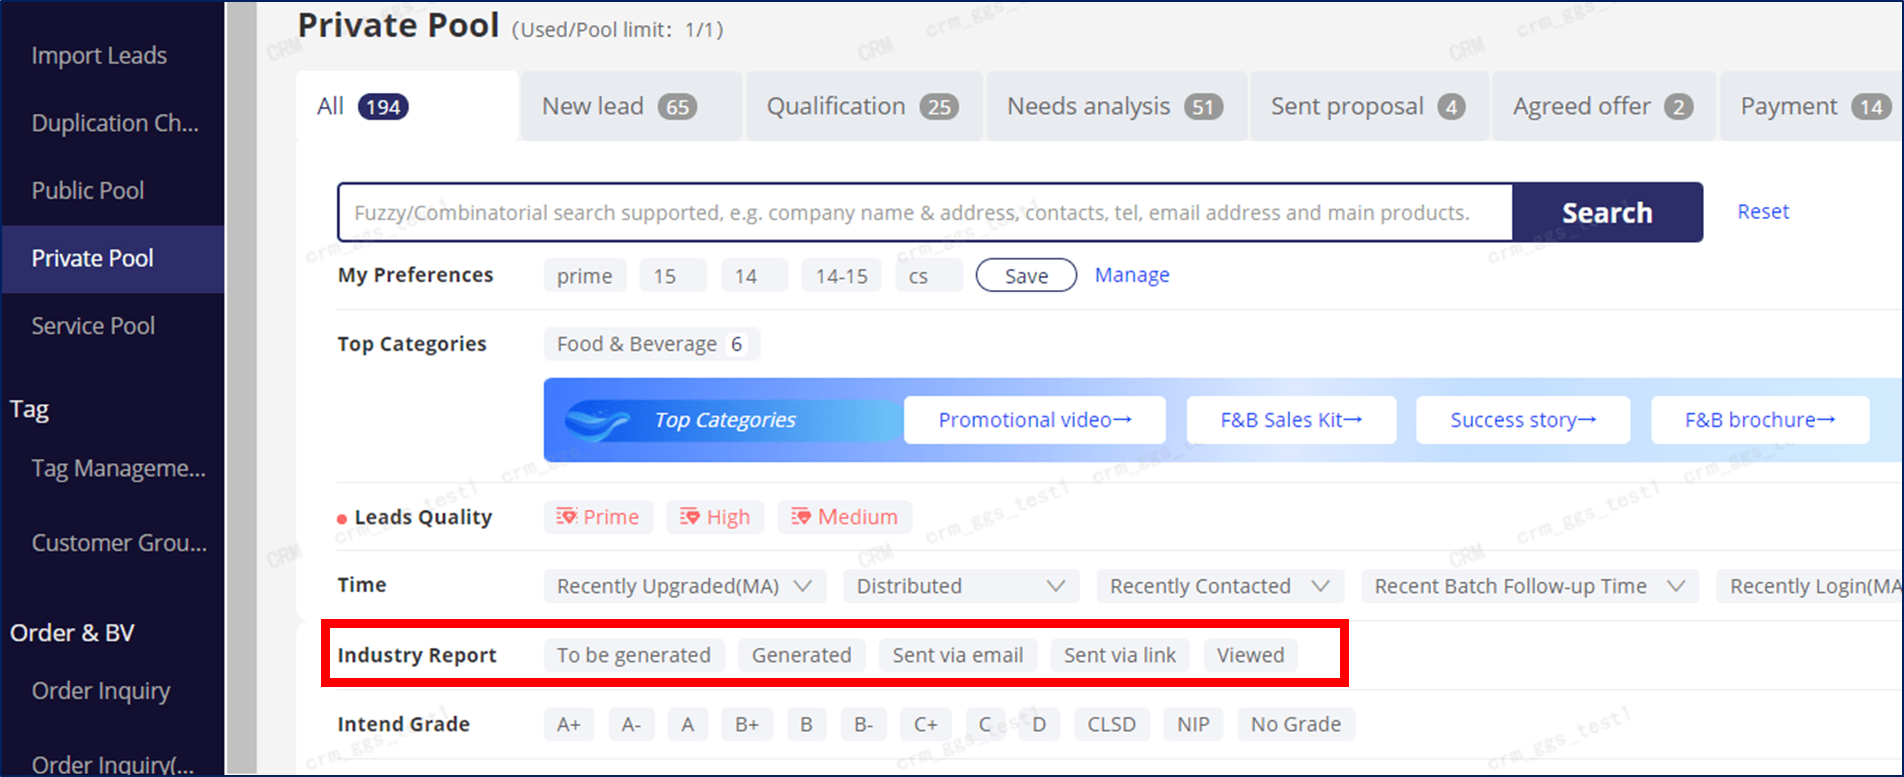
3.6 How to use Sales Pipeline?

3.6.1 Management of Sales Leads
The standard operating procedure of a complete sales process defined in the CRM system (hereinafter referred to as the “SOP”) is shown as follows:

After inputting a new lead into the private pool of a sales executive, the sales executive must fill in the Record of Effective Contact and Follow-Up at the New, Qualification, and Needs analysis stages of the CRM SOP within 24 hours, and determine the rating of the customer. (Refer to Article 12. Record of effective contact and follow-up: The activity where a channel partner reaches the customer by phone, email, instant messaging, or other methods, checks “Effective Communication” in the “Contact Result” column of the CRM Sales Record, and specifies the following customer information in the CRM system: customer type (factory, trade company, or trade company with factories); key person or not; with export experience or not (if yes, specify the target market); with experience of operations on other e-commerce platforms or no; with experience of attending offline exhibitions or not; with budget or not.
The sales executive shall, after sending a proposal to the customer, record and describe the follow-up activity in detail at the Sent proposal stage of the CRM SOP within 24 hours.
The sales executive shall, after determining an offer and the payment time, record and describe the follow-up activity in detail at the Agreed offer and Payment stages of the CRM SOP within 24 hours.
3.6.2 How Sales Pipeline looks like?
Listing page
- Click each tab to filter potential customers in different pipeline stage.
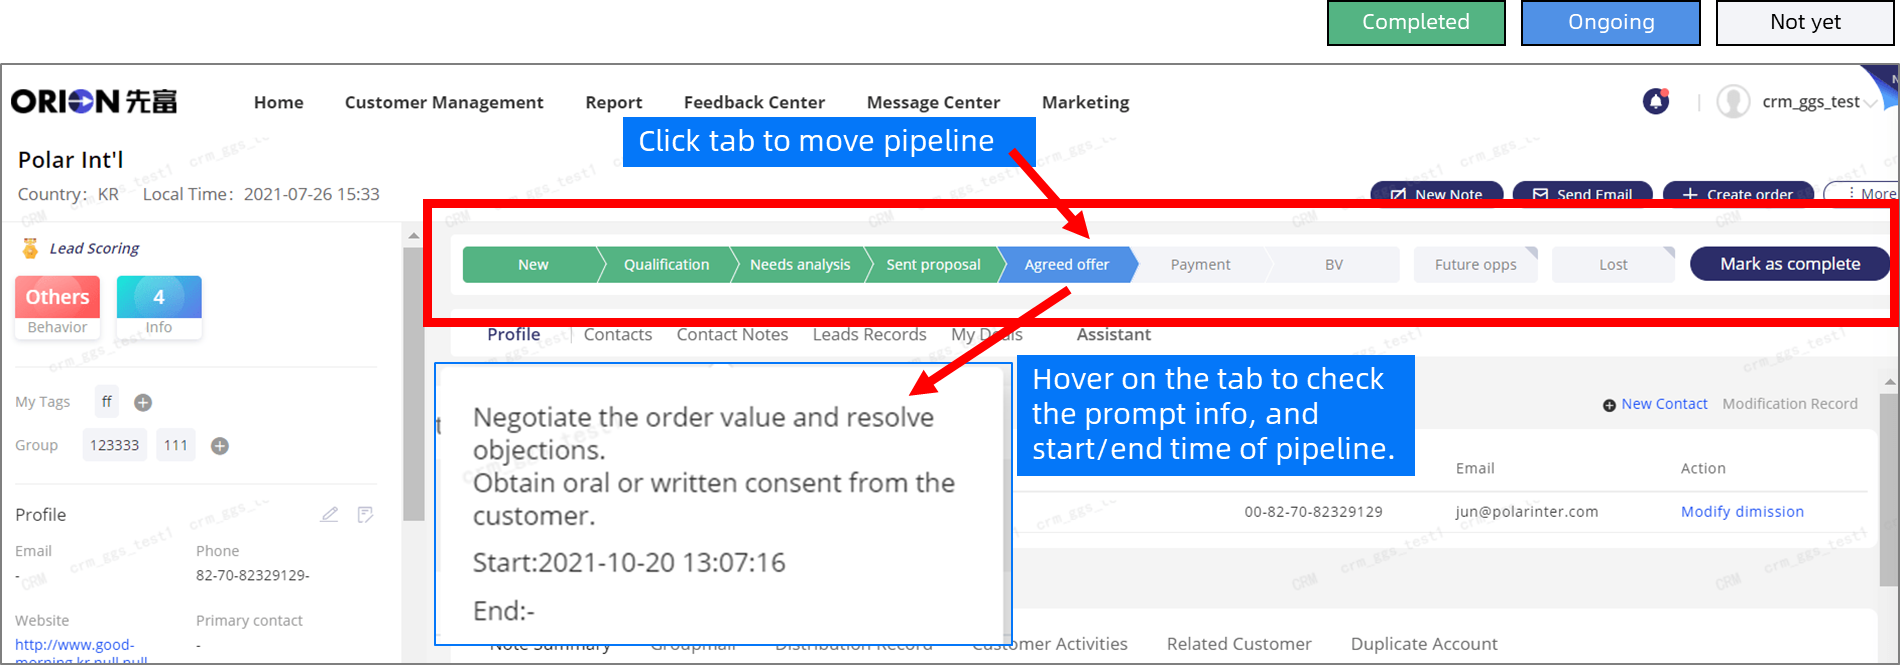
Detail page
- Add pipeline stage display in detail page
- Click tab to move pipeline stage, or click ‘Mark as complete’ to move the pipeline.
- Different color of the pipeline has different meaning .
- Hover on the tab to check the prompt info, and start/end time of pipeline.
3.6.3 Guidance for Success
01.NEW LEAD Stage
Contact and learn about your new lead quickly.
1.When sales check lead info of a new lead in detail page, the section(Guidance for Success) will appear in Assistant.
2.CRM Orion will move the pipeline to next stage automatically, when sales complete ONE SALES NOTE. 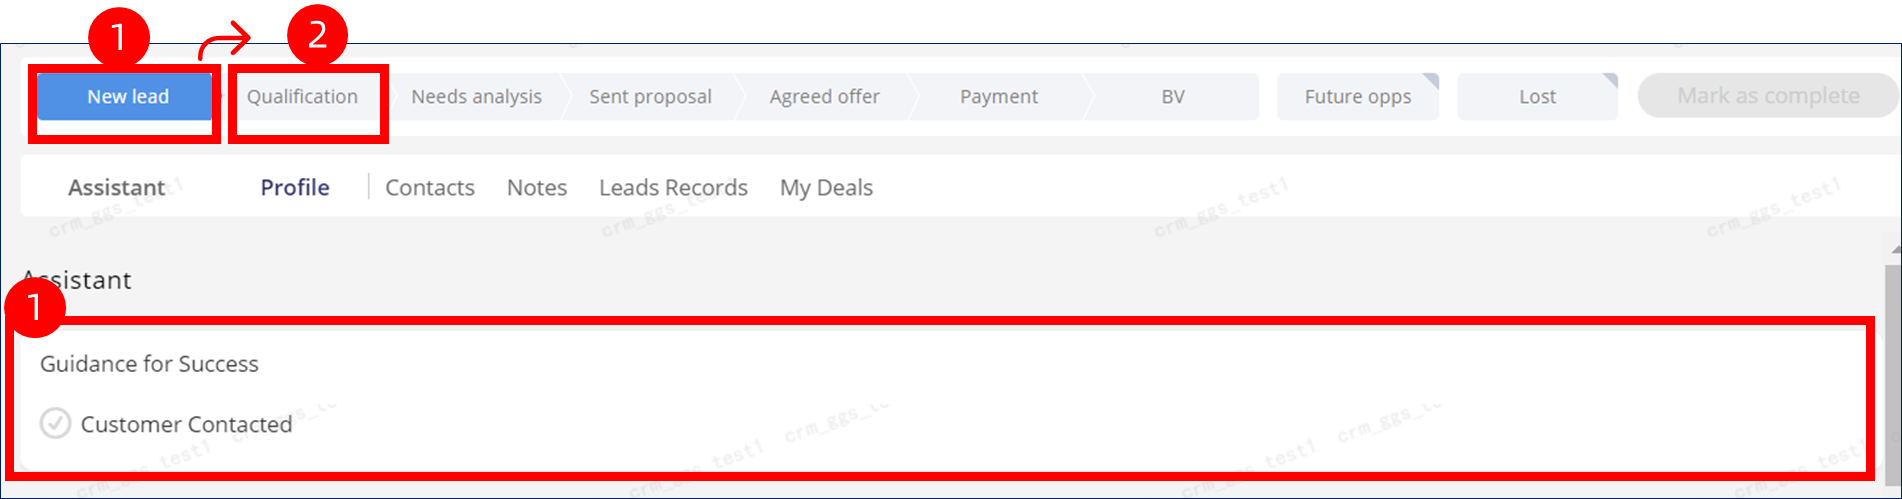
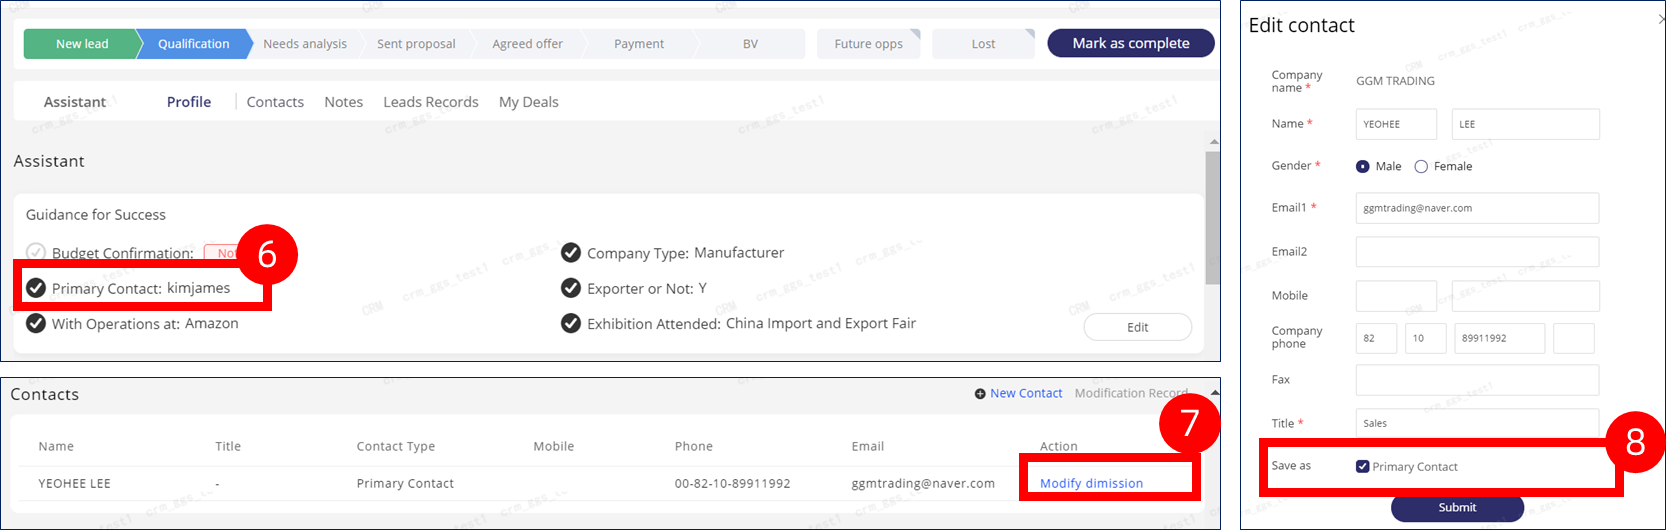
02.QUALFICATION Stage
Identify potential customers by six key elements.
1.To move the pipeline stage to Qualification.
2.The section(Guidance for Success) will appear in Assistant.
3.Click EDIT button to modify the required information.
4.The ICON will show  after sales complete each question.
5.CRM Orion will move the pipeline to next stage automatically, when sales complete the six questions.
6.Most elements can be edit within the section, except for ‘Primary Contact’
7.Please note that you can only modify the primary contact in CONTACTS section .
8.Click the , and submit.
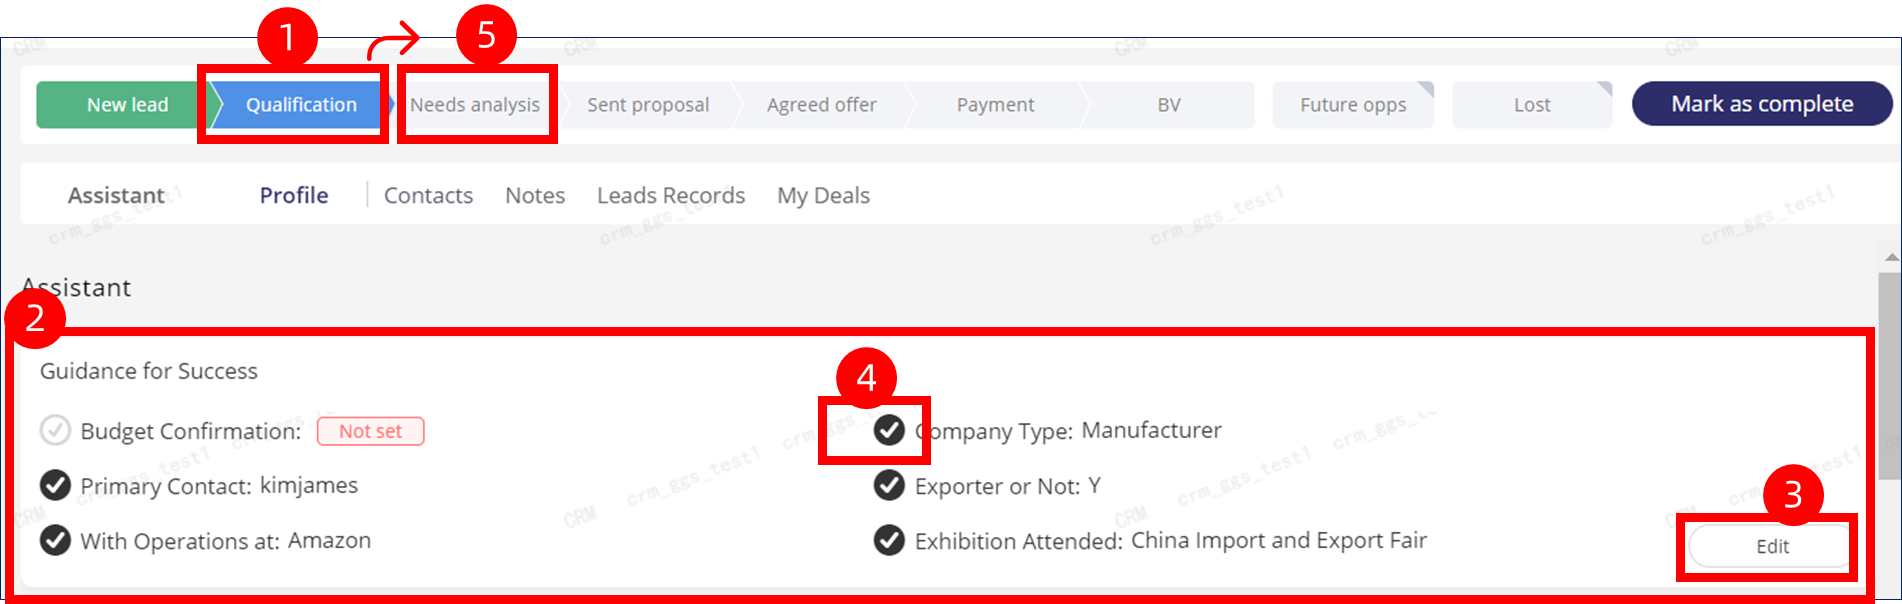
03.NEEDS ANALYSIS Stage
1.Follow six principles to analyze the needs of potential customers
2.To move the pipeline stage to NEEDS ANALYSIS.
3.The section(Guidance for Success) will appear in Assistant .
4.Click EDIT button to modify the required information.
5.The ICON will show  after sales complete each task.
6.CRM Orion will move the pipeline to next stage automatically, when sales complete the tasks. 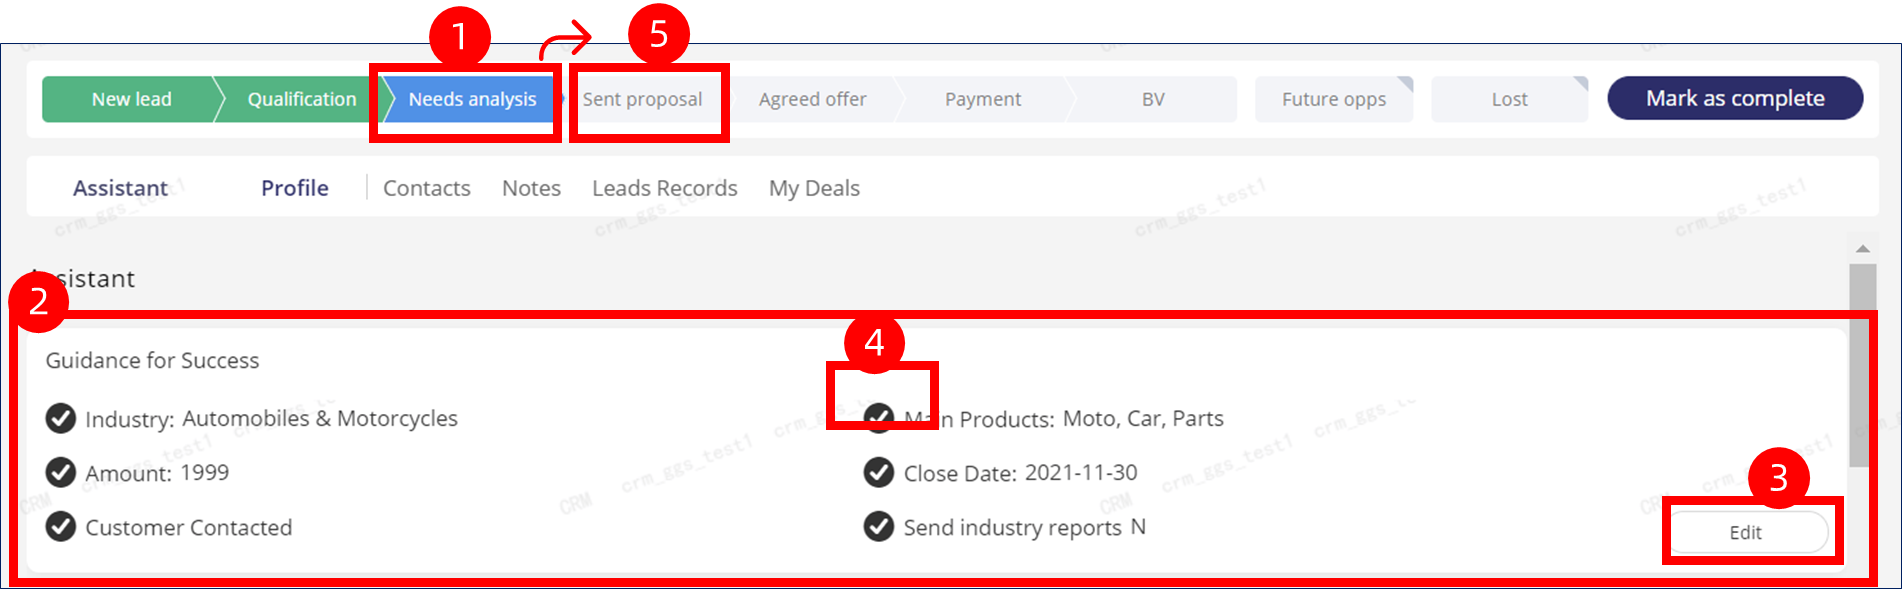
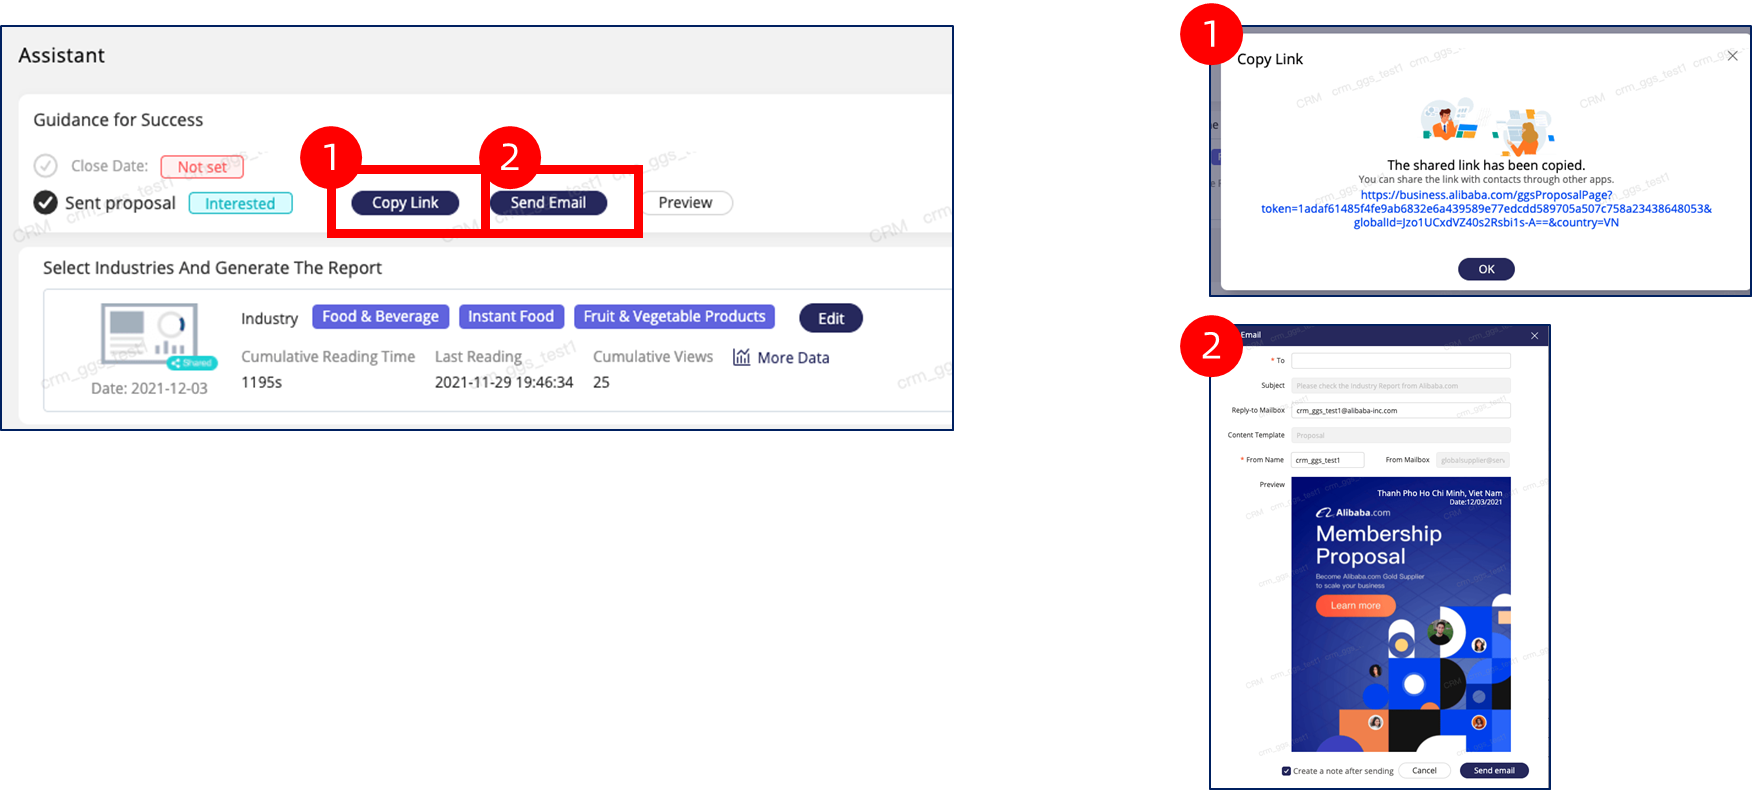
04.SENT PROPOSAL Stage
New ‘Sent proposal’ function in Assistant section. It will help sales to generate an official PROPOSAL LINK.
The function area will appear when pipeline stage equals to ‘Sent proposal’
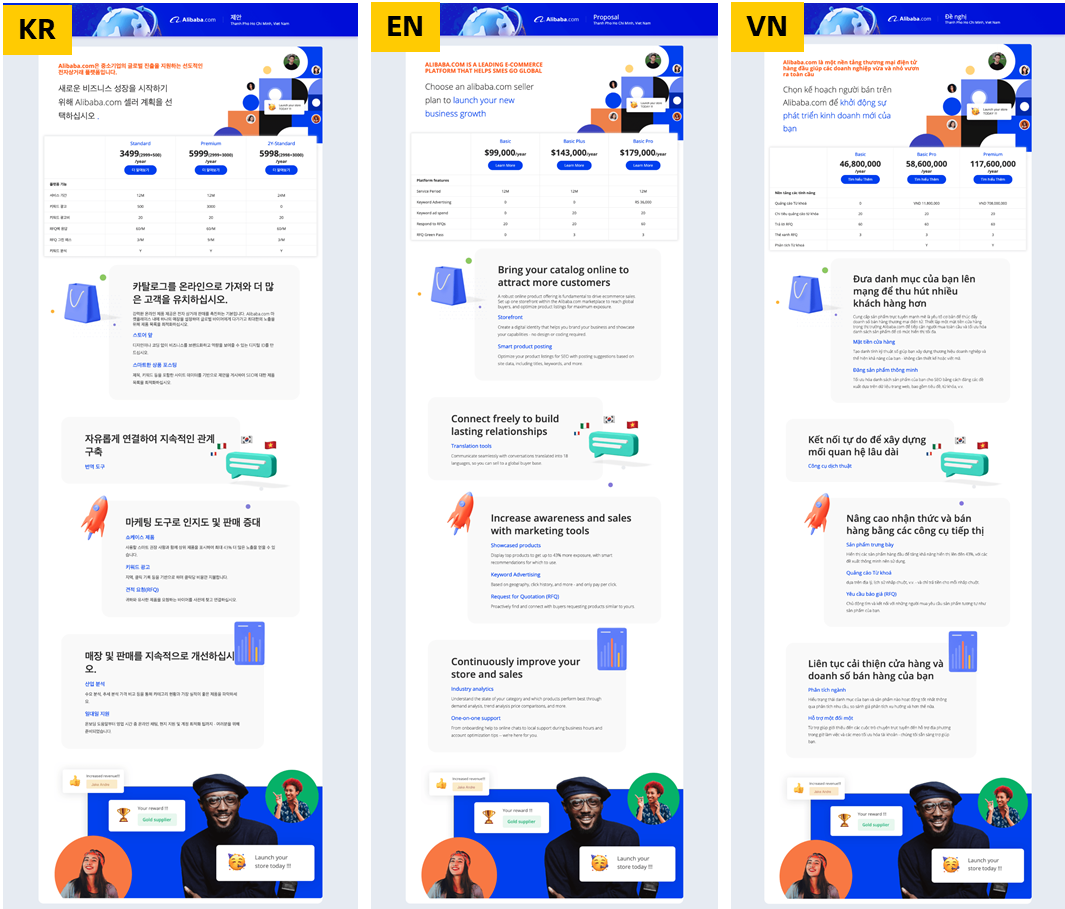
Support country teams to define standard proposal formats.
NOTE: Pilot countries include South Korean, Vietnam, Pakistan and India. 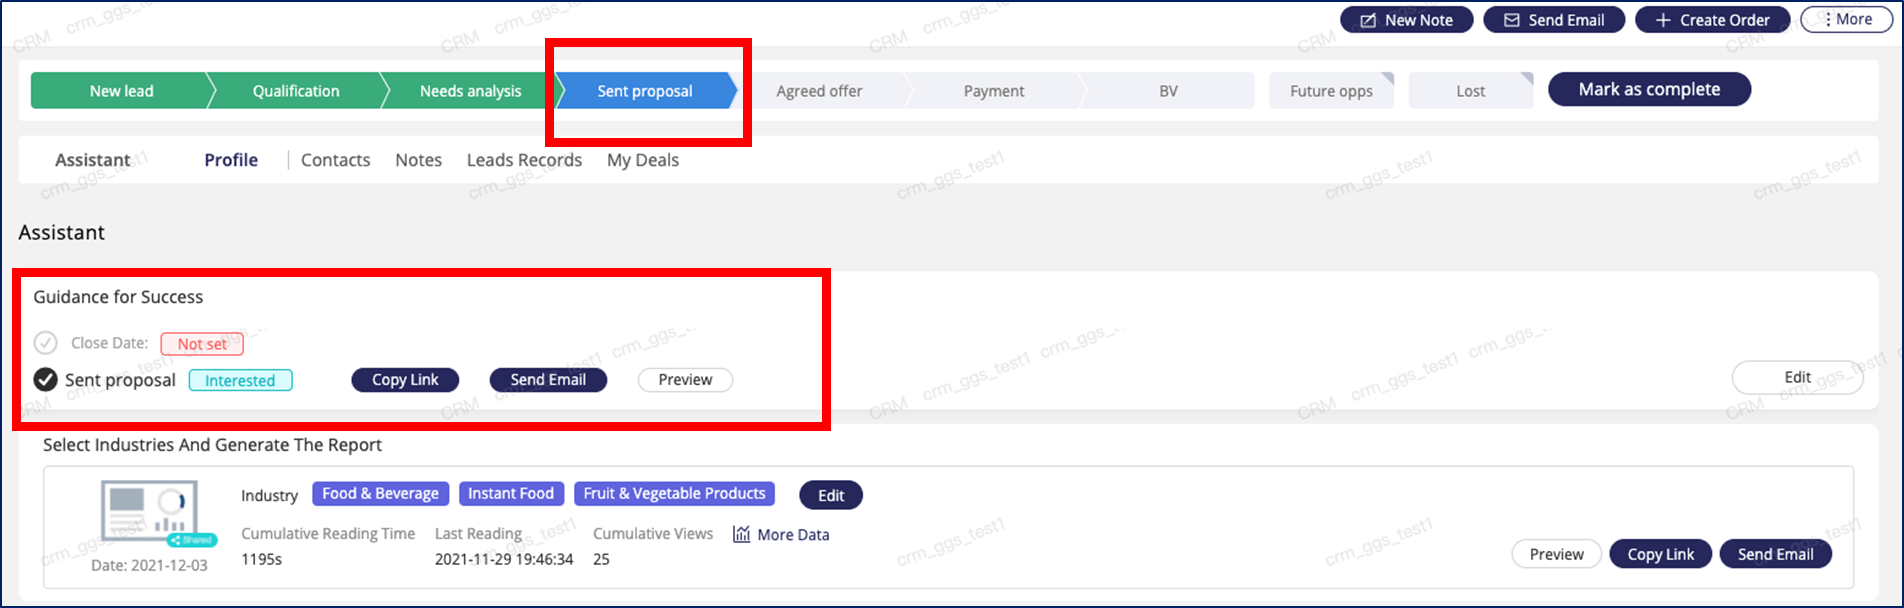
Benefits:
- The proposal is officially designed by Alibaba.com, with unified vision and brand endorsement to improve the trust .
- Multi-language support(Currently support VN/KR/EN), support country team to customize the content of proposal.
- Using CRM ORION to collect the reading behavior of potential customers is conducive to further sales follow-up.
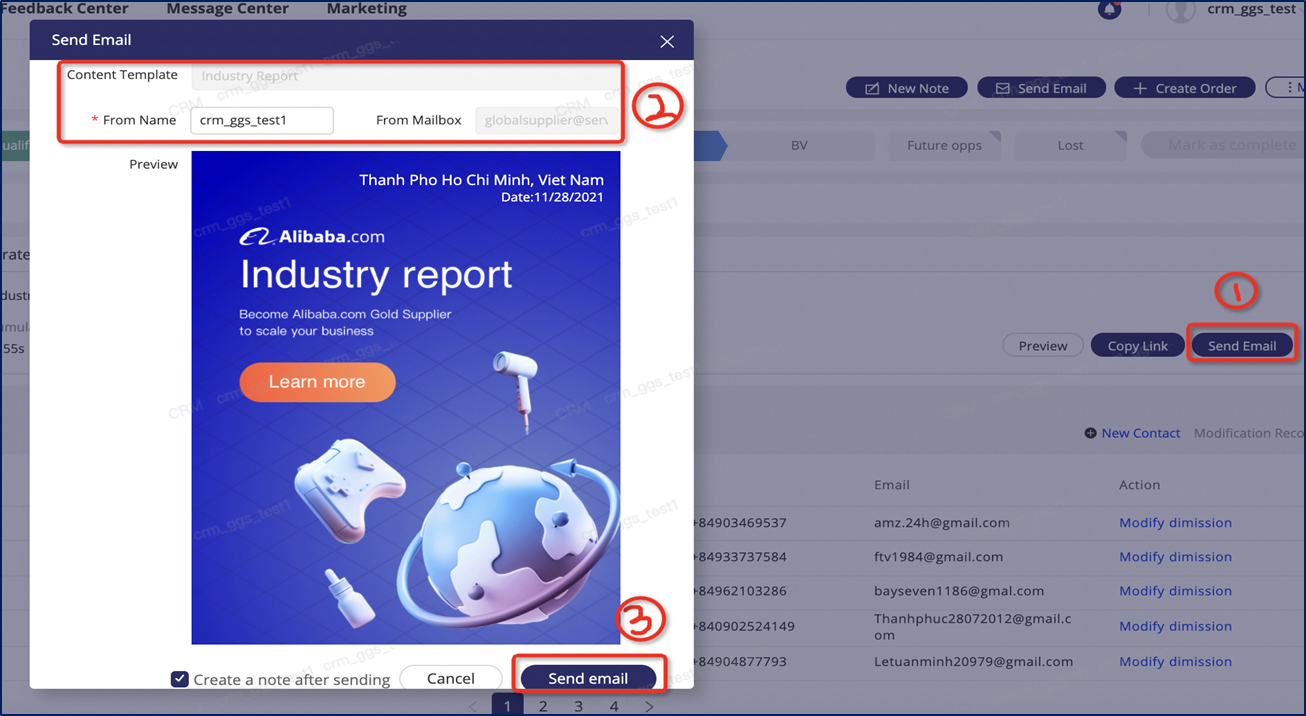
1.Click ‘Copy Link’ to share the proposal to potential customer with IM tool.
2.Click ‘Send Email’ to share the proposal to potential customer with Email tool in Orion CRM.
3. Click ‘Preview’ button to check the format and info of the generated PROPOSAL LINK.
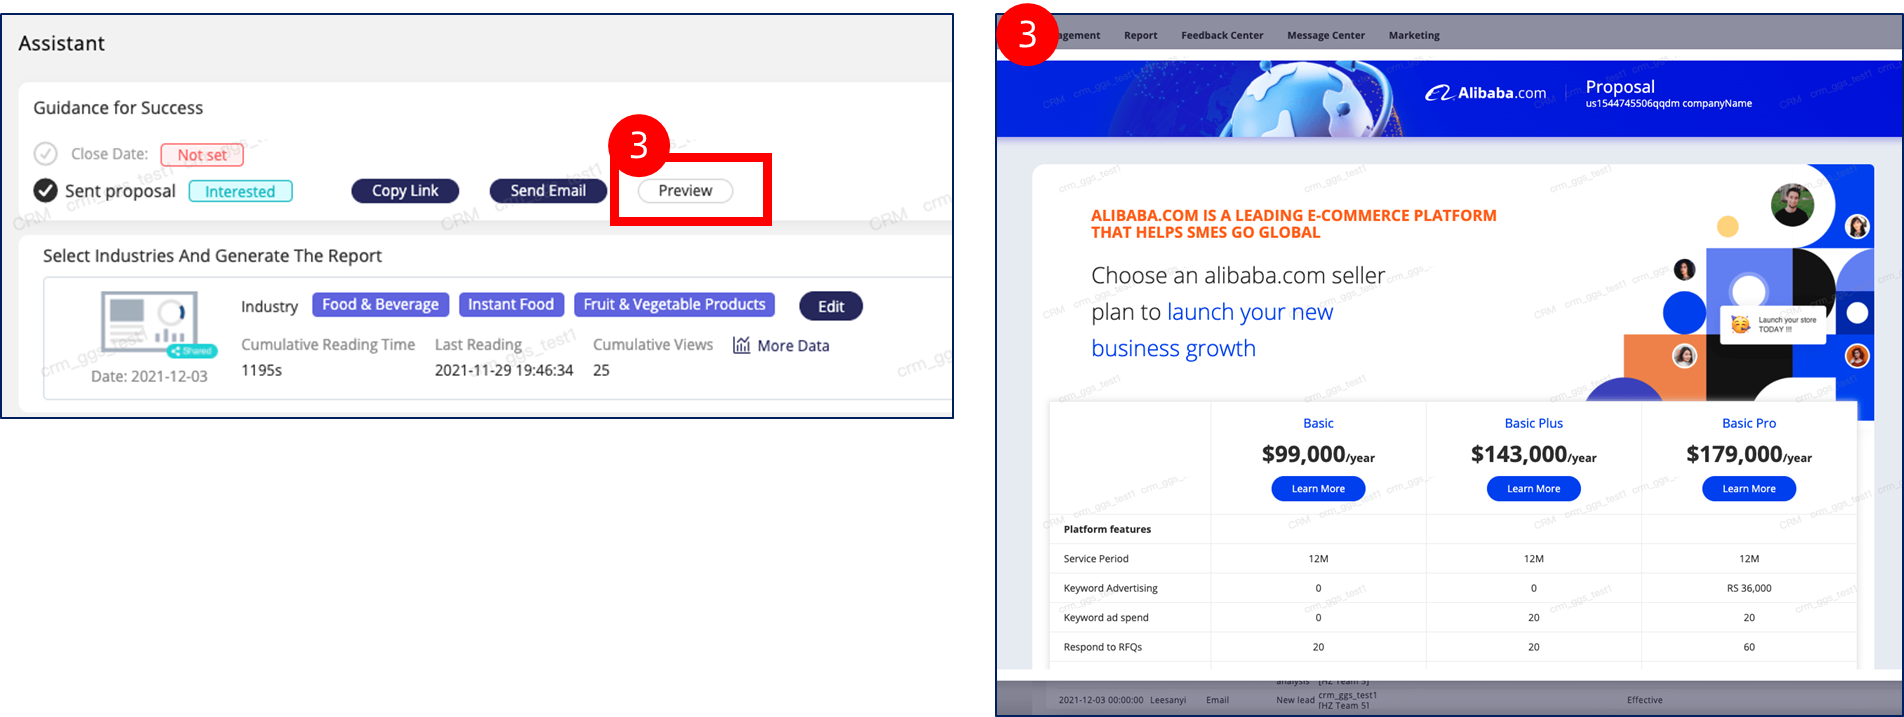
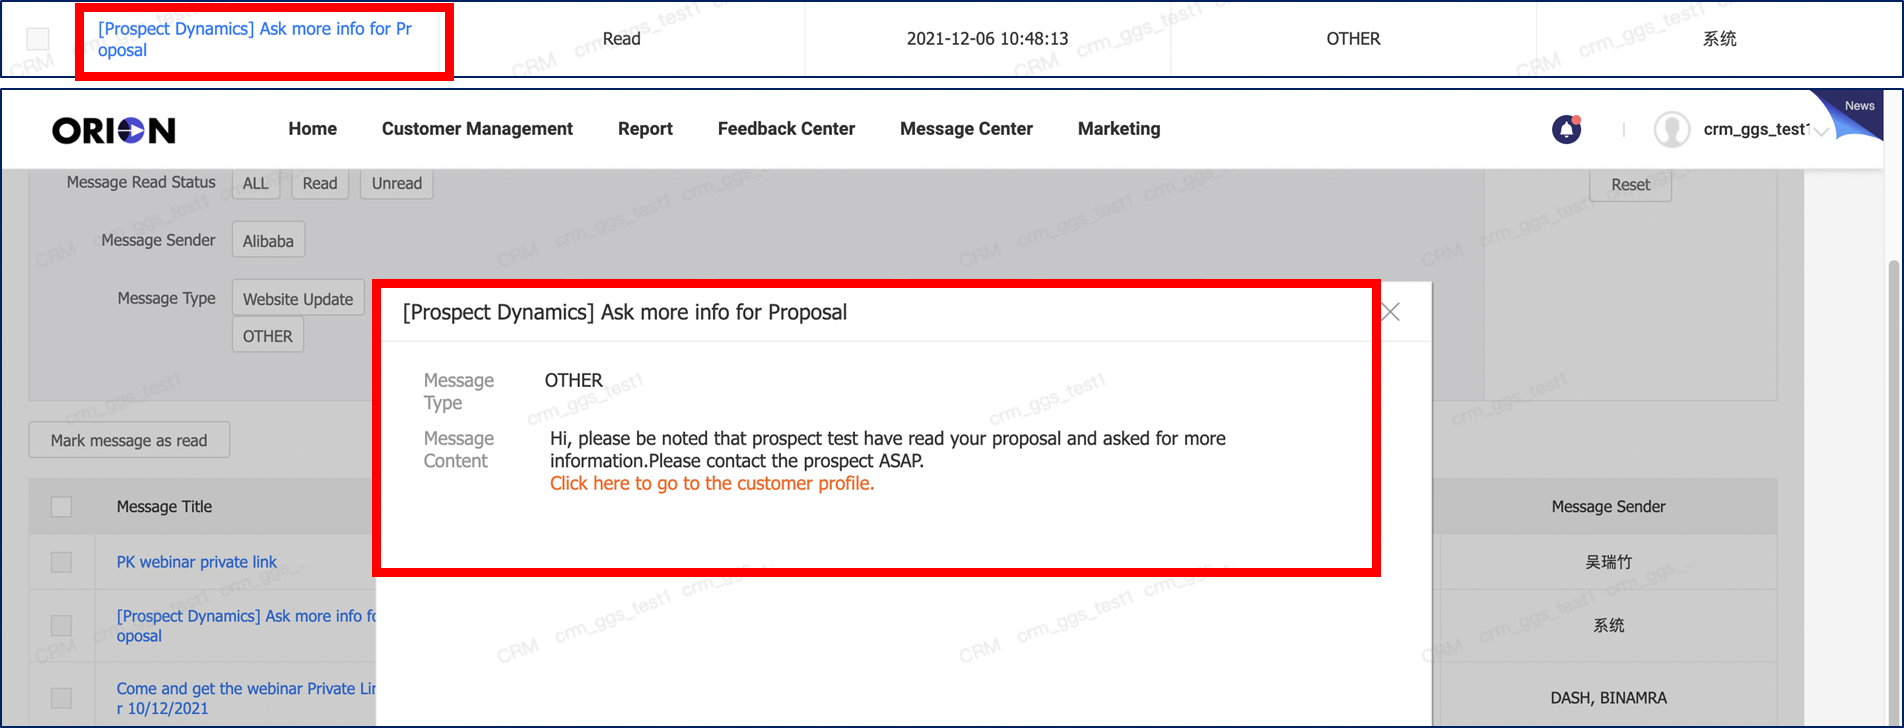
When the customer clicks the “Learn More” button in the proposal, ORION CRM will create a notification in the message center to remind sales to contact the customer ASAP.
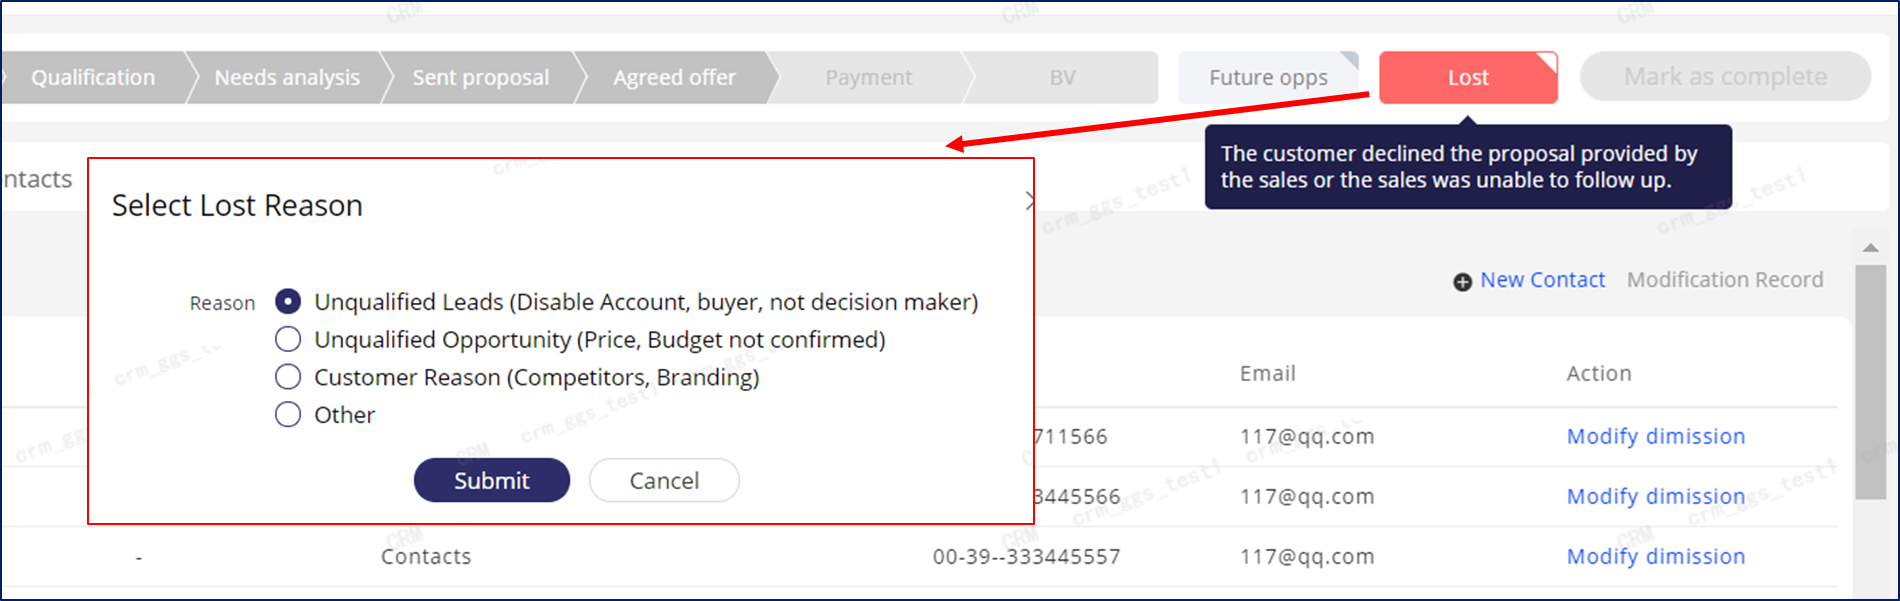
09.LOST Stage
- Click pipeline stage ‘Lost’.
- Select ‘Lost’ Reason
- Unqualified Leads: Leads that do not match ‘Potential customer’ criteria;
- Unqualified Opportunity: Describe leads that match ‘Potential customer’ criteria, however cannot be defined as an ‘Opportunity’;
- Customer Reason: Such as not an interested contacts;
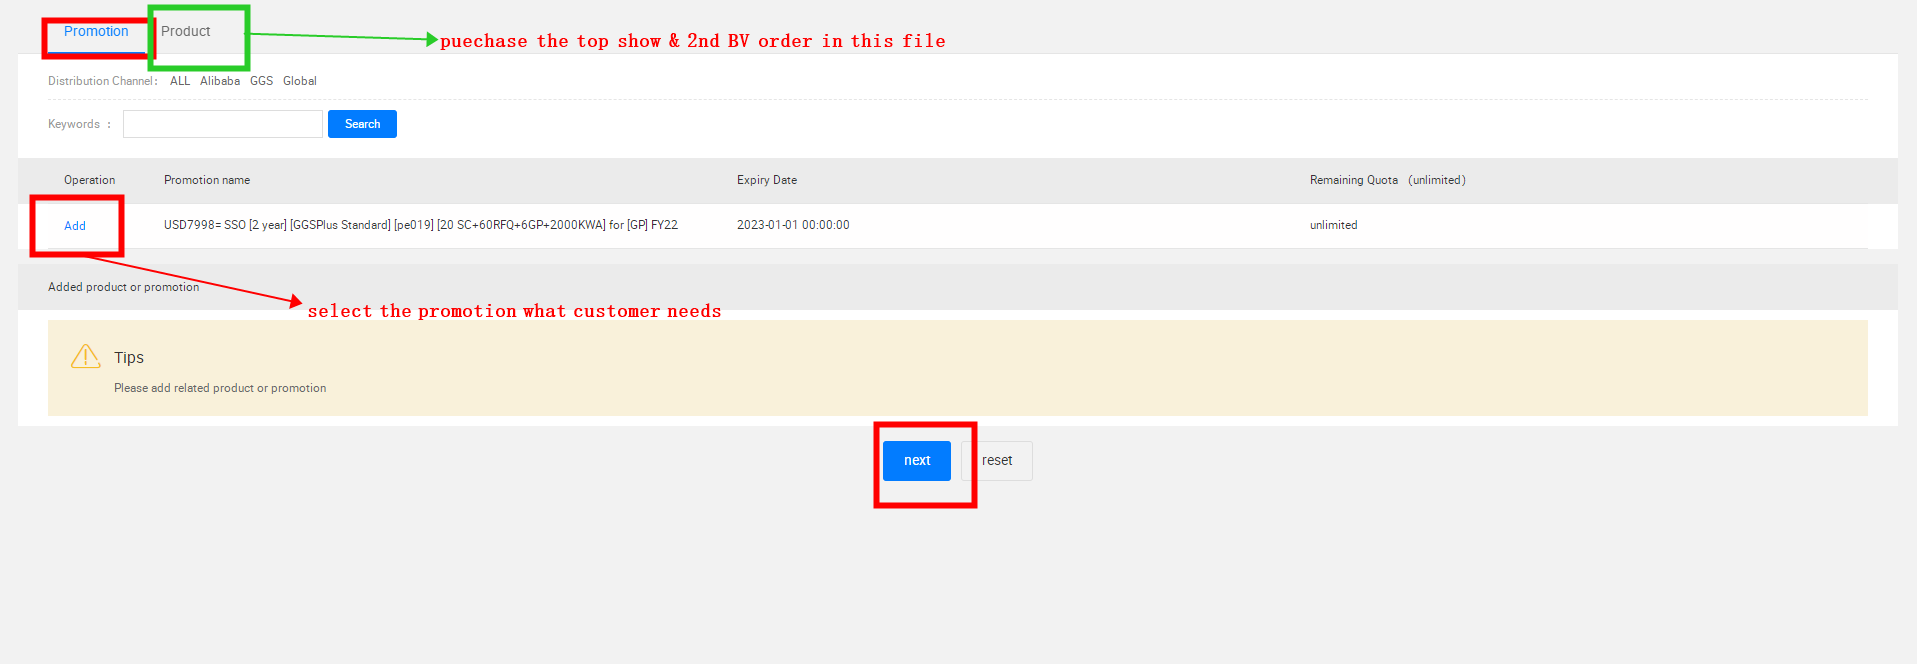
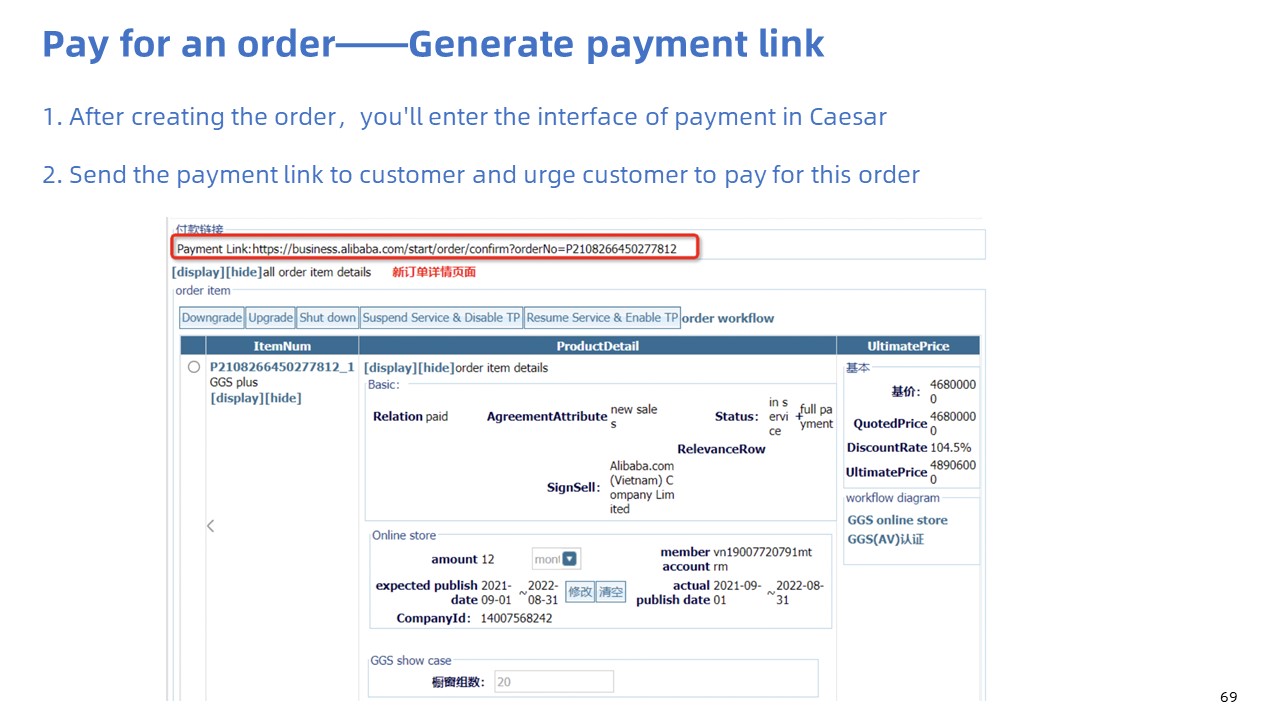
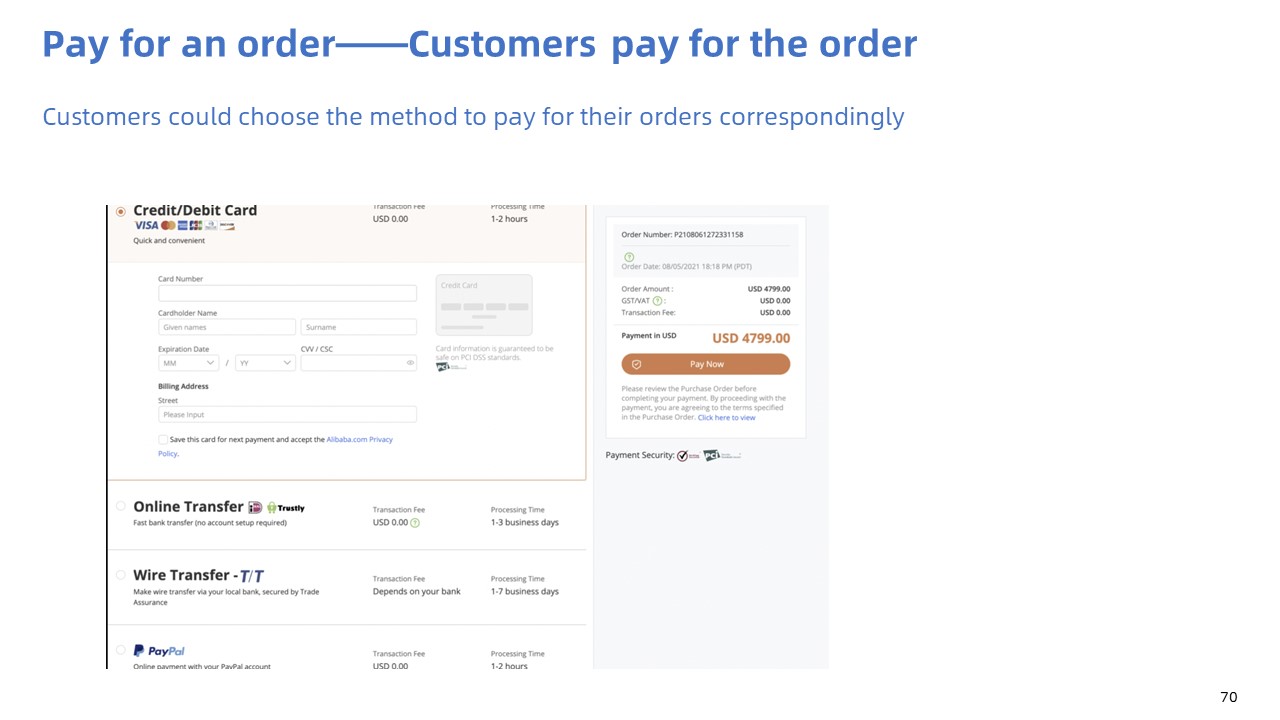
4. Creating Order & Payment & BV
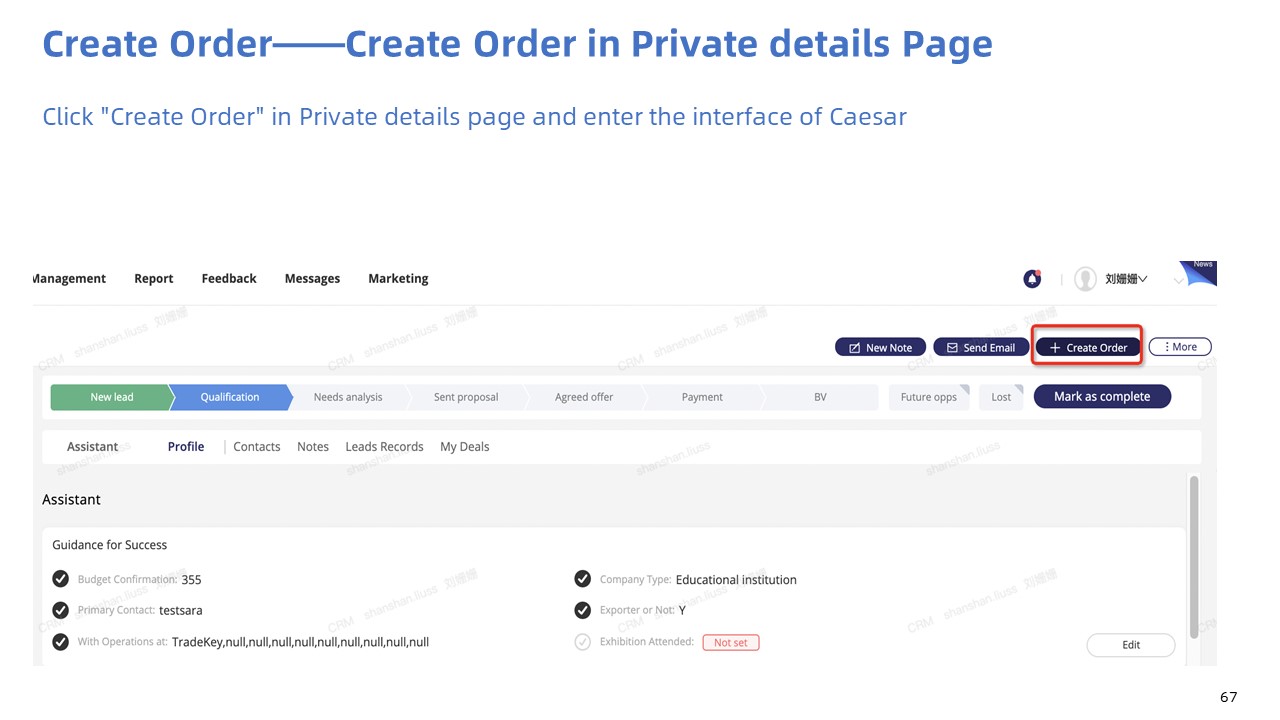
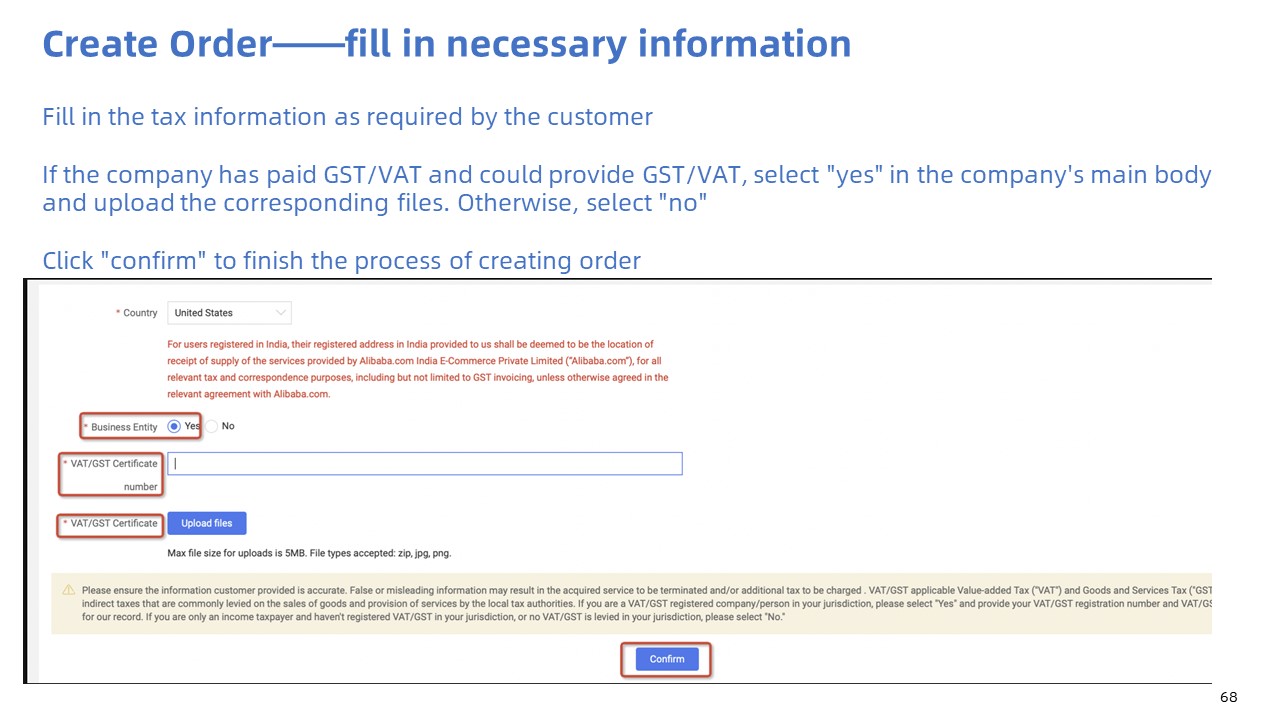
4.1 How to create an order?

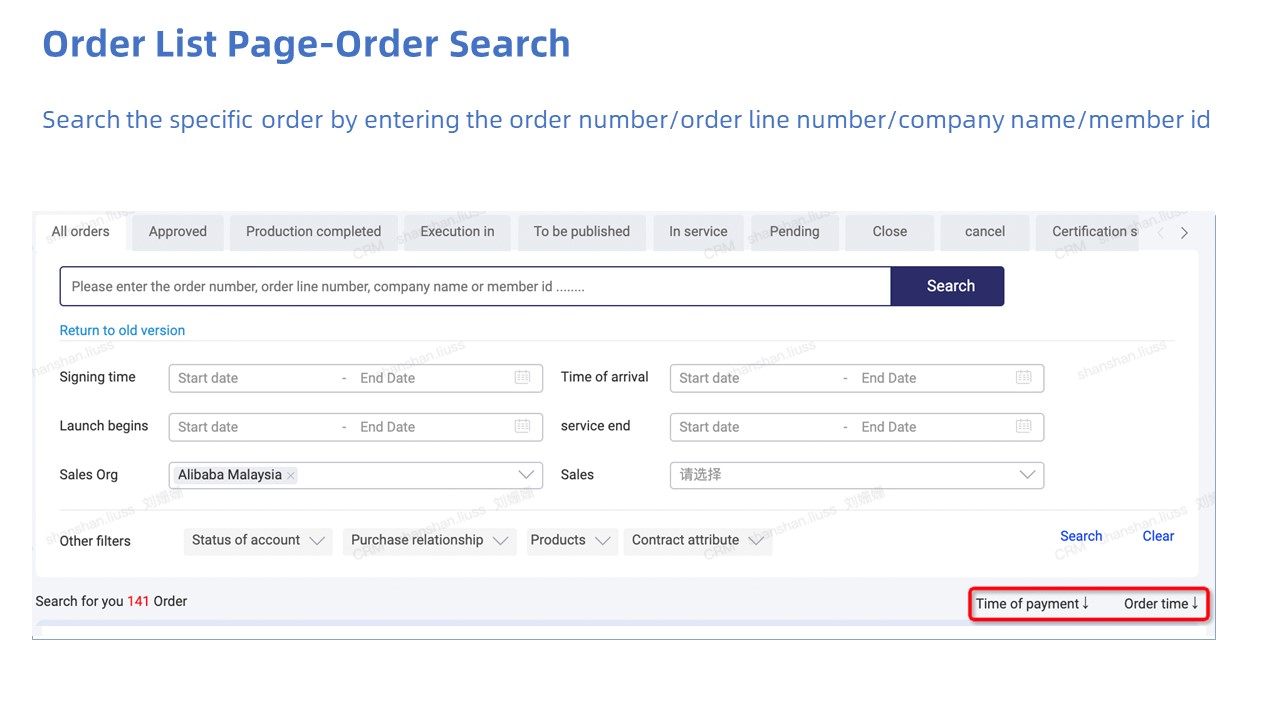
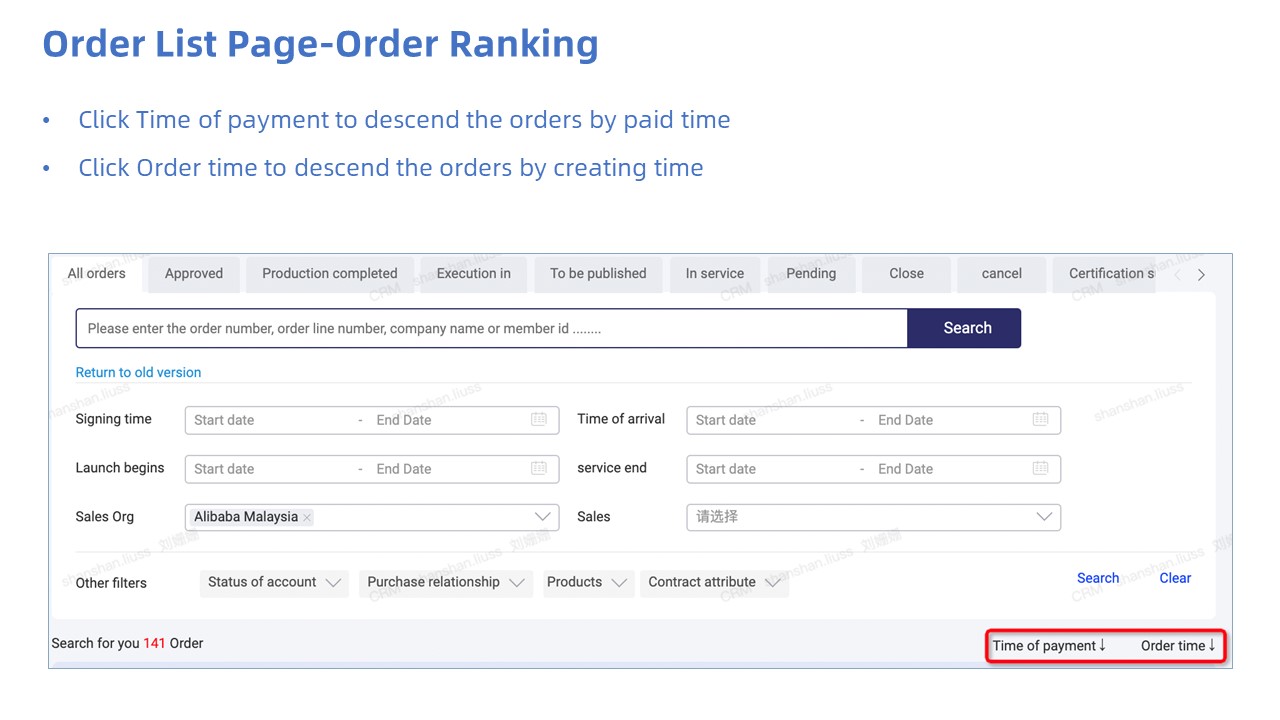
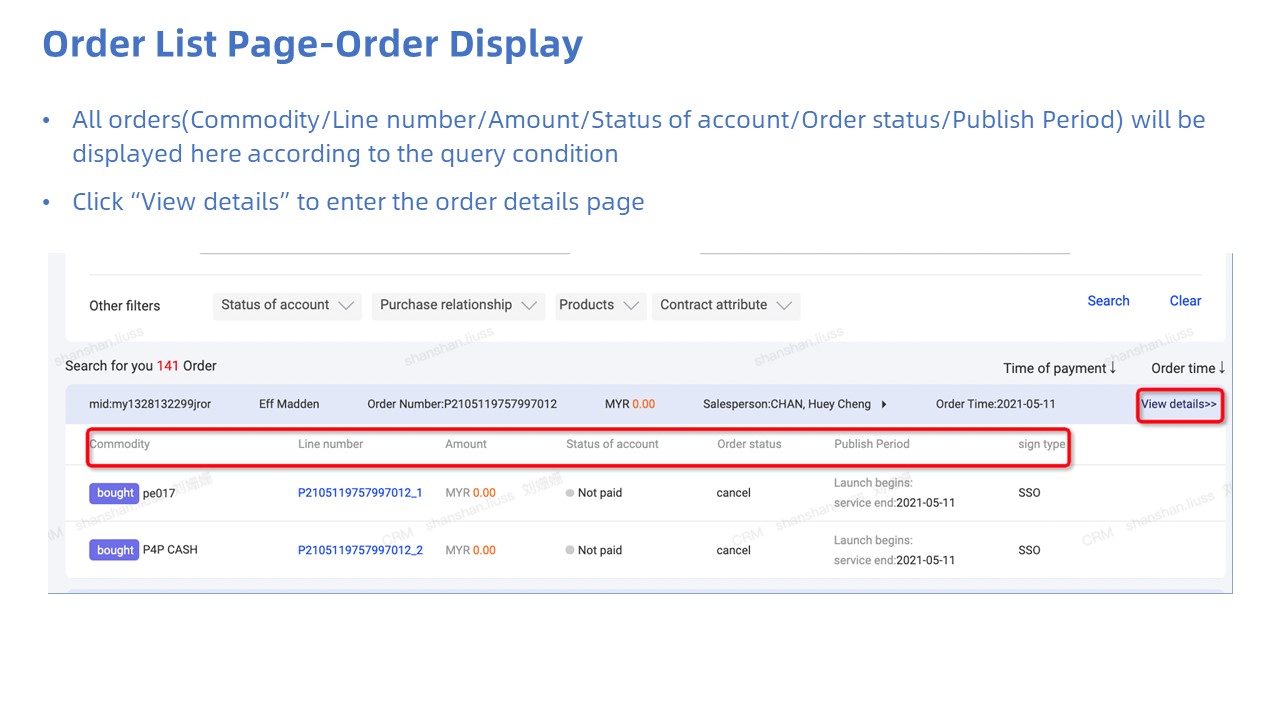
4.2 How to check existing order information
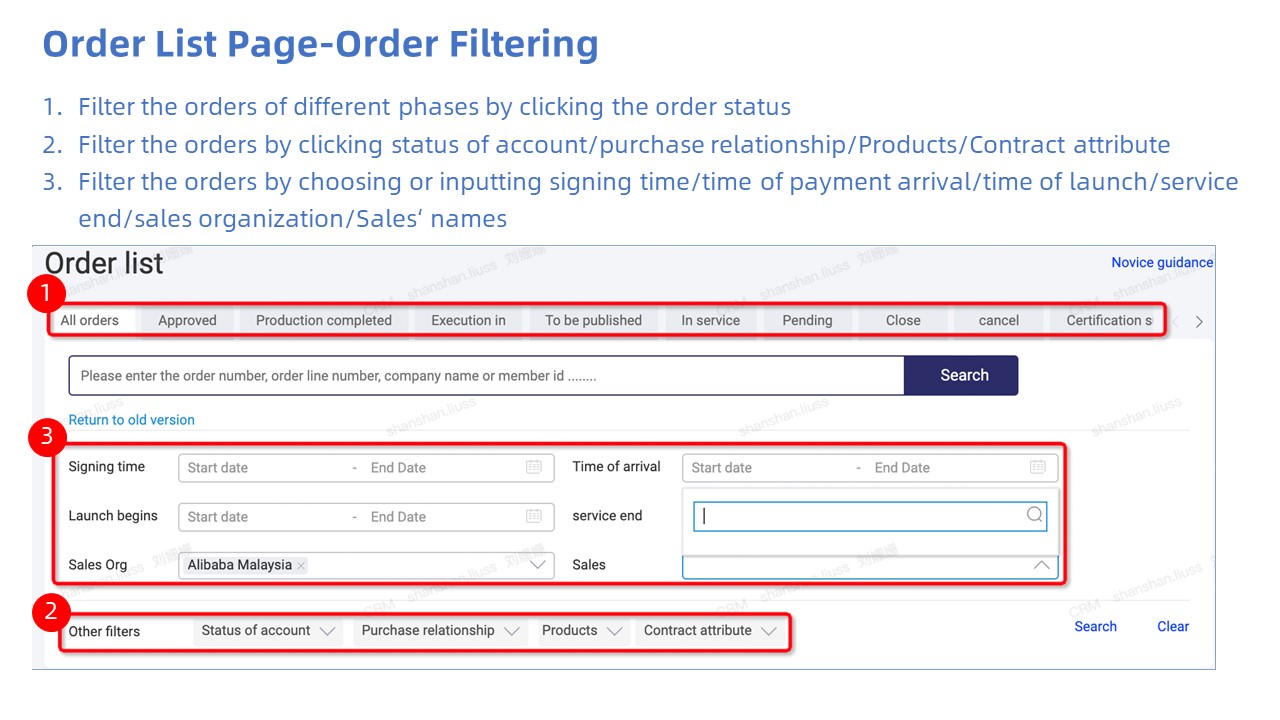
What does the order list stand for?
①. All orders: the total order in his/her pool
②. Approved: after creating order and before passing BV,system will audit the order if it is valid automatically.
③. To be published: BV has been passed
④. In service: account is published
⑤. Pending: pending to pay
⑥. Close: account is closed
⑦. Cancel: account is cancelled
⑧. Certifications: pending BV

4.3 Definition of Order Page
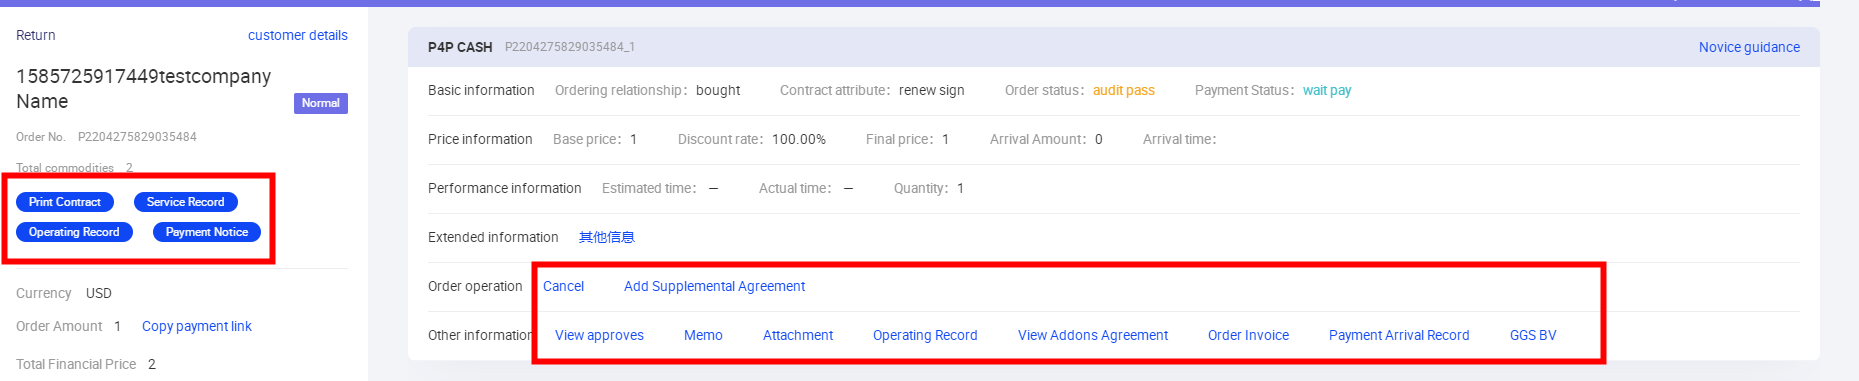
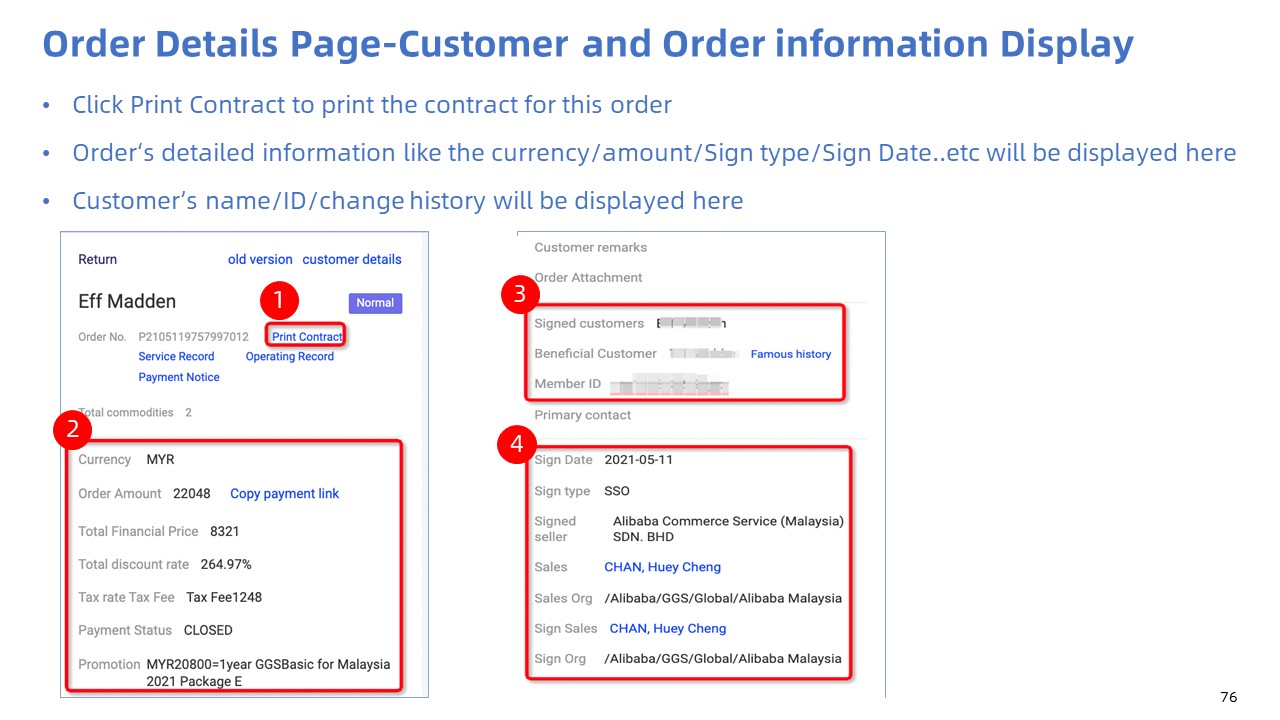
What does the order page stand for?
①、Print Contract: sales can download the order contract here to customer to show all the rules of GGS membership
②、Service Recode: sales can refer the order details published on platform
③、Operating Recode: sales can refer the operating details of order in system
④、Payment Notice: sales can download the format before they paid (customer always call it to “invoice” )
⑤、Cancel: sales can cancel the unpaid order customer doesn’t want to purchase by this button
⑥、View approves: sales can check if the current order has been extended
⑦、Memo: sales can recode the memo
⑧、Payment Arrived Recode: sales can refer the payment arrived recode details
⑨、GGS BV: slaes can go to BV page directly by this button
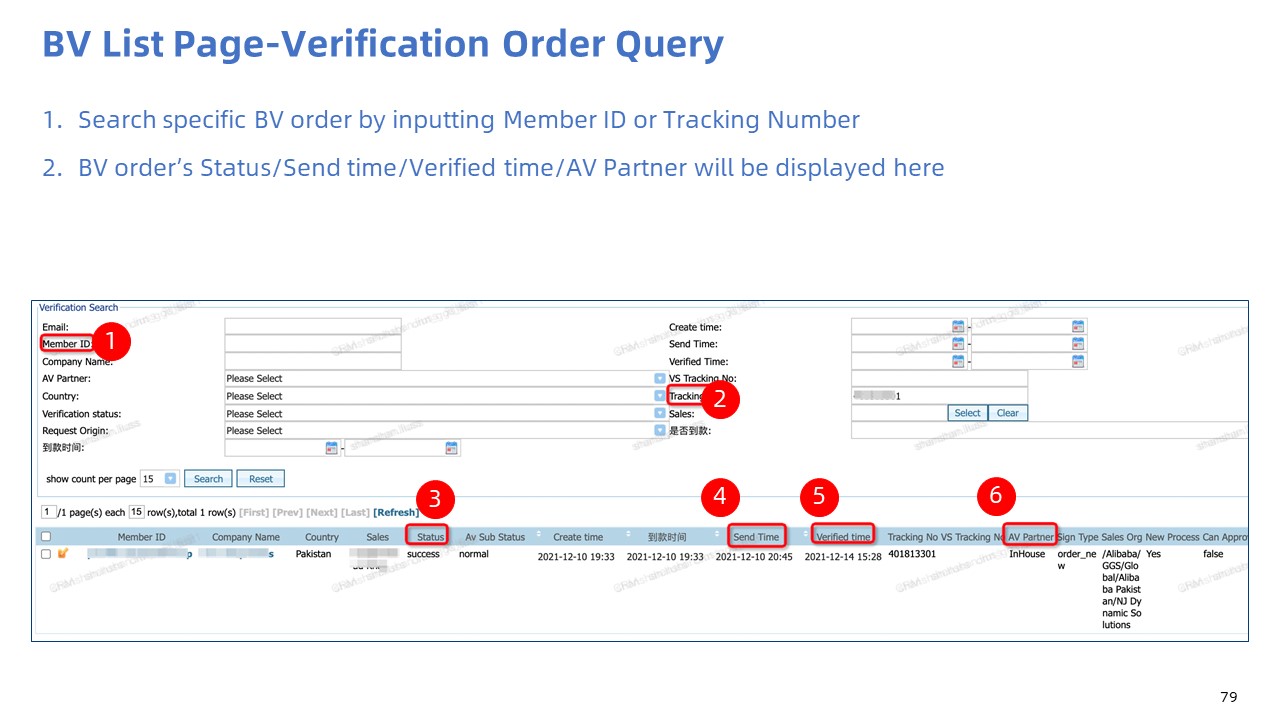
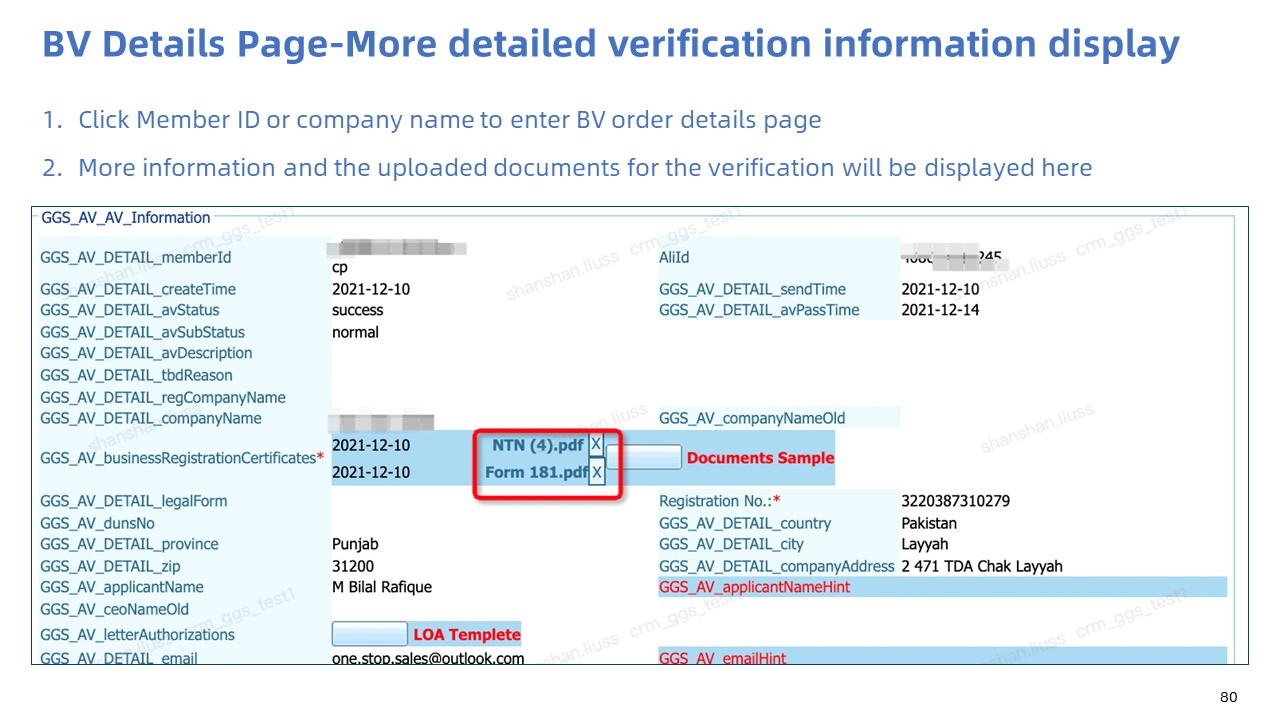
4.4 Business Verification(BV)

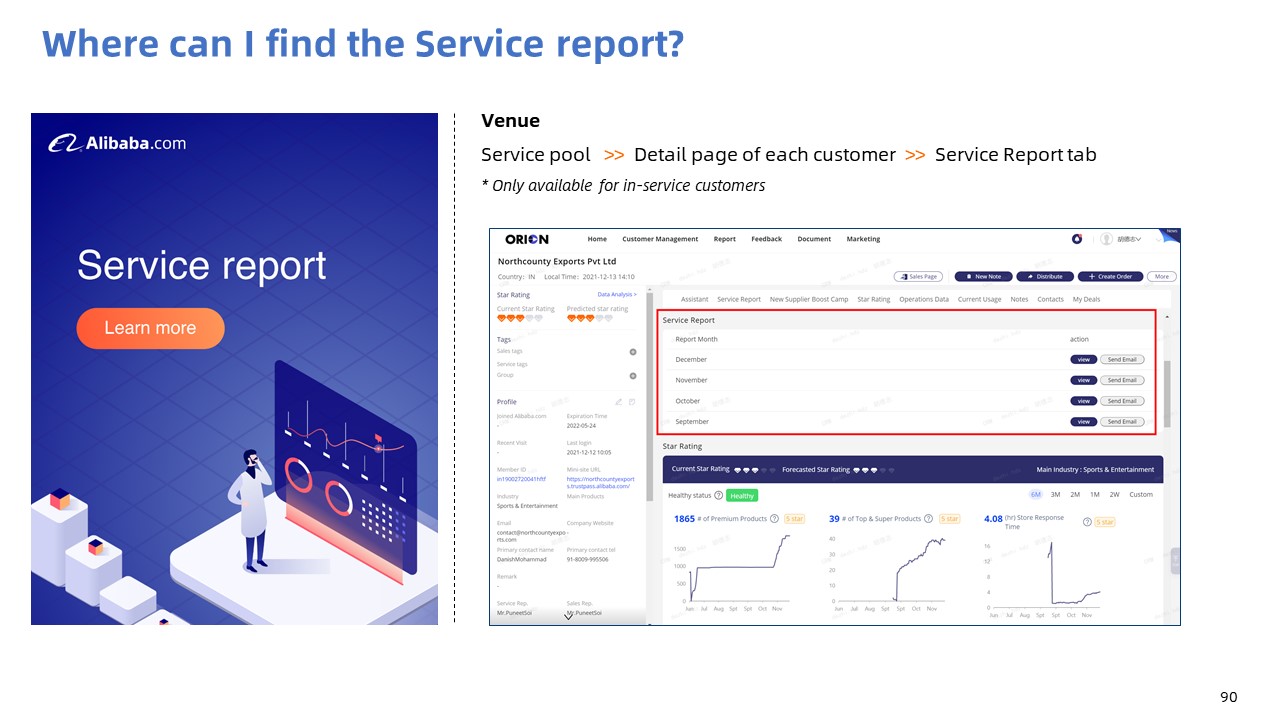
5. Managing in-service customers

5.1 Service Pool Interface Introduction
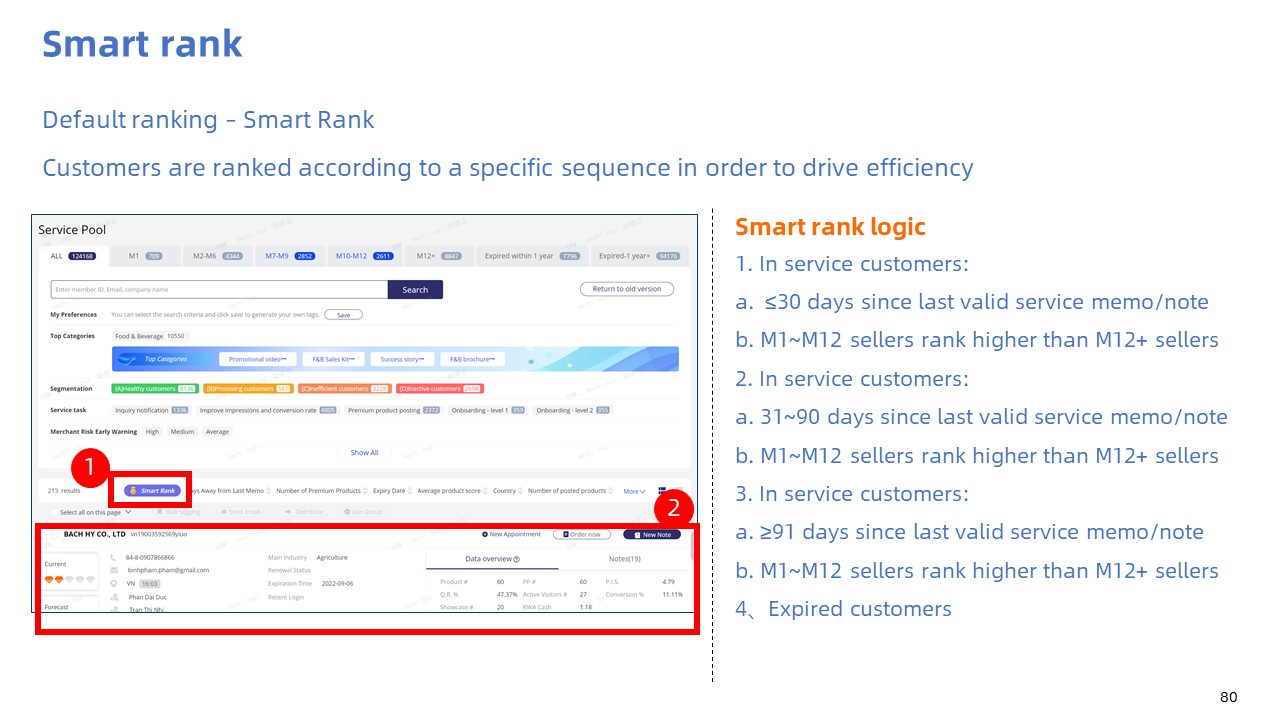
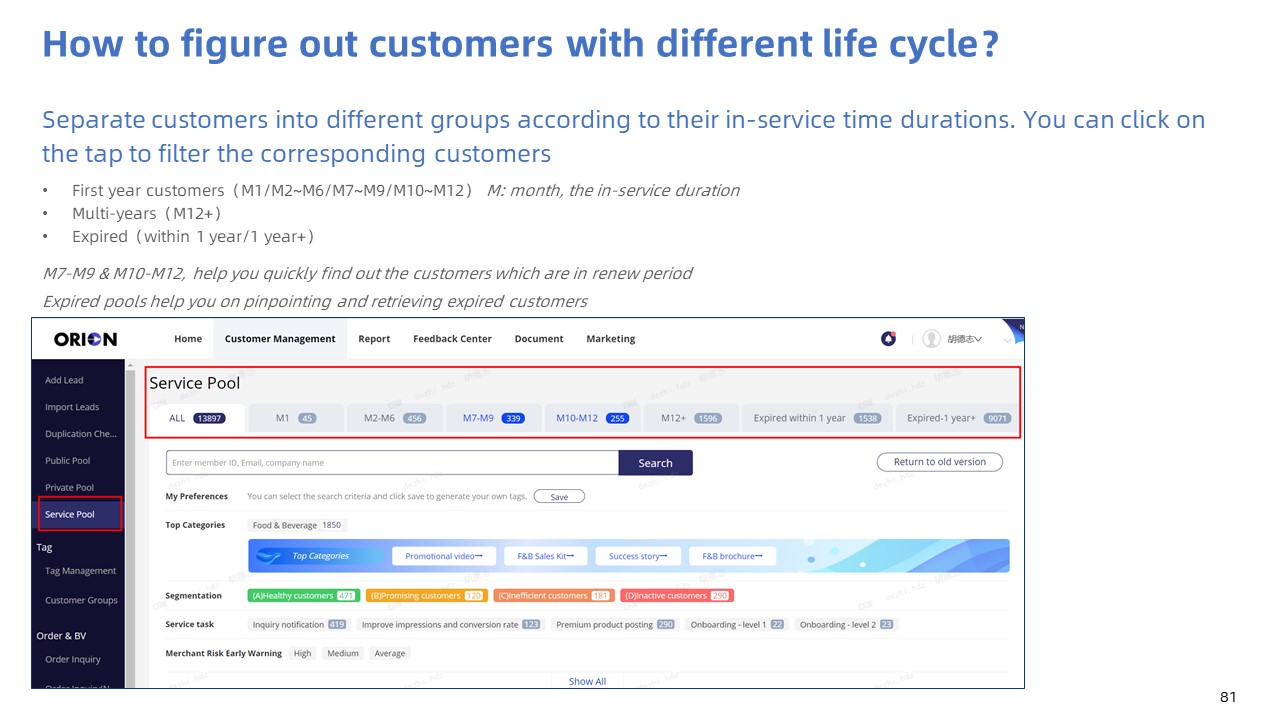
5.2 How to figure out customers with different segmentation?

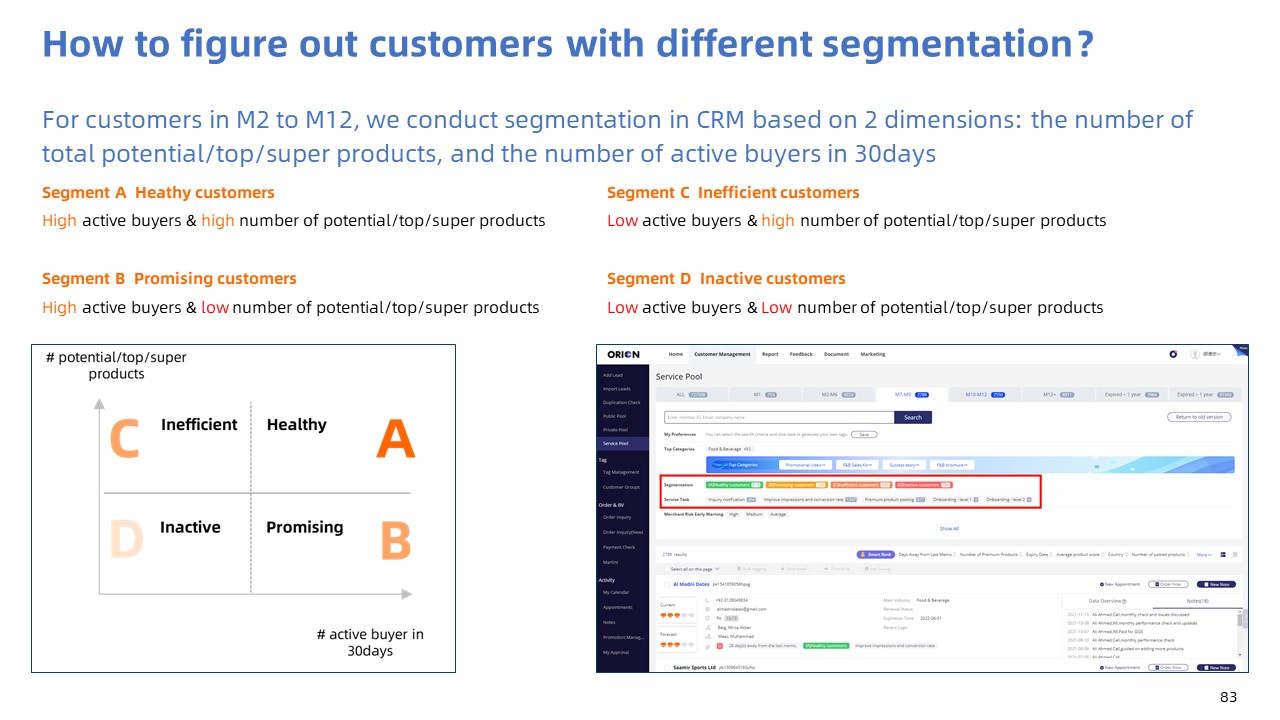
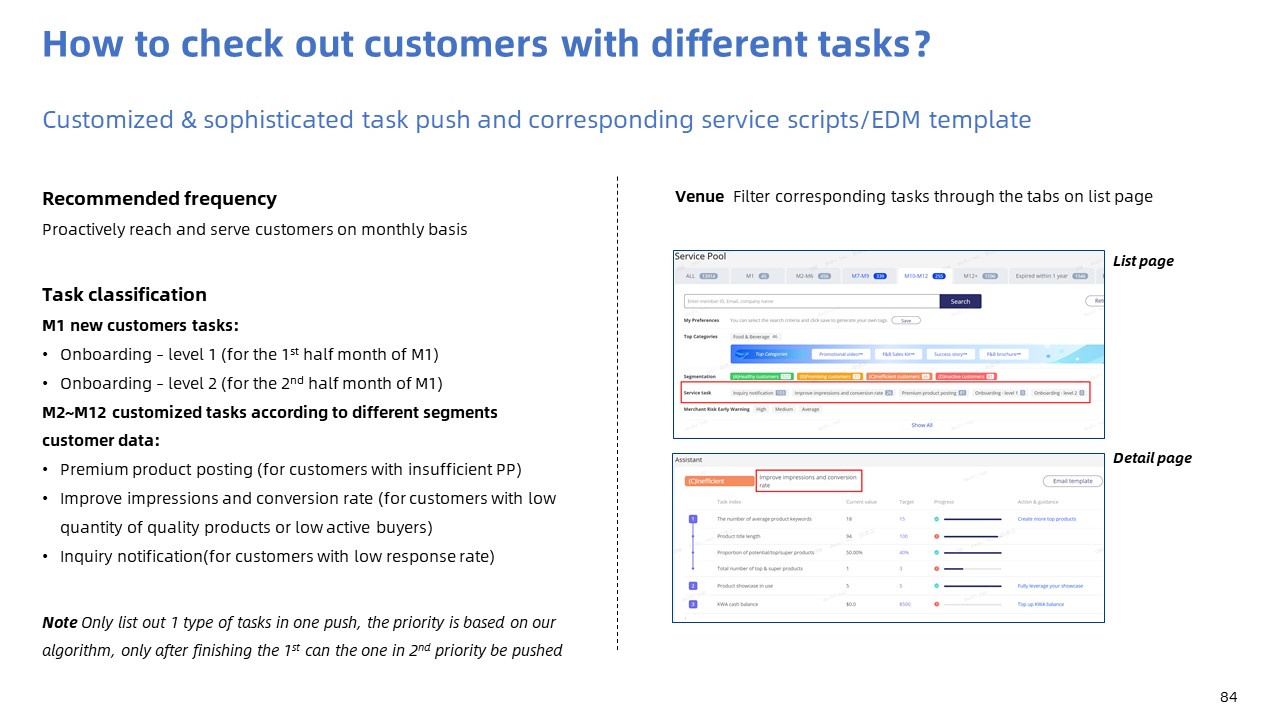
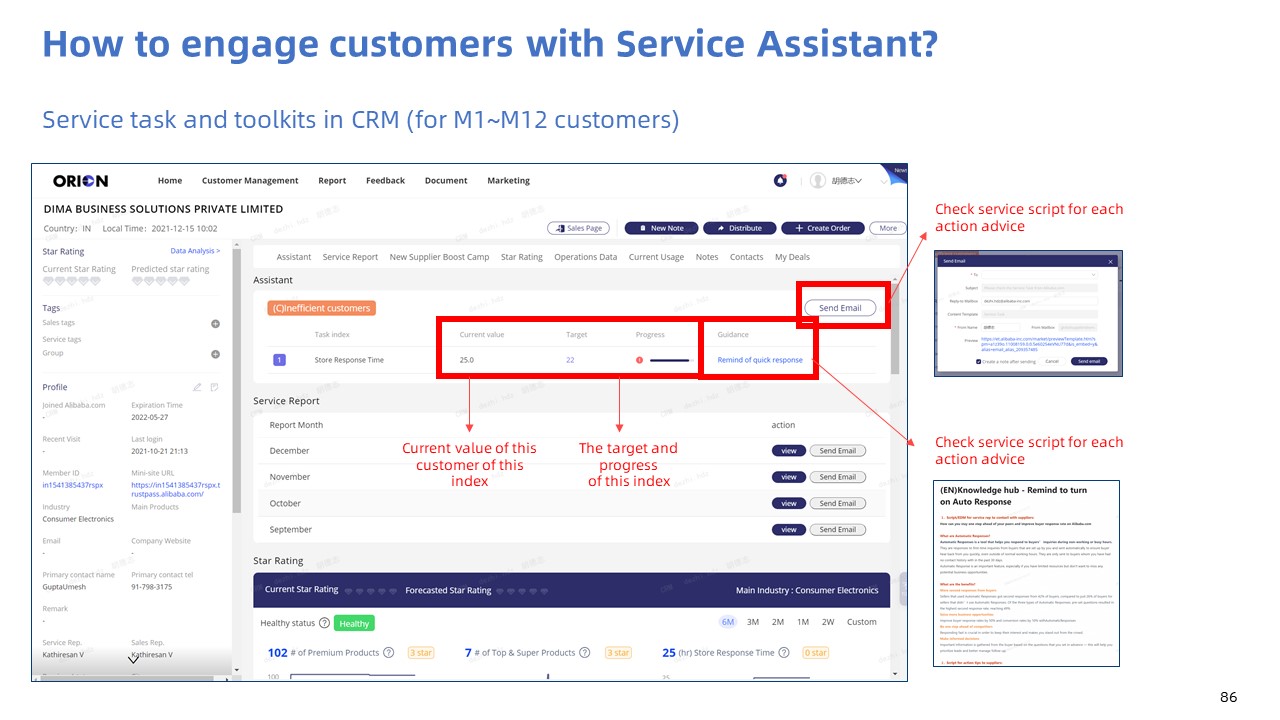
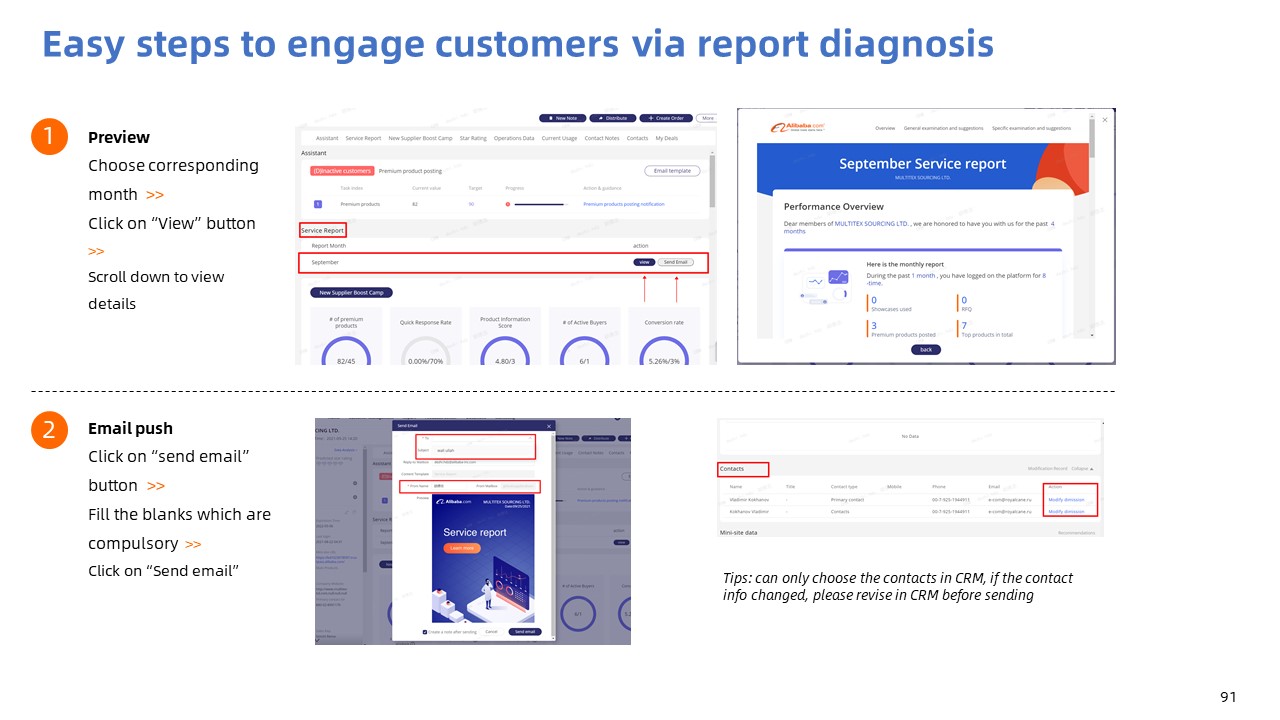
5.3 How to engage customers with Service Assistant?


6. Email
6.1 One-on-one email sending
1.Click ‘Send Email’ in ‘Sales Assistant’ or ‘Service Assistant’ section of customer detail page
2.Confirm the setting and click ‘Send Email’ at the bottom, [Industry Report] or [Service Report] email will be sent to the customer.
6.2 One-to-many Email Sending
Select specific, multiple or all customersin yourprivate/servicepoollistpage
Click ‘Send Email’ and you’ll enter the email task detail page
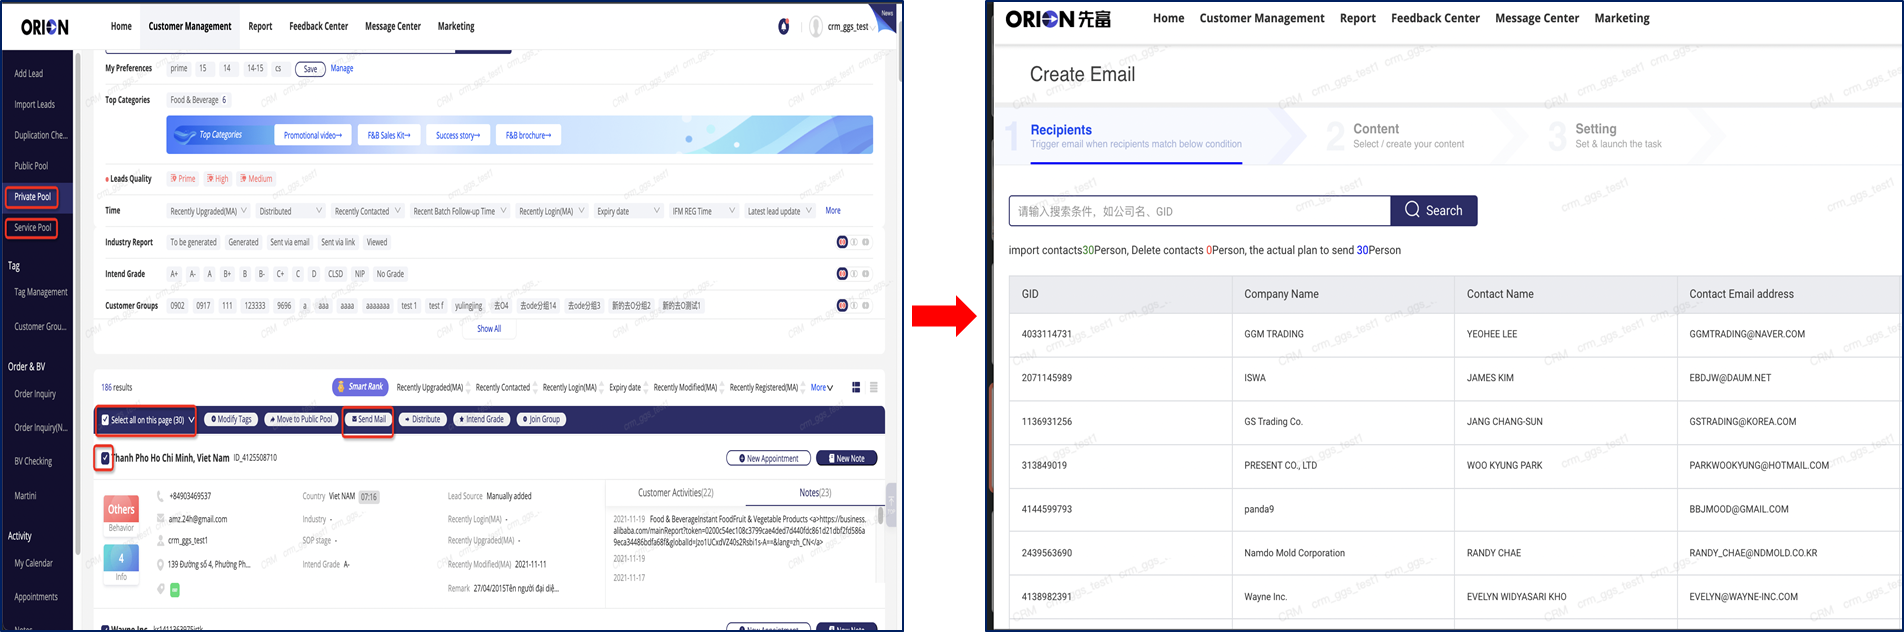
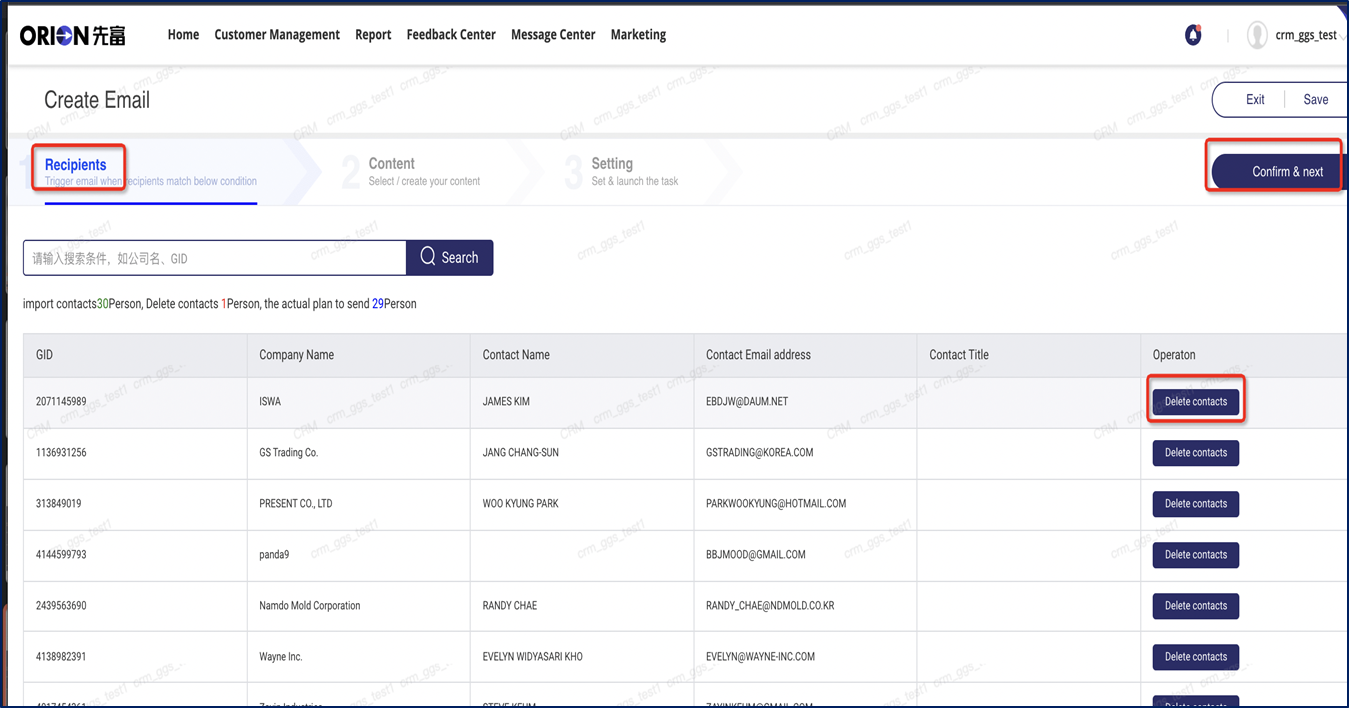
- All your selected customers in step1 will be displayed in Recipients list. If you need to remove specific customer(s) from the list, please click ‘Delete contacts’.
4.After confirming the recipients,click ‘Confirm&next’ and move to the next step.
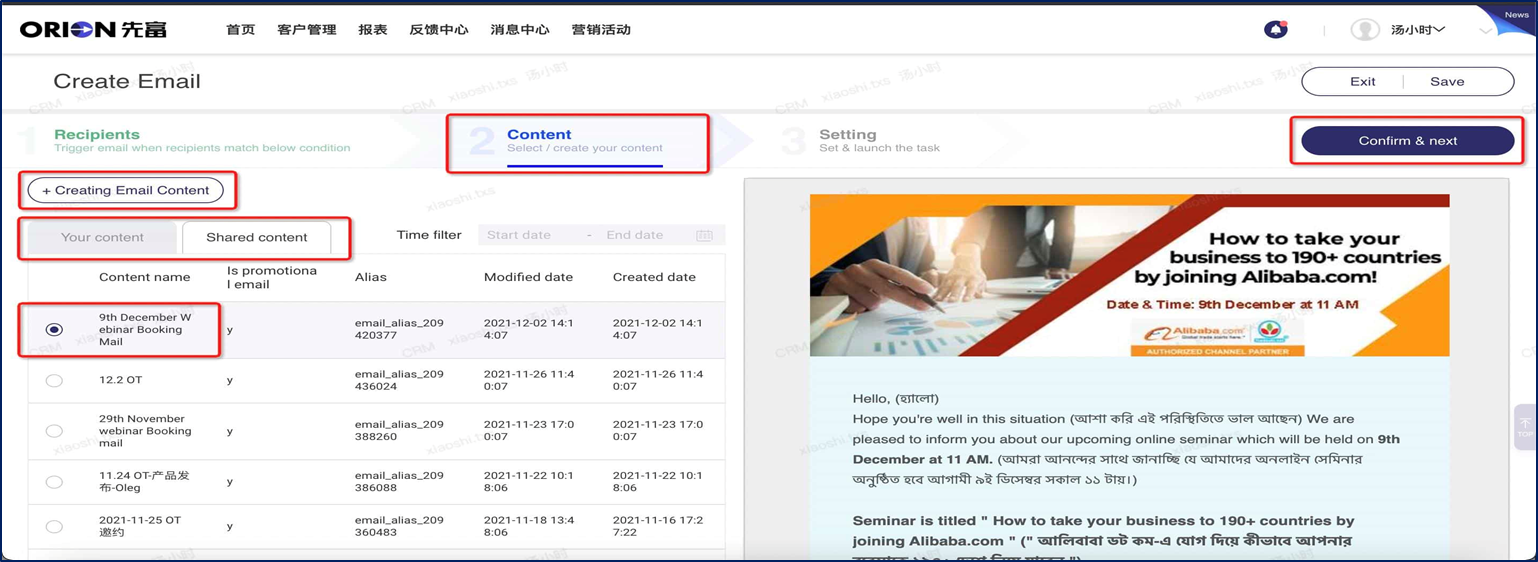
- If you’ve already created email contents before, you could use one of them, or you could use one Shared content from other sales.
6.You could also choose ‘Creating Email Content’ to generate new contents (full details are given in Appendix).
7.Click ‘Confirm&next’ and move to the next step.
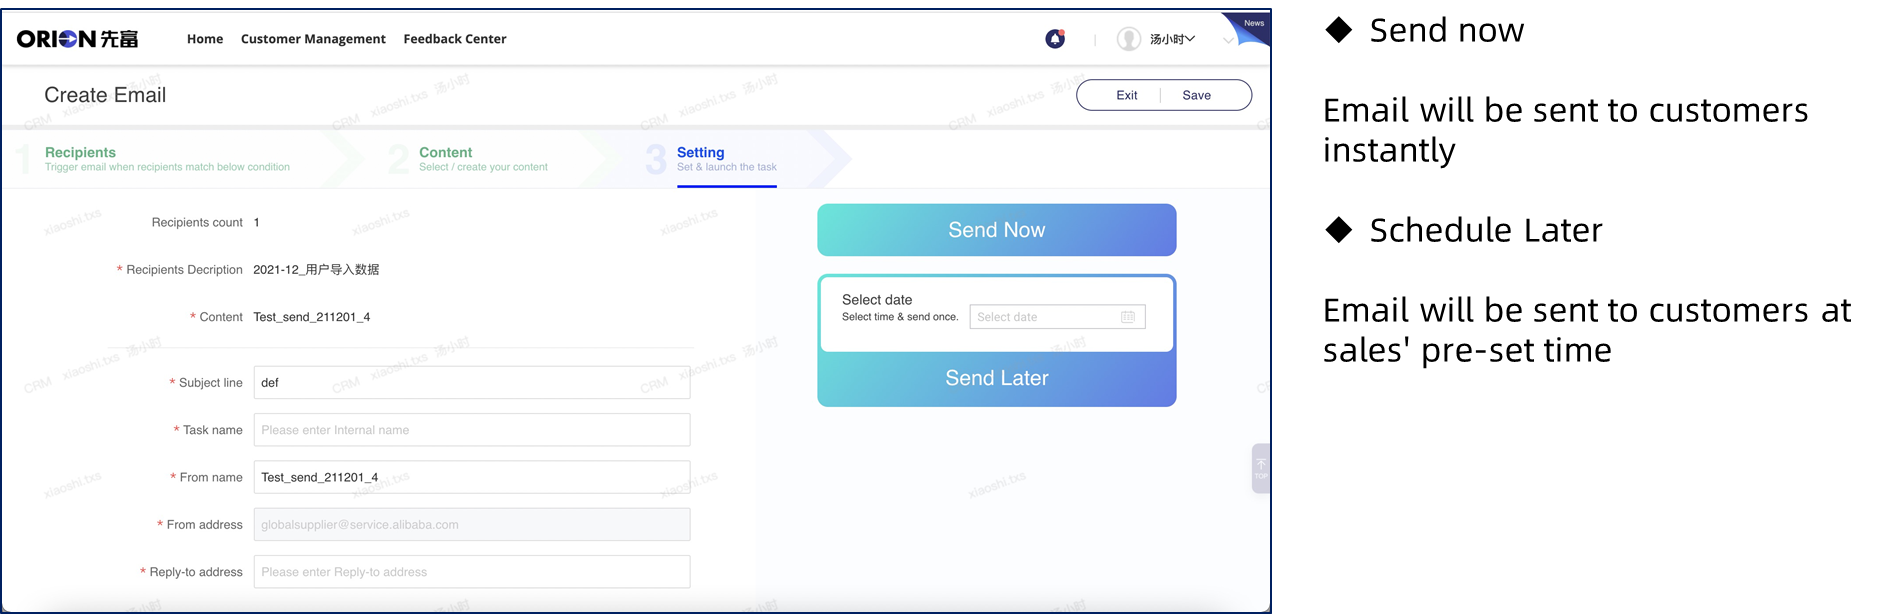
- Fill in’Subject line’/‘Internal name’/‘From name’/‘Reply-to address’ items correspondingly.
9.Click ‘Send Now’, or set the ‘Send time’ then click ‘Send Later’.
10. A notification will be sent to your line manager in Alibaba workflow for his/her approval. After approval, email will be sent to the target recipients .
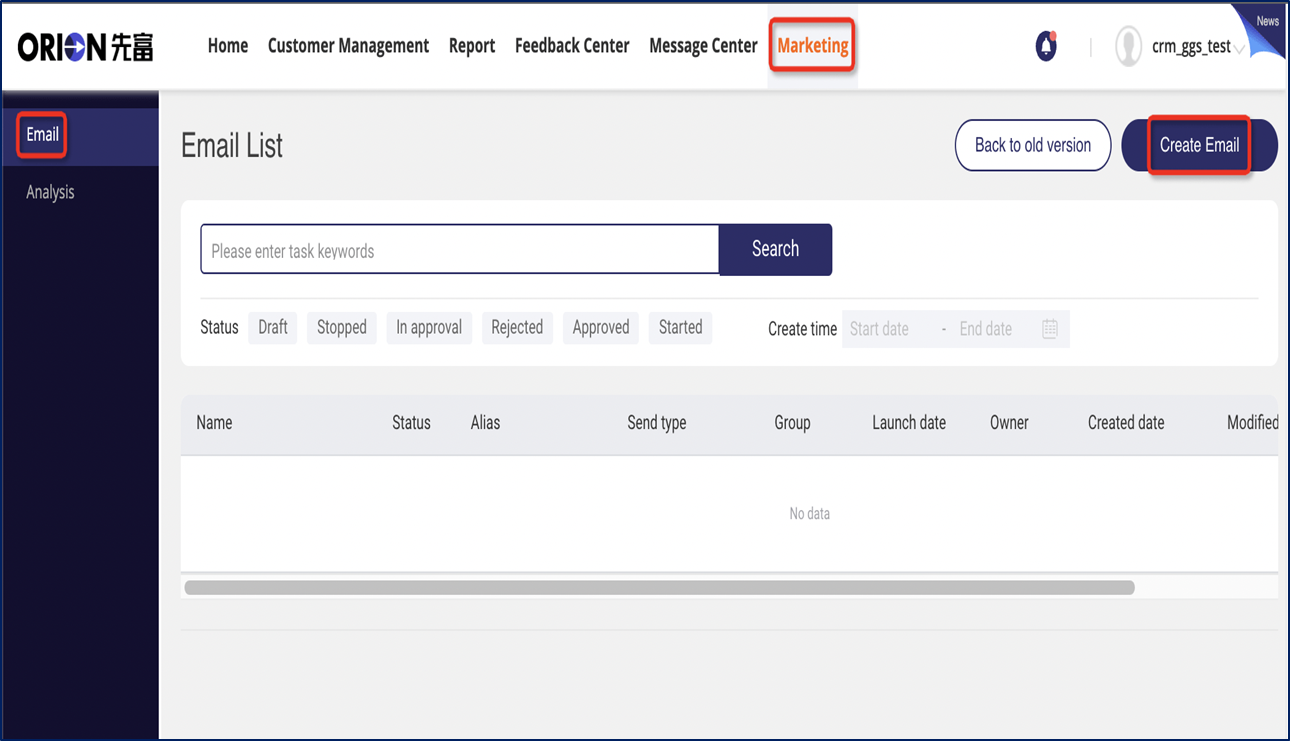
6.3 Automated Email Sending
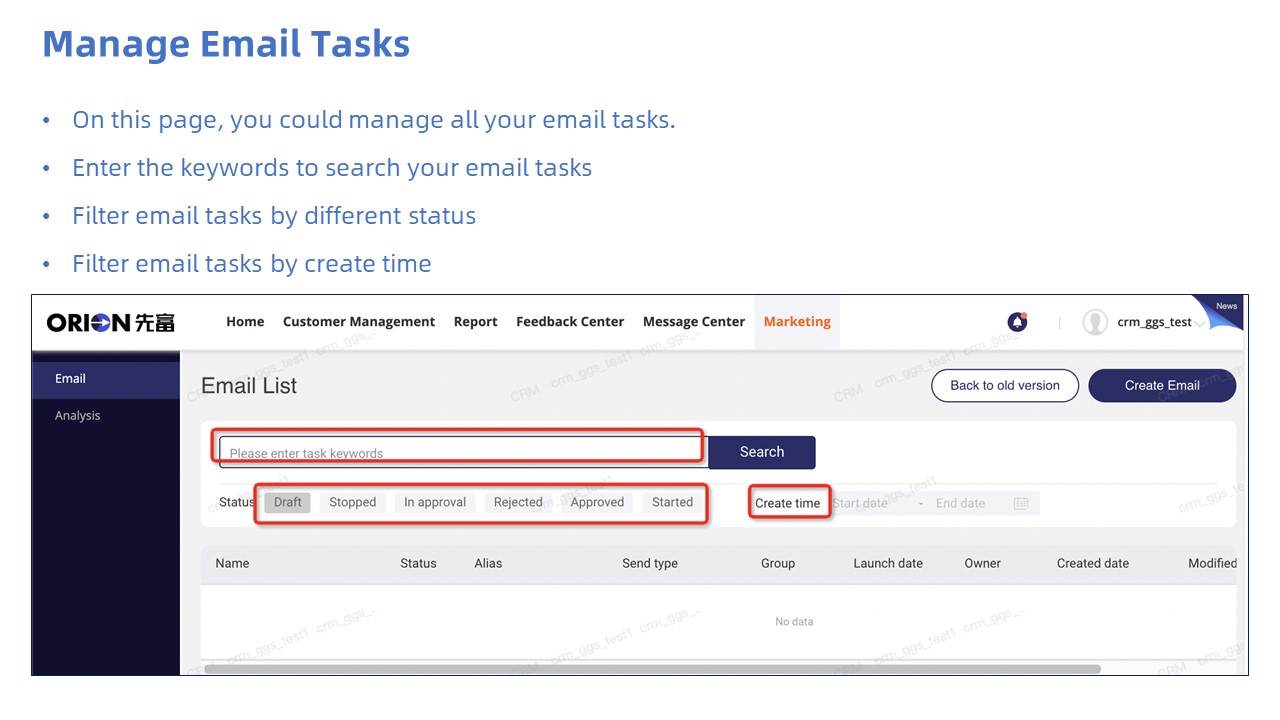
1.Click‘Marketing’and enter the Email List Page,here you could manage all your email tasks(Full details are given in Appendix)
2.Click ‘Create Email’ and move to the next step
- Filter your recipients by pipeline SOP step or contact notes & result.
4.Click ‘Confirm&next’and move to the next step.
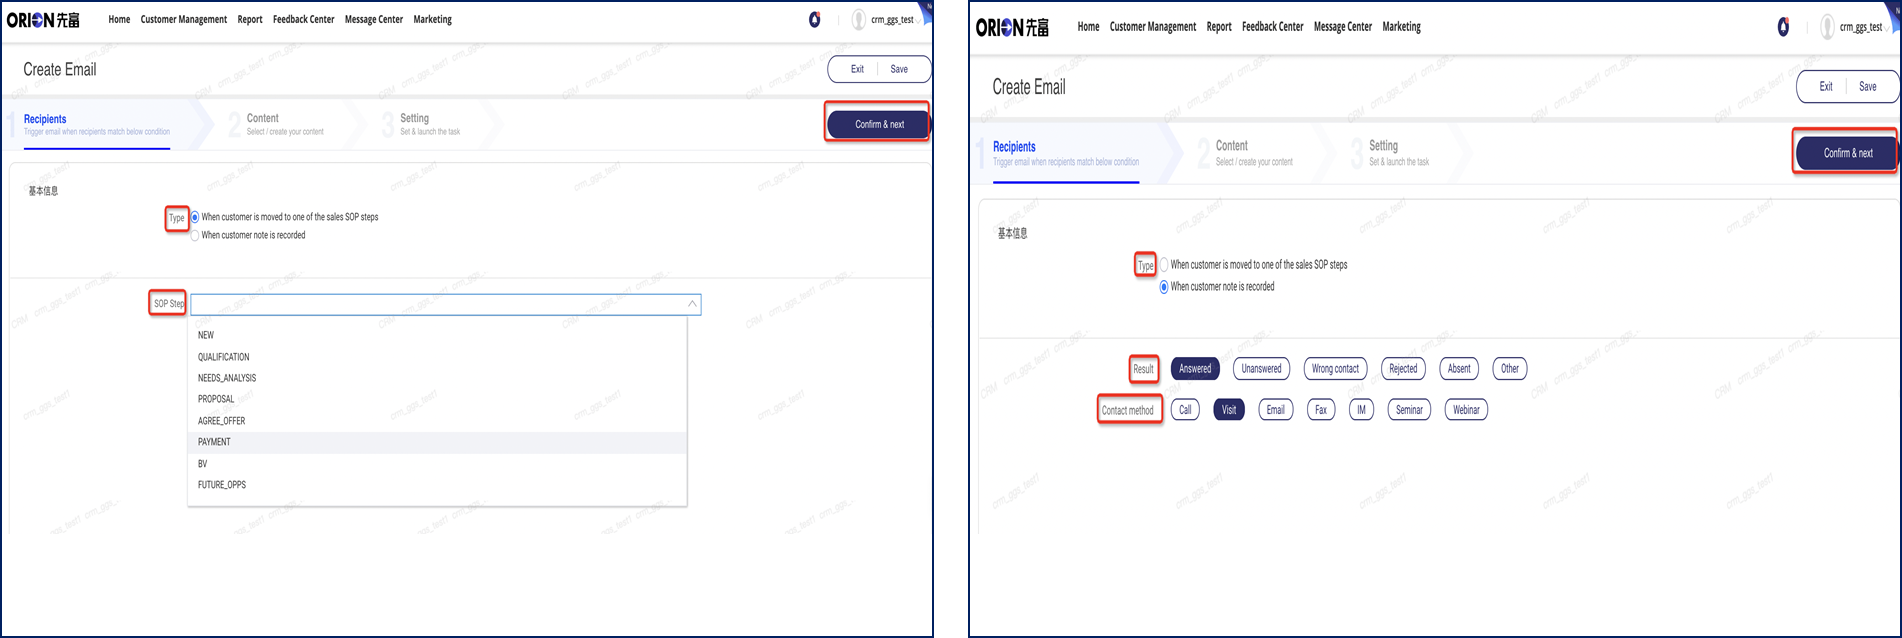
- If you’ve already created email contents before, you could use one of them.
6.Or you could choose ‘Creating Email Content’ to generate new contents(Full details are given in Appendix )
7.Click ‘Confirm&next’ and move to the next step.

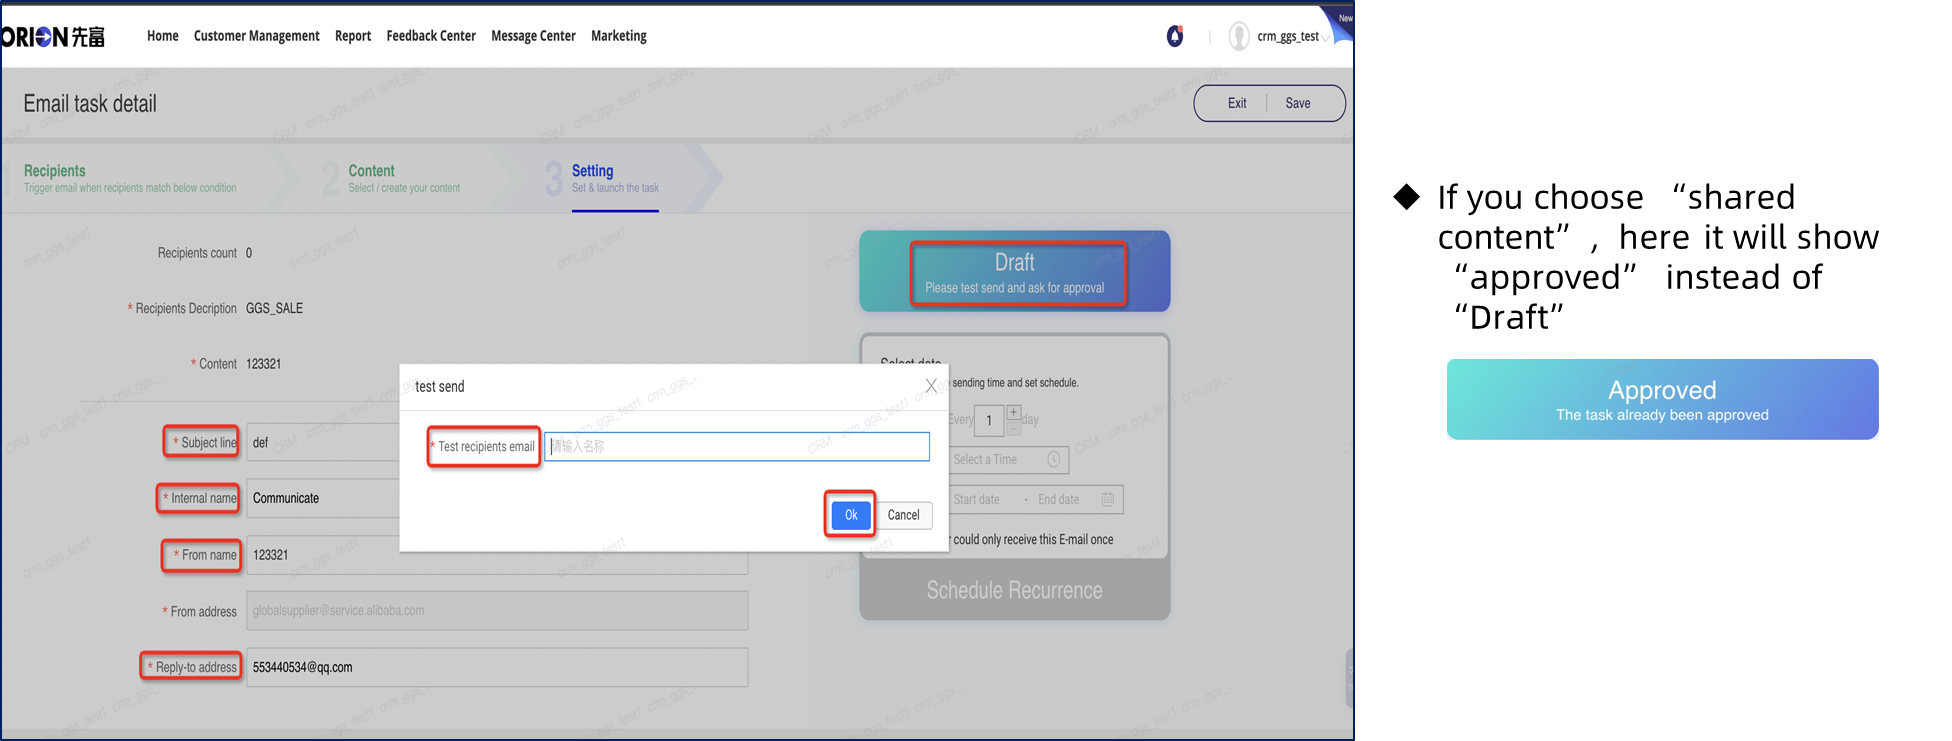
- Fill in ‘Subject line’ /‘Internal name’/ ‘From name’/ ‘Reply-to address’ items correspondingly.
9.Click ‘Draft’,fill in the Test recipient email address and click ‘OK’.
10.Test email will be sent and notification will be sent to sale’s line manager to approve
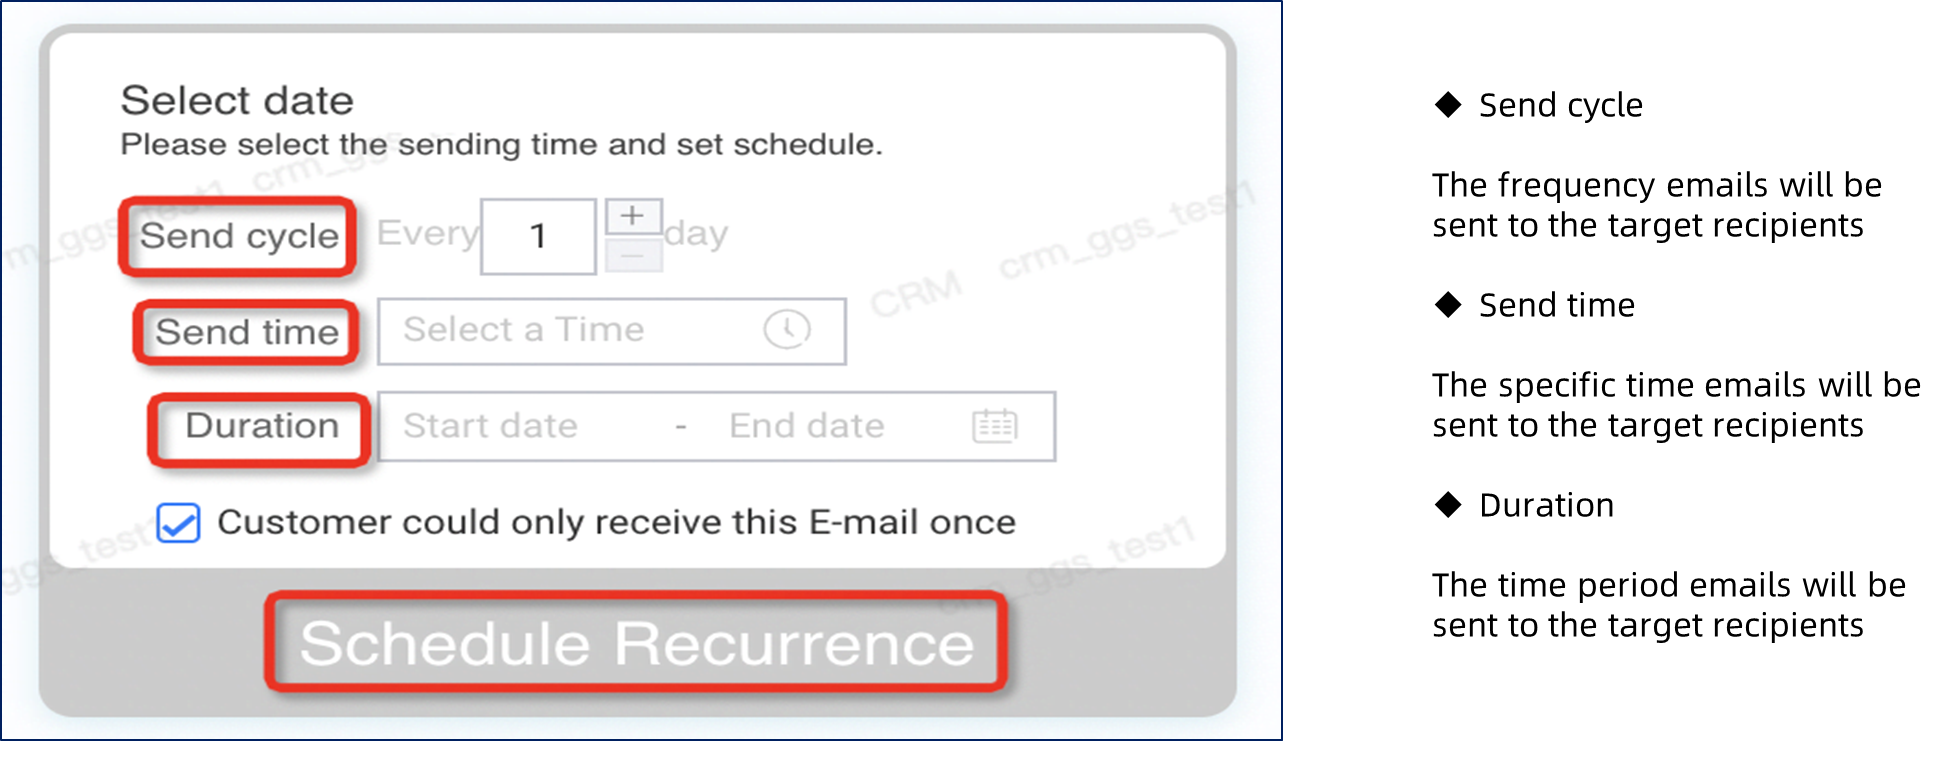
- After the approval by line manager, set ‘Send cycle’/‘Send time’/‘Duration’ items according to your need.
12.Click ‘Schedule Recurrence’ , emails will be sent the target recipients on basis of your settings
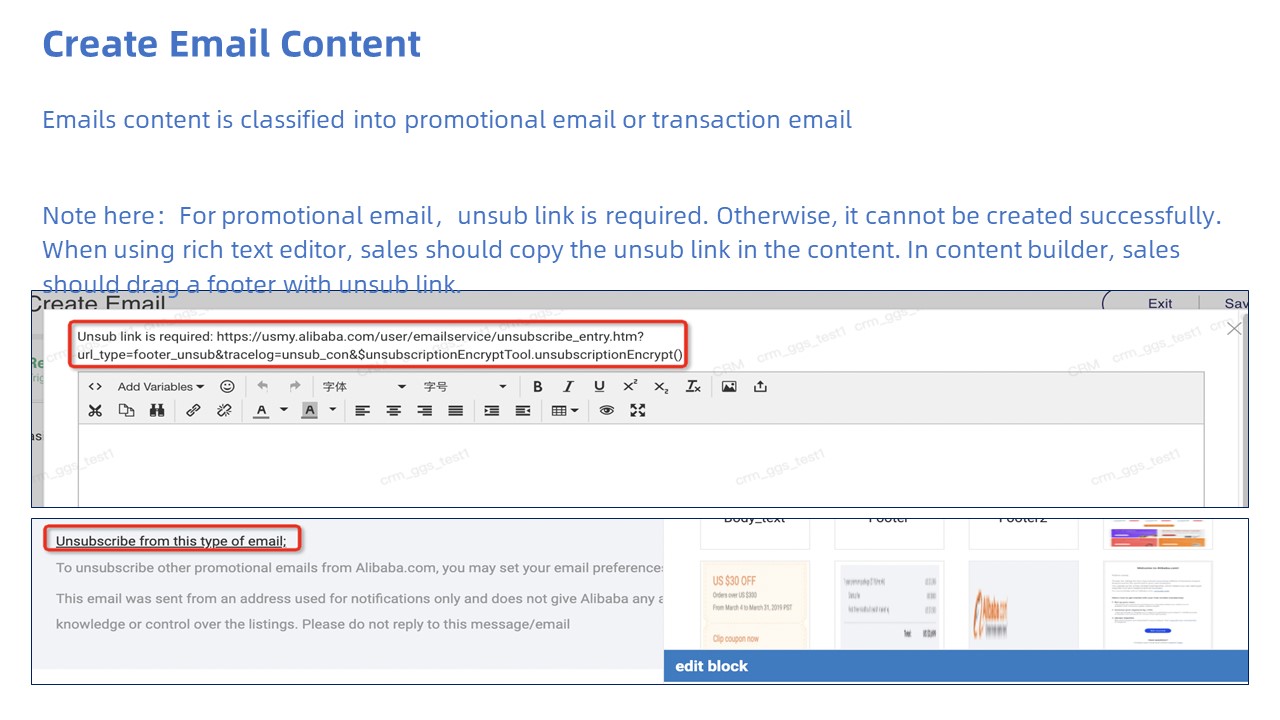
6.4 Create Email Content
6.5 Manage Email Tasks


若有收获,就点个赞吧
0 人点赞
