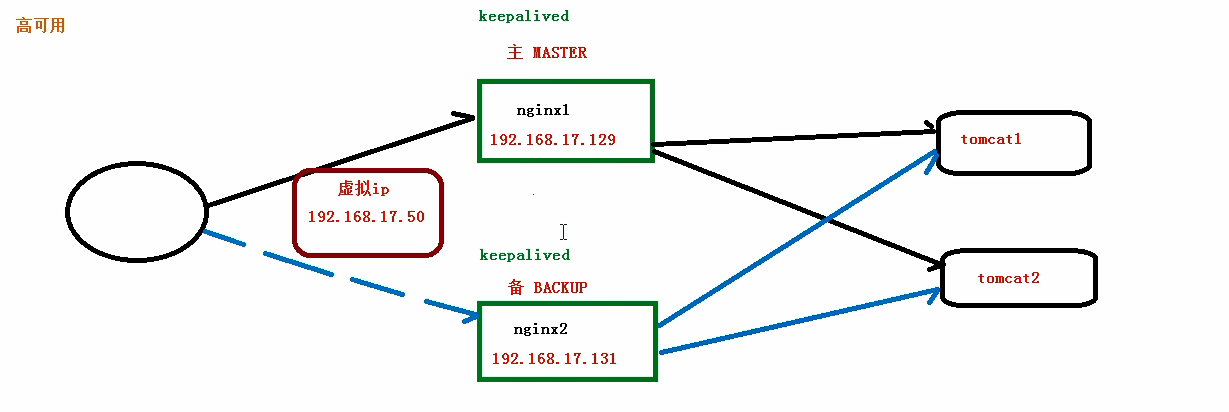
1.准备两台虚拟机分别为 : 192.168.11.110 , 192.168.11.120 ; 分别装上nginx,keepalived
yum install keepalived -y
2.进入/etc/keepalived/keepalivec.conf 配置文件修改
global_defs {notification_email {acassen@firewall.locfailover@firewall.locsysadmin@firewall.loc}notification_email_from Alexandre.Cassen@firewall.locsmtp_server 192.168.11.120 #本地主机名smtp_connect_timeout 30router_id LVS_DEVEL}vrrp_script chk_http_port {script "/usr/local/src/nginx_check.sh"interval 2 #(检测脚本执行的间隔)weight 2}vrrp_instance VI_1 {state BACKUP #备份服务器上将 MASTER 改为 BACKUPinterface ens33 //网卡virtual_router_id 51 # 主、备机的 virtual_router_id 必须相同priority 90 # 主、备机取不同的优先级,主机值较大,备份机值较小advert_int 1authentication {auth_type PASSauth_pass 1111}virtual_ipaddress {192.168.11.50 // VRRP H 虚拟地址}}
3.在/usr/local/src 添加检测脚本
nginx_check.sh
#!/bin/bashA=`ps -C nginx –no-header |wc -l`if [ $A -eq 0 ];then/usr/local/nginx/sbin/nginxsleep 2if [ `ps -C nginx --no-header |wc -l` -eq 0 ];thenkillall keepalivedfifi
4.启动nginx可keepalived
./nginx
systemctl start keepalived.service
5.测试: 输入192.168.11.50,关掉自己服务器(192.168.11.110) 和keeplived,在输入

若有收获,就点个赞吧
0 人点赞
