1、概述
- 项目结构
npm install -g @angular/cling new my-app
生成的项目结构与 react,vue区别较大
cli 隐藏了 webpack 配置文件,取而代之多了一个angular.json 文件,该文件指定了应用的入口文件,静态资源等,有点儿类似小程序的 project.config.json
- 主要文件
1、main.ts 为主 js 入口,其内容基本是固定的,不需要修改
import { enableProdMode } from '@angular/core';import { platformBrowserDynamic } from '@angular/platform-browser-dynamic';import { AppModule } from './app/app.module';import { environment } from './environments/environment';if (environment.production) {enableProdMode();}platformBrowserDynamic().bootstrapModule(AppModule).catch(err => console.error(err));
2、app.module.ts
一个应用一般由很多模块(组件、服务等)组成,angular中需要将这些模块在一个集中的地方统一声明,可以看作是组装应用核心模块的地方
import { BrowserModule } from '@angular/platform-browser';import { NgModule } from '@angular/core';import { AppRoutingModule } from './app-routing.module';import { AppComponent } from './app.component';import { TestComponent } from './test/test.component';@NgModule({declarations: [ // 引入组件的地方AppComponent,TestComponent],imports: [ // 引入模块的地方BrowserModule,AppRoutingModule],providers: [],bootstrap: [AppComponent]})export class AppModule { }
3、路由模块写法
import { NgModule } from '@angular/core';import { Routes, RouterModule } from '@angular/router';const routes: Routes = [];@NgModule({imports: [RouterModule.forRoot(routes)],exports: [RouterModule] // 必须 exports})export class AppRoutingModule {}
4、组件写法
使用 ng g c test2 命令将会在src/app 下生成 test2 目录并包含四个文件:模板test2.component.html, 样式test2.component.scss,逻辑 test2.component.ts 以及一个测试文件 test2.component.spec.ts
// test2.component.tsimport { Component, OnInit } from '@angular/core';@Component({selector: 'app-test2',templateUrl: './test2.component.html',styleUrls: ['./test2.component.scss']})export class Test2Component implements OnInit {constructor() { }ngOnInit() {}}
5、服务写法
使用 ng g s test 命令将会在src/app 下生成 test.service.ts 服务及对应的测试文件,可以加 —spec false 来避免生成测试文件
import { Injectable } from '@angular/core';@Injectable({providedIn: 'root'})export class TestService {constructor() { }}
2、基本语法
1、# 语法
# 是获取 dom 引用,类似 react 的 ref
import {Component, OnInit} from '@angular/core';@Component({selector: 'app-simple-form',template: `<div><input #myInput type="text"><button (click)="onClick(myInput.value)">点击</button></div>`,styles: []})export class SimpleFormComponent implements OnInit {onClick(value) {console.log(value);}ngOnInit() {}}
2、事件绑定
(eventName)=”onXX()” 是进行事件绑定的语法,如上例。如果想获得原生事件对象,可传入 $event 到处理函数中,位置随意。注意要写成调用的形式,而不仅仅是函数名
3、属性绑定
<show-title [title]="title"></show-title> // 等价于<show-title bind-title="title"></show-title>
4、双向绑定
Angular 中 [] 实现了模型到视图的数据绑定,() 实现了视图到模型的事件绑定。把它们两个结合在一起 [()] 就实现了双向绑定。也被称为 banana in the box 语法
5、插值
可以使用{{}}语法将模型中数据绑定到模板中,其内还可以使用管道来格式化输出
import { Component } from '@angular/core';@Component({selector: 'my-app',template: `<h1>Hello {{name}}</h1>`,})export class AppComponent {name = 'Angular';}
6、常用结构指令
ngFor , ngSwitch, ngIf ,使用指令需要在其前加 *
@Component({selector: 'sl-user',template: `<h2>大家好,我是{{name}}</h2><p>我来自<strong>{{address.province}}</strong>省,<strong>{{address.city}}</strong>市</p><div *ngIf="showSkills"><h3>我的技能</h3><ul><li *ngFor="let skill of skills">{{skill}}</li></ul></div>`})// ngIf 的 else,必须平级<ng-template #hidden><p>You are not allowed to see our secret</p></ng-template><p *ngIf="shown; else hidden">Our secret is being happy</p>// ngSwitch<div class="container" [ngSwitch]="myVar"><div *ngSwitchCase="'A'">Var is A</div><div *ngSwitchCase="'B'">Var is B</div><div *ngSwitchCase="'C'">Var is C</div><div *ngSwitchDefault>Var is something else</div></div>
7、ngClass vs ngStyle
// 数组语法<button [ngClass]="['btn', 'btn-primary']">提交</button>// 对象语法<button [ngClass]="{ btn: true, 'btn-primary': true }">提交</button><button [ngStyle]="{background: 'red'}">提交</button>
8、ng-template vs ng-container
:是一个逻辑容器,可用于对节点进行分组,它将被渲染为 HTML中的 comment 元素,它可用于避免添加额外的元素来使用结构指令,ng-template 一般配合 # 语法一起使用
<ng-template [ngIf]="true"> // 不用 * 而是 []<p> ngIf with a template.</p></ng-template><ng-container><p> ngIf with an ng-container.</p></ng-container>
9、样式
- :host 伪类选择器,选择当前的组件
:host {border: 2px solid dimgray;display: block;padding: 20px;}
- :host-context 向上寻找,当祖先有某个类时,样式生效
:host-context(.red-theme) .btn-theme {background: red;}:host-context(.blue-theme) .btn-theme {background: blue;}
Angular 的样式具有隔离的效果,即一个组件内的CSS样式只会影响自己的模版部分,不会影响子组件和其它任意组件。这是基于属性选择器做到的。(Angualr编译模版时,给html元素加了类似 _ngcontent,_nghost 之类的自定义属性,再对关联的css文件做处理,将原本的纯类式写法改成类式+属性选择器的写法)注意不是基于 Shadow Dom 的哦,因为Shadow Dom 的兼容性还不太好。
3、组件语法
1、组件的 props down,events up
- Input
父组件向子组件传递数据。
// counter.component.tsimport { Component, Input, SimpleChanges, OnChanges } from '@angular/core';@Component({selector: 'exe-counter',template: `<p>当前值: {{ count }}</p><button (click)="increment()"> + </button><button (click)="decrement()"> - </button>`})export class CounterComponent implements OnChanges{@Input() count: number = 0;ngOnChanges(changes: SimpleChanges) {console.dir(changes['count']);}increment() {this.count++;}decrement() {this.count--;}}// app.component.tsimport { Component } from '@angular/core';@Component({selector: 'exe-app',template: `<exe-counter [count]="initialCount"></exe-counter>`})export class AppComponent {initialCount: number = 5;}
当数据绑定输入属性的值发生变化的时候,Angular 将会主动调用 ngOnChanges 方法。它会获得一个 SimpleChanges 对象,包含绑定属性的新值和旧值,它主要用于监测组件输入属性的变化
- Output
子组件将信息通过事件的形式通知到父级组件
// counter.component.tsimport { Component, Input, Output, EventEmitter } from '@angular/core';@Component({selector: 'exe-counter',template: `<p>当前值: {{ count }}</p><button (click)="increment()"> + </button><button (click)="decrement()"> - </button>`})export class CounterComponent {@Input() count: number = 0;@Output() change: EventEmitter<number> = new EventEmitter<number>();increment() {this.count++;this.change.emit(this.count);}decrement() {this.count--;this.change.emit(this.count);}}// app.component.tsimport { Component } from '@angular/core';@Component({selector: 'exe-app',template: `<p>{{changeMsg}}</p><exe-counter [count]="initialCount"(change)="countChange($event)"></exe-counter>`})export class AppComponent {initialCount: number = 5;changeMsg: string;countChange(event: number) {this.changeMsg = `子组件change事件已触发,当前值是: ${event}`;}}
2、ngOnInit 和 constructor 区别constructor 中拿不到父组件传递给子组件的值,一般只是在 constructor 中做依赖注入的操作。初始化操作放在 ngOnInit 钩子中去执行
import { Component, ElementRef } from '@angular/core';@Component({selector: 'my-app',template: `<h1>Welcome to Angular World</h1><p>Hello {{name}}</p>`,})export class AppComponent implements OnInit {name: string = '';constructor(public elementRef: ElementRef) { // 使用构造注入方式注入依赖对象}ngOnInit() {this.name = 'Semlinker'; // 执行数据初始化操作}}
3、ng-content 类似 slot
import { Component } from '@angular/core';@Component({selector: 'wrapper',template: `<div class="box red"><ng-content></ng-content></div><div class="box blue"><ng-content select="counter"></ng-content></div>`,styles: [`.red {background: red;}.blue {background: blue;}`]})export class Wrapper { }//<wrapper><span>This is not a counter</span><counter></counter></wrapper>
4、 ngAfterViewInit 父级组件模板中引用了子组件,且在父组件中想调用子组件的某些功能时使用:
//template: `<div>-- child view begins --</div><app-child-view></app-child-view><div>-- child view ends --</div>`//export class AfterViewComponent implements AfterViewChecked, AfterViewInit {private prevHero = '';// Query for a VIEW child of type `ChildViewComponent`@ViewChild(ChildViewComponent, {static: false}) viewChild: ChildViewComponent;ngAfterViewInit() {// viewChild is set after the view has been initializedthis.logIt('AfterViewInit');this.doSomething();}ngAfterViewChecked() {// viewChild is updated after the view has been checkedif (this.prevHero === this.viewChild.hero) {this.logIt('AfterViewChecked (no change)');} else {this.prevHero = this.viewChild.hero;this.logIt('AfterViewChecked');this.doSomething();}}// ...}
5、ngContentInit 当在组件标签中嵌入其他html或者其他组件时,想获取嵌入的内容时使用,常与 ng-content标签一起使用:
// after-parent-template`<after-content><app-child></app-child></after-content>`// after-template<div>-- projected content begins --</div><ng-content></ng-content><div>-- projected content ends --</div>//export class AfterContentComponent implements AfterContentChecked, AfterContentInit {private prevHero = '';comment = '';// Query for a CONTENT child of type `ChildComponent`@ContentChild(ChildComponent, {static: false}) contentChild: ChildComponent;ngAfterContentInit() {// contentChild is set after the content has been initializedthis.logIt('AfterContentInit');this.doSomething();}ngAfterContentChecked() {// contentChild is updated after the content has been checkedif (this.prevHero === this.contentChild.hero) {this.logIt('AfterContentChecked (no change)');} else {this.prevHero = this.contentChild.hero;this.logIt('AfterContentChecked');this.doSomething();}}// ...}
4、HttpClient 使用
1、导入 HttpClientModule 模块
import { BrowserModule } from "@angular/platform-browser";import { NgModule } from "@angular/core";import { HttpClientModule } from "@angular/common/http";import { AppComponent } from "./app.component";@NgModule({declarations: [AppComponent],imports: [BrowserModule, HttpClientModule],providers: [],bootstrap: [AppComponent]})export class AppModule {}
2、发送get
export class AppComponent implements OnInit {todos$: Observable<Todo[]>;constructor(private http: HttpClient) {}ngOnInit() {this.todos$ = this.http.get<Todo[]>("https://jsonplaceholder.typicode.com/todos?_page=1&_limit=10").pipe(tap(console.log));}}// 设置 params 和headers 参数import { HttpClient, HttpParams } from "@angular/common/http";const params = new HttpParams().set("_page", "1").set("_limit", "10");const headers = new HttpHeaders().set("token", "iloveangular");ngOnInit() {this.todos$ = this.http.get<Todo[]>("https://jsonplaceholder.typicode.com/todos", { params,headers }).pipe(tap(console.log));}// 获取完整响应this.http.get("https://jsonplaceholder.typicode.com/todos/1", {observe: "response"}).subscribe(res => {console.dir("Response: " + res.status);});
3、拦截器
// auth.interceptor.tsimport { Injectable } from "@angular/core";import { HttpEvent, HttpRequest, HttpHandler, HttpInterceptor } from "@angular/common/http";import { Observable } from "rxjs";@Injectable()export class AuthInterceptor implements HttpInterceptor {intercept(req: HttpRequest<any>,next: HttpHandler): Observable<HttpEvent<any>> {const clonedRequest = req.clone({headers: req.headers.set("X-CustomAuthHeader", "iloveangular")});console.log("new headers", clonedRequest.headers.keys());return next.handle(clonedRequest);}}import { AuthInterceptor } from "./interceptors/auth.interceptor";@NgModule({declarations: [AppComponent],imports: [BrowserModule, HttpClientModule],providers: [{ provide: HTTP_INTERCEPTORS, useClass: AuthInterceptor, multi: true }],bootstrap: [AppComponent]})export class AppModule {}
5、指令 directive
指令有三种:组件指令、属性指令、结构指令。组件本身就是一种指令,只不过组件指令拥有模板,而属性指令和结构指令都没有模板
1、可以使用 HostBinding 装饰器,实现元素的属性绑定
import { Directive, HostBinding} from '@angular/core';@Directive({selector: '[greet]'})export class GreetDirective {@HostBinding() innerText = 'Hello, Everyone!';}import { Component } from '@angular/core';@Component({selector: 'app-root',template: `<h2>Hello, Angular</h2><h2 greet>Hello, Angular</h2>`,})export class AppComponent { }
2、使用 Input 装饰器可以定义指令的输入属性
import { Directive, HostBinding, Input } from '@angular/core';@Directive({selector: '[greet]'})export class GreetDirective {@Input() greet: string;@HostBinding() get innerText() {return this.greet;}}import { Component } from '@angular/core';@Component({selector: 'app-root',template: `<h2>Hello, Angular</h2><h2 [greet]="'Hello, Semlinker!'">Hello, Angular</h2>`,})export class AppComponent { }
3、使用 HostListener 属性装饰器,实现元素的事件绑定
import { Directive, HostBinding, HostListener, Input } from '@angular/core';@Directive({selector: '[greet]'})export class GreetDirective {@Input() greet: string;@HostBinding() get innerText() {return this.greet;}@HostListener('click',['$event'])onClick(event) {this.greet = 'Clicked!';}}import { Component } from '@angular/core';@Component({selector: 'app-root',template: `<h2>Hello, Angular</h2><h2 [greet]="'Hello, Semlinker!'">Hello, Angular</h2>`,})export class AppComponent { }
4、通过 Attribute 装饰器来获取指令宿主元素的属性值
import { Directive, HostBinding, HostListener, Input, Attribute } from '@angular/core';@Directive({selector: '[greet]'})export class GreetDirective {@Input() greet: string;@HostBinding() get innerText() {return this.greet;}@HostListener('click',['$event'])onClick(event) {this.greet = 'Clicked!';console.dir(event);}constructor(@Attribute('author') public author: string) {console.log(author);}}import { Component } from '@angular/core';@Component({selector: 'app-root',template: `<h2>Hello, Angular</h2><h2 [greet]="'Hello, Semlinker!'"author="semlinker">Hello, Angular</h2>`,})export class AppComponent { }
5、通过 ViewChild 装饰器来获取视图中定义的模板元素,然后利用 ViewContainerRef 对象的 createEmbeddedView() 方法,创建内嵌视图
import { Component, TemplateRef, ViewContainerRef, ViewChild,AfterViewInit } from '@angular/core';@Component({selector: 'app-root',template: `<ng-template #tpl>Hello, Semlinker!</ng-template>`,})export class AppComponent implements AfterViewInit{@ViewChild('tpl') tplRef: TemplateRef<any>;constructor(private vcRef: ViewContainerRef) {}ngAfterViewInit() {this.vcRef.createEmbeddedView(this.tplRef);}}
6、ElementRef,TemplateRef,ViewContainerRef
6、路由
1、使用 base 指定路由根地址
<!doctype html><html><head><base href="/"><title>Application</title></head><body><app-root></app-root></body></html>
2、在 AppModule 模块中,导入 RouterModule
import { RouterModule } from '@angular/router';import { AppComponent } from './app.component';@NgModule({imports: [BrowserModule,RouterModule],bootstrap: [AppComponent],declarations: [AppComponent]})export class AppModule {}
3、使用 RouterModule 对象为我们提供的静态方法:forRoot() 和 forChild() 来配置路由信息(根模块中使用 forRoot(),子模块中使用 forChild())
export const ROUTES: Routes = [];@NgModule({imports: [BrowserModule,RouterModule.forRoot(ROUTES)],// ...})export class AppModule {}
4、定义 routes
通过 path 属性定义路由的匹配路径,而 component 属性用于定义路由匹配时需要加载的组件
export const ROUTES: Routes = [{ path: '', component: HomeComponent }];
5、使用 router-outlet 的指令告诉 Angular 在哪里加载组件
import { Component } from '@angular/core';@Component({selector: 'app-root',template: `<div class="app"><h3>Our app</h3><router-outlet></router-outlet></div>`})export class AppComponent {}
6、动态路由
export const ROUTES: Routes = [{ path: '', component: HomeComponent },{ path: '/profile/:username', component: ProfileComponent }];
获取username需要先从 @angular/router 模块中导入 ActivatedRoute ,然后在组件类的构造函数中注入该对象,最后通过订阅该对象的 params 属性,来获取路由参数
import { Component, OnInit } from '@angular/core';import { ActivatedRoute } from '@angular/router';@Component({selector: 'profile-page',template: `<div class="profile"><h3>{{ username }}</h3></div>`})export class SettingsComponent implements OnInit {username: string;constructor(private route: ActivatedRoute) {}ngOnInit() {this.route.params.subscribe((params) => this.username = params.username);}}
7、子路由
export const ROUTES: Routes = [{path: 'settings',component: SettingsComponent,children: [{ path: 'profile', component: ProfileSettingsComponent },{ path: 'password', component: PasswordSettingsComponent }]}];
8、按需加载
export const ROUTES: Routes = [{path: 'settings',loadChildren: './settings/settings.module#SettingsModule'}];@NgModule({imports: [BrowserModule,RouterModule.forRoot(ROUTES)],// ...})export class AppModule {}
9、router-link
// 传递路由信息<a [routerLink]="['/profile', username]">Go to {{ username }}'s profile.</a>// 当前激活路由类名<nav><a routerLink="/settings" routerLinkActive="active">Home</a><a routerLink="/settings/password" routerLinkActive="active">Change password</a><a routerLink="/settings/profile" routerLinkActive="active">Profile Settings</a></nav>
10、编程式导航
constructor(private router: Router) {}handleSelect(event) {this.router.navigate(['/profile', event.name]);}
7、服务
// 1、局部注入法export class UserService {}import { UserService } from './user.service';...@NgModule({imports: [ BrowserModule],declarations: [ AppComponent],bootstrap: [ AppComponent],providers: [UserService]})// 2、全局注入法// 在 Angular 6 之后,我们也可以利用 @Injectable 的元数据来配置服务类import { Injectable } from '@angular/core';@Injectable({providedIn: 'root',})export class UserService { }
8、动画
- 基本步骤
1、启用动画模块 BrowserAnimationsModule
import { NgModule } from '@angular/core';import { BrowserModule } from '@angular/platform-browser';import { BrowserAnimationsModule } from '@angular/platform-browser/animations';@NgModule({imports: [BrowserModule,BrowserAnimationsModule],declarations: [ ],bootstrap: [ ]})export class AppModule { }
2、导入动画功能函数到组件文件
import {trigger,state,style,animate,transition,// ...} from '@angular/animations';
3、添加动画的元数据属性
@Component({selector: 'app-open-close',animations: [trigger('openClose', [// ...state('open', style({height: '200px',opacity: 1,backgroundColor: 'yellow'})),state('closed', style({height: '100px',opacity: 0.5,backgroundColor: 'green'})),transition('open => closed', [animate('1s')]),transition('closed => open', [animate('0.5s')]),]),],templateUrl: 'open-close.component.html',styleUrls: ['open-close.component.css']})export class OpenCloseComponent {isOpen = true;toggle() {this.isOpen = !this.isOpen;}}
4、触发动画
<div [@openClose]="isOpen ? 'open' : 'closed'" class="open-close-container"><p>The box is now {{ isOpen ? 'Open' : 'Closed' }}!</p></div>
- 进阶
1、用 state 函数可以定义一个动画状态,但还有一些特殊的状态:* 代表任意状态;void 代表空状态。它们不需要用 state 函数来定义
animations: [trigger('openClose', [// ...state('open', style({height: '200px',opacity: 1,backgroundColor: 'yellow'})),state('closed', style({height: '100px',opacity: 0.5,backgroundColor: 'green'})),transition('* => closed', [animate('1s')]),transition('* => open', [animate('0.5s')]),]),],
当元素离开视图时,就会触发 => void 转场,而不管它离开前处于什么状态。
当元素进入视图时,就会触发 void => 转场,而不管它进入时处于什么状态。
通配符状态 * 会匹配任何状态 —— 包括 void。
注意:
a、 => void 等价于 :leave,void => 等价于 :enter
b、:increment 和 :decrement 泛指某个增加和减少的场景,如:
[@menuActivateSubmenu]=”count”,可以通过控制 count 值的++或—来触发对应的 :increment 或 :decrement 动画
2、转场 transition 会按照其定义的顺序进行匹配。因此,你可以在 => 转场的前面定义其它转场。比如,定义只针对 open => closed 的状态变更或动画,或 closed => open,而使用 => 作为匹配不上其它状态对时的后备。
3、样式通配符
transition ('* => open', [animate ('1s',style ({ opacity: '*' }),),]),
这个 * 代表动画过程中 opacity 的值自动计算
4、:enter,:leave 结合 ngIf 和 ngFor
当任何 ngIf 或 ngFor 中的视图放进页面中时,会运行 :enter 转场;当移除这些视图时,就会运行 :leave 转场。
<div @myInsertRemoveTrigger *ngIf="isShown" class="insert-remove-container"><p>The box is inserted</p></div>trigger('myInsertRemoveTrigger', [transition(':enter', [style({ opacity: 0 }), // 初始状态,没有用 state 定义animate('100ms', style({ opacity: 1 })), // 终止状态]),transition(':leave', [animate('100ms', style({ opacity: 0 }))])]),
5、动画回调
<div [@openClose]="isOpen ? 'open' : 'closed'"(@openClose.start)="onAnimationEvent($event)"(@openClose.done)="onAnimationEvent($event)"class="open-close-container"></div>export class OpenCloseComponent {onAnimationEvent ( event: AnimationEvent ) {// openClose is trigger name in this exampleconsole.warn(`Animation Trigger: ${event.triggerName}`);// phaseName is start or doneconsole.warn(`Phase: ${event.phaseName}`);// in our example, totalTime is 1000 or 1 secondconsole.warn(`Total time: ${event.totalTime}`);// in our example, fromState is either open or closedconsole.warn(`From: ${event.fromState}`);// in our example, toState either open or closedconsole.warn(`To: ${event.toState}`);// the HTML element itself, the button in this caseconsole.warn(`Element: ${event.element}`);}}
6、关键帧动画
transition('* => active', [animate('2s', keyframes([style({ backgroundColor: 'blue', offset: 0}), // offset 标志动画过渡到哪儿了style({ backgroundColor: 'red', offset: 0.8}),style({ backgroundColor: 'orange', offset: 1.0})])),]),transition('* => inactive', [animate('2s', keyframes([style({ backgroundColor: 'orange', offset: 0}),style({ backgroundColor: 'red', offset: 0.2}),style({ backgroundColor: 'blue', offset: 1.0})]))]),
- 进阶2
1、动画复用
使用 [animation()](https://angular.cn/api/animations/animation) 方法来在独立的 .ts 文件中定义动画,并把该动画的定义声明为一个导出的 const 变量。然后你就可以在应用的组件代码中通过 [useAnimation()](https://angular.cn/api/animations/useAnimation) 来导入并复用它了。
// 定义import {animation, trigger, animateChild, group,transition, animate, style, query} from '@angular/animations';export const transAnimation = animation([style({height: '{{ height }}',opacity: '{{ opacity }}',backgroundColor: '{{ backgroundColor }}'}),animate('{{ time }}')]);// 使用import { Component } from '@angular/core';import { useAnimation, transition, trigger, style, animate } from '@angular/animations';import { transAnimation } from './animations';@Component({trigger('openClose', [transition('open => closed', [useAnimation(transAnimation, {params: {height: 0,opacity: 1,backgroundColor: 'red',time: '1s'}})])])})
2、复杂序列
2.1、query & stagger
animations: [trigger('pageAnimations', [transition(':enter', [query('.hero, form', [style({opacity: 0, transform: 'translateY(-100px)'}),stagger(-30, [animate('500ms cubic-bezier(0.35, 0, 0.25, 1)', style({ opacity: 1, transform: 'none' }))])])])]),]})
a、用 query 查阅正在进入或离开页面的任意元素。该查询会找出那些符合某种匹配 CSS 选择器的元素。
b、 对每个元素,使用 style 为其设置初始样式。使其不可见,并使用 transform 将其移出位置,以便它能滑入后就位。
c、使用 stagger 来在每个动画之间延迟 30 毫秒。
d、对屏幕上的每个元素,根据一条自定义缓动曲线播放 0.5 秒的动画,同时将其淡入,而且逐步取消以前的位移效果。
2.2、group
对同一个元素的不同属性做不同的动画,动画是并行执行的
animations: [trigger('flyInOut', [state('in', style({width: 120,transform: 'translateX(0)', opacity: 1})),transition('void => *', [style({ width: 10, transform: 'translateX(50px)', opacity: 0 }),group([animate('0.3s 0.1s ease', style({transform: 'translateX(0)',width: 120})),animate('0.3s ease', style({opacity: 1}))])]),transition('* => void', [group([animate('0.3s ease', style({transform: 'translateX(50px)',width: 10})),animate('0.3s 0.2s ease', style({opacity: 0}))])])])]
2.3、过滤动画
@Component({animations: [trigger('filterAnimation', [transition(':enter, * => 0, * => -1', []), // 忽略进入动画transition(':increment', [query(':enter', [ // 查询进入的元素并应用动画style({ opacity: 0, width: '0px' }),stagger(50, [animate('300ms ease-out', style({ opacity: 1, width: '*' })),]),], { optional: true })]),transition(':decrement', [query(':leave', [stagger(50, [animate('300ms ease-out', style({ opacity: 0, width: '0px' })),]),])]),]),]})export class HeroListPageComponent implements OnInit {heroTotal = -1;}
3、路由转场动画
// 1、定义路由,注意 data 参数定义了动画的一个状态,后面会用上{ path: 'home', component: HomeComponent, data: {animation: 'HomePage'} },{ path: 'about', component: AboutComponent, data: {animation: 'AboutPage'} },// 2、定义路由出口<div [@routeAnimations]="prepareRoute(outlet)" ><router-outlet #outlet="outlet"></router-outlet></div>prepareRoute(outlet: RouterOutlet) {return outlet && outlet.activatedRouteData && outlet.activatedRouteData['animation']; // 这里取出路由定义中data值}// 3、定义动画export const slideInAnimation =trigger('routeAnimations', [transition('HomePage <=> AboutPage', [style({ position: 'relative' }), // 宿主元素初始样式query(':enter, :leave', [ // 子元素动画过程中的样式style({position: 'absolute',top: 0,left: 0,width: '100%'})]),query(':enter', [ // 刚进入时隐藏进入元素style({ left: '-100%'})]),query(':leave', animateChild()), // 刚离开时允许允许子元素动画group([ // 一个元素进入同时另一个元素退出query(':leave', [animate('300ms ease-out', style({ left: '100%'}))]),query(':enter', [animate('300ms ease-out', style({ left: '0%'}))])]),query(':enter', animateChild()), // 元素进入后,开始执行子动画]),]);// 4、应用动画@Component({selector: 'app-root',templateUrl: 'app.component.html',styleUrls: ['app.component.css'],animations: [slideInAnimation]})
9、主要模块

- 注意事项
1、使用 ngModel 时必须先引入 FormsModule( ngModel 是一个有效的 Angular 指令,不过它在默认情况下是不可用的)
2、Angular 的自定义元素是如何被浏览器识别的?
Angular 编译时,会用到一个浏览器原生支持的自定义元素API:customElements.define
customElements.define('element-details',class extends HTMLElement {constructor() {super();const template = document.getElementById('element-details-template').content;const shadowRoot = this.attachShadow({mode: 'open'}).appendChild(template.cloneNode(true));}});
3、生命周期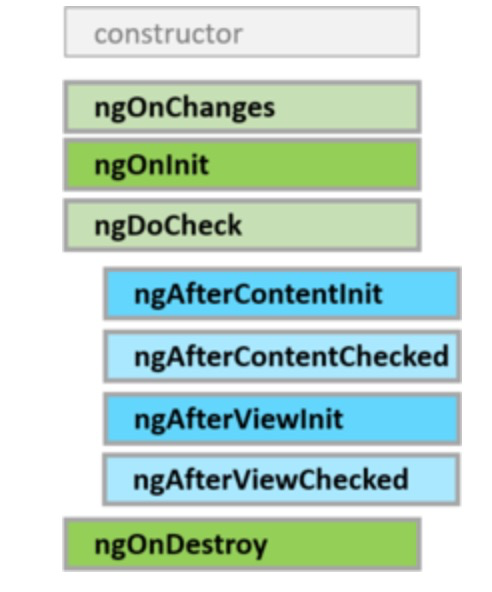


- ngOnChanges: 当组件数据绑定的输入属性发生变化时触发, 该方法接受一个SimpleChanges对象,包括当前值和上一属性值.首次调用一定发生在ngOnInit前,注意的是该方法仅限于对象的引用发生变化时,也就是说,如果对象的某个属性发生变化,Angular是不会触发onChanges的.
- ngOninit:初始化指令或组件, 在angular第一次展示组件的绑定属性后调用,该方法只调用一次.
- ngDocheck: 检测,并在发生Angular无法或不愿意自己检测的变化时作出反应。
在每个Angular变更检测周期中调用,ngOnChanges()和ngOnInit()之后。 - ngAfterContentInit: 当把内容投影进组件之后调用。
第一次ngDoCheck()之后调用,只调用一次. 只适用于组件。 - ngAfterContentChecked: 每次完成被投影组件内容的变更检测之后调用。
- ngAfterContentInit()和每次ngDoCheck()之后调用,只适合组件。
- ngAfterViewInit: 在angular初始化组件及其子组件的视图之后调用, 只调用一次,第一次ngAfterContentChecked()之后调用.只适合组件。
- ngAfterViewChecked: 每次做完组件视图和子视图的变更检测之后调用。
ngAfterViewInit()和每次ngAfterContentChecked()之后调用。只适合组件。 - ngOnDestory: 在angular每次销毁组件或指令之前调用, 通常用于移除事件监听,退订可观察对象等.
4、变更检测
- 单组件模式

- default 自动刷新UI的机制会被 runOutsideAngualr 方法所影响
- 父级 default or onPush + 子级 onPush 模式
子级 detectChange 不能更新父级UI
子级 markForCheck 可以更新父级UI
父级onPush,子级default时,子级也不会更新 - 应该全部用 onPush + detectChange 策略,各组件只关心自己的UI更新情况,不必关心父级和子级。若子级的变化想引起父级的变化,不应该用 markForCheck。而是类似发起一个 action,更新store,父级监听 store 的变化,然后自己 detectChange
- click这种用户触发的事件是一个特例,会引起全局的 UI 刷新
- 子组件中 HostBinding 这种绑定的属性不会随UI一起刷新,除非显示调用 markForCheck
5、JS和CSS共享变量的一种方式:
// ts@HostBinding('attr.style')get valueAsStyle(): any {return this.sanitizer.bypassSecurityTrustStyle(`--some-var: ${this.test}`);}test = '100%';constructor(private readonly sanitizer: DomSanitizer,) {}// scss:host {width: calc(var(--some-var));height: 100%;position: fixed;z-index: 2000;}
10、最佳实践
- 组件更新策略
onPush + detectChanges
最好不要在宿主元素上绑定属性,如 hidden,这会使 detectChanges 失效,因为宿主模板本质上可以理解为父级的DOM,需用 markForCheck 才能得到更新,但 markForCheck 代价较大
rxjs 订阅与取消
尽量使用 async pipe 自动管理退订,而不是 destroy$ or subscribtion
- ngrx 用 typeof 定义默认值类型,减少模板代码 ```javascript // good export const initialState = { showRank: false, rankItems: [], scoreCommited: true, }; export type State = typeof initialState
// bad export interface State { showRank: boolean; rankItems: FullAttendanceRankItem[]; scoreCommited: boolean; } export const initialState: State = { showRank: false, rankItems: [], scoreCommited: true, }; ```
- 逻辑容器用 ng-container 而不是 div,可以减少dom嵌套层级
参考

若有收获,就点个赞吧
0 人点赞
