angular优点
1.1 Angular最大程度减少了页面上的DOM操作;
1.2 让JavaScript中专注业务逻辑的代码
1.3 通过自定义指令实现组件化编程
1.4 代码结构更合理
1.5 维护成本更低
1. 组件
1.1 HTML模板
1.2 typescript定义行为
1.3 css组,可以引入多个css文件,因此可以在一个组件里面定义多个css文件。
//从angular主模块中引入Component(组件装饰器或组件注解)import { Component } from '@angular/core';//装饰器中以json的形式声明元数据@Component({//它指定了一个叫 <app-root> 的元素。 该元素是 index.html 文件里的一个占位符//为什么这个组件跟入口index建立了联系呢?因为入口main.ts中绑定了主模块为appModuleselector: 'app-root', //在模板中找对应的标签,找到后创建并插入该组件实例templateUrl: './app.component.html', // html模板styleUrls: ['./app.component.css'], // css样式,可以引入多个css文件// 这个属性(内联模板)和templateUrl(外联模板)二选一,template后面可以直接跟html字符串// 注意在模板语法(反引号)中是使用插值表达式,不能使用${}插入值template: `<h1>{{title}}</h1>`})//组件控制器,写逻辑代码的地方export class AppComponent {title = 'myAngular';//构造函数可以用来进行属性的声明和初始化语句//在angular里面有个特别重要的点要记住:只能通过构造函数注入依赖constructor() {}}
2. 指令和渲染
2.1 渲染文本用双花括号 {{}} // 和vue一样
2.2 属性绑定用方括号 [] // 将属性或属性绑定到组件类中的值
2.3 绑定事件用单括号 ()
2.4 ngIf和ngFor
2.5 [()] 双向绑定
3. 依赖注入
@Injectable();
4. 生命周期
@Directive()export class PeekComponent implements OnInit, OnChanges, DoCheck,AfterContentInit, AfterContentChecked, AfterViewInit, AfterViewChecked, OnDestroy{name: string = '';constructor() {this.string = '';console.log('00构造函数执行了---除了使用简单的值对局部变量进行初始化之外,什么都不应该做')}ngOnChanges() {console.log('01ngOnChages执行了---当被绑定的输入属性的值发生变化时调用(父子组件传值的时候会触发)');}ngOnInit() {console.log('02ngOnInit执行了--- 请求数据一般放在这个里面');}ngDoCheck() {console.log('03ngDoCheck执行了---检测,并在发生 Angular 无法或不愿意自己检测的变化时作出反应');}ngAfterContentInit() {console.log('04ngAfterContentInit执行了---当把内容投影进组件之后调用');}ngAfterContentChecked() {console.log('05ngAfterContentChecked执行了---每次完成被投影组件内容的变更检测之后调用');}ngAfterViewInit() : void {console.log('06 ngAfterViewInit执行了----初始化完组件视图及其子视图之后调用(dom操作放在这个里面)');}ngAfterViewChecked() {console.log('07ngAfterViewChecked执行了----每次做完组件视图和子视图的变更检测之后调用');}ngOnDestroy() {console.log('08ngOnDestroy执行了····');}//自定义方法changeMsg() {this.msg = "数据改变了";}}
4.1 生命周期执行顺序
- ngOnChanges - 当数据绑定输入属性的值发生变化时调用(父子传值时会触发)
- ngOnInit - 在第一次 ngOnChanges 后调用, 初始化只调用一次,请求数据
- ngDoCheck - 自定义的方法,用于检测和处理值的改变
- ngAfterContentInit - 在组件内容初始化之后调用。只调用一次
- ngAfterContentChecked - 组件每次检查内容时调用
- ngAfterViewInit - 组件相应的视图初始化之后调用
- ngAfterViewChecked - 组件每次检查视图时调用。每次做完组件视图和子视图的变更检测之后调用。
- ngOnDestroy - 指令销毁前调用。在这儿反订阅可观察对象和分离事件处理器,以防内存泄 漏。在 Angular 销毁指令/组件之前调用。比如:移除事件监听、清除定时器、退订 Observable 等。
- 初始化调用constructor,ngOnChanges,ngOnInit,ngDoCheck,ngAfterContentInit,ngAfterContentChecked,ngAfterViewInit,ngAfterViewChecked
- 卸载 ngOnDestroy 3-5-7

5. 组件传值
5.1 装饰器
5.1.1 1). @Input(); 2). @Output(); 是Angular2专门用来实现跨组件通讯,双向绑定等操作的。
@Input 父组件向子组件 ,@Output 子组件向父组件,并且需要EventEmitter,变量不能加‘on’,可以使用。
// tslint:disable-next-line:no-output-on-prefix@Output() onRemoveElement = new EventEmitter<Element>();
1.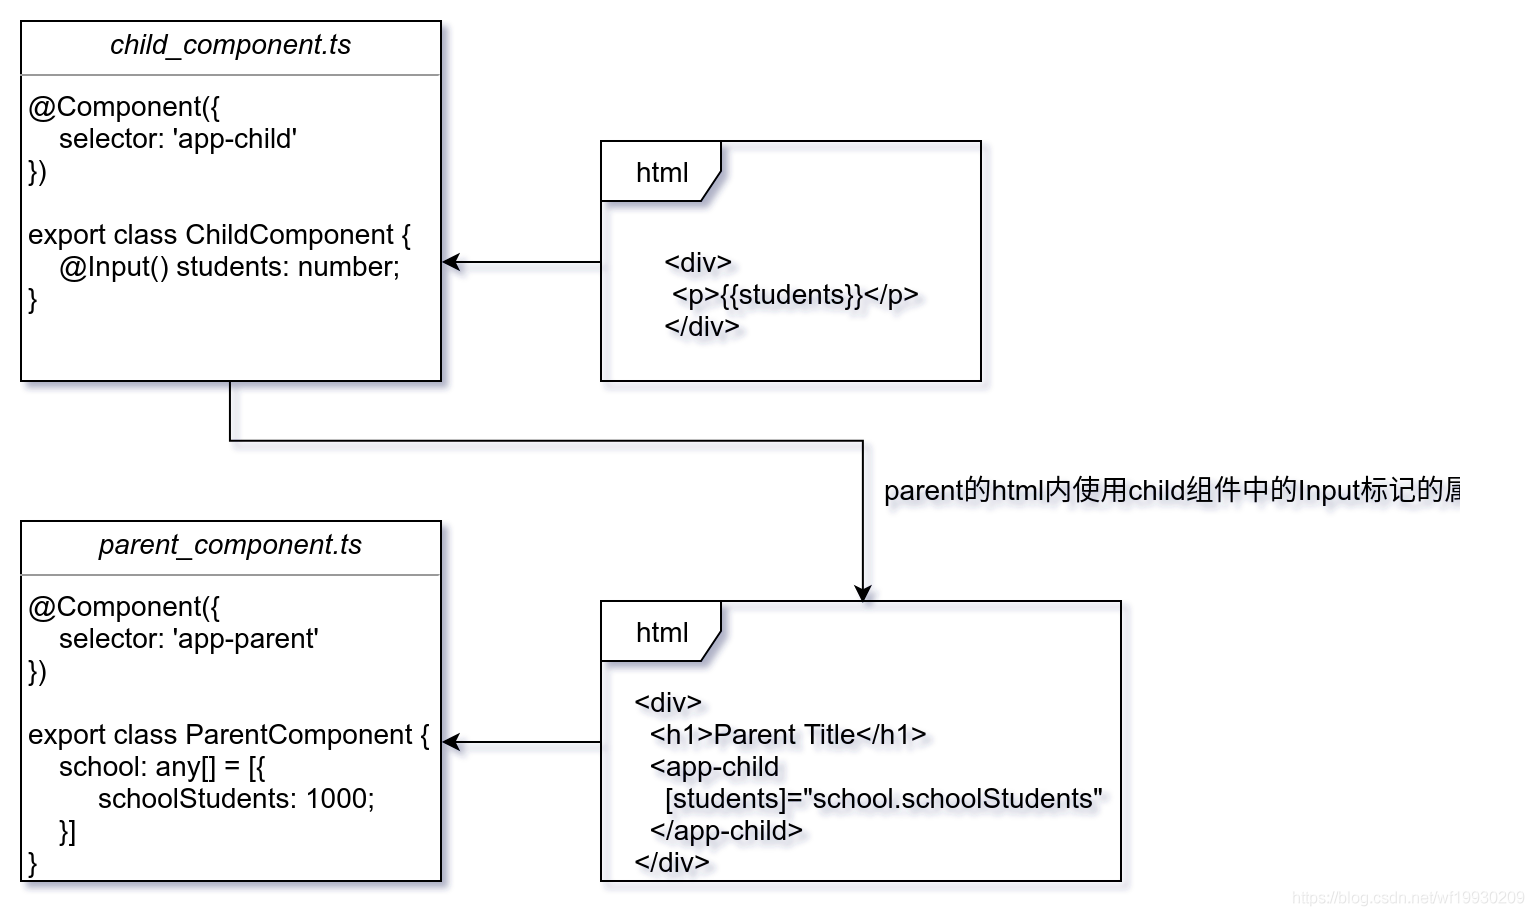
- child_component.ts内有students,并且是被@Input标记的,那么这个属性就作为输入属性
- 在parent_component.html内直接使用了students,那是因为在parent.module.ts内将child组件import进来了
- [students]这种形式叫属性绑定,绑定的值为school.schoolStudents属性
- Angular会把schoolStudents的值赋值给students,然后影响到子组件的显示。
所以我们可以总结,child_component中有数据要显示,但是这个数据的来源是通过parent_component.html中通过属性绑定的形式作为child组件的输入,要想child组件内的students属性能够成功赋值,那么必须使用@Input。
可以使用ngChanges监听@Input的变化。
2.
child组件内有一个Output customClick的事件,事件的数据类型是number
child组件内有一个onClicked方法,这个是应用在html中button控件的click事件中,通过(click)=”onClicked()”进行方法绑定
parent组件内有一个public的属性showMsg,Angular的ts类默认不写关键字就是public。
parent组件内有一个onCustomClicked方法,这个也是要用在html中的,是和child组件内的output标记的customClick事件进行绑定的
步骤为child的html的button按钮被点击->onClicked方法被调用->emit(99)触发customClick->Angular通过Output数据流识别出发生变化并通知parent的html中(customClick)->onCustomClicked(event)被调用,event)被调用,event为数据99->改变了showMsg属性值->影响到了parent的html中的显示由1变为99。
// 子组件import { Component, Input, OnInit, Output, EventEmitter } from '@angular/core';@Component({selector: 'selector-aaa',templateUrl: './aaa.component.html'})export class AaaComponent implements OnInit {@Input() mes: any;@Output() childClick = new EventEmitter<any>();child = '发给父组件的值'constructor() { }ngOnInit() { }aaa() {this.childClick.emit(this.child);}}// ---html<div style="width: 40px;height: 40px;" (click)="aaa()">我是子组件--{{ mes }}</div>
// 关联页面@NgModule({imports: [SharedModule,DragDropModule,RouterModule.forChild(ROUTES)],exports: [RouterModule],entryComponents: COMPONENTS,declarations: [COMPONENTS],schemas: [CUSTOM_ELEMENTS_SCHEMA],providers: [...SERVICES]})
// 父组件prventMes = '父组件发的';parentClick(e) {console.log(e);}// html<selector-aaa [mes]="prventMes" (childClick)="parentClick($event)"></selector-aaa>
5.2 组件通过服务来通讯(发布订阅模式);
// 1.创建一个service服务import { Observable, Subject } from 'rxjs';export class MessService {private subject = new Subject<any>();send(mes: any) {this.subject.next(mes);}get(): Observable<any> {return this.subject.asObservable();}}
// 2.关联service@NgModule({imports: [SharedModule,DragDropModule,RouterModule.forChild(ROUTES)],exports: [RouterModule],entryComponents: COMPONENTS,declarations: [COMPONENTS],schemas: [CUSTOM_ELEMENTS_SCHEMA],providers: [...SERVICES]})
// 3. 发布组件import { MessService } from './../../../states';name = '发布啦';constructor(private Util: UtilService,private Dialog: DialogService,private fb: FormBuilder,// private service: TempHumiSettingStatusServiceprivate sev: MessService,) { }add() {this.sev.send(this.name);});
// 4.接受组件import { MessService } from './../../../states';message = '';constructor(private dialogService: DialogService,private fb: FormBuilder,private util: UtilService,private srv: MessService) { }ngOnInit() {this.srv.get().subscribe((result) => {console.log('111111111111111111');this.message = result;console.log(this.message);});}
5.3 本地缓存
5.4 路由传参
6. 动态组件
添加组件之前,先定义一个锚点 告诉Angular把组件插到什么地方。
组件的模板不会永远是固定的。应用可能会需要在运行期间按需加载一些新的组件。 通过下面的例子可以了解动态组件的基本使用。
7. 模板
7.1 插值 {{ }}
7.2 别名 #
8. 装饰器
8.1 简介
8.1.1 装饰器就是一个函数;
8.1.2 它是一个返回函数的函数;
8.1.3 它不是Angular的特性,它是ts的特性;
8.1.4 函数的入参分别为 target,name和descriptor;
8.1.5 执行该函数后,可能返回description对象,用于配置target对象。
8.2 TypeSctipt装饰器的分类;
8.2.1 类装饰器(Class decorators);
8.2.2 方法装饰器(Method decorators);
8.2.3 属性装饰器(Property decorators);
8.2.4 参数装饰器(Paramter decorators);
8.2.5 访问器装饰器();
8.3 实现一个@Emoji()的装饰器,能够让传入的字符串两边加上标签符合。
export function Emoji() {return (target: Object, key: string) {let val = target[key];const getter = () => {return this.val;};const setter = () => {val = `表情${value}表情`};Object.defineProperty(target, key, {get: getter,set: setter,enumerable: true,configurable: true})}}## 如何使用+ @Emoji() Result = 'hello';+ {{ result }} 页面显示为:表情hello表情
8.4 实现一个@Confirmable()装饰器,弹窗确认对话框;
export function Confirmable(message: string) {return (target: Object, key: string, descriptor: PropertyDescriptor) {const origin = descriptor.value;descriptor.value = function(...args:any) {const allow = window.confirm(message);if (allow) {const result = origin.apply(this, args);return result;}return null;};return descriptor;}}## 在方法前加上这个装饰器@Confirmable('确定要点击吗')handlerClick() {console.log('click');}## 效果触发handlerClick前会出现一个弹窗,点击确认后才会继续输出click。
8.4 Angular中的装饰器的种类,19个内置装饰器。
| 装饰器类型 | 内置装饰器 |
|---|---|
| 类装饰器 5个 | @Component、@NgModule、@Pipe、@Injectabl、@Directive |
| 属性装饰器 6个 | @Input、@Output、@ContentChild、@ContentChildren、@ViewChild、@ViewChildren |
| 方法装饰器 2个 | @HostListener、@HostBinding |
| 参数装饰器 6个 | @Attribute、@Inject、@Optional、@Self、@SkipSelf、@Host |
1. 使用 [@Directive] 自定义指令
1.1 创建属性指令
import { Directive, HostListener, ElementRef, Renderer2, HostBinding } from '@angular/core';@Directive({selector: '[appBackgroundExe]'})export class BackgroundExeDirective {@Input('appBackgroundExe') highLightColor: string;constructor(private elementRef: ElementRef, private renderer: Renderer2) {// 这种写法比较丑陋// this.elementRef.nativeElement.style.background = 'yellow';// 推荐这种写法, Rendererthis.renderer.setStyle(this.elementRef.nativeElement, 'background', 'yellow');}@HostBinding('class.pressed') isPressed: boolean;@HostListener('mouseenter')onMouseEnter(): void {this.highLight(this.highLightColor);}@HostListener('mouseleave')onMouseLeave(): void {this.highLight(null);}@HostListener('mousedown')onMouseDown(): void {this.isPressed = true;}@HostListener('mouseup')onMouseUp(): void {this.isPressed = false;}private highLight(color: string): void {// this.elementRef.nativeElement.style.background = color;this.renderer.setStyle(this.elementRef.nativeElement, 'background', color);}}其中,selector: '[appBackgroundExe]' 是指令关联的属性名称,以便 Angular 在编译时,能从模板中找到与此指令关联的 HTML 代码。构造函数中,注入了 ElementRef 和 Renderer2 模块的实例。通过 ElementRef 我们可以引用指令标识的 DOM 元素,并对其进行相关的操作;并且可以利用 Renderer2 提供的 API 对元素进行相关的渲染操作。@HostListener 和 @HostBinding 是属性装饰器。@HostListener 是用来为宿主元素添加事件监听;而指令标记的元素,就是宿主元素。@HostBinding 是用来动态设置宿主元素的属性值。
在模板中使用.pressed {font-size: 30px;}<div class="panel panel-primary"><div [appBackgroundExe]="'red'">鼠标移进,元素变成红色。鼠标移出,元素红色消失</div></div>
1.2 创建结构型指令
import { Directive, Input, TemplateRef, ViewContainerRef } from '@angular/core';@Directive({selector: '[appIf]'})export class IfDirective {constructor(private templateRef: TemplateRef<any>,private viewContainerRef: ViewContainerRef) { }@Input('ifCreat')set condition(condition: boolean) {if (condition) {this.viewContainerRef.createEmbeddedView(this.templateRef);} else {this.viewContainerRef.clear();}}}
<div class="panel panel-primary"><div *ifCreate="'true'">hello</div></div>
import { Directive, Type, ViewContainerRef, Input, ComponentFactoryResolver, AfterViewInit } from '@angular/core';@Directive({selector: '[add-comp]',})export class AddCompDirective implements AfterViewInit {@Input() comp: Type<any>;constructor(public viewContainerRef: ViewContainerRef, public componentFactoryResolver: ComponentFactoryResolver) {}ngAfterViewInit(){console.log('comp', this.comp);if (this.comp){const componentFactory = this.componentFactoryResolver.resolveComponentFactory(this.comp);this.viewContainerRef.clear();this.viewContainerRef.createComponent(componentFactory);}}}<ng-container add-comp [comp]="tab?.Comp"></ng-container>
9. Angular操作DOM
9.1 @ViewChild();
在探索 DOM 抽象类前,先了解下如何在组件/指令中获取这些抽象类。Angular 提供了一种叫做 DOM Query 的技术,主要来源于 @ViewChild 和 @ViewChildren 装饰器(decorators)。两者基本功能相同,唯一区别是 @ViewChild 返回单个引用,@ViewChildren 返回由 QueryList 对象包装好的多个引用。
1 ,一般@ViewChild和ViewChildren 与 模板引用变量(template reference variable)一起使用。
2 ,模板引用变量仅仅是对模板(template)内DOM元素的命名式引用(a named reference),类似于HTML中的 id 属性。
3 ,你可以使用模板引用来标记一个DOM元素,并在组件/指令中使用@ViewChild装饰器查询(query)它。
@Component({selector: 'sample',template: `<span #tref>I am span</span>`})export class SampleComponent implements AfterViewInit {@ViewChild("tref", {read: ElementRef}) tref: ElementRef;constructor(private el:ElementRef,private renderer2: Renderer2){}ngAfterViewInit(): void {// outputs `I am span`console.log(this.tref.nativeElement.textContent);}/** 通过 ElementRef 我们就可以封装不同平台下视图层中的 native 元素(在浏览器环境中,native 元素通常是指 DOM 元素),最后借助于 Angular 2 提供的强大的依赖注入特性,我们就可以轻松地访问到 native 元素。*/Oninit() {console.log(this.el.nativeElement);// 获取元素DOM后nativeElement下可以操作原生属性this.el.nativeElement.querySelector('.btn1').style.height = '300px';this.renderer2.setStyle(this.el.nativeElement.querySelector('.btn1'),'background','green')}}
@ViewChild([reference from template], {read: [reference type]}) 模板引用名称;
第二个参数 read 是可选的,因为 Angular 会根据 DOM 元素的类型推断出该引用类型。例如,如果它(#tref)挂载的是类似 span 的简单 html 元素,Angular 返回 ElementRef;如果它挂载的是 template 元素,Angular 返回 TemplateRef。一些引用类型如 ViewContainerRef 就不可以被 Angular 推断出来,所以必须在 read 参数中显式申明。其他的如 ViewRef 不可以挂载在 DOM 元素中,所以必须手动在构造函数中编码构造出来
9.2 ElementRef
最基本的抽象类,只包含所挂载的元素对象,对访问原生元素很有用。(Angular不推荐)
console.log(this.tref.nativeElement.textContent);
9.2.1 使用@ViewChild()装饰器的DOM元素会返回ElementRef, 但是由于所有组件挂载在自定义的DOM元素,所有指令都作用于DOM元素,所以组件和指令都可以通过DI(Dependency Injection)获取宿主元素ElemntRef对象。
@Component({selector: 'sample',...export class SampleComponent{constructor(private hostElement: ElementRef) {//outputs <sample>...</sample>console.log(this.hostElement.nativeElement.outerHTML);}...
private el: ElementRef,// 表格增加滚动条锁定最后ngAfterViewChecked(): void {if (this.flag) {const editorhtml = this.el.nativeElement.querySelector('.editorhtml');editorhtml.scrollTop = editorhtml.scrollHeight - editorhtml.clientHeight;this.flag = false;}}// 滚动不刷新滚动条位置scroll(e) {this.flag = false;}
9.3 TemplateRef
9.3.1 模板:跨程序视图内一堆DOM元素的组合。在HTML5引入template标签前,浏览器通过在script标签内设置type来引入模板。
<script id="tpl" type="text/template"><span>I am span in template</span></script>
9.3.2 缺点: 1. 这种方式不仅有语义缺陷,还需要手动创建DOM模型。
2.通过template标签,浏览器可以解析HTML并创建DOM树,但不会渲染它,该DOM树可以通过content属性访问。
<script>let tpl = document.querySelector('#tpl');let container = document.querySelector('.insert-after-me');insertAfter(container, tpl.content); // content</script><div class="insert-after-me"></div><ng-template id="tpl"><span>I am span in template</span></ng-template>
9.3.3 ng-template : Angular采用template标签,实现了Template抽象类template标签一起合作。
@Component({selector: 'sample',template: `<ng-template #tpl><span>I am span in template</span></ng-template>`})export class SampleComponent implements AfterViewInit {@ViewChild("tpl") tpl: TemplateRef<any>;ngAfterViewInit() {let elementRef = this.tpl.elementRef;// outputs `template bindings={}`console.log(elementRef.nativeElement.textContent);}}
Angular从DOM中移除template元素,并在其位置插入注释.TemplateRef 是一个结构简单的抽象类,它的 elementRef 属性是对其宿主元素的引用,还有一个 createEmbeddedView 方法。然而 createEmbeddedView 方法很有用,因为它可以创建一个视图(view)并返回该视图的引用对象 ViewRef。
autocomplete=”new-password”
https://blog.csdn.net/zwj_jyzl/article/details/90348405
https://blog.csdn.net/qq_29532651/article/details/103729603
https://blog.csdn.net/wjyyhhxit/article/details/91973582?utm_medium=distribute.pc_relevant.none-task-blog-2~default~CTRLIST~default-1.no_search_link&depth_1-utm_source=distribute.pc_relevant.none-task-blog-2~default~CTRLIST~default-1.no_search_link
https://segmentfault.com/a/1190000012252368
https://juejin.cn/post/6910943445569765384#heading-38
https://juejin.cn/post/6910943445569765384#heading-25

若有收获,就点个赞吧
0 人点赞
