一、SpringBoot
SpringBoot是spring公司pivotal后续研发的一款框架,其目的是简化传统的Spring框架的开发,并不是替代spring。简化的过程主要体现在对于传统Spring项目中的一些繁琐的配置、繁琐的依赖管理进行简化。而且和传统的web项目有很大不同的是SpringBoot提供了一种新的部署方式:服务器内置,传统的web项目需要打包,然后将程序包放到外置tomcat中去运行,而Springboot通过将tomcat内置,将Tomcat的启动放到了SpringBoot项目的启动过程中。
Spring-Boot实现原理
POM.xml
- 依赖版本的管理 BOM spring-boot-starter-parent —> Spring-boot-dependencies(所有的依赖版本)
- 统一版本,减少技术成本
- 解决jar包之间版本兼容的问题,尽量不写版本,沿用父项目中的版本
- starter依赖
- 简化依赖
- 自动配置
- spring-boot-maven-plugin插件
- 通过maven运行spring-boot项目 mvn spring-boot:run
- 打包 jar (fatjar,支持直接运行)
- mvn clean package -Dmaven.test.skip=true
- java -jar demo56-0.0.1-SNAPSHOT.jar
自动配置原理
- 目的: 集成第三方框架之后,可自动配置,集成到spring中
 问题:
问题:
mybatis集成到spring中的方式是一样的,换言之,以下代码在不同项目中是重复存在的
//sqlSessionFactoryBean配置,替代mybatis-config.xml@Beanpublic SqlSessionFactoryBean sqlSessionFactoryBean() throws IOException {SqlSessionFactoryBean sqlSessionFactoryBean = new SqlSessionFactoryBean();//数据源sqlSessionFactoryBean.setDataSource(dataSource());//别名包sqlSessionFactoryBean.setTypeAliasesPackage("com.woniuxy.framework.model");org.apache.ibatis.session.Configuration configuration = new org.apache.ibatis.session.Configuration();//下划线映射到驼峰configuration.setMapUnderscoreToCamelCase(true);//日志configuration.setLogImpl(StdOutImpl.class);sqlSessionFactoryBean.setConfiguration(configuration);//配置文件位置PathMatchingResourcePatternResolver patternResolver = new PathMatchingResourcePatternResolver();Resource[] resources = patternResolver.getResources("classpath*:mappers/**/*.xml");sqlSessionFactoryBean.setMapperLocations(resources);return sqlSessionFactoryBean;}
1) 重复的,套路式的配置代码,在不同项目中是一样的
2) 部分配置,需要手动配置,每个项目是不同
如果有一种方式,能够将重复的配置代码封装掉,并且提供了修改的配置项的配置的方式,能够很大的提高效率
spring-boot的starter完成以上功能
技术实现:
- @SpringBootApplication 包含了@EnableAutoConfiguration,启动自动配置
- xxx-spring-boot-starter 的包下有一个文件夹 META-INF,文件叫spring.factories,包含了自动配置类路径
3.定位自动配置类,自动配置类提供了必要的bean 的配置 ```java @org.springframework.context.annotation.Configuration //配置类 public class MybatisAutoConfiguration implements InitializingBean {# Auto Configureorg.springframework.boot.autoconfigure.EnableAutoConfiguration=\org.mybatis.spring.boot.autoconfigure.MybatisLanguageDriverAutoConfiguration,\org.mybatis.spring.boot.autoconfigure.MybatisAutoConfiguration
@Bean //注册springbean @ConditionalOnMissingBean public SqlSessionFactory sqlSessionFactory(DataSource dataSource) throws Exception { SqlSessionFactoryBean factory = new SqlSessionFactoryBean(); factory.setDataSource(dataSource); … //设置配置map-underscore-to-camel-case、log-impl applyConfiguration(factory); if (this.properties.getConfigurationProperties() != null) { factory.setConfigurationProperties(this.properties.getConfigurationProperties()); } if (!ObjectUtils.isEmpty(this.interceptors)) { factory.setPlugins(this.interceptors); } … //设置别名包 if (StringUtils.hasLength(this.properties.getTypeAliasesPackage())) { factory.setTypeAliasesPackage(this.properties.getTypeAliasesPackage()); } … //mapper.xml的路径位置 if (!ObjectUtils.isEmpty(this.properties.resolveMapperLocations())) { factory.setMapperLocations(this.properties.resolveMapperLocations()); } …. return factory.getObject(); }
}
4. 需要自定义的配置,自动配置类MybatisAutoConfiguration关联了一个配置属性类 @EnableConfigurationProperties_(_MybatisProperties.class_)_```java@org.springframework.context.annotation.Configuration@ConditionalOnClass({ SqlSessionFactory.class, SqlSessionFactoryBean.class })@ConditionalOnSingleCandidate(DataSource.class)>>>>@EnableConfigurationProperties(MybatisProperties.class)@AutoConfigureAfter({ DataSourceAutoConfiguration.class, MybatisLanguageDriverAutoConfiguration.class })public class MybatisAutoConfiguration implements InitializingBean {private static final Logger logger = LoggerFactory.getLogger(MybatisAutoConfiguration.class);>>>> private final MybatisProperties properties;
配置属性类与applicatoin.yml配置文件里的属性相对应 ```java //标记为配置属性类,指定前缀,此处为mybatis,完整配置项名为mybatis.属性名 例如mybatis.typeAliasesPackage @ConfigurationProperties(prefix = MybatisProperties.MYBATIS_PREFIX) public class MybatisProperties {
public static final String MYBATIS_PREFIX = “mybatis”;
…
private String typeAliasesPackage;
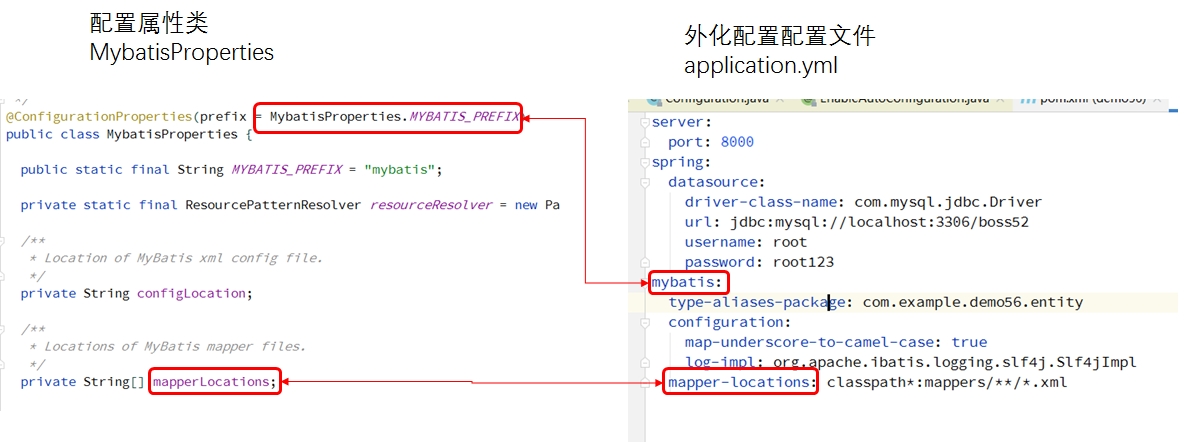<br />1) 重复的,套路式的配置代码,在不同项目中是一样的 ---> 自动配置类<br />2) 部分配置,需要手动配置,每个项目是不同 ---> 配置属性类+外化配置文件<a name="eKD3M"></a>## 二、SpringBoot的基本使用<a name="KTg1i"></a>#### 第一种创建方式<a name="7c263a62"></a>### 1、创建一个Maven项目创建一个Maven项目,使用quick-start模板<a name="e0ba759c"></a>### 2、以SpringBoot提供的start依赖作为父项目通过SpringBoot的父项目可以将一个SpringBoot版本之下的一整套web项目中所需的依赖版本进行约束。
<a name="1dffd83c"></a>### 3、引入spring-boot-starter-web依赖引入一个web项目中所要使用到的常用依赖,包括内置的tomcat、spring、springmvc、hibernate-validator、jackson,不包括_mybatis**、**jdbc**、连接池、**spring-jdbc、file-upload。_
<a name="bb8e0cdf"></a>### 4、提供springboot配置文件在resources文件夹下名为application.properties或者application.yml的配置文件。<a name="1de8b151"></a>### 5、完善项目结构在resources之下新建static的文件夹,因为springboot默认加载了SpringMVC,而在加载SpringMVC的前端控制器时,使用的地址规则为/,为了访问静态资源SpringBoot也做了静态资源映射,默认情况下映射的路径为static目录下,所以我们要新建static目录。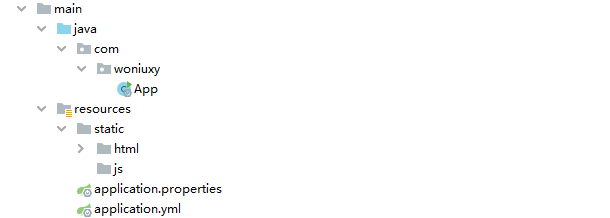<a name="ed70425a"></a>### 6、启动springboot项目在一个拥有main函数的类中添加一个注解@SpringBootApplication,在main函数中执行SpringApplication.run(主类名.class)
@SpringBootApplication public class App { public static void main( String[] args ) { SpringApplication.run(App.class); } }
@SpringBootApplication是springboot项目的核心注解,该注解是一个复合注解,在它上面有3大注解:@SpringBootConfiguration:被Configuration注解修饰表示配置类,也就是我们的springboot启动类也是一个配置类@EnableAutoConfiguration:启动自动配置,springboot会自动将一些重要框架的核心对象进行配置、包括spring的监听器、springmvc的前端控制器。@ComponentScan:扫描包加载bean,默认扫描和启动类同级的包以及子包<a name="ooWmy"></a>#### 第二种创建方式1. 选择spring intializer1. 填写maven坐标GAV1. 选择依赖(spring-web\lombok)1. 完成<br />a. 访问start.spring.io,根据所选依赖,生成代码<br />b. 返回一个项目zip<br />c. 解压,导入到idea<br />d. maven编译**注意**:Application类,一定放在根目录,跟其他包同级**打包是jar包,jar包怎么部署?**Spring Boot使创建独立的、生产级的、基于Spring的应用程序变得容易,您可以 “just run” 这些应用程序。<br />我们对于spring平台和第三方库做了统一的视图,以便于以最小的代价开始开发。大多数Spring Boot应用程序需要最少的Spring配置。<a name="ExAJ2"></a>## 特征- 创建**独立的Spring应用程序**:不依赖于其他的工具或者平台,直接运行- 直接**内嵌入Tomcat**、Jetty或Undertow (无需部署WAR文件): 直接启动tomcat运行,无须部署war包- 提供自包含的 **“starter” 依赖**,以简化您的构建配置- 将需要的依赖进行了依赖传递,简化依赖- 在spring-boot中使用的依赖都是starter依赖,换言之,引入springmvc,不直接导入spring-webmvc而是使用spring-boot-starter-web- 命名规范:官方spring-boot-starter-xxx 民间:xxx-spring-boot-starter- 简化配置- 尽可能**自动配置**Spring和第三方库- 集成springmvc,自动配置viewresolver- 提供可用于**生产级功能**,如指标、运行状况检查和**外部化配置**- 绝对没有代码生成,也不需要XML配置<a name="bb0cfffb"></a>## 三、SpringBoot搭建SSM应用<a name="0fe2e25a"></a>### 1、新建控制层业务层完成依赖注入控制层和业务层的包必须和启动类平级或者处于它的子级,因为springboot会默认扫描启动类平级的包及子包。热部署插件:
<a name="f7225c01"></a>### 2、springboot配置mybatis引入依赖```xml<dependency><groupId>org.springframework</groupId><artifactId>spring-jdbc</artifactId></dependency><dependency><groupId>mysql</groupId><artifactId>mysql-connector-java</artifactId><!-- 如果是8.0,不需要加版本--><version>5.1.47</version></dependency><dependency><groupId>org.mybatis.spring.boot</groupId><artifactId>mybatis-spring-boot-starter</artifactId><version>2.1.4</version></dependency><dependency><groupId>com.alibaba</groupId><artifactId>druid</artifactId><version>1.1.23</version></dependency>
在引入了mybatis-spring-boot-starter以后,springboot就会自动对mybatis进行配置,而配置mybatis的第一步就是加载数据源,要加载数据源需要我们提供连接数据库的各项信息。如果没有提供连接数据库的信息会在启动项目时报错。
连接数据库的各项信息在application.yml文件中提供
外化配置配置文件,命名约定 : application / boostarp 后缀: yml/yaml/properties
spring:datasource:type: com.alibaba.druid.pool.DruidDataSourceurl: jdbc:mysql://localhost/woniudb?useUnicode=true&characterEncoding=utf-8driver-class-name: com.mysql.jdbc.Driverusername: rootpassword: 123456server:port: 8000mybatis:type-aliases-package: com.example.demo56.entityconfiguration:map-underscore-to-camel-case: truelog-impl: org.apache.ibatis.logging.slf4j.Slf4jImplmapper-locations: classpath*:mappers/**/*.xml
按照以前mybatis的使用方式建好mapper以及它的映射文件,映射文件存放到resource/mapper文件夹下。
然后在application.yml文件中提供mybatis映射文件的地址,如果使用了别名,别名在此处配置
mybatis:mapper-locations: classpath:/mapper/*Mapper.xmltype-aliases-package: com.woniuxy.entity
最后在启动类上添加一个注解@MapperScan(“数据层mapper的包名”),springboot就会自动的创建出mapper对象
@SpringBootApplication@MapperScan("com.woniuxy.mapper")//扫包,一般设定为mapper包@EnableTransactionManagement //开启事务public class App {public static void main( String[] args ) {SpringApplication.run(App.class);}}
3、声明式事务
用注解的方式正常的完成依赖注入,调用方法。
在SpringBoot中声明式事务有两种配置方式:
方式一:使用常规的spring配置文件
<!--配置事务管理器 封装了事务的提交回滚等方法--><bean id="transactionManager" class="org.springframework.jdbc.datasource.DataSourceTransactionManager"><!--注入数据源--><property name="dataSource" ref="dataSource"></property></bean><!--事务通知--><!--定义在程序执行到切入点以后 具体的切面织入方式(哪些方法需要使用事务管理 哪些不需要)--><tx:advice id="txAdvice" transaction-manager="transactionManager" ><tx:attributes><!--配置方法名的规则 前缀是insert delete update的所有方法 需要事务控制--><tx:method name="insert*" propagation="REQUIRED"/><tx:method name="delete*" propagation="REQUIRED"/><tx:method name="update*" propagation="REQUIRED"/><!--其他方法不需要事务控制 read-only为只读 --><tx:method name="*" read-only="true"/></tx:attributes></tx:advice><!--切面的配置--><!--定义切面--><aop:config><!--定义切入点--><aop:pointcut expression="execution(* com.woniuxy.service.impl.*.*(..))" id="transactionPoint"/><!--织入 在某个切入点执行通知--><aop:advisor advice-ref="txAdvice" pointcut-ref="transactionPoint"/></aop:config>
然后在启动类上添加一个@ImportResource(“xml文件地址”),加载xml文件完成声明式事务。
方式二:注解方式
在启动类上添加注解@EnableTransactionManagement开启声明式事务
@SpringBootApplication@MapperScan("com.woniuxy.mapper")@EnableTransactionManagementpublic class App {public static void main( String[] args ) {SpringApplication.run(App.class);}}
在业务层的方法上需要开启事务管理的添加一个注解@Transactional
@Transactional注解可选的属性有:
@Transactionalpublic User insert(User user) throws Exception {System.out.println("执行新增");return userMapper.insert(user);}
propagation:配置事务传播机制
rollbackFor:配置需要进行回滚的异常种类,默认Exception
4、在SpringBoot配置过滤器
方式一:和以前一样创建一个过滤器,添加WebFilter注解。在启动类上添加一个注解@ServletComponentScan(“过滤器的包名”)。
@WebFilter("/*")public class CrossFilter implements Filter {@Overridepublic void init(FilterConfig filterConfig) throws ServletException {}@Overridepublic void doFilter(ServletRequest servletRequest, ServletResponse servletResponse, FilterChain filterChain) throws IOException, ServletException {System.out.println("执行过滤器");filterChain.doFilter(servletRequest,servletResponse);}@Overridepublic void destroy() {}}@SpringBootApplication@MapperScan("com.woniuxy.mapper")@EnableTransactionManagement@ServletComponentScan("com.woniuxy.filter")//扫描Servlet组件,也可以用于扫描WebListener、WebServletpublic class App {public static void main( String[] args ) {SpringApplication.run(App.class);}}
方式二:使用SpringBoot提供的注册器来加载Filter
在一个配置类中通过bean标签创建FilterRegistrationBean对象,通过该对象来完成过滤器的加载。
@Beanpublic FilterRegistrationBean initFilterRegister(){FilterRegistrationBean<Filter> registrationBean = new FilterRegistrationBean<>();registrationBean.setFilter(new CrossFilter());//添加我们自己的Filter对象ArrayList<String> list = new ArrayList<>();list.add("/*");registrationBean.setUrlPatterns(list);//设置过滤器的地址规则registrationBean.setName("crossFilter");//设置filter名称registrationBean.setOrder(1);//设置filter执行顺序 1最先执行return registrationBean;}
5、在SpringBoot中配置拦截器
在springboot中配置拦截器需要借助Spring提供WebmvcConfigure这个接口,通过实现该接口重写addInterceptors方法。
@Configurationpublic class IntercepterConfigure implements WebMvcConfigurer {@Overridepublic void addInterceptors(InterceptorRegistry registry) {registry.addInterceptor(new MyInterceptor()).addPathPatterns("/**").excludePathPatterns("/js/**").excludePathPatterns("/css/**");}}
6、在SpringBoot中配置参数类型转换器
和以前一样首先写好一个参数类型转换器。然后在WebmvcConfigure配置类中通过addFormatters方法来加载参数类型转换器。
public class DateConverter implements Converter<String, Date> {@Overridepublic Date convert(String s) {SimpleDateFormat format1 = new SimpleDateFormat("yyyy-MM-dd");SimpleDateFormat format2 = new SimpleDateFormat("yyyy/MM/dd");Date date=null;if(s.contains("/")){try {date=format2.parse(s);} catch (ParseException e) {e.printStackTrace();}}else if(s.contains("-")){try {date=format1.parse(s);} catch (ParseException e) {e.printStackTrace();}}return date;}}@Configurationpublic class MVCComponentConfigure implements WebMvcConfigurer {@Overridepublic void addFormatters(FormatterRegistry registry) {registry.addConverter(new DateConverter());}}
四、整合Swagger2框架提供在线API文档
在前后端分离开发的场景中,前端负责调用后端提供的数据接口来实现前端业务功能。前端需要后端开发人员提供一套详细的接口文档。传统的方式一般是后端人员以word、excel等格式编写API文档。传统的方式存在一些问题,首先后端人员要编写一份较为完善的API文档是具备一定难度的,更重要的是如果我们的代码发生了变更,API也需要同步修改。Swagger2框架的作用是可以快捷生成在线的API文档并可以进行在线测试。
springboot整合swagger2的步骤
1、引入swagger2的依赖
我们本次使用的是Swagger2 2.9.2的版本
<dependency><groupId>io.springfox</groupId><artifactId>springfox-swagger2</artifactId><version>2.9.2</version></dependency><dependency><groupId>io.springfox</groupId><artifactId>springfox-swagger-ui</artifactId><version>2.9.2</version></dependency>
2、在配置类中配置Swagger2相关参数
@Beanpublic Docket createRestApi() {//API构建器ApiInfoBuilder apiBuilder = new ApiInfoBuilder();//设置API的相关信息apiBuilder.title("蜗牛OA系统");apiBuilder.description("只为成就更好的你");apiBuilder.contact(new Contact("蜗牛学院","www.woniuxy.com","dengqiang@woniuxy.com"));apiBuilder.version("1.0");//构建API对象ApiInfo api = apiBuilder.build();//构建API清单 用于说明那些接口需要生成API文档Docket docket = new Docket(DocumentationType.SWAGGER_2).apiInfo(api);//定义接口(控制层)所在的包docket.select().apis(RequestHandlerSelectors.basePackage("com.woniuxy.controller")).paths(PathSelectors.any()).build();return docket;}
3、在启动类上添加一个注解@EnableSwagger2启用Swagger2
@SpringBootApplication@MapperScan("com.woniuxy.mapper")@EnableTransactionManagement@EnableSwagger2public class App {}
项目启动之后通过swagger2提供的在线的API文档并可以进行测试,名称:swagger-ui.html。
4、对接口信息进行更为详细的描述
可以使用一些额外的注解将接口信息描述的更加详细。
@Api :添加到业务控制器类上,使用tags属性可以描述我们的业务控制器信息
@ApiOperation :添加到业务控制器方法上,用于对每一个方法进行说明
@ApiImplicitParams :对参数进行详细的描述,外层标签
@ApiImplicitParam :对某一个具体的参数进行详细描述,内层标签
@PostMapping@ApiOperation("新增用户信息")@ApiImplicitParams({@ApiImplicitParam(name="id",required = false),@ApiImplicitParam(name="token",required = false),@ApiImplicitParam(name="account",required = true),@ApiImplicitParam(name="password",required = true),@ApiImplicitParam(name="nickname",required = true)})public JSONResult insert(User user) throws Exception{JSONResult result = new JSONResult();result.setCode("1001");result.setMessage("新增成功");return result;}
五、SpringBoot整合模板引擎
模板引擎是通过一个网页模板编写网页,在模板中使用了很多的占位符来代替动态数据的位置,最后在将动态数据渲染到网页模板中的这样一种技术。
1、引入thymeleaf依赖
<dependency><groupId>org.springframework.boot</groupId><artifactId>spring-boot-starter-thymeleaf</artifactId></dependency>
所有的依赖
<dependency><groupId>org.springframework.boot</groupId><artifactId>spring-boot-starter-jdbc</artifactId></dependency><dependency><groupId>org.springframework.boot</groupId><artifactId>spring-boot-starter-thymeleaf</artifactId></dependency><dependency><groupId>org.springframework.boot</groupId><artifactId>spring-boot-starter-web</artifactId></dependency><dependency><groupId>org.mybatis.spring.boot</groupId><artifactId>mybatis-spring-boot-starter</artifactId><version>2.1.4</version></dependency><dependency><groupId>org.springframework.boot</groupId><artifactId>spring-boot-devtools</artifactId><scope>runtime</scope><optional>true</optional></dependency><dependency><groupId>mysql</groupId><artifactId>mysql-connector-java</artifactId><version>5.1.47</version></dependency><dependency><groupId>org.projectlombok</groupId><artifactId>lombok</artifactId><optional>true</optional></dependency><dependency><groupId>com.alibaba</groupId><artifactId>druid</artifactId><version>1.1.23</version></dependency>
2、配置springboot的配置文件
server.port=80spring.datasource.type=com.alibaba.druid.pool.DruidDataSourcespring.datasource.url=jdbc:mysql://localhost/woniudb?useUnicode=true&characterEncoding=utf-8spring.datasource.password=123456spring.datasource.username=rootspring.datasource.driver-class-name=com.mysql.jdbc.Drivermybatis.mapper-locations=classpath:/mapper/*Mapper.xmlmybatis.type-aliases-package=com.woniuxy.entity#配置模板引擎的存放位置和后缀#前后缀默认就是classpath:/templates/和.html所以可以不配置spring.thymeleaf.prefix=classpath:/templates/spring.thymeleaf.suffix=.htmlspring.thymeleaf.cache=false
3、编写一个模板文件
模板文件存放在resources的templates文件夹下,模板文件采用html格式,在html标签中可以指定命名空间,指定命名空间之后作用是可以提示thymeleaf的插值和表达式
在网页中使用th:text标签属性将数据渲染到span标签中。
<!DOCTYPE html><html lang="en" xmlns:th="http://www.thymeleaf.org"><head><meta charset="UTF-8"><title>用户数据</title></head><body><!--可以使用模板引擎的插值来作为占位符--><span th:text="${user.nickname}"></span></body></html>
4、编写一个Controller
该Controller不会响应JSON的数据格式所以直接才@Controller注解,然后方法的返回值需要定义ModelAndView类型,用于存放模板名称和动态数据。
@Controllerpublic class UserController{@RequestMapping("select")public ModelAndView select() throws Exception{User user = new User();user.setNickname("宋昂泰");user.setAccount("songangtai");user.setPassword("250");ModelAndView modelAndView = new ModelAndView("user");modelAndView.addObject("user",user);return modelAndView;}}
5、启动项目访问
访问select地址,网页上出现了渲染的动态数据

6、其他的插值
th:each:等同于jsp中的c:foreach用于遍历集合数据
th:attr :用于给标签属性赋值,例如要给图片标签的src属性赋值,
th:value:用于为表单控件赋值
th:text:给标签之间的文本赋值
<!DOCTYPE html><html lang="en" xmlns:th="http://www.thymeleaf.org"><head><meta charset="UTF-8"><title>用户数据</title><style>.red{background-color: red}.green{background-color: green}</style></head><body><table><tr><td>用户编号</td><td>账户</td><td>密码</td><td>昵称</td><td>令牌</td></tr><tr th:each="u,i:${users}" th:attr="class=${i.even?'red':'green'}"><td th:text="${u.id}"></td><td th:text="${u.account}"></td><td th:text="${u.password}"></td><td th:text="${u.nickname}"></td><td><input th:value="${u.token}"></td></tr></table></body></html>
六、SpringBoot整合MybatisPlus框架
MybatisPlus框架并不是取代原本的mybatis,而是对Mybatis做了一层封装提供了更简洁的数据层访问方式,但是MybatisPlus并没有对原本mybatis的使用方式造成影响。MP主要优势有两点:提供了默认的API进行数据层的访问,在我们不去写任何sql的情况下就可以对数据库进行基本的CRUD。提供了内置的代码生成器可以快捷生成实体类、数据层接口、映射xml。
1、引入依赖
mp的依赖中已经默认引入了mybatis的依赖,就不需要再额外导入mybatis的依赖。
<!--mybatis-plus依赖--><dependency><groupId>com.baomidou</groupId><artifactId>mybatis-plus-boot-starter</artifactId><version>3.4.0</version></dependency>
2、在springboot项目中配置mybatis的属性
这里的配置和单独使用mybatis没有区别,仍然要配置数据源,mybatis映射文件地址等等。
server:port: 80spring:datasource:type: com.alibaba.druid.pool.DruidDataSourceurl: jdbc:mysql://localhost/woniudb?useUnicode=true&characterEncoding=utf-8driver-class-name: com.mysql.jdbc.Driverusername: rootpassword: 123456mybatis:mapper-locations: classpath:/mapper/*Mapper.xmltype-aliases-package: com.woniuxy.entity
3、新建数据层接口和映射文件
在新建数据层接口时继承一个叫BaseMapper的父类,同时传入泛型(当前这个数据层操作那个实体类就传那个泛型)
BaseMapper中提供了一系列CRUD的方法,而这些方法,MP已经帮我们进行了实现,要注意MP在执行sql时,是根据属性名称生成的SQL语句。所以我们需要保证实体类属性名称必须和数据库表的字段名称一致。
public interface UserMapper extends BaseMapper<User> {}<?xml version="1.0" encoding="UTF-8" ?><!DOCTYPE mapperPUBLIC "-//mybatis.org//DTD Mapper 3.0//EN""http://mybatis.org/dtd/mybatis-3-mapper.dtd"><mapper namespace="com.woniuxy.mapper.UserMapper"></mapper>
4、MP提供的数据层API
int insert(T entity); //传入实体对象实现新增 (重要)int deleteById(Serializable id);//根据ID删除 (重要)int deleteByMap(@Param("cm") Map<String, Object> columnMap);//根据键值对删除数据,键值对中的每一对键值都会作为删除的条件来使用int delete(@Param("ew") Wrapper<T> wrapper);//根据条件删除 使用MP提供的条件封装API封装条件 (重要)int deleteBatchIds(@Param("coll") Collection<? extends Serializable> idList);//根据ID集合删除数据int updateById(@Param("et") T entity);//(重要)根据传入的实体更新(根据主键更新其他所有数据),会将实体中的非空数据更新到数据库,但是0会更新到数据库,解决方式是尽量用包装类来定义属性int update(@Param("et") T entity, @Param("ew") Wrapper<T> updateWrapper);//根据传入的实体和Wrapper进行更新,entity中保存的是更新的数据,updateWrapper存放的是更新的条件和需要更新的字段T selectById(Serializable id);//根据传入的ID查询一个实体 (重要)List<T> selectBatchIds(@Param("coll") Collection<? extends Serializable> idList);//根据多个ID查询实体集合List<T> selectByMap(@Param("cm") Map<String, Object> columnMap);//根据键值对查询实体集合,键值对中的每一个键值对都会作为一个查询条件where key=valueT selectOne(@Param("ew") Wrapper<T> queryWrapper);//根据条件查询一个实体Integer selectCount(@Param("ew") Wrapper<T> queryWrapper);//根据条件查询数据总行数List<T> selectList(@Param("ew") Wrapper<T> queryWrapper);//根据条件查询实体集合 (重要)用于条件搜索不分页List<Map<String, Object>> selectMaps(@Param("ew") Wrapper<T> queryWrapper);//根据条件查询键值对List<Object> selectObjs(@Param("ew") Wrapper<T> queryWrapper);//根据条件查询主键值,将多个查询结果的主键封装为一个集合<E extends IPage<T>> E selectPage(E page, @Param("ew") Wrapper<T> queryWrapper);//(重要)做分页查询<E extends IPage<Map<String, Object>>> E selectMapsPage(E page, @Param("ew") Wrapper<T> queryWrapper);
关于Wrapper类的使用:
在使用mybatis generator生成的代码中,每个类都有一个对应的example类,用于封装条件,mybatis plus提供了一个Wrapper类,用于封装各种条件。
下面我们就Wrapper中的常用条件的封装方式给出示例:
要封装条件首先需要实例化一个Wrapper类,Wrapper类分为两种,QueryWrapper和UpdateWrapper,UpdateWrapper比QueryWrapper多了set条件的设置,可以用于动态更新字段。实例化Wrapper类时需要指定泛型。例如:

需要追加条件时,通过Wrapper提供的API来完成:
eq:eq用于添加相等的条件。
eq(R column, Object val):参数一为字段名称,参数二为值
eq(boolean condition, R column, Object val):参数一为boolean值,表示是否需要添加该条件到sql
ne:ne用于添加不相等的条件。
ne(R column, Object val):参数一为字段名称,参数二为值
ne(boolean condition, R column, Object val):参数一为boolean值,表示是否需要添加该条件到sql
gt:gt用于添加大于的条件
gt(R column, Object val)
gt(boolean condition, R column, Object val)
ge:ge用于添加大于等于的条件
ge(R column, Object val)
ge(boolean condition, R column, Object val)
lt:lt用于添加小于的条件
lt(R column, Object val)
lt(boolean condition, R column, Object val)
le:le用于添加小于等于的条件
le(R column, Object val)
le(boolean condition, R column, Object val)
between:between用于添加在两者之间的条件
between(R column, Object val1, Object val2)
between(boolean condition, R column, Object val1, Object val2)
notBetween:notBetween用于添加不在两者之间的条件
notBetween(R column, Object val1, Object val2)
notBetween(boolean condition, R column, Object val1, Object val2)
like:like用于添加模糊查询的条件
like(R column, Object val)
like(boolean condition, R column, Object val)
notLike:notlike用于添加not like 条件
notLike(R column, Object val)
notLike(boolean condition, R column, Object val)
likeLeft:leftLike用于添加左侧模糊匹配的条件
likeLeft(R column, Object val)
likeLeft(boolean condition, R column, Object val)
likeRight:likeRight用于添加右侧模糊匹配的条件
likeRight(R column, Object val)
likeRight(boolean condition, R column, Object val)
or:or用于追加or条件
or():主动调用则下一个条件会使用or来拼接
or(boolean condition)
orderBy:排序
orderBy(boolean condition, boolean isAsc, R… columns)
select:用于设置查询的字段列表
select(String… sqlSelect)
5、MybatisPlus分页插件的使用
加载MybatisPlus的分页插件,通过配置类来加载
//加载分页插件拦截器@Beanpublic MybatisPlusInterceptor mybatisPlusInterceptor() {MybatisPlusInterceptor interceptor = new MybatisPlusInterceptor();interceptor.addInnerInterceptor(new PaginationInnerInterceptor(DbType.MYSQL));return interceptor;}
前端传条件数据封装为实体以及页码和每页显示行数,将这些数据一起传到业务层,业务的方法返回值需要定义为Page类型(MybatisPlus提供的Page类型)
@Overridepublic Page<User> selectPage(User user, int pageNum, int pageSize) {}
在业务方法中实例化一个Page对象,定义泛型为实体类型,在构造函数中传入页码和每页显示行数
Page<User> userPage = new Page<>(pageNum,pageSize);
根据前端传递的条件参数,拼接动态查询条件
QueryWrapper<User> wrapper = new QueryWrapper<>();if(user.getNickname()!=null&&!"".equals(user.getNickname())){wrapper.like("nickname",user.getNickname());}if(user.getAccount()!=null&&!"".equals(user.getAccount())){wrapper.like("account",user.getAccount());}
调用Mapper的API:selectPage(Page page,Wrapper wrapper);得到的返回值为Page对象,需要说明的是该Page对象就是我们之前所创建的Page对象。所有的数据(分页数据,业务数据)都保存在了这个Page对象中。返回该对象到控制层。
@Overridepublic Page<User> selectPage(User user, int pageNum, int pageSize) {Page<User> userPage = new Page<>(pageNum,pageSize);QueryWrapper<User> wrapper = new QueryWrapper<>();if(user.getNickname()!=null&&!"".equals(user.getNickname())){wrapper.like("nickname",user.getNickname());}if(user.getAccount()!=null&&!"".equals(user.getAccount())){wrapper.like("account",user.getAccount());}userMapper.selectPage(userPage, wrapper);return userPage;}
在控制层中将Page中的数据封装为一个自定义个Page对象(保存分页数据),取出其中的集合数据,一起封装为JSONresult,响应给前端。
@GetMappingpublic JSONResult selectPage(User user,int pageNum,int pageSize)throws Exception{IPage<User> page = userService.selectPage(user, pageNum, pageSize);List<User> list = page.getRecords();Page page1 = new Page();page1.setCount(page.getTotal());page1.setTotal(page.getPages());page1.setCurrent(page.getCurrent());page1.setSize(page.getSize());return new JSONResult("1001","",page1,list);}
6、MybatisPlus代码生成器
引入依赖
<dependency><groupId>org.apache.velocity</groupId><artifactId>velocity-engine-core</artifactId><version>2.2</version></dependency><dependency><groupId>com.baomidou</groupId><artifactId>mybatis-plus-generator</artifactId><version>3.4.0</version></dependency>
通过代码实现逆向工程:
public class CodeGenerator {public static void main(String[] args) {String projectPath="D:\\springboot-demo\\src\\main\\";AutoGenerator ag = new AutoGenerator();//1. 全局配置GlobalConfig config = new GlobalConfig();config.setAuthor("wuyanzu") //作者.setOutputDir(projectPath+"java") //生成路径.setFileOverride(true)//是否文件覆盖,如果多次.setIdType(IdType.AUTO) //主键策略.setServiceName("%sService") //设置生成的service接口名首字母不用I开头.setBaseResultMap(true)//映射文件中生成默认的baseMap.setBaseColumnList(true);//映射文件中生成默认的基础列名sql//2. 数据源配置DataSourceConfig dsConfig = new DataSourceConfig();dsConfig.setDbType(DbType.MYSQL).setUrl("jdbc:mysql://localhost:3306/woniudb").setDriverName("com.mysql.jdbc.Driver").setUsername("root").setPassword("123456");//3.策略配置StrategyConfig stConfig = new StrategyConfig();stConfig.setCapitalMode(true) // 全局大写命名.setNaming(NamingStrategy.underline_to_camel) //下划线转驼峰.setInclude(new String[]{"t_student","teacher"});//生成的表,参数为数组//4.包名策略PackageConfig pkConfig = new PackageConfig();pkConfig.setParent("com.woniuxy")//父包名.setController("controller").setEntity("entity").setService("service").setMapper("mapper");//5.生成xml的配置List<FileOutConfig> focList = new ArrayList<>();// 自定义配置InjectionConfig cfg = new InjectionConfig() {@Overridepublic void initMap() {}};String templatePath = "/templates/mapper.xml.vm";// 自定义配置会被优先输出focList.add(new FileOutConfig(templatePath) {@Overridepublic String outputFile(TableInfo tableInfo) {// 自定义输出文件名 , 如果你 Entity 设置了前后缀、此处注意 xml 的名称会跟着发生变化!!return projectPath+"\\resources\\mapper\\"+ tableInfo.getEntityName() + "Mapper" + StringPool.DOT_XML;}});cfg.setFileOutConfigList(focList);// 配置模板TemplateConfig templateConfig = new TemplateConfig();//不生成如下类型模板templateConfig.setXml(null);ag.setTemplate(templateConfig);//6.整合配置ag.setGlobalConfig(config).setDataSource(dsConfig).setStrategy(stConfig).setPackageInfo(pkConfig).setCfg(cfg).setTemplateEngine(new VelocityTemplateEngine());ag.execute();}}

若有收获,就点个赞吧
0 人点赞


