Spring
概述
Spring为简化企业级开发而生,使用Spring开发可以将Bean对象,Dao组件对象,Service组件对象等交给Spring容器来管理,这样使得很多复杂的代码在Spring中开发却变得非常的优雅和简洁,有效的降低代码的耦合度,极大的方便项目的后期维护、升级和扩展。
Spring是一个IOC(DI)和AOP容器框架。
Spring的优良特性
[1]非侵入式:基于Spring开发的应用中的对象可以不依赖于Spring的API
[2]控制反转:IOC——Inversion of Control,指的是将对象的创建权交给Spring去创建。使用Spring之前,对象的创建都是由我们自己在代码中new创建。而使用Spring之后。对象的创建都是由给了Spring框架。
[3]依赖注入:DI——Dependency Injection,是指依赖的对象不需要手动调用setXX方法去设置,而是通过配置赋值。
[4]面向切面编程:Aspect Oriented Programming——AOP
[5]容器:Spring是一个容器,因为它包含并且管理应用对象的生命周期
[6]组件化:Spring实现了使用简单的组件配置组合成一个复杂的应用。在 Spring 中可以使用XML和Java注解组合这些对象。
[7]一站式:在IOC和AOP的基础上可以整合各种企业应用的开源框架和优秀的第三方类库(实际上Spring 自身也提供了表述层的SpringMVC和持久层的Spring JDBC)
模块化
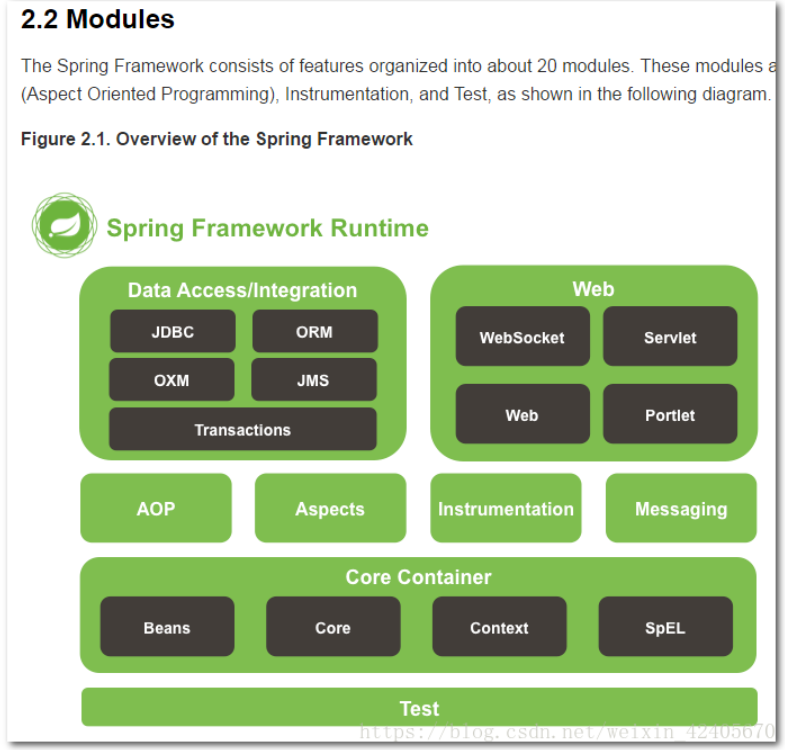
Spring框架分为四大模块:
Core核心模块。负责管理组件的Bean对象
面向切面编程
数据库操作
Web模块
配置文件
applicationContext.xml
参考博客:https://www.cnblogs.com/loveer/p/11332066.html
<?xml version="1.0" encoding="UTF-8"?><beans xmlns="http://www.springframework.org/schema/beans"xmlns:context="http://www.springframework.org/schema/context"xmlns:xsi="http://www.w3.org/2001/XMLSchema-instance"xmlns:aop="http://www.springframework.org/schema/aop"xmlns:tx="http://www.springframework.org/schema/tx"xmlns:p="http://www.springframework.org/schema/p"xsi:schemaLocation="http://www.springframework.org/schema/contexthttp://www.springframework.org/schema/context/spring-context.xsdhttp://www.springframework.org/schema/beanshttp://www.springframework.org/schema/beans/spring-beans.xsdhttp://www.springframework.org/schema/txhttp://www.springframework.org/schema/tx/spring-tx.xsdhttp://www.springframework.org/schema/aophttp://www.springframework.org/schema/aop/spring-aop.xsd"><!-- 加载配置文件 --><context:property-placeholder location="classpath:jdbc.properties"/><!-- 自动扫描web包 ,将带有注解的类纳入spring容器管理 --><!--Spring 容器初始化的时候,会扫描 com.web 下标有(@Component,@Service,@Controller,@Repository) 注解的类,纳入spring容器管理--><context:component-scan base-package="com.web"></context:component-scan><!-- dataSource 配置 --><bean id="dataSource" class="com.alibaba.druid.pool.DruidDataSource" init-method="init" destroy-method="close"><!-- 基本属性 url、user、password --><property name="driverClassName" value="com.mysql.jdbc.Driver"></property><property name="url" value="${jdbcUrl}"/><property name="username" value="${username}"/><property name="password" value="${password}"/><!-- 配置初始化大小 --><property name="initialSize" value="1"/><!-- 连接池最小空闲 --><property name="minIdle" value="1"/><!-- 连接池最大使用连接数量 --><property name="maxActive" value="20"/><!-- 配置获取连接等待超时的时间 --><property name="maxWait" value="60000"/><!-- 配置间隔多久才进行一次检测,检测需要关闭的空闲连接,单位是毫秒 --><property name="timeBetweenEvictionRunsMillis" value="60000"/><!-- 配置一个连接在池中最小生存的时间,单位是毫秒 --><property name="minEvictableIdleTimeMillis" value="300000"/></bean><!--使用Spring+MyBatis的环境下,我们需要配值一个SqlSessionFactoryBean来充当SqlSessionFactory在基本的MyBatis中,SqlSessionFactory可以使用SqlSessionFactoryBuilder来创建,而在mybatis-spring中,则使用SqlSessionFactoryBean来创建。--><!-- mybatis文件配置,扫描所有mapper文件 --><bean id="sqlSessionFactory"class="org.mybatis.spring.SqlSessionFactoryBean"p:dataSource-ref="dataSource"p:configLocation="classpath:mybatis-config.xml"p:typeAliasesPackage="com.entity"<!-- 如果 MyBatis 映射器 XML 文件在和映射器类相同的路径下不存在,那么另外一个需要配置文件的原因就是它了。 -->p:mapperLocations="classpath*:mapper/*.xml"/><!-- spring与mybatis整合配置,自动扫描所有dao ,将dao接口生成代理注入到Spring--><!-- MapperScannerConfigurer 的作用是取代手动添加 Mapper ,自动扫描完成接口代理。而不需要再在mybatis-config.xml里面去逐一配置mappers。 --><bean class="org.mybatis.spring.mapper.MapperScannerConfigurer"p:basePackage="com.dao"p:sqlSessionFactoryBeanName="sqlSessionFactory"/><!-- 对dataSource 数据源进行事务管理 --><bean id="transactionManager"class="org.springframework.jdbc.datasource.DataSourceTransactionManager"p:dataSource-ref="dataSource"/><!-- 配置AOP通知 --><tx:advice id="txAdvice" transaction-manager="transactionManager"><!-- 配置事务属性 --><tx:attributes><!-- 添加事务管理的方法 --><tx:method name="save*" propagation="REQUIRED"/><tx:method name="delete*" propagation="REQUIRED"/><tx:method name="update*" propagation="REQUIRED"/><tx:method name="select*" propagation="REQUIRED" read-only="true"/></tx:attributes></tx:advice><!-- 配置一个切面AOP --><aop:config><aop:aspect id="helloWorldAspect" ref="txAdvice"><!-- 配置切点 --><aop:pointcut id="pointcut" expression="execution(* com.aop.*.*(..))"/><!-- 配置前置通知 --><aop:before pointcut-ref="pointcut" method="beforeAdvice"/><!-- 配置前置通知 --><aop:after pointcut-ref="pointcut" method="afterAdvice"/><!-- 配置后置返回通知 --><aop:after-returning pointcut-ref="pointcut" method="afterReturnAdvice" returning="result"/><!-- 配置环绕通知 --><aop:around pointcut-ref="pointcut" method="aroundAdvice"/><!-- 异常通知 --><aop:after-throwing pointcut-ref="pointcut" method="throwingAdvice" throwing="e"/></aop:aspect></aop:config><!-- 配置使Spring采用CGLIB代理 --><aop:aspectj-autoproxy proxy-target-class="true"/><!-- 启用对事务注解的支持 --><tx:annotation-driven transaction-manager="transactionManager"/></beans>
IOC控制反转模式
xml配置
import xml
分类建立不同application
applicationContext
applicationContext-user
applicationContext-product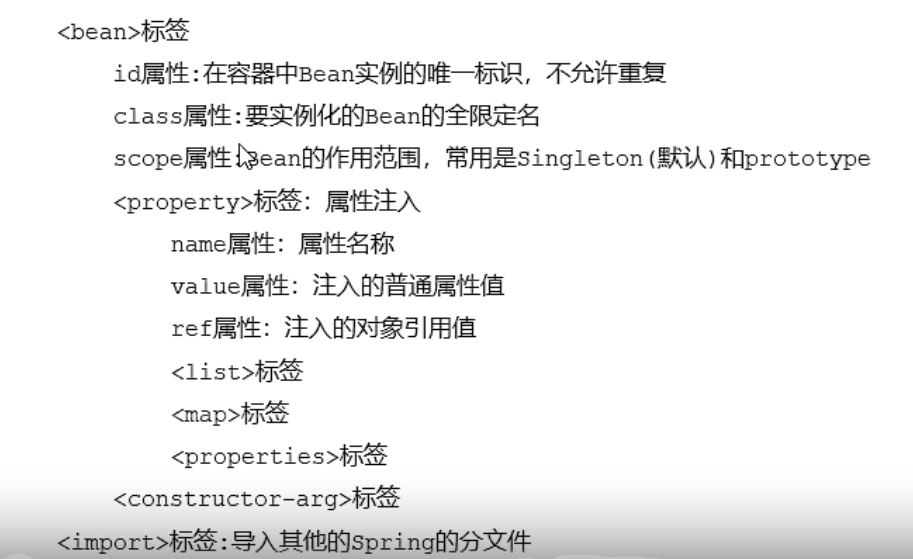
Bean标签
用于配置对象交由Spring来创建
默认情况下它调用是类中的无参构造方法,如果没有无参构造方法则会创建失败。
基本属性:
- id:Bean实例在Spring容器的唯一标识
- class:Bean的全限定名称
Bean标签范围配置 Scope:指对象的作用范围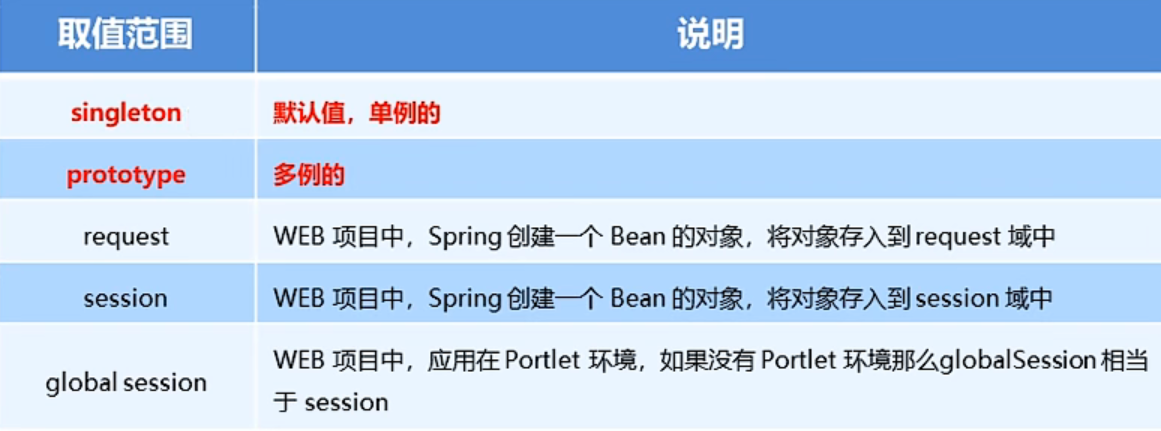
生命周期
当scope的取值为singleton的时候
- 对象创建:当应用加载,创建容器时,对象就被实例化了。
- 对象运行:只要容器在,对象就一直活着。
- 对象销毁:当应用卸载,销毁容器时,对象就被销毁了。
当scope的取值为prototype时
- 对象创建:当使用对象时,创建新的对象实例
- 对象运行:只要对象在使用中,就一直活着。
- 对象销毁:当对象长期不使用时,被Java的垃圾回收器回收了
Bean配置容器
直接配置
静态工厂配置
实例工厂配置
Bean依赖注入
set注入
```xml
<a name="XwPKM"></a>
##### 构造法注入
xml
<a name="IpdcC"></a>
##### 注入复杂类型数据
xml
<a name="sYu22"></a>
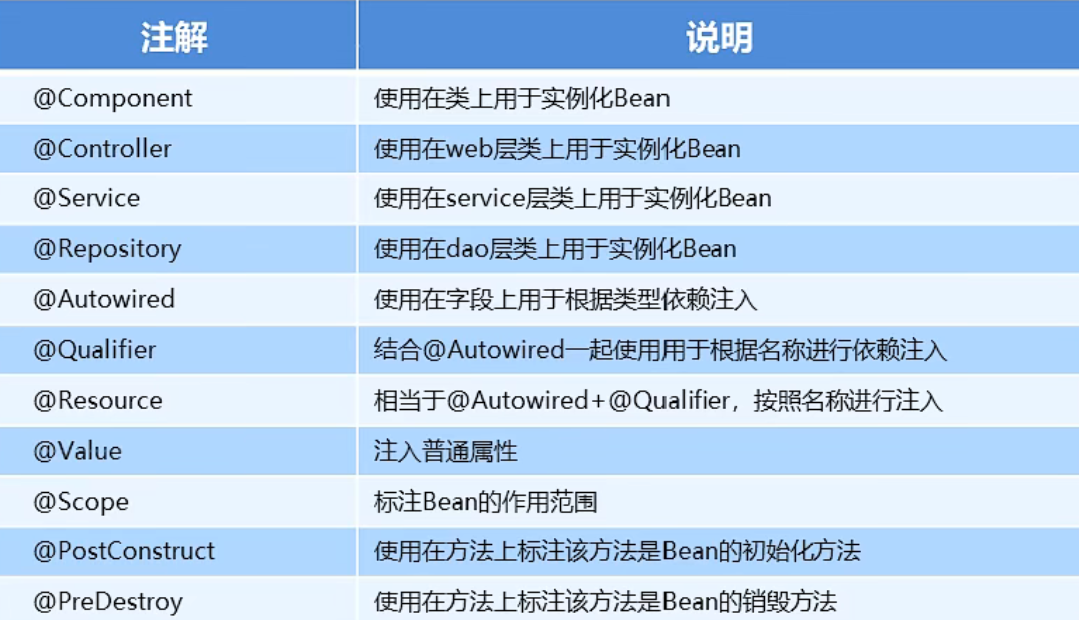
### 注解配置容器
<br /><bean id="ComputerDao" class="com.dao.impl.ComputerDapImpl"><br />@Component_(_"computerDao"_)_<br /><property name="computer" ref="computer"></property><br />@Autowired<br />@Qualifier_(_"computer"_)_
<a name="A7rrc"></a>
### Spring新注解
使用完全注解的方式替代xml配置<br />通过建立Configuration.class文件 编写配置文件的方式来实现自定义bean<br />和配置以下卡死都健康阿三n<br />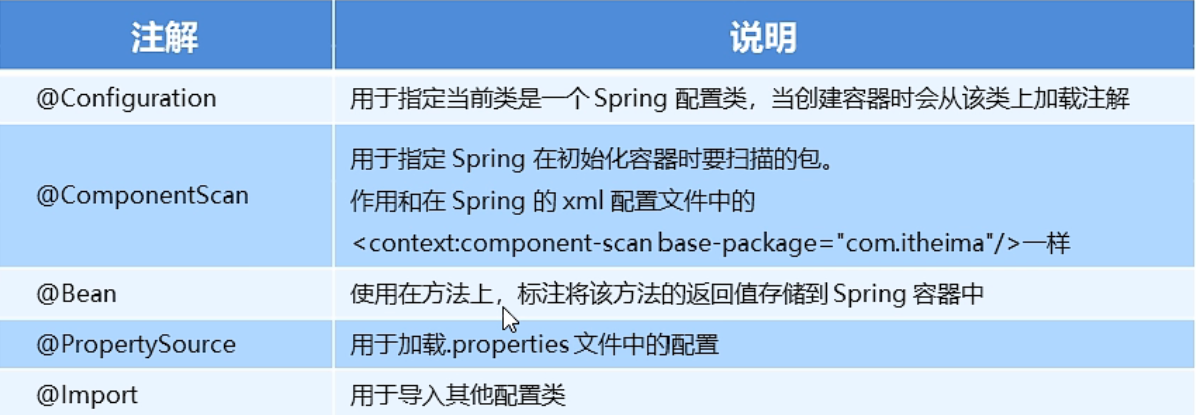
<a name="xsiUI"></a>
## AOP代理模式
<a name="WH5Ie"></a>
### xml方式实现aopxml
<!--切面对象-->
<bean id="myAspect" class="com.aop.MyAspect"></bean>

<!--配置织入:告诉spring框架 哪些方法(切点)需要进行哪些增强-->
<aop:config>
    <!--声明切面-->
    <aop:aspect ref="myAspect">
        <!--切面:切点+通知-->
        <aop:before method="before" pointcut="execution(public void com.aop.Target.*(..))"></aop:before>
    </aop:aspect>
</aop:config>
<a name="qGYQG"></a>
### 切点表达式
```xml
<!--aop包下Target类下的method()方法-->
execution(public void com.aop.Target.method())
<!--aop包下Target类下的所有方法-->
execution(public void com.aop.Target.*(..))
<!--aop包下所有类及其所有方法-->
execution(public void com.aop.*.*(..))
<!--aop包及其子包下所有类所有方法-->
execution(public void com.aop..*.*.*(..))
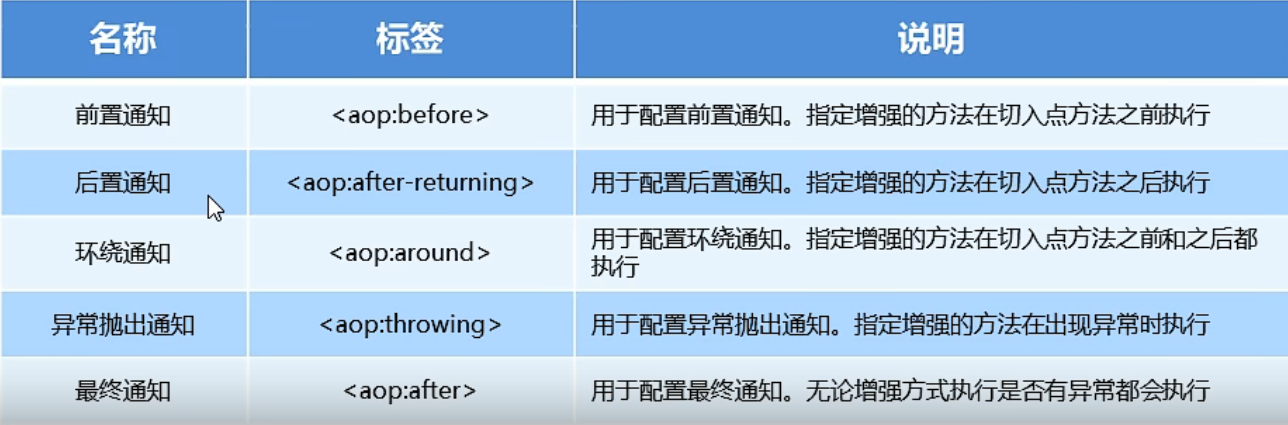
通知类型
SpringMvc
MyBatis
概述
●mybatis 是一个优秀的基于java的持久层框架,它内部封装了jdbc,使开发者只需要关注sq|语句本身,而不需要花费精力去处理加载驱动、创建连接、创建Statement等繁杂的过程
●mybatis通过xml或注解的方式将要执行的各种statement配置起来,并通过java对象和statement中sql的动态参数进行映射生成最终执行的sq|语句。
●最后mybatis框架执行sq|并将结果映射为java对象并返回。采用ORM思想解决了实体和数据库映射的问题,对jdbc进行了为封装,屏蔽了jdbc api底层访问细节,使我们不用与jdbc api 打交道,就实现对数据库的持久化操作。
原始JDBC操作数据库的方式太过繁琐,操作复杂。
缺点: 1.存在数据库连接创建、释放频繁造成系统资源浪费
2.sql语句在代码中硬偏码,造成代码不易维护,实际应用sql经常变化,sql变动则需要改变java代码
3.查询操作时,需要手动将结果集中的数据手动封装到实体。
插入操作时,需要手动将实体的数据设置到sql语句的占符位置。
于是MyBatis为了解决上述问题
1.使用数据库连接池初始化连接资源
2.将sql语句抽取到xml配置文件中
3.使用反射、内省等底层技术,自动将实体与表进行属性与字段的映射
配置文件
Mybatis核心配置文件
SqlMapConfig.xml
<?xml version="1.0" encoding="UTF-8" ?>
<!DOCTYPE configuration
        PUBLIC "-//mybatis.org//DTD Config 3.0//EN"
        "http://mybatis.org/dtd/mybatis-3-config.dtd">
<configuration>
    <!--  读取路径下的properties文件 用于存储数据库基本信息 -->
    <properties resource="database.properties"/>
    <settings>
        <setting name="logImpl" value="LOG4J" />
    </settings>
    <!--  类型别名  -->
    <typeAliases>
        <!--<typeAlias type="mybatis.pojo.User" alias="User"/>-->
        <package name="mybatis.pojo"/>
    </typeAliases>

    <!-- 数据源环境 -->
    <environments default="dev">
        <environment id="dev">
            <transactionManager type="JDBC"></transactionManager>
            <!--  启用mybatis的数据连接池 -->
            <dataSource type="POOLED">
                <property name="driver" value="${db.drivername}"/>
                <property name="url" value="${db.url}"/>
                <property name="username" value="${db.username}"/>
                <property name="password" value="${db.password}"/>
            </dataSource>
        </environment>
    </environments>
    <!-- 映射文件 -->
    <mappers>
        <!--  映射到包下文件  -->
        <package name="mybatis.dao"/>
        <!--  <mapper resource="mybatis/dao/userMapper.xml"/>  -->
    </mappers>
</configuration>
UserMapper.Xml
<?xml version="1.0" encoding="UTF-8" ?>
<!DOCTYPE mapper
        PUBLIC "-//mybatis.org//DTD Mapper 3.0//EN"
        "http://mybatis.org/dtd/mybatis-3-mapper.dtd">
<mapper namespace="mybatis.dao.UserMapper">

<!-- 将查询语句都写在xml里 映射关系到java代码中 -->
<select id="count" resultType="int">
    select count(1) as count from employee
</select>
<select id="findFirst" resultType="User">
    select * from users where id = 1
</select>
 <select id="update" parameterType="User" >
       update employee set username=#{0} where id=#{1}
 </select>
</mapper>

Mapper
UserMapper接口文件
可以使用注解的方式来写sql语句
也可以映射xml里的方法
注意:当mapper层的接口中超过一个参数是以下两种写法才可以被mybatis识别参数
第一种 (改mapper层的接口代码):
List
在参数前面加上@Param(“xxx”) xxx就是mapper.xml中指定的参数名
第二种 (该mapper.xml中的代码)
在参数指定的名字出替换成接口中参数的序号(从0开始排)
public interface UserMapper {
    int count();

    @Select({"select count(1) from employee where id = 1001"})
    int cc();

    User findFirst();

    List<User> find_alluser();
}
MybatisUtil
操作数据库本身的流程是如下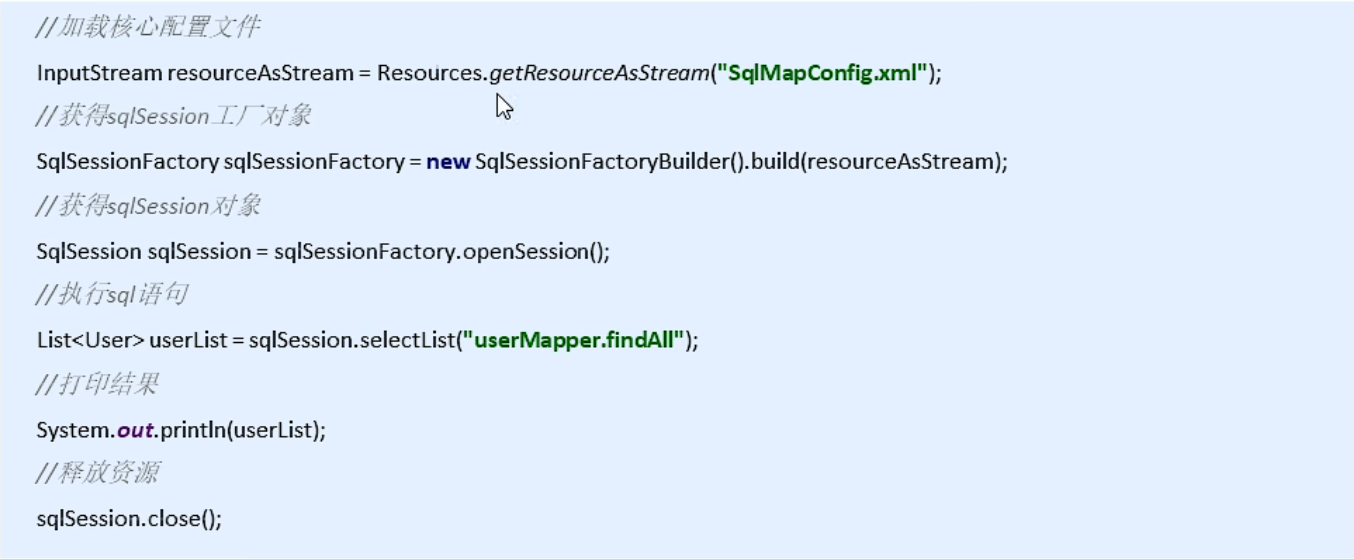
但由于执行多个sql语句的时候 重复操作过多 所以使用MybatisUtil文件替代重复步骤
public class MybatisUtil {
    static SqlSessionFactory factory;

    public MybatisUtil() {
    }

    public static SqlSession getSession(boolean isTranscation) {
        return factory.openSession(isTranscation);
    }

    static {
        SqlSessionFactoryBuilder builder = new SqlSessionFactoryBuilder();

        try {
            factory = builder.build(Resources.getResourceAsReader("config.xml"));
        } catch (IOException var2) {
            var2.printStackTrace();
        }

    }
}
Session
//选择的是xml中mapper里select方法
i = session.getMapper(UserMapper.class).cc();
//选择的是usermapper接口的方法
user = session.getMapper(UserMapper.class).findFirst();
动态sql
模糊查询 条件不足查询
<select id="findUser" parameterType="user" resultType="user">
        select * from employee
        <where>
            <if test="id!=0">
                and id=#{id}
            </if>
            <if test="username!=null">
                and username=#{username}
            </if>
        </where>
</select>
应用场景:我们需要查询 user 表中 id 分别为1,2,3的用户
sql语句:select from user where id=1 or id=2 or id=3 || select from user where id in (1,2,3)
<select id="findUserbyid" parameterType="list" resultType="mybatis.pojo.User">
        select * from employee
        <where>
            <foreach collection="list" open="id in(" close=")" item="id" separator=",">
                #{id}
            </foreach>
        </where>
    </select>
Sql片段的抽取
减少重复sql语句 并且方便修改
<sql id="select_user"> select * from employee </sql>
<select id="test" resultType="user">
  <include refid="select_user"/>
  where id=1001
</select>
Trim
但是涉及到更新操作时,可能不需要对所有字段更新,这时不需要更新的字段需要保持原字段信息
这时就需要进行动态SQL拼接,如下,使用trim就是为了删掉最后字段的“,”。
主要不用单独写SET了,因为set被包含在trim中了:
UPDATE ENTITY_RELATION
 <trim prefix="set" suffixOverrides=",">
  <if test="srcId!=null">SRC_ID=#{srcId},</if>
  <if test="srcType!=null">SRC_TYPE=#{srcType},</if>
  <if test="destId!=null">DEST_ID=#{destId},</if>
 </trim>
结果集映射ResultMap
概述
一般我们都使用POJO(实体对象)储存查询结果。我们可以使用select自动映射,还可以使用select语句中的resultMap属性配置映射集合,不过需要提前定义resultMap。
级联
参考博客:https://blog.csdn.net/wuskzuo/article/details/79186144
https://www.freesion.com/article/3733778773/
在数据库中包含着一对多、一对一的关系。比如说一个人和他的身份证就是一对一的关系,但是他和他的银行卡就是一对多的关系。这样的情况我们就要使用级联。在级联中存在3种对应关系。
- 一对一的关系
- 一对多的关系
- 多对多的关系(这种情况由于比较复杂,我们通常会使用双向一对多的关系来降低复杂度)
1.association 一对一级联
2.collection 一对多级联
3.discriminator 鉴别器级联
Mtbatis核心配置深入
Typehandler类型处理器
参考博客:https://blog.csdn.net/lmb55/article/details/90380309
当我们在Java中自定义了枚举类型或者其它某个类型,但是在数据库中存储时往往需要转换成数据库对应的类型,并且在从数据库中取出来时也需要将数据库类型转换为javabean中的对应类型。比如:java中字段类型为Date,数据库中存储的是varchar类型;
因为有大量类似数据的转换,手动转换类型进行存储和查询已经过于麻烦。MyBatis为我们提供了解决办法:TypeHandler类型处理器。
atuoMapping
链接:https://www.jb51.net/article/235286.htm
整合框架

若有收获,就点个赞吧
0 人点赞
