SpringSecurity扩展第三方登录的思路,是借鉴Spring Security密码登录流程的,不了解的同学可以回顾一下:Spring Security 密码登录流程源码。
本文使用JustAuth扩展第三方登录,同时还预留了手机号登录的方式。
关于JustAuth,官网这样介绍:
史上最全的整合第三方登录的开源库,Login, so easy. 极简的API设计,已集成国内外十多家平台。
来一张JustAuth实现类的截图,大家感受下,集成了市面上的大部分登录,像QQ、微信、微博、淘宝、百度、github、码云等等。只需要配置一下,即可集成第三方登录。
开始
如下图,是密码登录的流程图,其中蓝色框是扩展登录需要重新写的,通过重写Filter获取认证用户,重写Provider和UserDetailsService给用户授权。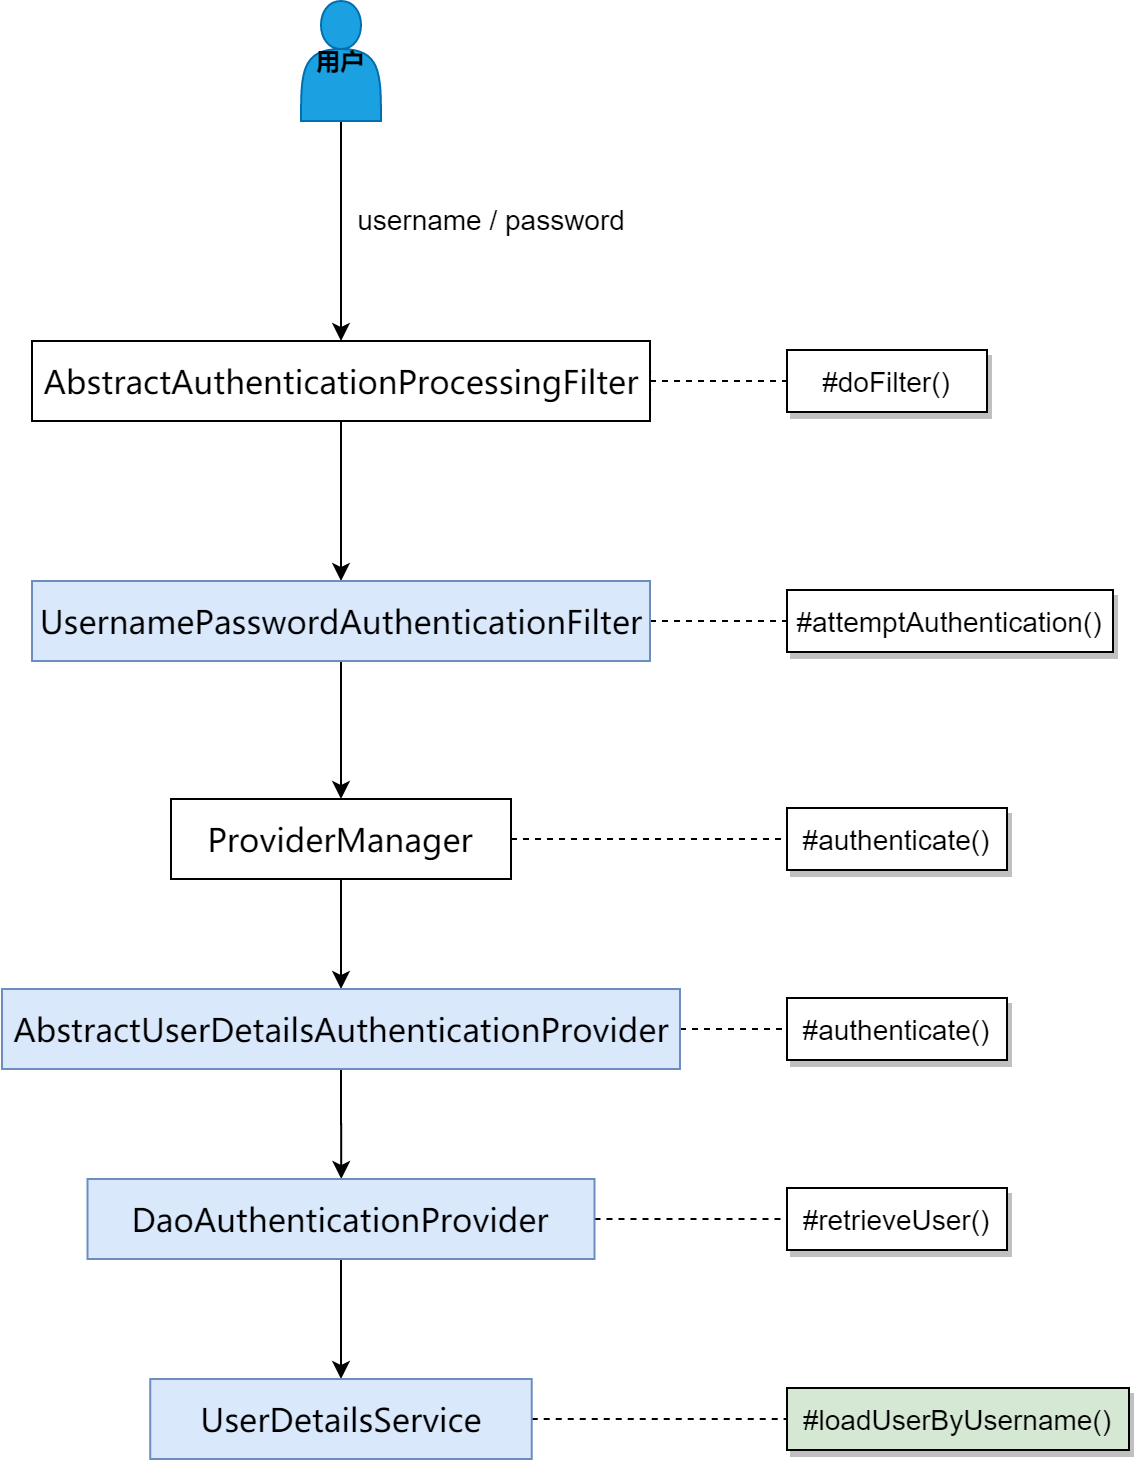
下面咱们一个一个介绍,扩展登录的蓝色框是如何实现的。
用户授权第三方登录
以码云为例,用户访问本系统/open/oauth/login/gitee,系统会跳转到gitee登录页,由用户登录,然后授权。
@RestControllerpublic class ExtendLoginController {@Autowiredprivate AuthRequestFactory factory;@GetMapping("/open/oauth")public List<String> list() {return factory.oauthList();}@GetMapping("/open/oauth/login/{type}")public void login(@PathVariable String type, HttpServletResponse response) throws IOException {AuthRequest authRequest = factory.get(type);response.sendRedirect(authRequest.authorize(AuthStateUtils.createState()));}}
获取认证用户
用户同意授权后,会进入filter。对标UsernamePasswordAuthenticationFilter,新建一个ExtendAuthenticationFilter,用来获取认证用户。
@Slf4j@Servicepublic class ExtendAuthenticationFilter extends AbstractAuthenticationProcessingFilter {public static String EXTEND_LOGIN_URL = "/open/oauth/callback/**";private boolean postOnly = false;private AuthRequestFactory authRequestFactory;/*** 通过构造函数指定该 Filter 要拦截的 url 和 httpMethod*/protected ExtendAuthenticationFilter() {super(new AntPathRequestMatcher(EXTEND_LOGIN_URL, null));}@Overridepublic Authentication attemptAuthentication(HttpServletRequest request, HttpServletResponse response) throws AuthenticationException, IOException, ServletException {// 当设置该 filter 只拦截 post 请求时,符合 pattern 的非 post 请求会触发异常if (this.postOnly && !request.getMethod().equals("POST")) {throw new AuthenticationServiceException("Authentication method not supported: " + request.getMethod());} else {// 1. 从请求中获取参数 用户登录扩展参数String extendKey = obtainExtendKey(request);String extendCredentials = obtainCredentials(request);String extendType = obtainExtendType(request);// 2. 封装成 Token 调用 AuthenticationManager 的 authenticate 方法,该方法中根据 Token 的类型去调用对应 Provider 的 authenticatedExtendAuthenticationToken token;if (StrUtil.isNotBlank(extendKey)) {token = new ExtendAuthenticationToken(extendKey, extendType, extendCredentials);}else {// 从第三方拿到用户信息token = new ExtendAuthenticationToken(obtainAuthUser(request));}this.setDetails(request, token);// 3. 返回 authenticated 方法的返回值return this.getAuthenticationManager().authenticate(token);}}/*** 获取扩展登录extendKey,可以是用户名、手机号等,根据业务需要去扩展*/protected String obtainExtendKey(HttpServletRequest request) {return request.getParameter(UserUtil.EXTEND_KEY_PARAMETER);}/*** 获取扩展登录extendCredentials,可以是手机号的验证码等,根据业务需要去扩展*/protected String obtainCredentials(HttpServletRequest request) {return request.getParameter(UserUtil.EXTEND_CREDENTIALS_PARAMETER);}/*** 获取扩展登录类型*/protected String obtainExtendType(HttpServletRequest request) {return request.getParameter(UserUtil.EXTEND_TYPE_PARAMETER);}/*** 获取 justauth 登录后的用户信息*/protected AuthUser obtainAuthUser(HttpServletRequest request) {String type = getCallbackType(request);AuthRequest authRequest = authRequestFactory.get(type);// 登录后,从第三方拿到用户信息AuthResponse response = authRequest.login(getCallback(request));log.info("【justauth 第三方登录 response】= {}", JSONUtil.toJsonStr(response));// 第三方登录成功if (response.getCode() == AuthResponseStatus.SUCCESS.getCode()) {AuthUser authUser = (AuthUser) response.getData();return authUser;}return null;}/*** 从请求中构建 AuthCallback*/private AuthCallback getCallback(HttpServletRequest request) {AuthCallback authCallback = AuthCallback.builder().code(request.getParameter("code")).auth_code(request.getParameter("auth_code")).authorization_code(request.getParameter("authorization_code")).oauthToken(request.getParameter("oauth_token")).state(request.getParameter("state")).oauthVerifier(request.getParameter("oauth_verifier")).build();return authCallback;}/*** 获取路径参数:回调类型*/private String getCallbackType(HttpServletRequest request) {// /context/open/oauth/callback/giteeString uri = request.getRequestURI();// "/open/oauth/callback/".length()int common = EXTEND_LOGIN_URL.length() - 2;int start = uri.indexOf(EXTEND_LOGIN_URL.substring(0, common));if(start == -1) {log.warn("【justauth 第三方登录 response】回调类型为空,uri={}", uri);return null;}// giteereturn uri.substring(start + common);}protected void setDetails(HttpServletRequest request, ExtendAuthenticationToken authRequest) {authRequest.setDetails(this.authenticationDetailsSource.buildDetails(request));}public void setPostOnly(boolean postOnly) {this.postOnly = postOnly;}public void setAuthRequestFactory(AuthRequestFactory authRequestFactory) {this.authRequestFactory = authRequestFactory;}}
首先验证是否为POST请求,验证通过后,开始进入主题。
- 从请求中获取用户扩展登录参数,包括扩展登录key(如手机号)、扩展登录凭证(如手机验证码)、扩展登录类型;
- 如果扩展登录key不为空,则使用扩展登录三要素生成token;
- 如果扩展登录key为空,使用obtainAuthUser方法获取AuthUser,该方法中,获取了回调的参数,带着回调参数向第三方获取当前登录的用户信息AuthUser,使用AuthUser生成token;
- 设置相关参数,默认为远程地址和会话id;
- 调用ProviderManager#authenticate方法认证。
ProviderManager
ProviderManager#authenticate方法,主要是根据token的类型,找到匹配的filter去认证
合适的认证器做认证
ExtendAuthenticationProvider对标AbstractAuthenticationProcessingFilter,该filter主要干了3件事:
- 从数据库中,获取用户详情ExtendUserDetailsService#loadUserByExtendKey();
- 前置校验:校验用户是否锁定、不可用、过期;
- 附加校验:在密码登录中,校验的是密码是否正确;在手机号登录中,校验的是验证码是否正确;在第三方认证时,该方法不需要实现;
/**
* 查找用户详情
*/
protected UserDetails retrieveUser(String extendKey,
                                 ExtendAuthenticationToken authentication)
  throws AuthenticationException {
  try {
      UserDetails loadedUser = this.getExtendUserDetailsService().loadUserByExtendKey(authentication);
      if (loadedUser == null) {
          throw new InternalAuthenticationServiceException(
              "UserDetailsService returned null, which is an interface contract violation");
      }
      return loadedUser;
  }
  catch (UsernameNotFoundException | InternalAuthenticationServiceException ex) {
      throw ex;
  } catch (Exception ex) {
      throw new InternalAuthenticationServiceException(ex.getMessage(), ex);
  }
}
ExtendUserDetailsService
ExtendUserDetailsService对标的是我们熟悉的UserDetailsService,用来获取用户详情,我这里实现了一个默认实现:
@Slf4j
@Service
public class ExtendUserDetailsServiceImpl implements ExtendUserDetailsService {

    @Autowired
    private DefaultUserDetailsService userDetailsService;
    @Autowired
    private SystemService systemService;

    /**
     * 扩展第三方登录
     */
    @Override
    public UserDetails loadUserByExtendKey(ExtendAuthenticationToken token) throws UsernameNotFoundException {
        if (!(ObjectUtil.isNotEmpty(token.getPrincipal()) && token.getPrincipal() instanceof AuthUser)) {
            log.info("extend, type={}", token.getExtendType());
            // 当扩展登录key是用户名时
            return userDetailsService.loadUserByUsername(token.getExtendKey());
        }

        AuthUser authUser = (AuthUser) token.getPrincipal();
        // 1. 根据 gitee 唯一id 查找用户信息
        /**
         * 这里要求 user 表中有 authUser.getSource()+'_id' 字段(小写,如 gitee_id),authUser.getSource()的取值见 {@link AuthDefaultSource}
         */
        UserVO userVO = systemService.loadUserByBiz(authUser.getSource().toLowerCase() + "_id", authUser.getUuid());

        // 2. 用户不存在 --> 新增(注册)用户,之后返回 UserDetails
        if (ObjectUtil.isNull(userVO) || StrUtil.isBlank(userVO.getUserId())) {
            UserDTO user = new UserDTO();
            user.setUserName(authUser.getUsername());
            user.setNickName(authUser.getNickname());
            user.setAvatar(authUser.getAvatar());
            user.setRemark(authUser.getRemark());
            if (StrUtil.equalsIgnoreCase(authUser.getSource(), AuthDefaultSource.GITEE.getName())) {
                user.setGiteeId(authUser.getUuid());
            }
            UserVO registerUser = systemService.registerUser(user);
            return new LoginUser(registerUser, IpUtils.getIpAddr(ServletUtils.getRequest()), LocalDateTime.now(), authUser.getSource());
        }

        // 3. 用户存在 --> 返回 UserDetails
        return new LoginUser(userVO, IpUtils.getIpAddr(ServletUtils.getRequest()), LocalDateTime.now(), LoginType.EXTEND);
    }

}
根据gitee 唯一id 查找用户信息,这里取了个巧,要求 user 表中有 authUser.getSource()+’_id’ 字段(小写,如 gitee_id)。当然,也可以设计一个第三方登录的关系表,查找用户信息。
用户存在,构造UserDetails返回;不存在,根据获取的authUser,向系统注册用户,然后再构造UserDetails返回。
配置
以上面这些自定义的类,构造SecurityConfigurerAdapter
/**
 * 扩展第三方登录配置
 *
 * @author songyinyin
 * @date 2020/5/4 下午 07:58
 */
@Configuration
public class ExtendAuthenticationSecurityConfig extends SecurityConfigurerAdapter<DefaultSecurityFilterChain, HttpSecurity> {

    @Autowired
    private AuthRequestFactory authRequestFactory;
    @Autowired
    private ExtendUserDetailsService extendUserDetailsService;
    @Autowired
    private AuthenticationSuccessHandler successHandler;
    @Autowired
    private AuthenticationFailureHandler failureHandler;

    @Override
    public void configure(HttpSecurity builder) throws Exception {

        // 1. 初始化 ExtendAuthenticationFilter
        ExtendAuthenticationFilter filter = new ExtendAuthenticationFilter();
        filter.setAuthenticationManager(builder.getSharedObject(AuthenticationManager.class));
        filter.setAuthenticationSuccessHandler(successHandler);
        filter.setAuthenticationFailureHandler(failureHandler);
        filter.setAuthRequestFactory(authRequestFactory);

        // 2. 初始化 ExtendAuthenticationProvider
        ExtendAuthenticationProvider provider = new ExtendAuthenticationProvider();
        provider.setExtendUserDetailsService(extendUserDetailsService);

        // 3. 将设置完毕的 Filter 与 Provider 添加到配置中,将自定义的 Filter 加到 UsernamePasswordAuthenticationFilter 之前
        builder.authenticationProvider(provider).addFilterBefore(filter, UsernamePasswordAuthenticationFilter.class);
    }
}
最后,将自定义的 SecurityConfigurerAdapter 添加到配置中,主要使用 http.apply(extendAuthenticationSecurityConfig) 方法将我们自定义的配置加入到 SpringSecurity 中,如下:
@Configuration
@EnableWebSecurity
public class WebSecurityConfig extends WebSecurityConfigurerAdapter {

    // 省略注入各种自定义配置类

    /**
     * 扩展用户登录
     */
    @Autowired
    private ExtendAuthenticationSecurityConfig extendAuthenticationSecurityConfig;

    /**
     * 配置认证方式等
     *
     * @param auth
     * @throws Exception
     */
    @Override
    protected void configure(AuthenticationManagerBuilder auth) throws Exception {
        auth.userDetailsService(userDetailsService);
    }

    /**
     * http相关的配置,包括登入登出、异常处理、会话管理等
     *
     * @param http
     * @throws Exception
     */
    @Override
    protected void configure(HttpSecurity http) throws Exception {
        http.cors().and().csrf().disable();
        http.apply(extendAuthenticationSecurityConfig) // 扩展用户登录
                .and().authorizeRequests()
                // 放行接口
                .antMatchers(GitsResourceServerConfiguration.AUTH_WHITELIST).permitAll()
                // 除上面外的所有请求全部需要鉴权认证
                .anyRequest().authenticated()
                // 异常处理(权限拒绝、登录失效等)
                .and().exceptionHandling()
                .authenticationEntryPoint(anonymousAuthenticationEntryPoint)//匿名用户访问无权限资源时的异常处理
                .accessDeniedHandler(accessDeniedHandler)//登录用户没有权限访问资源
                // 登入
                .and().formLogin().permitAll()//允许所有用户
                .successHandler(loginSuccessHandler)//登录成功处理逻辑
                .failureHandler(loginFailureHandler)//登录失败处理逻辑
                // 登出
                .and().logout().permitAll()//允许所有用户
                .logoutSuccessHandler(logoutSuccessHandler)//登出成功处理逻辑
                .deleteCookies(RestHttpSessionIdResolver.AUTH_TOKEN)
                // 会话管理
                .and().sessionManagement().invalidSessionStrategy(invalidSessionHandler) // 超时处理
                .maximumSessions(1)//同一账号同时登录最大用户数
                .expiredSessionStrategy(sessionInformationExpiredHandler) // 顶号处理
        ;

    }
}
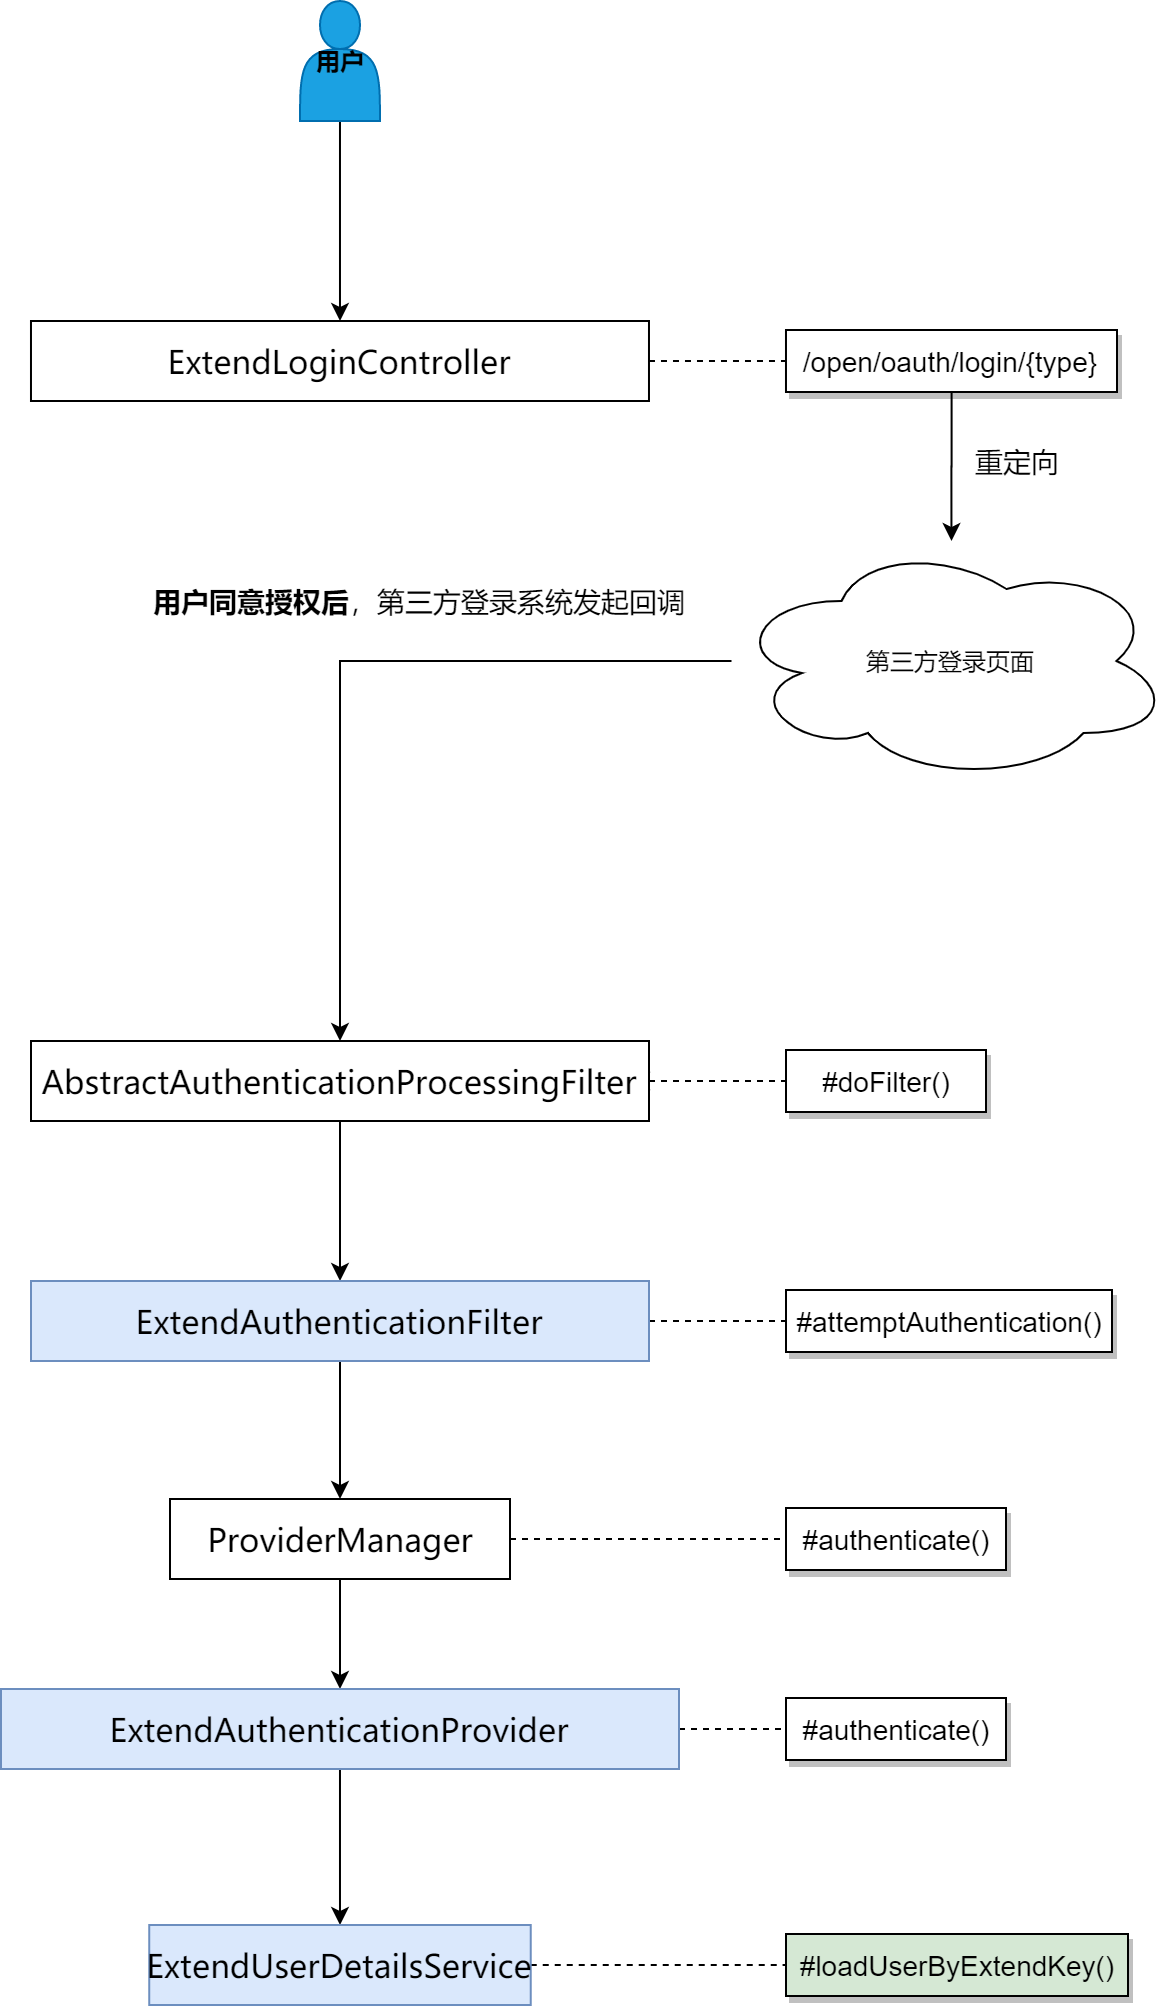
总结
可以看出,扩展第三方登录,与密码登录的流程基本一致,在获取登录参数、查找用户信息时,略有不同。再梳理一下第三方登录的流程图,方便大家理解。
本文的所有代码都已经开源,地址如下:
github:https://github.com/dudiao/gits
码云:https://gitee.com/songyinyin/gits
本篇文章在Spring Security的基础上,实现了第三方登录的集成,同时预留出来了手机号验证码登录。比起 spring-social 更加轻量级一点,而且 spring-social 有一年没更新了。
Spring Security灵活性很强,可以留言说说你是怎么使用Spring Security进行扩展登录的。

若有收获,就点个赞吧
0 人点赞
