- 发布jar包到服务器.wmv">发布jar包到服务器.wmv
- 1.程序的打包与运行
我们的jar包一般不发布在window系统下,都发布在linux系统下,往下看">查询端口
netstat -ano
# 查询指定端口
netstat -ano I findstr “端口号“
# 根据进程PID查询进程名称
tasklist I findstr “进程PID号“
# 根据PID杀死任务
taskkill -F -PID “进程PID号“
# 根据进程名称杀死任务
taskkill -f -t -im “进程名称“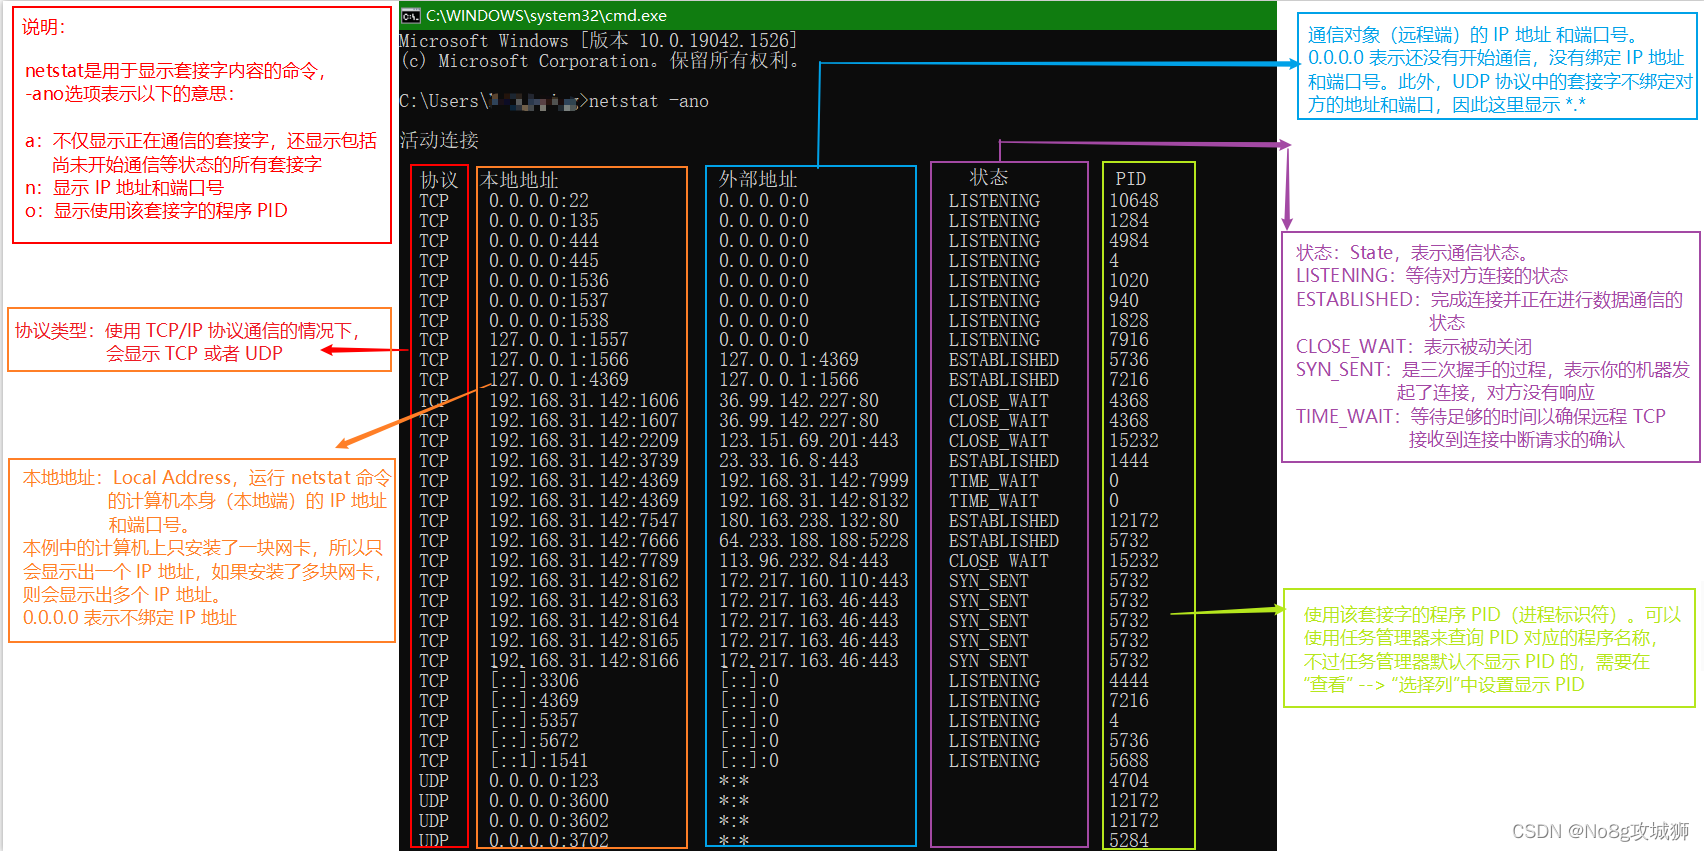
我们的jar包一般不发布在window系统下,都发布在linux系统下,往下看- Linux安装MySql
- For advice on how to change settings please see
- http://dev.mysql.com/doc/refman/5.7/en/server-configuration-defaults.html">http://dev.mysql.com/doc/refman/5.7/en/server-configuration-defaults.html
- Remove leading # and set to the amount of RAM for the most important data
- cache in MySQL. Start at 70% of total RAM for dedicated server, else 10%.
- innodb_buffer_pool_size = 128M
- Remove leading # to turn on a very important data integrity option: logging
- changes to the binary log between backups.
- log_bin
- Remove leading # to set options mainly useful for reporting servers.
- The server defaults are faster for transactions and fast SELECTs.
- Adjust sizes as needed, experiment to find the optimal values.
- join_buffer_size = 128M
- sort_buffer_size = 2M
- read_rnd_buffer_size = 2M
- Disabling symbolic-links is recommended to prevent assorted security risks
发布jar包到服务器.wmv
1.程序的打包与运行
我们在运行springboot项目的时候,必须要打开idea然后运行,非常不方便,实际开发中会把idea中的程序抽取出来,打成一个jar包发布到服务器上,然后运行这台服务器,这台服务器是可以长期运行的。
windows版
打包和运行
以之前的这个项目为例,我们目前是把他运行在idea上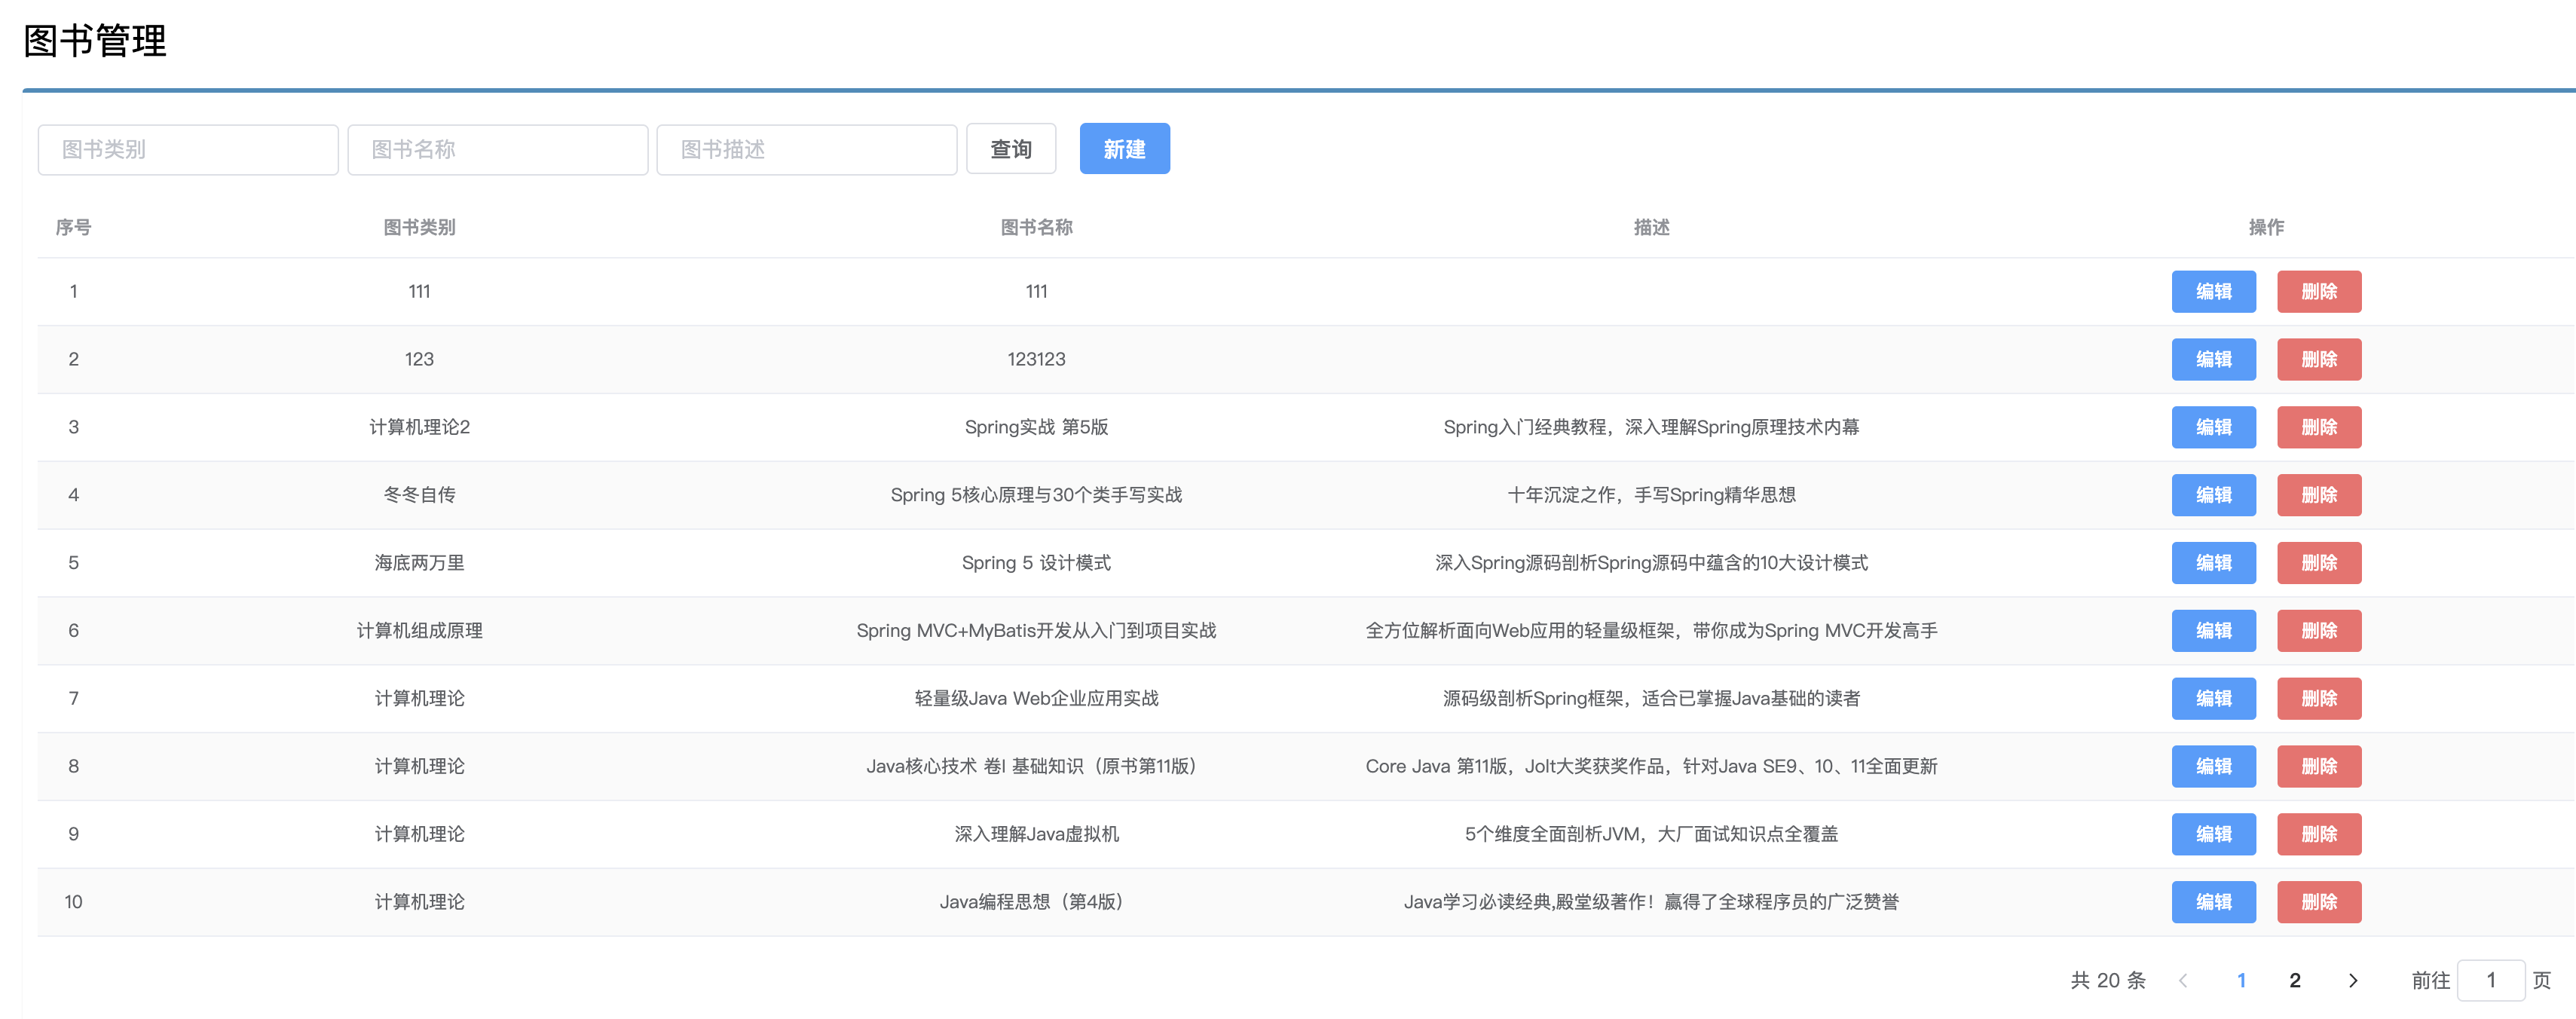
打包依赖spring-boot-maven-plugin插件
<build><plugins><plugin><groupId>org.springframework.boot</groupId><artifactId>spring-boot-maven-plugin</artifactId><version>${spring-boot.version}</version><executions><execution><id>repackage</id><goals><goal>repackage</goal></goals></execution></executions></plugin></plugins></build>
找到他的生命周期,选择test然后跳过单元测试,选择package打包,在打包的时候我们不希望执行单元测试,这里一定要跳过单元测试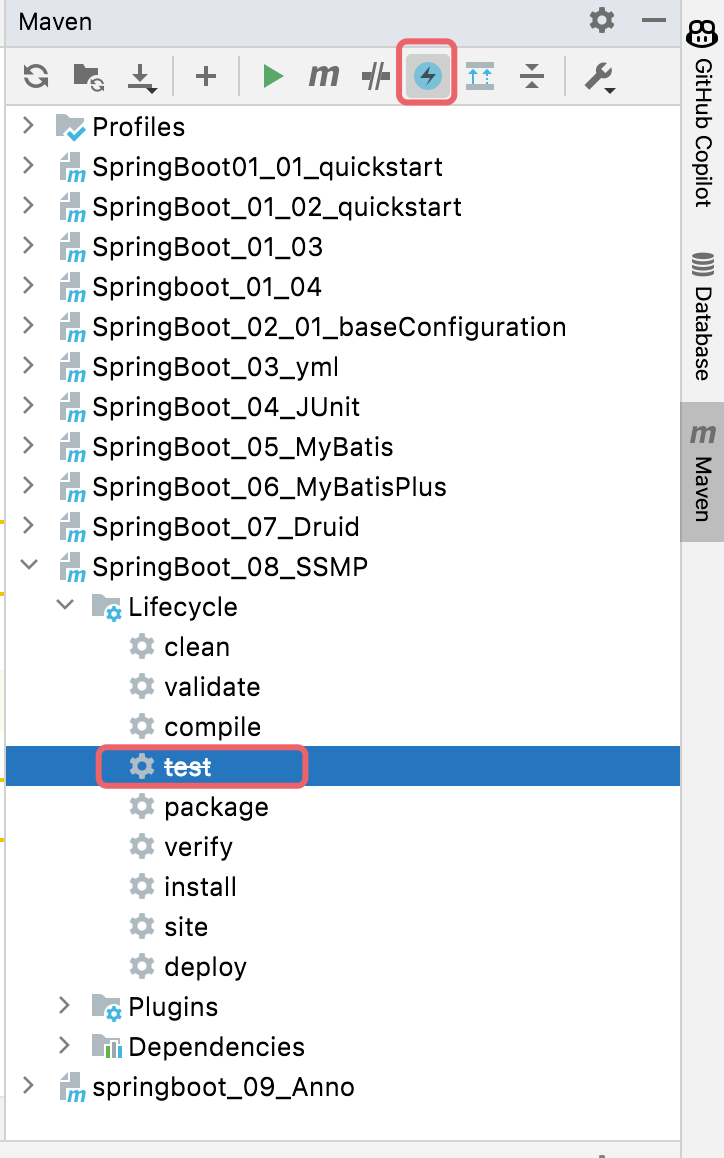
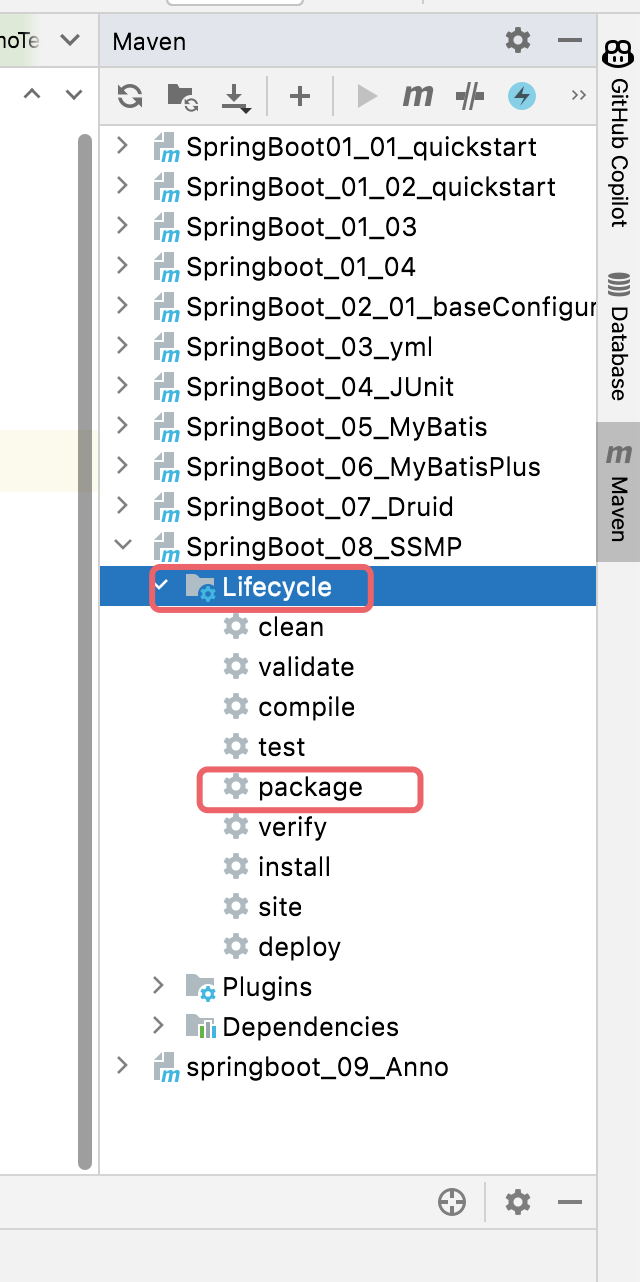
打包执行完毕之后,在target目录中就会出现这个jar包
在文件夹中打开,打开终端
使用 java -jar jar包的名称运行jar包,则项目启动成功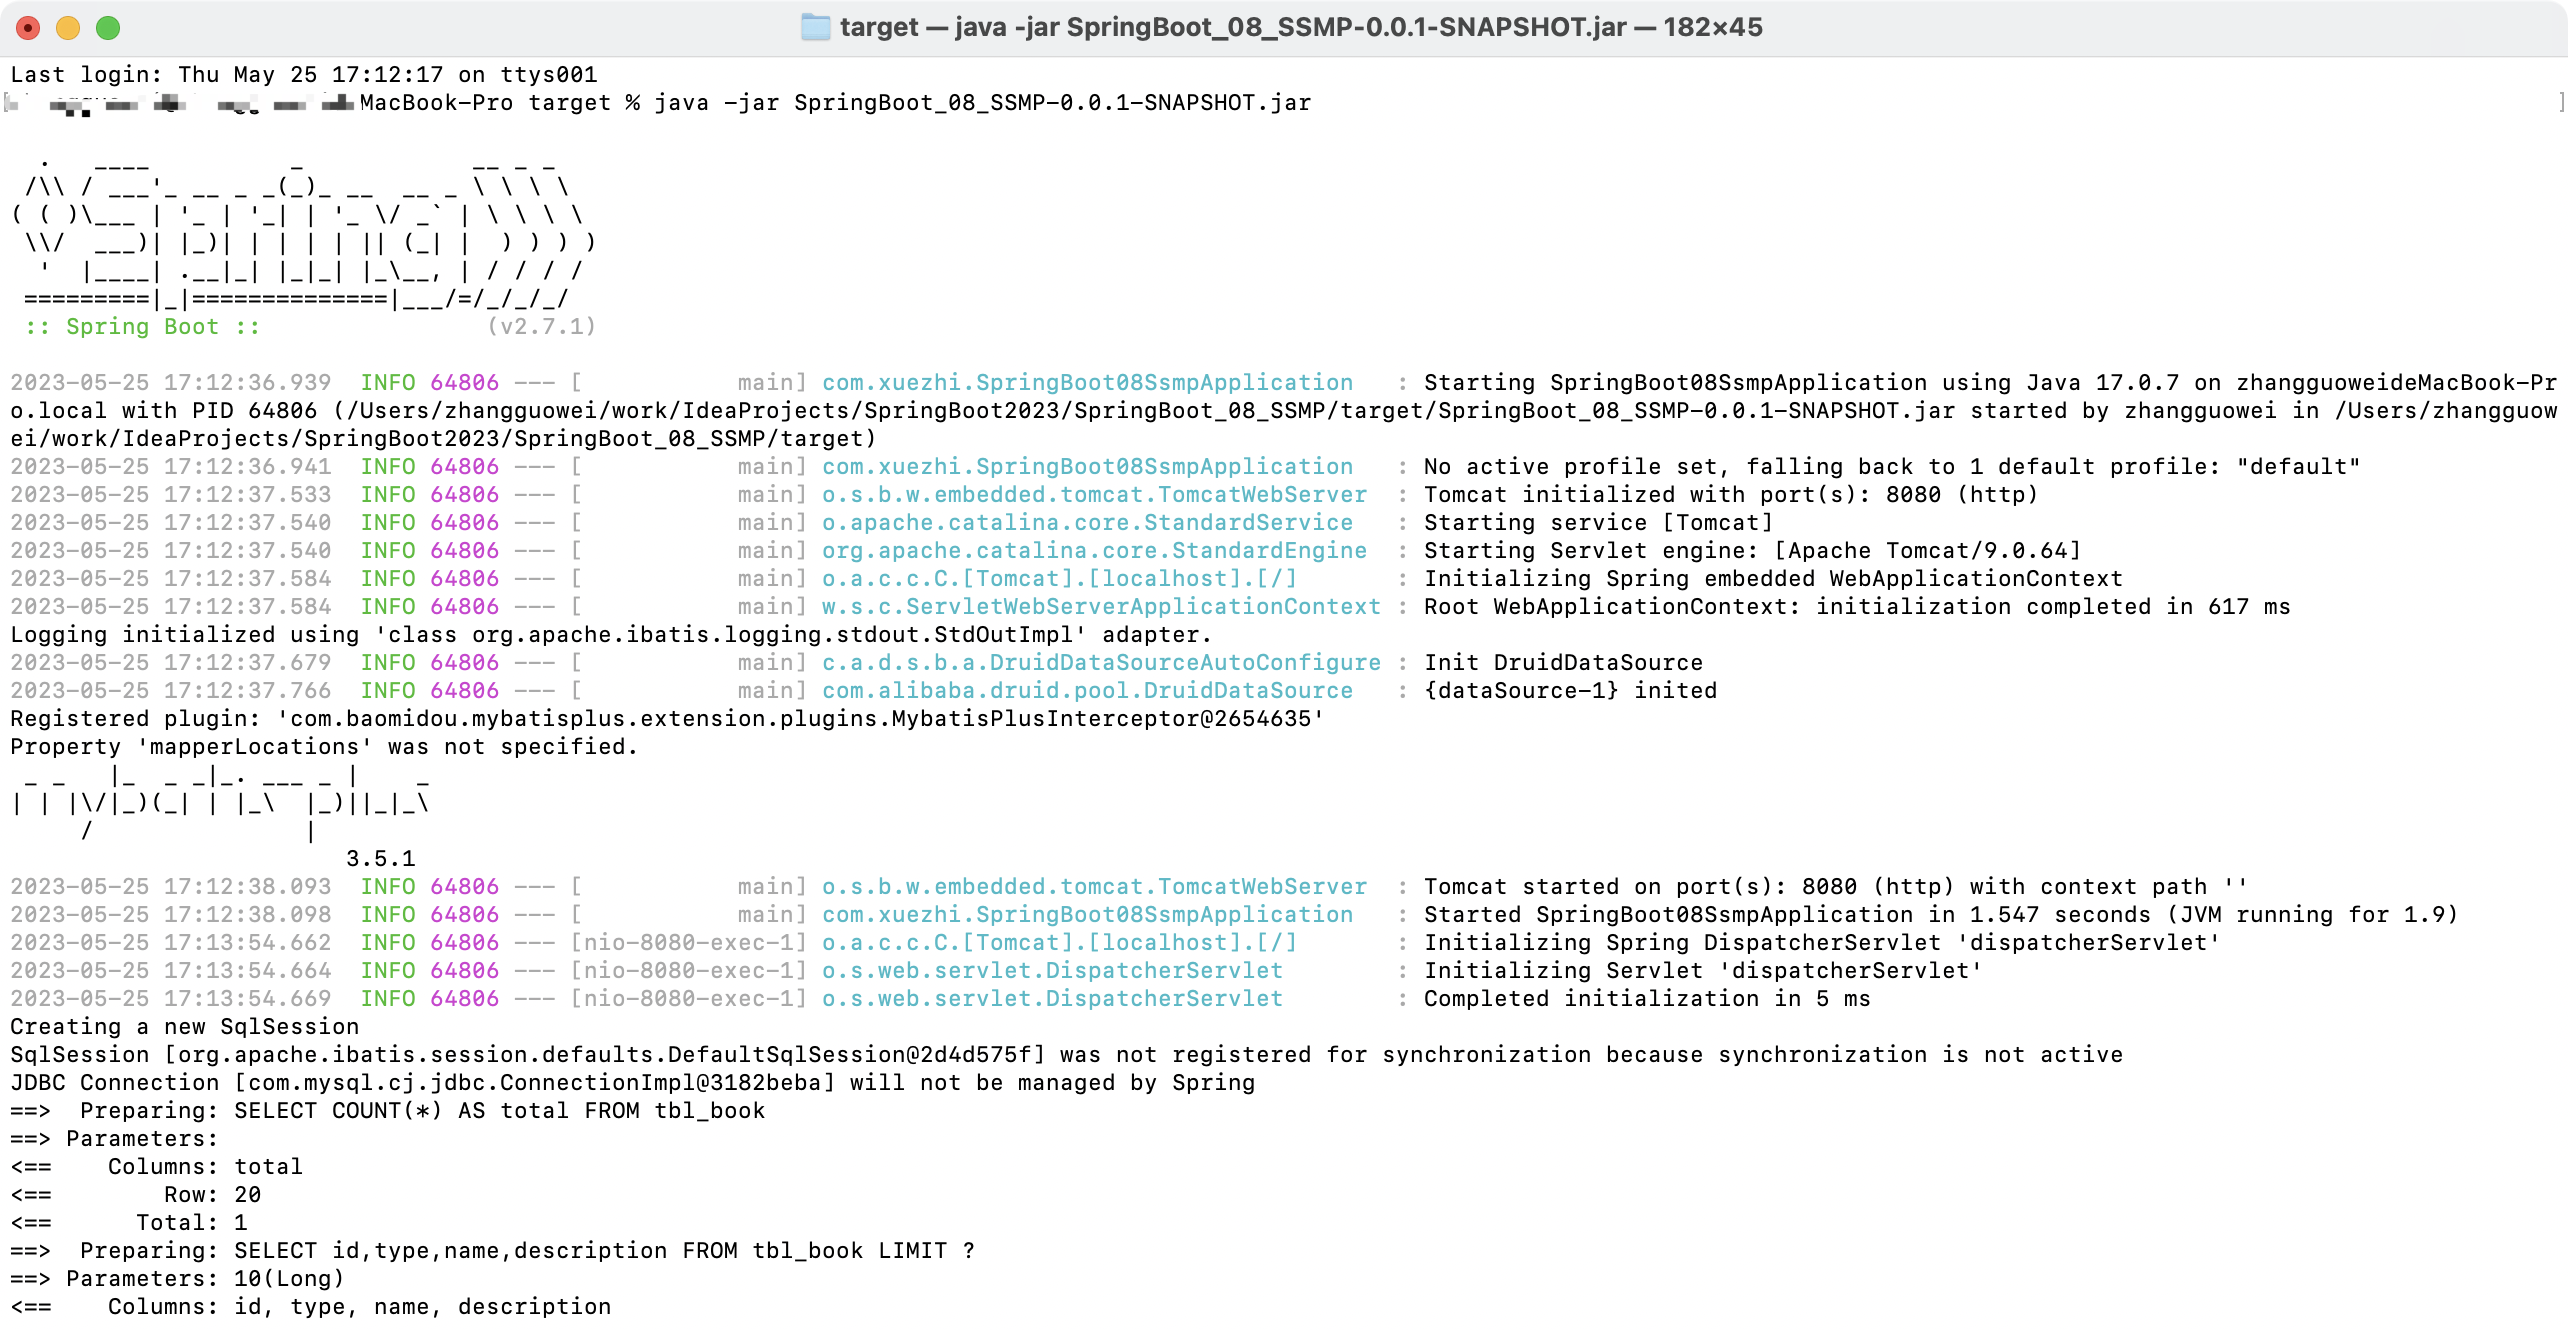
测试一下,正常访问
端口冲突解决方案
查询端口
netstat -ano
# 查询指定端口
netstat -ano I findstr “端口号“
# 根据进程PID查询进程名称
tasklist I findstr “进程PID号“
# 根据PID杀死任务
taskkill -F -PID “进程PID号“
# 根据进程名称杀死任务
taskkill -f -t -im “进程名称“

我们的jar包一般不发布在window系统下,都发布在linux系统下,往下看
Linux版
环境准备
基于CentOS7,默认安装了jdk1.8和MySql57, MySql安装教程https://www.yuque.com/dongdong-eu2rj/crt3d8/wyrpuec7x2qsx7qw#yb7q2
把springboot程序打包的时候注意mysql的密码以及数据库名称调整到和linux中一致
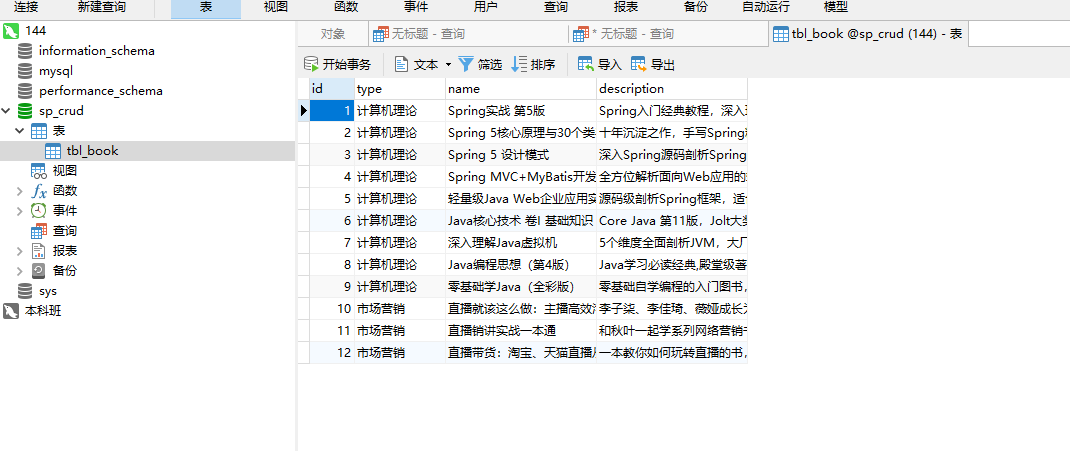
使用navicat连接linux中的mysql服务,并准备好库和表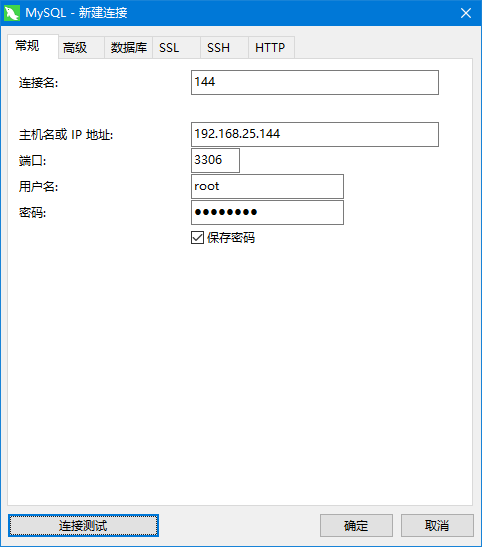
因为要在linux中运行要保证数据库的密码以及数据库名和linux中的mysql一致,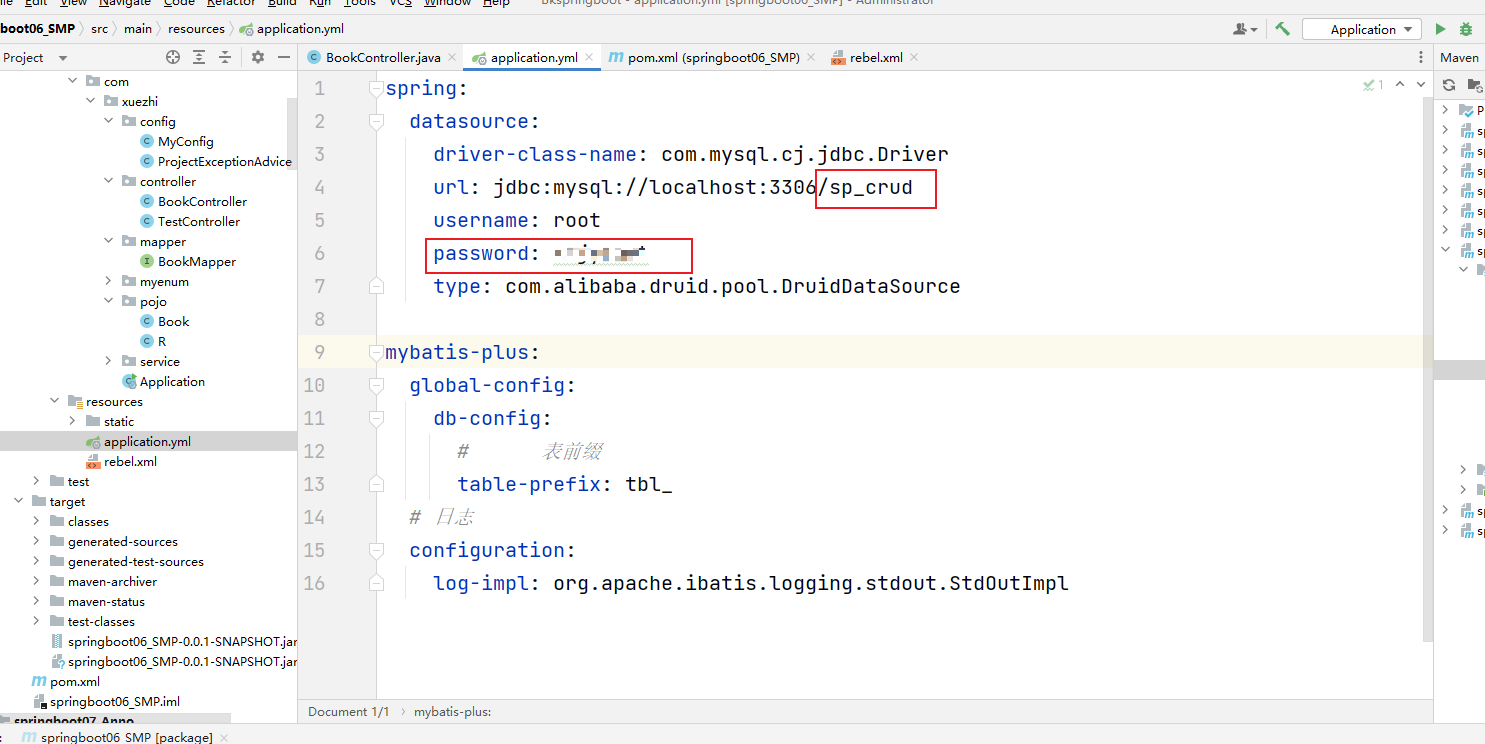
上传和运行
跳过单元测试打包完毕之后
在linux的/usr/local目录下创建app文件夹
mkdir /usr/local/app
把jar包上传到/usr/local/app目录下
执行 java -jar jar包名称 运行项目
java -jar springboot06_SMP-0.0.1-SNAPSHOT.jar
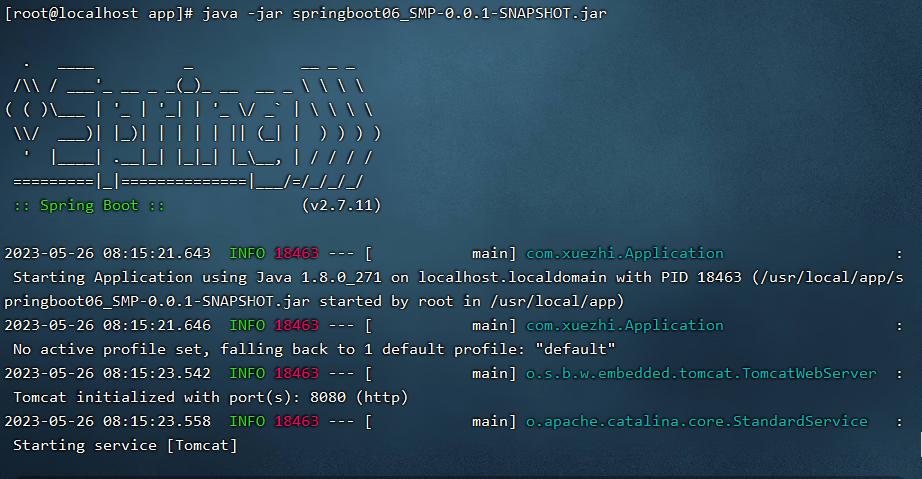
在浏览器访问即可http://192.168.25.144:8080/pages/books.html 一切正常使用,注意访问使用http协议,不要使用https协议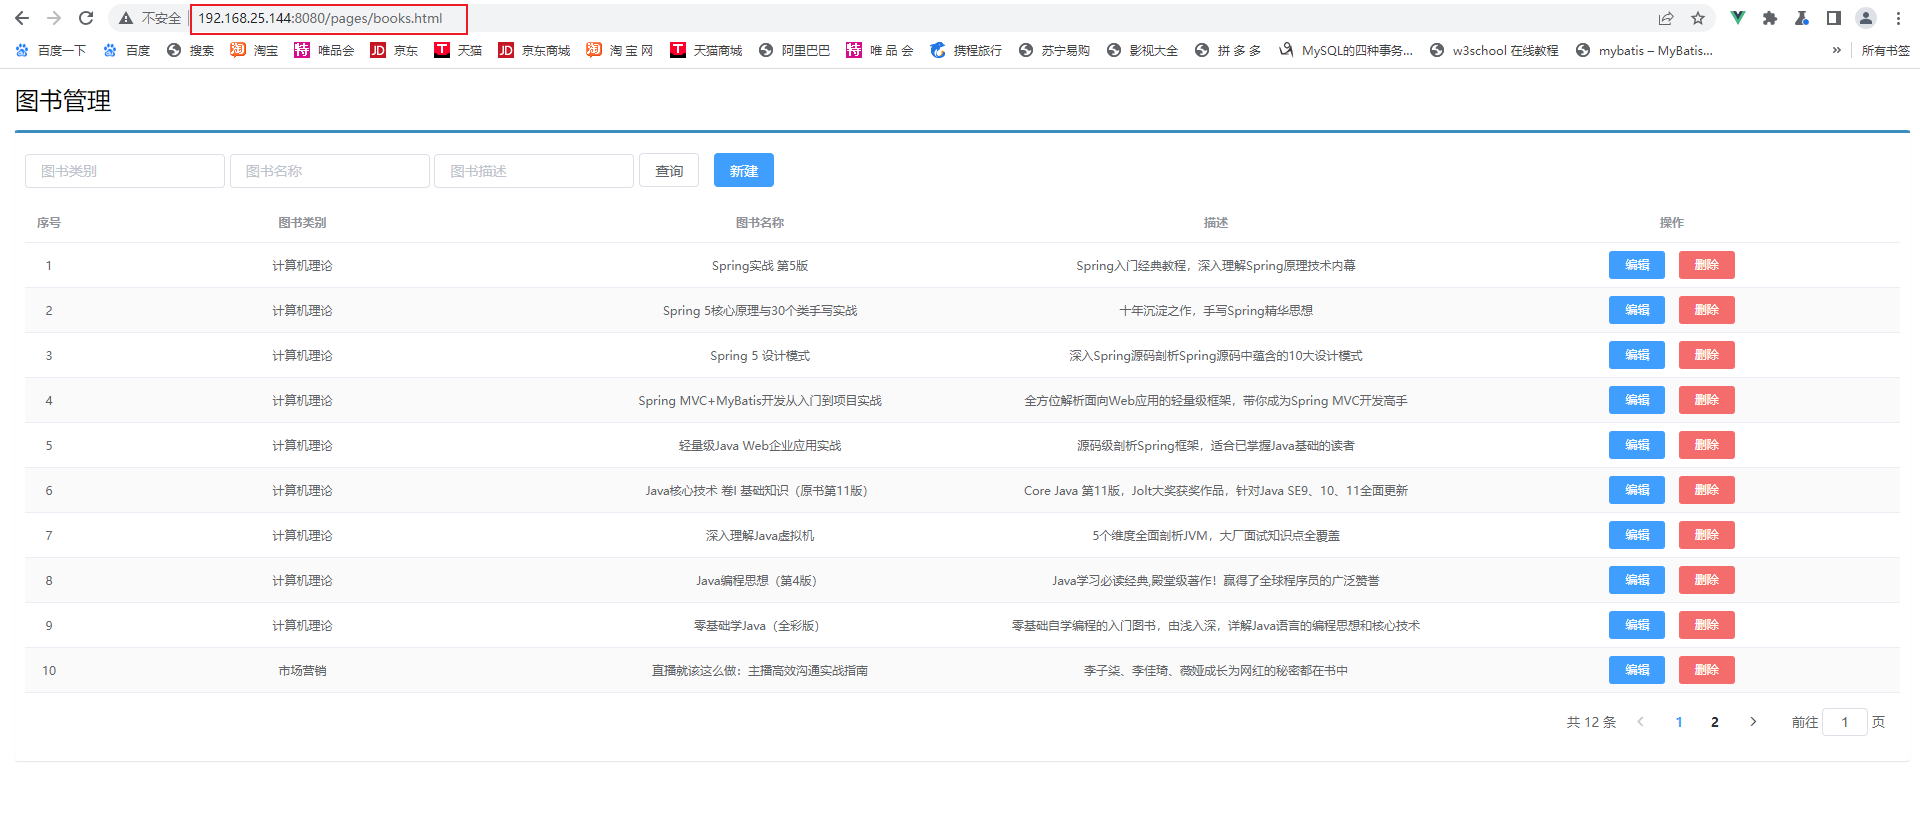
但是目前这种启动方式会占用整个linux屏幕,属于前台启动,linux不可继续使用了,所以我们可以ctrl+c退出
使用nohup java -jar springboot06_SMP-0.0.1-SNAPSHOT.jar > dongdong.log 2>&1 &命令后台运行
nohup java -jar springboot06_SMP-0.0.1-SNAPSHOT.jar > dongdong.log 2>&1 &
在后台启动jar包并把日志打印到dongdong.log日志文件中,启动一样好使
冬冬的知识加油站: nohup 英文全称 no hang up(不挂起),用于在系统后台不挂断地运行命令,退出终端不会影响程序的运行。 1和2在Linux中的含义 在Linux系统中0 1 2是一个文件描述符: 标准的输入,输出和错误输出分别表示为STDIN,STDOUT,STDERR,也可以用0,1,2来表示。 整理成表格如下: 名称 代码 Linux 下文件描述符(Debian 为例)
其中0表示键盘输入 1表示屏幕输出 2表示错误输出。 二、2>&1的含义 2>&1的含义:将标准错误输出重定向到标准输出。 注意:符号>&是一个整体,不可分开,分开后就不是上述含义了。 三、例子 1)cat test 2>&1 >file : 错误输出到终端,标准输出被重定向到文件file。 2)cat test >file 2>&1 : 标准输出被重定向到文件file,然后错误输出也重定向到和标准输出一样,所以也错误输出到文件file。 3) command >out.file 2>&1 & command >out.file 是将command的输出重定向到out.file文件,输出内容不打印到屏幕上,而是输出到out.file文件中。 2>&1 是将标准出错重定向到标准输出,因为标准输出已经重定向到了out.file文件,所以标准出错也输出到out.file文件中。 最后一个&, 是让该命令在后台执行。
通俗的说,就是把所有标准输出和标准出错都输出到out.file文件。
退出
在后台运行jar包的情况下,就不能ctrl+c退出了,而是需要通过ps -ef | grep “java -jar”查看运行的PID(进程ID)
ps -ef | grep "java -jar"

使用kill -9 PID杀死进程
kill -9 23946
HTTPS访问(选做)
如果想要使用https访问,可以先在自己项目中根目录下生成数字证书
生成命令如下:keytool -genkey -alias tomcathttps -keyalg RSA -keysize 2048 -keystore sang.p12 -validity 365
命令解释
• -genkey表示要创一个新的密钥。
• alias表示 keystore 的别名。
• keyalg表示使用的加密算法是RSA种非对称加密算法
• -keysize表示密钥的长度
• -keystore表示生成的密钥存放位直
• validity表示密钥的有效时间,单位为天
在cmd 窗口中直接执行如上命令,在执行的过程中需要输入密钥口令等信息,根据提示输入即可。命令执行完成后,会在当前用户目录下生成一个名为 sang.p12的文件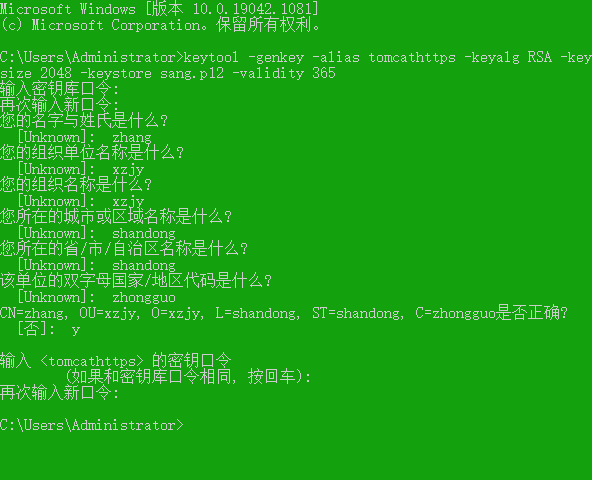
server:port: 8080ssl:key-store: classpath:sang.p12key-alias: tomcathttpskey-store-password: xzjyroot

因为SpringBoot不支持同时使用HTTP和HTTPS,所以我们可以写一个配置类 把http的80请求转发到https的8080
package com.xuezhi.config;import org.apache.catalina.Context;import org.apache.catalina.connector.Connector;import org.apache.tomcat.util.descriptor.web.SecurityCollection;import org.apache.tomcat.util.descriptor.web.SecurityConstraint;import org.springframework.boot.web.embedded.tomcat.TomcatServletWebServerFactory;import org.springframework.context.annotation.Bean;import org.springframework.context.annotation.Configuration;@Configurationpublic class TomcatConfig {@BeanTomcatServletWebServerFactory tomcatServletWebServerFactory(){TomcatServletWebServerFactory factory = new TomcatServletWebServerFactory(){@Overrideprotected void postProcessContext(Context context){SecurityConstraint constraint = new SecurityConstraint();constraint.setUserConstraint("CONFIDENTIAL");SecurityCollection collection = new SecurityCollection();collection.addPattern("/*");constraint.addCollection(collection);context.addConstraint(constraint);}};factory.addAdditionalTomcatConnectors(createTomcatConnector());return factory;}private Connector createTomcatConnector(){Connector connector = new Connector("org.apache.coyote.http11.Http11NioProtocol");// 把http的80请求转发到https的8080connector.setScheme("http");connector.setPort(80);connector.setSecure(false);connector.setRedirectPort(8080);return connector;}}

总结:
Boot程序打包依赖SpringBoot对应的Maven插件即可打包出可执行的jar包
运行jar包使用java -jar命令
Windows与Linux下执行Boot打包程序流程相同,仅需确保运行环境有效即可
Linux安装MySql
1.卸载MariaDB
在CentOS中默认安装有MariaDB,是MySQL的一个分支,主要由开源社区维护。
CentOS 7及以上版本已经不再使用MySQL数据库,而是使用MariaDB数据库。
如果直接安装MySQL,会和MariaDB的文件冲突。
因此,需要先卸载自带的MariaDB,再安装MySQL。
1.1 查看是否存在MariaDB文件
[root@localhost ~]# rpm -qa|grep mariadb
1.2 卸载
[root@localhost ~]# rpm -e —nodeps 文件名
1.3 检查是否卸载干净
[root@localhost ~]# rpm -qa|grep mariadb
1、查看当前系统是否安装了mysql
rpm -qa | grep mysql
2.安装MySql
开始安装,安装方式为将安装包下载到本地进行安装
安装wget,命令中的 -y 的意思是所有的选项都同意。作用时安装过程中如果有询问y/n时自动选择y
yum -y install wget
使用wget下载安装文件包,这里以mysql5.7为例,如果需要自行使用8.0版本,在下面二选一 ``` wget http://dev.mysql.com/get/mysql57-community-release-el7-10.noarch.rpm **冬冬提示:注意二选一选择自己需要的版本* wget https://repo.mysql.com//mysql80-community-release-el7-3.noarch.rpm
3. 使用yum 下载并安装mysql
yum -y install mysql57-community-release-el7-10.noarch.rpm **冬冬提示:注意二选一选择自己需要的版本* yum -y install mysql80-community-release-el7-3.noarch.rpm
```yum -y install mysql-community-server
如果出现公钥尚未安装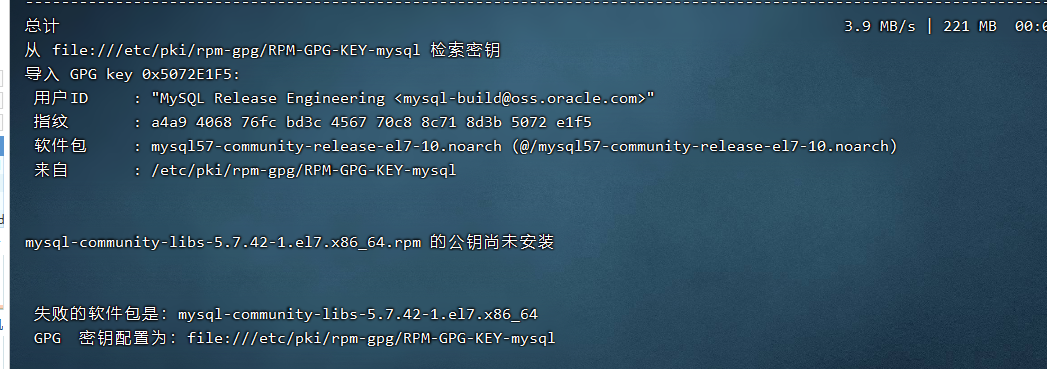
解决方案
运行命令:rpm —import https://repo.mysql.com/RPM-GPG-KEY-mysql-2022
在重新安装
运行命令
[root@localhost ~]# yum -y install mysql-community-server
mysql的初始化配置
查看MySQL运行状态:
[root@localhost ~]# systemctl status mysqld.service
首先启动MySQL
[root@localhost ~]# systemctl start mysqld.service
查看MySQL运行状态,运行状态如图:
[root@localhost ~]# systemctl status mysqld.service
此时MySQL已经开始正常运行,不过要想进入MySQL还得先找出此时root用户的密码,通过如下命令可以在日志文件中找出密码:
[root@localhost ~]# grep “password” /var/log/mysqld.log
马赛克部分为密码
如下命令登录数据库:
[root@localhost ~]# mysql -uroot -p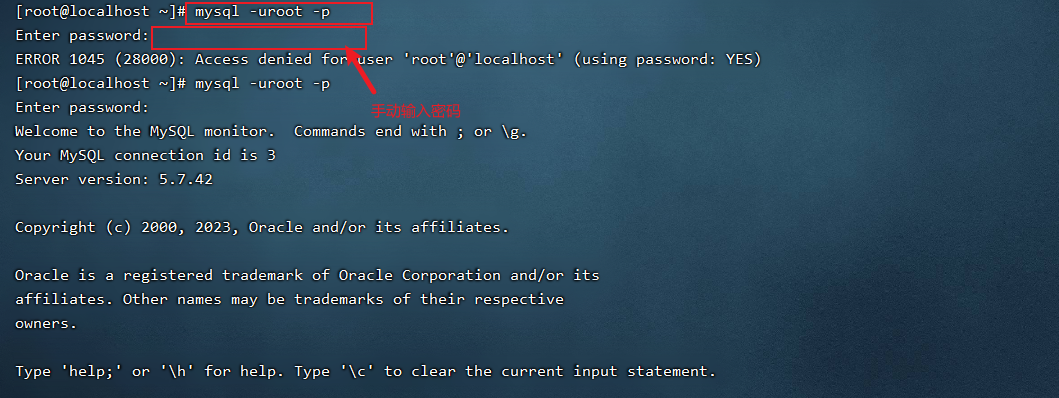
此时不能做任何事情,因为MySQL默认必须修改密码之后才能操作数据库,如下命令修改密码:
mysql> ALTER USER ‘root’@’localhost’ IDENTIFIED BY ‘new password’;
其中‘new password’替换成你要设置的密码,注意:密码设置必须要大小写字母数字和特殊符号(,/‘;:等),不然不能配置成功。
如果出现如下错误:
是因为密码的复杂度不符合默认规定
如需修改密码复杂度参考如下命令:
set global validate_password_policy=LOW;
set global validate_password_length=6;
开启mysql的远程访问
执行以下命令开启远程访问限制(注意:如要开启所有的,用%代替IP):
grant all privileges on . to ‘root’@’%’ identified by ‘password’ with grant option;
注:password—是你设置你的mysql远程登录密码。
然后再输入下面两行命令
mysql> flush privileges;
此步操作,退出mysql也可以。具体参考:
新建用户(可选)
建立一个新的用户,以方便后期登陆使用,如果是自用也可以不建立新的用户直接用root登陆,但是还是建议弄一个新的
查看现有的用户信息:
SELECT host,user,authentication_string from mysql.user;
新建一个用户:
CREATE user '用户名称'@'%' IDENTIFIED BY '用户密码';
给新建的用户赋予权限,我这里是给的全部的权限,如果不想给他全部的权限也可以单独设置。
GRANT ALL PRIVILEGES ON *.* TO '用户名称'@'%' WITH GRANT OPTION;
更改mysql的语言
首先重新登录mysql,然后输入status:
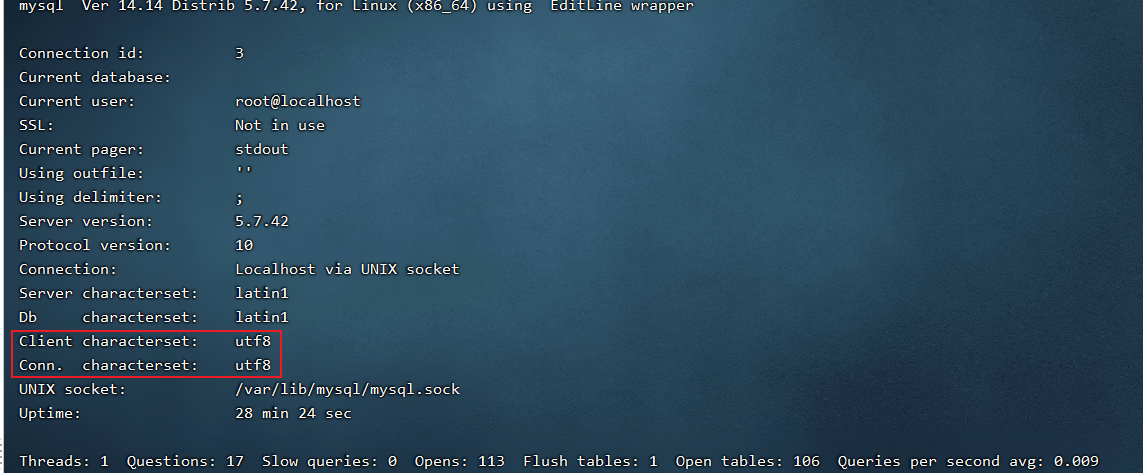
可以看到,红色方框处不是utf-8,修改为utf8即可。
因此我们先退出mysql(ctrl+z),然后再到/etc目录下的my.cnf文件下修改一下文件内容cd /etcvi my.cnf
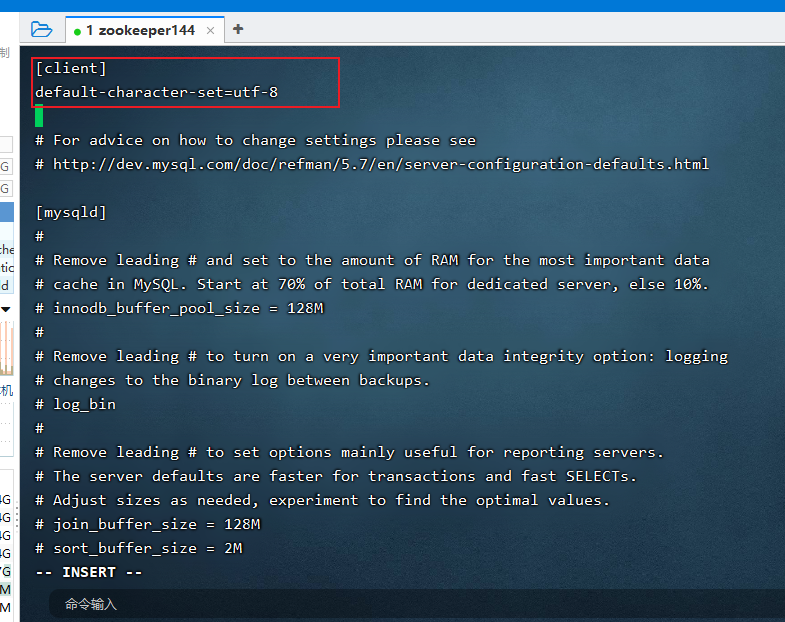
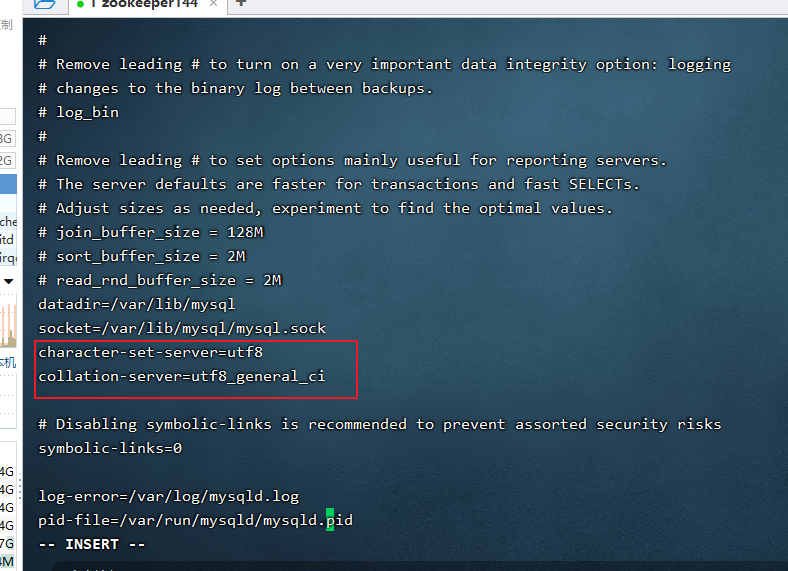 :::info
第1行,2行,25行,26行
:::
```xml
[client]
default-character-set=utf8
For advice on how to change settings please see
http://dev.mysql.com/doc/refman/5.7/en/server-configuration-defaults.html
[mysqld] #
Remove leading # and set to the amount of RAM for the most important data
cache in MySQL. Start at 70% of total RAM for dedicated server, else 10%.
innodb_buffer_pool_size = 128M
#
Remove leading # to turn on a very important data integrity option: logging
changes to the binary log between backups.
log_bin
#
Remove leading # to set options mainly useful for reporting servers.
The server defaults are faster for transactions and fast SELECTs.
Adjust sizes as needed, experiment to find the optimal values.
join_buffer_size = 128M
sort_buffer_size = 2M
read_rnd_buffer_size = 2M
datadir=/var/lib/mysql socket=/var/lib/mysql/mysql.sock character-set-server=utf8 collation-server=utf8_general_ci
Disabling symbolic-links is recommended to prevent assorted security risks
symbolic-links=0
log-error=/var/log/mysqld.log pid-file=/var/run/mysqld/mysqld.pid
保存更改后的my.cnf文件后,重启下mysql,然后输入status再次查看,你就会发现变化啦
service mysqld restart
<br />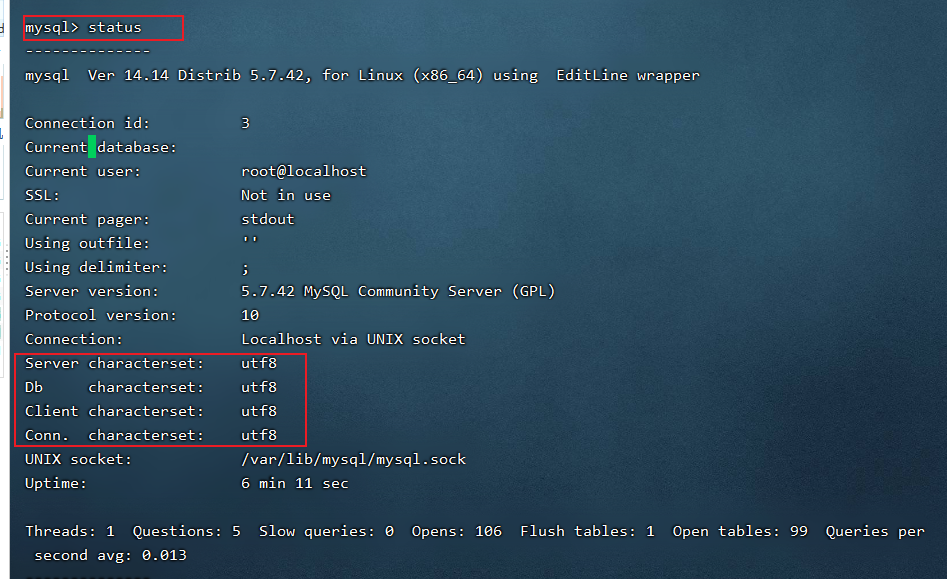<a name="xMNV9"></a>### 开机自启我们确认一下mysql是不是开机自动启动- 查看是否为开机自动启动,如果是则返回enabled
systemctl is-enabled mysqld.service
- 如果不是开机自动启动则打开它:
systemctl enabled mysqld.service
<a name="V4wAw"></a>### centos防火墙配置冬冬没开防火墙所以下面所有配置都不需要了<a name="lgfAX"></a>### 1、检查防火墙是否运行,如果没有运行则打开它。- 检查防火墙是否运行。如果运行中则会返回一个值:running,否则会返回not running:
firewall-cmd —state
- 如果没有运行则开启它:
systemctl start firewalld.service
- 设置防火墙开机自动运行:
systemctl enable firewalld.service
<a name="idqdl"></a>### 2、开启端口- 打开需要开启的端口,mysql的默认端口为3306,我们就打开这个。<br />命令含义:注意命令前的“-”是两个,不是一个<br />—zone #作用域<br />—add-port=80/tcp #添加端口,格式为:端口/通讯协议<br />—permanent #永久生效,没有此参数重启后失效
firewall-cmd —zone=public —add-port=3306/tcp —permanent
- 重启防火墙以生效配置
systemctl restart firewalld.service
- 查看端口是否已经开启
firewall-cmd —list-ports ```


