1. 前言
1.1 mongoDB 集群概念介绍
mongoDB支持单机(stand-alone)、主从(master-slave)、副本集(replica set)以及分片(sharding),而最常用的架构则是副本集+分片。分片有三大组件,分别是mongos、configsvr、sharding server,他们的功能如下:
mongos:前端路由,应用程序直接与其相连,提供应用程序和分片集群之间的接口。让整个集群看上去像单一的数据库。他不存储任何数据,只载入configsvr的配置。configsvr:它是一个mongodb实例,存储了整个集群的配置信息,包括chunk信息。存放分片与数据之间的对应关系。sharding server:它是一个mongodb实例,用于存储实际的数据块,实际生产环境中一个shard server角色可以由几台机器组成的副本集(replica set)承担,防止主机单点故障1.2 分片集群概览
本次测试环境为 3 台CentOS 7虚拟机,搭建的集群有一个前端路由,三个分片,每个分片都有三个副本集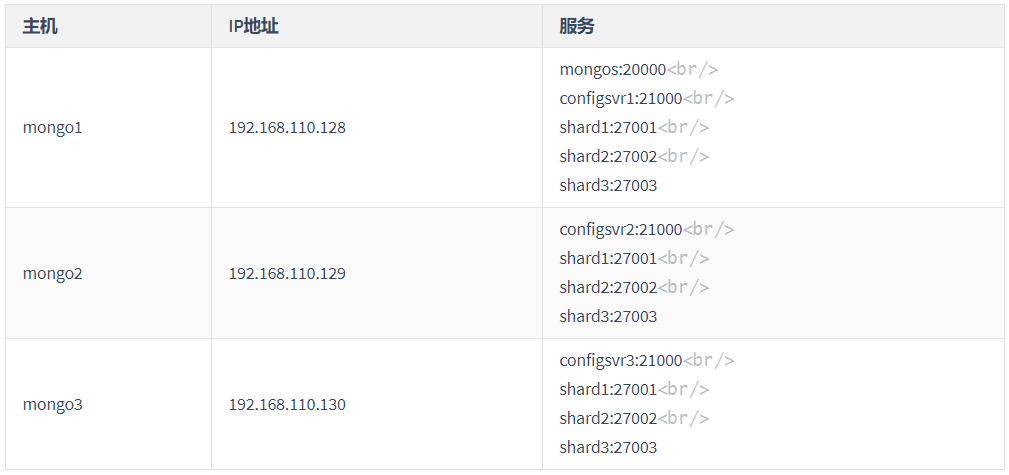
分片集群配置表2. 环境准备
2.1 关闭 Transparent HugePages
执行下面的命令
或者执行下面的命令 ```bash vim /etc/systemd/system/thpset.serviceecho never > /sys/kernel/mm/transparent_hugepage/enabledecho never > /sys/kernel/mm/transparent_hugepage/defrag
将下面内容写入并保存
[Unit] Description=”thp set”
[Service] User=root PermissionsStartOnly=true Type=oneshot ExecStart=/bin/bash -c ‘echo never > /sys/kernel/mm/transparent_hugepage/enabled’ ExecStart=/bin/bash -c ‘echo never > /sys/kernel/mm/transparent_hugepage/defrag’
[Install] WantedBy=multi-user.target
保存成功后执行下面命令关闭 THP
systemctl start thpset && systemctl enable thpset
<a name="84129978"></a>### 2.2 创建用户、下载二进制文件```bashuseradd mongod # 添加用户wget https://fastdl.mongodb.org/linux/mongodb-linux-x86_64-rhel70-4.0.10.tgz # 下载文件tar zxvf mongodb-linux-x86_64-rhel70-4.0.10.tgz # 解压cp mongodb-linux-x86_64-rhel70-4.0.10/bin/* /usr/bin # 将可执行文件拷贝到 /usr/bin 目录下
2.3 创建相关目录
mkdir -pv /usr/local/mongodb/conf # 用于存放集群配置文件mkdir -pv /data/mongos/log # 用于存放mongos日志文件,它本身不存在数据,只是路由mkdir -pv /data/{config,shard1,shard2,shard3}/{data,log} # configsvr和3个分片的数据目录、日志目录
3. 配置 ConfigSvr
分别在mongo1、mongo2、mongo3上新建配置文件
vim /usr/local/mongodb/conf/config.conf
分别在 mongo1、 mongo2、 mongo3上配置如下内容,要修改的地方只有bindIp为本机IP即可
## contentsystemLog:destination: filelogAppend: truepath: /data/config/log/config.log# Where and how to store data.storage:dbPath: /data/config/datajournal:enabled: true# how the process runsprocessManagement:fork: truepidFilePath: /data/config/log/configsrv.pid# network interfacesnet:port: 21000bindIp: 192.168.110.128#operationProfiling:replication:replSetName: configsharding:clusterRole: configsvr# configure security#security:# authorization: enabled# keyFile: /usr/local/mongodb/keyfile
分别在mongo1、mongo2、mongo3上配置systemctl文件
注意:使用 numactl禁用 numa需要安装 numactl, 安装命令: yum install -y numactl
vim etc/systemd/system/mongo-config.service# 写入如下内容并保存[Unit]Description=High-performance, schema-free document-oriented databaseAfter=network.target[Service]User=mongodType=forkingExecStart=/usr/bin/numactl --interleave=all /usr/bin/mongod --config /usr/local/mongodb/conf/config.confExecReload=/bin/kill -s HUP $MAINPIDExecStop=/usr/bin/mongod --shutdown --config /usr/local/mongodb/conf/config.conf[Install]WantedBy=multi-user.target
分别启动三台服务器的config server
chown -R mongod /data/ && chown -R mongod /usr/local/mongodb/systemctl start mongo-config && systemctl enable mongo-config
登录任意一台配置服务器,初始化配置副本集
mongo 192.168.110.128:21000> rs.initiate( {_id : "config",members : [{_id : 0, host : "192.168.3.125:21000" },{_id : 1, host : "192.168.3.126:21000" },{_id : 2, host : "192.168.3.127:21000" }]})> rs.status(); # 查看当前configsvr副本集状态
注意:其中_id 的名称应与配置文件中配置的 replicaction.replSetName 一致,这里是 config,members 中的 host 为三个节点的 ip和 port
4. 配置分片、副本集
4.1 配置 mongo1 上shard1的副本集
vim /usr/local/mongodb/conf/shard1.conf
写入如下内容
# where to write logging data.systemLog:destination: filelogAppend: truepath: /data/shard1/log/shard1.log# Where and how to store data.storage:dbPath: /data/shard1/datajournal:enabled: truewiredTiger:engineConfig:cacheSizeGB: 20# how the process runsprocessManagement:fork: truepidFilePath: /data/shard1/log/shard1.pid# network interfacesnet:port: 27001bindIp: 192.168.110.128#operationProfiling:replication:replSetName: shard1sharding:clusterRole: shardsvr# configure security#security:# authorization: enabled# keyFile: /usr/local/mongodb/keyfile
4.1 配置 mongo1 上shard2的副本集
vim /usr/local/mongodb/conf/shard2.conf
写入如下内容
# where to write logging data.systemLog:destination: filelogAppend: truepath: /data/shard2/log/shard2.log# Where and how to store data.storage:dbPath: /data/shard2/datajournal:enabled: truewiredTiger:engineConfig:cacheSizeGB: 20# how the process runsprocessManagement:fork: truepidFilePath: /data/shard2/log/shard2.pid# network interfacesnet:port: 27001bindIp: 192.168.110.128#operationProfiling:replication:replSetName: shard2sharding:clusterRole: shardsvr# configure security#security:# authorization: enabled# keyFile: /usr/local/mongodb/keyfile
4.1 配置 mongo1 上shard3的副本集
vim /usr/local/mongodb/conf/shard3.conf
写入如下内容
# where to write logging data.systemLog:destination: filelogAppend: truepath: /data/shard1/log/shard3.log# Where and how to store data.storage:dbPath: /data/shard3/datajournal:enabled: truewiredTiger:engineConfig:cacheSizeGB: 20# how the process runsprocessManagement:fork: truepidFilePath: /data/shard3/log/shard3.pid# network interfacesnet:port: 27001bindIp: 192.168.110.128#operationProfiling:replication:replSetName: shard3sharding:clusterRole: shardsvr# configure security#security:# authorization: enabled# keyFile: /usr/local/mongodb/keyfile
复制mongo1节点上的shard1.conf、shard2.conf、shard3.conf到mongo2和mongo3主机上。要改动的地方只有bindIp,修改为本机IP即可。
分别在mongo1、mongo2、mongo3上配置分片副本的systemctl文件
vim /etc/systemd/system/mongo-27001.service# 写入如下内容[Unit]Description=High-performance, schema-free document-oriented databaseAfter=network.target[Service]User=mongodType=forkingExecStart=/usr/bin/numactl --interleave=all /usr/bin/mongod --config /usr/local/mongodb/conf/shard1.confExecReload=/bin/kill -s HUP $MAINPIDExecStop=/usr/bin/mongod --shutdown --config /usr/local/mongodb/conf/shard1.conf[Install]WantedBy=multi-user.target
vim /etc/systemd/system/mongo-27002.service# 写入如下内容[Unit]Description=High-performance, schema-free document-oriented databaseAfter=network.target[Service]User=mongodType=forkingExecStart=/usr/bin/numactl --interleave=all /usr/bin/mongod --config /usr/local/mongodb/conf/shard2.confExecReload=/bin/kill -s HUP $MAINPIDExecStop=/usr/bin/mongod --shutdown --config /usr/local/mongodb/conf/shard2.conf[Install]WantedBy=multi-user.target
vim /etc/systemd/system/mongo-27003.service# 写入如下内容[Unit]Description=High-performance, schema-free document-oriented databaseAfter=network.target[Service]User=mongodType=forkingExecStart=/usr/bin/numactl --interleave=all /usr/bin/mongod --config /usr/local/mongodb/conf/shard3.confExecReload=/bin/kill -s HUP $MAINPIDExecStop=/usr/bin/mongod --shutdown --config /usr/local/mongodb/conf/shard3.conf[Install]WantedBy=multi-user.target
分别启动三台服务器的分片副本
chown -R mongod /data/ && chown -R mongod /usr/local/mongodb/systemctl start mongo-27001 && systemctl enable mongo-27001systemctl start mongo-27002 && systemctl enable mongo-27002systemctl start mongo-27003 && systemctl enable mongo-27003
登录任意一台配置服务器,初始化各个配置副本集
mongo 192.168.110.128:27001> rs.initiate( {_id : "shard1",members : [{_id : 0, host : "192.168.110.128:27001" },{_id : 1, host : "192.168.110.129:27001" },{_id : 2, host : "192.168.110.130:27001" }]})> rs.status(); # 查看当前shard1副本集状态
mongo 192.168.110.128:27002> rs.initiate( {_id : "shard2",members : [{_id : 0, host : "192.168.110.128:27002" },{_id : 1, host : "192.168.110.129:27002" },{_id : 2, host : "192.168.110.130:27002" }]})> rs.status(); # 查看当前shard2副本集状态
mongo 192.168.110.128:27003> rs.initiate( {_id : "shard3",members : [{_id : 0, host : "192.168.110.128:27003" },{_id : 1, host : "192.168.110.129:27003" },{_id : 2, host : "192.168.110.130:27003" }]})> rs.status(); # 查看当前shard3副本集状态
注意:如果 1 分片只需要 2 副本 1 仲裁的话,只需要在 rs.initiate命令后对应的 host加上, arbiterOnly: true即可让该主机称为仲裁节点。
5. 配置 mongos
mongos 这里只配置在 mongo1 上,所以只要在这台主机上配置即可
注意:先启动配置服务器和分片服务器,后启动路由实例
在mongo1上配置:
vim /usr/local/mongodb/conf/mongos.conf
写入如下内容:
systemLog:destination: filelogAppend: truepath: /data/mongos/log/mongos.logprocessManagement:fork: truepidFilePath: /data/mongos/log/mongos.pid# network interfacesnet:port: 20000bindIp: 192.168.110.128#监听的配置服务器,只能有1个或者3个 configs为配置服务器的副本集名字sharding:configDB: config/192.168.110.128:21000,192.168.110.129:21000,192.168.110.130:21000# configure security#security:# keyFile: /usr/local/mongodb/keyfile
在mongo1上配置systemctl文件
vim /etc/systemd/system/mongos.service# 写入如下内容[Unit]Description=High-performance, schema-free document-oriented databaseAfter=network.target[Service]User=mongodType=forkingExecStart=/usr/bin/mongos --config /usr/local/mongodb/conf/mongos.confExecReload=/bin/kill -s HUP $MAINPID[Install]WantedBy=multi-user.target
启动mongo1服务器上的mongos
chown -R mongod /data/ && chown -R mongod /usr/local/mongodb/systemctl start mongos && systemctl enable mongos
至此已经搭建了mongodb配置服务器、路由服务器,各个分片服务器,不过应用程序连接到mongos路由服务器并不能使用分片机制,还需要在程序里设置分片配置,让分片生效。
登录 mongo1 上的 mongos,设置分片配置:
mongo 192.168.110.128:20000> sh.addShard("shard1/192.168.110.128:27001,192.168.110.129:27001,192.168.110.130:27001")> sh.addShard("shard2/192.168.110.128:27002,192.168.110.129:27002,192.168.110.130:27002")> sh.addShard("shard3/192.168.110.128:27003,192.168.110.129:27003,192.168.110.130:27003")> sh.status() # 查看集群状态
6. 创建管理员账户
登陆mongos,建立管理员账号,赋所有权限(admin和config数据库)
mongo 192.168.110.128:20000> use admin> db.createUser({user: "admin",pwd: "123456",roles: [ { role: "root", db: "admin" } ]}) # root所有权限> use config> db.createUser({user: "admin",pwd: "123456",roles: [ { role: "root", db: "admin" } ]}) # root所有权限> db.auth("admin","123456") # 登陆认证,返回1为验证成功
netstat -ptln | grep mongotcp 0 0 192.168.110.128:21000 0.0.0.0:* LISTEN 3277/mongodtcp 0 0 192.168.110.128:27001 0.0.0.0:* LISTEN 3974/mongodtcp 0 0 192.168.110.128:27002 0.0.0.0:* LISTEN 3281/mongodtcp 0 0 192.168.110.128:27003 0.0.0.0:* LISTEN 3280/mongodtcp 0 0 192.168.110.128:20000 0.0.0.0:* LISTEN 3251/mongos
7. 查看集群状态
登陆任意一台mongos查看集群状态
mongo 192.168.110.128:20000mongos> use adminmongos> db.auth("admin","123456") # 这里要认证了。不然看不到集群信息mongos> sh.status();
8. 配置集群认证
在分片集群环境中,建议副本集内成员之间需要用keyFile认证或者509.x证书认证,mongos与配置服务器,副本集之间也要keyFile认证,集群所有mongod和mongos实例使用内容相同的keyFile文件,我们这里只在mongo1上生成,然后复制到其他节点上。
openssl rand -base64 753 > /usr/local/mongodb/keyfilechmod 400 /usr/local/mongodb/keyfilescp /usr/local/mongodb/keyfile 192.168.110.129:/usr/local/mongodb/keyfilescp /usr/local/mongodb/keyfile 192.168.110.130:/usr/local/mongodb/keyfile
然后修改3个configsrv、3个shard、1个mongos实例的配置文件
configsrv和shard增加如下配置:# configure securitysecurity:authorization: enabledkeyFile: /usr/local/mongodb/keyfile
mongos增加如下配置:security:keyFile: /usr/local/mongodb/keyfile
注意:mongos比 mongod 少了
authorization:enabled的配置。原因是,副本集加分片的安全认证需要配置两方面的,副本集各个节点之间使用内部身份验证,用于内部各个mongo实例的通信,只有相同keyfile才能相互访问。所以都要开启keyFile: /usr/local/mongodb/keyfile,然而对于所有的 mongod,才是真正的保存数据的分片。mongos 只做路由,不保存数据。所以所有的 mongod 开启访问数据的授权authorization:enabled。这样用户只有账号密码正确才能访问到数据。
我们已经配置了用户帐号密码连接集群以及集群内部通过keyfile通信,为了使配置生效,需要重启整个集群,启动的顺序为先启动configsrv,在启动分片,最后启动mongos。
重启步骤:systemctl restart mongo-configsystemctl restart mongo-27001systemctl restart mongo-27002systemctl restart mongo-27003systemctl restart mongos # 该步骤只在 mongo1 上执行
9. 插入数据验证分片副本
在案例中,创建
appuser用户、为数据库实例appdb启动分片。 ```bash mongo 192.168.110.128:20000创建appuser用户
mongos> use appdb mongos> db.createUser({user:’appuser’,pwd:’AppUser@01’,roles:[{role:’dbOwner’,db:’appdb’}]}) mongos> sh.enableSharding(“appdb”)
创建集合book,为其执行分片初始化
mongos> use appdb mongos> db.createCollection(“book”) mongos> db.device.ensureIndex({createTime:1}) mongos> sh.shardCollection(“appdb.book”, {bookId:”hashed”}, false, { numInitialChunks: 4} )
往`book`集合写入50000条记录,观察`chunks`的分布情况!```bashmongos> use appdbmongos> var cnt = 0;mongos> for(var i=0; i<100; i++){var dl = [];for(var j=0; j<500; j++){dl.push({"bookId" : "BBK-" + i + "-" + j,"type" : "Revision","version" : "IricSoneVB"+j,"title" : "这是一本书哦","subCount" : 10,"location" : "北京市石景山区万达广场","author" : {"name" : "dmego","email" : "dmeago@gmail.com","gender" : "female"},"createTime" : new Date()});}cnt += dl.length;db.book.insertMany(dl);print("insert ", cnt);}
执行db.book.getShardDistribution(),输出如下:
Shard shard2 at shard2/192.168.110.128:27002,192.168.110.129:27002,192.168.110.130:27002data : 3.38MiB docs : 12605 chunks : 1estimated data per chunk : 3.38MiBestimated docs per chunk : 11105Shard shard3 at shard3/192.168.110.128:27003,192.168.110.129:27003,192.168.110.130:27003data : 3.45MiB docs : 12882 chunks : 1estimated data per chunk : 3.45MiBestimated docs per chunk : 12882Shard shard1 at shard1/192.168.110.128:27001,192.168.110.129:27001,192.168.110.130:27001data : 6.98MiB docs : 26013 chunks : 2estimated data per chunk : 3.49MiBestimated docs per chunk : 13006Totalsdata : 13.83MiB docs : 50000 chunks : 4Shard shard2 contains 24.47% data, 24.47% docs in cluster, avg obj size on shard : 281BShard shard3 contains 25.01% data, 25.01% docs in cluster, avg obj size on shard : 281BShard shard1 contains 50.51% data, 50.51% docs in cluster, avg obj size on shard : 281B
执行 db.book.stats() 查看 book集合状态
mongos> db.book.stats();# 输出结果如下,有省略{"sharded" : true,"capped" : false,"ns" : "appdb.book","count" : 50000,"size" : 14506850,"storageSize" : 2236416,"totalIndexSize" : 2453504,"indexSizes" : {"_id_" : 622592,"bookId_hashed" : 1830912},"avgObjSize" : 281,"maxSize" : NumberLong(0),"nindexes" : 2,"nchunks" : 4,"shards" : {"shard3" : {"ns" : "appdb.book","size" : 3628619,"count" : 12882,"avgObjSize" : 281,"storageSize" : 565248,},"shard2" : {"ns" : "appdb.book","size" : 3550698,"count" : 11105,"avgObjSize" : 281,"storageSize" : 557056,},"shard1" : {"ns" : "appdb.book","size" : 7327533,"count" : 26013,"avgObjSize" : 281,"storageSize" : 1114112,}}}
可以看到数据分到3个分片,各自分片数量为: shard1:count: 26013,shard2 :count: 11105,shard3 count: 12882。加起来为50000,数据分片已经成功了!
备注
使用mongo-connector时,需要每个切片的用户都相同,所有需要为每个切片创建集群管理员用户,由于切片也是部署为副本集,所有在创建用户是,需要在PRIMARY上创建,而不是在SECONDARY上。
例如在分片1上创建用户:
shard1:PRIMARY> db.createUser({user:"shardManager",pwd:"123456",roles:[{role:"clusterAdmin", db: "admin"},{role:"readWriteAnyDatabase", db: "admin"},{role:"dbOwner", db: "local"},{role:"userAdminAnyDatabase", db: "admin"},]})

若有收获,就点个赞吧
0 人点赞
