requests
上一节中,我们了解了 urllib 的基本用法,但是其中确实有不方便的地方,比如处理网页验证和 Cookies 时,需要写 Opener 和 Handler 来处理。为了更加方便地实现这些操作,就有了更为强大的库 requests,有了它,Cookies、登录验证、代理设置等操作都不是事儿。
安装环境
pip install requests
官方地址:http://docs.python-requests.org/zh_CN
1. 实例引入
urllib 库中的 urlopen 方法实际上是以 GET 方式请求网页,而 requests 中相应的方法就是 get 方法,是不是感觉表达更明确一些?下面通过实例来看一下:
import requestsr = requests.get('https://www.baidu.com/')print(type(r))print(r.status_code)print(type(r.text))print(r.text)print(r.cookies)
测试实例:
r = requests.post('http://httpbin.org/post')r = requests.put('http://httpbin.org/put')r = requests.delete('http://httpbin.org/delete')r = requests.head('http://httpbin.org/get')r = requests.options('http://httpbin.org/get')
2、GET获取参数案例
import requestsdata = {'name': 'germey','age': 22}r = requests.get("http://httpbin.org/get", params=data)print(r.text)
2.1 抓取二进制数据
下面以 图片为例来看一下:
import requestsr = requests.get("http://qwmxpxq5y.hn-bkt.clouddn.com/hh.png")print(r.text)print(r.content)
如果不传递 headers,就不能正常请求:
import requestsr = requests.get("https://mmzztt.com/")print(r.text)
但如果加上 headers 并加上 User-Agent 信息,那就没问题了:
import requestsheaders = {'User-Agent': 'Mozilla/5.0 (Macintosh; Intel Mac OS X 10_11_4) AppleWebKit/537.36 (KHTML, like Gecko) Chrome/52.0.2743.116 Safari/537.36'}r = requests.get("https://mmzztt.com/, headers=headers)print(r.text)
3、post请求
3.1 —前面我们了解了最基本的 GET 请求,另外一种比较常见的请求方式是 POST。使用 requests 实现 POST 请求同样非常简单,示例如下:
import requestsdata = {'name': 'germey', 'age': '22'}r = requests.post("http://httpbin.org/post", data=data)print(r.text)
测试网站
- 巨潮网络数据
import requestsurl= 'http://www.cninfo.com.cn/data20/ints/statistics'res = requests.post(url)print(res.text)
3.2 —发送请求后,得到的自然就是响应。在上面的实例中,我们使用 text 和 content 获取了响应的内容。此外,还有很多属性和方法可以用来获取其他信息,比如状态码、响应头、Cookies 等。示例如下:
import requestsheaders = {'User-Agent': 'Mozilla/5.0 (Macintosh; Intel Mac OS X 10_11_4) AppleWebKit/537.36 (KHTML, like Gecko) Chrome/52.0.2743.116 Safari/537.36'}r = requests.get('http://www.jianshu.com',headers=headers)print(type(r.status_code), r.status_code)print(type(r.headers), r.headers)print(type(r.cookies), r.cookies)print(type(r.url), r.url)print(type(r.history), r.history)
3.3 —状态码常用来判断请求是否成功,而 requests 还提供了一个内置的状态码查询对象 requests.codes,示例如下:
import requestsheaders = {'User-Agent': 'Mozilla/5.0 (Macintosh; Intel Mac OS X 10_11_4) AppleWebKit/537.36 (KHTML, like Gecko) Chrome/52.0.2743.116 Safari/537.36'}r = requests.get('http://www.jianshu.com',headers=headers)exit() if not r.status_code == requests.codes.ok else print('Request Successfully')
3.4 —那么,肯定不能只有 ok 这个条件码。下面列出了返回码和相应的查询条件:
# 信息性状态码100: ('continue',),101: ('switching_protocols',),102: ('processing',),103: ('checkpoint',),122: ('uri_too_long', 'request_uri_too_long'),# 成功状态码200: ('ok', 'okay', 'all_ok', 'all_okay', 'all_good', '\\o/', '✓'),201: ('created',),202: ('accepted',),203: ('non_authoritative_info', 'non_authoritative_information'),204: ('no_content',),205: ('reset_content', 'reset'),206: ('partial_content', 'partial'),207: ('multi_status', 'multiple_status', 'multi_stati', 'multiple_stati'),208: ('already_reported',),226: ('im_used',),# 重定向状态码300: ('multiple_choices',),301: ('moved_permanently', 'moved', '\\o-'),302: ('found',),303: ('see_other', 'other'),304: ('not_modified',),305: ('use_proxy',),306: ('switch_proxy',),307: ('temporary_redirect', 'temporary_moved', 'temporary'),308: ('permanent_redirect','resume_incomplete', 'resume',), # These 2 to be removed in 3.0# 客户端错误状态码400: ('bad_request', 'bad'),401: ('unauthorized',),402: ('payment_required', 'payment'),403: ('forbidden',),404: ('not_found', '-o-'),405: ('method_not_allowed', 'not_allowed'),406: ('not_acceptable',),407: ('proxy_authentication_required', 'proxy_auth', 'proxy_authentication'),408: ('request_timeout', 'timeout'),409: ('conflict',),410: ('gone',),411: ('length_required',),412: ('precondition_failed', 'precondition'),413: ('request_entity_too_large',),414: ('request_uri_too_large',),415: ('unsupported_media_type', 'unsupported_media', 'media_type'),416: ('requested_range_not_satisfiable', 'requested_range', 'range_not_satisfiable'),417: ('expectation_failed',),418: ('im_a_teapot', 'teapot', 'i_am_a_teapot'),421: ('misdirected_request',),422: ('unprocessable_entity', 'unprocessable'),423: ('locked',),424: ('failed_dependency', 'dependency'),425: ('unordered_collection', 'unordered'),426: ('upgrade_required', 'upgrade'),428: ('precondition_required', 'precondition'),429: ('too_many_requests', 'too_many'),431: ('header_fields_too_large', 'fields_too_large'),444: ('no_response', 'none'),449: ('retry_with', 'retry'),450: ('blocked_by_windows_parental_controls', 'parental_controls'),451: ('unavailable_for_legal_reasons', 'legal_reasons'),499: ('client_closed_request',),# 服务端错误状态码500: ('internal_server_error', 'server_error', '/o\\', '✗'),501: ('not_implemented',),502: ('bad_gateway',),503: ('service_unavailable', 'unavailable'),504: ('gateway_timeout',),505: ('http_version_not_supported', 'http_version'),506: ('variant_also_negotiates',),507: ('insufficient_storage',),509: ('bandwidth_limit_exceeded', 'bandwidth'),510: ('not_extended',),511: ('network_authentication_required', 'network_auth', 'network_authentication')
4、高级用法
1、代理添加
proxy = {'http' : 'http://183.162.171.78:4216',}# 返回当前IPres = requests.get('http://httpbin.org/ip',proxies=proxy)print(res.text)
2、快代理IP使用
文献:https://www.kuaidaili.com/doc/dev/quickstart/
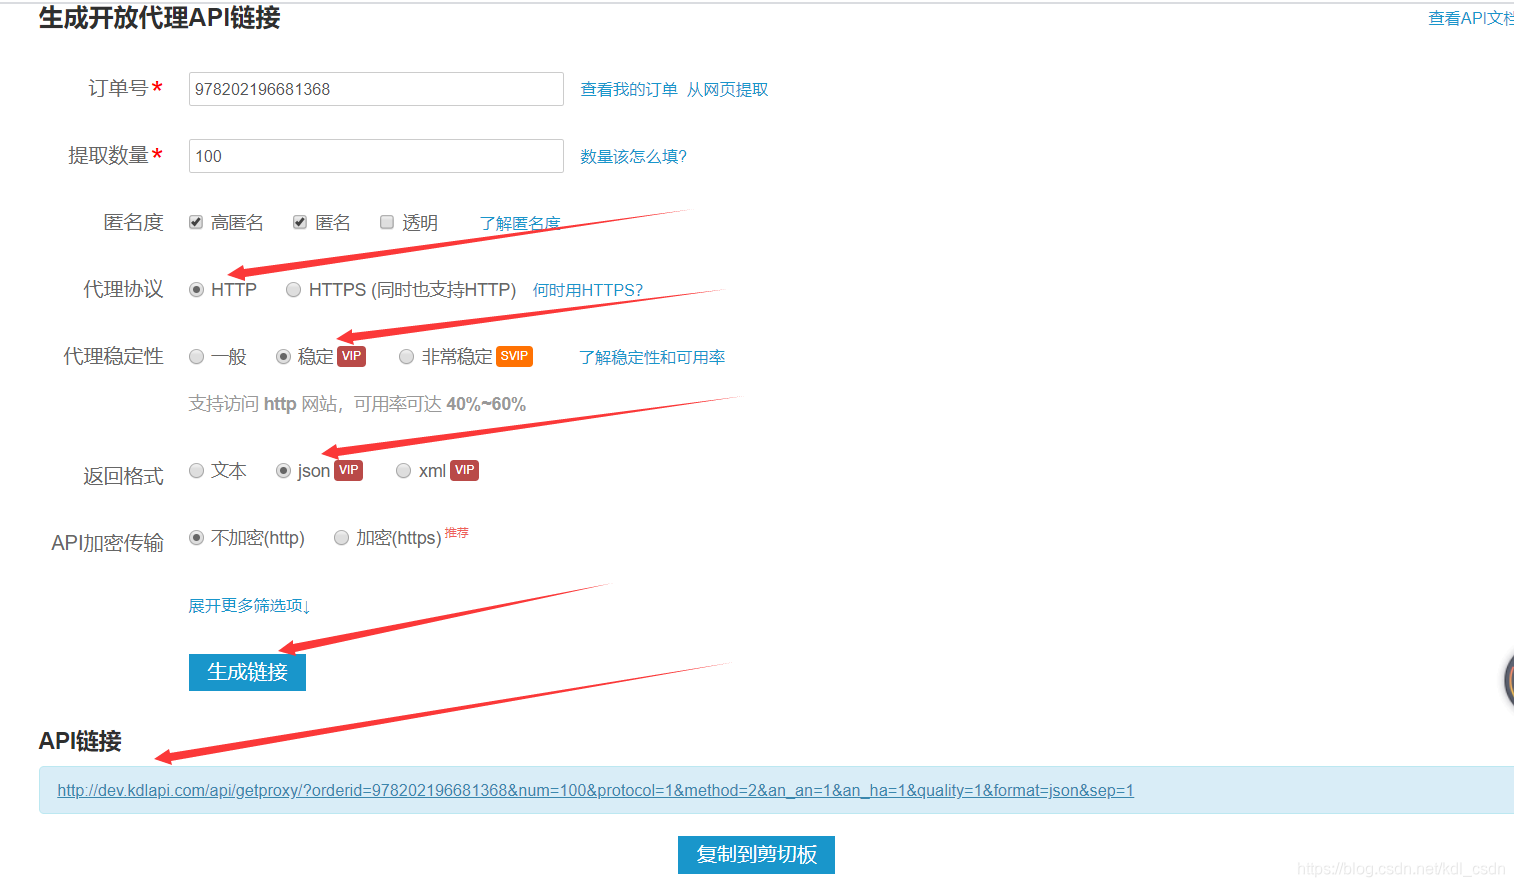
打开后,默认http协议,返回格式选json,我的订单是VIP订单,所以稳定性选稳定,返回格式选json,然后点击生成链接,下面的API链接直接复制上。
3.关闭警告
from requests.packages import urllib3urllib3.disable_warnings()
爬虫流程
5、初级爬虫
# encoding: utf-8"""@author: 夏洛@QQ: 1972386194@file: 初级.py"""# https://36kr.com/information/technologyimport requestsfrom lxml import etreedef main():# 1. 定义页面URL和解析规则crawl_urls = ['https://36kr.com/p/1328468833360133','https://36kr.com/p/1328528129988866','https://36kr.com/p/1328512085344642']parse_rule = "//h1[contains(@class,'article-title margin-bottom-20 common-width')]/text()"for url in crawl_urls:# 2. 发起HTTP请求response = requests.get(url)# 3. 解析HTMLresult = etree.HTML(response.text).xpath(parse_rule)[0]# 4. 保存结果print(result)if __name__ == '__main__':main()
6、全站采集
6.1 封装公共文件
# from retrying import retryimport requestsfrom retrying import retryfrom requests.packages.urllib3.exceptions import InsecureRequestWarningrequests.packages.urllib3.disable_warnings(InsecureRequestWarning)from lxml import etreeimport random,time#https://diag.qichacha.com/ 浏览器信息class FakeChromeUA:first_num = random.randint(55, 62)third_num = random.randint(0, 3200)fourth_num = random.randint(0, 140)os_type = ['(Windows NT 6.1; WOW64)', '(Windows NT 10.0; WOW64)', '(X11; Linux x86_64)','(Macintosh; Intel Mac OS X 10_12_6)']chrome_version = 'Chrome/{}.0.{}.{}'.format(first_num, third_num, fourth_num)@classmethoddef get_ua(cls):return ' '.join(['Mozilla/5.0', random.choice(cls.os_type), 'AppleWebKit/537.36','(KHTML, like Gecko)', cls.chrome_version, 'Safari/537.36'])class Spiders(FakeChromeUA):urls = []@retry(stop_max_attempt_number=3, wait_fixed=2000)def fetch(self, url, param=None,headers=None):try:if not headers:headers ={}headers['user-agent'] = self.get_ua()else:headers['user-agent'] = self.get_ua()self.wait_some_time()response = requests.get(url, params=param,headers=headers)if response.status_code == 200:response.encoding = 'utf-8'return responseexcept requests.ConnectionError:returndef wait_some_time(self):time.sleep(random.randint(100, 300) / 1000)
6.2 案例实践
# encoding: utf-8"""@author: 夏洛@QQ: 1972386194@file: 征战.py"""# encoding: utf-8from urllib.parse import urljoin"""整站爬虫"""import requestsfrom lxml import etreefrom queue import Queuefrom xl.base import Spidersfrom pymongo import MongoClientflt = lambda x :x[0] if x else Noneclass Crawl(Spiders):base_url = 'https://36kr.com/'# 种子URLstart_url = 'https://36kr.com/information/technology'# 解析规则rules = {# 文章列表'list_urls': '//div[@class="article-item-pic-wrapper"]/a/@href',# 详情页数据'detail_urls': '//div[@class="common-width margin-bottom-20"]//text()',# 标题'title': '//h1[@class="article-title margin-bottom-20 common-width"]/text()',}# 定义队列list_queue = Queue()def crawl(self, url):"""首页"""response =self.fetch(url)list_urls = etree.HTML(response.text).xpath(self.rules['list_urls'])# print(urljoin(self.base_url, list_urls))for list_url in list_urls:# print(urljoin(self.base_url, list_url)) # 获取url 列表信息self.list_queue.put(urljoin(self.base_url, list_url))def list_loop(self):"""采集列表页"""while True:list_url = self.list_queue.get()print(self.list_queue.qsize())self.crawl_detail(list_url)# 如果队列为空 退出程序if self.list_queue.empty():breakdef crawl_detail(self,url):'''详情页'''response = self.fetch(url)html = etree.HTML(response.text)content = html.xpath(self.rules['detail_urls'])title = flt(html.xpath(self.rules['title']))print(title)data = {'content':content,'title':title}self.save_mongo(data)def save_mongo(self,data):client = MongoClient() # 建立连接col = client['python']['hh']if isinstance(data, dict):res = col.insert_one(data)return reselse:return '单条数据必须是这种格式:{"name":"age"},你传入的是%s' % type(data)def main(self):# 1. 标签页self.crawl(self.start_url)self.list_loop()if __name__ == '__main__':s = Crawl()s.main()
requests-cache
pip install requests-cache
在做爬虫的时候,我们往往可能这些情况:
- 网站比较复杂,会碰到很多重复请求。
- 有时候爬虫意外中断了,但我们没有保存爬取状态,再次运行就需要重新爬取。
测试样例对比
import requestsimport timestart = time.time()session = requests.Session()for i in range(10):session.get('http://httpbin.org/delay/1')print(f'Finished {i + 1} requests')end = time.time()print('Cost time', end - start)
测试样例对比2
import requests_cacheimport timestart = time.time()session = requests_cache.CachedSession('demo_cache')for i in range(10):session.get('http://httpbin.org/delay/1')print(f'Finished {i + 1} requests')end = time.time()print('Cost time', end - start)
但是,刚才我们在写的时候把 requests 的 session 对象直接替换了。有没有别的写法呢?比如我不影响当前代码,只在代码前面加几行初始化代码就完成 requests-cache 的配置呢?
import timeimport requestsimport requests_cacherequests_cache.install_cache('demo_cache')start = time.time()session = requests.Session()for i in range(10):session.get('http://httpbin.org/delay/1')print(f'Finished {i + 1} requests')end = time.time()print('Cost time', end - start)
这次我们直接调用了 requests-cache 库的 install_cache 方法就好了,其他的 requests 的 Session 照常使用即可。
刚才我们知道了,requests-cache 默认使用了 SQLite 作为缓存对象,那这个能不能换啊?比如用文件,或者其他的数据库呢?
自然是可以的。
比如我们可以把后端换成本地文件,那可以这么做:
requests_cache.install_cache('demo_cache', backend='filesystem')
如果不想生产文件,可以指定系统缓存文件
requests_cache.install_cache('demo_cache', backend='filesystem', use_cache_dir=True)
另外除了文件系统,requests-cache 也支持其他的后端,比如 Redis、MongoDB、GridFS 甚至内存,但也需要对应的依赖库支持,具体可以参见下表:
| Backend | Class | Alias | Dependencies |
| SQLite | SQLiteCache |
'sqlite' |
|
| Redis | RedisCache |
'redis' |
redis-py |
| MongoDB | MongoCache |
'mongodb' |
pymongo |
| GridFS | GridFSCache |
'gridfs' |
pymongo |
| DynamoDB | DynamoDbCache |
'dynamodb' |
boto3 |
| Filesystem | FileCache |
'filesystem' |
|
| Memory | BaseCache |
'memory' |
比如使用 Redis 就可以改写如下:
backend = requests_cache.RedisCache(host='localhost', port=6379)requests_cache.install_cache('demo_cache', backend=backend)
更多详细配置可以参考官方文档:https://requests-cache.readthedocs.io/en/stable/user_guide/backends.html#backends
当然,我们有时候也想指定有些请求不缓存,比如只缓存 POST 请求,不缓存 GET 请求,那可以这样来配置:
import timeimport requestsimport requests_cacherequests_cache.install_cache('demo_cache2', allowable_methods=['POST'])start = time.time()session = requests.Session()for i in range(10):session.get('http://httpbin.org/delay/1')print(f'Finished {i + 1} requests')end = time.time()print('Cost time for get', end - start)start = time.time()for i in range(10):session.post('http://httpbin.org/delay/1')print(f'Finished {i + 1} requests')end = time.time()print('Cost time for post', end - start)
当然我们还可以匹配 URL,比如针对哪种 Pattern 的 URL 缓存多久,则可以这样写:
urls_expire_after = {'*.site_1.com': 30, 'site_2.com/static': -1}requests_cache.install_cache('demo_cache2', urls_expire_after=urls_expire_after)
好了,到现在为止,一些基本配置、过期时间配置、后端配置、过滤器配置等基本常见的用法就介绍到这里啦,更多详细的用法大家可以参考官方文档:https://requests-cache.readthedocs.io/en/stable/user_guide.html。

若有收获,就点个赞吧
0 人点赞
