使用ntpdate + crond
ntpdate ntp1.aliyun.comecho " */3 * * * * /usr/sbin/ntpdate -u ntp1.aliyun.com > /dev/null 2>&1 " >> /var/spool/cron/root
参考链接:
https://www.escapelife.site/posts/9587ae84.html
CentOS7 已经默认安装有 Chrony 工具,其既可作时间服务器服务端,也可作客户端。而且性能比 ntp 要好很多、配置简单、管理方便。
启动服务
systemctl start chronyd.service
设置开机自启动,默认就是enable的
systemctl enable chronyd.service
- [2] 防火墙配置```shell# 因NTP使用123/UDP端口协议,所以允许NTP服务即可firewall-cmd --add-service=ntp --permanentfirewall-cmd --reloadchronyc -a makestep
查看时区列表
timedatectl list-timezones
修改时区
timedatectl set-timezone Asia/Shanghai
修改日期时间
timedatectl set-time “2015-01-21 11:50:00”
设置完时区后,强制同步下系统时钟
chronyc -a makestep
- [4] 图形化界面```shellyum -y install system-config-date
主要配置
当 Chrony 启动时,它会读取 /etc/chrony.conf 配置文件中的设置,配置内容格式和 ntpd 服务基本相似。
- 主要配置选项
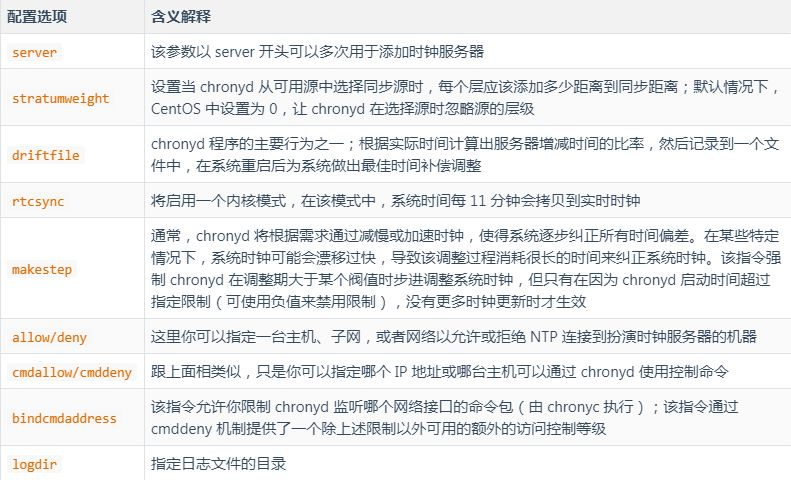
- 这里使用的是网络上提供的时间服务,如果本局域网内有对时服务开启的话,通过将上面的几条serer记录删除,增加指定局域网内的对时服务器并restart chrony服务即可。
[root@localhost ~]# cat /etc/chrony.conf |grep -v ^#|grep -v ^$server 0.centos.pool.ntp.org iburstserver 1.centos.pool.ntp.org iburstserver 2.centos.pool.ntp.org iburstserver 3.centos.pool.ntp.org iburststratumweight 0driftfile /var/lib/chrony/driftrtcsyncmakestep 10 3bindcmdaddress 127.0.0.1bindcmdaddress ::1keyfile /etc/chrony.keyscommandkey 1generatecommandkeynoclientloglogchange 0.5logdir /var/log/chrony
查看状态
- [1] 检查 ntp 源服务器状态
[root@localhost ~]# chronyc sourcestats210 Number of sources = 3Name/IP Address NP NR Span Frequency Freq Skew Offset Std Dev==============================================================================dns.sjtu.edu.cn 4 3 302 6.440 90.221 +13ms 694usdns1.synet.edu.cn 0 0 0 0.000 2000.000 +0ns 4000ms202.118.1.130 7 5 323 -0.174 7.323 -8406ns 303us
- [2] 检查 ntp 详细同步状态
[root@localhost ~]# chronyc sources -v210 Number of sources = 3.-- Source mode '^' = server, '=' = peer, '#' = local clock./ .- Source state '*' = current synced, '+' = combined , '-' = not combined,| / '?' = unreachable, 'x' = time may be in error, '~' = time too variable.|| .- xxxx [ yyyy ] +/- zzzz|| / xxxx = adjusted offset,|| Log2(Polling interval) -. | yyyy = measured offset,|| \ | zzzz = estimated error.|| | |MS Name/IP address Stratum Poll Reach LastRx Last sample===============================================================================^- dns.sjtu.edu.cn 3 7 13 20 +11ms[ +11ms] +/- 98ms^? dns1.synet.edu.cn 0 8 0 10y +0ns[ +0ns] +/- 0ns^* 202.118.1.130 2 6 377 125 -122us[ -305us] +/- 31ms
启用或关闭NTP时间同步
$ timedatectl set-ntp yes|flase
校准时间服务器
$ chronyc tracking
<a name="cr1om"></a>## **工具使用**```shell可以通过运行 chronyc 命令来修改设置,以下是常用命令。accheck检查 NTP 访问是否对特定主机可用activity该命令会显示有多少 NTP 源在线/离线add server手动添加一台新的 NTP 服务器clients在客户端报告已访问到服务器delete手动移除 NTP 服务器或对等服务器settime手动设置守护进程时间tracking显示系统时间信息help可以查看更多 chronyc 的交互命令

若有收获,就点个赞吧
0 人点赞
