在我们平时的测试中,完成一个功能,都需要单元测试,接口的话,可以通过浏览器或者postman进行接口测试, 有时开发job类功能或者只调整部分代码,junit单元测试就很方便了,接下来简单介绍下。
1、引入基础依赖
<dependency><groupId>org.springframework</groupId><artifactId>spring-context</artifactId><version>5.2.8.RELEASE</version></dependency><dependency><groupId>org.springframework</groupId><artifactId>spring-test</artifactId><version>5.2.8.RELEASE</version></dependency><dependency><groupId>junit</groupId><artifactId>junit</artifactId><version>4.12</version><scope>test</scope></dependency>
2、创建测试service类
import org.springframework.stereotype.Service;@Servicepublic class UserService {public String getUser() {return "cola";}}
3、创建spring的配置类applicationContext.xml
<?xml version="1.0" encoding="UTF-8"?><beans xmlns="http://www.springframework.org/schema/beans"xmlns:xsi="http://www.w3.org/2001/XMLSchema-instance"xmlns:context="http://www.springframework.org/schema/context"xsi:schemaLocation="http://www.springframework.org/schema/beans http://www.springframework.org/schema/beans/spring-beans.xsdhttp://www.springframework.org/schema/context https://www.springframework.org/schema/context/spring-context.xsd"><!-- 配置组件包扫描的位置 --><context:component-scan base-package="org.lee.junit"/></beans>
4、test包下新建Junit测试类
@RunWith(SpringRunner.class)@ContextConfiguration(locations = {"classpath:applicationContext.xml"})public class UserServiceTest {@Autowiredprivate UserService userService;@Testpublic void test() {System.out.println(userService.getUser());}}
注意:如果使用的spring版本小于4.3, 需要使用:
@RunWith(SpringJUnit4ClassRunner.class)
上面的方法是通过xml配置文件的方式,还可以使用Java Config的方式:
新建配置类SpringConfig
import org.springframework.context.annotation.ComponentScan;@ComponentScan(basePackages = "org.lee.architect.junit")public class SpringConfig {}
测试用例中使用如下注解:
@ContextConfiguration(classes = {SpringConfig.class})
在 SpringBoot 中
由于 @RunWith和@ContextConfiguration 都是可继承的
项目中如果单元测试用例较多,我们可以写个基础测试类BaseTest,然后其他的测试用例继承BaseTest,就可以省略了
@RunWith(SpringRunner.class)@ContextConfiguration(locations = {"classpath:applicationContext.xml"})public class BaseTest {}// UserServiceTest就可以这样写了:public class UserServiceTest extends BaseTest {@Autowiredprivate UserService userService;@Testpublic void test() {System.out.println(userService.getUser());}}
2、Ngari
基本上本地测试都是通过配置vm options里的属性设置后,在启动。
但我们平时会遇到需要测试的接口不是很庞大的情况, 这就会遇到启动整个资源浪费的情况,
其实我们可以进行单元测试 对一个模块进行调试。
首先看到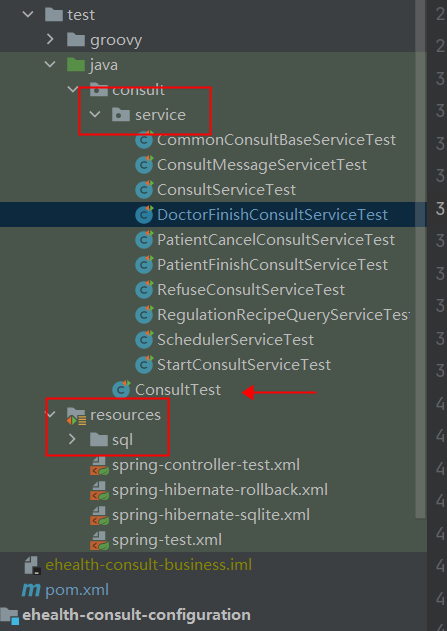
以consult项目为例,
@RunWith(SpringRunner.class)
JUnit运行使用Spring的测试支持。SpringRunner是SpringJUnit4ClassRunner的新名字,这样做的目的
仅仅是为了让名字看起来更简单一点。
在当前的文件下配置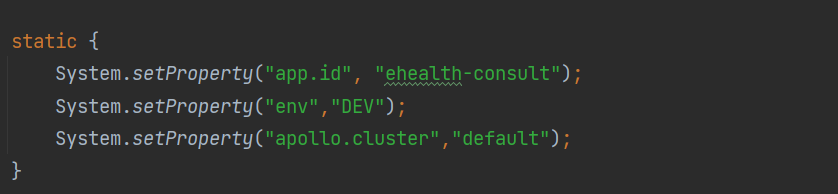
测试完成

若有收获,就点个赞吧
0 人点赞
