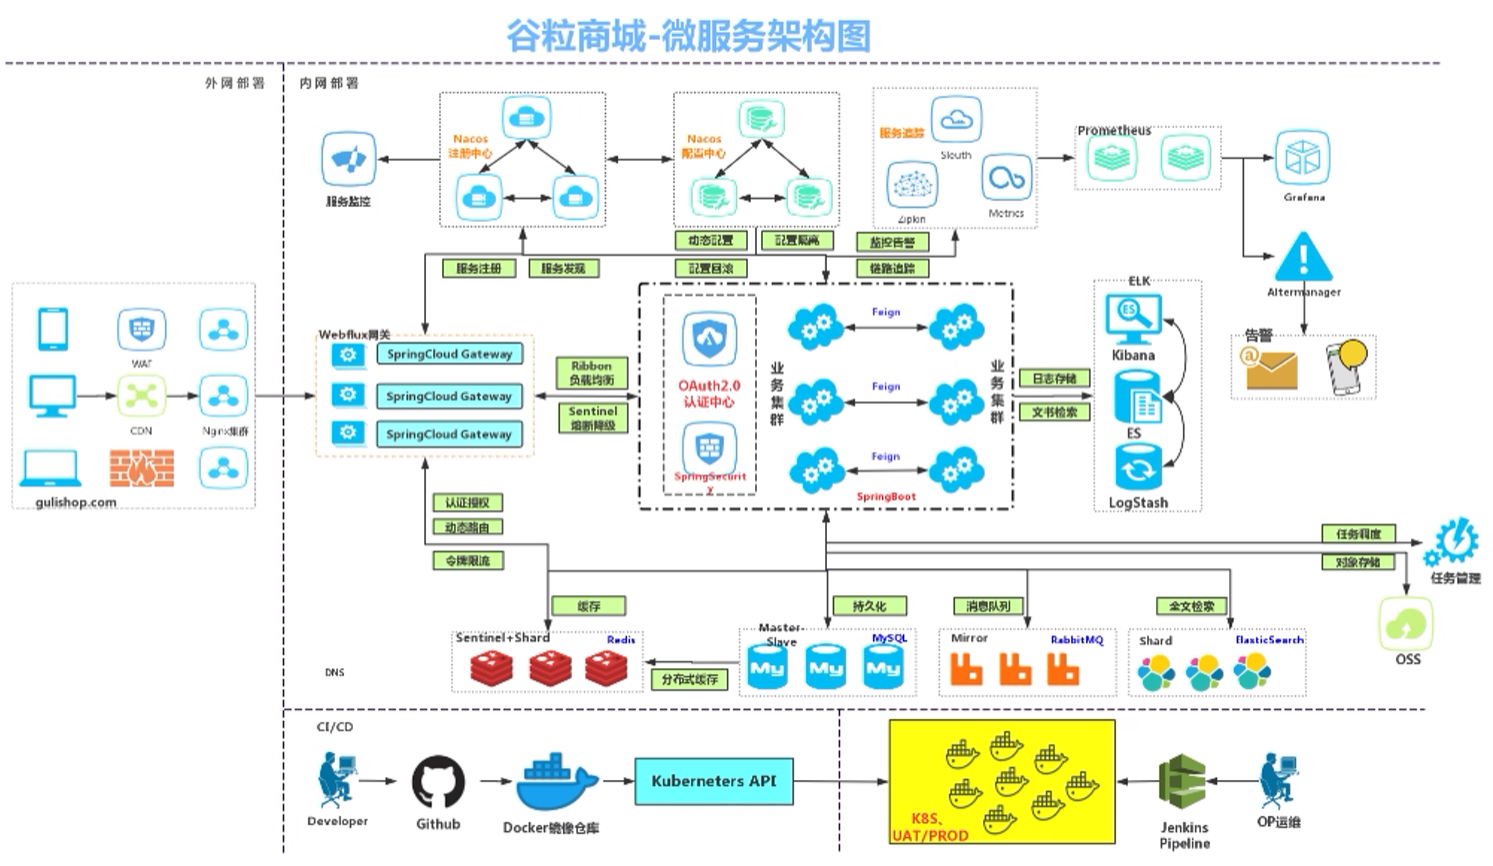
谷粒商城-微服务架构图
采用的电商模式为B2C模式:就是供应商直接把商品卖给雅虎,也就是通常说的商业零售(营销自营商品),直接面向消费者销售产品和服务。如:京东、天猫、小米商城、苏宁易购等。
项目技术&特色
- 前后端分离开发,并开宇基于vue的后台管理系统
- SpringCloud 全新的解决方案
- 应用监控、限流、网关、熔断降级等分布式方案全方位涉及
- 透彻讲解分布式事务、分布式锁等分布式系统的难点
- 分析高并发场景的编码方式,线程池,异步编排等使用
- 压力测试与性能优化
- 各种集群技术的区别以及使用
- CI/CD使用
涉及到的框架和技术:springboot、springcloud、k8s、docker、linux、redis、vue、Sentinel、Zipkin、KubeSphere
docker
重启docker
systemctl restart docker
安装/配置 Mysql
安装
docker pull mysql:8.0.29
运行
#这句目前有点问题docker run --name mysql -p 3306:3306 \-v /mydata/mysql/log:/var/log/mysql \-v /mydata/mysql/data:/var/lib/mysql \-v /mydata/mysql/conf:/etc/mysql \-e MYSQL_ROOT_PASSWORD=root \-d mysql:8.0.29#这一句可以直接启动mysql,并且能连接成功docker run --name mysql -p 3306:3306 -e MYSQL_ROOT_PASSWORD=root -d mysql#参数说明-p 3306:3306:将容器的3306端口映射到外部Linux主机的3306端口-v /mydata/mysg/conf/etc/mysg:将容器配置文件夹挂载到外部Linux主机-v /mydata/mysq/log:var/log/mysql:将容器日志文件夹挂载到外部Linux主机-v /mydata/mysg/data/var/ib/mysql:将容器配置文件夹挂载到外部Linux主机(mysql中的数据库都在这里)-e MYSQL ROOT_PASSWORD=root:初始化root用户的密码
问题:此时直接运行mysql后,会直接停止掉。我们需要使用新命令。
此时已将上方命令改造
-it 容器名称 /bin/bash
使用这段命令启动一个一直停留在后台运行的命令窗口,避免docker自动退出
自动运行
当虚拟机重启后,docker可以自动运行容器
docker update mysql --restart=always
安装/配置 Redis
安装
docker pull redis
运行/配置
#首先在Linux系统中创建目录和redis.conf文件,因为docker的redis镜像中并没有这个配置文件mkdir -p /mydata/redis/conftouch /mydata/redis/conf/redis.conf#运行redis容器docker run -p 6379:6379 --name redis \-v /mydata/redis/data:/data \-v /mydata/redis/conf/redis.conf:/etc/redis/redis.conf \-d redis redis-server /etc/redis/redis.conf
配置 redis.conf
#进入文件vim /mydata/redis/conf/redis.conf#文件中插入appendonly yes
进入redis容器
docker exec -it redis redis-cli
当docker容器已运行,想重新配置,如何解决
报错
docker: Error response from daemon: Conflict. The container name "/mysql" is already in use by container "db1a044f900d9788aedf1f783c8a3ac2ec1bff87db8c5f6d1f4e5d8fba478cf7". You have to remove (or rename) that container to be able to reuse that name.See 'docker run --help'.
可通过docker stop “容器名称”
再可通过 docker container rm “容器的名字” 即可
自动运行
docker update redis --restart=always
docker运行容器自动退出问题
1、docker容器运行必须有一个前台进程, 如果没有前台进程执行,容器认为空闲,就会自行退出
2、容器运行的命令如果不是那些一直挂起的命令( 运行top,tail、循环等),就是会自动退出
3、这个是 docker 的机制问题
docker容器重启
当虚拟机重启后,docker可以自动运行容器
docker restart 容器名称/ID
此方式可以直接运行已配置过的容器,并且不需要重新配置
Git的安装和配置
下载git : https://git-scm.com
配置git,进入git bash
#配置用户名git config --global user.name "username"#配置邮箱git config --global user.email "邮箱地址"
Node.js
安装
官网下载地址:http://nodejs.cn/download/
镜像配置
npm config set registery http://registry.npm.taobao.org/
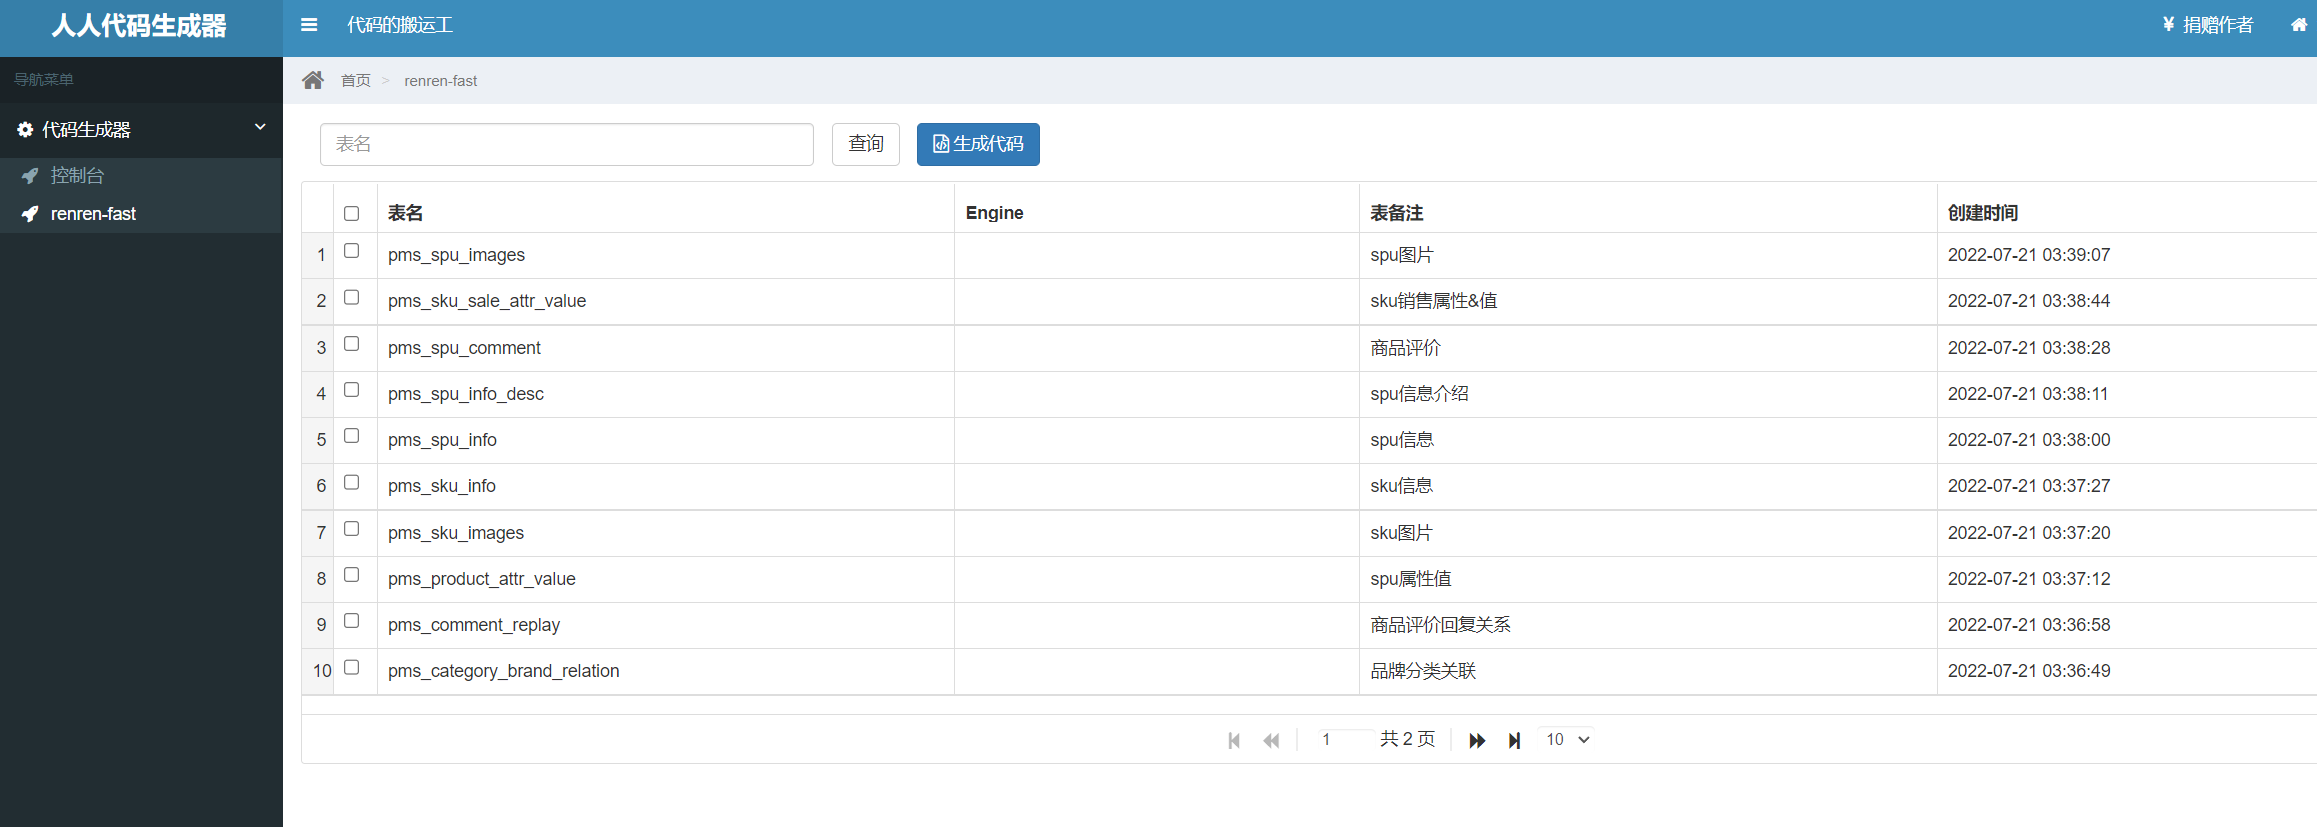
使用·人人开源·脚手架快速搭建项目
人人代码生成器
链接地址:https://gitee.com/renrenio/renren-generator
项目说明
- renren-generator是人人开源项目的代码生成器,可在线生成entity、xml、dao、service、html、js、sql代码,减少70%以上的开发任务
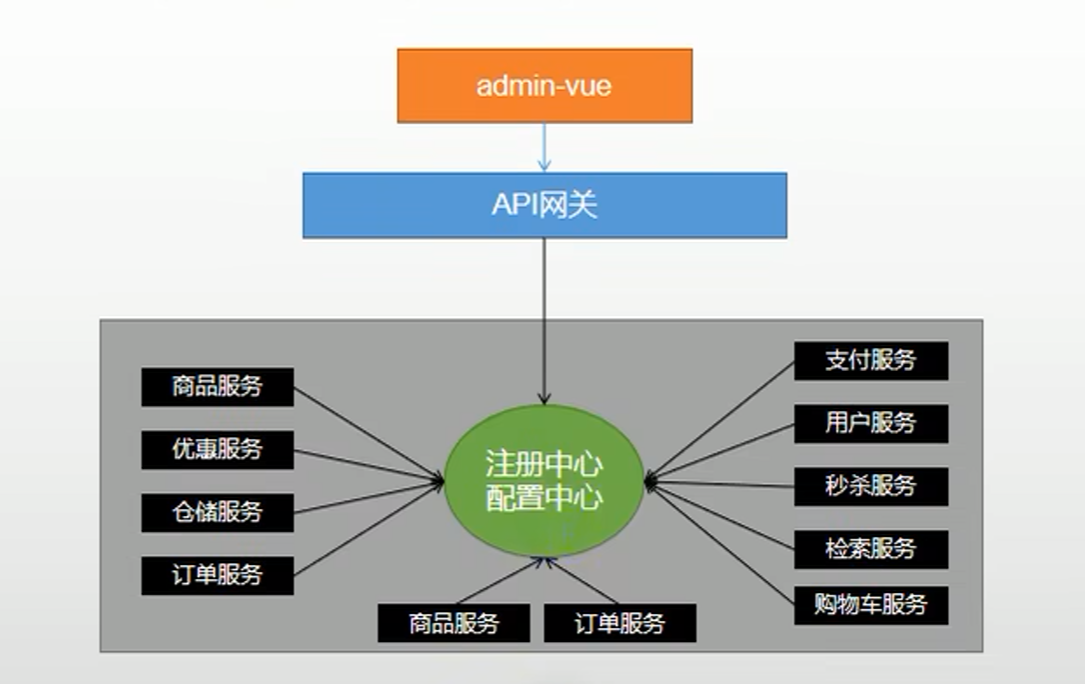
微服务-注册中心、配置中心、网关
SpringCloud的几大痛点SpringCloud的几大痛点
SpringCloud部分组件停止维护和更新,给开发带来不便;
SpringCloud,部分环境搭建复杂,没有完善的可视化界面,我们需要大量的二次开发和定制SpringCloud配置复杂,难以上手,部分配置差别难以区分和合理应用SpringCloud
SpringCloud Alibaba 的优势
阿里使用过的组件经历了考验,性能强悍,设计合理,现在开源出来大家用成套的产品搭配完善的可视化界面给开发运维带来极大的便利
搭建简单,学习曲线低。
结合SpringCloud Alibaba我们最终的技术搭配方案
SpringCloud Alibaba- Nacos :注册中心(服务发现/注册)
SpringCloud Alibaba -Nacos :配置中心(动态配置管理)
SpringCloud - Ribbon:负载均衡
SpringCloud -Feign:声明式HTTP客户端(调用远程服务)
SpringCloud Alibaba - Sentinel:服务容错(限流、降级、熔断)
Springcloud-Gateway: API网关(webflux,编程模式)
SpringCloud- Sleuth:调用链监控
SpringCloud Alibaba-Seata:原 Fescar,即分布式事务解决方案
Spring Cloud Alibaba
gitee网址:https://gitee.com/mirrors/Spring-Cloud-Alibaba/
github网址:https://github.com/alibaba/spring-cloud-alibaba
组件
Sentinel:把流量作为切入点,从流量控制、熔断降级、系统负载保护等多个维度保护服务的稳定性。
Nacos:一个更易于构建云原生应用的动态服务发现、配置管理和服务管理平台。
RocketMQ:一款开源的分布式消息系统,基于高可用分布式集群技术,提供低延时的、高可靠的消息发布与订阅服务。
Seata:阿里巴巴开源产品,一个易于使用的高性能微服务分布式事务解决方案。
Alibaba Cloud OSS: 阿里云对象存储服务(Object Storage Service,简称 OSS),是阿里云提供的海量、安全、低成本、高可靠的云存储服务。您可以在任何应用、任何时间、任何地点存储和访问任意类型的数据。
Alibaba Cloud SchedulerX: 阿里中间件团队开发的一款分布式任务调度产品,提供秒级、精准、高可靠、高可用的定时(基于 Cron 表达式)任务调度服务。
Alibaba Cloud SMS: 覆盖全球的短信服务,友好、高效、智能的互联化通讯能力,帮助企业迅速搭建客户触达通道。
Nacos
Nacos:一个更易于构建云原生应用的动态服务发现、配置管理和服务管理平台。
Nacos服务中心
<!--nacos config 配置中心--><dependency><groupId>org.springframework.cloud</groupId><artifactId>spring-cloud-starter-alibaba-nacos-config</artifactId></dependency><!--nacos 服务中心--><dependency><groupId>org.springframework.cloud</groupId><artifactId>spring-cloud-starter-alibaba-nacos-discovery</artifactId></dependency>
Nacos配置中心
- 配置中心默认使用public命名空间,可自行配置
- 开发、测试、生产环境可利用命名空间来做环境隔离
1.pom.xml中添加依赖
<dependency><groupId>org.springframework.cloud</groupId><artifactId>spring-cloud-alibaba-nacos-config</artifactId><version>0.2.2.RELEASE</version></dependency>
2.在应用的 /src/main/resources/bootstarp.yml 配置文件中配置Nacos Config元数据
spring:application:name: coupon-api # 应用名称cloud:nacos:#服务中心discovery:server-addr: 运行nacos的ip地址:8848#配置中心config:enabled: true # 如果不想使用 Nacos 进行配置管理,设置为 false 即可server-addr: 运行nacos的ip地址:8848 #Nacos Server 地址file-extension: yaml # 配置内容的数据格式,默认为 propertiesnamespace: b5c796a9-e822-4f23-9356-1abc3c63cae2 #命名空间id值#开启动态刷新配置,否则配置文件修改,工程无法感知ext-config:# 可加载多个公共配置文件- refresh: true # 是否支持动态刷新#druid数据源data-id: db.yaml # 配置集Data Idgroup: DEFAULT_GROUP- refresh: truedata-id: uc-port.yamlgroup: UC_GROUPgroup: UC_GROUP
3.访问Nacos服务中心,配置相应的配置文件。
每个服务的第一个配置文件起名规则为:应用名称.配置内容格式,如:coupon-api.yaml
第二个配置文件则为 ext-config 下配置 data-id(配置文件ID) - group(分组)
动态获取Nacos配置
将 @RefreshScope //动态获取Nacos配置 添加至Controller中,可动态获取配置内容
此时修改Nacos配置中心的相应文件,可动态获取到值。
@RefreshScope //动态获取Nacos配置@RestController@RequestMapping("/coupon")public class CouponController {@Autowiredprivate CouponService couponService;@Value("${user.name}")private String name;@Value("${user.age}")private Integer age;@RequestMapping("/test")public R test(){return R.ok().put("name",name).put("age",age);}}
Nacos普通方式启动
1.下载nacos压缩包:https://github.com/alibaba/nacos/tags
2.在应用的 /src/main/resources/bootstarp.yml 配置文件中配置nacos server的地址
#127.0.0.1 可换为你运行nacos的ip地址spring.cloud.nacos.discovery.server-addr=127.0.0.1:8848
3.使用@EnableDiscoveryClient 注解,在启动类上开启服务注册于发现功能
4.在 nacos\conf 目录下 修改 application.properties 文件,配置数据库和启动端口号等配置信息
#
# Copyright 1999-2018 Alibaba Group Holding Ltd.
#
# Licensed under the Apache License, Version 2.0 (the "License");
# you may not use this file except in compliance with the License.
# You may obtain a copy of the License at
#
#      http://www.apache.org/licenses/LICENSE-2.0
#
# Unless required by applicable law or agreed to in writing, software
# distributed under the License is distributed on an "AS IS" BASIS,
# WITHOUT WARRANTIES OR CONDITIONS OF ANY KIND, either express or implied.
# See the License for the specific language governing permissions and
# limitations under the License.
#

#*************** Spring Boot Related Configurations ***************#
### Default web context path:
server.servlet.contextPath=/nacos
### Default web server port:
server.port=8848

#*************** Network Related Configurations ***************#
### If prefer hostname over ip for Nacos server addresses in cluster.conf:
# nacos.inetutils.prefer-hostname-over-ip=false

### Specify local server's IP:
# nacos.inetutils.ip-address=


#*************** Config Module Related Configurations ***************#
### If use MySQL as datasource:
# spring.datasource.platform=mysql

### Count of DB:
db.num=1

### Connect URL of DB:
db.url.0=jdbc:mysql://192.168.111.129:3306/nacos?characterEncoding=utf8&connectTimeout=1000&socketTimeout=3000&autoReconnect=true&useUnicode=true&useSSL=false&serverTimezone=UTC
db.user.0=root
db.password.0=root

### Connection pool configuration: hikariCP
db.pool.config.connectionTimeout=30000
db.pool.config.validationTimeout=10000
db.pool.config.maximumPoolSize=20
db.pool.config.minimumIdle=2

#*************** Naming Module Related Configurations ***************#
### Data dispatch task execution period in milliseconds:
# nacos.naming.distro.taskDispatchPeriod=200

### Data count of batch sync task:
# nacos.naming.distro.batchSyncKeyCount=1000

### Retry delay in milliseconds if sync task failed:
# nacos.naming.distro.syncRetryDelay=5000

### If enable data warmup. If set to false, the server would accept request without local data preparation:
# nacos.naming.data.warmup=true

### If enable the instance auto expiration, kind like of health check of instance:
# nacos.naming.expireInstance=true

nacos.naming.empty-service.auto-clean=true
nacos.naming.empty-service.clean.initial-delay-ms=50000
nacos.naming.empty-service.clean.period-time-ms=30000


#*************** CMDB Module Related Configurations ***************#
### The interval to dump external CMDB in seconds:
# nacos.cmdb.dumpTaskInterval=3600

### The interval of polling data change event in seconds:
# nacos.cmdb.eventTaskInterval=10

### The interval of loading labels in seconds:
# nacos.cmdb.labelTaskInterval=300

### If turn on data loading task:
# nacos.cmdb.loadDataAtStart=false


#*************** Metrics Related Configurations ***************#
### Metrics for prometheus
#management.endpoints.web.exposure.include=*

### Metrics for elastic search
management.metrics.export.elastic.enabled=false
#management.metrics.export.elastic.host=http://localhost:9200

### Metrics for influx
management.metrics.export.influx.enabled=false
#management.metrics.export.influx.db=springboot
#management.metrics.export.influx.uri=http://localhost:8086
#management.metrics.export.influx.auto-create-db=true
#management.metrics.export.influx.consistency=one
#management.metrics.export.influx.compressed=true


#*************** Access Log Related Configurations ***************#
### If turn on the access log:
server.tomcat.accesslog.enabled=true

### The access log pattern:
server.tomcat.accesslog.pattern=%h %l %u %t "%r" %s %b %D %{User-Agent}i %{Request-Source}i

### The directory of access log:
server.tomcat.basedir=


#*************** Access Control Related Configurations ***************#
### If enable spring security, this option is deprecated in 1.2.0:
#spring.security.enabled=false

### The ignore urls of auth, is deprecated in 1.2.0:
nacos.security.ignore.urls=/,/error,/**/*.css,/**/*.js,/**/*.html,/**/*.map,/**/*.svg,/**/*.png,/**/*.ico,/console-ui/public/**,/v1/auth/**,/v1/console/health/**,/actuator/**,/v1/console/server/**

### The auth system to use, currently only 'nacos' is supported:
nacos.core.auth.system.type=nacos

### If turn on auth system:
nacos.core.auth.enabled=false

### The token expiration in seconds:
nacos.core.auth.default.token.expire.seconds=18000

### The default token:
nacos.core.auth.default.token.secret.key=SecretKey012345678901234567890123456789012345678901234567890123456789

### Turn on/off caching of auth information. By turning on this switch, the update of auth information would have a 15 seconds delay.
nacos.core.auth.caching.enabled=true

### Since 1.4.1, Turn on/off white auth for user-agent: nacos-server, only for upgrade from old version.
nacos.core.auth.enable.userAgentAuthWhite=true

### Since 1.4.1, worked when nacos.core.auth.enabled=true and nacos.core.auth.enable.userAgentAuthWhite=false.
### The two properties is the white list for auth and used by identity the request from other server.
nacos.core.auth.server.identity.key=
nacos.core.auth.server.identity.value=

#*************** Istio Related Configurations ***************#
### If turn on the MCP server:
nacos.istio.mcp.server.enabled=false


###*************** Add from 1.3.0 ***************###


#*************** Core Related Configurations ***************#

### set the WorkerID manually
# nacos.core.snowflake.worker-id=

### Member-MetaData
# nacos.core.member.meta.site=
# nacos.core.member.meta.adweight=
# nacos.core.member.meta.weight=

### MemberLookup
### Addressing pattern category, If set, the priority is highest
# nacos.core.member.lookup.type=[file,address-server]
## Set the cluster list with a configuration file or command-line argument
# nacos.member.list=192.168.16.101:8847?raft_port=8807,192.168.16.101?raft_port=8808,192.168.16.101:8849?raft_port=8809
## for AddressServerMemberLookup
# Maximum number of retries to query the address server upon initialization
# nacos.core.address-server.retry=5
## Server domain name address of [address-server] mode
# address.server.domain=jmenv.tbsite.net
## Server port of [address-server] mode
# address.server.port=8080
## Request address of [address-server] mode
# address.server.url=/nacos/serverlist

#*************** JRaft Related Configurations ***************#

### Sets the Raft cluster election timeout, default value is 5 second
# nacos.core.protocol.raft.data.election_timeout_ms=5000
### Sets the amount of time the Raft snapshot will execute periodically, default is 30 minute
# nacos.core.protocol.raft.data.snapshot_interval_secs=30
### raft internal worker threads
# nacos.core.protocol.raft.data.core_thread_num=8
### Number of threads required for raft business request processing
# nacos.core.protocol.raft.data.cli_service_thread_num=4
### raft linear read strategy. Safe linear reads are used by default, that is, the Leader tenure is confirmed by heartbeat
# nacos.core.protocol.raft.data.read_index_type=ReadOnlySafe
### rpc request timeout, default 5 seconds
# nacos.core.protocol.raft.data.rpc_request_timeout_ms=5000
5.在 nacos\conf 目录下 运行 nacos-mysql.sql 文件,创建数据库
6.在 nacos\bin 目录下,修改 startup.cmd 文件(window系统),修改为单机模式。
set MODE="standalone"
7.在 nacos\bin 目录下,运行 startup.cmd,此时项目启动成功,访问 ip:端口号即可。
使用docker
#拉取镜像
docker pull nacos/nacos-server


#创建目录
mkdir -p /mydata/nacos/config
#创建本地application.properties文件
touch /mydata/nacos/config/application.properties

#运行nacos
docker run --name nacos -e MODE=standalone -p 8848:8848 \
-v /mydata/nacos/config/application.properties:/home/nacos/conf/application.properties \
-d nacos/nacos-server
这里映射了8848端口,选择挂载了一个配置文件,配置文件内容如下
#
# Copyright 1999-2018 Alibaba Group Holding Ltd.
#
# Licensed under the Apache License, Version 2.0 (the "License");
# you may not use this file except in compliance with the License.
# You may obtain a copy of the License at
#
#      http://www.apache.org/licenses/LICENSE-2.0
#
# Unless required by applicable law or agreed to in writing, software
# distributed under the License is distributed on an "AS IS" BASIS,
# WITHOUT WARRANTIES OR CONDITIONS OF ANY KIND, either express or implied.
# See the License for the specific language governing permissions and
# limitations under the License.
#

#*************** Spring Boot Related Configurations ***************#
### Default web context path:
server.servlet.contextPath=/nacos
### Default web server port:
server.port=8848

#*************** Network Related Configurations ***************#
### If prefer hostname over ip for Nacos server addresses in cluster.conf:
# nacos.inetutils.prefer-hostname-over-ip=false

### Specify local server's IP:
# nacos.inetutils.ip-address=


#*************** Config Module Related Configurations ***************#
### If use MySQL as datasource:
# spring.datasource.platform=mysql

### Count of DB:
db.num=1

### Connect URL of DB:
db.url.0=jdbc:mysql://ip地址:3306/nacos?characterEncoding=utf8&connectTimeout=1000&socketTimeout=3000&autoReconnect=true&useUnicode=true&useSSL=false&serverTimezone=UTC
db.user.0=数据库用户名
db.password.0=数据库密码

### Connection pool configuration: hikariCP
db.pool.config.connectionTimeout=30000
db.pool.config.validationTimeout=10000
db.pool.config.maximumPoolSize=20
db.pool.config.minimumIdle=2

#*************** Naming Module Related Configurations ***************#
### Data dispatch task execution period in milliseconds:
# nacos.naming.distro.taskDispatchPeriod=200

### Data count of batch sync task:
# nacos.naming.distro.batchSyncKeyCount=1000

### Retry delay in milliseconds if sync task failed:
# nacos.naming.distro.syncRetryDelay=5000

### If enable data warmup. If set to false, the server would accept request without local data preparation:
# nacos.naming.data.warmup=true

### If enable the instance auto expiration, kind like of health check of instance:
# nacos.naming.expireInstance=true

nacos.naming.empty-service.auto-clean=true
nacos.naming.empty-service.clean.initial-delay-ms=50000
nacos.naming.empty-service.clean.period-time-ms=30000


#*************** CMDB Module Related Configurations ***************#
### The interval to dump external CMDB in seconds:
# nacos.cmdb.dumpTaskInterval=3600

### The interval of polling data change event in seconds:
# nacos.cmdb.eventTaskInterval=10

### The interval of loading labels in seconds:
# nacos.cmdb.labelTaskInterval=300

### If turn on data loading task:
# nacos.cmdb.loadDataAtStart=false


#*************** Metrics Related Configurations ***************#
### Metrics for prometheus
#management.endpoints.web.exposure.include=*

### Metrics for elastic search
management.metrics.export.elastic.enabled=false
#management.metrics.export.elastic.host=http://localhost:9200

### Metrics for influx
management.metrics.export.influx.enabled=false
#management.metrics.export.influx.db=springboot
#management.metrics.export.influx.uri=http://localhost:8086
#management.metrics.export.influx.auto-create-db=true
#management.metrics.export.influx.consistency=one
#management.metrics.export.influx.compressed=true


#*************** Access Log Related Configurations ***************#
### If turn on the access log:
server.tomcat.accesslog.enabled=true

### The access log pattern:
server.tomcat.accesslog.pattern=%h %l %u %t "%r" %s %b %D %{User-Agent}i %{Request-Source}i

### The directory of access log:
server.tomcat.basedir=


#*************** Access Control Related Configurations ***************#
### If enable spring security, this option is deprecated in 1.2.0:
#spring.security.enabled=false

### The ignore urls of auth, is deprecated in 1.2.0:
nacos.security.ignore.urls=/,/error,/**/*.css,/**/*.js,/**/*.html,/**/*.map,/**/*.svg,/**/*.png,/**/*.ico,/console-ui/public/**,/v1/auth/**,/v1/console/health/**,/actuator/**,/v1/console/server/**

### The auth system to use, currently only 'nacos' is supported:
nacos.core.auth.system.type=nacos

### If turn on auth system:
nacos.core.auth.enabled=false

### The token expiration in seconds:
nacos.core.auth.default.token.expire.seconds=18000

### The default token:
nacos.core.auth.default.token.secret.key=SecretKey012345678901234567890123456789012345678901234567890123456789

### Turn on/off caching of auth information. By turning on this switch, the update of auth information would have a 15 seconds delay.
nacos.core.auth.caching.enabled=true

### Since 1.4.1, Turn on/off white auth for user-agent: nacos-server, only for upgrade from old version.
nacos.core.auth.enable.userAgentAuthWhite=true

### Since 1.4.1, worked when nacos.core.auth.enabled=true and nacos.core.auth.enable.userAgentAuthWhite=false.
### The two properties is the white list for auth and used by identity the request from other server.
nacos.core.auth.server.identity.key=
nacos.core.auth.server.identity.value=

#*************** Istio Related Configurations ***************#
### If turn on the MCP server:
nacos.istio.mcp.server.enabled=false


###*************** Add from 1.3.0 ***************###


#*************** Core Related Configurations ***************#

### set the WorkerID manually
# nacos.core.snowflake.worker-id=

### Member-MetaData
# nacos.core.member.meta.site=
# nacos.core.member.meta.adweight=
# nacos.core.member.meta.weight=
访问网站
Linux的ip地址:8848/nacos
我这里的ip地址是 192.168.111.129,访问地址就是http://192.168.111.129:8848/nacos
Feign
使用
pom.xml引入依赖
        <dependency>
            <groupId>org.springframework.cloud</groupId>
            <artifactId>spring-cloud-starter-openfeign</artifactId>
        </dependency>
服务提供方
@RestController
@RequestMapping("/inner/sms")
public class CenterController {

    final PushService pushService;
    /**
     * 返回消息未读数量
     * @return
     */
    @GetMapping("getUnreadCount")
    public R getUnreadCount(@RequestParam String userId){
        List<Push> pushList = pushService.list(new QueryWrapper<Push>().eq("user_id", userId));
        long count = pushList.stream().filter(res -> false==res.getIsRead()).count();
        return R.ok().data("count",count);
    }
}
服务消费方
接口
/**
 * @FeignClient(value = "vod-api", path = "/api/aliyun/vod/video") // value = 调用服务的名称 , path = 访问路径@RequestMapping, fallback = 出错后执行方法的class
 */
@FeignClient(value = "zeal-sms", path = "/inner/sms", fallback = SmsFileDegradeFeignClient.class)
@Component
public interface SmsClient {
    @GetMapping("/getUnreadCount")
    public R getUnreadCount(@RequestParam("userId") String userId);

}
实现类(里面的返回是接口调用失败的情况下才返回)
@Component
public class SmsFileDegradeFeignClient implements SmsClient {
    @Override
    public R getUnreadCount(String userId) {
        return R.error().message("系统繁忙,请稍后再试");
    }
}
注意
使用Feign的时候,需要在启动类上添加 @EnableFeignClients //开启服务调用
@EnableFeignClients //开启服务调用
Gateway
文档:https://www.springcloud.cc/spring-cloud-greenwich.html#_spring_cloud_gateway
工作原理
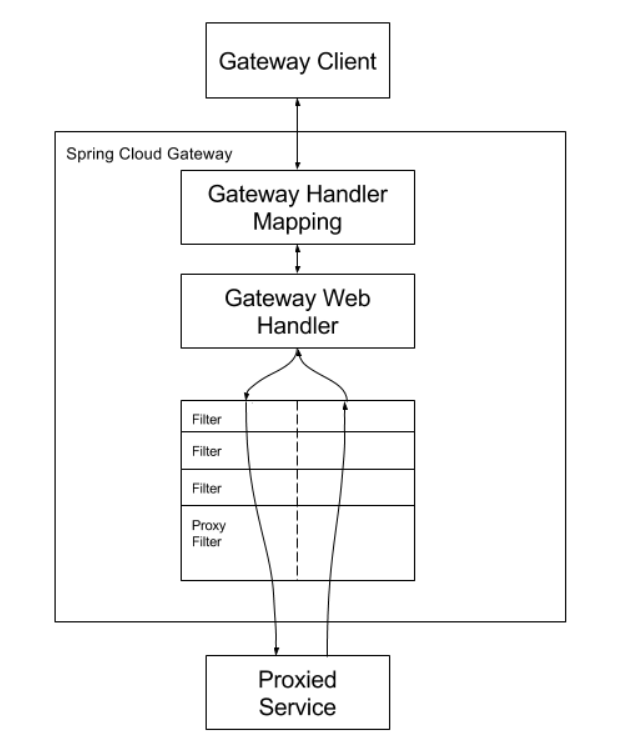
客户端向Spring Cloud网关发出请求。如果网关处理程序映射确定请求与路由匹配,则将其发送到网关Web处理程序。该处理程序运行通过特定于请求的筛选器链发送请求。筛选器由虚线分隔的原因是,筛选器可以在发送代理请求之前或之后执行逻辑。执行所有“前置”过滤器逻辑,然后发出代理请求。发出代理请求后,将执行“后”过滤器逻辑。

若有收获,就点个赞吧
0 人点赞
