一、SpringBoot单模块项目构建
访问[https://start.spring.io/](https://start.spring.io/),即Spring官网,配置初始化项目,此处选择Maven Project,语言为Java,2.5.4版本,然后点击Generate下载项目压缩文件,解压后导入idea。导入方法我选择的是解压后通过idea打开文件,导入进去后在右侧maven窗口刷新完成。<br />
二、准备环境
1、下载maven安装包
访问https://maven.apache.org/download.cgi,下载压缩文件并解压到本机目录。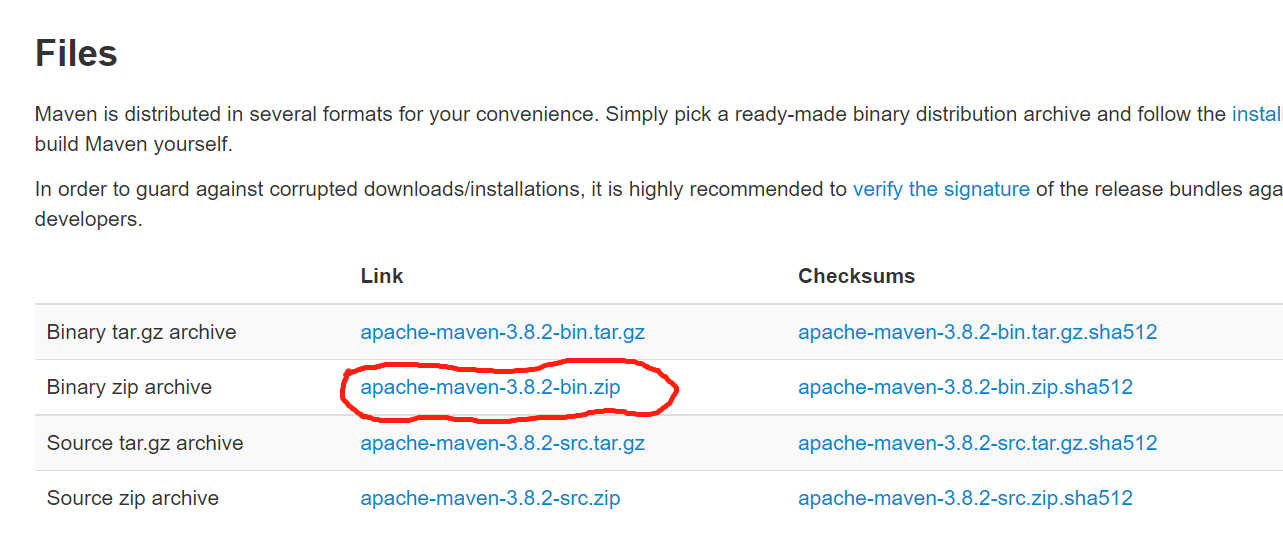
2、配置环境变量
配置环境变量,可以在cmd环境下运行maven命令。
在系统变量中增加MAVEN_HOME,指向本地maven安装目录
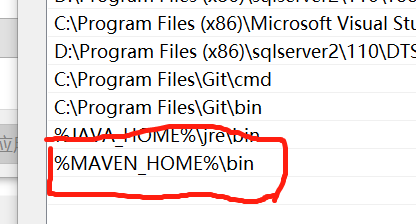
在Path中增加%MAVEN_HOME%\bin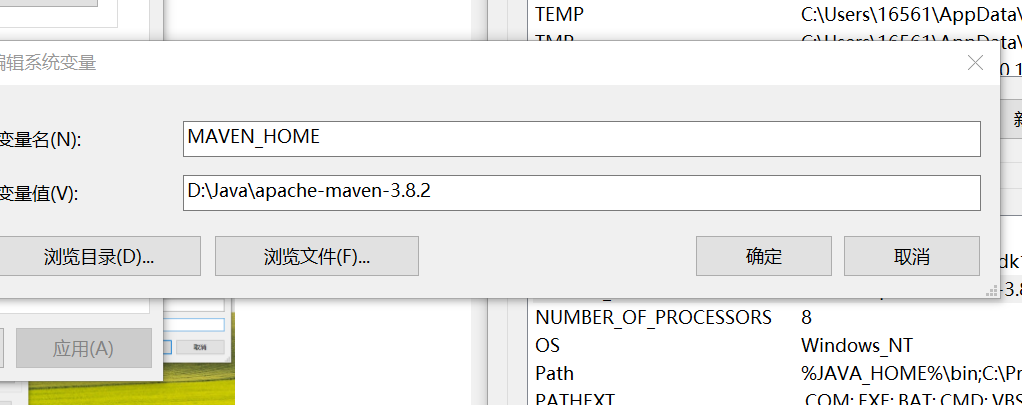
配置好后,打开cmd命令窗口,输入mvn -version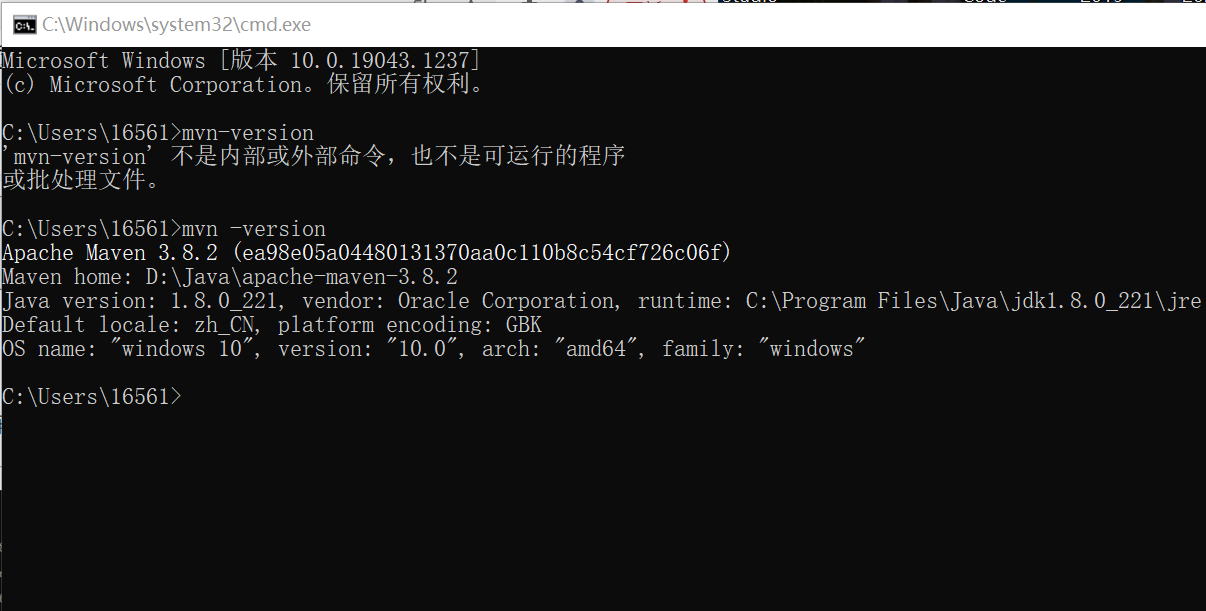
3、修改仓库位置
修改conf/setting.xml文件,设定本机maven仓库位置。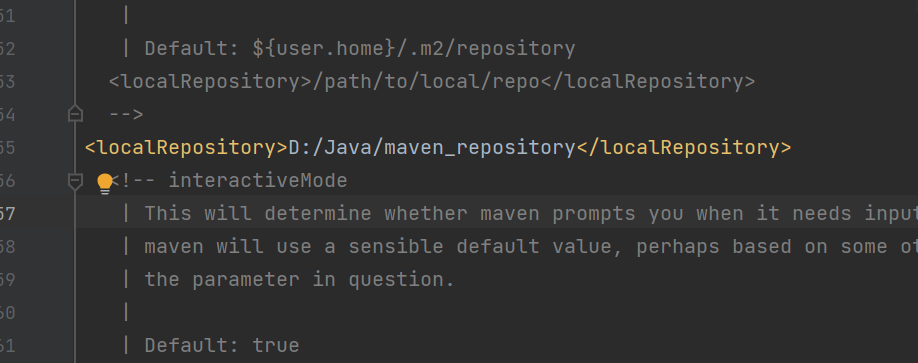
修改conf/setting.xml文件,设定默认下载仓库。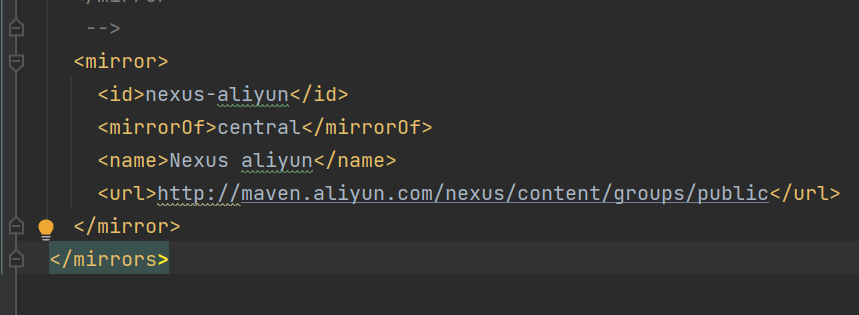
设定IDEA的maven环境
选择文件——设置,找到maven项,设定Maven Home为本机maven
三、创建多模块maven项目
1.新建maven父模块misp
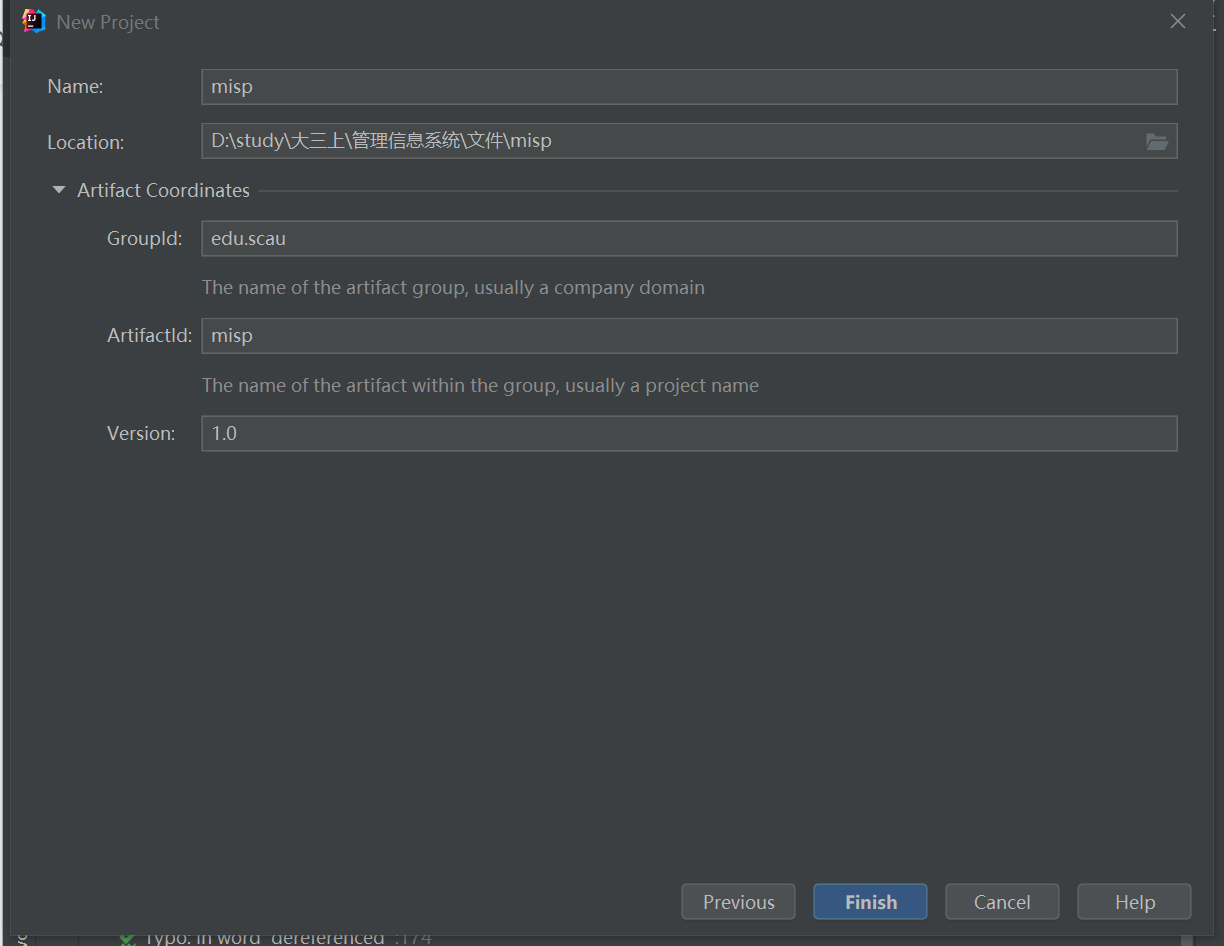
模块命名为misp,设定项目存储位置。
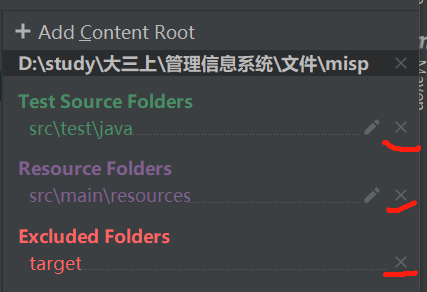
因为该目录所有模块容器,不需要src目录。右键选择项目,选择“打开模块设置”,在弹出项目结构窗口,删除右侧”添加内容根目录”所有设定内容。检查语言级别是否为8-Lambdas,点击确定。然后删除src目录。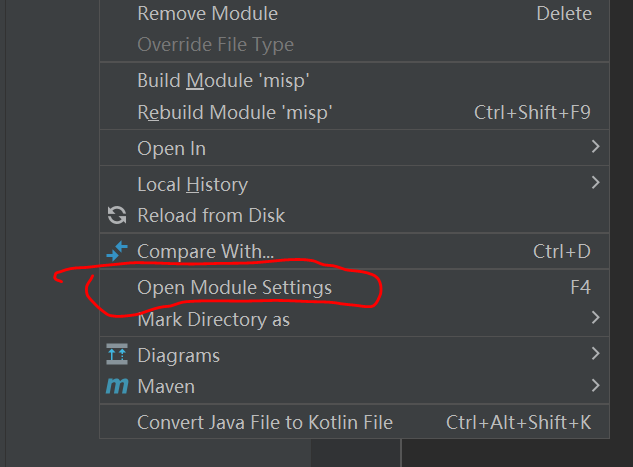

2.创建maven子模块
在misp项目下,右键——新建——模块,选择maven
分别创建子模块mis-web,mis-core,mis-lab,mis-sys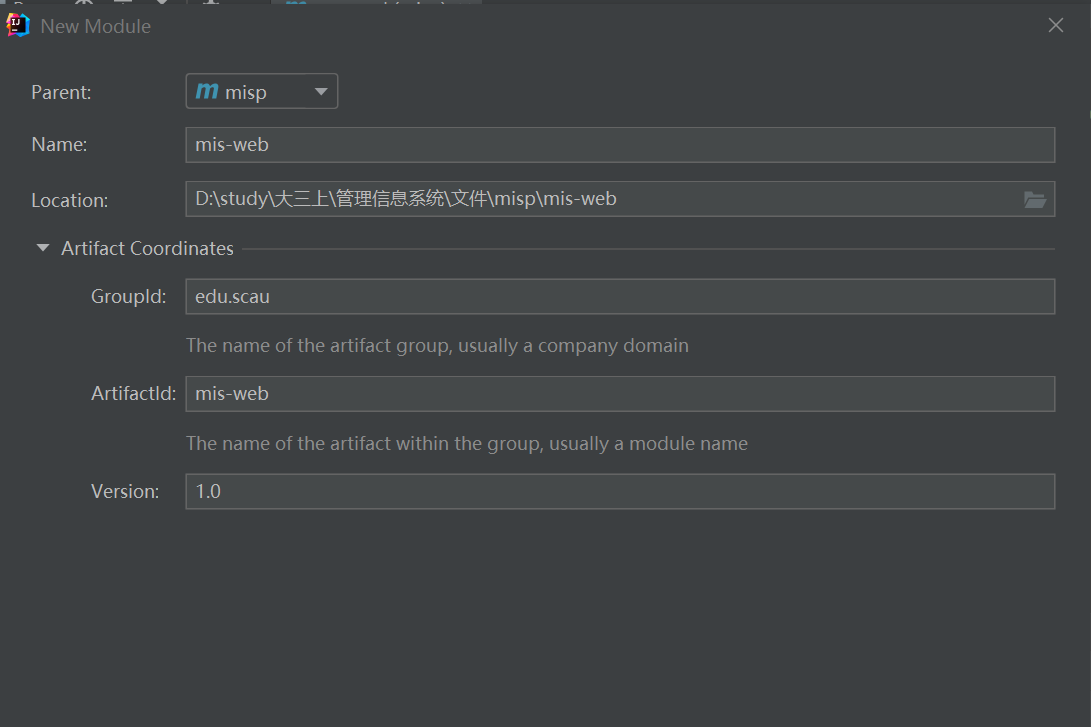
项目结构如下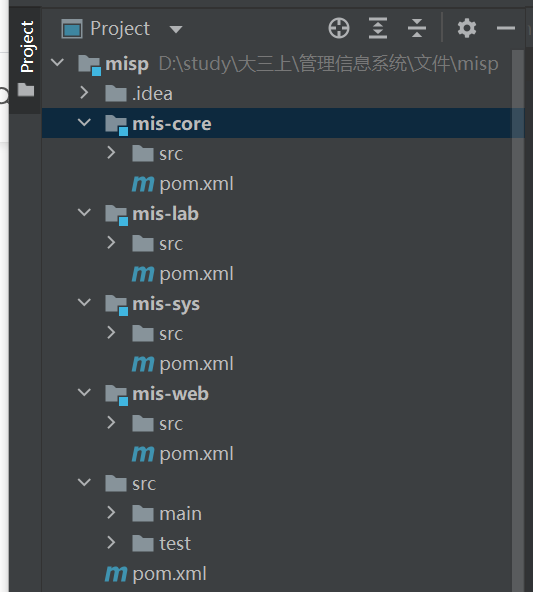
查看项目的根目录pom.xml,以及子模块下的pom.xml
<?xml version="1.0" encoding="UTF-8"?><project xmlns="http://maven.apache.org/POM/4.0.0"xmlns:xsi="http://www.w3.org/2001/XMLSchema-instance"xsi:schemaLocation="http://maven.apache.org/POM/4.0.0 http://maven.apache.org/xsd/maven-4.0.0.xsd"><modelVersion>4.0.0</modelVersion><groupId>edu.scau</groupId><artifactId>misp</artifactId><!--检查根目录下pom.xml的packaging标签内容设定为pom--><packaging>pom</packaging><version>1.0</version><!--项目子模块--><modules><module>mis-web</module><module>mis-core</module><module>mis-sys</module><module>mis-lab</module></modules></project>
<?xml version="1.0" encoding="UTF-8"?><project xmlns="http://maven.apache.org/POM/4.0.0"xmlns:xsi="http://www.w3.org/2001/XMLSchema-instance"xsi:schemaLocation="http://maven.apache.org/POM/4.0.0 http://maven.apache.org/xsd/maven-4.0.0.xsd"><!--项目父模块--><parent><artifactId>misp</artifactId><groupId>edu.scau</groupId><version>1.0</version></parent><modelVersion>4.0.0</modelVersion><artifactId>mis-web</artifactId></project>
检查web,core,sys,lab等各子模块的项目结构,右键选择项目,选择“打开模块设置”,检查语言级别是否为8-Lambdas。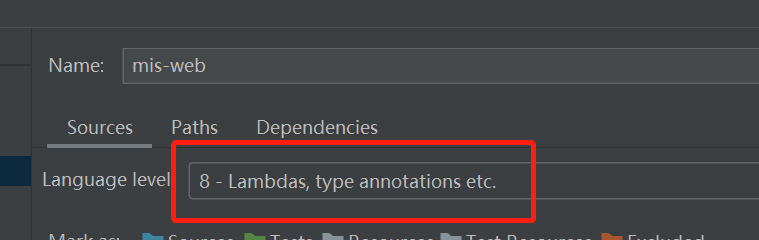
四、为项目添加Springboot依赖
1.修改misp的pom.xml
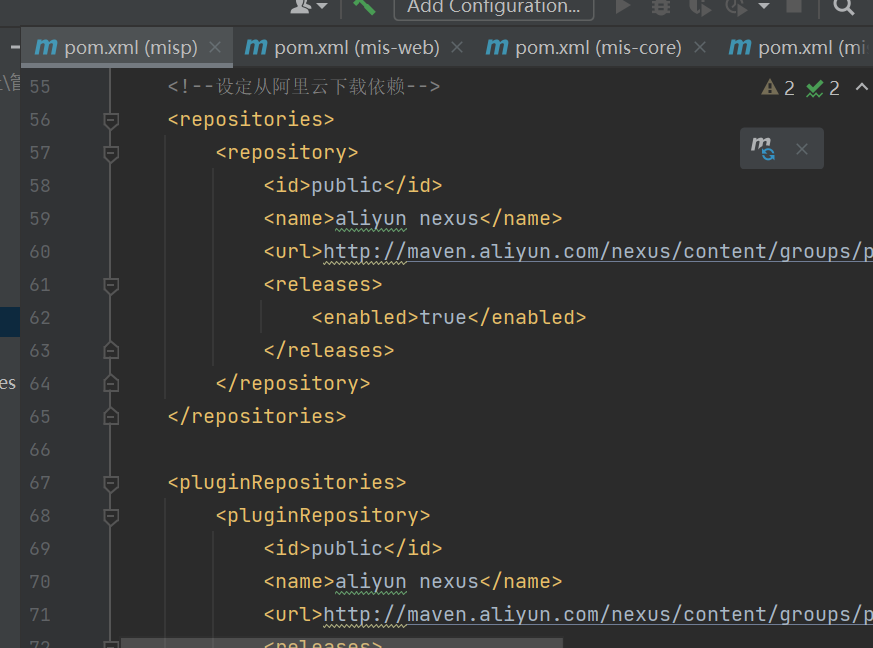
SpringBoot选择2.2.13.RELEASE版本,修改根目录下pom.xml,最终内容如下
<?xml version="1.0" encoding="UTF-8"?><project xmlns="http://maven.apache.org/POM/4.0.0"xmlns:xsi="http://www.w3.org/2001/XMLSchema-instance"xsi:schemaLocation="http://maven.apache.org/POM/4.0.0 http://maven.apache.org/xsd/maven-4.0.0.xsd"><modelVersion>4.0.0</modelVersion><groupId>edu.scau</groupId><artifactId>misp</artifactId><!--检查根目录下pom.xml的packaging标签内容设定为pom--><packaging>pom</packaging><version>1.0</version><!--项目子模块--><modules><module>mis-web</module><module>mis-core</module><module>mis-sys</module><module>mis-lab</module></modules><!--版本设定--><properties><java.version>1.8</java.version><project.build.sourceEncoding>UTF-8</project.build.sourceEncoding></properties><!--设定SpringBoot依赖管理,之后引入依赖不需要添加版本号--><dependencyManagement><dependencies><!-- SpringBoot的依赖配置--><dependency><groupId>org.springframework.boot</groupId><artifactId>spring-boot-dependencies</artifactId><version>2.2.13.RELEASE</version><type>pom</type><scope>import</scope></dependency></dependencies></dependencyManagement><!--设定maven编译插件为3.1版本--><build><plugins><plugin><groupId>org.apache.maven.plugins</groupId><artifactId>maven-compiler-plugin</artifactId><version>3.1</version><configuration><source>${java.version}</source><target>${java.version}</target><encoding>${project.build.sourceEncoding}</encoding></configuration></plugin></plugins></build><!--设定从阿里云下载依赖--><repositories><repository><id>public</id><name>aliyun nexus</name><url>http://maven.aliyun.com/nexus/content/groups/public/</url><releases><enabled>true</enabled></releases></repository></repositories><pluginRepositories><pluginRepository><id>public</id><name>aliyun nexus</name><url>http://maven.aliyun.com/nexus/content/groups/public/</url><releases><enabled>true</enabled></releases><snapshots><enabled>false</enabled></snapshots></pluginRepository></pluginRepositories></project>
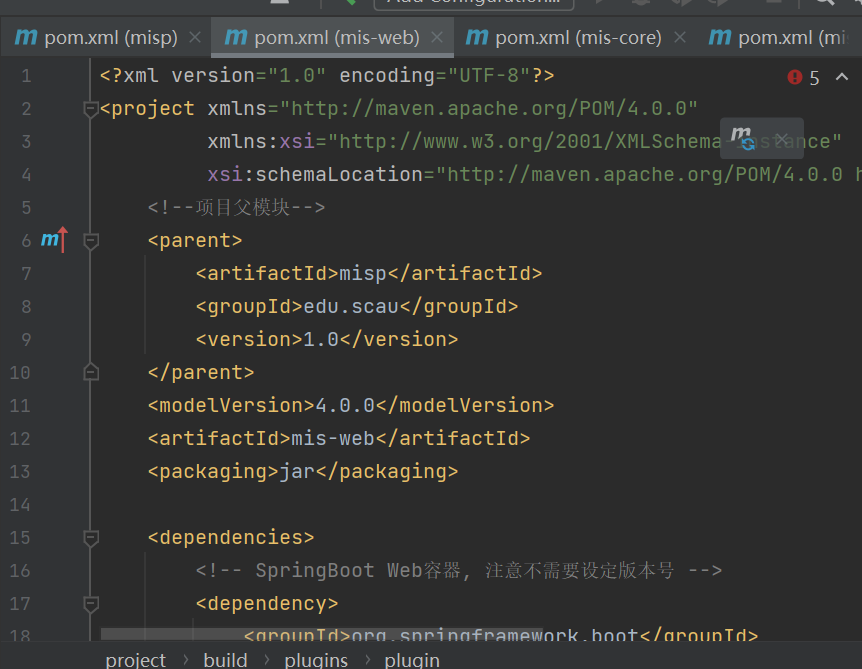
2.修改mis-web的pom.xml
(1)添加打包方式为jar
(2)添加SpringBoot web组件依赖
(3)添加插件 spring-boot-maven-plugin
<?xml version="1.0" encoding="UTF-8"?><project xmlns="http://maven.apache.org/POM/4.0.0"xmlns:xsi="http://www.w3.org/2001/XMLSchema-instance"xsi:schemaLocation="http://maven.apache.org/POM/4.0.0 http://maven.apache.org/xsd/maven-4.0.0.xsd"><!--项目父模块--><parent><artifactId>misp</artifactId><groupId>edu.scau</groupId><version>1.0</version></parent><modelVersion>4.0.0</modelVersion><artifactId>mis-web</artifactId><packaging>jar</packaging><dependencies><!-- SpringBoot Web容器, 注意不需要设定版本号 --><dependency><groupId>org.springframework.boot</groupId><artifactId>spring-boot-starter-web</artifactId></dependency></dependencies><build><plugins><plugin><groupId>org.springframework.boot</groupId><artifactId>spring-boot-maven-plugin</artifactId><version>2.1.1.RELEASE</version><configuration><fork>true</fork> <!-- 如果没有该配置,devtools不会生效 --></configuration><executions><execution><goals><goal>repackage</goal></goals></execution></executions></plugin><plugin><groupId>org.apache.maven.plugins</groupId><artifactId>maven-war-plugin</artifactId><version>3.1.0</version><configuration><failOnMissingWebXml>false</failOnMissingWebXml><warName>${project.artifactId}</warName></configuration></plugin></plugins><finalName>${project.artifactId}</finalName></build></project>
3.检查依赖库

4.设置SpringBoot配置文件
在mis-web下src/mian/resource下添加application.yml文件,设定服务器端口号为8080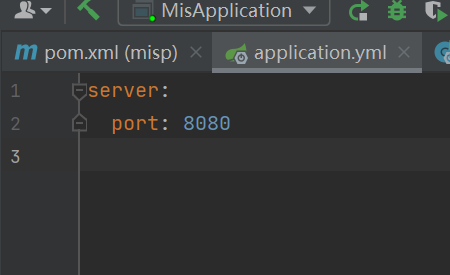
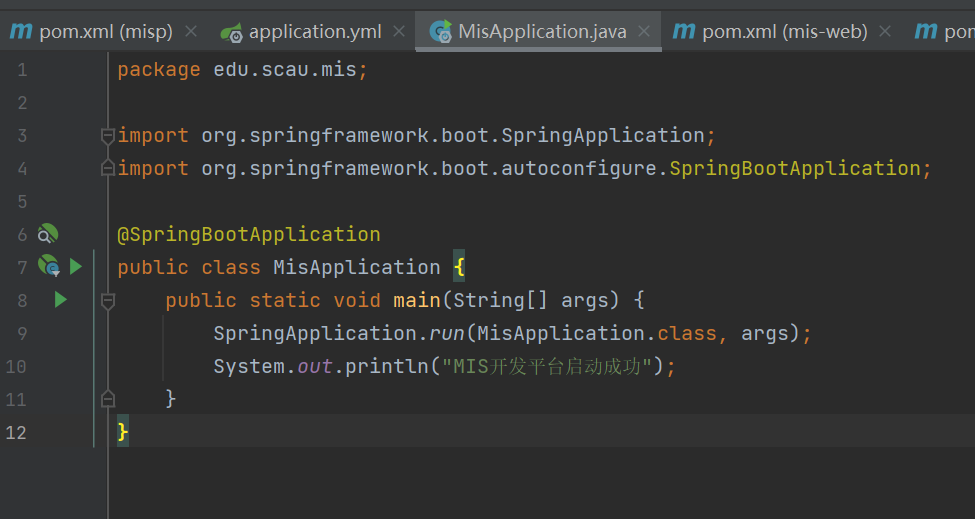
5.添加SpringBoot主程序
在src/main/java下添加包edu.scau.mis
添加类MisApplication,编写代码如下
package edu.scau.mis;import org.springframework.boot.SpringApplication;import org.springframework.boot.autoconfigure.SpringBootApplication;@SpringBootApplicationpublic class MisApplication {public static void main(String[] args) {SpringApplication.run(MisApplication.class, args);System.out.println("MIS开发平台启动成功");}}
运行MisApplication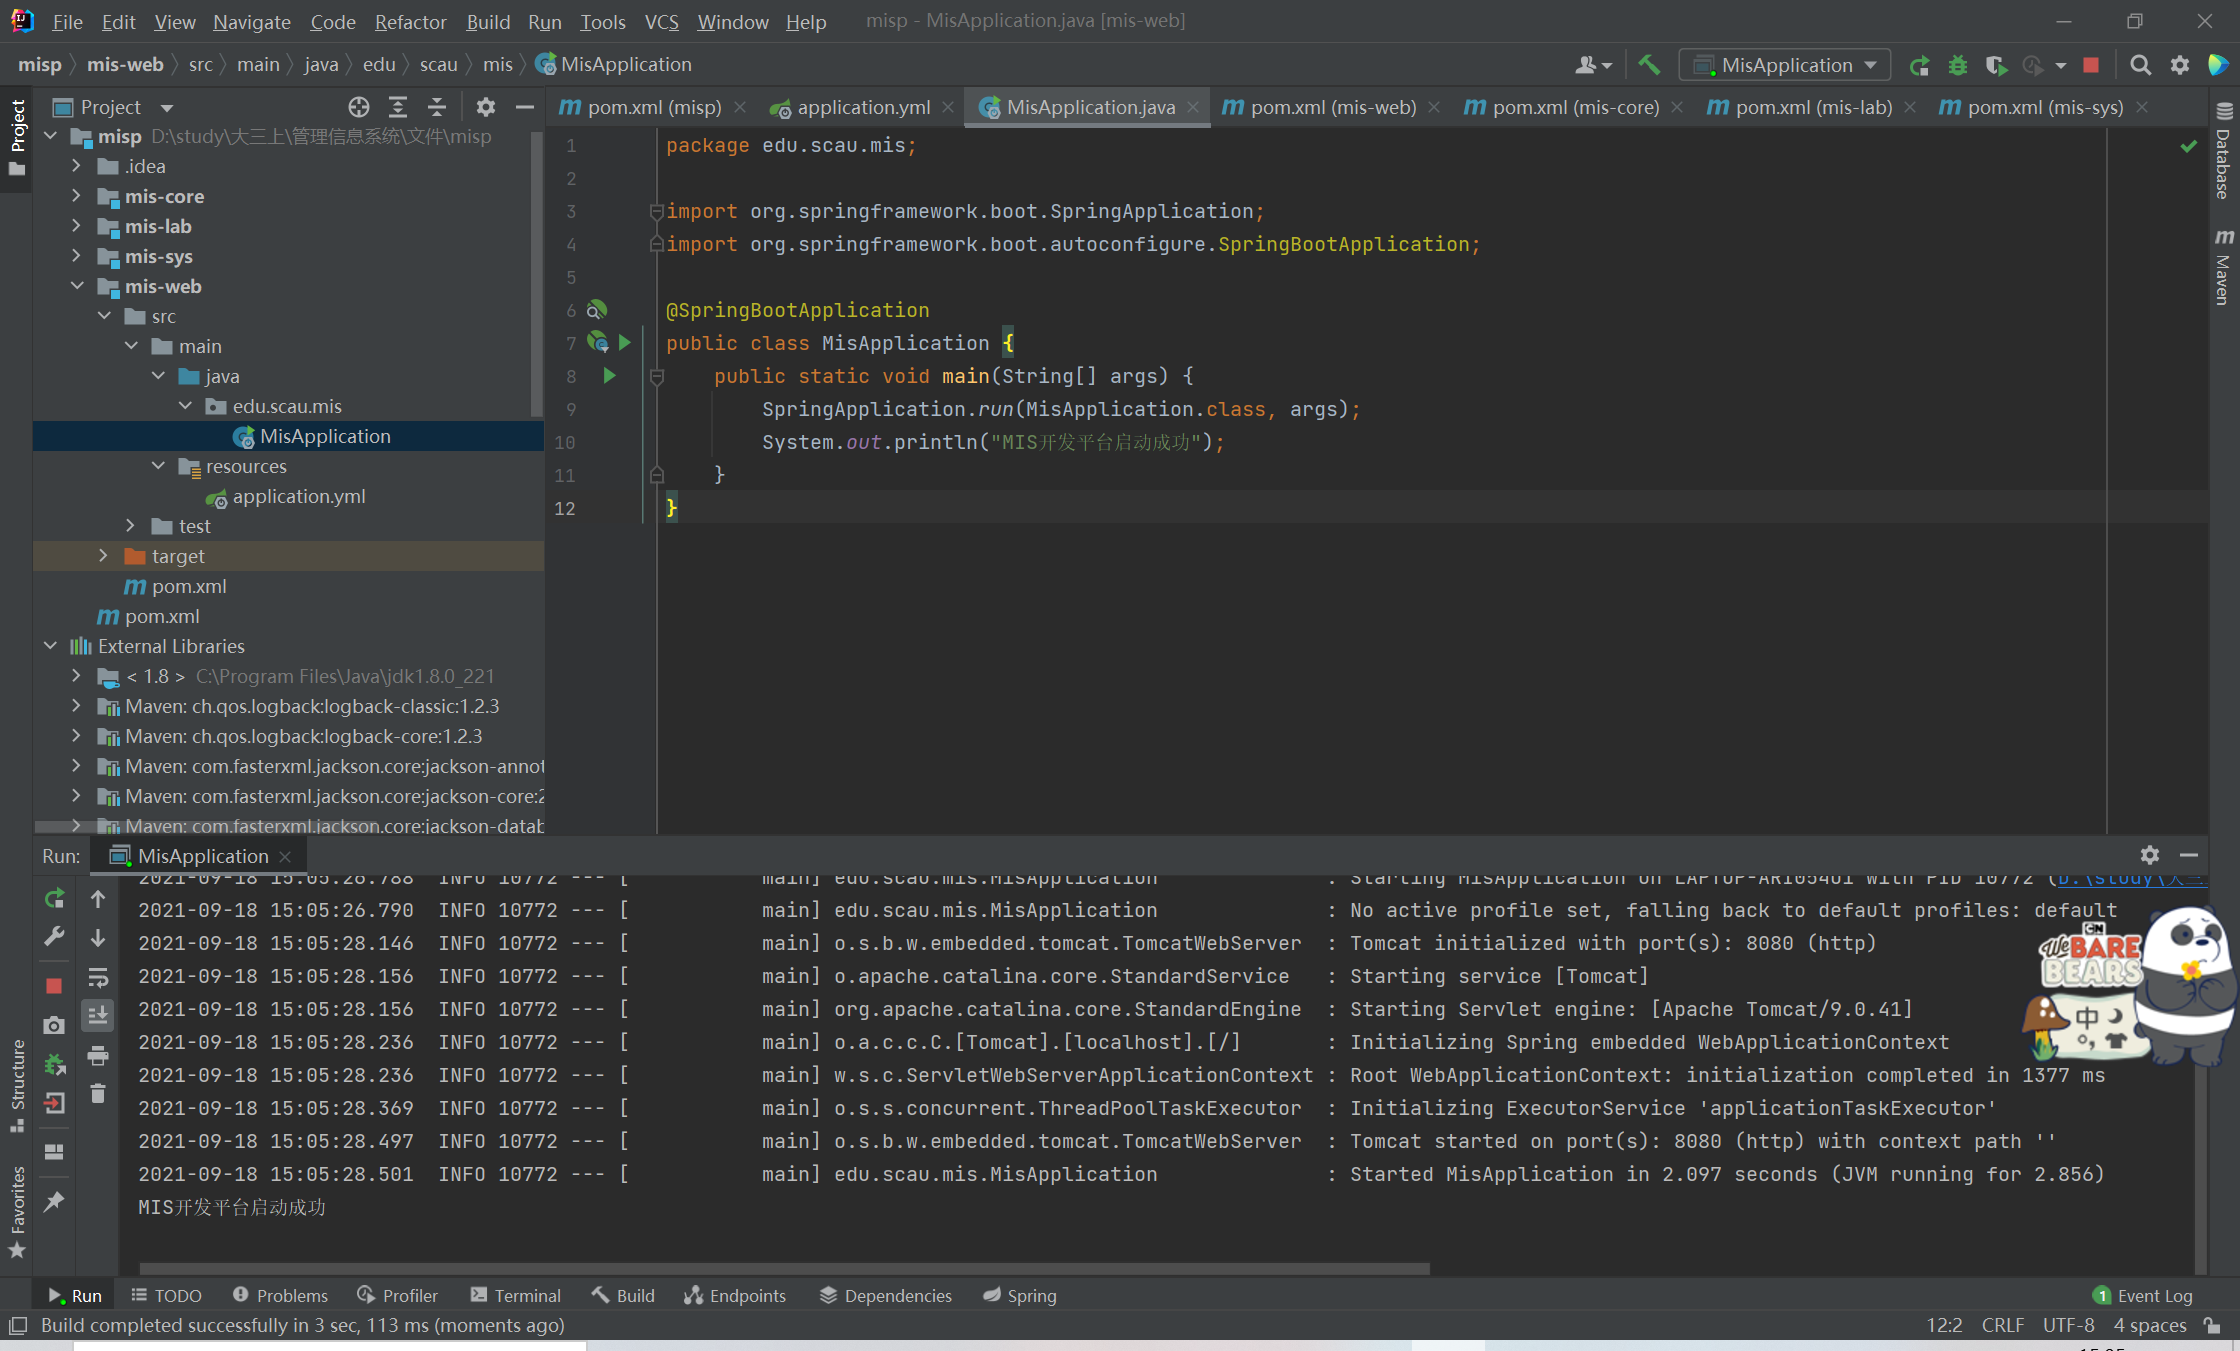
SpringBoot多模块搭建运行成功。
五、编写测试Controller
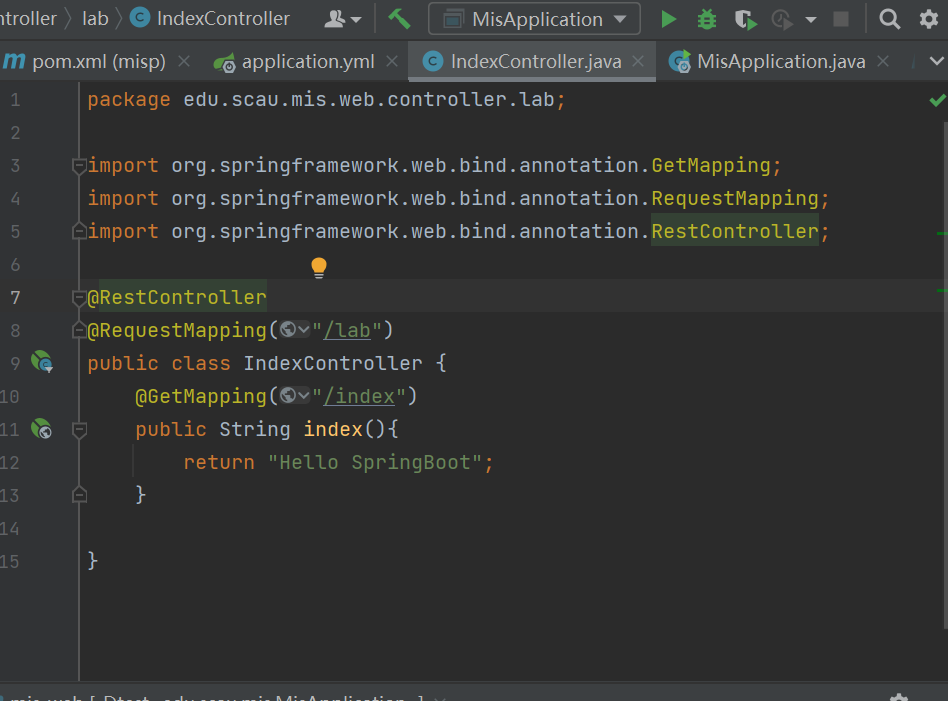
1.编写IndexController
在mis-web模块src/main/java/下创建包edu.scau.mis.web.controller.lab
新建类 IndexController代码如下
package edu.scau.mis.web.controller.lab;import org.springframework.web.bind.annotation.GetMapping;import org.springframework.web.bind.annotation.RequestMapping;import org.springframework.web.bind.annotation.RestController;@RestController@RequestMapping("/lab")public class IndexController {@GetMapping("/index")public String index(){return "Hello SpringBoot";}}
2.注解说明
@RestController标记该类为Rest接口,该注解后端返回为json格式。
@RequestMapping(“/lab”) 设定接口请求地址路径,即http://localhost:8080/lab
@GetMapping(“/index”) 注解方法,该接口请求方法为get,路径为http://localhost:8080/lab/index
3.访问接口
运行MisApplication
在Chrome浏览器中输入http://localhost:8080/lab/index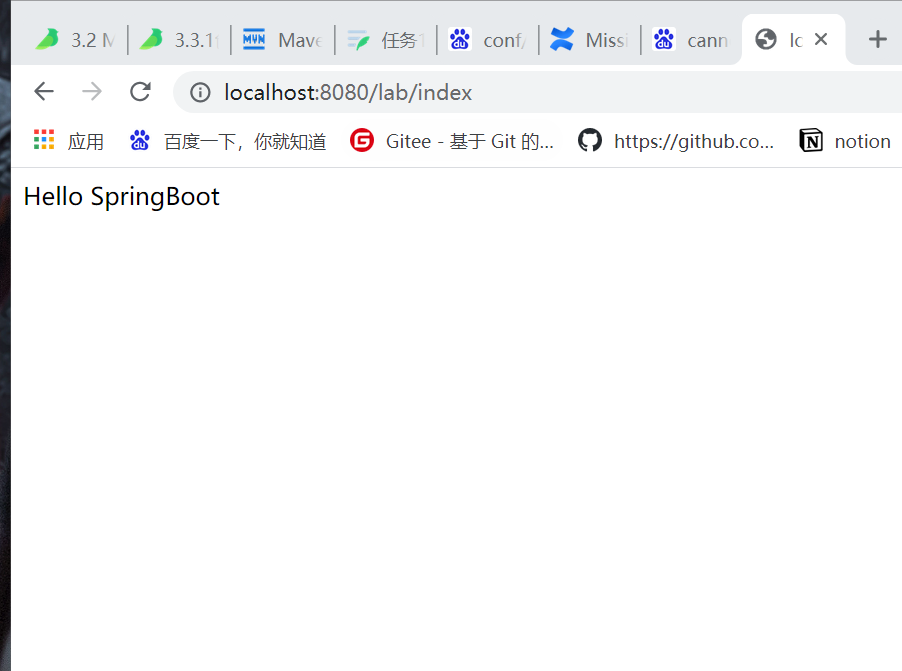
六、实验感想
这次是第一次接触maven和springboot的模块项目构建,跟着邓老师的步骤一步步完成,总得接触下来还是比较顺利。之前接触的比较多的是eclipse和vs code,感觉idea和vs code的风格和布局很相似,但是仍然有很多地方我找不到,窗口位置也不习惯,今后需要重新适应并熟练使用idea的开发软件。<br /> 在构建项目的过程中,有许多拓展的内容想深入了解,随即在网络上搜寻学习资料,下面放出几个我觉得比较有收藏性的网址和图片供后面学习使用。<br />①[https://lixuekai.blog.csdn.net/article/details/69226949?utm_medium=distribute.pc_relevant.none-task-blog-2%7Edefault%7ECTRLIST%7Edefault-1.no_search_link&depth_1-utm_source=distribute.pc_relevant.none-task-blog-2%7Edefault%7ECTRLIST%7Edefault-1.no_search_link](https://lixuekai.blog.csdn.net/article/details/69226949?utm_medium=distribute.pc_relevant.none-task-blog-2%7Edefault%7ECTRLIST%7Edefault-1.no_search_link&depth_1-utm_source=distribute.pc_relevant.none-task-blog-2%7Edefault%7ECTRLIST%7Edefault-1.no_search_link)<br />② [https://blog.csdn.net/weixin_43819847/article/details/94428845](https://blog.csdn.net/weixin_43819847/article/details/94428845)<br />③(图片较大文字较多,需要点开放大看)<br />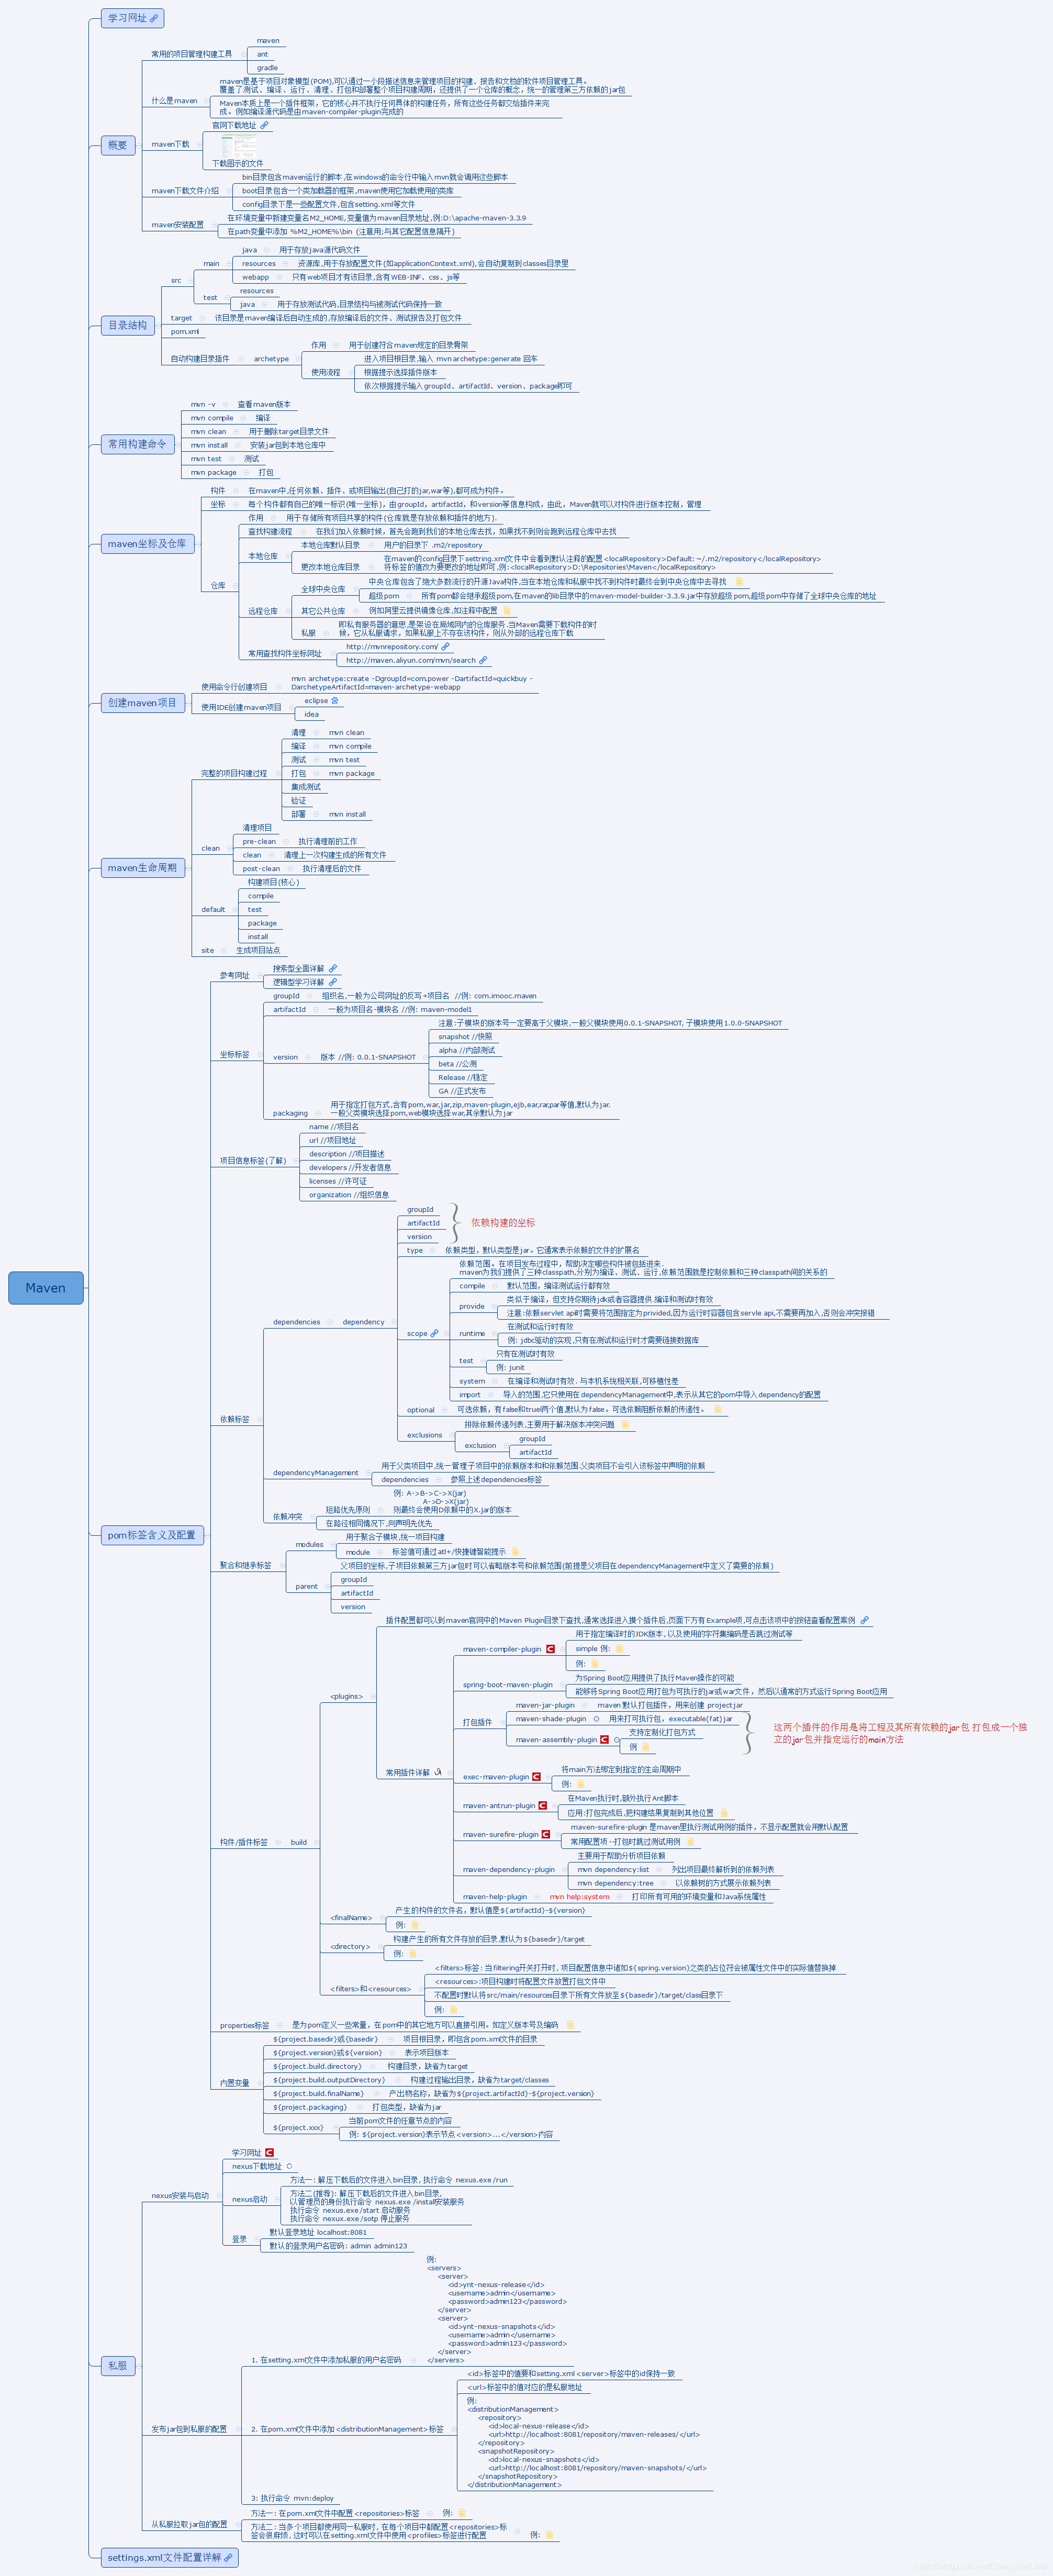

若有收获,就点个赞吧
0 人点赞
