首先对于这个文档,我感到很抱歉,本来早就该写好的东西,拖到现在。 不得不说意外和生活总是一起到来,不多说现在就开始
一、项目介绍
这个项目实际上是我的一个同学介绍给我的,老板是一个篮球培训机构老总,他希望可以做一个小程序,帮助上课的孩子们签到,同时学生,家长,管理员都能使用这个小程序。
学生端的功能:可以获取到每日管理员发表的公告,包括图片,文字(这是一个我认为的难点),学生还需要使用签到功能,然后每次签到都会在数据库中写入,之后还可以查看自己的签到情况,检查自己的情况是否有错,可以反馈给老师,让老师消除错误。
家长端的功能:家长可以登录,并且绑定多个孩子,可以获取某个孩子的签到情况。可以获取到每日管理员发表的公告,包括图片,文字。
管理员端功能:可以自动生成学生的学号,即有同学新加入时,需要通过管理员提供的一系列连续的学号,学生以此作为登录或注册的唯一凭证。如果学生忘记该凭证,也可以通过管理员查询该学生名字,获取到其学号。超级管理员可以生成一系列管理员号,拥有对一般管理员增删的权限,该账号只有一个,所以不赘述。可以发表每日的推文。
目前能想到的功能应该就是这些,详情往下看。
二、项目的结构
miniprogram-4 // 项目根目录 ├─cloudfunctions // 云函数功能,这里是小程序开发提供的 │ ├─callback │ ├─echo │ ├─login │ └─openapi └─miniprogram // 项目主体 ├─cloud // 云函数自定义及实现 │ ├─addStudent │ ├─delSign │ ├─delStudent │ ├─getAllStudent │ ├─getopenid │ ├─getSign │ ├─getStudent │ ├─getStudentMach │ ├─getTweets │ ├─modifySign │ ├─Sign │ └─upStudent ├─images // 图片目录 ├─page // 页面根目录 │ ├─AdminsterPage // 管理员页面目录 │ │ ├─addAdminster // 添加管理员 │ │ ├─addStudent // 添加学生 │ │ ├─EditPassage // 编辑页面 │ │ ├─Search // 搜索页 │ │ ├─SearchByName // 以名字搜索页 │ │ └─Tabbar // Tabbar主页 │ ├─CheckData // 检索数据页 │ ├─ParentPage // 父母页面目录 │ │ ├─AlterData // 修改数据 │ │ ├─CheckData // 检索数据,这里是检索自己孩子的 │ │ └─Tabbar // Tabbar主页 │ ├─RegisterPage // 注册页面,包含三个模块,利用wx:if判断 │ ├─ShowPassage // 展示管理员发送的推文详情 │ ├─showStudent // 展示学生签到的详情 │ ├─SignMainPage // 登录页面 │ ├─StudentPage // 学生页面目录 │ │ ├─Reflect // 反馈页面,即可以向软件开发者提意见 │ │ └─Tabbar // Tabbar主页 │ └─ToChooseSignUp // 选择签到类型, └─style // 基本的样式,无需我们修改
二、页面详情
2.1 小程序的配置情况
{"pages": ["page/SignMainPage/SignMainPage", // 谁放在第一行就是第一个打开的页面"page/showStudent/showStudent","page/RegisterPage/RegisterPage","page/CheckData/CheckData","page/StudentPage/Tabbar/Tabbar","page/AdminsterPage/addAdminster/addAdminster","page/StudentPage/Reflect/Reflect","page/AdminsterPage/addStudent/addStudent","page/ShowPassage/ShowPassage","page/ParentPage/Tabbar/Tabbar","page/ParentPage/AlterData/AlterData","page/ParentPage/CheckData/CheckData","page/ToChooseSignUp/ToChooseSignUp","page/AdminsterPage/EditPassage/EditPassage","page/AdminsterPage/Search/Search","page/AdminsterPage/Tabbar/Tabbar","page/AdminsterPage/SearchByName/SearchByName"],"window": {"backgroundColor": "#FFFFFF", // 背景颜色"backgroundTextStyle": "light", // 深色模式?"navigationBarBackgroundColor": "#1E90FF", // 签到小程序文本的背景"navigationBarTitleText": "签到小程序", // 标题"navigationBarTextStyle": "white", // 标题颜色"enablePullDownRefresh": true // 允许下拉刷新},"sitemapLocation": "sitemap.json","style": "v2"}
2.2 登录页面

首先是这个布局,实际上并不好看。
<view class="signTab"><button data-id="0" bindtap="handleSign" style="font-size: 45rpx;">我是学生</button><button data-id="1" bindtap="handleSign" style="font-size: 45rpx;">我是家长</button><button data-id="2" bindtap="handleSign" style="font-size: 45rpx;">管理员</button></view><button style="margin-top:70%" bindtap="navigateToSignIssue">登录遇到问题</button>
需要注意的是,wxml中均是一个个view堆叠,我的理解是与html中的div相应<br />`data-id=`是一个属性值,用于`SignMainPage.js`读取数据。
handleSign(e) {wx.showLoading({title: '',mask: true})// wx.showLoading将调用loading动画,title为空即没有提示信息,mask为true即是添加蒙层console.log("在这里调用showLodging")// 所有的consol.log("")均是输出提示信息,对功能没有实际影响let _id = e.currentTarget.dataset.id// 获取上文提到的data-id,这表示的是用户类型wx.setStorageSync('userNumber', _id)// 设置缓存,命名为userNumberwx.cloud.callFunction({name: 'getopenid'// 调用云函数中定义好的getopenid// 关于then与catch的用法,// 见https://www.cnblogs.com/skuld-yi/p/14599594.html}).then(res => {wx.hideLoading()console.log('在这里调用hideLodging')wx.setStorageSync('openid', res.result.openid)// 设置缓存openidconsole.log('handleSign openid', wx.getStorageSync('openid'))this.login() // 调用登录函数}).catch(res => {wx.hideLoading()console.log('在这里调用hideLodging')console.log(res)// 隐藏loading动画})},// 需要注意的是,这里的handleSign(e)的定义写在与onLoad同级下。
这里需要接着找我们的`getopenid`云函数
// 云函数入口文件const cloud = require('wx-server-sdk')cloud.init()// 云函数入口函数exports.main = async (event, context) => {const wxContext = cloud.getWXContext()return {event,openid: wxContext.OPENID,appid: wxContext.APPID,unionid: wxContext.UNIONID,}}

关于云函数更多见:https://developers.weixin.qq.com/miniprogram/dev/wxcloud/guide/functions.html
还有找到openid之后我们还需要调用this.login()
login() {wx.hideHomeButton({success: (res) => {console.log('成功') // 隐藏左上角的home键},})wx.showLoading({title: '', // 展示loading动画mask:true})console.log("在这里调用showLodging")let openid = wx.getStorageSync('openid') // handleSign中已经获得了openidlet userNumber = wx.getStorageSync('userNumber') // 获取用户类型if (userNumber == '0' || userNumber == '1' && openid != '') {console.log('openid1:', openid)//这里不要用用户上传的时候自动添加的_openid字段db.collection(this.data.userType[userNumber].value) // 获取用户类型的所有值(见下图).where({openid: openid // 条件语句等于sql中的where}).get().then(res => { // 成功后执行console.log('res:', res)if (res.data.length == 1) { // 如果找到一个console.log('这台设备使用过这个小程序,且在数据库找到这台设备', res)if (userNumber == 0) {wx.setStorageSync('studentID', res.data[0].studentID)wx.setStorageSync('studentName', res.data[0].studentName)wx.hideLoading()console.log('在这里调用hideLodging')wx.setStorageSync('status', true)wx.reLaunch({url: '../StudentPage/Tabbar/Tabbar', // 找到学生主页})} else if (userNumber == 1) {wx.setStorageSync('parentsName', res.data[0].name)// 设置父母的名字wx.setStorageSync('childData', res.data[0].child) // 设置孩子数据wx.setStorageSync('_id', res.data[0]._id)wx.setStorageSync('status', true)console.log('在这里调用hideLodging')wx.hideLoading()wx.reLaunch({url: '../ParentPage/Tabbar/Tabbar', // 跳转父母页面})} else {console.log('在这里调用hideLodging')wx.hideLoading()console.log('userNumber出错')}} else {console.log('在这里调用hideLodging')wx.hideLoading()console.log('这台设备使用过这个小程序,但是数据库没有找到这台设备,转去注册')wx.setStorageSync('status', false)wx.redirectTo({url: '../RegisterPage/RegisterPage',})}}).catch(res => {console.log('在这里调用hideLodging')wx.hideLoading()console.log('查询失败,云函数出错', res)})}else if (userNumber == '2') {let adminID = wx.getStorageSync('adminID')let adminPw = wx.getStorageSync('adminPw')const _ = db.commanddb.collection('admin').where(_.and([{adminID: adminID//见这里//https://developers.weixin.qq.com/miniprogram/dev/wxcloud/reference-sdk-api/database/command/Command.and.html}, {adminPw: adminPw}])).get().then(res => {console.log(res)if (res.data.length > 0) {wx.setStorageSync('adminID', res.data[0].adminID)wx.setStorageSync('adminPw', res.data[0].adminPw)wx.setStorageSync('adminName', res.data[0].adminName)wx.setStorageSync('status', true)console.log('在这里调用hideLodging')wx.hideLoading()wx.reLaunch({url: '../AdminsterPage/Tabbar/Tabbar',})} else {console.log('在这里调用hideLodging')wx.hideLoading()wx.setStorageSync('status', false)wx.reLaunch({url: '../RegisterPage/RegisterPage',})}}).catch(res => {console.log('在这里调用hideLodging')wx.hideLoading()console.log(res)})} else {console.log('在这里调用hideLodging')wx.hideLoading()console.log('这台设备没有使用过这个小程序,不转跳让用户选择身份')}},

2.3 推文详情页功能

首先是前端页面:
<view class="passageUser"><view class="passageAvatar"><image class="Avatar" src="../../images/user.png"></image></view><view class="passageUserName"><view style="line-height:100rpx;font-size:40rpx"><text>{{tweets.adminName}}</text></view></view></view><view class="title" style="font-size:40rpx"><text>{{tweets.title}}</text></view> <!-- 此处为标题 --><view class="passage" style="font-size:40rpx"><text>{{tweets.text}}</text></view><view class="container"><view class="divLine"></view></view><view wx:if="{{userNumber=='2'}}"><button bindtap="deleteTweets" type="warn" style="font-size:40rpx;width:30%;margin-top:20% ;position: relative;background-color:red;color: white">删除</button></view><view class='container_bottom_imglist'><block wx:for='{{tweets.photoList}}' wx:key=''><view class='container_bottom_img'><image class='img' bindtap='previewImg' data-img='{{item}}' src='{{item}}' mode="aspectFill"></image></view></block></view>
这里所有的`tweets`、`tweets.photoList`、`tweets.adminName`、`tweets.text`等是在JavaScript文件中有所定义的。
data: {tweets_id: '',tweets: '',userNumber: ''},
这里的`tweets`不是一个简单的数据,而是一个对象
onLoad: function (options) { // 在onload的时候就调用的函数console.log('options', options) // options,在输出的时候是一个空的字典let that = thisthis.setData({tweets_id: options._id, // 这里是前面一个Tabbar页面所推过来的option,userNumber: wx.getStorageSync('userNumber')})console.log('userNumber', this.data.userNumber)wx.cloud.database().collection('tweets').where({ // 获取集合中符合条件的记录_id: that.data.tweets_id // 保存当时的现场}).get().then(res => {console.log(res)that.setData({tweets: res.data[0] // 这里的结果返回出来一定是一个数组}) // 所以这里要是用下标为0的操作,才能读取}).catch(res => {console.log('获取推文失败', res)})},
navToShowPassage:function(e){console.log('e',e)let _id = ''_id = e.currentTarget.dataset.tweets._id // currentTarget:当前组件对象if(_id!==''){wx.setStorageSync('tweets_id', _id)wx.navigateTo({url: '../../ShowPassage/ShowPassage?_id='+_id // ._id 是数据库中的数据,// 具体是哪里设置的这个值// 是在tabbar页中onload函数中获取// 这里不展开讲})}else{console.log('推文的_id出错')}},

至此我们获取到了推文的详情,并显示在页面上。
还有一个重点,我们如何将文件上传并读取?
2.4 编辑推文上传文件功能
前端页面:
丑的很依旧。
<view class="passageUser"><view class="passageAvatar"><open-data type="userAvatarUrl"></open-data></view><view class="passageUserName" style="font-size:40rpx;font-weight:800"><open-data type="userNickName"></open-data></view></view><view class="passage" style="font-size:40rpx;"><input class="title" type="text" bindinput="getTitle" value="标题:"></input><textarea bindinput="getTextarea" maxlength='-1' value="键入文章"></textarea><!-- 加入的代码 --><view class='container_bottom_imglist'><block wx:for='{{photo}}' wx:key=''><view class='container_bottom_img'><image class='clear_img' bindtap='clearimg' data-index='{{index}}' src="/images/clear.png"></image><image class='img' bindtap='previewImg' data-img='{{item}}' src='{{item}}'></image></view></block><image style="" bindtap='headUpImage' class='add_img' src='/images/addimg.png'></image></view><!-- 加入的代码 --></view><view class="submit"><button type="primary" bindtap="headUpTweets"><view style="font-size:40rpx;"><text>提交</text></view></button></view><!-- </view> -->
重点看到22行里,有一个`bindtap='headUpImage'`,显然我们需要将这个`headUpImage`看明白。
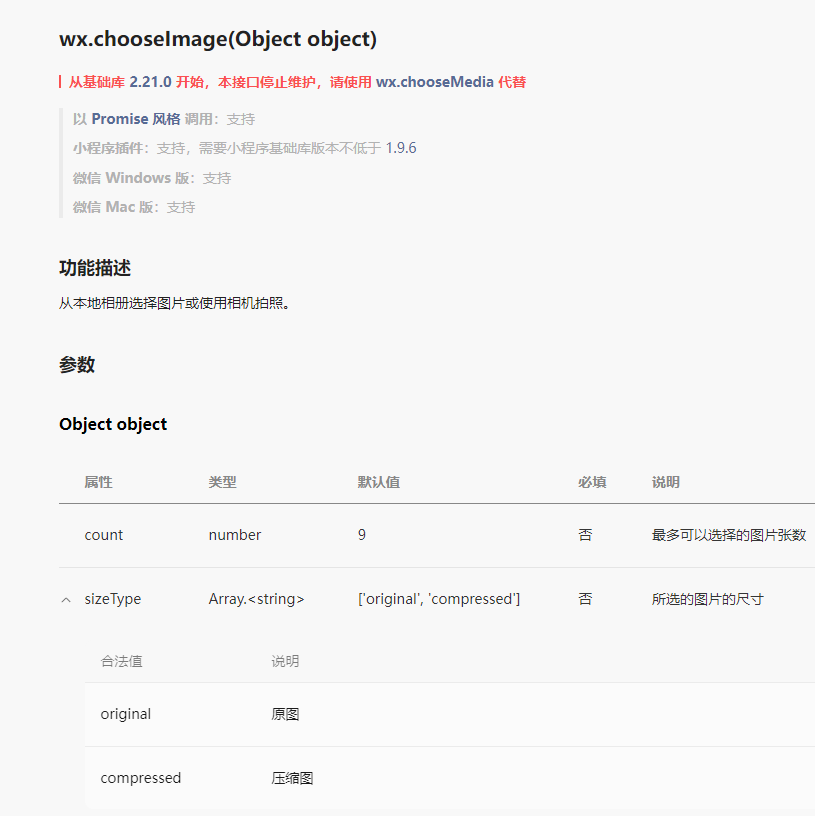
data: {title:'',photo: [], //图片},headUpImage: function (e) {let that = this // 保存当前的thiswx.chooseImage({ // 微信自带的选择图片count: 9, // 参数:可选择多少张,最高值好像就是9张sizeType: ['compressed'], // 参数:所选图片的尺寸,这里用的压缩图sourceType: ['album', 'camera'], // 参数:可以从哪里选择图片,相册与相机success: function (res) { // 参数:是否成功,调用一个函数。利用其返回值var newphoto = that.data.photo; // 这里是将data中的空列表拿来,方便调用that.setData({photo: newphoto.concat(res.tempFilePaths),}) // 先说一下push和concat,这两个方法很像,// 都是将元素正序放入集合中,区别在于,push是在原数组上添加元素// 而concat是存入新数组中。// tempFilePaths本地临时文件路径列表 (本地路径)console.log('photo:',that.data.photo)},fail: function () {} // 失败函数未定义})},
直到这里还是选择图片,还有将图片放入内存中。
接下来是上传推文
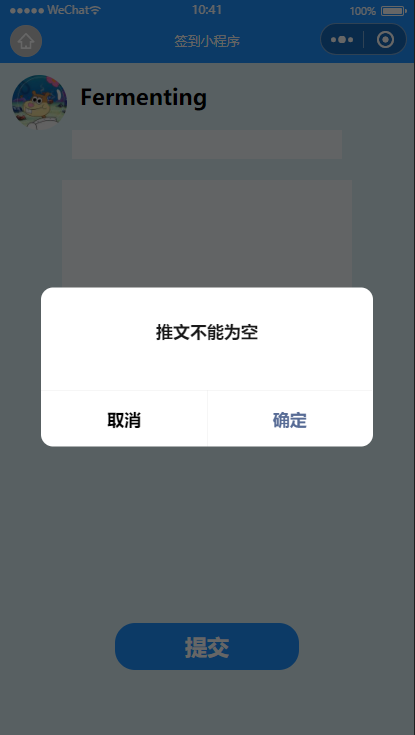
headUpTweets: async function (e) {wx.showLoading({title: '上传中...',mask:true})let that = thislet title = that.data.title // 从前端获取的title,通过一个getTitle函数let time = util.formatTime(new Date) // 获取时间let photoList = await that.savePhoto() // await等待执行完成console.log('photoList:',photoList)if (this.data.textarea != '') {db.collection('tweets').add({ // 在数据库中写入数据data: {title:title,text: that.data.textarea,photoList:photoList,time: time,adminID:wx.getStorageSync('adminID'),adminName:wx.getStorageSync('adminName')}}).then(res => {console.log('res',res)wx.showModal({title: '恭喜',content: '发生推文成功'})console.log('上传成功')setTimeout(function() {wx.navigateBack({})}, 1500)}).catch('上传失败')} else {wx.hideLoading()wx.showModal({title:'推文不能为空'})console.log('推文不能为空')}wx.hideLoading()},
<br />接下来是`savePhoto()`
savePhoto: async function() {var that = this;var photo = that.data.photo; // 临时图片地址var photoTemp = [];for (var i = 0; i < photo.length; i++) {//等待存储图片完成await new Promise((resolve, reject) => {wx.cloud.uploadFile({cloudPath: 'mernorandum/' + that.guid() + '.png', // 上传至云端的路径filePath: photo[i], // 小程序临时文件路径success: res => {// 返回文件 IDphotoTemp[i] = res.fileID;resolve()},fail(err) {console.log(err)reject()}})})}console.log('photoTemp:',photoTemp)return photoTemp;},
Promise,简单来说就是一个容器,里面保存着某个未来才会结束的时间(通常是一个异步操作的结果) 从语法上来说,Promise是一个对象,从它可以获取异步操作的消息。 见: https://www.jianshu.com/p/fe0159f8beb4 https://www.ruanyifeng.com/blog/2015/05/async.html https://zhuanlan.zhihu.com/p/348557507

若有收获,就点个赞吧
0 人点赞
