fusionpbx官网:https://www.fusionpbx.com/download
1)下载fusionpbx:
yum install wgetwget -O - https://raw.githubusercontent.com/fusionpbx/fusionpbx-install.sh/master/centos/pre-install.sh | shcd /usr/src/fusionpbx-install.sh/centos && ./install.sh
2)安装完成后记录登录密码:
Installation has completed.Use a web browser to login.domain name: https://172.16.45.101username: adminpassword: jHIoEfNhKTjcHqdi
3)查看已经安装的服务是否正常启动:
systemctl status freeswitchsystemctl status php-fpmsystemctl status nginxsystemctl status fail2ban
如果未正常启动,检查是否安装。如未安装进入目录cd /usr/src/fusionpbx-install.sh/centos,根据安装脚本进行安装。安装完成后重启系统。
连接数据库的配置文件:
Go to /etc/fusionpbx/config.php on the old server and get the password - look for $db_password.//pgsql: database connection information$db_host = 'localhost'; //set the host only if the database is not local$db_port = '5432';$db_name = 'fusionpbx';$db_username = 'fusionpbx';$db_password = '<my-password>';
4)登录fusionbpx,更改admin的密码
点击【accounts】-【users】进行修改
5)修改监听的IP地址(默认会监听第一张网卡的IP,如需修改为其他网卡)
如默认监听了:172.16.45.101改为监听192.168.45.101
[root@localhost ~]# netstat -lntup | grep 5060tcp 0 0 172.16.45.101:5060 0.0.0.0:* LISTEN 1371/freeswitchtcp6 0 0 ::1:5060 :::* LISTEN 1371/freeswitchudp 0 0 172.16.45.101:5060 0.0.0.0:* 1371/freeswitchudp6 0 0 ::1:5060 :::* 1371/freeswitch[root@localhost ~]# netstat -lntup | grep 5080tcp 0 0 172.16.45.101:5080 0.0.0.0:* LISTEN 1371/freeswitchtcp6 0 0 ::1:5080 :::* LISTEN 1371/freeswitchudp 0 0 172.16.45.101:5080 0.0.0.0:* 1371/freeswitchudp6 0 0 ::1:5080 :::* 1371/freeswitch
点击【advanced】—【sip profile】
把external和internal的sip-ip改为192.168.45.101

更改完成后重启freeswitch
[root@localhost ~]# systemctl restart freeswitch.service[root@localhost ~]# netstat -lntup | grep 5060tcp 0 0 192.168.45.101:5060 0.0.0.0:* LISTEN 2549/freeswitchtcp6 0 0 ::1:5060 :::* LISTEN 2549/freeswitchudp 0 0 192.168.45.101:5060 0.0.0.0:* 2549/freeswitchudp6 0 0 ::1:5060 :::* 2549/freeswitch[root@localhost ~]# netstat -lntup | grep 5080tcp 0 0 192.168.45.101:5080 0.0.0.0:* LISTEN 2549/freeswitchtcp6 0 0 ::1:5080 :::* LISTEN 2549/freeswitchudp 0 0 192.168.45.101:5080 0.0.0.0:* 2549/freeswitchudp6 0 0 ::1:5080 :::* 2549/freeswitch
6)新增域(可按部门,区域进行增加)
点击【advanced】—【domain】进行增加,本例增加域:dh5
7)切换到dh5域,添加终端注册的账号
点击【accounts】—【extensions】,可单个添加,也可以批量导入;导入模板如下:
fusionbpx_user_temp.csv 导入完毕后点击toggle,把用户的状态切换为enable。
8)添加鼎信通达网关
9)设置入方向的路由
10)设置出方向的路由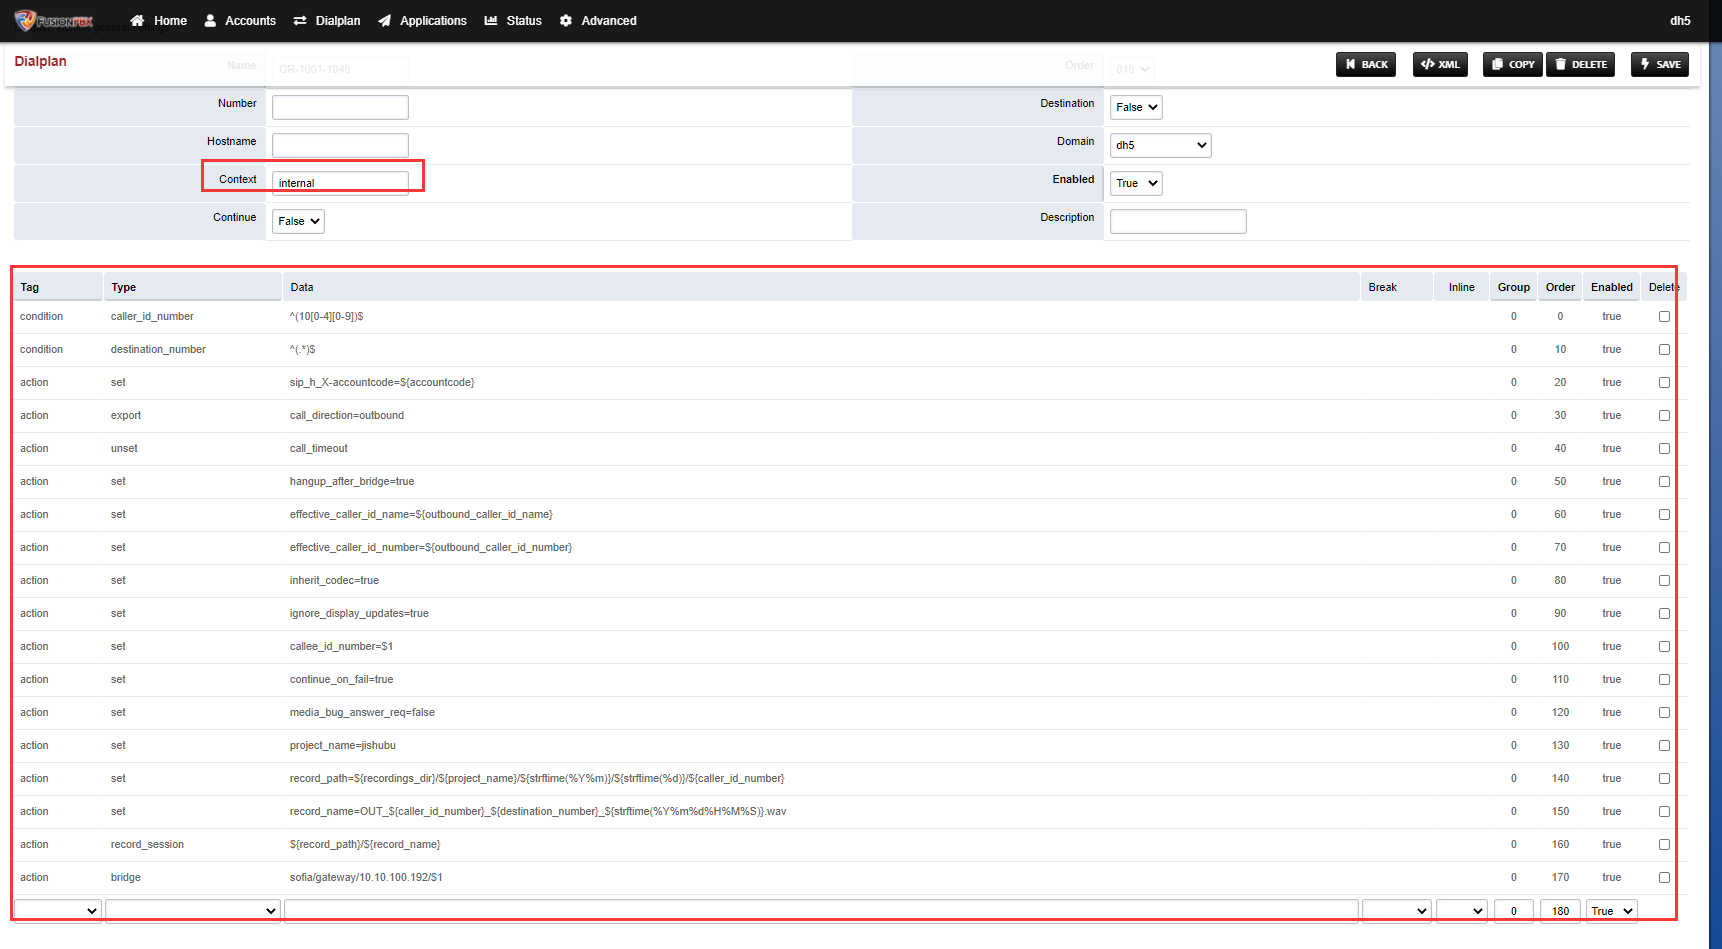
11)设置SIP模板关联路由
12)设置鼎信通达的语音网关—指定sip服务器

13)SIP账号关联端口
14)配置外拨路由
15)配置回拨路由,配置完后重启设备
16)按需求变更录音存储位置
WARNING! The remote SSH server rejected X11 forwarding request.Last login: Thu Mar 18 17:16:35 2021 from 172.16.45.240[root@localhost ~]# ll /var/lib/freeswitch/recordings/total 0[root@localhost ~]# cd /var/lib/freeswitch/[root@localhost freeswitch]# rm -fr recordings[root@localhost freeswitch]# mkdir -p /data/recordings[root@localhost freeswitch]# ln -s /data/recordings ./recordings[root@localhost freeswitch]# lltotal 0drwxrwx--- 2 freeswitch daemon 204 Mar 18 17:41 dbdrwxrwx--- 2 freeswitch daemon 56 Mar 18 17:06 imageslrwxrwxrwx 1 root root 16 Mar 18 21:06 recordings -> /data/recordings[root@localhost freeswitch]# chown -R freeswitch.daemon /data/recordings ./recordings /var/cache/fusionpbx
17)拨打电话测试
18)查看对应的录音
[root@localhost freeswitch]# ll /data/recordings/total 0drwxr-x--- 3 freeswitch daemon 20 Mar 18 21:13 jishubu[root@localhost freeswitch]# ll /data/recordings/jishubu/total 0drwxr-x--- 3 freeswitch daemon 16 Mar 18 21:13 202103

若有收获,就点个赞吧
0 人点赞
