前言
本次解读主要以阅读代码的逻辑编写,而非直接归总性的编写。虽然可能会在阅读时产生疑惑,但是胜在推敲理解的过程。
**
初始准备
$ mkdir egg-example && cd egg-example$ npm init egg --type=simple$ npm i
目录结构
.├── README.md├── app│ ├── controller│ │ └── home.js│ └── router.js├── config│ ├── config.default.js│ └── plugin.js├── package.json└── test└── app└── controller└── home.test.js
版本
- node version v13.10.1
- egg version 2.26.0
- egg-bin version 4.14.1
项目启动
"scripts": {"dev": "egg-bin dev","debug": "egg-bin debug",}
npm run dev// 相当于./node_modules/egg-bin/bin/egg-bin.js dev
源码分析
node_modules/egg-bin/bin/egg-bin.js文件
#!/usr/bin/env node'use strict';const Command = require('..');new Command().start();
找到node_modules/egg-bin/index.js进行分析,之后的路径不做说明都在node_modules/egg-bin
'use strict';const path = require('path');const Command = require('./lib/command');class EggBin extends Command {constructor(rawArgv) {super(rawArgv);this.usage = 'Usage: egg-bin [command] [options]';// load directory// 将当前目录下的lib/cmd文件夹路劲传入load,具体做了什么找到load函数后再做分析this.load(path.join(__dirname, 'lib/cmd'));}}// 导出EggBin对象module.exports = exports = EggBin;// 将以下几个类都挂载在EggBin对象下exports.Command = Command;exports.CovCommand = require('./lib/cmd/cov');exports.DevCommand = require('./lib/cmd/dev');exports.TestCommand = require('./lib/cmd/test');exports.DebugCommand = require('./lib/cmd/debug');exports.PkgfilesCommand = require('./lib/cmd/pkgfiles');
EggBin继承于./lib/command的Command类;
找到./lib/command.js ;
const BaseCommand = require('common-bin');class Command extends BaseCommand {constructor(rawArgv) {super(rawArgv);this.parserOptions = {execArgv: true,removeAlias: true,};// common-bin setter, don't care about override at sub class// https://github.com/node-modules/common-bin/blob/master/lib/command.js#L158this.options = {// ...};}/*** default error handler* @param {Error} err - err obj*/errorHandler(err) {console.error(err);process.nextTick(() => process.exit(1));}get context() {// ...}}
从以上代码可以看出Command又继承于common-bin 模块
从./node_modules/common-bin/lib 下找到command.js
class CommonBin {constructor(rawArgv) {/*** original argument* @type {Array}* 获取到启动后的命令参数,例如dev、port*/this.rawArgv = rawArgv || process.argv.slice(2);debug('[%s] origin argument `%s`', this.constructor.name, this.rawArgv.join(' '));/*** yargs* @type {Object}* 使用yargs解析命令行参数*/this.yargs = yargs(this.rawArgv);/*** helper function* @type {Object}*/this.helper = helper;/*** parserOptions* @type {Object}* @property {Boolean} execArgv - whether extract `execArgv` to `context.execArgv`* @property {Boolean} removeAlias - whether remove alias key from `argv`* @property {Boolean} removeCamelCase - whether remove camel case key from `argv`*/this.parserOptions = {execArgv: false,removeAlias: false,removeCamelCase: false,};// <commandName, Command>this[COMMANDS] = new Map();}// ...}
yargs 模块能够解决如何处理命令行参数,具体教程参考Node.js 命令行程序开发教程
构造函数处理了内容为:
- 获取启动命令行参数
- 使用yargs模块解析命令行参数
- 将helper挂载在this.helper
- 使用
Symbol('Command#commands')建立了一个变量为空Map
回到之前看到的this.load(path.join(__dirname, 'lib/cmd'));
load函数继承于当前CommonBin类,具体如下,需要明白load具体干了什么。
load(fullPath) {// fullPath:/个人/路径/就不显示了/egg-example/node_modules/_egg-bin@4.14.1@egg-bin/lib/cmd// 判断文件夹是否存在并且是不是一个系统目录assert(fs.existsSync(fullPath) && fs.statSync(fullPath).isDirectory(),`${fullPath} should exist and be a directory`);// load entire directory// 这里的const files = fs.readdirSync(fullPath);const names = [];for (const file of files) {if (path.extname(file) === '.js') {/*** 读取到的文件如下* autod.js* cov.js* debug.js* dev.js* pkgfiles.js* test.js*/const name = path.basename(file).replace(/\.js$/, '');names.push(name);// 拿到文件名后文件路径之后,执行了add方法this.add(name, path.join(fullPath, file));}}debug('[%s] loaded command `%s` from directory `%s`',this.constructor.name, names, fullPath);}
以上代码体会:
1.用assert断言来判断,在写egg插件的时候也用到过,但是确实有编程习惯遗留,之前基本上都用的是if判断。
2.for循环读文件算是很熟悉了,无论是orm读model挂载还是koa2里的route准备都差不多。
体会(废话)太多了,代码读到所有文件和文件名之后执行了add方法,继续看add方法;
add(name, target) {assert(name, `${name} is required`);if (!(target.prototype instanceof CommonBin)) {assert(fs.existsSync(target) && fs.statSync(target).isFile(), `${target} is not a file.`);debug('[%s] add command `%s` from `%s`', this.constructor.name, name, target);target = require(target);// try to require es moduleif (target && target.__esModule && target.default) {target = target.default;}assert(target.prototype instanceof CommonBin,'command class should be sub class of common-bin');}this[COMMANDS].set(name, target);}
此处的最终操作是将传过来的文件放入构造函数中建立的空Map中,不过多了一层判断,如果target直接是一个继承于CommonBin的模块传进去的话可以直接赋值处理,如果是路径的话先require作为模块之后赋值处理。处理完后,this[COMMANDS]的值如下
this[COMMANDS]的值Map(6) {'autod' => [Function: AutodCommand],'cov' => [Function: CovCommand],'debug' => [Function: DebugCommand],'dev' => [Function: DevCommand],'pkgfiles' => [Function: PkgfilesCommand],'test' => [Function: TestCommand]}
此时将lib/cmd 下的所有类通过键值对的形式都挂载了this[COMMANDS]下。
到这里load方法初始化已经结束,当我看到这里的时候也是很疑惑的,就像我文章开头写的一样,看源码的过程有时候会带着疑惑,这种疑惑让人焦虑,不过不着急,还有一个start方法还没看,在项目路径node_modules/egg-bin/bin/egg-bin.js下有一行new Command().start(); ,接下来再看start方法,不过在start方法之前,先做之前的内容做一个汇总。
类的继承关系汇总
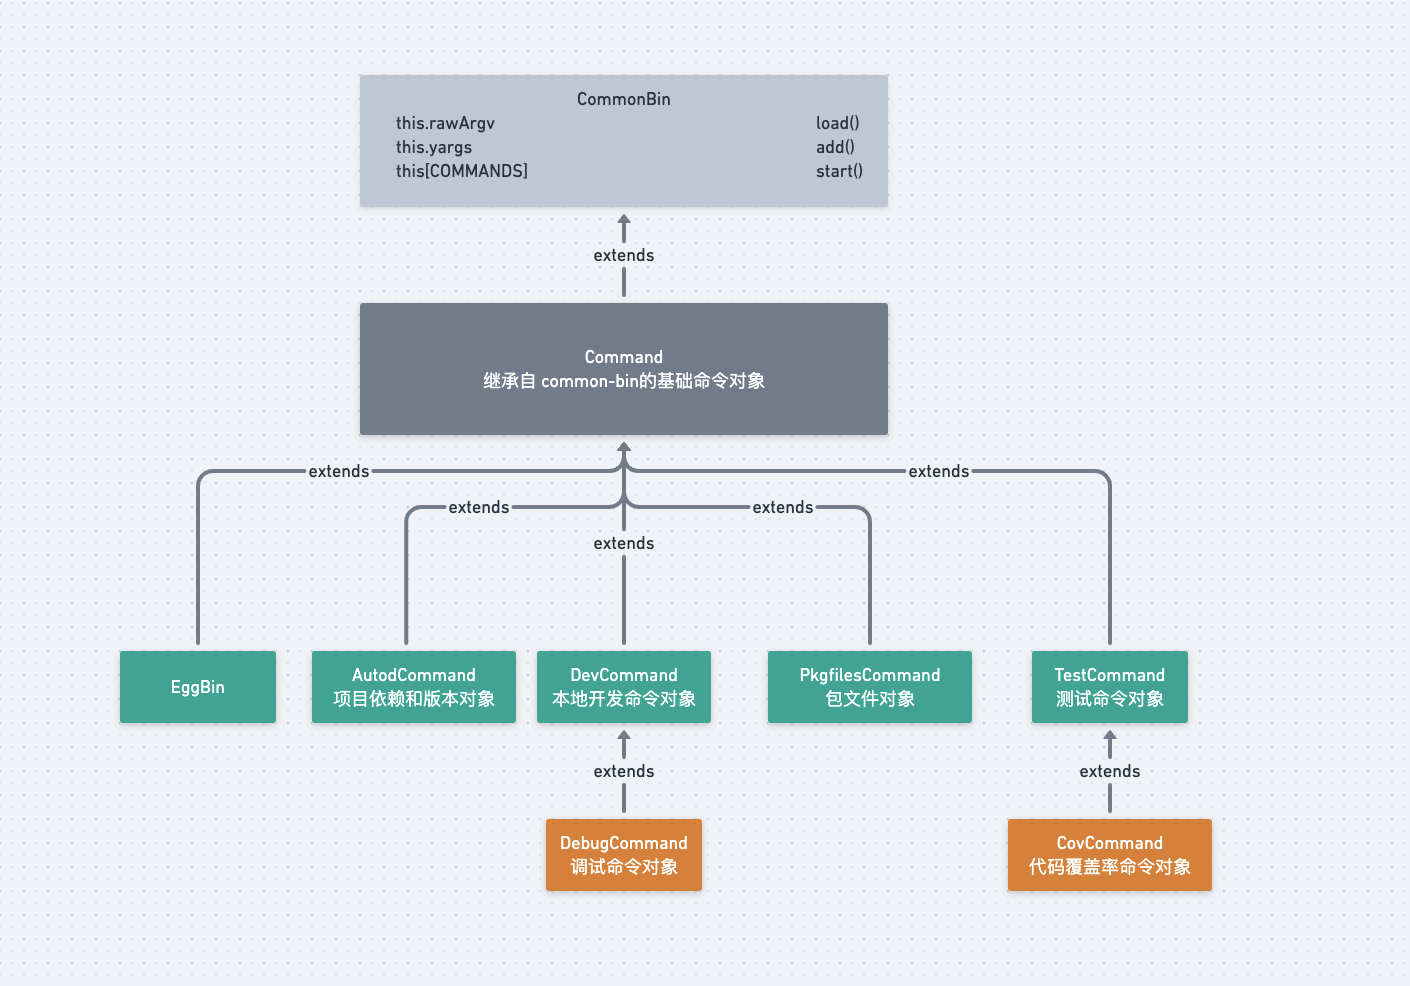
Command —- 继承自 common-bin的基础命令对象
DevCommand —- 本地开发命令对象(egg-bin dev)
DebugCommand —- 调试命令对象(egg-bin debug)
CovCommand —- 代码覆盖率命令对象(egg-bin cov)
TestCommand —- 测试命令对象(egg-bin test)
PkgfilesCommand —- 包文件对象(egg-bin pkgfiles)
AutodCommand —- 项目依赖和版本对象(egg-bin autod)
startnew Command().start();
start() {co(function* () {// replace `--get-yargs-completions` to our KEY, so yargs will not block our DISPATCHconst index = this.rawArgv.indexOf('--get-yargs-completions');if (index !== -1) {// bash will request as `--get-yargs-completions my-git remote add`, so need to remove 2this.rawArgv.splice(index, 2, `--AUTO_COMPLETIONS=${this.rawArgv.join(',')}`);}yield this[DISPATCH]();}.bind(this)).catch(this.errorHandler.bind(this));}
start函数使用了co模块自动执行generator函数,重点在于yield this[DISPATCH]();再来看* [DISPATCH]函数。
补充co模块原理:co 模块其实就是将两种自动执行器(Thunk 函数和 Promise 对象),包装成一个模块。
* [DISPATCH]() {// define --help and --version by defaultthis.yargs// .reset().completion().help().version().wrap(120).alias('h', 'help').alias('v', 'version').group([ 'help', 'version' ], 'Global Options:');// get parsed argument without handling helper and versionconst parsed = yield this[PARSE](this.rawArgv);const commandName = parsed._[0];if (parsed.version && this.version) {console.log(this.version);return;}// if sub command existif (this[COMMANDS].has(commandName)) {const Command = this[COMMANDS].get(commandName);const rawArgv = this.rawArgv.slice();rawArgv.splice(rawArgv.indexOf(commandName), 1);debug('[%s] dispatch to subcommand `%s` -> `%s` with %j', this.constructor.name, commandName, Command.name, rawArgv);const command = this.getSubCommandInstance(Command, rawArgv);yield command[DISPATCH]();return;}// register command for printingfor (const [ name, Command ] of this[COMMANDS].entries()) {this.yargs.command(name, Command.prototype.description || '');}debug('[%s] exec run command', this.constructor.name);const context = this.context;// print completion for bashif (context.argv.AUTO_COMPLETIONS) {// slice to remove `--AUTO_COMPLETIONS=` which we appendthis.yargs.getCompletion(this.rawArgv.slice(1), completions => {// console.log('%s', completions)completions.forEach(x => console.log(x));});} else {// handle by selfyield this.helper.callFn(this.run, [ context ], this);}}
首先先执行yargs的一些自带的方法,然后取到运行参数,例如:npm run dev的时候或者egg-bin dev的时候,会取到parsed._=['dev'],具体的用法参考上面给出的yargs教程链接。所以commandName = dev。
取到commandName之后,用Map的has方法判断是否在Map对象中有该key,如果有的话,获取Map存的类对象,然后把commandName这个对实例化没用的参数删除,再通过getSubCommandInstance方法实例化该类。
实例化的方法再进行递归执行[DISPATCH]函数,才会去使用helper(common-bin中支持异步的关键所在)类继续执行每个command文件中的* run()函数。
还是以npm run dev为例,通过helper的callFn执行了DevCommand的* run
文件路径:./lib/cmd/dev.js
* run(context) {const devArgs = yield this.formatArgs(context);const env = {NODE_ENV: 'development',EGG_MASTER_CLOSE_TIMEOUT: 1000,};const options = {execArgv: context.execArgv,env: Object.assign(env, context.env),};debug('%s %j %j, %j', this.serverBin, devArgs, options.execArgv, options.env.NODE_ENV);yield this.helper.forkNode(this.serverBin, devArgs, options);}
formatArgs主要修改一些执行的参数,例如端口号未传入的时候使用7001之类的。最终执行this.helper.forkNode
传入的参数:
this.serverBin=path.join(__dirname, '../start-cluster');start-cluster为一个可执行脚本devArgs为formatArgs方法格式化过的内容options经过组合的一些列参数,太多了就不一一列出
接下来再看this.helper.forkNode
exports.forkNode = (modulePath, args = [], options = {}) => {options.stdio = options.stdio || 'inherit';debug('Run fork `%s %s %s`', process.execPath, modulePath, args.join(' '));const proc = cp.fork(modulePath, args, options);gracefull(proc);return new Promise((resolve, reject) => {proc.once('exit', code => {childs.delete(proc);if (code !== 0) {const err = new Error(modulePath + ' ' + args + ' exit with code ' + code);err.code = code;reject(err);} else {resolve();}});});};
forkNode做的就是通过子进程启动模块,具体用法参考child_process - 子进程
可以通过ps aux | grep start-cluster找到该进程
文章的结尾看看start-cluster脚本。
#!/usr/bin/env node'use strict';const debug = require('debug')('egg-bin:start-cluster');const options = JSON.parse(process.argv[2]);debug('start cluster options: %j', options);// options.framework = /个人/路径/就不显示了/egg-example/node_modules/eggrequire(options.framework).startCluster(options);
后续启动的就是egg里的startCluster方法了,此后面的内容,下一章再做解读。
**
整体流程图

总结
EggBin中的构造函数loader各个command类对象,挂载到this[COMMANDS] 下,start方法后面的相应对象实例化,到最后的启动startCluster,实现了调试,单元测试和代码覆盖率等功能。一句话来概况的话,egg-bin就是一个非常强的本地开发工具。

若有收获,就点个赞吧
0 人点赞
