前期准备
结构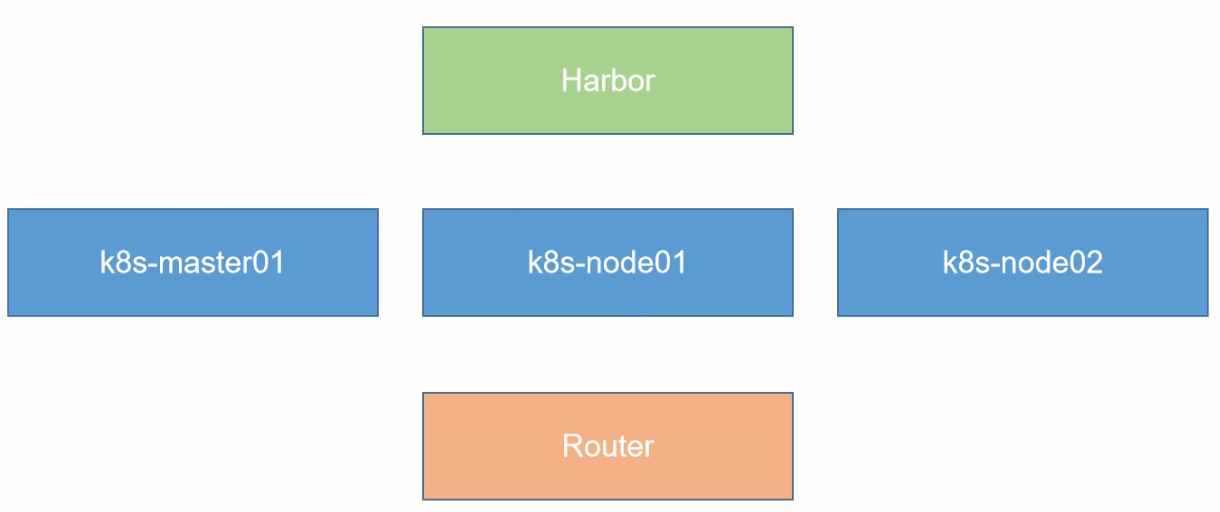
- 安装k8s的节点必须是大于 1 核心的CPU
- 安装节点的网络信息:192.168.66.0/24 master:10 node01:20 node02:21
- koolshare 软路由的默认密码是 koolshare
系统安装
安装机器
centos master01
centos node01
centos node02
centos Harbor
openwrt koolshare
本机是 Centos8,有些步骤不用执行
系统优化
设置系统主机名以及Host文件的相互解析
hostnamectl set-hostname k8s-master01
安装依赖包
yum install -y conntrack ntpdate ntp ipvsadm ipset jq iptables curl sysstat libseccomp wget vim net-tools git
设置防火墙为lptables 并设置空规则
systemctl stop firewalld && systemctl disable firewalldyum -y install iptables-services && systemctl start iptables &&systemctl enable iptables && iptables -F && service iptables save
关闭 SELINUX
swapoff -a && sed -i '/swap / s/^\(.*\)$/#\1/g' /etc/fstabsetenforce 0 && sed -i 's/^SELINUX=.*/SELINUX=disabled/' /etc/selinux/config
调整内核参数,对于K8S
cat > kubernetes.conf << EOFnet.bridge.bridge-nf-call-iptables=1net.bridge.bridge-nf-call-ip6tables=1net.ipv4.ip_forward=1net.ipv4.tcp_tw_recycle=0vm.swappiness=0 #禁止使用swap空间,只有当系统ooM时才允许使用它vm.overcommit_memory=1 #不检查物理内存是否够用vm.panic_on_oom=0 #开启 00Mfs.inotify.max_user_instances=8192fs.inotify.max_user_watches=1048576fs.file-max=52706963fs.nr_open=52706963net.ipv6.conf.all.disable_ipv6=1net.netfilter.nf_conntrack_max=2310720EOFcp kubernetes.conf /etc/sysctl.d/kubernetes.confsysctl -p /etc/sysctl.d/kubernetes.conf
调整系统时区
如果安装系统的时候未设置,需要设置
#设置系统时区为中国/上海timedatectl set-timezone Asia/Shanghai#将当前的UTC时间写入硬件时钟timedatectl set-local-rtc 0#重启依赖于系统时间的服务systemctl restart rsyslogsystemctl restart crond
关闭系统不需要服务
systemctl stop postfix && systemctl disable postfix # 邮件服务
设置rsyslogd 和 systemd journald
mkdir /var/log/journal #持久化保存日志的目录mkdir /etc/systemd/journald.conf.dcat > /etc/systemd/journald.conf.d/99-prophet.conf << EOF[Journal]# 持久化保存到磁盘Storage=persistent# 压缩历史日志Compress=yesSyncIntervalSec=5mRateLimitInterval=30sRateLimitBurst=1000# 最大占用空间10GSystemMaxUse=10G# 单日志文件最大200MSystemMaxFileSize=200M# 日志保存时间 2周MaxRetentionSec=2week# 不将日志转发到 sys1ogForwardToSyslog=noEOFsystemctl restart systemd-journald
升级系统内核为4.44
查看本地内核,如果是4.x, 可以不用升级
CentOS 7.x系统自的3.10.×内核存在一些Bugs,导致运行的Docker、Kubernetes 不稳定,例如:rpm-Uvh http://www.elrepo.org/elrepo-release-7.0-3.el7.elrepo.noarch.rom
rpm -Uvh http://www.elrepo.org/elrepo-release-7.e-3.e17.elrepo.noarch.rpm#安装完成后检查/boot/grub2/grub.cfg中对应内核menuentry中是否包含initrd16配置,如果没有,再安装一次!yum --enablerepo=elrepo-kernel install-y kernel-lt#设置开机从新内核启动grub2-set-default 'CentoS Linux(4.4.189-1.e17.elrepo.×86_64)7(Core)'
配置
kube-proxy开启ipvs的前置条件
modprobe br_netfiltercat > /etc/sysconfig/modules/ipvs.modules <<EOF#!/bin/bashmodprobe -- ip_vsmodprobe -- ip_vs_rrmodprobe -- ip_vs_wrrmodprobe -- ip_vs_shmodprobe -- nf_conntrack_ipv4EOF# 注意:nf_conntrack_ipv4适用于4的内核版本,本内核版本部署时需要修改成modprobe -- nf_conntrack,下面也一样chmod 755 /etc/sysconfig/modules/ipvs.modules && bash /etc/sysconfig/modules/ipvs.modules && lsmod | grep -e ip_vs -e nf_conntrack_ipv4
安装Docker软件
yum install -y yum-utils device-mapper-persistent-data lvm2yum-config-manager --add-repo http://mirrors.aliyun.com/docker-ce/linux/centos/docker-ce.repoyum update -y && yum install -y docker-ce# 如果安装失败(centos7/8),可以通过阿里云镜像库安装符合最新docker-ce版本yum install -y https://mirrors.aliyun.com/docker-ce/linux/centos/7/x86_64/edge/Packages/containerd.io-1.2.13-3.2.el7.x86_64.rpmyum update -y && yum -y install docker-ce docker-ce-cli# 创建/etc/docker目录mkdir /etc/docker# 配置 daemon.# "registry-mirrors" 这行为阿里云国内docker镜像,可以不配置cat > /etc/docker/daemon.json << EOF{"registry-mirrors": ["https://6jtttufe.mirror.aliyuncs.com"],"exec-opts": ["native.cgroupdriver=systemd"],"log-driver": "json-file","log-opts": {"max-size": "100m"}}EOFmkdir -p /etc/systemd/system/docker.service.d#重启docker服务systemctl daemon-reload && systemctl restart docker && systemctl enable docker
安装Kubeadm(主从配置)
每个节点都要安装
cat <<EOF > /etc/yum.repos.d/kubernetes.repo[kubernetes]name=Kubernetes Repobaseurl=http://mirrors.aliyun.com/kubernetes/yum/repos/kubernetes-el7-x86_64enabled=1gpgcheck=1repo_gpgcheck=0gpgkey=http://mirrors.aliyun.com/kubernetes/yum/doc/yum-key.gpg http://mirrors.aliyun.com/kubernetes/yum/doc/rpm-package-key.gpgEOF#在每个节点安装kubeadm(初始化工具)、kubectl(命令行管理工具)、kubelet(与docker的cri交互创建容器)yum -y install kubeadm-1.15.1 kubectl-1.15.1 kubelet-1.15.1#开机自启,暂先不启动systemctl enable kubelet.service
将镜像上传至服务器,然后加载镜像
scp kubeadm-basic.images.tar.gz root@192.168.66.20:/root/# 解压tar -zxvf kubeadm-basic.images.tar.gz# 创建导入脚本[root@k8s-node01 ~]# vi load-images.sh#!/bin/bashls /root/kubeadm-basic.images > /tmp/image-list.txtcd /root/kubeadm-basic.imagesfor i in $( cat /tmp/image-list.txt )dodocker load -i $idonerm -rf /tmp/image-list.txt# 运行导入[root@k8s-node01 ~]# chmod +x load-images.sh[root@k8s-node01 ~]# ./load-images.shfe9a8b4f1dcc: Loading layer [==================================================>] 43.87MB/43.87MBd1e1f61ac9f3: Loading layer [==================================================>] 164.5MB/164.5MBLoaded image: k8s.gcr.io/kube-apiserver:v1.15.1fb61a074724d: Loading layer [==================================================>] 479.7kB/479.7kBc6a5fc8a3f01: Loading layer [==================================================>] 40.05MB/40.05MBLoaded image: k8s.gcr.io/coredns:1.3.18a788232037e: Loading layer [==================================================>] 1.37MB/1.37MB30796113fb51: Loading layer [==================================================>] 232MB/232MB6fbfb277289f: Loading layer [==================================================>] 24.98MB/24.98MBLoaded image: k8s.gcr.io/etcd:3.3.10aa3154aa4a56: Loading layer [==================================================>] 116.4MB/116.4MBLoaded image: k8s.gcr.io/kube-controller-manager:v1.15.1e17133b79956: Loading layer [==================================================>] 744.4kB/744.4kBLoaded image: k8s.gcr.io/pause:3.115c9248be8a9: Loading layer [==================================================>] 3.403MB/3.403MB00bb677df982: Loading layer [==================================================>] 36.99MB/36.99MBLoaded image: k8s.gcr.io/kube-proxy:v1.15.1e8d95f5a4f50: Loading layer [==================================================>] 38.79MB/38.79MBLoaded image: k8s.gcr.io/kube-scheduler:v1.15.1[root@k8s-node01 ~]#
这里检查 是否有 ipvs服务,若没有,则需要安装
初始化主节点
# 生成配置文件# 生成kubeadm config print init-defaults --component-configs KubeProxyConfiguration > kubeadm-config.yaml# 默认的kubeadm config print init-defaults > kubeadm-config.yaml1ocalAPIEndpoint:advertiseAddress: 192.168.66.10kubernetesVersion: v1.15.1 # 版本改成最新的 1.15.1networking:podSubnet: "10.244.0.0/16" # flannel 插件网站默认地址是这个网段serviceSubnet:10.96.0.0/12---apiVersion: kubeproxy.config.k8s.io/v1alpha1kind: KubeProxyconfigurationfeatureGates:SupportIPVSProxyMode: truemode: "ipvs"kubeadm init --config=kubeadm-config.yaml --experimental-upload-certs | tee kubeadm-init.log# 配置完成之后,根据日志操作mkdir -p $HOME/.kubesudo cp -i /etc/kubernetes/admin.conf $HOME/.kube/configsudo chown $(id -u):$(id -g) $HOME/.kube/config# 然后将日志文件及配置文件移动到其他目录,以防误删mkdir -p install-k8s/coremv kubeadm-config.yaml kubeadm-init.log ./install-k8s/coremv install-k8s /usr/local/
部署网络
# 将文件保存至mkdir -p /usr/local/install-k8s/plugin/flannelcd /usr/local/install-k8s/plugin/flannel# 加载flannel插件wget https://raw.githubusercontent.com/coreos/flannel/master/Documentation/kube-flannel.yml# 创建flannelkubectl create -f kube-flannel.yml# 查看运行情况[root@k8s-master01 flannel]# kubectl get pod -n kube-systemNAME READY STATUS RESTARTS AGEcoredns-5c98db65d4-gswcv 1/1 Running 0 13mcoredns-5c98db65d4-vpzjk 1/1 Running 0 13metcd-k8s-master01 1/1 Running 0 12mkube-apiserver-k8s-master01 1/1 Running 0 12mkube-controller-manager-k8s-master01 1/1 Running 0 12mkube-flannel-ds-amd64-bdrs2 1/1 Running 0 2m22skube-proxy-t24cv 1/1 Running 0 13mkube-scheduler-k8s-master01 1/1 Running 0 12m# 查看节点加入后的详细信息[root@k8s-master01 core]# kubectl get pod -n kube-system -o wideNAME READY STATUS RESTARTS AGE IP NODE NOMINATED NODE READINESS GATEScoredns-5c98db65d4-gswcv 1/1 Running 0 18m 10.244.0.3 k8s-master01 <none> <none>coredns-5c98db65d4-vpzjk 1/1 Running 0 18m 10.244.0.2 k8s-master01 <none> <none>etcd-k8s-master01 1/1 Running 0 17m 192.168.66.10 k8s-master01 <none> <none>kube-apiserver-k8s-master01 1/1 Running 0 17m 192.168.66.10 k8s-master01 <none> <none>kube-controller-manager-k8s-master01 1/1 Running 0 17m 192.168.66.10 k8s-master01 <none> <none>kube-flannel-ds-amd64-2wcfx 0/1 Init:0/1 0 47s 192.168.66.20 k8s-node01 <none> <none>kube-flannel-ds-amd64-bdrs2 1/1 Running 0 7m30s 192.168.66.10 k8s-master01 <none> <none>kube-flannel-ds-amd64-blcch 0/1 Init:0/1 0 43s 192.168.66.21 k8s-node02 <none> <none>kube-proxy-cj2ht 1/1 Running 0 47s 192.168.66.20 k8s-node01 <none> <none>kube-proxy-gn59p 1/1 Running 0 43s 192.168.66.21 k8s-node02 <none> <none>kube-proxy-t24cv 1/1 Running 0 18m 192.168.66.10 k8s-master01 <none> <none>kube-scheduler-k8s-master01 1/1 Running 0 17m 192.168.66.10 k8s-master01 <none> <none>[root@k8s-master01 core]## 加参数 -w 监视[root@k8s-master01 core]# kubectl get pod -n kube-system -o wide -wNAME READY STATUS RESTARTS AGE IP NODE NOMINATED NODE READINESS GATEScoredns-5c98db65d4-gswcv 1/1 Running 0 19m 10.244.0.3 k8s-master01 <none> <none>coredns-5c98db65d4-vpzjk 1/1 Running 0 19m 10.244.0.2 k8s-master01 <none> <none>etcd-k8s-master01 1/1 Running 0 18m 192.168.66.10 k8s-master01 <none> <none>kube-apiserver-k8s-master01 1/1 Running 0 18m 192.168.66.10 k8s-master01 <none> <none>kube-controller-manager-k8s-master01 1/1 Running 0 18m 192.168.66.10 k8s-master01 <none> <none>kube-flannel-ds-amd64-2wcfx 0/1 Init:0/1 0 101s 192.168.66.20 k8s-node01 <none> <none>kube-flannel-ds-amd64-bdrs2 1/1 Running 0 8m24s 192.168.66.10 k8s-master01 <none> <none>kube-flannel-ds-amd64-blcch 0/1 Init:0/1 0 97s 192.168.66.21 k8s-node02 <none> <none>kube-proxy-cj2ht 1/1 Running 0 101s 192.168.66.20 k8s-node01 <none> <none>kube-proxy-gn59p 1/1 Running 0 97s 192.168.66.21 k8s-node02 <none> <none>kube-proxy-t24cv 1/1 Running 0 19m 192.168.66.10 k8s-master01 <none> <none>kube-scheduler-k8s-master01 1/1 Running 0 18m 192.168.66.10 k8s-master01 <none> <none>
修改配置,开启ipvs
修改kube-proxy配置
kubectl edit configmap kube-proxy -n kube-system
apiVersion: v1
data:
  config.conf: |-
    apiVersion: kubeproxy.config.k8s.io/v1alpha1
    bindAddress: 0.0.0.0
    clientConnection:
      acceptContentTypes: ""
      burst: 10
      contentType: application/vnd.kubernetes.protobuf
      kubeconfig: /var/lib/kube-proxy/kubeconfig.conf
      qps: 5
    clusterCIDR: 10.244.0.0/16
    configSyncPeriod: 15m0s
    conntrack:
      maxPerCore: 32768
      min: 131072
      tcpCloseWaitTimeout: 1h0m0s
      tcpEstablishedTimeout: 24h0m0s
    enableProfiling: false
    healthzBindAddress: 0.0.0.0:10256
    hostnameOverride: ""
    iptables:
      masqueradeAll: false
      masqueradeBit: 14
      minSyncPeriod: 0s
      syncPeriod: 30s
    ipvs:
      excludeCIDRs: null
      minSyncPeriod: 0s
      scheduler: ""
      strictARP: false
      syncPeriod: 30s
    kind: KubeProxyConfiguration
    metricsBindAddress: 127.0.0.1:10249
    mode: "ipvs"    ## 修改这里
    nodePortAddresses: null
删除所有kube-proxy的pod
kubectl delete pod xxx -n kube-system
校验
kubectl logs kube-proxy-xxx -n kube-system 日志出现Using ipvs Proxier即可
检查ipvs代理规则
kubectl get svc --all-namespaces
# ipvsadm -ln
#可以看到service对应的很多规则
部署出问题时,可以执行 kubeadm reset 还原命令,重新进行安装部署 Kubernetes。
加入主节点以及其余工作节点
执行安装日志中的加入命令即可

# 在node机器上运行日志中命令
Harbor配置
修改docker 配置
同样要安装docker,与上面安装docker配置相同
[root@k8s-Harbor ~]# vi /etc/docker/daemon.json
{
  "registry-mirrors": ["https://6jtttufe.mirror.aliyuncs.com"],
  "exec-opts": ["native.cgroupdriver=systemd"],
  "log-driver": "json-file",
  "log-opts": {
      "max-size": "100m"
  },
  "insecure-registries": ["https://hub.atguigu.com"]   # 添加安全域名,告诉节点,证书是安全的,其他节点也需要添加
}

# 重启docker
systemctl restart docker
加载镜像
先将docker-compose 安装,可将资源包中docker-compose直接传进服务器,然后赋予权限
[root@k8s-Harbor ~]#
[root@k8s-Harbor ~]# ll
总用量 11468
-rw-------. 1 root root     1543 7月  15 10:02 anaconda-ks.cfg
-rw-r--r--. 1 root root 11737584 7月  15 17:03 docker-compose
[root@k8s-Harbor ~]#
[root@k8s-Harbor ~]#
[root@k8s-Harbor ~]# mv docker-compose /usr/local/bin/
[root@k8s-Harbor ~]# ls
anaconda-ks.cfg
[root@k8s-Harbor ~]# chmod a+x /usr/local/bin/docker-compose
[root@k8s-Harbor ~]#
然后将harbor安装文件上传至服务器
# 解压后
[root@k8s-Harbor ~]# cd harbor/
[root@k8s-Harbor harbor]# ls
common  docker-compose.clair.yml  docker-compose.notary.yml  docker-compose.yml  harbor_1_1_0_template  harbor.cfg  harbor.v1.2.0.tar.gz  install.sh  LICENSE  NOTICE  prepare  upgrade
[root@k8s-Harbor harbor]# pwd
/root/harbor
[root@k8s-Harbor harbor]#
[root@k8s-Harbor harbor]# ls
common  docker-compose.clair.yml  docker-compose.notary.yml  docker-compose.yml  harbor_1_1_0_template  harbor.cfg  harbor.v1.2.0.tar.gz  install.sh  LICENSE  NOTICE  prepare  upgrade
[root@k8s-Harbor harbor]# cd ..
[root@k8s-Harbor ~]# ls
anaconda-ks.cfg  harbor  harbor-offline-installer-v1.2.0.tgz
[root@k8s-Harbor ~]# mv harbor /usr/local/
[root@k8s-Harbor ~]#
[root@k8s-Harbor ~]# cd /usr/local/harbor/
[root@k8s-Harbor harbor]# ls
common  docker-compose.clair.yml  docker-compose.notary.yml  docker-compose.yml  harbor_1_1_0_template  harbor.cfg  harbor.v1.2.0.tar.gz  install.sh  LICENSE  NOTICE  prepare  upgrade
[root@k8s-Harbor harbor]#

# 修改配置文件
[root@k8s-Harbor harbor]# vi harbor.cfg
修改域名,改成上面 docker中配置的安全域名
hostname = hub.atguigu.com
# 如果是http, 则改成https
ui_url_protocol = https
创建证书
# 创建 证书目录
[root@k8s-Harbor harbor]# mkdir -p /data/cert
[root@k8s-Harbor harbor]# cd /data/cert/

# 生成私钥,输入密码,如:123123
[root@k8s-Harbor cert]# openssl genrsa -des3 -out server.key 2048
Generating RSA private key, 2048 bit long modulus (2 primes)
.................................+++++
..+++++
e is 65537 (0x010001)
Enter pass phrase for server.key:
Verifying - Enter pass phrase for server.key:
[root@k8s-Harbor cert]#

# 创建证书的请求,输入上面私钥的密码
[root@k8s-Harbor cert]# openssl req -new -key server.key -out server.csr
Enter pass phrase for server.key:
You are about to be asked to enter information that will be incorporated
into your certificate request.
What you are about to enter is what is called a Distinguished Name or a DN.
There are quite a few fields but you can leave some blank
For some fields there will be a default value,
If you enter '.', the field will be left blank.
-----
Country Name (2 letter code) [XX]:CN
State or Province Name (full name) []:GZ
Locality Name (eg, city) [Default City]:SZ
Organization Name (eg, company) [Default Company Ltd]:chengms
Organizational Unit Name (eg, section) []:chengms
Common Name (eg, your name or your server's hostname) []:hub.atr^H^C
[root@k8s-Harbor cert]# openssl req -new -key server.key -out server.csr
Enter pass phrase for server.key:
You are about to be asked to enter information that will be incorporated
into your certificate request.
What you are about to enter is what is called a Distinguished Name or a DN.
There are quite a few fields but you can leave some blank
For some fields there will be a default value,
If you enter '.', the field will be left blank.
-----
Country Name (2 letter code) [XX]:CN
State or Province Name (full name) []:GZ
Locality Name (eg, city) [Default City]:SZ
Organization Name (eg, company) [Default Company Ltd]:chengms
Organizational Unit Name (eg, section) []:chengms
Common Name (eg, your name or your server's hostname) []:hub.atguigu.com
Email Address []:chengms666@163.com

Please enter the following 'extra' attributes
to be sent with your certificate request
A challenge password []:
An optional company name []:
[root@k8s-Harbor cert]#
[root@k8s-Harbor cert]#

# 备份私钥
[root@k8s-Harbor cert]# cp server.key server.key.org

# 转换成证书,这一步是为了把私钥密码退出
[root@k8s-Harbor cert]# openssl ras -in server.key.org -out server.key
Invalid command 'ras'; type "help" for a list.
[root@k8s-Harbor cert]# openssl rsa -in server.key.org -out server.key
Enter pass phrase for server.key.org:
writing RSA key
[root@k8s-Harbor cert]#

# 签名证书
[root@k8s-Harbor cert]# openssl x509 -req -days 365 -in server.csr -signkey server.key -out server.crt
Signature ok
subject=C = CN, ST = GZ, L = SZ, O = chengms, OU = chengms, CN = hub.atguigu.com, emailAddress = chengms666@163.com
Getting Private key
[root@k8s-Harbor cert]#
引导安装
生成证书之后,就可以引导安装了
[root@k8s-Harbor harbor]# ll
总用量 485012
drwxr-xr-x. 4 root root        37 7月  15 17:59 common
-rw-r--r--. 1 root root      1163 9月  11 2017 docker-compose.clair.yml
-rw-r--r--. 1 root root      1988 9月  11 2017 docker-compose.notary.yml
-rw-r--r--. 1 root root      3191 9月  11 2017 docker-compose.yml
-rw-r--r--. 1 root root      4304 9月  11 2017 harbor_1_1_0_template
-rw-r--r--. 1 root root      4345 7月  15 17:58 harbor.cfg
-rw-r--r--. 1 root root 496209164 9月  11 2017 harbor.v1.2.0.tar.gz
-rwxr-xr-x. 1 root root      5332 9月  11 2017 install.sh
-rw-r--r--. 1 root root    371640 9月  11 2017 LICENSE
-rw-r--r--. 1 root root       482 9月  11 2017 NOTICE
-rwxr-xr-x. 1 root root     17686 7月  15 18:04 prepare
-rwxr-xr-x. 1 root root      4550 9月  11 2017 upgrade
[root@k8s-Harbor harbor]# ./install.sh
[Step 0]: checking installation environment ...

Note: docker version: 19.03.12

Note: docker-compose version: 1.23.1

[Step 1]: loading Harbor images ...

Loaded image: vmware/registry:2.6.2-photon
Loaded image: photon:1.0
Loaded image: vmware/notary-photon:signer-0.5.0
Loaded image: vmware/clair:v2.0.1-photon
Loaded image: vmware/harbor-ui:v1.2.0
Loaded image: vmware/harbor-log:v1.2.0
Loaded image: vmware/harbor-db:v1.2.0
Loaded image: vmware/nginx-photon:1.11.13
Loaded image: vmware/postgresql:9.6.4-photon
Loaded image: vmware/harbor-adminserver:v1.2.0
Loaded image: vmware/harbor-jobservice:v1.2.0
Loaded image: vmware/notary-photon:server-0.5.0
Loaded image: vmware/harbor-notary-db:mariadb-10.1.10


[Step 2]: preparing environment ...
Clearing the configuration file: ./common/config/adminserver/env
Clearing the configuration file: ./common/config/ui/env
Clearing the configuration file: ./common/config/ui/app.conf
Clearing the configuration file: ./common/config/ui/private_key.pem
Clearing the configuration file: ./common/config/db/env
Clearing the configuration file: ./common/config/jobservice/env
Clearing the configuration file: ./common/config/jobservice/app.conf
Clearing the configuration file: ./common/config/registry/config.yml
Clearing the configuration file: ./common/config/registry/root.crt
Clearing the configuration file: ./common/config/nginx/cert/server.crt
Clearing the configuration file: ./common/config/nginx/cert/server.key
Clearing the configuration file: ./common/config/nginx/nginx.conf
loaded secret from file: /data/secretkey
Generated configuration file: ./common/config/nginx/nginx.conf
Generated configuration file: ./common/config/adminserver/env
Generated configuration file: ./common/config/ui/env
Generated configuration file: ./common/config/registry/config.yml
Generated configuration file: ./common/config/db/env
Generated configuration file: ./common/config/jobservice/env
Generated configuration file: ./common/config/jobservice/app.conf
Generated configuration file: ./common/config/ui/app.conf
Generated certificate, key file: ./common/config/ui/private_key.pem, cert file: ./common/config/registry/root.crt
The configuration files are ready, please use docker-compose to start the service.


[Step 3]: checking existing instance of Harbor ...


[Step 4]: starting Harbor ...
Creating harbor-log ... done
Creating registry           ... done
Creating harbor-adminserver ... done
Creating harbor-db          ... done
Creating harbor-ui          ... done
Creating harbor-jobservice  ... done
Creating nginx              ... done

✔ ----Harbor has been installed and started successfully.----

Now you should be able to visit the admin portal at https://hub.atguigu.com.
For more details, please visit https://github.com/vmware/harbor .

[root@k8s-Harbor harbor]#
此时已经安装成功,可以在浏览器上打开该网址进行操作了。不过需要先修改windwos的hosts文件,将网址对应IP添加,以使windows中浏览器可以打开改网址。
IPVS 安装
# 安装
yum install -y ipvsadm ipset
mkdir -p /etc/sysconfig/ipvsadm
systemctl start ipvsadm
systemctl enable ipvsadm

若有收获,就点个赞吧
0 人点赞
