1.引言
简介
Hystrix是一个开源的容错框架,可以用于隔离各个远程服务调用,防止因为某一个节点调用失败导致整个调用链路都崩溃
部分概念
服务降级:指的是当调用的服务出现异常/超时时,可以返回一个备用的方案,不至于直接抛异常
- 服务熔断:和服务降级有点类似,但是在Hystrix中还是比较容易区别的;服务熔断指的是当调用的服务异常/超时达到一定的阈值后,服务就会熔断;这时候再去调用服务,服务直接返回备用方案(降级);
- 熔断和降级区别:服务降级是有实际的去调用服务,但是因为服务故障,所以再去调用备用方案;而服务熔断则不会去调用真实服务,而直接调用备用方案
服务隔离:Hystrix中的服务隔离分为线程隔离和信号量隔离;当系统中某个服务故障后,如果没有隔离,而且访问量很大,会导致所有线程都去调用这个服务,而请求其他可用服务时,没有线程(资源)可以去执行了;所以需要对服务做隔离;以线程隔离为例,每种服务都有一个线程池,调用该服务时,会把请求交给它的线程池去执行;这样,即使该服务挂了,大量请求涌入,最终还是交给该服务的线程池执行,而其他服务的线程池(资源)不受影响,还是可用的
前置知识
Hystrix的源码中涉及到了大量的RxJava方面的内容,所以如果要有比较好的阅读体验,最好先了解一下RxJava的一些内容;
- RxJava运用了类似发布-订阅的模式,事件源发布事件后,可以对事件流做流式处理;在Android中应用的比较多
- 本文不会对RxJava做过多介绍(因为博主也不大会。。。),觉得有需要的可以先了解一下再看源码可能比较好理解一些
2.Hystrix总览
执行流程
- 先看一下官方给出的执行流程图
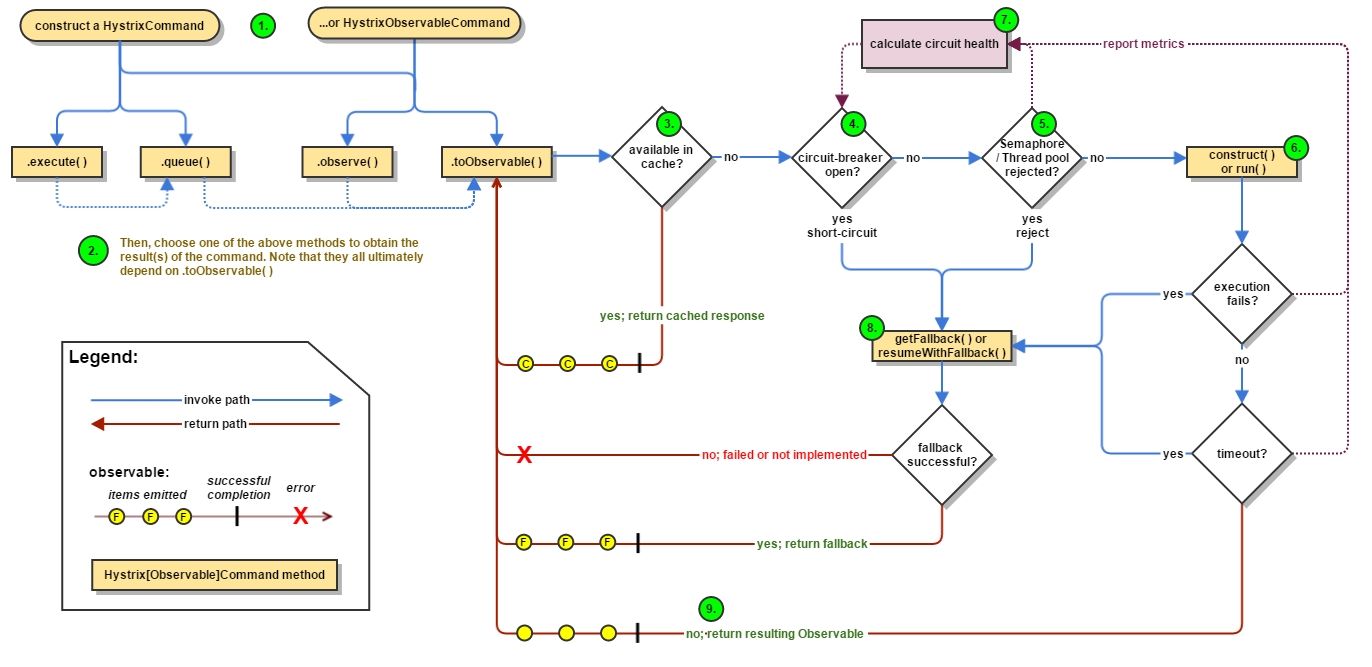
- 总体执行步骤如下
- 根据要调用的服务构造HystrixCommand,代表本次调用的服务;toObservable()方法会将服务构造成一个Observable对象,这样可以在该事件上做一些处理;这部分涉及RxJava知识
- 接下来执行HystrixCommand,先判断该服务是否有缓存结果,有则执行返回;没有则执行下一步
- 判断断路器CircuitBreaker是否打开,即服务的熔断状态,打开则执行调用fallback降级方法并返回;否则下一步
- 判断是否能够拿到资源(线程/信号量),不能则直接降级;否则下一步
- 执行服务,如果服务执行失败/超时,则调用降级方法返回;成功则直接返回
- 执行服务时,成功或失败都会反馈到图中的calculate circuit health,它的作用是监控服务的执行情况,并根据异常情况来决定打开还是关闭熔断器
源码分析
- 通过上面的分析可以看出,Hystrix的入口是HystrixCommand;测试时,可以自己构造一个HystrixCommand来执行服务,或者直接使用注解方式;
- 如果使用手动创建,只需要创建HystrixCommand并实现run方法即可
如果使用注解
@HystrixCommand,那么Hystrix会在IOC容器中注入一个HystrixCommandAspect切面类,该切面会对含有@HystrixCommand注解的方法做代理;大致的逻辑就是封装该方法调用成为HystrixCommand对象,然后执行即可;源码可参考如下//HystrixCommandAspect#methodsAnnotatedWithHystrixCommand//这是一个环绕增强,切点是@HystrixCommand注解的方法@Around("hystrixCommandAnnotationPointcut() || hystrixCollapserAnnotationPointcut()")public Object methodsAnnotatedWithHystrixCommand(final ProceedingJoinPoint joinPoint) throws Throwable {Method method = getMethodFromTarget(joinPoint);...MetaHolderFactory metaHolderFactory = META_HOLDER_FACTORY_MAP.get(HystrixPointcutType.of(method));//创建一个methodHolder,把joinPoint封装进来,这样后续joinPoint的执行都在HystrixCommand中MetaHolder metaHolder = metaHolderFactory.create(joinPoint);//这里会创建一个HystrixCommand对象,即本次调用服务,HystrixCommand同时也是HystrixInvokable类型HystrixInvokable invokable = HystrixCommandFactory.getInstance().create(metaHolder);...try {if (!metaHolder.isObservable()) {//接着就是执行了,这个方法调用最终会调用到HystrixCommand.execute()方法result = CommandExecutor.execute(invokable, executionType, metaHolder);} else {result = executeObservable(invokable, executionType, metaHolder);}}...return result;}
创建HystrixCommand时,由于它是抽象类,常用的实现类是GenericCommand;不过重点逻辑都在
HystrixCommand和它的父类AbstractCommand中;接下来看看AbstractCommand的构造方法protected AbstractCommand(HystrixCommandGroupKey group, HystrixCommandKey key, HystrixThreadPoolKey threadPoolKey, HystrixCircuitBreaker circuitBreaker, HystrixThreadPool threadPool,HystrixCommandProperties.Setter commandPropertiesDefaults, HystrixThreadPoolProperties.Setter threadPoolPropertiesDefaults,HystrixCommandMetrics metrics, TryableSemaphore fallbackSemaphore, TryableSemaphore executionSemaphore,HystrixPropertiesStrategy propertiesStrategy, HystrixCommandExecutionHook executionHook) {//初始化命令及其组的key,这个key用于标识该服务,后面很多组件就可以通过key来拿到this.commandGroup = initGroupKey(group);this.commandKey = initCommandKey(key, getClass());//初始化一些属性this.properties = initCommandProperties(this.commandKey, propertiesStrategy, commandPropertiesDefaults);this.threadPoolKey = initThreadPoolKey(threadPoolKey, this.commandGroup, this.properties.executionIsolationThreadPoolKeyOverride().get());//metrics会负责统计该服务的各种调用情况this.metrics = initMetrics(metrics, this.commandGroup, this.threadPoolKey, this.commandKey, this.properties);//该服务的熔断器this.circuitBreaker = initCircuitBreaker(this.properties.circuitBreakerEnabled().get(), circuitBreaker, this.commandGroup, this.commandKey, this.properties, this.metrics);//该服务的线程池this.threadPool = initThreadPool(threadPool, this.threadPoolKey, threadPoolPropertiesDefaults);//Strategies from pluginsthis.eventNotifier = HystrixPlugins.getInstance().getEventNotifier();this.concurrencyStrategy = HystrixPlugins.getInstance().getConcurrencyStrategy();HystrixMetricsPublisherFactory.createOrRetrievePublisherForCommand(this.commandKey, this.commandGroup, this.metrics, this.circuitBreaker, this.properties);this.executionHook = initExecutionHook(executionHook);this.requestCache = HystrixRequestCache.getInstance(this.commandKey, this.concurrencyStrategy);this.currentRequestLog = initRequestLog(this.properties.requestLogEnabled().get(), this.concurrencyStrategy);/* fallback semaphore override if applicable */this.fallbackSemaphoreOverride = fallbackSemaphore;/* execution semaphore override if applicable */this.executionSemaphoreOverride = executionSemaphore;}
需要注意的是,每次服务调用都会生成一个HystrixCommand,但是该对象中的很多依赖都是有缓存的,所以只有第一次生成该服务的HystrixCommand时,才会创建,后面直接从缓存取;
- 接下来看看HystrixCommand的execute方法,它是Hystrix方法执行的入口
```java
public R execute() {
try {
} catch (Exception e) {//queue()方法返回future,再调用get阻塞等待return queue().get();
} }throw Exceptions.sneakyThrow(decomposeException(e));
public Future
- 接下来就是重点的toObservable()了,它会对服务进行封装,并且添加各种处理,这里面涉及很多RxJava知识;并且该方法比较长,此处做大量省略```javapublic Observable<R> toObservable() {final AbstractCommand<R> _cmd = this;//命令执行完的回调操作final Action0 terminateCommandCleanup = new Action0() {...};//unsubscribe取消订阅时执行的操作final Action0 unsubscribeCommandCleanup = new Action0() {...};//这个是执行命令时的回调函数,重点final Func0<Observable<R>> applyHystrixSemantics = new Func0<Observable<R>>() {@Overridepublic Observable<R> call() {if (commandState.get().equals(CommandState.UNSUBSCRIBED)) {return Observable.never();}return applyHystrixSemantics(_cmd);}};final Func1<R, R> wrapWithAllOnNextHooks = new Func1<R, R>() {...};final Action0 fireOnCompletedHook = new Action0() {...};//创建Observable,设置各种处理操作return Observable.defer(new Func0<Observable<R>>() {@Overridepublic Observable<R> call() {//设置已启动标志if (!commandState.compareAndSet(CommandState.NOT_STARTED, CommandState.OBSERVABLE_CHAIN_CREATED)) {IllegalStateException ex = new IllegalStateException("This instance can only be executed once. Please instantiate a new instance.");//TODO make a new error type for thisthrow new HystrixRuntimeException(FailureType.BAD_REQUEST_EXCEPTION, _cmd.getClass(), getLogMessagePrefix() + " command executed multiple times - this is not permitted.", ex, null);}commandStartTimestamp = System.currentTimeMillis();...//缓存处理final boolean requestCacheEnabled = isRequestCachingEnabled();final String cacheKey = getCacheKey();/* try from cache first */if (requestCacheEnabled) {HystrixCommandResponseFromCache<R> fromCache = (HystrixCommandResponseFromCache<R>) requestCache.get(cacheKey);if (fromCache != null) {isResponseFromCache = true;return handleRequestCacheHitAndEmitValues(fromCache, _cmd);}}//创建Observable,注意内部使用applyHystrixSemantics来生成ObservableObservable<R> hystrixObservable =Observable.defer(applyHystrixSemantics).map(wrapWithAllOnNextHooks);Observable<R> afterCache;// put in cache 根据是否缓存来做处理if (requestCacheEnabled && cacheKey != null) {// wrap it for cachingHystrixCachedObservable<R> toCache = HystrixCachedObservable.from(hystrixObservable, _cmd);HystrixCommandResponseFromCache<R> fromCache = (HystrixCommandResponseFromCache<R>) requestCache.putIfAbsent(cacheKey, toCache);if (fromCache != null) {// another thread beat us so we'll use the cached value insteadtoCache.unsubscribe();isResponseFromCache = true;return handleRequestCacheHitAndEmitValues(fromCache, _cmd);} else {// we just created an ObservableCommand so we cast and return itafterCache = toCache.toObservable();}} else {afterCache = hystrixObservable;}//这个afterCache最终是前面的hystrixObservable,或由他封装而来,//这里设置各种监听处理操作return afterCache.doOnTerminate(terminateCommandCleanup) // perform cleanup once (either on normal terminal state (this line), or unsubscribe (next line)).doOnUnsubscribe(unsubscribeCommandCleanup) // perform cleanup once.doOnCompleted(fireOnCompletedHook);}});}
- 最终生成Observble的逻辑是applyHystrixSemantics由这个匿名内部类来执行,再看一下上面的这个类
```java
final Func0
call() {
} };if (commandState.get().equals(CommandState.UNSUBSCRIBED)) {return Observable.never();}//调用AbstractCommand的方法return applyHystrixSemantics(_cmd);
private Observable
//执行前判断断路器是否打开if (circuitBreaker.allowRequest()) {//拿到该服务的信号量final TryableSemaphore executionSemaphore = getExecutionSemaphore();final AtomicBoolean semaphoreHasBeenReleased = new AtomicBoolean(false);final Action0 singleSemaphoreRelease = new Action0() {@Overridepublic void call() {if (semaphoreHasBeenReleased.compareAndSet(false, true)) {executionSemaphore.release();}}};final Action1<Throwable> markExceptionThrown = new Action1<Throwable>() {@Overridepublic void call(Throwable t) {eventNotifier.markEvent(HystrixEventType.EXCEPTION_THROWN, commandKey);}};//尝试获取信号量if (executionSemaphore.tryAcquire()) {try {/* used to track userThreadExecutionTime */executionResult = executionResult.setInvocationStartTime(System.currentTimeMillis());//调用executeCommandAndObserve创建Observable,并设置各种回调return executeCommandAndObserve(_cmd).doOnError(markExceptionThrown).doOnTerminate(singleSemaphoreRelease).doOnUnsubscribe(singleSemaphoreRelease);} catch (RuntimeException e) {return Observable.error(e);}} else {//获取失败则降级return handleSemaphoreRejectionViaFallback();}} else {//断路器已打开,直接降级return handleShortCircuitViaFallback();}
}
- 接下来是AbstractCommand#executeCommandAndObserve方法创建Observable```javaprivate Observable<R> executeCommandAndObserve(final AbstractCommand<R> _cmd) {final HystrixRequestContext currentRequestContext = HystrixRequestContext.getContextForCurrentThread();//下面仍然是几个回调匿名内部类final Action1<R> markEmits = new Action1<R>() {...};final Action0 markOnCompleted = new Action0() {@Overridepublic void call() {if (!commandIsScalar()) {long latency = System.currentTimeMillis() - executionResult.getStartTimestamp();eventNotifier.markCommandExecution(getCommandKey(), properties.executionIsolationStrategy().get(), (int) latency, executionResult.getOrderedList());eventNotifier.markEvent(HystrixEventType.SUCCESS, commandKey);executionResult = executionResult.addEvent((int) latency, HystrixEventType.SUCCESS);circuitBreaker.markSuccess();}}};final Func1<Throwable, Observable<R>> handleFallback = new Func1<Throwable, Observable<R>>() {@Overridepublic Observable<R> call(Throwable t) {Exception e = getExceptionFromThrowable(t);executionResult = executionResult.setExecutionException(e);if (e instanceof RejectedExecutionException) {return handleThreadPoolRejectionViaFallback(e);} else if (t instanceof HystrixTimeoutException) {return handleTimeoutViaFallback();} else if (t instanceof HystrixBadRequestException) {return handleBadRequestByEmittingError(e);} else {/** Treat HystrixBadRequestException from ExecutionHook like a plain HystrixBadRequestException.*/if (e instanceof HystrixBadRequestException) {eventNotifier.markEvent(HystrixEventType.BAD_REQUEST, commandKey);return Observable.error(e);}return handleFailureViaFallback(e);}}};final Action1<Notification<? super R>> setRequestContext = new Action1<Notification<? super R>>() {..};Observable<R> execution;//判断超时功能是否打开if (properties.executionTimeoutEnabled().get()) {//如果打开了,则通过lift操作来加入超时控制execution = executeCommandWithSpecifiedIsolation(_cmd).lift(new HystrixObservableTimeoutOperator<R>(_cmd));} else {execution = executeCommandWithSpecifiedIsolation(_cmd);}return execution.doOnNext(markEmits).doOnCompleted(markOnCompleted).onErrorResumeNext(handleFallback).doOnEach(setRequestContext);}
executeCommandWithSpecifiedIsolation()方法会根据不同的隔离策略,生成不同的Observable;主要有按线程隔离和按信号量隔离
private Observable<R> executeCommandWithSpecifiedIsolation(final AbstractCommand<R> _cmd) {//线程隔离if (properties.executionIsolationStrategy().get() == ExecutionIsolationStrategy.THREAD) {//创建一个Observablereturn Observable.defer(new Func0<Observable<R>>() {@Overridepublic Observable<R> call() {...//设置线程启动if (threadState.compareAndSet(ThreadState.NOT_USING_THREAD, ThreadState.STARTED)) {//we have not been unsubscribed, so should proceedHystrixCounters.incrementGlobalConcurrentThreads();threadPool.markThreadExecution();// store the command that is being runendCurrentThreadExecutingCommand = Hystrix.startCurrentThreadExecutingCommand(getCommandKey());executionResult = executionResult.setExecutedInThread();/*** If any of these hooks throw an exception, then it appears as if the actual execution threw an error*/try {executionHook.onThreadStart(_cmd);executionHook.onRunStart(_cmd);executionHook.onExecutionStart(_cmd);//返回一个Observable,这个函数最终会返回一个封装了我们的run()逻辑的Observablereturn getUserExecutionObservable(_cmd);} catch (Throwable ex) {return Observable.error(ex);}} else {//command has already been unsubscribed, so return immediatelyreturn Observable.error(new RuntimeException("unsubscribed before executing run()"));}}//回调设置}).doOnTerminate(new Action0() {...}).doOnUnsubscribe(new Action0() {...}).subscribeOn(threadPool.getScheduler(new Func0<Boolean>() {...}));} else {//信号量隔离...}}
到这里,就创建完成一个Observable对象了,创建过程中设置了各种回调操作;这些操作包括了超时监控,服务隔离执行,调用结果反馈等等;而这些才是Hystrix的重点,后面会慢慢解析;
3.Hystrix断路器
核心类
- Hystrix对于每一个命令(HystrixCommand)都有一个相关的断路器
HystrixCircuitBreaker;断路器负责管理该命令是否熔断 HystrixCircuitBreaker是断路器的接口,声明的方法比较简单public interface HystrixCircuitBreaker {//HystrixCommand命令执行前,会调用该方法,判断是否可以执行,不行就直接降级public boolean allowRequest();//判断当前断路器是否打开,打开则服务熔断public boolean isOpen();//标记命令执行成功,这个方法会关闭掉断路器void markSuccess();}
每一个HystrixCommand命令都有一个断路器,在构造该对象的时候会从缓存中取出该命令的断路器;可以翻一下第二节中的源码,在这里再次贴一下HystrixCommand构造时的部分内容
protected AbstractCommand(HystrixCommandGroupKey group, HystrixCommandKey key, HystrixThreadPoolKey threadPoolKey, HystrixCircuitBreaker circuitBreaker, HystrixThreadPool threadPool,HystrixCommandProperties.Setter commandPropertiesDefaults, HystrixThreadPoolProperties.Setter threadPoolPropertiesDefaults,HystrixCommandMetrics metrics, TryableSemaphore fallbackSemaphore, TryableSemaphore executionSemaphore,HystrixPropertiesStrategy propertiesStrategy, HystrixCommandExecutionHook executionHook) {this.commandGroup = initGroupKey(group);this.commandKey = initCommandKey(key, getClass());this.properties = initCommandProperties(this.commandKey, propertiesStrategy, commandPropertiesDefaults);this.threadPoolKey = initThreadPoolKey(threadPoolKey, this.commandGroup, this.properties.executionIsolationThreadPoolKeyOverride().get());this.metrics = initMetrics(metrics, this.commandGroup, this.threadPoolKey, this.commandKey, this.properties);//获取该命令的断路器this.circuitBreaker = initCircuitBreaker(this.properties.circuitBreakerEnabled().get(), circuitBreaker, this.commandGroup, this.commandKey, this.properties, this.metrics);this.threadPool = initThreadPool(threadPool, this.threadPoolKey, threadPoolPropertiesDefaults);}
HystrixCircuitBreakerImpl:是断路器的默认实现,看一下其成员变量static class HystrixCircuitBreakerImpl implements HystrixCircuitBreaker {//存储相关属性private final HystrixCommandProperties properties;//监控指标,metrics负责该命令调用的各项指标信息,断路器会根据这些指标信息决定是否熔断private final HystrixCommandMetrics metrics;//标志断路器是否打开private AtomicBoolean circuitOpen = new AtomicBoolean(false);private AtomicLong circuitOpenedOrLastTestedTime = new AtomicLong();}
源码分析
前面第二节分析HystrixCommand执行流程的时候,有如下过程会判断断路器是否打开
private Observable<R> applyHystrixSemantics(final AbstractCommand<R> _cmd) {// mark that we're starting execution on the ExecutionHook// if this hook throws an exception, then a fast-fail occurs with no fallback. No state is left inconsistentexecutionHook.onStart(_cmd);//执行前判断断路器是否打开if (circuitBreaker.allowRequest()) {//拿到该服务的信号量final TryableSemaphore executionSemaphore = getExecutionSemaphore();final AtomicBoolean semaphoreHasBeenReleased = new AtomicBoolean(false);final Action0 singleSemaphoreRelease = new Action0() {@Overridepublic void call() {if (semaphoreHasBeenReleased.compareAndSet(false, true)) {executionSemaphore.release();}}};}...}
接下来看一下
HystrixCircuitBreakerImpl的allowRequest方法@Overridepublic boolean allowRequest() {//检查是否配置了forceOpen属性,是则返回false,代表不允许执行if (properties.circuitBreakerForceOpen().get()) {// properties have asked us to force the circuit open so we will allow NO requestsreturn false;}//检查是否配置了forceClose属性,是则返回true,代表允许执行if (properties.circuitBreakerForceClosed().get()) {// we still want to allow isOpen() to perform it's calculations so we simulate normal behaviorisOpen();// properties have asked us to ignore errors so we will ignore the results of isOpen and just allow all traffic throughreturn true;}//如果没配置以上属性,那么断路器会根据当前命令调用情况判断断路器是否打开return !isOpen() || allowSingleTest();}
看一下
isOpen方法@Overridepublic boolean isOpen() {//若断路器已打开,直接返回trueif (circuitOpen.get()) {// if we're open we immediately return true and don't bother attempting to 'close' ourself as that is left to allowSingleTest and a subsequent successful test to closereturn true;}//如果现在断路器关闭,还需要通过metrics的指标判断以下是否已经达到了打开的标准HealthCounts health = metrics.getHealthCounts();// 判断请求次数是否到达阈值,未到达则不进行判断,直接返回falseif (health.getTotalRequests() < properties.circuitBreakerRequestVolumeThreshold().get()) {// we are not past the minimum volume threshold for the statisticalWindow so we'll return false immediately and not calculate anythingreturn false;}//判断异常率是否小于阈值if (health.getErrorPercentage() < properties.circuitBreakerErrorThresholdPercentage().get()) {return false;} else {//到这里说明异常率高于阈值了,需要打开断路器if (circuitOpen.compareAndSet(false, true)) {// if the previousValue was false then we want to set the currentTimecircuitOpenedOrLastTestedTime.set(System.currentTimeMillis());return true;} else {//这里说明其他线程已经设置了断路器打开,直接返回truereturn true;}}}
isOpen会根据metrics统计的信息,判断断路器是否应该打开;如果isOpen返回true,代表断路器打开;但是打开了也可能会执行该命令(不然断路器一直打开,就永远没法执行了);因为Hystrix在断路器打开过了一定的时间窗口后,会放过去少量请求去执行,探测一下是否执行成功,成功就会关闭断路器;这就是接下来allowSingleTest方法的内容public boolean allowSingleTest() {long timeCircuitOpenedOrWasLastTested = circuitOpenedOrLastTestedTime.get();//如果当前断路器已经打开,并且已经过了时间窗口指定的时间,则允许执行if (circuitOpen.get() && System.currentTimeMillis() > timeCircuitOpenedOrWasLastTested + properties.circuitBreakerSleepWindowInMilliseconds().get()) {// We push the 'circuitOpenedTime' ahead by 'sleepWindow' since we have allowed one request to try.// If it succeeds the circuit will be closed, otherwise another singleTest will be allowed at the end of the 'sleepWindow'.if (circuitOpenedOrLastTestedTime.compareAndSet(timeCircuitOpenedOrWasLastTested, System.currentTimeMillis())) {// if this returns true that means we set the time so we'll return true to allow the singleTest// if it returned false it means another thread raced us and allowed the singleTest before we didreturn true;}}return false;}
当命令执行成功后,会调用markSuccess命令,关闭断路器,并重置Metrics的统计信息
public void markSuccess() {if (circuitOpen.get()) {if (circuitOpen.compareAndSet(true, false)) {//win the thread race to reset metrics//Unsubscribe from the current stream to reset the health counts stream. This only affects the health counts view,//and all other metric consumers are unaffected by the resetmetrics.resetStream();}}}
4.Hystrix隔离策略
概述
- Hystrix的隔离策略主要有
- 信号量隔离:每个命令执行前必须拿到信号量,如果拿不到,就调用fallback方法降级
- 线程隔离:任务执行在单独的线程里
源码分析
在第二节分析命令执行过程中,有如下过程
private Observable<R> applyHystrixSemantics(final AbstractCommand<R> _cmd) {...//判断断路器是否打开if (circuitBreaker.allowRequest()) {//拿到执行的信号量,不同隔离策略的信号量实现类不同final TryableSemaphore executionSemaphore = getExecutionSemaphore();final AtomicBoolean semaphoreHasBeenReleased = new AtomicBoolean(false);...//尝试获取信号量if (executionSemaphore.tryAcquire()) {try {/* used to track userThreadExecutionTime */executionResult = executionResult.setInvocationStartTime(System.currentTimeMillis());return executeCommandAndObserve(_cmd).doOnError(markExceptionThrown).doOnTerminate(singleSemaphoreRelease).doOnUnsubscribe(singleSemaphoreRelease);} catch (RuntimeException e) {return Observable.error(e);}} else {//获取失败则直接降级return handleSemaphoreRejectionViaFallback();}} else {return handleShortCircuitViaFallback();}}
从上面可以看出,无论是哪种隔离策略,都必须拿到信号量才行;而不同的隔离策略,拿到的信号量是不同的
protected TryableSemaphore getExecutionSemaphore() {//信号量隔离if (properties.executionIsolationStrategy().get() == ExecutionIsolationStrategy.SEMAPHORE) {//若这个变量不为空,直接返回该信号量if (executionSemaphoreOverride == null) {//根据commandKey拿到属于这个命令的信号量,每个断路器都有一个信号量TryableSemaphore _s = executionSemaphorePerCircuit.get(commandKey.name());if (_s == null) {//如果没有则创建并缓存executionSemaphorePerCircuit.putIfAbsent(commandKey.name(), new TryableSemaphoreActual(properties.executionIsolationSemaphoreMaxConcurrentRequests()));return executionSemaphorePerCircuit.get(commandKey.name());} else {return _s;}} else {return executionSemaphoreOverride;}} else {//线程隔离策略的话,返回NoOp类型的信号量,这种信号量其实是空的return TryableSemaphoreNoOp.DEFAULT;}}
当策略是线程隔离时,返回NoOp类型的信号量,这种信号量直接是不操作,返回true
static class TryableSemaphoreNoOp implements TryableSemaphore {public static final TryableSemaphore DEFAULT = new TryableSemaphoreNoOp();//可以看到并没有维护信号量,而是直接返回true@Overridepublic boolean tryAcquire() {return true;}@Overridepublic void release() {}...}
拿到执行的信号量之后,
executeCommandAndObserve方法里面会调用如下方法private Observable<R> executeCommandWithSpecifiedIsolation(final AbstractCommand<R> _cmd) {//判断是否为线程隔离if (properties.executionIsolationStrategy().get() == ExecutionIsolationStrategy.THREAD) {//返回Observable,注意最后一个方法调用subscribeOn()该方法是指定Observable在另外的线程中执行return Observable.defer(new Func0<Observable<R>>() {@Overridepublic Observable<R> call() {...}}).doOnTerminate(new Action0() {...}).doOnUnsubscribe(new Action0() {...}).subscribeOn(threadPool.getScheduler(new Func0<Boolean>() {...}));} else {//信号量隔离return Observable.defer(new Func0<Observable<R>>() {...}}
Observable.subscribeOn()方法是RxJava中的用法,该方法会传入一个Scheduler,让Observable.call()在该调度器的线程中执行,从而实现线程隔离
5.Hystrix超时
概述
- Hystrix当开启超时控制时,会在命令执行时启动一个定时任务,当命令执行超过指定时间后,触发定时任务;
- 该定时任务会把命令的状态切换为超时,并且发布超时事件,这样观察者就可以做出相应的操作了(如结束命令,反馈执行情况等)
源码分析
在第二节执行HystrixCommand命令时,会经过如下方法
private Observable<R> executeCommandAndObserve(final AbstractCommand<R> _cmd) {final HystrixRequestContext currentRequestContext = HystrixRequestContext.getContextForCurrentThread();...Observable<R> execution;//判断是否开启超时控制if (properties.executionTimeoutEnabled().get()) {//超时控制时,会调用lift方法,传入超时控制器HystrixObservableTimeoutOperatorexecution = executeCommandWithSpecifiedIsolation(_cmd).lift(new HystrixObservableTimeoutOperator<R>(_cmd));} else {execution = executeCommandWithSpecifiedIsolation(_cmd);}return execution.doOnNext(markEmits)...}
lift方法也是RxJava中的方法,会对Observable执行后的返回结果进行类型变换;重点看一下
HystrixObservableTimeoutOperator类的call方法public Subscriber<? super R> call(final Subscriber<? super R> child) {final CompositeSubscription s = new CompositeSubscription();// if the child unsubscribes we unsubscribe our parent as wellchild.add(s);//超时的策略,调用onError发布超时事件final HystrixContextRunnable timeoutRunnable = new HystrixContextRunnable(originalCommand.concurrencyStrategy, new Runnable() {@Overridepublic void run() {child.onError(new HystrixTimeoutException());}});//当命令超时时,会调用listener的tick方法TimerListener listener = new TimerListener() {@Overridepublic void tick() {//尝试将命令状态从未完成切换为超时if (originalCommand.isCommandTimedOut.compareAndSet(TimedOutStatus.NOT_EXECUTED, TimedOutStatus.TIMED_OUT)) {//发布超时事件originalCommand.eventNotifier.markEvent(HystrixEventType.TIMEOUT, originalCommand.commandKey);// shut down the original requests.unsubscribe();//调用上面创建的RunnabletimeoutRunnable.run();//if it did not start, then we need to mark a command start for concurrency metrics, and then issue the timeout}}//返回定义的超时时间@Overridepublic int getIntervalTimeInMilliseconds() {return originalCommand.properties.executionTimeoutInMilliseconds().get();}};//拿到HystrixTimer定时器,添加定时任务final Reference<TimerListener> tl = HystrixTimer.getInstance().addTimerListener(listener);...return parent;}
接下来看看HystrixTimer
public class HystrixTimer {private static HystrixTimer INSTANCE = new HystrixTimer();private HystrixTimer() {// private to prevent public instantiation}//getInstance会返回一个静态实例public static HystrixTimer getInstance() {return INSTANCE;}public Reference<TimerListener> addTimerListener(final TimerListener listener) {startThreadIfNeeded();// add the listener//创建Runnable,内部调用传进来的listener.tick()方法,即超时时的操作Runnable r = new Runnable() {@Overridepublic void run() {try {listener.tick();} catch (Exception e) {logger.error("Failed while ticking TimerListener", e);}}};//加入定时任务,这样当任务执行超过期限后,就会调用前面创建的runnable.run(),完成超时的控制ScheduledFuture<?> f = executor.get().getThreadPool().scheduleAtFixedRate(r, listener.getIntervalTimeInMilliseconds(), listener.getIntervalTimeInMilliseconds(), TimeUnit.MILLISECONDS);return new TimerReference(listener, f);}}
6.Metrics
概述
- 还记得在断路器中有一个Metrics成员变量吗,它是Hystrix中一个很重要的角色;Metrics中文意思可以理解为指标;
- 每个CommandKey都会对应一个Metrics,负责监控统计命令执行的情况;内部维护了很多事件流;命令执行成功,失败,超时,异常等都会发布对应的事件,然后各种事件流接收到后做相应的统计
- Metrics会将统计结果反馈给断路器,这样就可以根据统计结果,决定断路器打开还是关闭等操作
先来看一下HystrixCommand创建时,有如下过程,会拿到属于它的metrics;到这里你会发现,构造一个HystrixCommand中需要的各种依赖,已经讲了不少了;需要注意的是,每次调用都会创建HystrixCommand,不必担心依赖这么多东西会导致效率问题,因为几乎所有的依赖都是有缓存的(可以debug一下看看);所以只有首次创建才会真正创建所有依赖
protected AbstractCommand(HystrixCommandGroupKey group, HystrixCommandKey key, HystrixThreadPoolKey threadPoolKey, HystrixCircuitBreaker circuitBreaker, HystrixThreadPool threadPool,HystrixCommandProperties.Setter commandPropertiesDefaults, HystrixThreadPoolProperties.Setter threadPoolPropertiesDefaults,HystrixCommandMetrics metrics, TryableSemaphore fallbackSemaphore, TryableSemaphore executionSemaphore,HystrixPropertiesStrategy propertiesStrategy, HystrixCommandExecutionHook executionHook) {this.commandGroup = initGroupKey(group);this.commandKey = initCommandKey(key, getClass());this.properties = initCommandProperties(this.commandKey, propertiesStrategy, commandPropertiesDefaults);this.threadPoolKey = initThreadPoolKey(threadPoolKey, this.commandGroup, this.properties.executionIsolationThreadPoolKeyOverride().get());//获取commnadKey对应的metricsthis.metrics = initMetrics(metrics, this.commandGroup, this.threadPoolKey, this.commandKey, this.properties);//获取断路器时,也传入了metricsthis.circuitBreaker = initCircuitBreaker(this.properties.circuitBreakerEnabled().get(), circuitBreaker, this.commandGroup, this.commandKey, this.properties, this.metrics);this.threadPool = initThreadPool(threadPool, this.threadPoolKey, threadPoolPropertiesDefaults);}
源码分析(待更新)

若有收获,就点个赞吧
0 人点赞
