1. 介绍
2. 安装和入门
1. 安装
1. 需要安装jdk1.8
2. zookeeper官网地址
3. 下载linux的tar包

4. 安装到 /opt/module/文件夹下
2. 操作
安装位置
cd /opt/module/zoopkeeper-3.5.7/


3. 参数介绍
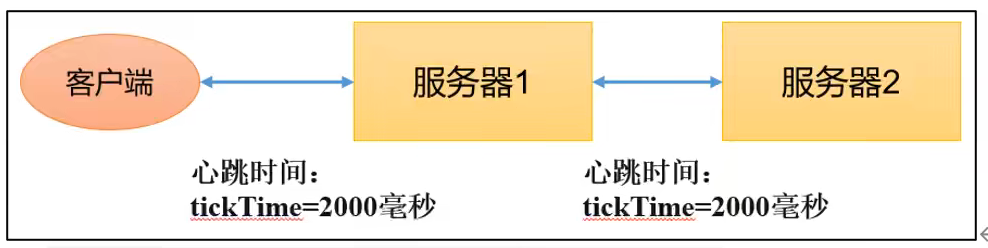
- tickTime =2000 通讯心跳时间 zookeeper服务器与客户端心跳时间 单位毫秒
- initLimit =10; LF初始化通讯时间 10LF 为10个tickTime, 初始连接时不能超过20S

- synLimit =5 ; LF通讯时限 通讯中如果超过5个tickTime


- dataDir 保存Zookeeper中的数据

- clientPort =2181 客服端连接端口 不做修改
4.zookeeper集群安装
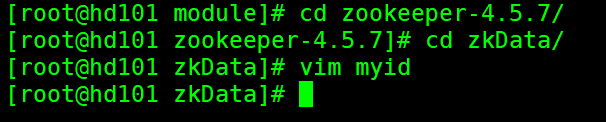
1. 在/opt/module/zookeeper/zkData下创建myid
 输入2
输入2
2. 再另外机器上创建myid配置为3和4

3. 配置cof文件


5. 编写脚本
1. 批量启动停止脚本
#!/bin/bash
case $1 in
"start"){
    for i in hd100 hd101 hd102
    do
        echo ---------- zookeeper $i 启动 ------------
        ssh    $i    "/opt/module/zookeeper-4.5.7/bin/zkServer.sh start"
    done
};;
"stop"){
    for i in hd100 hd101 hd102
    do
        echo ---------- zookeeper $i 停止 ------------
        ssh    $i    "/opt/module/zookeeper-4.5.7/bin/zkServer.sh stop"
    done
};;
"status"){
    for i in hd100 hd101 hd102
    do
        echo ---------- zookeeper $i 状态 ------------
        ssh    $i    "/opt/module/zookeeper-4.5.7/bin/zkServer.sh status"
    done
};;
在~目录下的bin文件夹创建 zk.sh
赋予权限
chmod u+x zk.sh
一键启动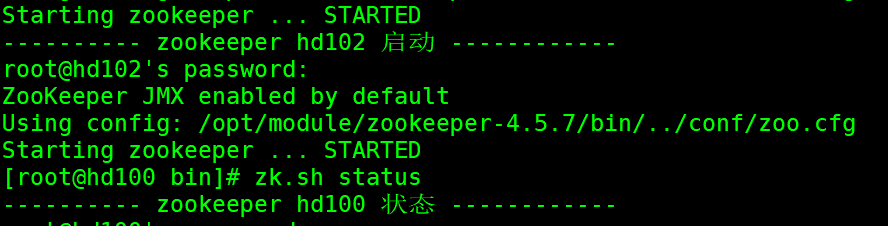
3. 选举机制
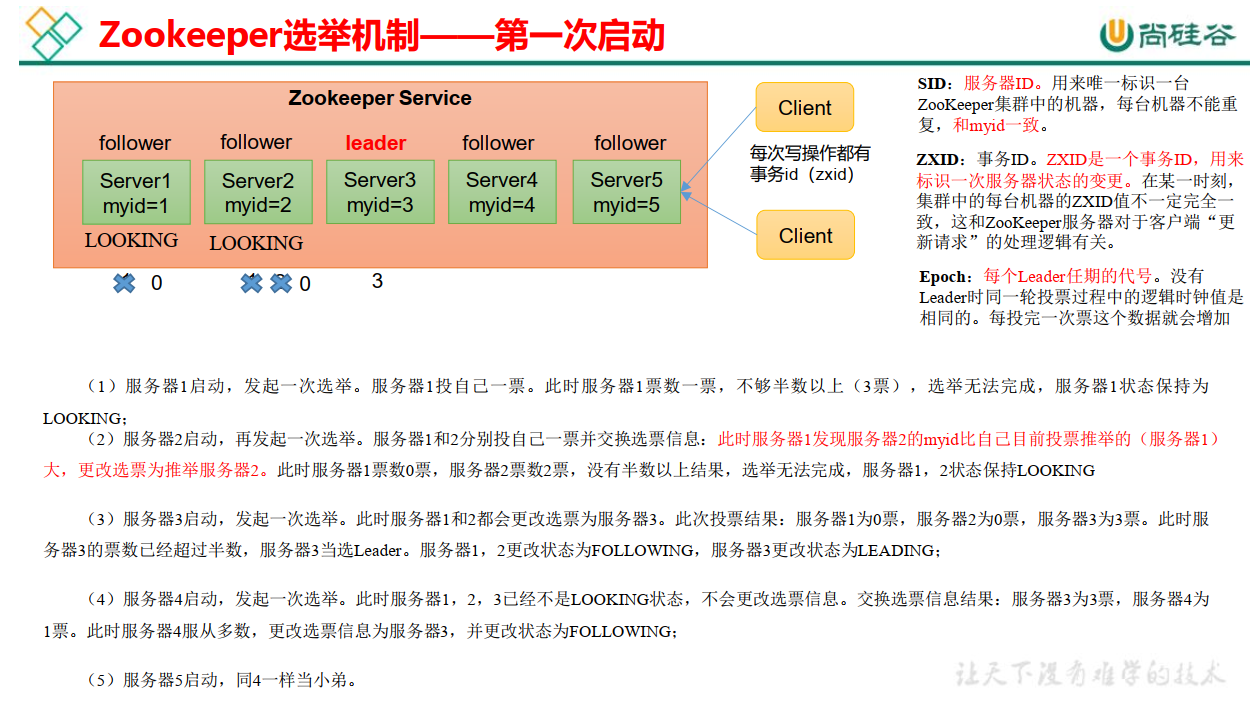
1. 第一次启动
2. 非第一次启动

4.客户端命令行操作
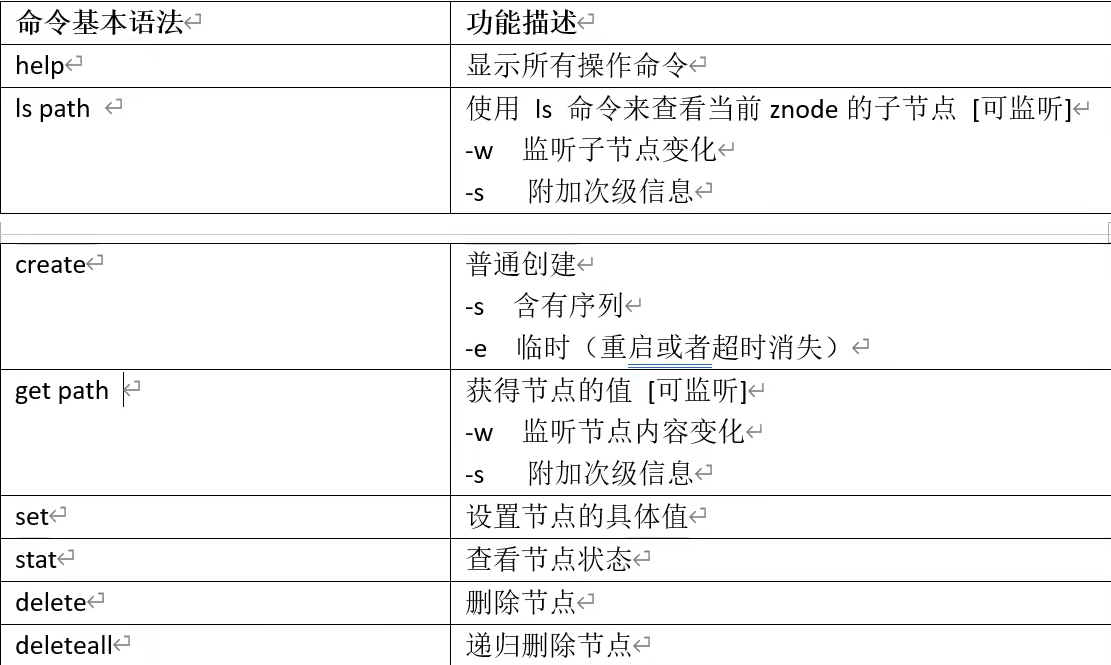
1.命令行语法
- 访问其他服务器


2.zone节点信息
(1) czxid: 创建节点的事务 zxid
每次修改 ZooKeeper 状态都会产生一个 ZooKeeper 事务 ID。事务 ID 是 ZooKeeper 中所
有修改总的次序。每次修改都有唯一的 zxid,如果 zxid1 小于 zxid2,那么 zxid1 在 zxid2 之
前发生。
(2) ctime: znode 被创建的毫秒数(从 1970 年开始)
(3) mzxid: znode 最后更新的事务 zxid
(4) mtime: znode 最后修改的毫秒数(从 1970 年开始)
(5) pZxid: znode 最后更新的子节点 zxid
(6) cversion: znode 子节点变化号, znode 子节点修改次数
(7) dataversion: znode 数据变化号
(8) aclVersion: znode 访问控制列表的变化号
(9) ephemeralOwner: 如果是临时节点,这个是 znode 拥有者的 session id。如果不是
临时节点则是 0。
(10) dataLength: znode 的数据长度
(11) numChildren: znode 子节点数量
3. 节点

1. 创建永久节点不带序号
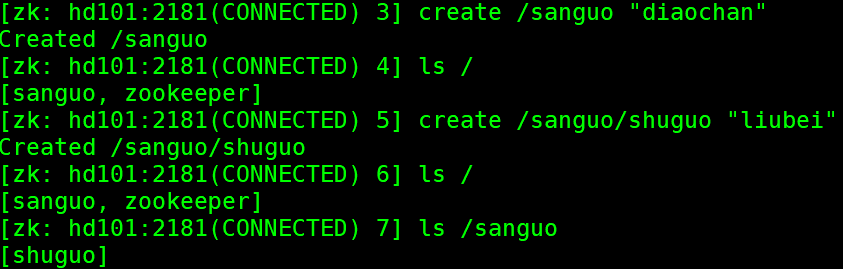


2. 创建带序号的持久节点


3.创建临时节点 带序号与不带


4. 修改节点值

4. 监听器原理
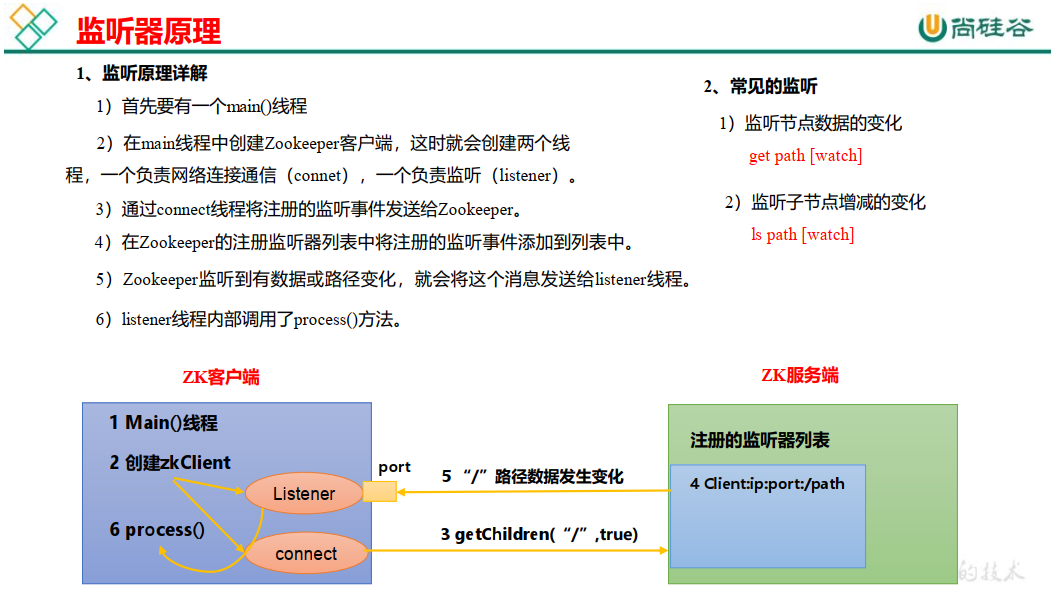
1. 监听节点的值
- 创建节点值监听

- 修改值 发生的变化


2. 监控节点数量(路径)
- 创建节点监控

- 改变节点数量


5. 节点删除与查看
1.删除一个节点

2. 删除该节点下的所有节点

5.客户端API操作与案例
1. 工程配置
1. 导入依赖
        <dependency>
            <groupId>junit</groupId>
            <artifactId>junit</artifactId>
            <version>RELEASE</version>
        </dependency>

        <dependency>
            <groupId>org.apache.logging.log4j</groupId>
            <artifactId>log4j-core</artifactId>
            <version>2.8.2</version>
        </dependency>

        <dependency>
            <groupId>org.apache.zookeeper</groupId>
            <artifactId>zookeeper</artifactId>
            <version>3.5.7</version>
        </dependency>
2. 配置log4j

log4j.rootLogger=INFO, stdout
log4j.appender.stdout=org.apache.log4j.ConsoleAppender
log4j.appender.stdout.layout=org.apache.log4j.PatternLayout
log4j.appender.stdout.layout.ConversionPattern=%d %p [%c]
- %m%n
log4j.appender.logfile=org.apache.log4j.FileAppender
log4j.appender.logfile.File=target/spring.log
log4j.appender.logfile.layout=org.apache.log4j.PatternLayout
log4j.appender.logfile.layout.ConversionPattern=%d %p [%c]
- %m%n
3. 创建Zkclient连接客户端 测试
public class ZkClient {

    private String connectString = "hd100:2181,hd101:2181,hd102:2181";
    private int sessionTimeout = 2000; //超时连接
    private ZooKeeper zooKeeper;

    @Before
    public void init() throws IOException{
        zooKeeper = new ZooKeeper(connectString, sessionTimeout, new Watcher() {
            @Override
            public void process(WatchedEvent watchedEvent) {

            }
        });
    }

    @Test
    public void test() throws KeeperException, InterruptedException {
        String nodeCreate = zooKeeper.create("/atguigu", "ss.avi".getBytes(), ZooDefs.Ids.OPEN_ACL_UNSAFE, CreateMode.PERSISTENT);
        System.out.println(nodeCreate);
    }
}
4.监控子节点
注册一次 只能监听一次 所以把注册方法放在Watcher事件里 重复注册
@Before
    public void init() throws IOException{
        zooKeeper = new ZooKeeper(connectString, sessionTimeout, new Watcher() {
            @Override
            public void process(WatchedEvent watchedEvent) {
                List<String> children = null;
                try {
                    children = zooKeeper.getChildren("/", true);
                } catch (KeeperException e) {
                    e.printStackTrace();
                } catch (InterruptedException e) {
                    e.printStackTrace();
                }
                System.out.println();
                for (String child : children) {
                    System.out.println(child);
                }
            }
        });
    }
 启动这个方法时 @Before自动注册一次 以后每次执行修改都会通过 Watcher注册
 @Test
    public void getChildern() throws KeeperException, InterruptedException {
        //加延时
        Thread.sleep(Long.MAX_VALUE);
    }
5. 判断节点是否存在
    @Test
    public void isExit() throws KeeperException, InterruptedException {
        Stat exists = zooKeeper.exists("/atguigu", false);
        System.out.println("========exists============" + exists);
    }
    =======================
    不存在会返回null
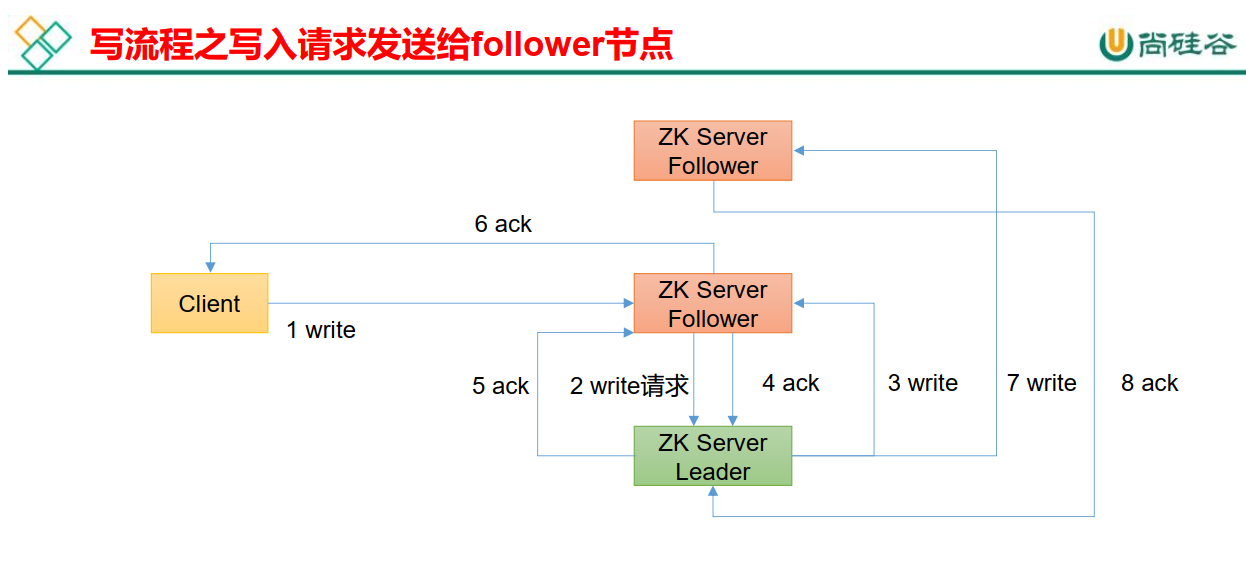
2. 客户端向服务端写数据流程
- 写操作 直接发送 leader写一份 通知对应服务器 写操作 超过半数写完了 leader返回成功 其他数据库继续同步数据
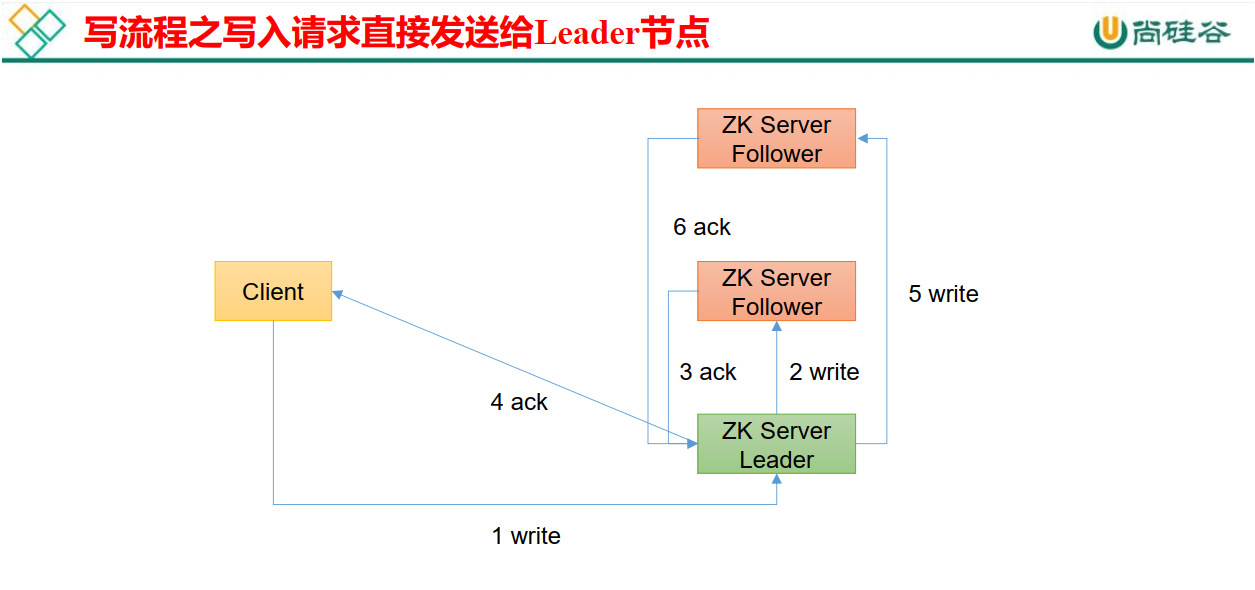
- 访问小弟 小弟转给老大 老大自己写一份 发给小弟 超过半数 leader发消息给小弟 小弟返回客户端 其他服务器继续写
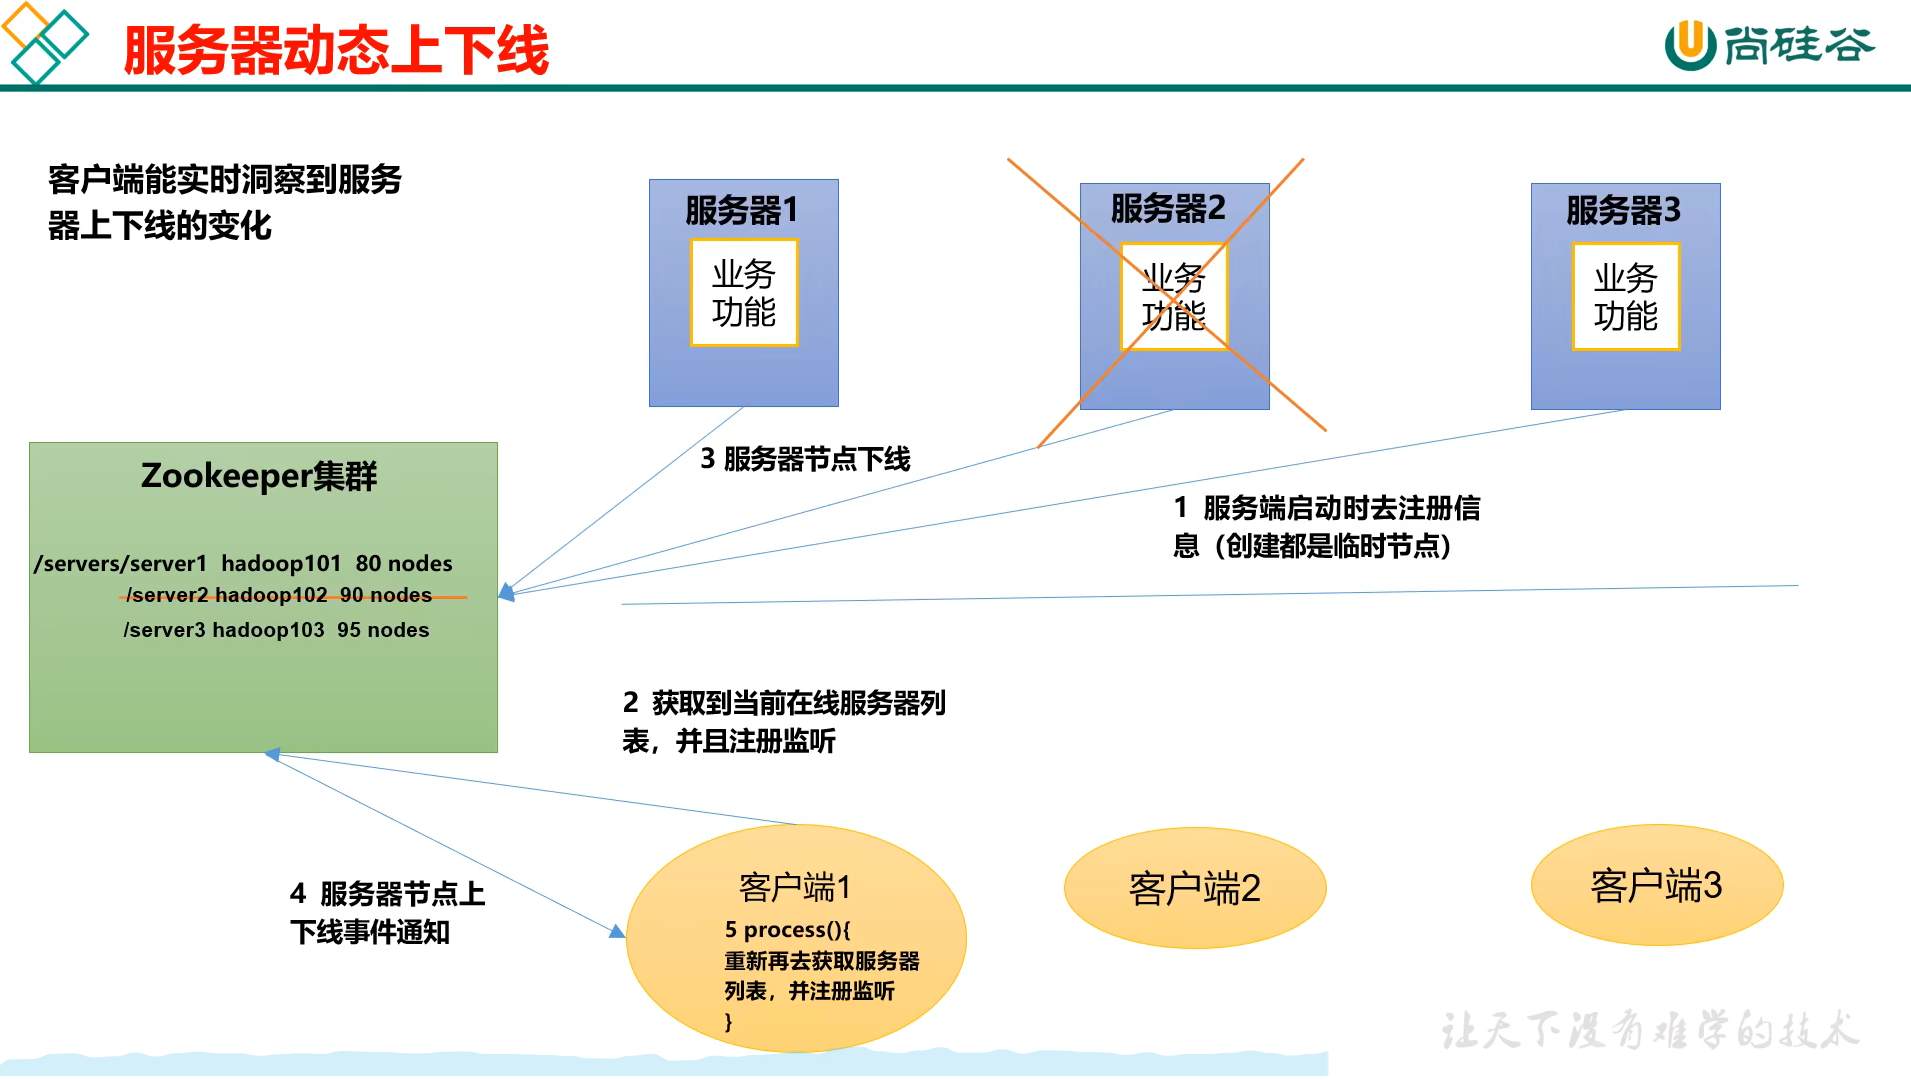
3. 服务器动态上下线监听案例
1. 需求分析
3. 具体实现
- 创建/servers节点

- 实现 服务器上线 创建节点 ```
public class DistributeServer { private String connectString = “hd100:2181,hd101:2181,hd102:2181”; private int sessionTimeout = 2000; private ZooKeeper zooKeeper;
public static void main(String[] args) throws IOException, KeeperException, InterruptedException {

    DistributeServer distributeServer = new DistributeServer();
    // 1. 获取zk连接
    distributeServer.getConnect();
    // 2. 注册服务器 zk集群
    distributeServer.regist(args[0]);
    // 3. 启动业务逻辑
    distributeServer.business();
}

private void business() throws InterruptedException {
    Thread.sleep(Long.MAX_VALUE);
}

private void regist(String hostname) throws KeeperException, InterruptedException {
    zooKeeper.create("/servers", hostname.getBytes(), ZooDefs.Ids.OPEN_ACL_UNSAFE, CreateMode.EPHEMERAL_SEQUENTIAL);
    System.out.println(hostname + "已经上线");
}

private void getConnect() throws IOException {

    zooKeeper = new ZooKeeper(connectString, sessionTimeout, new Watcher() {
        @Override
        public void process(WatchedEvent watchedEvent) {

        }
    });


}
}
3. 实现客户端 监听 节点发生变化 打印在线服务器
public class DistributeClient {
private ZooKeeper zooKeeper;
private String connectString = "hd100:2181,hd101:2181,hd102:2181";
private int sessionTimeout = 2000;

public static void main(String[] args) throws IOException, KeeperException, InterruptedException {
    DistributeClient distributeClient = new DistributeClient();
    // 获取zk连接
    distributeClient.getConncet();
    // 监听/servers子节点变化
    distributeClient.getServersList();
    // 获取已经开启的服务器 对应的业务逻辑
    Thread.sleep(Long.MAX_VALUE);
}

private void getServersList() throws KeeperException, InterruptedException {
    List<String> children = zooKeeper.getChildren("/servers", true);
    ArrayList<String> servers = new ArrayList<>();
    for (String child : children) {
        byte[] data = zooKeeper.getData("/servers/" + child, false, null);
        servers.add(new String(data));
    }
    System.out.println(servers);
}

private void getConncet() throws IOException {
    zooKeeper = new ZooKeeper(connectString, sessionTimeout, new Watcher() {
        @Override
        public void process(WatchedEvent watchedEvent) {
            try {
                getServersList();
            } catch (KeeperException e) {
                e.printStackTrace();
            } catch (InterruptedException e) {
                e.printStackTrace();
            }
        }
    });
}
}
<br />实现了下线自动删除 上线打印在线数据
<a name="IotBc"></a>
## 4. Zookeeper分布式锁案例
<a name="XXnPI"></a>
### 1.什么是分布式锁

<a name="eXVpq"></a>
### 2. 案例分析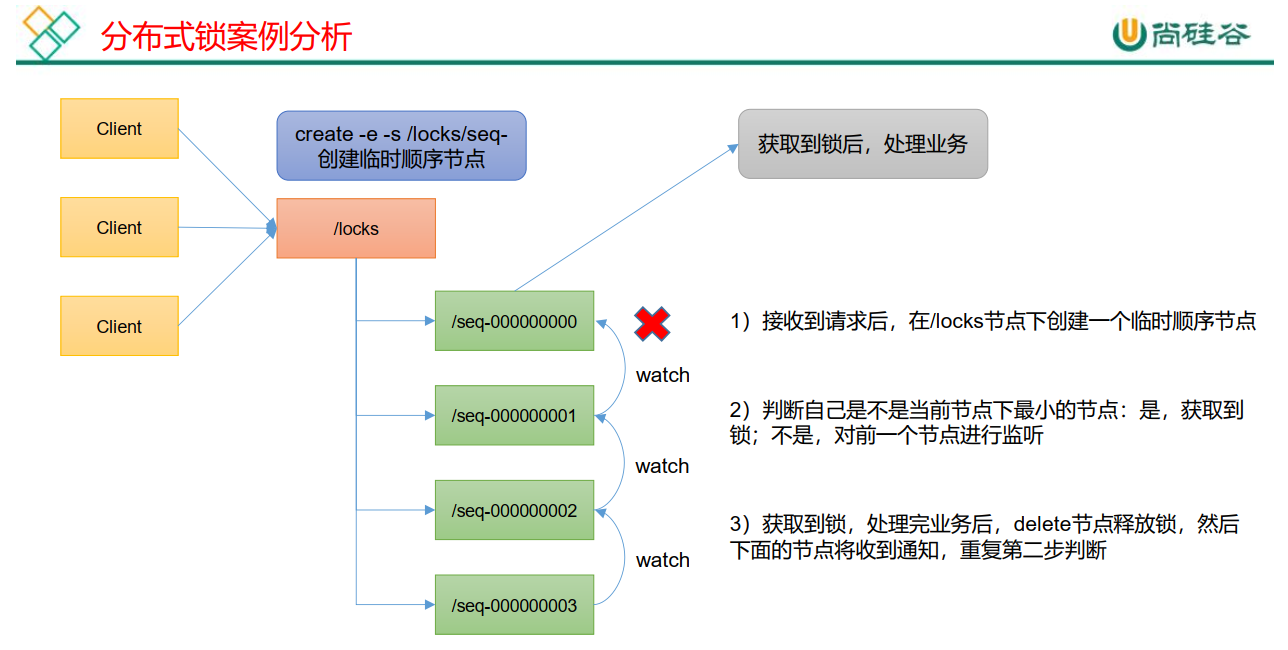
<a name="AdfSo"></a>
### 3.实现
private final String connectString = “hd100:2181,hd101:2181,hd102:2181”; private final int sessionTimeout = 2000; private final ZooKeeper zooKeeper; private CountDownLatch connectLatch = new CountDownLatch(1); private CountDownLatch waitLatch = new CountDownLatch(1);
private String currNode;
private String waitPath;

public static void main(String[] args) throws KeeperException, InterruptedException, IOException {
// Lock lock = new Lock(); // lock.AddLock(); }
public Lock() throws IOException, KeeperException, InterruptedException {
    //连接
    zooKeeper = new ZooKeeper(connectString, sessionTimeout, new Watcher() {
        @Override
        public void process(WatchedEvent watchedEvent) {
            // 如果连接成功就释放锁
            if (watchedEvent.getState() == Event.KeeperState.SyncConnected){
                connectLatch.countDown();
            }
            // 如果监控到前一个节点被删除 就执行
            if (watchedEvent.getPath().equals(waitPath) && watchedEvent.getType() == Event.EventType.NodeDeleted){
                waitLatch.countDown();
            }
        }

    });

    //等待连接成功
    connectLatch.await();
    //没有节点就创建
    Stat exists = zooKeeper.exists("/lock", false);
    if (exists == null) {
        zooKeeper.create("/lock", null, ZooDefs.Ids.OPEN_ACL_UNSAFE, CreateMode.CONTAINER);
    }


}


public void AddLock() throws KeeperException, InterruptedException {
    //创建一个节点 currNode代表当前的节点名
    currNode = zooKeeper.create("/lock/" + "sql-", null, ZooDefs.Ids.OPEN_ACL_UNSAFE, CreateMode.EPHEMERAL_SEQUENTIAL);
// System.out.println(currNode);
// 获取当前所有的节点
List
    }

}

public void delLock(){

    try {
        zooKeeper.delete(currNode,-1);
    } catch (InterruptedException e) {
        e.printStackTrace();
    } catch (KeeperException e) {
        e.printStackTrace();
    }
}
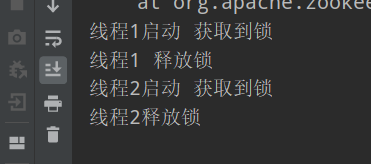
测试
public static void main(String[] args) throws InterruptedException, IOException, KeeperException { final Lock lock1 = new Lock(); final Lock lock2 = new Lock(); new Thread(new Runnable() { @Override public void run() { try { lock1.AddLock(); } catch (KeeperException e) { e.printStackTrace(); } catch (InterruptedException e) { e.printStackTrace(); } System.out.println(“线程1启动 获取到锁”); try { Thread.sleep(6000);
                lock1.delLock();
                System.out.println("线程1 释放锁");
            } catch (InterruptedException e) {
                e.printStackTrace();
            }
        }
    }).start();
    new Thread(new Runnable() {
        @Override
        public void run() {
            try {
                lock2.AddLock();
                System.out.println("线程2启动 获取到锁");
                Thread.sleep(6000);

                lock2.delLock();
                System.out.println("线程2释放锁");
            } catch (InterruptedException | KeeperException e) {
                e.printStackTrace();
            }
        }
    }).start();
}
<a name="lgTzs"></a>
# 6. Curator 框架实现分布式锁案例
<a name="St5Lx"></a>
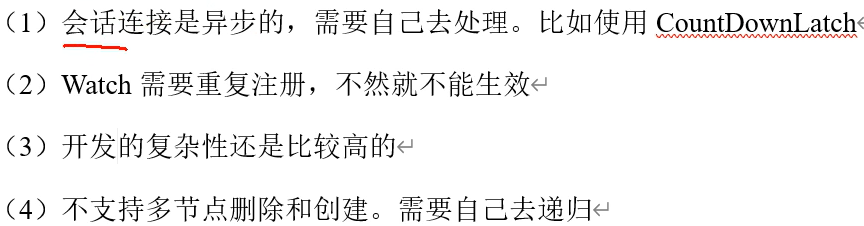
## 1. 原生的Java API开发存在的问题
<a name="CMwxb"></a>
## 2. Curator 是一个专门解决分布式锁的框架
官网地址: [https://curator.apache.org/](https://curator.apache.org/)
<a name="Qjnay"></a>
## 3. 案例实操
<a name="QTioG"></a>
### 1. 添加依赖
<a name="rt7sD"></a>
### 2. 代码实现
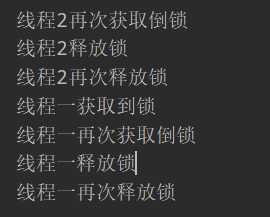
public static void main(String[] args) { //创建分布式锁1 InterProcessMutex lock1 = new InterProcessMutex(getCuratorFramework(), “/locks”); //分布式锁2 InterProcessMutex lock2 = new InterProcessMutex(getCuratorFramework(), “/locks”); //创建多线程 new Thread(new Runnable() { @Override public void run() { try { System.out.println(); //获取锁 lock1.acquire(); System.out.println(“线程一获取到锁” ); lock1.acquire(); System.out.println(“线程一再次获取倒锁”); Thread.sleep(5 1000); lock1.release(); System.out.println(“线程一释放锁”); lock1.release(); System.out.println(“线程一再次释放锁”); } catch (Exception e) { e.printStackTrace(); } } }).start(); new Thread(new Runnable() { @Override public void run() { try { //获取锁 lock2.acquire(); System.out.println(“线程2获取到锁” ); lock2.acquire(); System.out.println(“线程2再次获取倒锁”); Thread.sleep(5 1000); lock2.release(); System.out.println(“线程2释放锁”); lock2.release(); System.out.println(“线程2再次释放锁”); } catch (Exception e) { e.printStackTrace(); } } }).start(); }
private static CuratorFramework getCuratorFramework() {

    ExponentialBackoffRetry poliy = new ExponentialBackoffRetry(3000, 3);
    CuratorFramework client = CuratorFrameworkFactory.builder().connectString("hd100:2181,hd101:2181,hd102:2181").connectionTimeoutMs(2000).sessionTimeoutMs(2000)
            .retryPolicy(poliy).build();
    client.start();
    System.out.println("zookeeper启动中");
    return client;
}
7. 面试题
7.1 选举机制

7.2 生产集群环境多少zk合适
安装奇数台。
生产经验:
⚫ 10 台服务器: 3 台 zk;
⚫ 20 台服务器: 5 台 zk;
⚫ 100 台服务器: 11 台 zk;
⚫ 200 台服务器: 11 台 zk
服务器台数多:好处,提高可靠性;坏处:提高通信延时
7.3 常用命令
ls、 get、 create、 delete set watch
========源码解析========

若有收获,就点个赞吧
0 人点赞
