Spring 入门
Spring简介
Spring是一个开源的J2EE框架,针对Bean的生命周期进行管理的轻量级容器。特点:1.方便解耦,简化开发,我们可以将对象之间的依赖交给IOC容器管理,避免硬编码所造成的过度程序耦合。2.AOP功能支持,方便进行面向切面编程,许多不容易用OOP实现的功能都能通过AOP轻轻应付。3.声明式事务支持,我们可以从单调烦闷的事务管理代码中解脱出来,用声明式事务轻松进行事务管理。4.方便集成各种优秀的框架,使开发更简单,更易于维护。5.非侵入式,基于Spring开发的应用中的对象可以不依赖于Spring API。
Maven依赖
<dependencies><dependency><groupId>org.springframework</groupId><artifactId>spring-context</artifactId><version>5.3.3</version></dependency></dependencies><build><plugins><!-- 增加maven编译插件,设置编译版本,防止刷新后变为jdk5--><plugin><groupId>org.apache.maven.plugins</groupId><artifactId>maven-compiler-plugin</artifactId><version>3.6.0</version><configuration><source>1.8</source><target>1.8</target><encoding>UTF-8</encoding></configuration></plugin></plugins></build>
Bean测试类
public class HelloServiceImpl implements HelloService {
    @Override
    public void hello() {
        System.out.println("HelloServiceImpl...");
    }
}
applicationContext.xml
<?xml version="1.0" encoding="UTF-8"?>
<beans xmlns="http://www.springframework.org/schema/beans"
       xmlns:xsi="http://www.w3.org/2001/XMLSchema-instance"
       xsi:schemaLocation="http://www.springframework.org/schema/beans
       http://www.springframework.org/schema/beans/spring-beans.xsd">
    <!--  创建HelloService对象  -->
    <bean id="helloService" class="com.example.service.impl.HelloServiceImpl" />
</beans>
测试类
public class App1 {
    public static void main(String[] args) {
        //加载applicationContext.xml文件配置创建ioc容器
        ApplicationContext ioc
                = new ClassPathXmlApplicationContext("classpath:applicationContext.xml");
        //根据bean name和Class获取bean,如果只用类型查找,存在多个对象时会抛异常
        HelloService helloService = ioc.getBean("helloServiceImpl", HelloService.class);
        helloService.hello();
    }
}
IOC(XML)
IOC原理
IOC定义:
控制反转,是面向对象编程中的一种设计原则,把对象的创建和对象之间的调用过程交给Spring进行管理。
IOC可以用来降低计算机代码之间的耦合度。最常见的方式叫做依赖注入(DI),依赖注入是当容器中某个对
象运行时,需要依赖另一个对象,容器会通过反射的形式给组件注入依赖组件,还有一种叫做依赖查找。
通过控制反转,在对象被创建的时候,由一个调控系统内所有对象的外界实体将其所依赖的对象引用传递
给它,也叫依赖注入。
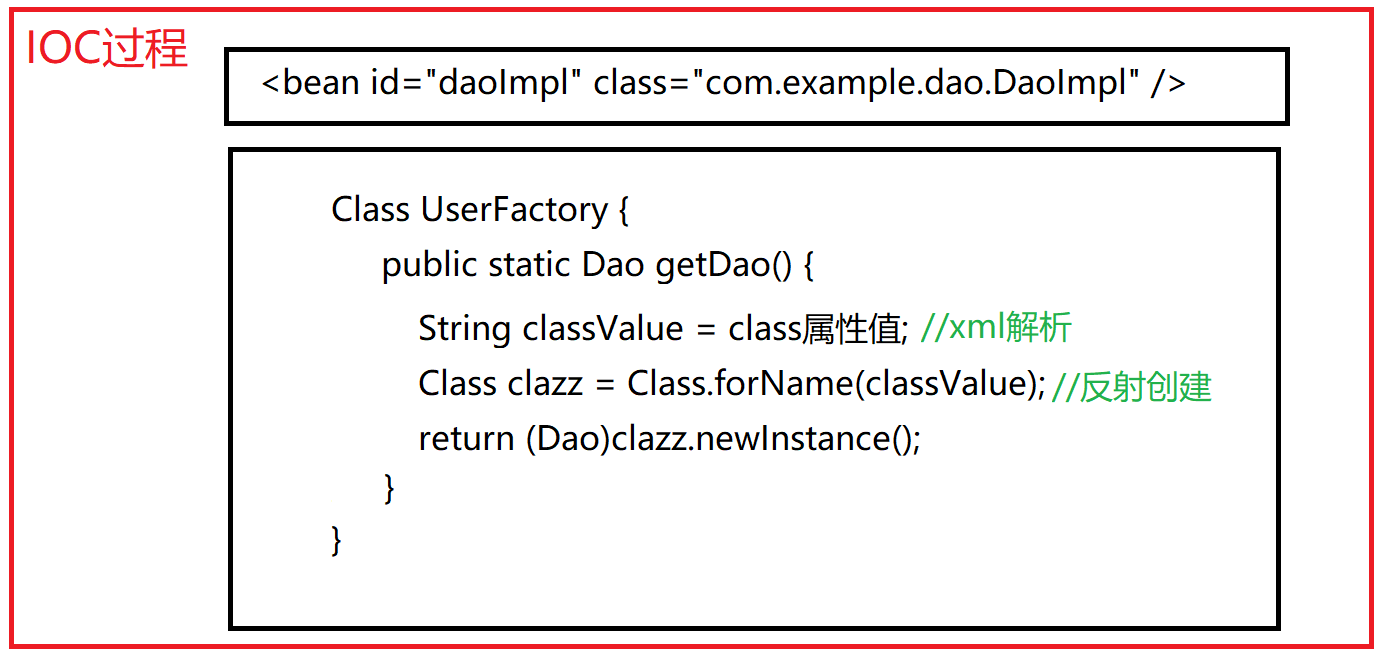
IOC原理:
简单工厂模式又称静态工厂方法,它属于创建型模式。在工厂模式中,可以根据参数不同返回不同的实例,
简单工厂模式专门定义一个类来负责创建其他类的实例,被创建的实例通常具有共同的父类。
IOC接口
IOC思想就是基于IOC容器实现的,IOC容器的底层就是对象工厂。Spring提供了IOC两种实现方式
1.BeanFactory
# 一般是Spring内部使用的接口,不建议一般应用开发者使用。加载配置文件的时候不会创建对象,使用时才会去创建对象。
BeanFactory ioc = new ClassPathXmlApplicationContext("classpath:applicationContext.xml");
2.ApplicationContext
# 是BeanFactory的一个子接口,提供了更多更强大的功能,一般开发人员使用这个接口,加载配置文件的时候会创建对象。
ApplicationContext ioc = new ClassPathXmlApplicationContext("classpath:applicationContext.xml");
实现类:
1.ClassPathXmlApplicationContext    2.ClassPathXmlApplicationContext(常用)
测试Bean类
@Data
@AllArgsConstructor
@NoArgsConstructor
public class User {
    private String name;
    private Integer age;
    private Double price;
}
属性依赖复用和抽象bean
<!--  创建一个user对象bean1  -->
<bean id="bean1" class="com.example.bean.User" abstract="true">
    <property name="name" value="唐纳德 特朗普" />
    <property name="age" value="74" />
    <property name="price" value="50000.00" />
</bean>
<!--  创建一个user对象bean2,继承重用bean1信息,depends-on="bean1"在创建bean2前先创建bean1  -->
<bean id="bean2" class="com.example.bean.User" parent="bean1" depends-on="bean1"/>
依赖注入
<!--  创建对象[id:给对象取一个唯一标识,class:创建对象的类的全路径,name:给对象定唯一标识可以有特殊符号]  -->
<bean id="user" class="com.example.bean.User" />
<!--  DI:依赖注入或注入属性[property:set方法属性注入标签,name:属性变量名,value:属性值]  -->
<bean id="user" class="com.example.bean.User">
    <property name="name" value="唐纳德 特朗普" />
    <property name="age" value="74" />
    <property name="price" value="50000.00" />
</bean>
<!--  有参构造器属性注入[constructor-arg:构造方法注入,name:属性变量名,value:属性值]  -->
<bean id="user" class="com.example.bean.User">
    <constructor-arg name="name" value="乔 拜登" />
    <constructor-arg name="age" value="78" />
    <constructor-arg name="price" value="30000.00" />
</bean>
<!--  使用p命名空间注入,在命名空间中添加自己的命名p,根据p就可以之间进行属性注入  -->
<!--  xmlns:p="http://www.springframework.org/schema/p"  -->
<bean id="user" class="com.example.bean.User" p:name="迈克 蓬佩奥" p:age="57" p:price="28000.00" />
<!--  set注入空值null  -->
<bean id="user" class="com.example.bean.User">
    <property name="name"><null/></property>
    <property name="age" value="67" />
    <property name="price" value="56000.00" />
</bean>
<!--  当需要注入的值中有特殊符号的话需要使用CDATA进行辅助注入  -->
<bean id="user" class="com.example.bean.User">
    <property name="name">
        <value><![CDATA[<<南希 佩洛西>>]]></value>
    </property>
    <property name="age" value="80" />
    <property name="price" value="46000.00" />
</bean>
引用Bean
//测试用类
public class UserServiceImpl implements UserService {
    private User user;
    public UserServiceImpl() {
    }
    public UserServiceImpl(User user) {
        this.user = user;
    }
    public void setUser(User user) {
        this.user = user;
    }
    public User getUser() {
        return user;
    }
    @Override
    public void exec() {
        System.out.println("service:=>"+user);
    }
}
<!--  constrctor-arg构造器注入,ref引用外部bean  -->
<bean id="user" class="com.example.bean.User">
    <property name="name">
        <value><![CDATA[<<南希 佩洛西>>]]></value>
    </property>
    <property name="age" value="80" />
    <property name="price" value="46000.00" />
</bean>
<bean id="userService" class="com.example.service.impl.UserServiceImpl">
    <constructor-arg name="user" ref="user"/>
</bean>
内部Bean注入
<!--  内部bean属性注入  -->
<bean id="userService" class="com.example.service.impl.UserServiceImpl">
    <constructor-arg name="user">
        <bean class="com.example.bean.User">
            <property name="name" value="唐纳德 特朗普" />
            <property name="age" value="74" />
            <property name="price" value="50000.00" />
        </bean>
    </constructor-arg>
</bean>
级联赋值外部Bean
<!--  外部注入bean,级联赋值bean,需要userService有一个getUser方法进行赋值  -->
<bean id="user" class="com.example.bean.User" />
<bean id="userService" class="com.example.service.impl.UserServiceImpl">
    <property name="user" ref="user" />
    <property name="user.name" value="迈克 彭斯" />
    <property name="user.age" value="62" />
    <property name="user.price" value="38000.00" />
</bean>
简单集合注入
public class ClassInfo {
    private Integer[] users;
    private List<Object> lists;
    private Set<String> sets;
    private Map<String,Object> maps;
    private Properties properties;
}
<?xml version="1.0" encoding="UTF-8"?>
<beans xmlns="http://www.springframework.org/schema/beans"
       xmlns:xsi="http://www.w3.org/2001/XMLSchema-instance"
       xsi:schemaLocation="http://www.springframework.org/schema/beans
       http://www.springframework.org/schema/beans/spring-beans.xsd">
    <bean id="classInfo" class="com.example.bean.ClassInfo">
        <!--  array数组注入  -->
        <property name="users">
            <array value-type="java.lang.Integer">
                <value>1</value>
                <value>2</value>
                <value>3</value>
            </array>
        </property>
        <!--  list注入  -->
        <property name="lists">
            <list value-type="java.lang.Object">
                <value>安东尼 布林肯</value>
                <value>59</value>
                <value>true</value>
            </list>
        </property>
        <!--  set注入  -->
        <property name="sets">
            <set value-type="java.lang.String">
                <value>雷克斯 帝勒森</value>
                <value>69</value>
                <value>48000.00</value>
            </set>
        </property>
        <!--  map注入  -->
        <property name="maps">
            <map key-type="java.lang.String" value-type="java.lang.Object">
                <entry key="name" value="卡马拉 哈里斯" />
                <entry key="age" value="57" />
                <entry key="salary" value="23000.00" />
            </map>
        </property>
        <!--  properties注入  -->
        <property name="properties">
            <props>
                <prop key="pk1">1</prop>
                <prop key="pk2">2</prop>
                <prop key="pk3">3</prop>
            </props>
        </property>
    </bean>
</beans>
对象集合注入(util工具)
public class ClassInfo {
    private User[] users;
    private List<User> lists;
    private Set<User> sets;
    private Map<String,User> maps;
    private Properties properties;
}
<?xml version="1.0" encoding="UTF-8"?>
<beans xmlns="http://www.springframework.org/schema/beans"
       xmlns:xsi="http://www.w3.org/2001/XMLSchema-instance"
       xmlns:util="http://www.springframework.org/schema/util"
       xsi:schemaLocation="http://www.springframework.org/schema/beans
       http://www.springframework.org/schema/beans/spring-beans.xsd
       http://www.springframework.org/schema/util
       http://www.springframework.org/schema/util/spring-util.xsd">
    <!--  创建一个user对象  -->
    <bean id="user" class="com.example.bean.User">
        <property name="name" value="唐纳德 特朗普" />
        <property name="age" value="74" />
        <property name="price" value="50000.00" />
    </bean>
    <!--  list对象组合  -->
    <util:list id="lists" value-type="com.example.bean.User">
        <ref bean="user"/>
        <ref bean="user"/>
        <ref bean="user"/>
    </util:list>
    <!--  set对象组合  -->
    <util:set id="sets" value-type="com.example.bean.User">
        <ref bean="user"/>
        <ref bean="user"/>
        <ref bean="user"/>
    </util:set>
    <!--  map对象组合  -->
    <util:map id="maps" key-type="java.lang.String" value-type="com.example.bean.User">
        <entry key="k1" value-ref="user"/>
        <entry key="k2" value-ref="user"/>
        <entry key="k3" value-ref="user"/>
    </util:map>
    <!--  properties对象组合  -->
    <util:properties id="props" value-type="java.util.Properties">
        <prop key="pv1">pv1</prop>
        <prop key="pv2">pv2</prop>
        <prop key="pv3">pv3</prop>
    </util:properties>
    <!--  将各个集合注入classInfo  -->
    <bean id="classInfo" class="com.example.bean.ClassInfo">
        <property name="users" ref="lists"/>
        <property name="lists" ref="lists"/>
        <property name="sets" ref="sets"/>
        <property name="maps" ref="maps"/>
        <property name="properties" ref="props"/>
    </bean>
</beans>
SPEL表达式
SpEL 表达式可用于XML或基于注释的配置元数据来定义。定义表达的语法都是形式#{ <expression string> }
<bean id="user" class="com.example.User">
    <!--  可以注入注入基本数据类型或者用Java API做运算的结果  -->
    <property name="randomNumber" value="#{ T(java.lang.Math).random() * 100.0 }"/>
    <!--  先引入properties命名为dp,再将值进行映射  -->
    <property name="defaultLocale" value="#{ dp['user.region'] }"/>
</bean>
<!--  引用bean,引用bean的属性  -->
<property name="user" value="#{ user }"/>
<property name="randomNumber" value="#{ user.randomNumber }"/>
// Java代码形式SpEL注入
@Value("#{ systemProperties['user.region'] }")
private String defaultLocale;
dp.properties
dataSource.driverClassName=com.mysql.jdbc.Driver
dataSource.jdbcUrl=jdbc:mysql://47.172.193.151:3306/demo_01
dataSource.username=root
dataSource.password=123456
属性Properties绑定(SPEL)
@Component    //注入IOC容器
public class DataSource {
    @Value("#{dp['dataSource.driverClassName']}")
    private String driverClassName;
    @Value("#{dp['dataSource.jdbcUrl']}")
    private String jdbcUrl;
    @Value("#{dp['dataSource.username']}")
    private String username;
    @Value("#{dp['dataSource.password']}")
    private String password;
    public String getDriverClassName() {
        return driverClassName;
    }
    public String getJdbcUrl() {
        return jdbcUrl;
    }
    public String getUsername() {
        return username;
    }
    public String getPassword() {
        return password;
    }
}
<!--  组件扫描添加dataSource,bean注入的对象不能触发@Value,会出现null  -->
<context:component-scan base-package="com.example.bean"/>
<!--  加载dataSource.properties文件,location指定properties路径和文件名  -->
<util:properties id="dp" location="classpath:dp.properties"/>
属性Properties绑定(占位符)
@Component
public class DataSource {
    private String driverClassName;
    private String jdbcUrl;
    private String username;
    private String password;
}
<!--  加载dataSource.properties文件  -->
<context:property-placeholder location="classpath:dp.properties"/>
<!--  SPEL实体类属性和properties属性值映射,${}只是占位符不是SpEL表达式  -->
<bean id="dataSource" class="com.example.bean.DataSource">
    <property name="driverClassName" value="${dataSource.driverClassName}"/>
    <property name="jdbcUrl" value="${dataSource.jdbcUrl}"/>
    <property name="username" value="${dataSource.username}"/>
    <property name="password" value="${dataSource.password}"/>
</bean>
Druid数据源配置
<dependency>
    <groupId>mysql</groupId>
    <artifactId>mysql-connector-java</artifactId>
    <version>5.1.31</version>
</dependency>
<dependency>
    <groupId>com.alibaba</groupId>
    <artifactId>druid</artifactId>
    <version>1.1.21</version>
</dependency>
<!--  加载dataSource.properties文件  -->
<context:property-placeholder location="classpath:dp.properties"/>
<!--  配置Druid数据源  -->
<bean id="dataSource" class="com.alibaba.druid.pool.DruidDataSource">
    <property name="driverClassName" value="${dataSource.driverClassName}"/>
    <property name="url" value="${dataSource.jdbcUrl}"/>
    <property name="username" value="${dataSource.username}"/>
    <property name="password" value="${dataSource.password}"/>
</bean>
Bean的作用域
<!--  在Spring中可以设置创建bean实例是单实例还是多实例,默认是单实例对象  -->
<!--  scope="prototype"设置多实例,单实例在容器启动创建对象保存到容器中  -->
<bean id="ub" class="com.example.bean.User" scope="prototype"/>
Bean的后置处理器(BeanPostProcessor接口)
<!--  注侧一个User对象命名为bean  -->
<bean id="bean" class="com.example.bean.User"/>
<!--  注册后置处理器  -->
<bean class="com.example.processor.MyBeanProcessor"/>
//自定义后置处理器
public class MyBeanProcessor implements BeanPostProcessor {
    //在init执行前调用before处理器
    @Override
    public Object postProcessBeforeInitialization(Object bean, String beanName) throws BeansException {
        System.out.println("postProcessBeforeInitialization:"+beanName);
        return bean;
    }
    //在init执行后调用after处理器
    @Override
    public Object postProcessAfterInitialization(Object bean, String beanName) throws BeansException {
        System.out.println("postProcessAfterInitialization:"+beanName);
        return bean;
    }
}
工厂创建Bean
普通bean:在配置文件中定义bean的类型就是返回类型。
工厂bean:在配置文件中定义bean类型可以和返回类型不一样。
    1.创建一个类作为工厂bean,实现接口FactoryBean
    2.实现接口里面的方法,在实现的方法中定义返回的bean类型
静态工厂:工厂本身提供提供创建bean的静态方法,不需要实例化工厂。
实例工厂:需要实例化工厂获得工厂对象,再调工厂对象的创建bean方法实例化对象。
public class UserFactoryBean {
    //静态工厂创建对象
    public static User createStaticUser(String factoryType) {
        User user = new User();
        user.setName(factoryType);
        return user;
    }
    //实例工厂创建对象
    public User createInstanceUser(String factoryType) {
        User user = new User();
        user.setName(factoryType);
        return user;
    }
}
<!--  指定静态工厂类和静态方法,constructor-arg参数传入  -->
<bean id="staticFactoryBean" class="com.example.factory.UserFactoryBean"
      factory-method="createStaticUser">
    <constructor-arg name="factoryType" value="staticFactoryBean"/>
</bean>
<!--  创建实例工厂对象  -->
<bean id="factoryBean" class="com.example.factory.UserFactoryBean"/>
<!--  指定实例工厂对象和创建bean的工厂方法,constructor-arg参数传入  -->
<bean id="instanceFactoryBean" class="com.example.bean.User"
      factory-bean="factoryBean" factory-method="createInstanceUser">
    <constructor-arg name="factoryType" value="instanceFactoryBean"/>
</bean>
public class UserFactoryBean implements FactoryBean<User> {
    //Spring自动调用创建bean
    @Override
    public User getObject() {
        return new User();
    }
    //获取bean的类型
    @Override
    public Class<?> getObjectType() {
        return User.class;
    }
    //指定是否为单例
    @Override
    public boolean isSingleton() {
        return false;
    }
}
<bean id="factoryBean" class="com.example.factory.UserFactoryBean"/>
基于XML的自动装配
public class MyDataSource {
    private DruidDataSource druidDataSource;
    public MyDataSource() {
    }
    public MyDataSource(DruidDataSource druidDataSource) {
        this.druidDataSource = druidDataSource;
    }
    public DruidDataSource getDruidDataSource() {
        return druidDataSource;
    }
    public void setDruidDataSource(DruidDataSource druidDataSource) {
        this.druidDataSource = druidDataSource;
    }
}
<!--  autowire:default,no都是不自动装配,byName以属性名作为id去查找这个组件进行装配  -->
<bean id="myDataSource" class="com.example.bean.MyDataSource" autowire="byName"/>
<!--  byType根据类型自动注入,如果没有则装配null,如果有多个同类型bean会报错装配失败  -->
<bean id="myDataSource" class="com.example.bean.MyDataSource" autowire="byType"/>
<!--  constructor构造器自动装配,默认按照类型装配,匹配不到装配null,如果有多个同类型bean就按照id装配  -->
<bean id="myDataSource" class="com.example.bean.MyDataSource" autowire="constructor"/>
IOC(注解)
Bean
@Component
@Scope(value = "prototype")
public class User {
    private String name;
    private Integer age;
    public void setName(String name) {
        this.name = name;
    }
    public void setAge(Integer age) {
        this.age = age;
    }
    @Override
    public String toString() {
        return "User{" +
                "name='" + name + '\'' +
                ", age=" + age +
                '}';
    }
}
Dao
public interface UserDao {
    User selectByName(String name);
}
@Repository(value = "userDao")
public class UserDaoImpl implements UserDao {
    private User user;
    public UserDaoImpl(User user) {
        this.user = user;
    }
    @Override
    public User selectByName(String name) {
        user.setName(name);
        user.setAge(74);
        return user;
    }
}
Service
public interface UserService {
    User selectByName(String name);
}
@Service(value = "userService")
public class UserServiceImpl implements UserService {
    private UserDao userDao;
    public UserServiceImpl(UserDao userDao) {
        this.userDao = userDao;
    }
    @Override
    public User selectByName(String name) {
        return userDao.selectByName(name);
    }
}
Controller
@Controller
public class UserController {
    private UserService userService;
    public UserController(UserService userService) {
        this.userService = userService;
    }
    public void exec() {
        System.out.println(userService.selectByName("唐纳德 特朗普"));
    }
}
注解自动装配
//使用Autowired实现属性自动装配,但不推荐这种方法[Field injection is not recommended]
//先按照类型去找bean,如果没找到抛异常,找到1个直接注入
//找到多个就按照属性名继续匹配id,如果匹配上就注入,否则就抛异常
//@Qualifier("new_userDao")指定一个新的id查找bean,不再按照属性名查找
//@Autowired的required属性默认true,找不到就抛异常,设置false找不到就注入null
@Autowired(required = false)
@Qualifier("new_userDao")
private UserDao userDao;
//使用构造器实现自动装配,自动装配的前提是此类要在IOC容器内
@Autowired(required = false)//如果方法上有@Autowired那方法的每一个参数都会自动注入
public void UserService(@Qualifier("new_userDao") UserDao userDao) {
    this.userDao = userDao;
}
Autowired/Resource
//@Autowired和@Resource都能完成bean的自动装配
@Autowired:Spring的规范,功能强大,但仅限于在Spring容器环境中使用
@Resource:J2EE标准,拓展性强,不局限于在Spring容器环境使用
Spring整合Junit4
<dependency>
    <groupId>junit</groupId>
    <artifactId>junit</artifactId>
    <version>4.12</version>
    <scope>test</scope>
</dependency>
<dependency>
    <groupId>org.springframework</groupId>
    <artifactId>spring-test</artifactId>
    <version>5.3.3</version>
    <scope>test</scope>
</dependency>
//指定单元测试环境为Spring环境,@Test将由Spring托管
@RunWith(SpringJUnit4ClassRunner.class)
//@ContextConfiguration指定Spring配置文件的路径,可以指定多个配置文件
@ContextConfiguration(locations = {"classpath:application1.xml"})
public class App1 {
    @Autowired
    private UserController userController;
    @Test
    public void test1() {
        userController.exec();
    }
}
泛型依赖注入
//Book实体类
public class Book {
}
//User实体类
public class User {
}
//BaseDao泛型抽象类
public abstract class BaseDao<T> {
    public abstract void save();
}
//BookDao实现类
@Repository
public class BookDao extends BaseDao<Book> {
    @Override
    public void save() {
        System.out.println("保存图书信息...");
    }
}
//UserDao实现类
@Repository
public class UserDao extends BaseDao<User> {
    @Override
    public void save() {
        System.out.println("保存用户信息...");
    }
}
//BaseService类
public class BaseService<T> {
    @Autowired
    private BaseDao<T> baseDao;
    public void save() {
        System.err.println("hello");
        baseDao.save();
    }
}
//BookService类
@Service
public class BookService extends BaseService<Book> {
}
//UserService类
@Service
public class UserService extends BaseService<User> {
}
//Spring依赖注入时会自动将所有上级父类或接口注入容器,如果带泛型,那么泛型会依赖传递或者在组件之间传递。
@RunWith(SpringRunner.class)
@ContextConfiguration(locations = {"classpath:application1.xml"})
public class App1 {
    @Autowired
    private BookService bookService;
    @Autowired
    private UserService userService;
    @Test
    public void test1() {
        bookService.save();
        userService.save();
    }
}

若有收获,就点个赞吧
0 人点赞
