1 为什么要使用哨兵模式
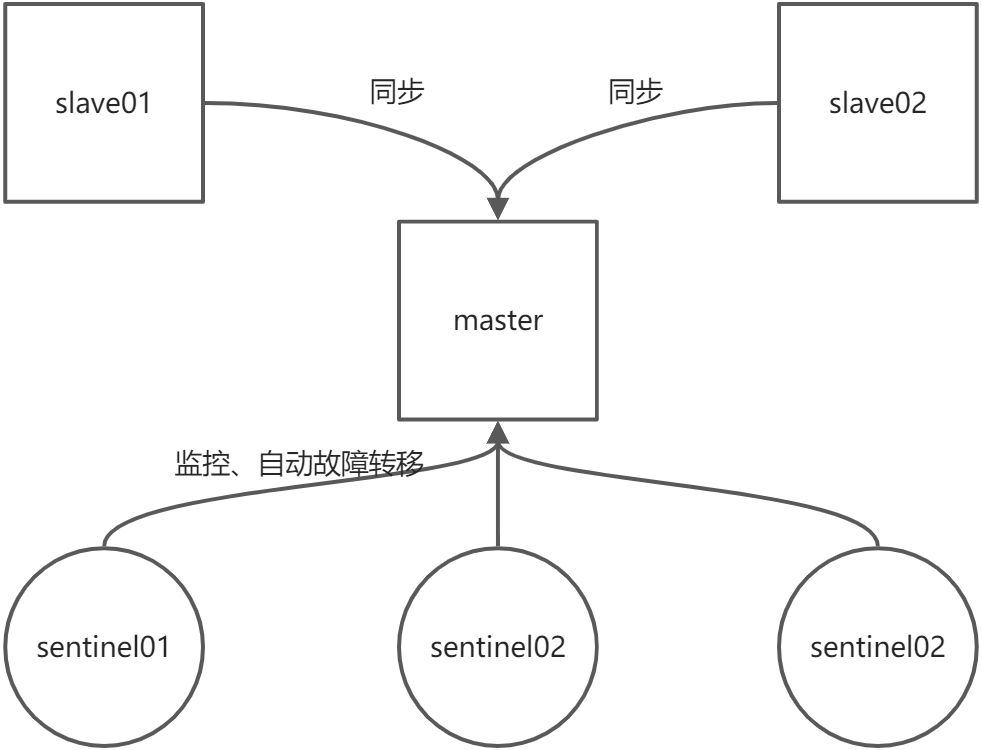
在主从模式下,当master节点宕机,那么集群就不可用了,为了解决这个问题,出现了哨兵模式。
哨兵是一个独立的进程用于监控Redis服务,在master故障时,重新选举主节点。
哨兵的三大任务:
- 监控
- 提醒
- 自动故障转移
当存在多个哨兵时,
- 主管下线:当哨兵发现master节点不可达时,会做出主管下线判断。
- 客观下线:多个哨兵认为某一个Redis服务不可达,就会做出客观下线。
- 仲裁:足够数量(哨兵数量/2 + 1)的哨兵主管下线,就会failover。
2 基本配置解释
#哨兵使用的端口号port 26379daemonize no# 哨兵使用的进程存放的文件pidfile /var/run/redis-sentinel.pid# 日志文件存放路径logfile ""# 工作目录dir /tmp# 哨兵监控的主节点ip,端口,2代表仲裁节点数sentinel monitor mymaster 127.0.0.1 6379 2# 哨兵检测到master节点不可达后,多长时间主管下线,单位是微秒,默认30ssentinel down-after-milliseconds mymaster 30000acllog-max-len 128sentinel parallel-syncs mymaster 1# 客观下线以后多久进行故障转移,单位是微秒,默认3分钟sentinel failover-timeout mymaster 180000# 默认SENTINEL SET是不被允许的sentinel deny-scripts-reconfig yes# 解析主机名SENTINEL resolve-hostnames noSENTINEL announce-hostnames no# master密码sentinel auth-pass mymaster 123456
3 搭建哨兵环境
哨兵是在主从环境的基础上,每一个redis节点都加上一个哨兵进行监控。
| 主从环境 | 192.168.1.11:6381(master) | 192.168.1.11:6382(slave) | 192.168.1.11:6383(slave) |
|---|---|---|---|
| 哨兵IP地址 | 192.168.1.11:23681 | 192.168.1.11:23682 | 192.168.1.11:23683 |
先部署一套1master+2slave的环境,部署方法如上一章,以下步骤为哨兵部署,其中哨兵配置文件做了如下修改:
port 26381sentinel monitor mymaster 192.168.1.11 6381 2sentinel down-after-milliseconds mymaster 30000sentinel failover-timeout mymaster 180000sentinel auth-pass mymaster 123456
启动三台sentinel,启动sentinel之前需要修改sentinel.conf为666的权限,是因为sentinel启动时为非root用户。
chmod 666 sentinel.conf
启动sentinel的脚本如下:
docker rm -f sentinel26381current_dir=$(cd $(dirname $0);pwd)docker run -d --name sentinel26381 \--net host \-v $current_dir/sentinel.conf:/etc/redis/sentinel.conf \-v /etc/localtime:/etc/localtime \redis:6.2.6 /etc/redis/sentinel.conf --sentinel
日志存在一些警告,不知道如何解决,请懂得朋友帮忙解释一下,多谢。
1:X 06 Feb 2022 23:40:18.299 # WARNING: Sentinel was not able to save the new configuration on disk!!!: Permission denied
整个哨兵模式启动以后,存在如下容器:
[root@es01 sentinel26383]# docker psCONTAINER ID IMAGE COMMAND CREATED STATUS PORTS NAMES9bf56fe739e8 redis:6.2.6 "docker-entrypoint.s…" About a minute ago Up About a minute sentinel263838710ba4149db redis:6.2.6 "docker-entrypoint.s…" About a minute ago Up About a minute sentinel26381afadcfb38017 redis:6.2.6 "docker-entrypoint.s…" 2 minutes ago Up 2 minutes sentinel2638225775bc1d513 redis:6.2.6 "docker-entrypoint.s…" 3 minutes ago Up 3 minutes redis6383ca6fbfe3f61c redis:6.2.6 "docker-entrypoint.s…" 3 minutes ago Up 3 minutes redis6382dd4e095bbc9e redis:6.2.6 "docker-entrypoint.s…" 4 minutes ago Up 4 minutes redis6381
工作目录存在如下:
sentinel/├── redis6381│ ├── data│ │ └── dump.rdb│ ├── redis.conf│ └── run-redis.sh├── redis6382│ ├── data│ │ └── dump.rdb│ ├── redis.conf│ └── run-redis.sh├── redis6383│ ├── data│ │ └── dump.rdb│ ├── redis.conf│ └── run-redis.sh├── sentinel26381│ ├── run-sentinel26381.sh│ └── sentinel.conf├── sentinel26382│ ├── run-sentinel26382.sh│ └── sentinel.conf├── sentinel26383│ ├── run-sentinel26383.sh│ └── sentinel.conf
4 故障转移测试
在任意哨兵内查看自身监控的redis服务器状态:
127.0.0.1:26381> INFO sentinel# Sentinelsentinel_masters:1sentinel_tilt:0sentinel_running_scripts:0sentinel_scripts_queue_length:0sentinel_simulate_failure_flags:0master0:name=mymaster,status=ok,address=192.168.1.11:6381,slaves=2,sentinels=3
模拟故障
停止当前master节点(6381)
# docker stop redis6381
查看哨兵日志:
1:X 07 Feb 2022 22:50:39.050 # +sdown master mymaster 192.168.1.11 63811:X 07 Feb 2022 22:50:39.055 # Could not create tmp config file (Permission denied)1:X 07 Feb 2022 22:50:39.055 # WARNING: Sentinel was not able to save the new configuration on disk!!!: Permission denied1:X 07 Feb 2022 22:50:39.055 # +new-epoch 11:X 07 Feb 2022 22:50:39.055 # Could not create tmp config file (Permission denied)1:X 07 Feb 2022 22:50:39.055 # WARNING: Sentinel was not able to save the new configuration on disk!!!: Permission denied1:X 07 Feb 2022 22:50:39.055 # +vote-for-leader 7c89ba8d21ffa79305459970cf7e7fbe90085a33 11:X 07 Feb 2022 22:50:39.153 # +odown master mymaster 192.168.1.11 6381 #quorum 3/21:X 07 Feb 2022 22:50:39.153 # Next failover delay: I will not start a failover before Mon Feb 7 22:52:39 20221:X 07 Feb 2022 22:50:40.270 # +config-update-from sentinel 7c89ba8d21ffa79305459970cf7e7fbe90085a33 192.168.1.11 26383 @ mymaster 192.168.1.11 63811:X 07 Feb 2022 22:50:40.270 # +switch-master mymaster 192.168.1.11 6381 192.168.1.11 63831:X 07 Feb 2022 22:50:40.270 * +slave slave 192.168.1.11:6382 192.168.1.11 6382 @ mymaster 192.168.1.11 63831:X 07 Feb 2022 22:50:40.270 * +slave slave 192.168.1.11:6381 192.168.1.11 6381 @ mymaster 192.168.1.11 63831:X 07 Feb 2022 22:50:40.271 # Could not create tmp config file (Permission denied)1:X 07 Feb 2022 22:50:40.271 # WARNING: Sentinel was not able to save the new configuration on disk!!!: Permission denied1:X 07 Feb 2022 22:51:10.315 # +sdown slave 192.168.1.11:6381 192.168.1.11 6381 @ mymaster 192.168.1.11 6383
从日志内可以看到重新选举后master节点为6382端口,确认6382是否为master角色
[root@es01 sentinel]# redis-cli -a 123456 -p 6383Warning: Using a password with '-a' or '-u' option on the command line interface may not be safe.127.0.0.1:6383> role1) "master"2) (integer) 300583) 1) 1) "192.168.1.11"2) "6382"3) "29780"
可以看到当前只有一个slave节点为6383,启动6381节点,查看哨兵日志:
1:X 07 Feb 2022 22:51:10.277 # +sdown slave 192.168.1.11:6381 192.168.1.11 6381 @ mymaster 192.168.1.11 63831:X 07 Feb 2022 22:52:40.780 # -sdown slave 192.168.1.11:6381 192.168.1.11 6381 @ mymaster 192.168.1.11 63831:X 07 Feb 2022 22:52:50.720 * +convert-to-slave slave 192.168.1.11:6381 192.168.1.11 6381 @ mymaster 192.168.1.11 6383
日志显示该节点启动,并重新加入转换为slave节点,确认当前6381节点角色:
127.0.0.1:6383> role1) "master"2) (integer) 396583) 1) 1) "192.168.1.11"2) "6382"3) "39519"2) 1) "192.168.1.11"2) "6381"3) "39519"
如果出现故障转移后老的master节点无法同步成功,可以检查一下老master节点是否漏配置master的密码。
masterauth 123456

若有收获,就点个赞吧
0 人点赞
