
一 基础
语法
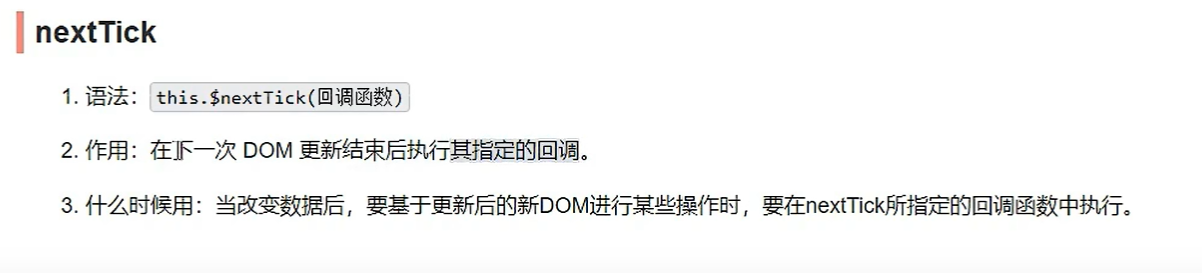
this.$nextTick

三个新的生命周期
路由组件独有的生命周期钩子. 当组件切换时, 两个生命周期钩子将会被激活
1 activated
切换到当前路由时被激活
<script>export default {name: "Home",beforeDestroy() {console.log("Home 被销毁了")},//activated() {console.log("路由被激活了")},deactivated() {console.log("路由休眠了")}}</script>
2. deactivated
<script>export default {name: "Home",beforeDestroy() {console.log("Home 被销毁了")},//activated() {console.log("路由被激活了")},deactivated() {console.log("路由休眠了")}}</script>
3 this.$nextTick()
this.$nextTick(function(){ // 页面更新后 input 获取焦点 this.$refs.inputTitle.focus() })
全局事件总线
1.定义和作用
什么是全局事件总线?全局事件总线,是实现任意组件(父子,兄弟)之间通信的一种方式,能够往任意方向进行数据的传递全局事件总线的要求:1.所有组件都能'看到',访问(Vue.prototype.$bus)2.具有$on(绑定),$off(解绑),$emit()等函数综上所述,vm/vc组件实例对象能够担任全局事件总线,又因为全局事件总线应该在整个应用创建后就应该存在,所以在main.js中安装全局事件总线最合适,
2.全局事件总线的安装
// 引入vueimport Vue from 'vue'// app最近,import App from './App.vue'Vue.config.productionTip = false// 定义/安装全局事件总线// const Bus = Vue.extend({})// const bus = new Bus();// Vue.prototype.$bus = busnew Vue({render: h => h(App),beforeCreate() {// 安装全局事件总线Vue.prototype.$bus = this;}}).$mount('#app')
3.消息接受者: 总线上绑定/解绑自定义事件
<template><div class="demo"><h3>{{ school }}</h3><h3>{{ address }}</h3></div></template><script>export default {name: 'School',data() {// 这里存放数据",return {school: 'SYSUniversity',address: 'HaiZhu,GuangZhou'}},mounted() {// 绑定全局事件总线,当sendDataToSchool被数据发送者触发,// ()=>{} 回调函数即刻执行, student即可收到paramsthis.$bus.$on('sendDataToSchool', (...params) => {console.log('school receive message:', params)})},beforeDestroy() {// 注销捆绑在全局事件总线上的自定义事件,防止事件总线压力过大// 一定要注意写某个特定的解绑的事件/多个,如果不写,整个应用中的自定义事件都将被解绑this.$off('sendDataToStudent')}}</script>
4.触发总线上的自定义事件: 消息的发送者
<template><div class="demo"><h3>{{ name }}</h3><h3>{{ age }}</h3><button @click="sendData">click me to send data</button></div></template><script>export default {// import引入的组件需要注入到对象中才能使用",name: 'Student',data() {// 这里存放数据",return {name: 'ManMan@qq.com',age: 22}},methods: {sendData() {// 触发全局事件总线上的sendDataToSchool, 回调函数执行, school即可收到student的信息this.$bus.$emit('sendDataToSchool', [this.name, this.age])}},}</script>
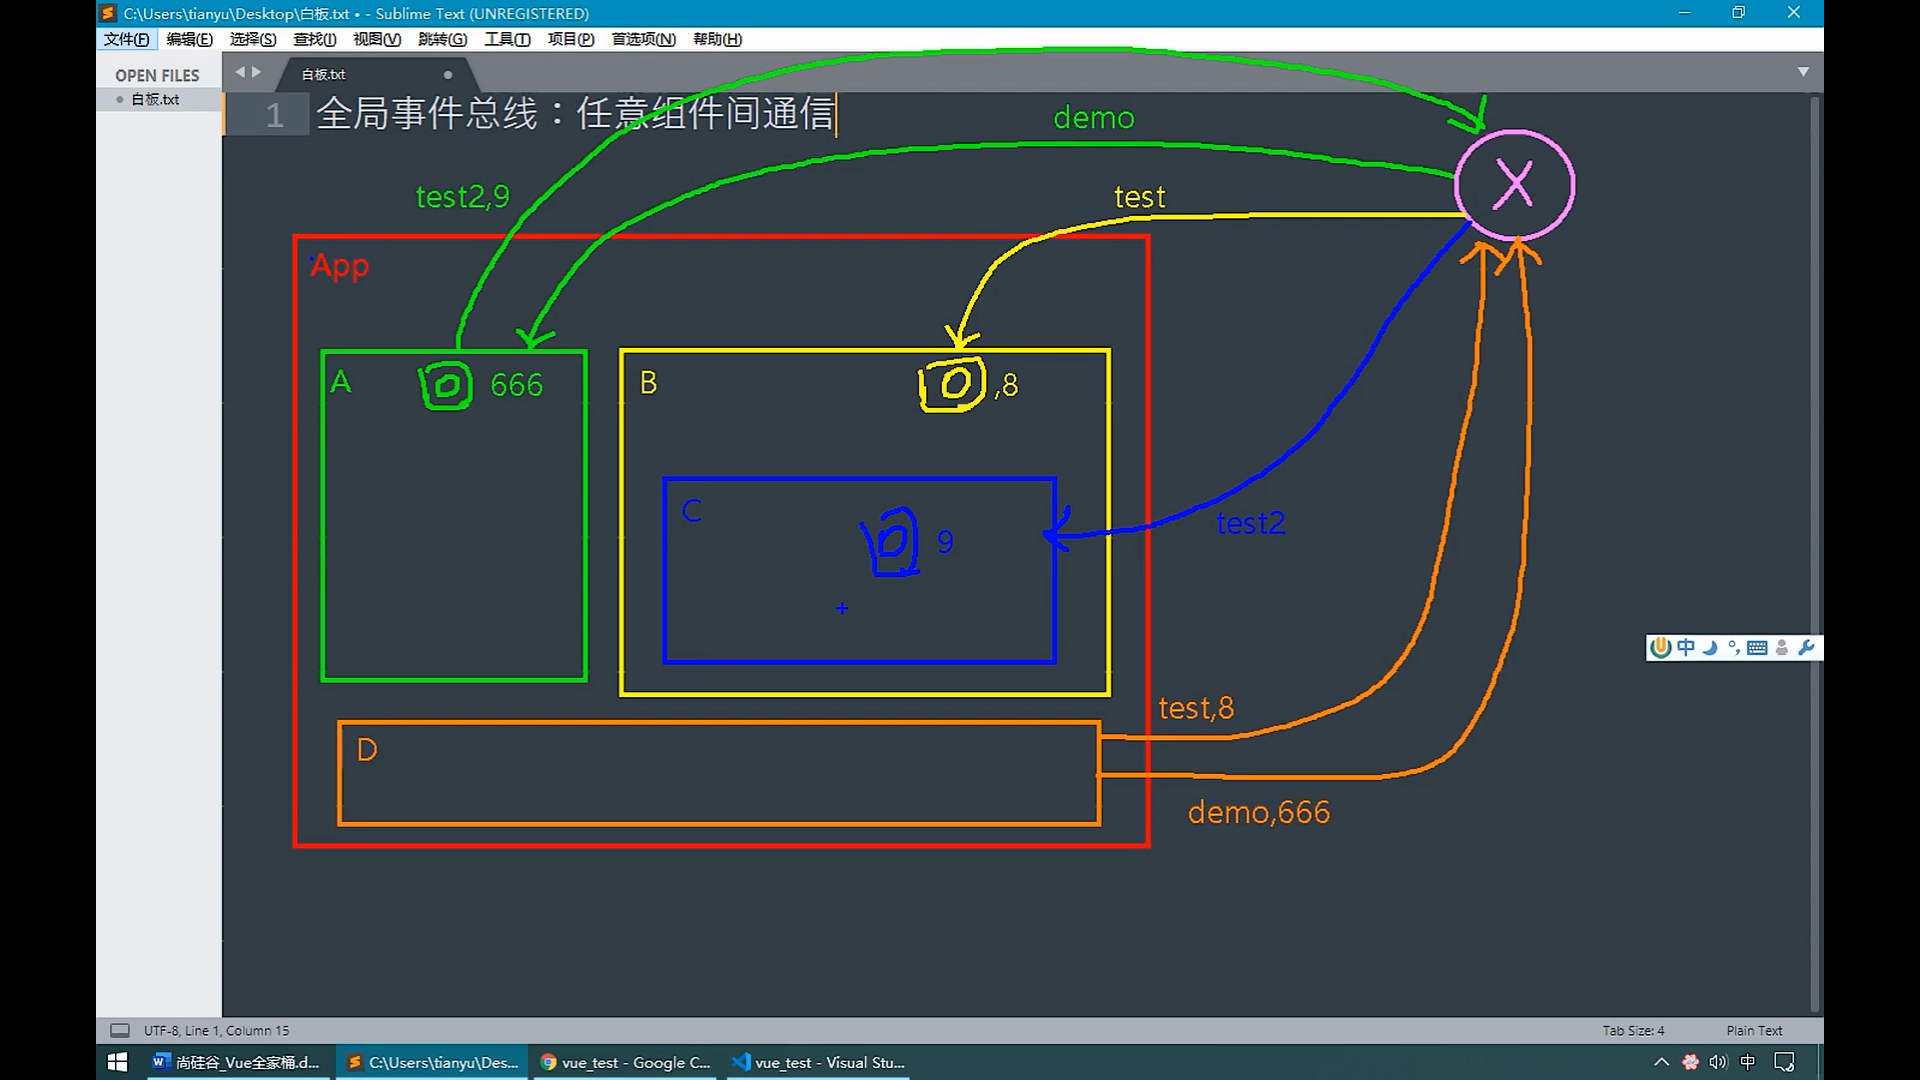
5. 事件总线原理
:::danger
如图所示,事件总线上绑定着每一个组件及其对应的自定义事件,例如A组价在总线上绑定(this.$bus.on)绑定了自定义事件test2,当其他组件(b,c,d…)想要给A发送消息(数据),只需要触发(this.$bus.$emit)test2事件,并携带相关参数,A即可收到其他组件传递的消息/数据
:::
消息订阅与发布
1.定义
:::info
1.什么是订阅/发布?
类似于全局事件总线,实现任意组件之间消息的通信以及信息的传递,消息的发布者发布消息到特定的频道,消息的订阅者订阅对应的频道获取消息,这就是消息的订阅与发布
:::
2.安装消息订阅发布插件
:::info
消息订阅发布只是vue中支持的一个概念,并没有提供对应的代码实现,所以需要引入/安装第三方订阅/发布库进行消息订阅与发布的开发
例如pubsub.js(还有其他很多的消息订阅/发布库,可以到网上或github中查找)
npm i pubsub-js
引入
import pubsub from ‘pubsub-js’
:::
:::info
关于pubsub.publish()等方法提示无法识别,是因为开发工具没有解析pubsub等第三方库的能力,需要下载能解析对应js的第三方库,解决方案参考如下连接
https://blog.csdn.net/u010142437/article/details/79041404
:::

3.消息订阅/取消订阅(订阅id取消)
<template><div class="demo"><h3>{{ school }}</h3><h3>{{ address }}</h3></div></template><script>import pubSub from "pubsub-js";export default {name: 'School',data() {// 这里存放数据",return {school: 'SYSUniversity',address: 'HaiZhu,GuangZhou'}},beforeCreate() {// 订阅消息, 订阅后会返回一个订阅id,用这个id取消某个频道消息的订阅this.channelId = pubSub.subscribe('schoolChannel', (channel, message) => {console.log('school get message:' + message + ' from:' + channel)})},beforeDestroy() {// 取消订阅pubSub.unsubscribe(this.channelId)}}</script>
4.消息发布
<template>
  <div class="demo">
    <h3>{{ name }}</h3>
    <h3>{{ age }}</h3>
    <button v-on:click="sendDataToSchool">发布消息到schoolChannel</button>
  </div>
</template>

<script>
// 1.引入pubsub
import pubSub from "pubsub-js";

export default {
  // import引入的组件需要注入到对象中才能使用",
  name: 'Student',
  data() {
    // 这里存放数据",
    return {
      name: 'ManMan@qq.com',
      age: 22
    }
  },
  methods: {
    // 消息发布
    sendDataToSchool() {
      pubSub.publish('schoolChannel', [this.name, this.age])
    }
  }

}
</script>
过渡与动画
1.vue动画Animation
<template>
  <div>
    <button @click="isShow =!isShow">显示/隐藏</button>
    <!--    appear让元素在页面打开时就以动画形式进入-->
    <transition appear>
      <h3 v-show="isShow">Vue动画</h3>
    </transition>
  </div>
</template>

<script>
export default {
  name: "Animation",
  data() {
    return {
      isShow: true
    }
  }
}
</script>

<style scoped>
h3 {
  background-color: pink;
  height: 150px;
}

.v-enter-active {
  /*my-animation动画效果进入过程*/
  animation: my-animation 1s linear;
}

.v-leave-active {
  /*my-animation动画效果离开过程*/
  animation: my-animation 1s reverse;
}

/*css 3动画 my-animation为动画效果名*/
@keyframes my-animation {
  /*进来*/
  from {
    transform: translateX(-100%);
  }
  /*离开*/
  to {
    transform: translateX(0px);
  }
}
</style>
2.vue过渡Transition
:::info vue对css过渡的封装和支持 :::
<template>
  <div>
    <h4>Transition</h4>
    <button @click="isShow =!isShow">显示/隐藏</button>
    <!--    appear让元素在页面打开时就以动画形式进入-->
    <transition appear>
      <h3 v-show="isShow">Vue动画</h3>
    </transition>
  </div>
</template>

<script>
export default {
  name: "Animation",
  data() {
    return {
      isShow: true
    }
  }
}
</script>

<style scoped>
h3 {
  background-color: pink;
  height: 150px;
}

/*上学家是起点,放学家是终点*/
.v-enter, .v-leave-to {
  transform: translateX(-100%);
}

.v-enter-active, .v-leave-active {
  transition: 0.5s linear;
}

.v-enter-to, .v-leave {
  transform: translateX(0);
}

</style>
3.vue过渡/动画的第三方库
:::info animation.css….,不用我们自己手动书写样式,直接按照要求引入使用第三方css动画/过渡库即可 :::
4.vue动画与过渡总结


二 vue脚手架cli
三 vue中的ajax
代理配置
:::info
跨域请求怎么配置?
1.xhr new XMLHttpRequest() xhr.open()/xhr.send()
2.jQuery $.get()/$post()
3.axios 对 xhr的封装 vue推荐使用
4.fetch
:::
1. 同源策略与跨域以及解决跨域的方式
:::info
同源: 协议名, ip, 端口保持一致
跨域: 违背同源策略, 协议名,ip,端口号只要有一个不同,就属于跨域cros
跨域解决方案
1.cor 后端配置跨域
2.jsonp 前后端共同解决跨域
3.代理服务器
注意:当使用代理时, 发送请求请求的资源在本地和目标服务器上都有且路径相同,此时没有进行相关配置,请求首先找寻的是本地vue项目目录下public下的资源 :::
2 代理服务器js
// 命令行 node server1
const express = require('express')
const app = express()

app.use((request,response,next)=>{
    console.log('有人请求服务器1了');
    console.log('请求来自于',request.get('Host'));
    console.log('请求的地址',request.url);
    next()
})

app.get('/students',(request,response)=>{
    const students = [
        {id:'001',name:'tom',age:18},
        {id:'002',name:'jerry',age:19},
        {id:'003',name:'tony',age:120},
    ]
    response.send(students)
})

app.listen(5000,(err)=>{
    if(!err) console.log('服务器1启动成功了,请求学生信息地址为:http://localhost:5000/students');
})
const express = require('express')
const app = express()

app.use((request,response,next)=>{
    console.log('有人请求服务器2了');
    next()
})

app.get('/cars',(request,response)=>{
    const cars = [
        {id:'001',name:'奔驰',price:199},
        {id:'002',name:'马自达',price:109},
        {id:'003',name:'捷达',price:120},
    ]
    response.send(cars)
})

app.listen(5001,(err)=>{
    if(!err) console.log('服务器2启动成功了,请求汽车信息地址为:http://localhost:5001/cars');
})
3.vue-cli配置单个代理服务器
:::info 当我们需要根据端口号的路径名不同代理到不同的服务器,这是单个的配置方式就不再适用 :::
2.1 axios发送请求(安装 引入axios)
<template>
  <div class="app">
    <h3>app</h3>
    <School></School>
    <Student></Student>
    <button @click="getStudentMessage">点击我获取学生信息,查看控制台</button>
  </div>
</template>

<script>
// 引入组件
import Student from "@/components/Student";
import School from "@/components/School";
import axios from "axios";

export default {
  name: "App",
  components: {
    School,
    Student,
  },
  methods: {
    getStudentMessage() {
      axios.get("http://localhost:8080/students").then(
          response => {
            console.log('请求成功了', response.data)
          },
          error => {
            console.log('请求失败了', error.message)
          }
      )
    }
  }
}
</script>
2.2 vue.config.js配置代理
const {defineConfig} = require('@vue/cli-service')
module.exports = defineConfig({
  transpileDependencies: true,
  lintOnSave: false,
  //开启代理服务器 方式1 只能配置单个代理
  devServer:{
    proxy:'http://localhost:5000'
  }
})
2.3 原理图

2.4 方法1小结

4. vue-cli配置多个代理服务器
3.1 axios发送请求
<template>
  <div class="app">
    <h3>app</h3>
    <School></School>
    <Student></Student>
    <button @click="getStudentMessage">点击我获取学生信息,查看控制台</button>
    <button @click="getCarMessage">点击我获取汽车信息,查看控制台</button>
  </div>
</template>

<script>
// 引入组件
import Student from "@/components/Student";
import School from "@/components/School";
import axios from "axios";

export default {
  name: "App",
  components: {
    School,
    Student,
  },
  methods: {
    // 获取学生信息
    getStudentMessage() {
      axios.get("http://localhost:8080/stu/students").then(
          response => {
            console.log('请求成功了', response.data)
          },
          error => {
            console.log('请求失败了', error.message)
          }
      )
    },
    // 获取汽车信息
    getCarMessage(){
      axios.get("http://localhost:8080/car/cars").then(
          response => {
            console.log('请求成功了', response.data)
          },
          error => {
            console.log('请求失败了', error.message)
          }
      )
    }
  }
}
</script>
3.2 vue.config.js配置多个代理
const {defineConfig} = require('@vue/cli-service')
module.exports = defineConfig({
    transpileDependencies: true,
    lintOnSave: false,

    //开启代理服务器 方式2
    devServer: {
        proxy: {
            // 所有baseUrl后面的第一个路径为 /stu 的请求
            // http://localhost:8081/stu/students -> http://localhost:5000/students
            '/stu': {
                target: 'http://localhost:5000',
                // 只要是前缀(端口号后的第一个子串)为/stu的,全部转发到http://localhost:5000/.../
                // 路径重写 baseUrl 后面的 /stu全部 替换为 '', + http://localhost:5000
                pathRewrite: {'^/stu': ''},
                ws:true, //是否使用websocket
                changeOrigin: true // 是否告诉目标服务器我来自哪里,ip是什么
            },
            // 所有baseUrl后面的第一个路径为 /car 的请求
            // http://localhost:8081/car/cars -> http://localhost:5000/cars
            '/car': {
                target: 'http://localhost:5001',
                pathRewrite: {'^/car': ''},
                changeOrigin: true
            },
        }
    }
})
3.3 方法小结

5. vue-resource
:::info vue中发送ajax请求的插件库, 本质上也是对xml的封装, 但是由于维护频率少,所以了解即可, 使用时 npm i vue-resource 下载 vue.use() 即可 :::
插槽slot
1、什么是插槽?它有什么作用?
:::info
数据的展现位置
作用: 让父组件可以向子组件指定的位置插入html, 也是组件间的一种通信方式之一
:::
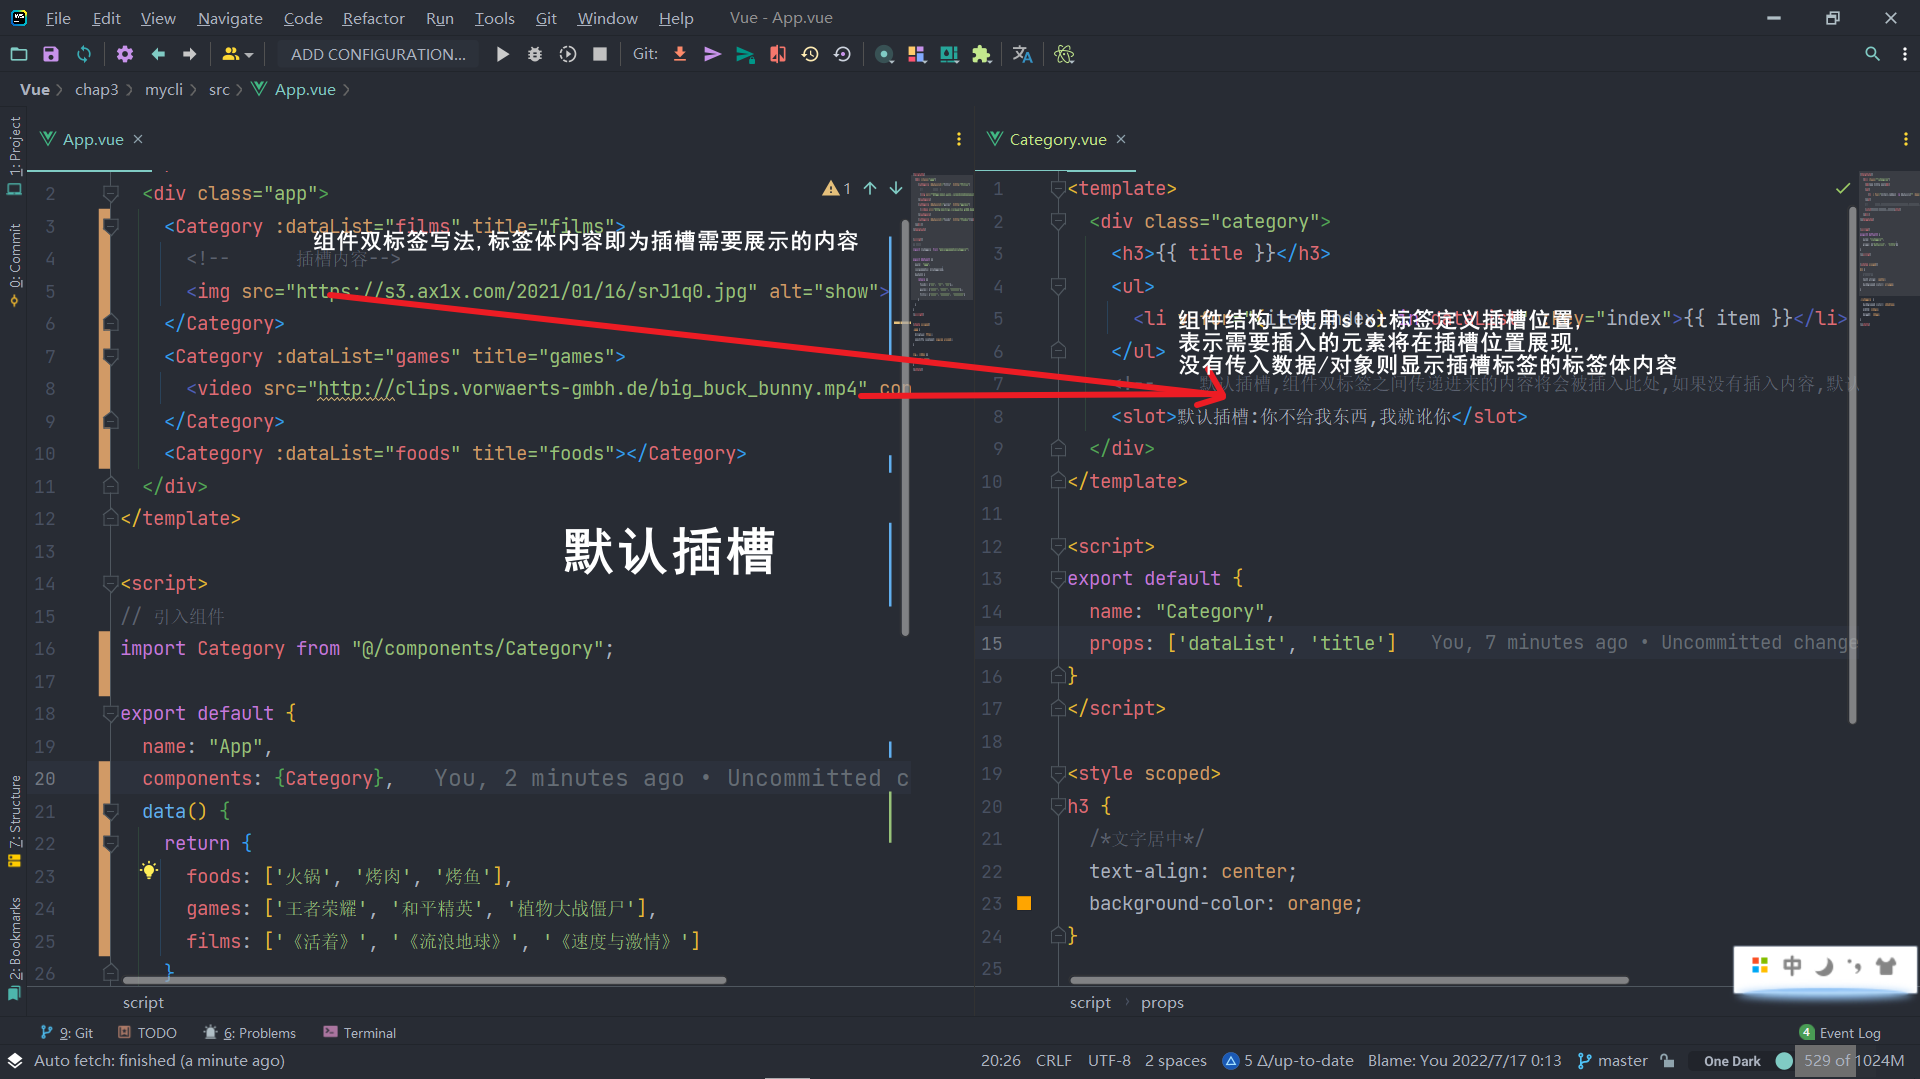
2 默认插槽
2.1 插槽定义
:::info 只有一个插槽, 插入的元素默认放置该插槽所在位置 :::
<template>
  <div class="category">
    <h3>{{ title }}</h3>
    <ul>
      <li v-for="(item,index) in dataList" :key="index">{{ item }}</li>
    </ul>
    <!--    默认插槽,组件双标签之间传递进来的内容将会被插入此处,如果没有插入内容,默认显示插槽配置的默认信息-->
    <slot>默认插槽:你不给我东西,我就讹你</slot>
  </div>
</template>

<script>
export default {
  name: "Category",
  props: ['dataList', 'title']
}
</script>

<style scoped>
h3 {
  /*文字居中*/
  text-align: center;
  background-color: orange;
}

.category {
  background-color: skyblue;
  width: 200px;
  height: 300px;
}
</style>
2.2 插槽使用
<template>
  <div class="app">
    <Category :dataList="films" title="films">
      <!--      插槽内容-->
      <img src="https://s3.ax1x.com/2021/01/16/srJ1q0.jpg" alt="show">
    </Category>
    <Category :dataList="games" title="games">
      <video src="http://clips.vorwaerts-gmbh.de/big_buck_bunny.mp4" controls></video>
    </Category>
    <Category :dataList="foods" title="foods"></Category>
  </div>
</template>

<script>
// 引入组件
import Category from "@/components/Category";

export default {
  name: "App",
  components: {Category},
  data() {
    return {
      foods: ['火锅', '烤肉', '烤鱼'],
      games: ['王者荣耀', '和平精英', '植物大战僵尸'],
      films: ['《活着》', '《流浪地球》', '《速度与激情》']
    }
  }
}
</script>

<style scoped>
.app {
  display: flex;
  justify-content: space-around;
}

img, video {
  width: 100%;
}
</style>
2.3 默认插槽理解
3 具名插槽
:::info 多个插槽时, 插入内容需要指定其具体的插入位置 :::
4 作用域插槽
:::info
当父组件需要往子组件的插槽放置html结构,但是html的结构/内容由子组件的数据来决定,并且子组件的数据受到限制不能往父组件传,此时就需要作用域插槽进行数据的传递
:::


四 vue-router
1.路由引入
1.1 Single Page Application
单页面应用, 整个应用只有一个完整的页面, 点击页面的导航链接不会刷新页面,只会做页面的局部更新,展示的数据需要发送ajax请求获取
1.2 路由
- 一组映射关系, 即 key-value键值对
- key为SPA路径处的路径变化,value为与路径key对应的组件
1.3 前端路由和后端路由
- 前端路由: 路径key 和 组件 映射
- 后端路由: 请求路径 和 controller 映射
2. 路由的基本使用
2.1 npm i vue-router@版本号
vue-router是vue的一个插件,vue的版本和插件的版本总是需要进行版本的协调,例如vue3对应vue-router@4, vue2只能使用vue-router@3
2.2 定义 引入 use 路由
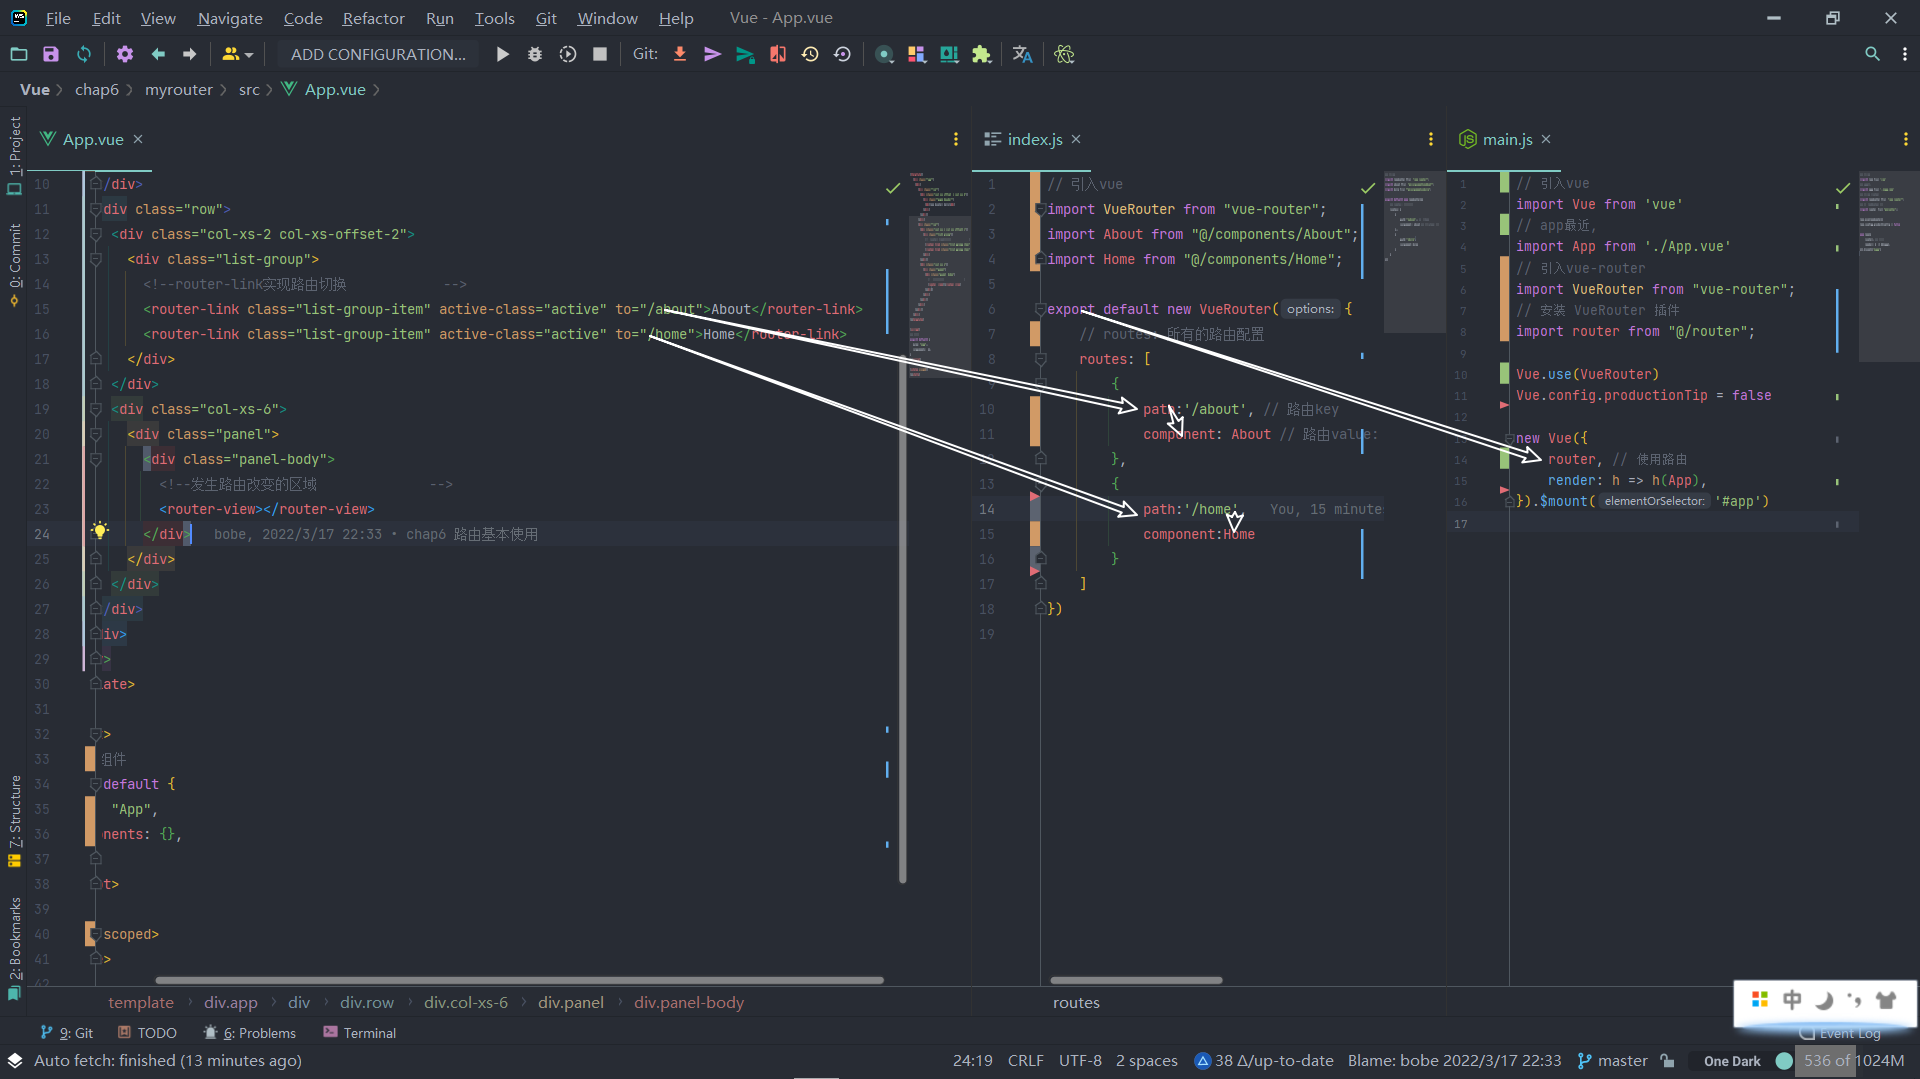
(1) new 新建路由
// 引入vue
import VueRouter from "vue-router";
import About from "@/components/About";
import Home from "@/components/Home";

export default new VueRouter({
    // routes: 所有的路由配置
    routes: [
        {
            path:'/about', // 路由key
            component: About // 路由value: 组件
        },
        {
            path:'/home',
            component:Home
        }
    ]
})
(2) import use 使用路由
// 引入vue
import Vue from 'vue'
// app最近,
import App from './App.vue'
// 引入vue-router
import VueRouter from "vue-router";
// 安装 VueRouter 插件
import router from "@/router";

Vue.use(VueRouter)
Vue.config.productionTip = false

new Vue({
    router, // 使用路由
    render: h => h(App),
}).$mount('#app')
(3) router-link 跳转, router-view 展现
- router-link设置点击此link时,路由跳转到哪里(哪个组件)
- router-view 类似于组件的插槽, vue-router找到router-link需要跳转的路由后,将该路由在router-view 处进行展示
<template>
  <div class="app">
    <div>
      <div class="row">
        <div class="col-xs-2 col-xs-offset-2">
          <div class="list-group">
            <!--router-link实现路由切换 to表示要跳转的路由 路径key           -->
            <router-link class="list-group-item" active-class="active" to="/about">About</router-link>
            <router-link class="list-group-item" active-class="active" to="/home">Home</router-link>
          </div>
        </div>
        <div class="col-xs-6">
          <div class="panel">
            <div class="panel-body">
              <!--发生路由改变的区域              -->
              <router-view></router-view>
            </div>
          </div>
        </div>
      </div>
    </div>
  </div>
</template>
(4) 过程图
(5) vue路由的几个注意点
- index.js中配置路由后,对应路由的组件实例身上将会被vue加上一个$route属性,这个属性包含本组件对应的路由规则相关信息, 每个组件不同
- 组件按照是否为路由组件分类, 分为: 路由组件(pages文件夹) 和 普通组件(component文件夹)
- 全局只有一个router, 里面包含 n 个 route 规则
2.3 路由嵌套
(1) 路由配置文件
父路由的path是 ‘/路径’ , 而子路由不能使用 ‘/路径’,而是直接 ‘子路由路径’
// 引入vue
import VueRouter from "vue-router";
import About from "@/pages/About";
import Home from "@/pages/Home";
import News from "@/pages/News";
import Message from "@/pages/Message";

export default new VueRouter({
    // routes: 所有的路由配置
    routes: [
        {
            path: '/about', // 路由key
            component: About // 路由value: 组件
        },
        {
            path: '/home',
            component: Home,
            children: [
                {
                    path: 'news', // 二级路由后 path 使用 news 而不是 /news
                    component: News
                },
                {
                    path: 'message',
                    component: Message
                }
            ]
        }
    ]
})
(2) 页面
router-link的to中 ,需要使用 ‘/父路由/子路由路径’ 方式进行阶梯式配置
<template>
  <div>
    <h2>Home组件内容</h2>
    <div>
      <ul class="nav nav-tabs">
        <li>
          <!-- 嵌套路由: /父路由路径/子路由路径           -->
          <router-link class="list-group-item" active-class="active" to="/home/news">News</router-link>
        </li>
        <li>
          <router-link class="list-group-item" active-class="active" to="/home/message">Message</router-link>
        </li>
      </ul>
    </div>
    <router-view></router-view>
  </div>
</template>
2.4 路由传参 query参数
路由跳转的同时, 跳转路径中携带query参数
(1) to字符串方式
<template>
  <div>
    <ul v-for="message in messages" :key="message.id">
      <li>
         路由传参: query参数 to字符串写法 ` `中间能够夹杂js表达式, 然后与字符串拼接
        <router-link :to="`/home/message/detail?id=${message.id}&title=${message.title}`">
          {{ message.title }}
        </router-link>
      </li>
    </ul>
    <router-view></router-view>
  </div>
</template>

<script>
export default {
  name: "Message",
  data() {
    return {
      messages: [
        {id: 1, title: 'message001'},
        {id: 2, title: 'message002'},
        {id: 3, title: 'message003'},
      ]
    }
  }
}
</script>
<template>
  <ul>
    <li>{{$route.query.id}}</li>
    <li>{{$route.query.title}}</li>
  </ul>
</template>

<script>
export default {
  name: "Detail",
}
</script>
(2) to对象方式
<template>
  <div>
    <ul v-for="message in messages" :key="message.id">
      <li>
        <router-link :to="{
          path:'/home/message/detail',
          query:{
            id:message.id,
            title: message.title
          }
        }">
          {{ message.title }}
        </router-link>
      </li>
    </ul>
    <router-view></router-view>
  </div>
</template>

<script>
export default {
  name: "Message",
  data() {
    return {
      messages: [
        {id: 1, title: 'message001'},
        {id: 2, title: 'message002'},
        {id: 3, title: 'message003'},
      ]
    }
  }
}
</script>
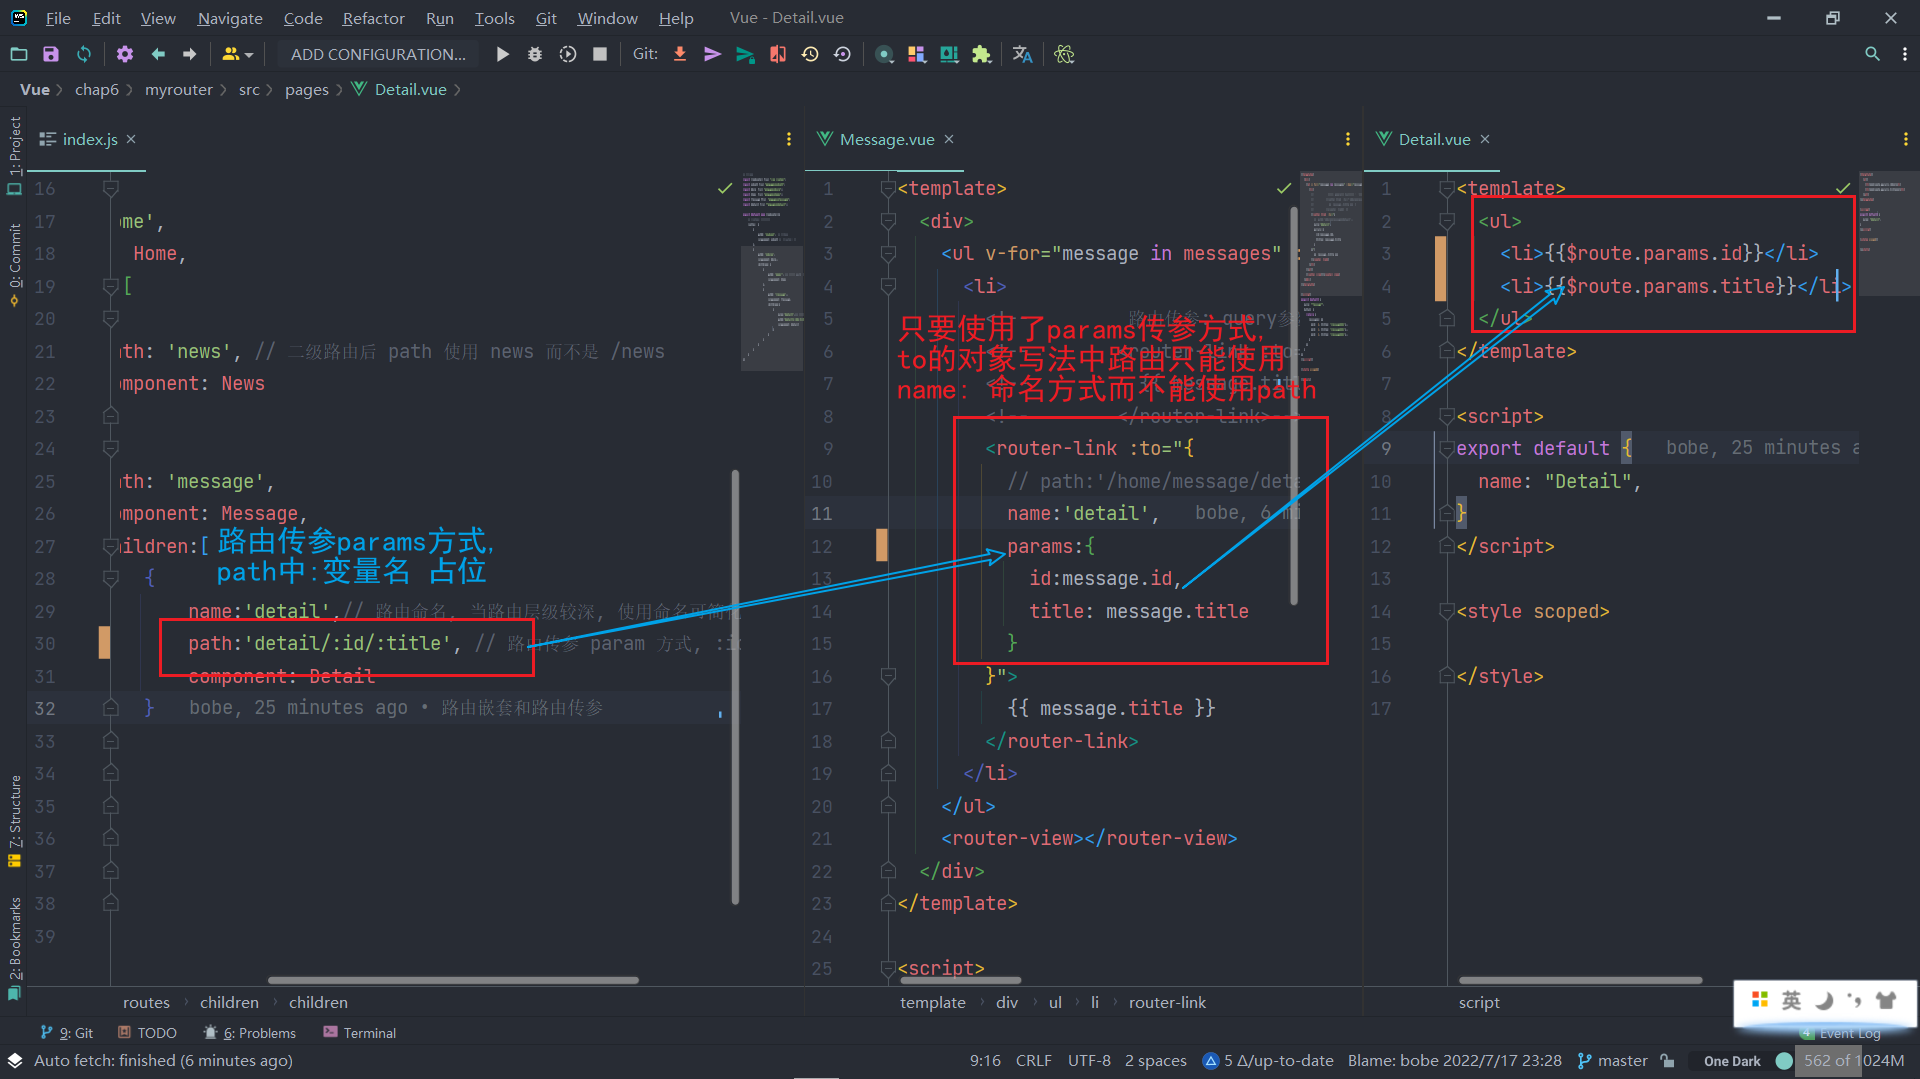
(3) 路由命名
简化router-link 中 to 的跳转配置

2.5路由传参 params参数
- path路径中 :变量名 占位
- router-link中 to对象式 只能使用name 而不能使用 path
- 获取参数 $route.params.参数名 而不是 $route.query.参数名
2.6 路由props属性
记得组件中 props[] 方式接收数据

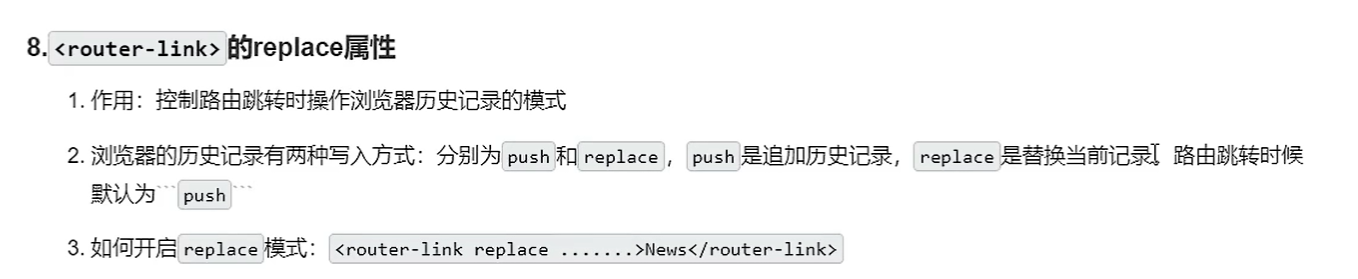
2.7 router-link的replace属性
3 编程式路由导航

4. 缓存路由组件

5. 路由守卫
5.1 全局路由守卫
(1) 前置路由守卫 router.beforeEach
全局前置路由守卫: 在路由跳转/切换前, 进行一定操作(路由鉴权…)
// 全局前置路由守卫, 在路由跳转之前执行一定的操作, 对路由进行鉴权操作...
router.beforeEach((to, from, next) => {
    // 如果 目标路由 的 meta.isAuth 为true, 并且用户名为'BobeLv'
    if (to.meta.isAuth) {
        if (localStorage.getItem("username") === 'BobeLv') {
            console.log("欢迎您")
            // 如果符合要求, 放行
            next()
        } else {
            alert("用户名错误,你无权限访问该区域!")
        }
    } else {
        next()
    }
})
(2) 后置路由守卫 router.afterEach
在路由跳转/切换后, 进行一定操作(路由鉴权…)
// 全局后置路由, 路由跳转成功以后执行的操作
router.afterEach((to, from) => {
    console.log("来自:" + from.name, "去往:" + to.name)
    if (to.meta.title) {
        // 跳转成功后, 改变页签标题
        document.title = to.meta.title
    } else {
        document.title = '通用title'
    }
})
(3) 全局路由守卫小结
// 引入vue
import VueRouter from "vue-router";
import About from "@/pages/About";
import Home from "@/pages/Home";
import News from "@/pages/News";
import Message from "@/pages/Message";
import Detail from "@/pages/Detail";

const router = new VueRouter({
    // routes: 所有的路由配置
    routes: [
        {
            name: 'About',
            path: '/about', // 路由key
            component: About, // 路由value: 组件
            // 前置路由守卫, 单个路由独享
            beforeEnter: (to, from, next) => {
                // 如果 目标路由 的 meta.isAuth 为true, 并且用户名为'BobeLv'
                if (localStorage.getItem("username2") === 'bobe1') {
                    console.log("欢迎您")
                    // 如果符合要求, 放行
                    next()
                } else {
                    alert("只有bobe能够访问此区域")
                }
            }
        },
        {
            name: 'Home',
            path: '/home',
            component: Home,
            children: [
                {
                    name: 'News',
                    path: 'news', // 二级路由后 path 使用 news 而不是 /news
                    component: News,
                    // 路由鉴权所需数据
                    meta: {
                        isAuth: true, // 当前路由需要鉴权
                        title: "news area"
                    }
                },
                {
                    name: 'Message',
                    path: 'message',
                    component: Message,
                    meta: {
                        isAuth: true, // 当前路由需要鉴权
                        title: "message area"
                    },
                    children: [
                        {
                            name: 'Detail',// 路由命名, 当路由层级较深, 使用命名可简化跳转配置
                            path: 'detail/:id/:title', // 路由传参 param 方式, :id 占位
                            component: Detail
                        }
                    ]
                }
            ]
        }
    ]
})
// 全局前置路由守卫, 在路由跳转之前执行一定的操作, 对路由进行鉴权操作...
router.beforeEach((to, from, next) => {
    // 如果 目标路由 的 meta.isAuth 为true, 并且用户名为'BobeLv'
    if (to.meta.isAuth) {
        if (localStorage.getItem("username") === 'BobeLv') {
            console.log("欢迎您")
            // 如果符合要求, 放行
            next()
        } else {
            alert("用户名错误,你无权限访问该区域!")
        }
    } else {
        next()
    }
})

// 全局后置路由, 路由跳转成功以后执行的操作
router.afterEach((to, from) => {
    console.log("来自:" + from.name, "去往:" + to.name)
    if (to.meta.title) {
        // 跳转成功后, 改变页签标题
        document.title = to.meta.title
    } else {
        document.title = '通用title'
    }
})

export default router;
5.2 独享路由守卫
(1) 路由内路由守卫 beforeEnter()
当进入当前路由前, 执行的操作
 {
            name: 'About',
            path: '/about', // 路由key
            component: About, // 路由value: 组件
            // 前置路由守卫, 单个路由独享
            beforeEnter: (to, from, next) => {
                // 如果 目标路由 的 meta.isAuth 为true, 并且用户名为'BobeLv'
                if (localStorage.getItem("username2") === 'bobe1') {
                    console.log("欢迎您")
                    // 如果符合要求, 放行
                    next()
                } else {
                    alert("只有bobe能够访问此区域")
                }
            }
        },
(2) 组件内路由守卫 beforeRouteEnter
 // 组件内路由守卫, 进入本组件前
  beforeRouteEnter(to, from, next) {
    console.log("进入detail组件前", to.name, from.name)
    next()
  },
(3) 组件内路由守卫 beforeRouteLeave
  beforeRouteLeave(to,from,next){
    console.log("离开detail组件之前",to.name,from.name)
    next()
  }
(4) 组件内路由守卫case
<template>
  <ul>
    <li>{{ $route.params.id }}</li>
    <li>{{ $route.params.title }}</li>
  </ul>
</template>

<script>
export default {
  name: "Detail",
  beforeDestroy() {
    console.log("Detail 被销毁了")
  },
  // 组件内路由守卫, 进入本组件前
  beforeRouteEnter(to, from, next) {
    console.log("进入detail组件前", to.name, from.name)
    next()
  },
  // 组件内路由守卫, 进入本组件前
  beforeRouteLeave(to,from,next){
    console.log("离开detail组件之前",to.name,from.name)
    next()
  }
}
</script>

<style scoped>

</style>
6 路由的两个工作模式

6.1 是什么?
6.2 hash哈希模式
6.3 history历史模式
五 vuex
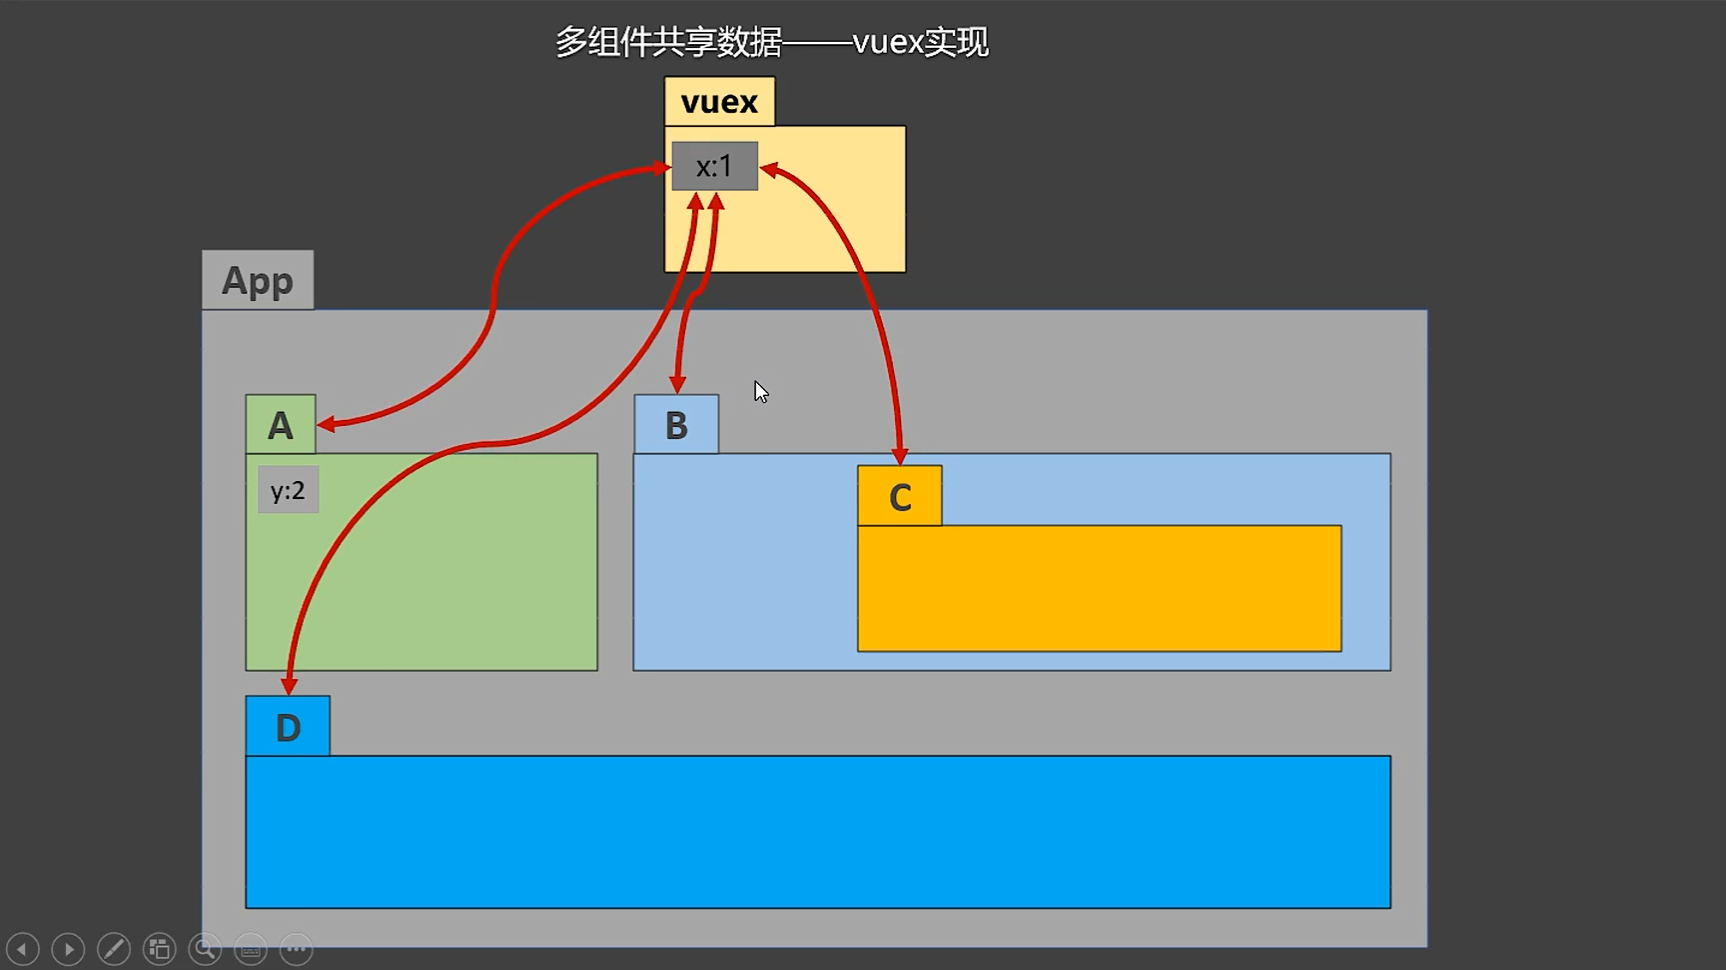
1 定义
:::info
专门在vue中实现 集中式 状态(数据) 管理的一个 插件(Vue.use()), 对 vue应用中多个组件的 共享状态 进行集中式管理(读/写/计算…) ,也是 组件之间进行通信的一种方式, 适用于任意组件通信
项目: https://github.com/vuejs/vuex
- 集中式: 所有组件共享的数据及对数据的操作, 都放置在一个地方进行统一管理
- 状态: 数据, vue组件所需要/依赖的数据
-
2 用途和作用
:::info
多组件共享/依赖同一个状态: 网站访问数: 所有人都需要能够看到并且能够修改(登录行为修改)
- 来自不同组件的行为需要变更共享的状态(同一状态)
:::
3 vuex原理图详解(重点)
4. vuex使用
4.1 npm安装
:::info vue3使用的是vuex4, vuex3只支持vue2, 在没有指定版本号时, 默认安装vuex4, 所以一定要注意版本依赖问题
npm i vuex@3 :::4.2 创建
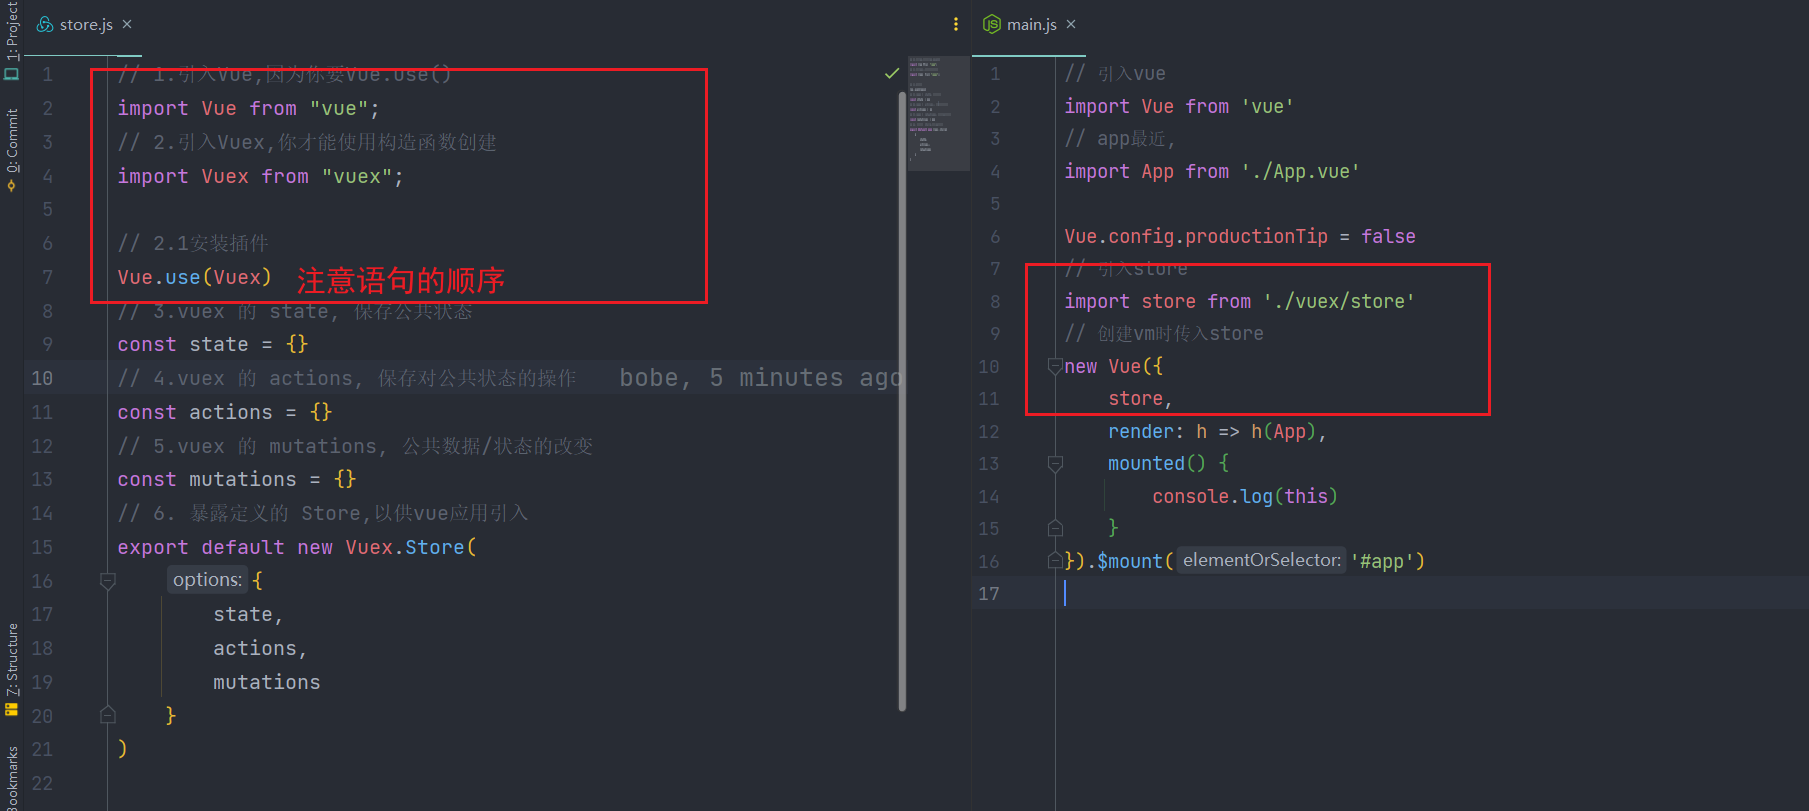
```javascript // 1.引入Vue,因为你要Vue.use() import Vue from “vue”; // 2.引入Vuex,你才能使用构造函数创建 import Vuex from “vuex”;
// 2.1安装插件 Vue.use(Vuex) // 3.vuex 的 state, 保存公共状态 const state = {} // 4.vuex 的 actions, 保存对公共状态的操作 const actions = {} // 5.vuex 的 mutations, 公共数据/状态的改变 const mutations = {} // 6. 暴露定义的 Store,以供vue应用引入 export default new Vuex.Store( { state, actions, mutations } )
<a name="gYI5k"></a>
### 4.3 使用
```javascript
// 引入vue
import Vue from 'vue'
// app最近,
import App from './App.vue'

Vue.config.productionTip = false
// 引入store
import store from './vuex/store'
// 创建vm时传入store
new Vue({
    store,
    render: h => h(App),
    mounted() {
        console.log(this)
    }
}).$mount('#app')
4.4 定义的注意点
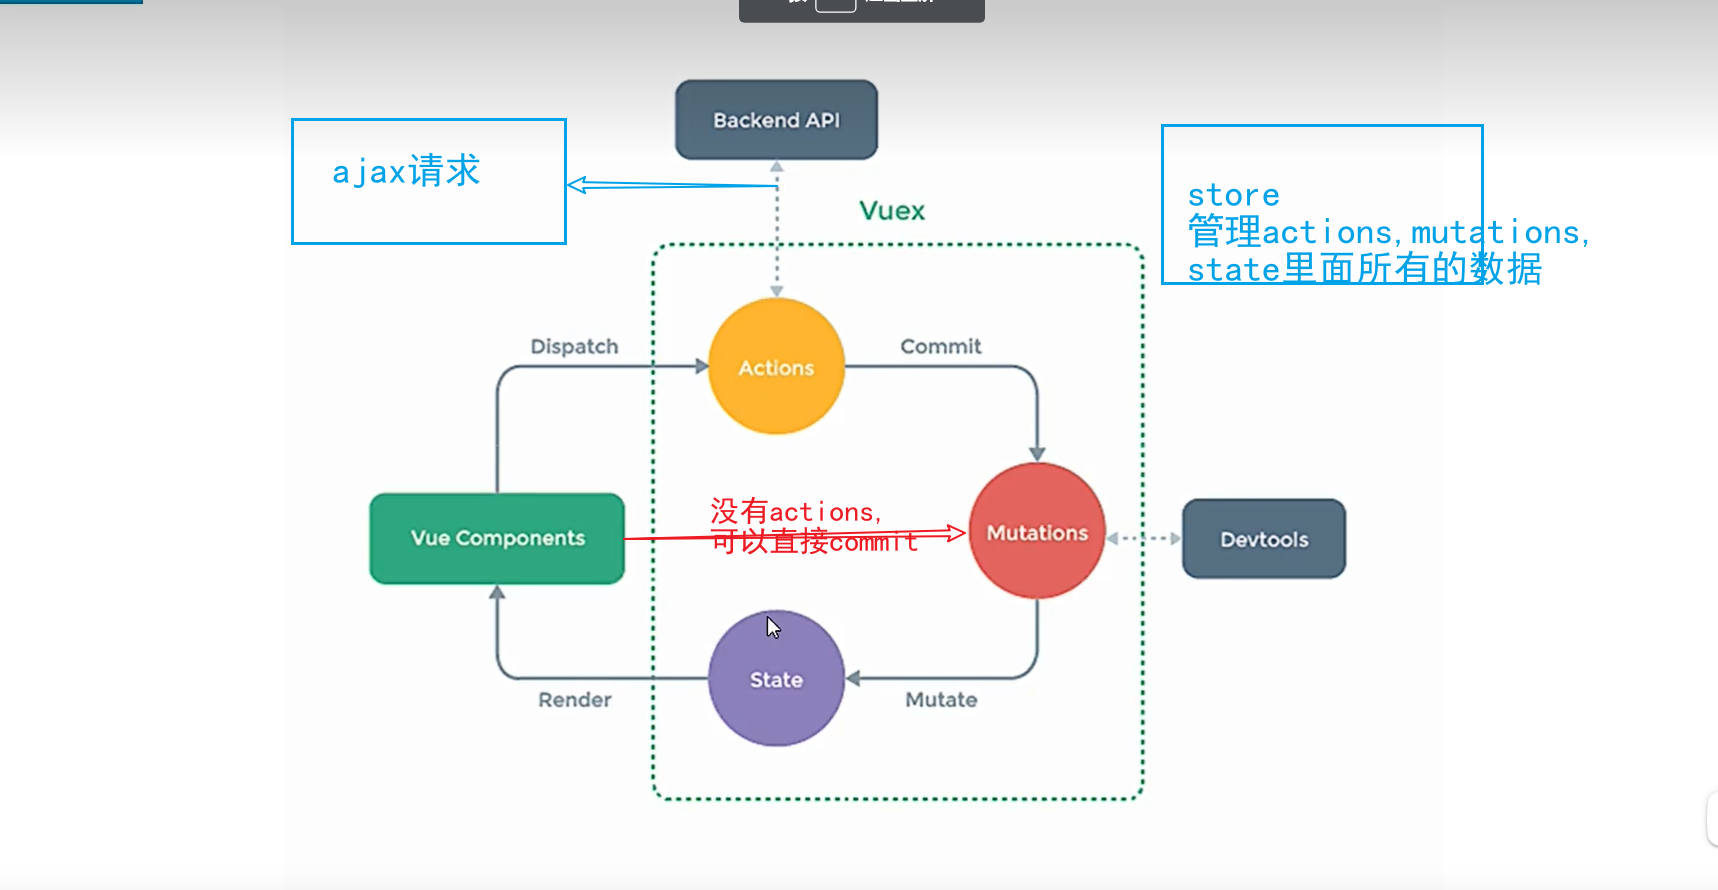
5 vuex的执行流程
:::info
dispatch(actionName,val) ——> commit(mutationName,val) ——>mutation
为了区分执行的动作是actions中还是mutations的, 我们通常将actions中的actionName小写, 而mutations中对应的mutationName大写
:::
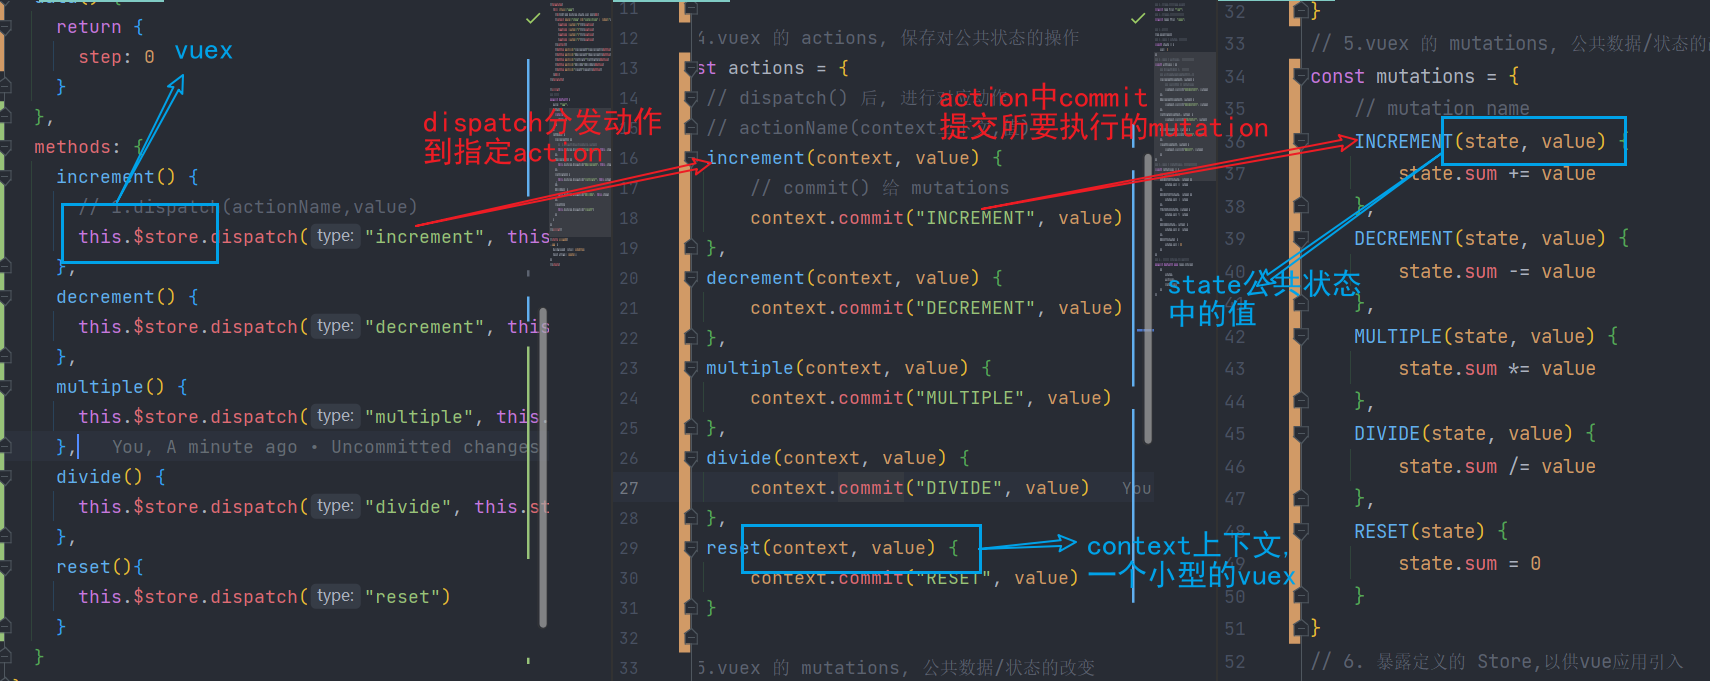
5.1 vuex的actions
:::info
动作和动作管理
当actions中没有过多的逻辑, 你可以直接commit到mutations中而不用经过dispatch到actions再到mutations,
同时,在action中你需要再dispatch到另一个action, 可以使用context提供的dispatch完成需求, 此时context中的内容能够让你的某个action不至于过于复杂
注意: 如果直接在action中进行状态state的修改而不是在mutations中进行状态的修改, vue的开发者工具将无法捕获state到在mutations以外的地方发生的变化
:::
// 4.vuex 的 actions, 保存对公共状态的操作
const actions = {
    // dispatch() 后, 进行对应动作
    // actionName(context上下文,值)
    increment(context, value) {
        // commit() 给 mutations
        context.commit("INCREMENT", value)
    },
    decrement(context, value) {
        context.commit("DECREMENT", value)
    },
    multiple(context, value) {
        context.commit("MULTIPLE", value)
    },
    divide(context, value) {
        context.commit("DIVIDE", value)
    },
    reset(context, value) {
        context.commit("RESET", value)
    },
    // 其他的再一次dispatch到这里, 然后打印日志
    log(context, value,mutationname){
      console.log("log info")
      context.commit(mutationname,value)
    }
}
5.2 vuex的mutations
:::info 状态管理 :::
// 5.vuex 的 mutations, 公共数据/状态的改变
const mutations = {
    // mutation name
    INCREMENT(state, value) {
        state.sum += value
    },
    DECREMENT(state, value) {
        state.sum -= value
    },
    MULTIPLE(state, value) {
        state.sum *= value
    },
    DIVIDE(state, value) {
        state.sum /= value
    },
    RESET(state) {
        state.sum = 0
    }
}
5.3 vuex的state
:::info 状态存储 :::
// 3.vuex 的 state, 保存公共状态
const state = {
    sum: 0
}
5.4 vuex的getters
:::info 类似vm中的data数据项和computed, 一个是原始数据来源, 另一个是被处理过后的数据 :::
// vuex 的 getters
const getters = {
    // vuex 的 state
    processedSum(state) {
        // 一定要return
        return state.sum + 1
    }
}
<template>
  <div class="app">
    <h2>SUM:{{ $store.state.sum }}</h2>
    <!-- vuex 中的 getters中 保存的处理过后的 sum    -->
    <h2>SUM+1:{{ $store.getters.processedSum }}</h2>
...
</template>
5.5 mapState
:::info 方便组件获取vuex的state的数据, 将对应的变量+值 映射为 data的计算属性 :::
(1) 计算属性获取state中的变量及其值
    sum() {
      return this.$store.state.sum
    },
    caseName(){
      return this.$store.state.caseName
    },
    caseTime(){
      return this.$store.state.caseTime
    },
(2) mapState对象写法
:::info 获取state中的变量及其值, 当 计算属性名和state变量名不一致时 :::
    // mapState写法1 对象写法 : 将vuex 的 state 中的变量及其值 映射 成计算属性,
    // 类似于 上面我们手写的计算属性
    ...mapState({sum: 'sum', caseName: 'caseName', caseTime: 'caseTime'})
(3) mapState数组写法
:::info 获取state中的变量及其值, 当 state中的变量名作为映射后的计算属性的名字 :::
5.6 mapGetters
和mapState一样的规则, 不多赘述
    // 手写mapGetters
    // processedSum() {
    //   return this.$store.getters.processedSum
    // },
    // mapGetters : 将vuex 的 getters 中的 变量及其值映射为 组件的 computed属性
    ...mapGetters(['processedSum'])
5.6 mapActions
  methods: {
    // increment() {
    //   // 1.dispatch(actionName,value)
    //   this.$store.dispatch("increment", this.step)
    // },
    // decrement() {
    //   this.$store.dispatch("decrement", this.step)
    // },
    // multiple() {
    //   this.$store.dispatch("multiple", this.step)
    // },
    // divide() {
    //   this.$store.dispatch("divide", this.step)
    // },
    // reset() {
    //   this.$store.dispatch("reset")
    // }
    ...mapActions(['increment', 'decrement', 'multiple',
      'divide', 'reset']),
  }

5.7 mapMutations
直接commit不用经过actions(没有ajax等其他逻辑需要再执行时使用
  methods: {
     ...mapMutations(['increment', 'decrement', 'multiple', 'divide', 'reset'])
  }
5.8 vuex的模块化编码+namespace命名空间(你很懒,记得补哟)


六 element-ui的使用
七 vue3

若有收获,就点个赞吧
0 人点赞
