安装
Ubuntu安装
安装前请先执行卸载命令,防止环境污染引起的一些奇怪问题
sudo apt remove docker docker-engine docker.io
使用docker官方提供的脚本进行安装,另外可以通过
--mirror选项来指定国内源# 下载安装脚本get-docker.shcurl -fsSL get.docker.com -o get-docker.sh# 执行安装脚本,并指定使用阿里源sudo sh get-docker.sh --mirror Aliyun
CentOS安装
Docker 支持 64 位版本 CentOS 7/8,并且要求内核版本不低于 3.10。 CentOS 7 满足最低内核的要求,但由于内核版本比较低,部分功能(如 overlay2 存储层驱动)无法使用,并且部分功能可能不太稳定。
安装前请先执行卸载命令,防止环境污染引起的一些奇怪问题
sudo yum remove docker \docker-client \docker-client-latest \docker-common \docker-latest \docker-latest-logrotate \docker-logrotate \docker-selinux \docker-engine-selinux \docker-engine
使用docker官方提供的脚本进行安装,另外可以通过
--mirror选项来指定国内源# 下载安装脚本get-docker.sh curl -fsSL get.docker.com -o get-docker.sh # 执行安装脚本,并指定使用阿里源 sudo sh get-docker.sh --mirror AliyunLinux离线安装
生产环境一般没有公网资源,我们来介绍如何在离线环境下安装
docker以CentOS为例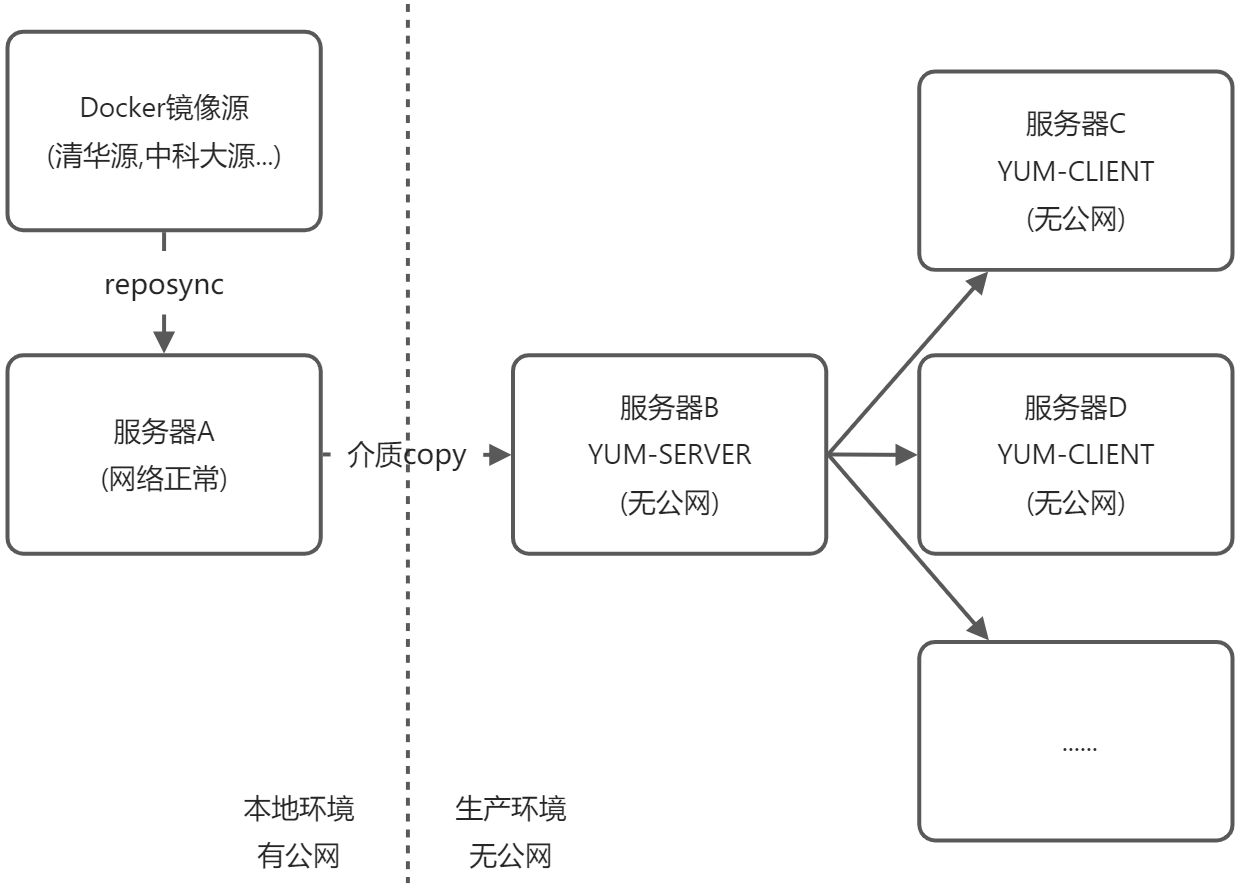
YUM本地文件安装
查询可用的软件版本(服务器A执行) ```bash
下载清华的镜像源文件
wget -O /etc/yum.repos.d/docker-ce.repo https://download.docker.com/linux/centos/docker-ce.repo
sudo sed -i ‘s+download.docker.com+mirrors.tuna.tsinghua.edu.cn/docker-ce+’ /etc/yum.repos.d/docker-ce.repo
yum update
sudo yum list docker-ce —showduplicates|sort -r
Loading mirror speeds from cached hostfile Loaded plugins: fastestmirror docker-ce.x86_64 3:19.03.8-3.el7 docker-ce-stable docker-ce.x86_64 3:19.03.7-3.el7 docker-ce-stable docker-ce.x86_64 3:19.03.6-3.el7 docker-ce-stable docker-ce.x86_64 3:19.03.5-3.el7 docker-ce-stable docker-ce.x86_64 3:19.03.4-3.el7 docker-ce-stable docker-ce.x86_64 3:19.03.3-3.el7 docker-ce-stable docker-ce.x86_64 3:19.03.2-3.el7 docker-ce-stable docker-ce.x86_64 3:19.03.1-3.el7 docker-ce-stable ….
2. 下载到指定的文件夹(服务器A执行)
```bash
sudo yum install --downloadonly --downloaddir=/tmp/docker-19.03 docker-ce-19.03.8-3.el7 docker-ce-cli-19.03.8-3.el7

Dependencies Resolved

====================================================================================================================================================================================
 Package                                          Arch                                  Version                                         Repository                             Size
====================================================================================================================================================================================
Installing:
 docker-ce                                        x86_64                                3:19.03.8-3.el7                                 docker                                 25 M
Installing for dependencies:
 container-selinux                                noarch                                2:2.107-3.el7                                   extras                                 39 k
 containerd.io                                    x86_64                                1.2.13-3.1.el7                                  docker                                 23 M
 docker-ce-cli                                    x86_64                                1:19.03.8-3.el7                                 docker                                 40 M

Transaction Summary
====================================================================================================================================================================================
Install  1 Package (+3 Dependent packages)

Total download size: 87 M
Installed size: 363 M
Background downloading packages, then exiting:
(1/4): container-selinux-2.107-3.el7.noarch.rpm                                                                                                              |  39 kB  00:00:00
(2/4): containerd.io-1.2.13-3.1.el7.x86_64.rpm                                                                                                               |  23 MB  00:00:00
(3/4): docker-ce-19.03.8-3.el7.x86_64.rpm                                                                                                                    |  25 MB  00:00:00
(4/4): docker-ce-cli-19.03.8-3.el7.x86_64.rpm                                                                                                                |  40 MB  00:00:00
------------------------------------------------------------------------------------------------------------------------------------------------------------------------------------
Total                                                                                                                                               118 MB/s |  87 MB  00:00:00
exiting because "Download Only" specified
复制到目标服务器后进入文件夹安装(服务器C、D、…执行)
yum install *.rpmYUM本地源服务器搭建安装docker
挂载ISO镜像搭建本地FILE源(服务器A+B执行) ```bash
删除其他网络源
rm -f /etc/yum.repo.d/*
挂载光盘或者iso镜像
mount /dev/cdrom /mnt
添加本地源
cat >/etc/yum.repos.d/local_files.repo<< EOF [Local_Files] name=Local_Files baseurl=file:///mnt enable=1 gpgcheck=0 gpgkey=file:///mnt/RPM-GPG-KEY-CentOS-7 EOF
测试刚才的本地源,安装createrepo软件
yum clean all yum install createrepo -y
2. 根据本地文件搭建BASE网络源(服务器B执行)
```bash
# 安装apache 服务器
yum install httpd -y
# 挂载光盘
mount /dev/cdrom /mnt
# 新建centos目录
mkdir /var/www/html/base
# 复制光盘内的文件到刚才新建的目录
cp -R /mnt/Packages/* /var/www/html/base/
createrepo  /var/www/html/centos/
systemctl enable httpd
systemctl start httpd
- 下载Docker-CE镜像仓库(服务器A执行)
```bash
下载清华的镜像源文件
wget -O /etc/yum.repos.d/docker-ce.repo https://download.docker.com/linux/centos/docker-ce.repo sudo sed -i ‘s+download.docker.com+mirrors.tuna.tsinghua.edu.cn/docker-ce+’ /etc/yum.repos.d/docker-ce.repo
新建 docker-ce目录
mkdir /tmp/docker-ce/
把镜像源同步到镜像文件中
reposync -r docker-ce-stable -p /tmp/docker-ce/
4. 创建仓库索引(服务器B执行)
> 把下载的 docker-ce 文件夹复制到离线的服务器

```bash
# 把docker-ce 文件夹复制到/var/www/html/docker-ce
# 重建索引
createrepo  /var/www/html/docker-ce/
YUM客户端设置(服务器C、D、…执行)
rm -f /etc/yum.repo.d/*
cat >/etc/yum.repos.d/local_files.repo<< EOF
[local_base]
name=local_base
# 改成B服务器地址
baseurl=http://x.x.x.x/base
enable=1
gpgcheck=0
proxy=_none_
[docker_ce]
name=docker_ce
# 改成B服务器地址
baseurl=http://x.x.x.x/base
enable=1
gpgcheck=0
proxy=_none_
EOF
Docker安装(服务器C、D、…执行)
sudo yum makecache fast
sudo yum install docker-ce docker-ce-cli containerd.io
sudo systemctl enable docker
配置
启动
$ sudo systemctl enable docker
$ sudo systemctl start docker
建立docker用户组
默认情况下,docker 命令会使用 Unix socket 与 Docker 引擎通讯。而只有 root 用户和 docker 组的用户才可以访问 Docker 引擎的 Unix socket。出于安全考虑,一般 Linux 系统上不会直接使用 root 用户。因此,更好地做法是将需要使用 docker 的用户加入 docker 用户组。
建立
docker组sudo groupadd docker将当前用户加入
docker组sudo usermod -aG docker $USER sudo gpasswd -a $USER docker newgrp - docker sudo chmod a+rw /var/run/docker.sock-
测试docker安装成功
```bash $ docker run —rm hello-world
Unable to find image ‘hello-world:latest’ locally latest: Pulling from library/hello-world b8dfde127a29: Pull complete Digest: sha256:308866a43596e83578c7dfa15e27a73011bdd402185a84c5cd7f32a88b501a24 Status: Downloaded newer image for hello-world:latest
Hello from Docker! This message shows that your installation appears to be working correctly.
To generate this message, Docker took the following steps:
- The Docker client contacted the Docker daemon.
- The Docker daemon pulled the “hello-world” image from the Docker Hub. (amd64)
- The Docker daemon created a new container from that image which runs the executable that produces the output you are currently reading.
- The Docker daemon streamed that output to the Docker client, which sent it to your terminal.
To try something more ambitious, you can run an Ubuntu container with: $ docker run -it ubuntu bash
Share images, automate workflows, and more with a free Docker ID: https://hub.docker.com/
For more examples and ideas, visit: https://docs.docker.com/get-started/ ``` 若能正常输出以上信息,则说明安装成功。

若有收获,就点个赞吧
0 人点赞
