- 一、实现用户显示和增加功能
- 二、添加用户
- 1、打开userlist.jsp找到添加用户的操作,将地址改成如下,之后controller就叫userAdd
- 2、回到UserController中
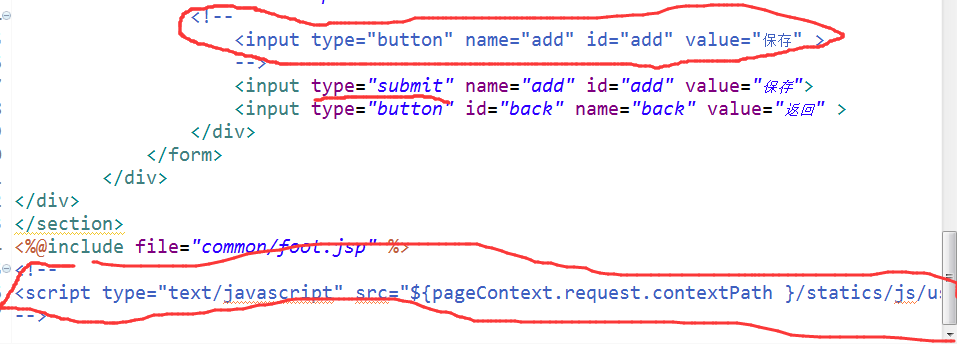
- 3、将useradd.jsp文件拷贝过来;去掉/jsp/;并在最下面的js前加statics/
- 4、启动Tomcat,测试,添加用户时会不会出现添加用户界面
- 5、这其中存在着ajax校验,没学,可以先把ajax校验注掉;useradd.jsp中
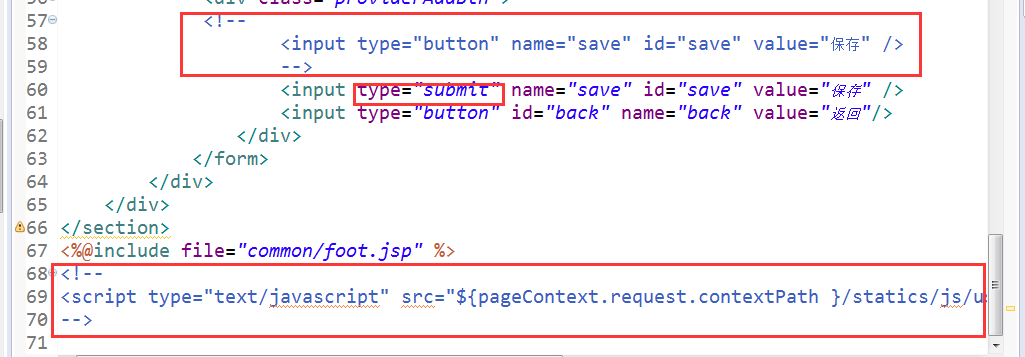
- 6、保存时要进行提交表单操作,表单提交地址改为如下/user/userAddSubmit
- 8、启动Tomcat,看添加操作是否好用。点击保存,列表中不显示,但是数据库中已经加入成功
- 9、为什么保存之后,列表页没有显示?为什么查询不到?
- 三、修改用户
- 1、找到userlist,jsp界面找到修改图标,看到class=”modifyUser”;打开userlist,js文件,找到modifyUser;将其中地址改为如下
- 2、把usermodify.jsp文件拷贝进来,删除/jsp/,并在最下面的js前加入statics/
- 3、打开usermodify.jsp文件,将下列代码注掉并修改,表单提交地址修改
- 在UserController中,在moidfyUserSubmit方法内重新写修改时间和修改人;并将userServlet中的modify方法中的将判断语句拷贝过来,修改
- 5、在usermodify.jsp中,找到用户生日一项,将value修改,并添加pattern属性,实现日期格式化
- 6、启动Tomcat,修改保存之后,跳回列表界面,并显示修改后的结果
- 四、查看
- 五、删除
- 六、文件上传
一、实现用户显示和增加功能
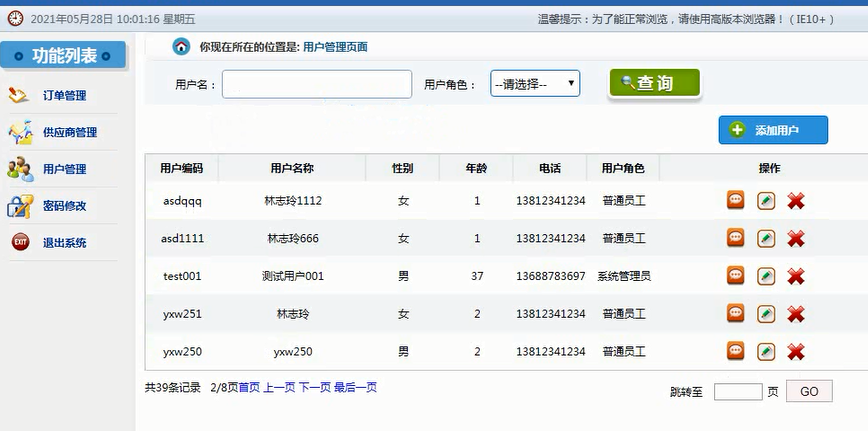
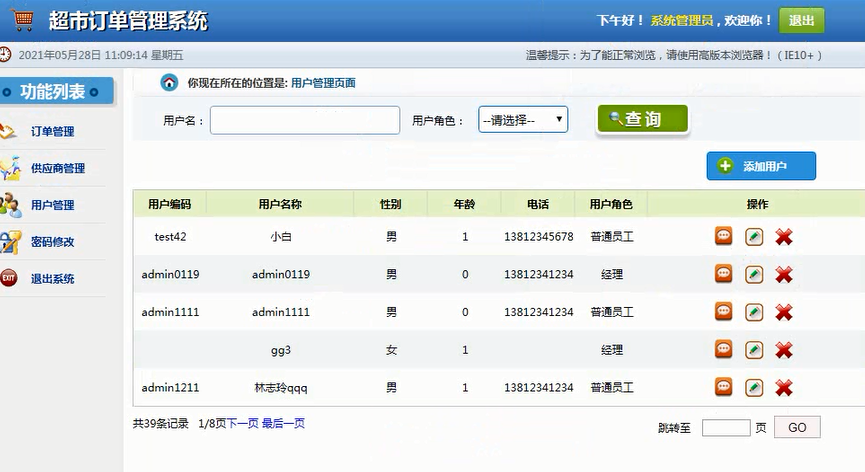
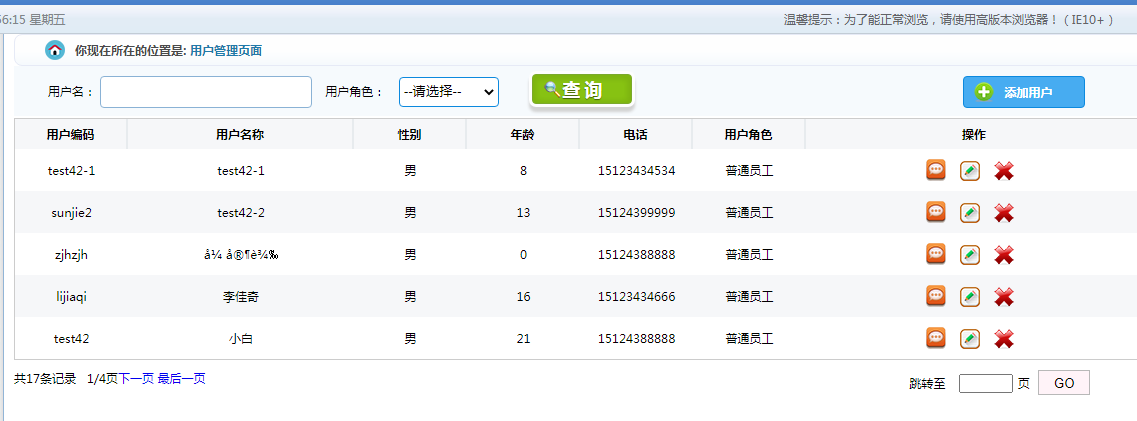
(一)、查询用户列表和分页
1、首先去SMBMS工程下查看UserServlet类,找到doPost方法下的query查询方法
2、对数据进行处理
(2)、打开UserController类,在UserList方法下传入参数,String queryname,String queryUserRole,String pageIndex
在CommonController中写入重定向error跳转
//重定向error页@RequestMapping("/error")public String error(){return "error";}
UserController中:
//登录后点击用户管理能进去,但没数据
    //传的三个参数,代替了原来UserServlet中的获得参数代码
    @RequestMapping("/userList")
    public String userList(String queryname,String queryUserRole,String pageIndex,Map<String,Object> map){
        //对传来的参数数据进行处理
        if(queryname == null){
            queryname = "";
        }
        //对queryUserRole进行处理;角色没选的时候,默认查询为0的角色
        if(queryUserRole == null||queryUserRole.equals("")){
            queryUserRole = "0";
        }
        //设置页面容量
        int pageSize = Constants.pageSize;
        //当前页码
        int currentPageNo = 1;
        if(pageIndex != null){
            try{
                currentPageNo = Integer.valueOf(pageIndex);
            }catch(NumberFormatException e){
                return "redirect:/common/error";
            }
        }
        //总数量(表)
        int totalCount    = userService.getUserCount(queryname,Integer.parseInt(queryUserRole));
        //总页数
        PageSupport pages=new PageSupport();
        pages.setCurrentPageNo(currentPageNo);
        pages.setPageSize(pageSize);
        pages.setTotalCount(totalCount);

        int totalPageCount = pages.getTotalPageCount();

        //控制首页和尾页
        if(currentPageNo < 1){
            currentPageNo = 1;
        }else if(currentPageNo > totalPageCount){
            currentPageNo = totalPageCount;
        }
        List<User> userList = userService.getUserList(queryname,Integer.parseInt(queryUserRole),currentPageNo, pageSize);
        //后台向前台传值
        map.put("userList", userList);
        List<Role> roleList = null;
        roleList = roleService.getRoleList();
        map.put("roleList", roleList);
        map.put("queryUserName", queryname);
        map.put("queryUserRole", queryUserRole);
        map.put("totalPageCount", totalPageCount);
        map.put("totalCount", totalCount);
        map.put("currentPageNo", currentPageNo);
        return "userlist";
    }
(1)、在实施分页之前,需要将PageSupport类拷贝进来
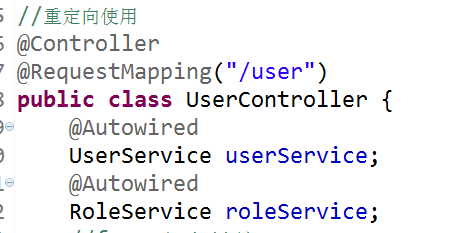
(3)、然后在上面加入注解和UserService @Autowired UserService userService; 加get/set方法
(4)、在UserList方法下还需要再传入一个Map
3、将Role实体,拷贝过来
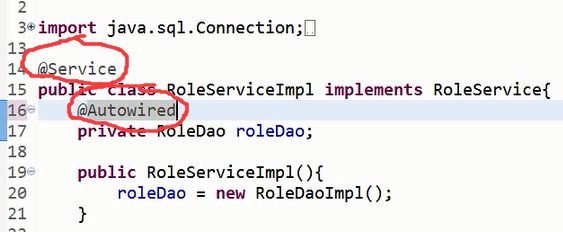
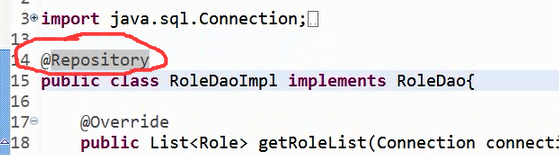
4、将dao层的RoleDao,RoleDaoImpl和service层的RoleService和RoleServiceImpl拷贝过来
5、@Autowired RoleService roleService; 加get/set方法
6、在RoleServiceImpl下加入两个注解,加get/set方法;在RoleDaoImpl中也要加入注解
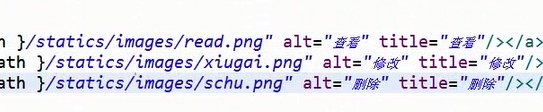
7、链表显示页后面的小图标如何解决,userList.jsp中,加入statics/
(二)、要实现分页除了userList方法中加入代码,还要将userlist.jsp文件中的/jsp/user.do该为如下

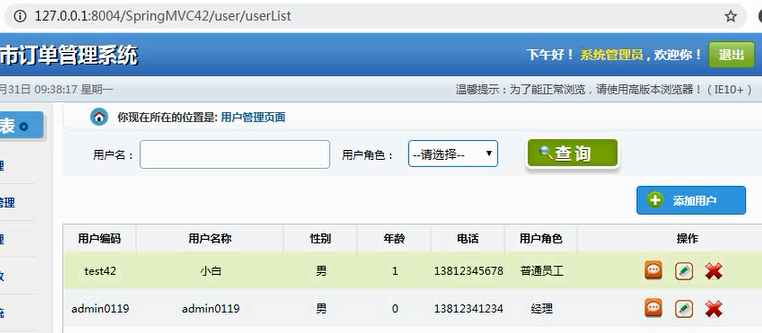
8、启动Tomcat,访问用户管理,查看效果
二、添加用户
1、打开userlist.jsp找到添加用户的操作,将地址改成如下,之后controller就叫userAdd

2、回到UserController中
    //添加用户
    @RequestMapping("/userAdd")
    public String userAdd(){
        //点击按钮,跳转到用户新增界面,把useradd.jsp拷贝
        //return "useradd";jsp页面的名字
        return "useradd";
    }
3、将useradd.jsp文件拷贝过来;去掉/jsp/;并在最下面的js前加statics/
4、启动Tomcat,测试,添加用户时会不会出现添加用户界面
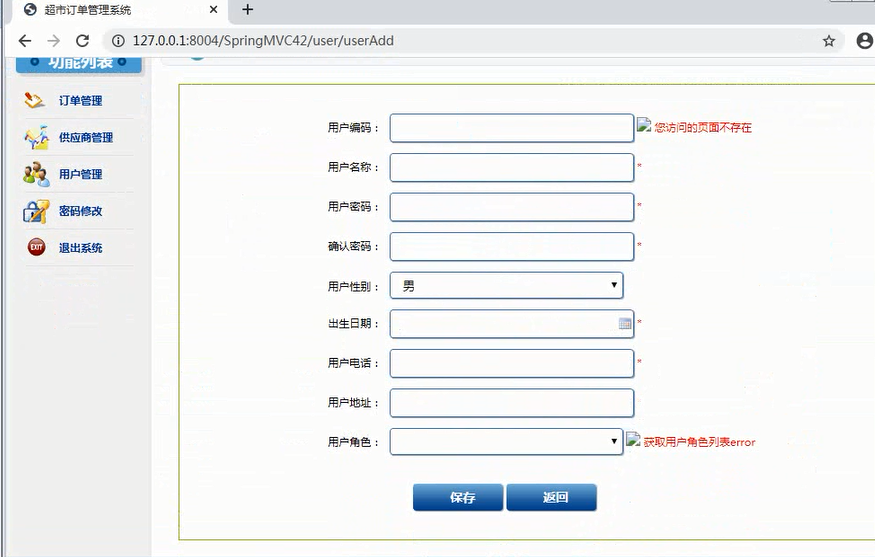
5、这其中存在着ajax校验,没学,可以先把ajax校验注掉;useradd.jsp中
6、保存时要进行提交表单操作,表单提交地址改为如下/user/userAddSubmit

7、UserController中写入处理方法,将userServlet中添加方法部分代码拷贝过来,由于定义参数太多,可以将封装成User实体来作为参数,会自动把页面中传递数据和实体匹配,匹配上就塞入;日期要进行特殊处理—在实体中加入注解。
注解替代了如下代码
创建时间和创建者没有替代,需要在UserController中的userAddSubmit方法下重新写
    //添加用户
    @RequestMapping("/userAdd")
    public String userAdd(){
        //点击按钮,跳转到用户新增界面,把useradd.jsp拷贝
        //return "useradd";jsp页面的名字
        return "useradd";
    }
    @RequestMapping("/userAddSubmit")
    public String userAddSubmit(User user,HttpSession session){
        user.setCreationDate(new Date());
        user.setCreatedBy(((User)session.getAttribute(Constants.USER_SESSION)).getId());
        if(userService.add(user)){
            //添加提交后,跳转到重定向的用户列表页
            return "redirect:/user/userList";
        }else{
            return "useradd";
        }

    }
8、启动Tomcat,看添加操作是否好用。点击保存,列表中不显示,但是数据库中已经加入成功
在web.xml文件中加入统一编码格式
  <!-- springMVC统一编码 -->
  <filter>
    <filter-name>encodingFilter</filter-name>
    <filter-class>
          org.springframework.web.filter.CharacterEncodingFilter
      </filter-class>
    <init-param>
      <param-name>encoding</param-name>
      <param-value>UTF-8</param-value>
    </init-param>
    <init-param>
      <param-name>forceEncoding</param-name>
      <param-value>true</param-value>
    </init-param>
  </filter>
   <filter-mapping>
    <filter-name>encodingFilter</filter-name>
    <url-pattern>/*</url-pattern>
  </filter-mapping>
9、为什么保存之后,列表页没有显示?为什么查询不到?
一定和查询语句有关;打开UserDaoImpl中,找getUserList方法中的查询语句,拼接了一个and userRole = ?;必须要按照角色去找,没有角色不行;如果在数据库中添加了角色,保存,返回页面,刷新,就会看到新增加的用户;模糊查询也是好使的;如果在useradd中加入option标签,就可选角色了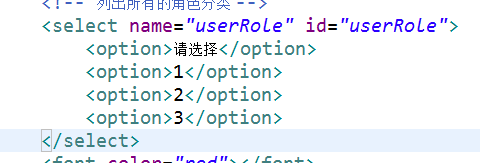
三、修改用户
1、找到userlist,jsp界面找到修改图标,看到class=”modifyUser”;打开userlist,js文件,找到modifyUser;将其中地址改为如下

2、把usermodify.jsp文件拷贝进来,删除/jsp/,并在最下面的js前加入statics/
到UserController中,首先modifyUser方法下,拷贝userServlet中getUserById方法体
    //修改
    @RequestMapping("/modifyUser")
    public String modifyUser(String uid,Map<String,Object> map){
        if(!StringUtils.isNullOrEmpty(uid)){
            //调用后台方法得到user对象
            User user = userService.getUserById(uid);
            map.put("user", user);
        }
        return "usermodify";
    }
3、打开usermodify.jsp文件,将下列代码注掉并修改,表单提交地址修改

在UserController中,在moidfyUserSubmit方法内重新写修改时间和修改人;并将userServlet中的modify方法中的将判断语句拷贝过来,修改
//修改
    @RequestMapping("/modifyUser")
    public String modifyUser(String uid,Map<String,Object> map){
        if(!StringUtils.isNullOrEmpty(uid)){
            //调用后台方法得到user对象
            User user = userService.getUserById(uid);
            map.put("user", user);
        }
        return "usermodify";
    }
    @RequestMapping("/moidfyUserSubmit")
    public String moidfyUserSubmit(User user,String uid,HttpSession session){
        user.setId(Integer.parseInt(uid));
        user.setModifyDate(new Date());
        user.setModifyBy(((User)session.getAttribute(Constants.USER_SESSION)).getId());
        if(userService.modify(user)){
            return "redirect:/user/userList";
        }else{
            return "usermodify";
        }


    }
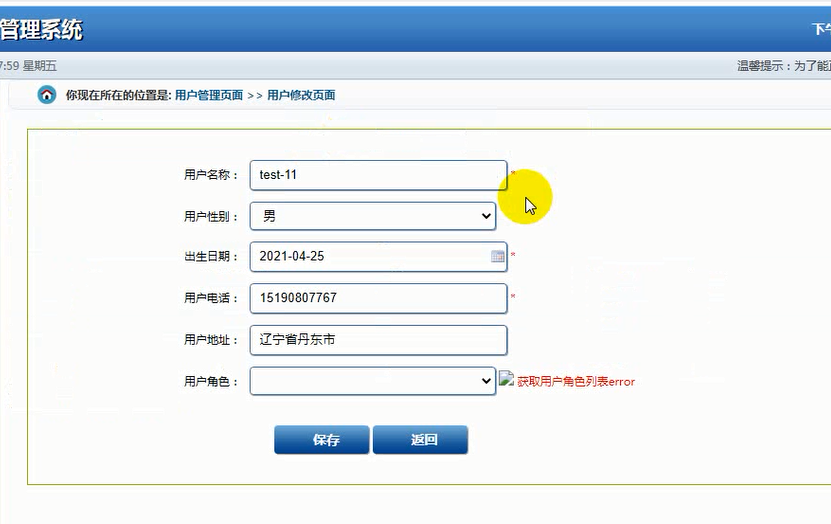
5、在usermodify.jsp中,找到用户生日一项,将value修改,并添加pattern属性,实现日期格式化

6、启动Tomcat,修改保存之后,跳回列表界面,并显示修改后的结果
四、查看
1、在userlist.jsp中,看查看按钮前边定义的class,viewUser;
2、到userlist.js文件中,找到viewUser;将路径修改,

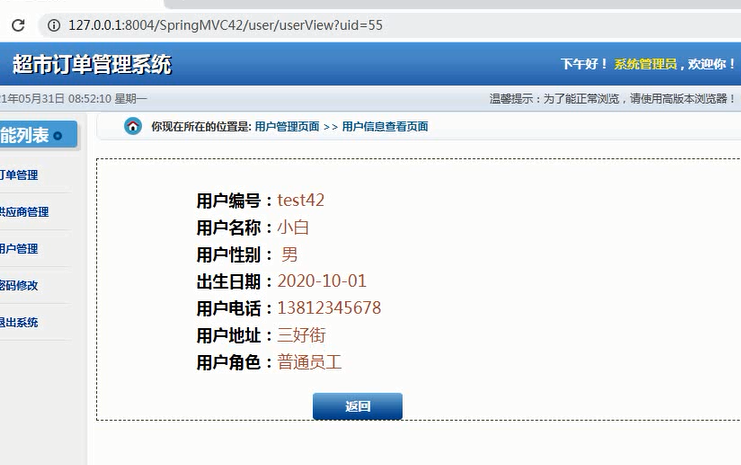
3、来到UserController中,编写查看方法,
//查看--先找到查看按钮,也是走的getUserById
    @RequestMapping("/userView")
    public String userView( String uid,Map<String,Object> map){
        //首先用问号传值,再次用REST风格
        User user = userService.getUserById(uid);
        map.put("user", user);
        return "userview";
    }
4、将userview。jsp文件拷贝过来,修改头和尾
5、启动tomcat测试
6、再次修改userlist.js文件的路径,改成REST格式

7、UserController中,添加{uid}和@PathVariable注解
//查看--先找到查看按钮,也是走的getUserById
    @RequestMapping("/userView/{uid}")
    public String userView(@PathVariable String uid,Map<String,Object> map){
        //首先用问号传值,再次用REST风格
        User user = userService.getUserById(uid);
        map.put("user", user);
        return "userview";
    }

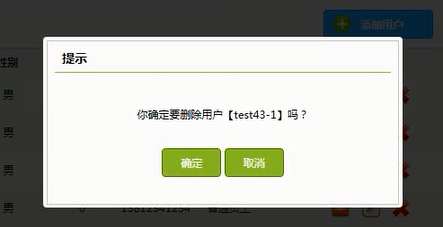
五、删除
1、在userlist.jsp中找到删除按钮,看前面的class,然后在userlist.js中,找到删除方法,将deleteUser中的ajax方法注掉,
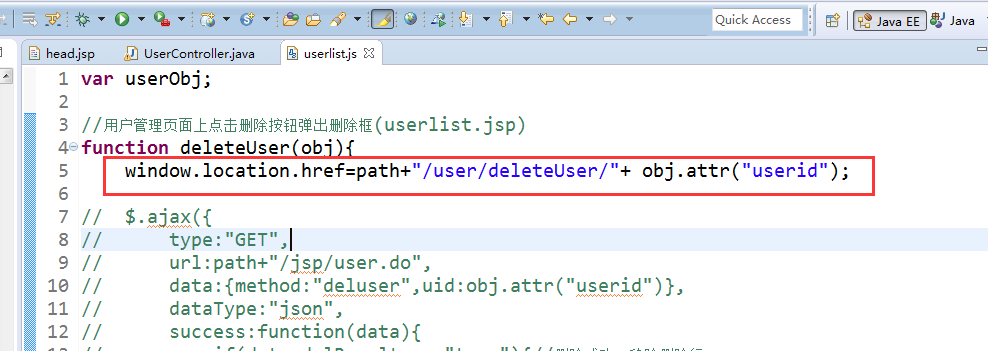
2、然后在UserController中,编写删除方法,
//删除
    @RequestMapping("/deleteUser/{uid}")
    public String deleteUser(@PathVariable String uid,Map<String,Object> map){
        userService.deleteUserById(Integer.parseInt(uid));
        return "redirect:/user/userList";

    }
六、文件上传
1、首先看数据库中有没有这个字段,idPicPath
先在数据库中添加字段;ALTER TABLE smbms_user ADD idPicPath VARCHAR(200) COMMENT”上传个人证件照存储路径”;
2、添加字段之后,在实体内添加属性和get/set方法
private String idPicPath; //上传证件照的路径
3、打开useradd.jsp;添加用户证件照选项
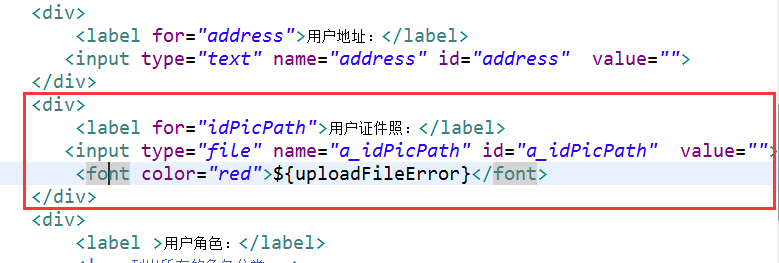
4、去提交地址,修改enctype属性

5、UserController中,userAddSubmit方法中,添加一个@requestParam注解
@RequestMapping("/userAddSubmit")
    public String userAddSubmit(User user,HttpSession session,
            HttpServletRequest request,
            @RequestParam(value="a_idPicPath")MultipartFile attach,
            Map<String , Object> map){
        String idPicPath = null;
        if (attach != null) {
            //定义文件上传路径
            String path = request.getSession().getServletContext().getRealPath("statics"+java.io.File.separator+"upload");
            //获得原文件名
            String oidFileName = attach.getOriginalFilename();
            //获得扩展名jpg
            String prefix=FilenameUtils.getExtension(oidFileName);
            //上传文件大小
            int fileSie = 50000000;//500kb500000
            if (attach.getSize()>fileSie) {
                map.put("uploadFileError", "上传文件大小不能超过500k");
                return"useradd";
            }else if (prefix.equalsIgnoreCase("jpg")||prefix.equalsIgnoreCase("png")) {
                //满足图片要求--保证唯一性
                Random random = new Random();
                String fileName = System.currentTimeMillis()+"_"+random.nextInt(100)+"_person."+ prefix;
                //创建目标文件
                File targetFile = new File(path,fileName);
                if (!targetFile.exists()) {
                    //如果文件夹不存在就创建
                    targetFile.mkdirs();
                }
                //文件传输
                try {
                    attach.transferTo(targetFile);
                } catch (Exception e) {
                    map.put("uploadFileError", "上传文件传输失败");
                    return"useradd";
                }
//                idPicPath = path + File.separator+fileName;
                idPicPath = fileName;
            }else {
                map.put("uploadFileError", "上传文件格式不正确");
                return"useradd";
            }

        }
        user.setIdPicPath(idPicPath);
        user.setCreationDate(new Date());
        user.setCreatedBy(((User)session.getAttribute(Constants.USER_SESSION)).getId());
        if(userService.add(user)){
            return "redirect:/user/userList";
        }else{
            return "useradd";
        }

    }
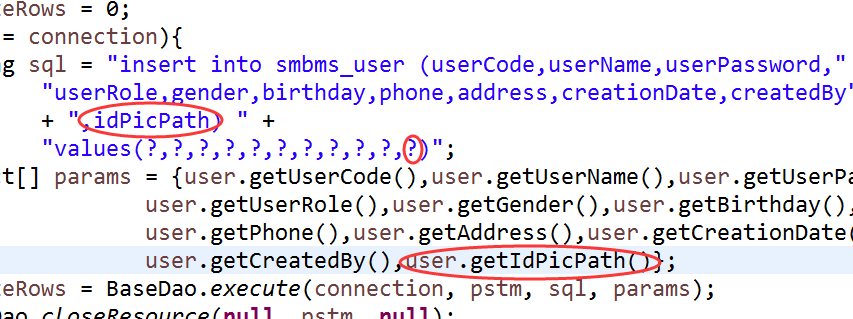
6、来到UserDaoImpl中,在add方法内,添加字段,问号,和user.getIdPicPath
7、在springmvc_servlet中配置
<!-- 配置文件上传对象 -->
     <bean id="multipartResolver" class="org.springframework.web.multipart.commons.CommonsMultipartResolver">
         <!-- 全局文件上传要求不能超过5兆 -->
         <property name="maxUploadSize" value="50000000"></property>
         <property name="defaultEncoding" value="UTF-8"></property>
     </bean>
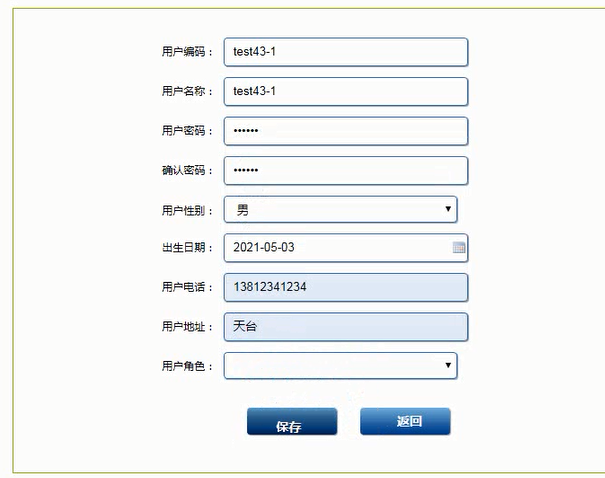
8、添加用户,测试一下

9、点击查看,如何让其显示证件照?
首先来到UserController中,将idPicPath路径修改。
其次,来到userview.jsp文件中,添加用户证件选项
<p><strong>用户证件照:</strong><img src="${pageContext.request.contextPath }/statics/upload/${user.idPicPath}"/></p>
然后通过UserController中的查看方法,找到getUserById的底层,加入user.setIdPicPath(rs.getString(“idPiPath”))
查看之前,先新增一条数据,然后再查看。

若有收获,就点个赞吧
0 人点赞
