操作命令
补充说明: linux 是多用户系统 windows是多用户的系统(收费)
系统运行相关命令
系统关机:
shutdown # 关机命令 1分钟后关机shutdown -c # 取消关机命令[root@localhost ~]# shutdownShutdown scheduled for 四 2021-04-22 16:30:08 CST, use 'shutdown -c' to cancel.# 定义一个关机方案 = 定义什么时间进行关机, 可以使用 shutdown -c 取消关机计划[root@localhost ~]#Broadcast message from root@localhost.localdomain (Thu 2021-04-22 16:29:08 CST):# 会将关机信息广播给所有关机主机的用户The system is going down for power-off at Thu 2021-04-22 16:30:08 CST!# 准备什么时间真正进行关机shutdown -h 5 # 指定5分钟后关机-h --> -halt 简写5 --> 这个参数位置是以分钟为单位
**系统重启:**
shutdown -r 5 # 指定5分钟后以重启的形式关机[root@localhost ~]# shutdown -r 5Shutdown scheduled for 四 2021-04-22 17:19:22 CST, use 'shutdown -c' to cancel.# 定义一个关机方案 = 定义什么时间进行关机, 可以使用 shutdown -c 取消关机计划[root@localhost ~]#Broadcast message from root@localhost.localdomain (Thu 2021-04-22 17:14:22 CST):The system is going down for reboot at Thu 2021-04-22 17:19:22 CST!reboot # 直接重启
目录或文件相关命令
目录相关命令
# 检查文件或目录是否存在命令ls == list(列表 列表显示相应信息)# 检查文件是否存在[root@localhost ~]# ls /etc/hosts/etc/hosts[root@localhost ~]# ls /etc/hosts1ls: 无法访问/etc/hosts1: 没有那个文件或目录# 检查目录是否存在[root@localhost ~]# ls /etc/abrt csh.cshrc groff libaudit.conf opt rc.local subversionadjtime csh.login group libnl os-release rdma sudo.confaliases dbus-1 group- libreport pam.d redhat-release sudoersaliases.db default grub2.cfg libuser.conf passwd resolv.conf sudoers.dalternatives depmod.d grub.d locale.conf passwd- rpc sudo-ldap.conf# 如何针对的查看目录是否存在ls -d /injury # 针对性的查看目录是否存在 -d 全屏为 : -directory# 创建新的目录make directory(制造目录 mkdir的全拼) == mkdir (创建目录命令)# 在 根目录下创建一个目录mkdir /injury # 在根目录下创建一个叫做injury的目录 刚创键好的目录是空的mkdir -p /injury/injury01/injury02 # 创建多级目录# 如何切换目录change directory (改变目录) == cdcd 绝对路径/相对路径 # 切换至指定目录下cd .. # 返回上一级目录 [ 相对路径的方式 ]cd ../../ # 返回上两级目录 [ 相对路径的方式 ]# 查看当前所在路径print work directory (显示当前路径) == pwdpwd # 显示当前的绝对路径
文件相关命令
# 查看文件信息命令ls -l # 查看文件详细信息[root@localhost ~]# ls /etc/services/etc/services[root@localhost ~]# ls -l /etc/services-rw-r--r--. 1 root root 670293 6月 7 2013 /etc/services# 如何创建一个空文件touch 对象 # 在这个路径下创建一个文件[root@localhost ~]# touch /root/a.txt[root@localhost ~]# ll总用量 4-rw-------. 1 root root 1274 4月 22 17:48 anaconda-ks.cfg-rw-r--r--. 1 root root 0 4月 26 08:58 a.txt# 如何对空文件进行编辑# 1.将文件打开进行直接编辑vi --> 用于编辑文件的命令vi /root/a.txt# 第一个步骤: 进入到编辑状态(插入模式) 按住小写字母 i# 第二个步骤: 编写文件内容# 第三个步骤: 进行保存关闭文档# 按esc键(退出编辑状态)--> :wq (write 写/保存 quit 退出)# :q (不保存直接退出)# :w (只保存但不退出)# 2.将文件不用打开进行直接编辑# 第一步 屏幕有信息显示[root@localhost ~]# echo "hello word"hello word# 第二步 将屏幕上的显示的信息[root@localhost ~]# echo "hello word" > /root/a.txt[root@localhost ~]# vi a.txthello word[root@localhost ~]# echo "test one" >> /root/a.txt[root@localhost ~]# vi a.txthello wordtest one# > 执行原理: 将原来文件内容先进行清空 添加新的信息# >> 执行原理: 不会覆盖原文件内容,而是在源文件最后一行末尾追加一行新的信息# 查看文件内容的命令cat # 查看文件内容[root@localhost ~]# cat a.txthello wordtest one
备份数据信息
# 如何复制保存数据cp # copy复制# 用法: cp 要复制的数据信息(文件/目录) 复制到什么位置(目录中)# 文件备份方法:[root@localhost ~]# cp /root/a.txt /tmp[root@localhost ~]# ls -l /tmp/a.txt-rw-r--r--. 1 root root 20 4月 26 09:41 /tmp/a.txt# 目录备份方法:[root@localhost ~]# cp -r /root/ /tmp[root@localhost ~]# ls -d /tmp/root//tmp/root/[root@localhost ~]# ls -l /tmp/root/a.txt-rw-r--r--. 1 root root 20 4月 26 09:47 /tmp/root/a.txt# 目录备份的时候有时需要进行多次确认\cp -r 目录 要复制的位置 # 强行复制,直接确认
删除数据信息
# 删除数据命令delete == remove (移除) == rm # 删除命令# 删除文件[root@localhost ~]# rm /tmp/a.txtrm:是否删除普通文件 "/tmp/a.txt"?n[root@localhost ~]# \rm /tmp/a.txt[root@localhost ~]# ls -l /tmp/a.txtls: 无法访问/tmp/a.txt: 没有那个文件或目录[root@localhost ~]# touch /tmp/a.txt[root@localhost ~]# rm /tmp/a.txtrm:是否删除普通空文件 "/tmp/a.txt"?n[root@localhost ~]# rm -f /tmp/a.txt[root@localhost ~]# ls -l /tmp/a.txtls: 无法访问/tmp/a.txt: 没有那个文件或目录# 删除目录[root@localhost ~]# lsa anaconda-ks.cfg a.txt c d[root@localhost ~]# rm crm: 无法删除"c": 是一个目录[root@localhost ~]# rm -r crm:是否删除目录 "c"?[root@localhost ~]# rm -rf c[root@localhost ~]# lsa anaconda-ks.cfg a.txt d[root@localhost ~]# \rm -r d[root@localhost ~]# lsa anaconda-ks.cfg a.txt[root@localhost ~]# rm -rf a
移动数据信息
move(移动) == mv # mv命令用法和cp命令用法相似# 移动剪切文件数据[root@localhost ~]# cp a.txt /tmp/[root@localhost ~]# ls -l /tmp总用量 8-rw-r--r--. 1 root root 20 4月 26 10:35 a.txt-rwx------. 1 root root 813 4月 22 17:48 ks-script-LFfccP-rw-------. 1 root root 0 4月 22 17:44 yum.log[root@localhost ~]# mv a.txt /tmpmv:是否覆盖"/tmp/a.txt"? ^C[root@localhost ~]# mv -f a.txt /tmp/[root@localhost ~]# ls -l /tmp总用量 8-rw-r--r--. 1 root root 20 4月 26 09:27 a.txt-rwx------. 1 root root 813 4月 22 17:48 ks-script-LFfccP-rw-------. 1 root root 0 4月 22 17:44 yum.log[root@localhost ~]# lsanaconda-ks.cfg# 移动剪切目录数据[root@localhost ~]# mkdir a[root@localhost ~]# mv /root/a /tmp/[root@localhost ~]# ls -ld /tmp/adrwxr-xr-x. 2 root root 6 4月 26 10:36 /tmp/a[root@localhost ~]# ls -ld /root/als: 无法访问/root/a: 没有那个文件或目录# 对文件进行重命名操作[root@localhost ~]# mkdir hurt[root@localhost ~]# cd hurt[root@localhost hurt]# ls[root@localhost hurt]# touch a.txt[root@localhost hurt]#[root@localhost hurt]# lsa.txt[root@localhost hurt]# mv a.txt b.txt[root@localhost hurt]# lsb.txt
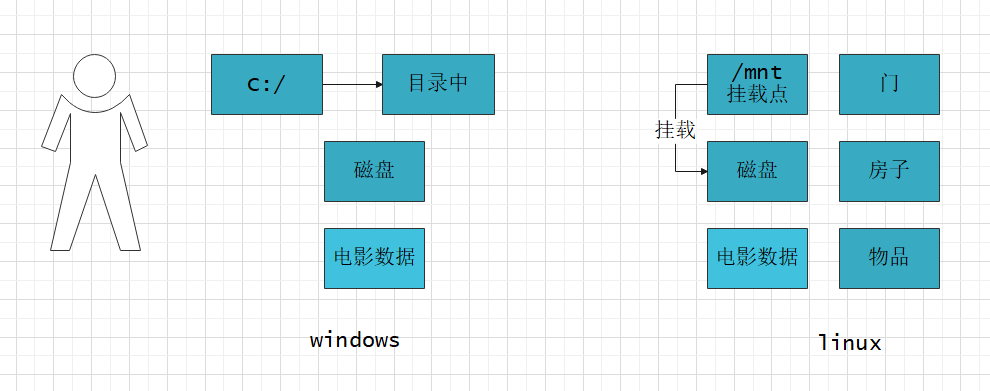
系统目录结构
linux 目录结构: 一切从根开始 [ 一个倒挂的树 ]
windows目录结构: 按照盘符进行划分
linux系统中挂载技术
让用户可以将一个目录作为一个存储设备的挂载点,通过挂载点可以看到挂载设备中的数据
实际操作演示Linux系统挂载操作
第一步 拥有一个存储设备 光驱 使光驱加载光盘
第二步 在Linux系统中找到光驱设备[root@localhost ~]# ls -l /dev/cdromlrwxrwxrwx. 1 root root 3 4月 26 08:25 /dev/cdrom -> sr0
第三步 将存储设备进行挂载
挂载命令语法: mount 挂载设备文件信息 挂载点(目录信息) mount /dev/cdrom /mnt [ 挂载点目录必须存在 ]
卸载挂载点的命令语法: umount 挂载点(目录信息)
[root@localhost ~]# ls -l /dev/cdromlrwxrwxrwx. 1 root root 3 4月 26 08:25 /dev/cdrom -> sr0[root@localhost ~]# ls -d /mnt/mnt[root@localhost ~]# mount /dev/cdrom /mntmount: /dev/sr0 写保护,将以只读方式挂载[root@localhost ~]# cd /mnt[root@localhost mnt]# lsCentOS_BuildTag EFI EULA GPL images isolinux LiveOS Packages repodata RPM-GPG-KEY-CentOS-7 RPM-GPG-KEY-CentOS-Testing-7 TRANS.TBL[root@localhost mnt]# cd ../[root@localhost /]# umount /mnt[root@localhost /]# cd mnt[root@localhost mnt]# ls
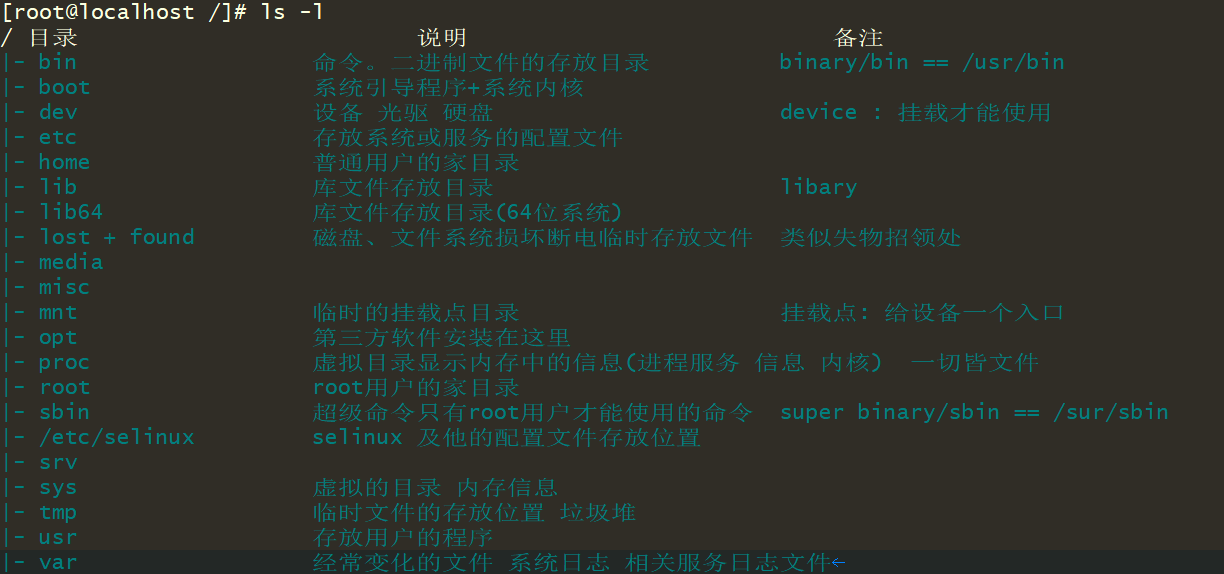
系统基础目录结构
linux根目录
[root@localhost /]# ls -l总用量 32lrwxrwxrwx. 1 root root 7 4月 22 17:45 bin -> usr/bindr-xr-xr-x. 4 root root 4096 4月 22 17:48 bootdrwxr-xr-x. 19 root root 3080 4月 26 08:25 devdrwxr-xr-x. 79 root root 8192 4月 26 08:25 etcdrwxr-xr-x. 3 root root 19 4月 22 17:48 homelrwxrwxrwx. 1 root root 7 4月 22 17:45 lib -> usr/liblrwxrwxrwx. 1 root root 9 4月 22 17:45 lib64 -> usr/lib64drwxr-xr-x. 2 root root 6 6月 10 2014 mediadrwxr-xr-x. 2 root root 6 6月 10 2014 mntdrwxr-xr-x. 2 root root 6 6月 10 2014 optdr-xr-xr-x. 349 root root 0 4月 26 08:25 procdr-xr-x---. 3 root root 4096 4月 26 10:40 rootdrwxr-xr-x. 22 root root 580 4月 26 08:25 runlrwxrwxrwx. 1 root root 8 4月 22 17:45 sbin -> usr/sbindrwxr-xr-x. 2 root root 6 6月 10 2014 srvdr-xr-xr-x. 13 root root 0 4月 26 08:25 sysdrwxrwxrwt. 8 root root 4096 4月 26 10:51 tmpdrwxr-xr-x. 13 root root 4096 4月 22 17:45 usrdrwxr-xr-x. 20 root root 4096 4月 26 08:25 var
详细了解目录结构中重要文件数据信息
网卡配置文件
[root@localhost ~]# ls /etc/sysconfig/network-scripts/ifcfg-eth0/etc/sysconfig/network-scripts/ifcfg-eth0[root@localhost ~]# cat /etc/sysconfig/network-scripts/ifcfg-eth0TYPE=Ethernet -- 指定网络类型 以太网BOOTPROTO=none -- 网络启动协议 如何让主机得到IP地址1. 自己手动配置 none static(静态)2. 自动获取地址 dhcpd(了解)NAME=eth0 -- 主机网卡名称 逻辑名称UUID=7f862c81-79e5-448b-8318-e7e0fda89634 -- 虚拟主机 会给每个硬件做一个标识DEVICE=eth0 -- 主机网卡名称 设备名称物理名称ONBOOT=yes -- 设置网卡是否处于开启状态IPADDR=10.0.0.200 -- 静态配置IP地址 标识主机身份PREFIX=24 -- 定义网络中可以有多少个主机GATEWAY=10.0.0.2 -- 一个网络到另一个网络的必经之路DNS1=223.5.5.5 -- DNS (建立名称和IP地址的对应关系) 180.101.49.11 -- 名称
配置文件修改重启服务
- systemctl restart network [ 重启所有网卡 ]
systemctl status network - ifdown 网卡名称 [ 指定网卡停止—不是重启 ]
ifup 网卡名称 [ 指定网卡开启 ]
ifdown 网卡名称 && ifup 网卡名称 [ 停止并启动网卡 ] - 异常问题: 网卡配置文件正确,无法重启网络服务
systemctl stop NetworkManager网络管理服务关闭
DNS解析配置文件
临时修改, 一旦重启网卡就会将其恢复至 ifcfg-eth0中的DNS
[root@localhost ~]# cat /etc/resolv.conf# Generated by NetworkManagernameserver 223.5.5.5
系统命令帮助方法
manual [ 手册 ] —> man mkdir [ 查看mkdir手册 ]
NAME # 命令作用说明
mkdir - make directories
SYNOPSIS # 命令使用方法
mkdir [OPTION]… DIRECTORY…
DESCRIPTION # 参数说明
-p, —parents
no error if existing, make parent directories as needed

若有收获,就点个赞吧
0 人点赞
