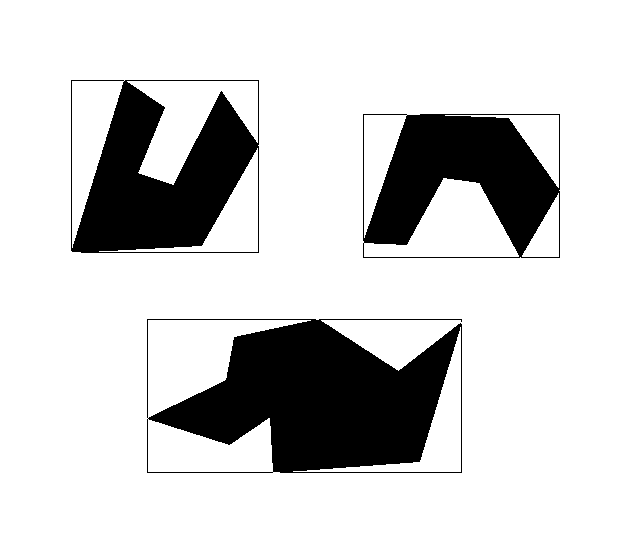
本文主要分析并实现了三种常见的多边形填充算法:逐点法、有序边表法和种子填充算法
1.逐点法
在逐点法实现中,用到了两个函数。
其中的实现原理十分简单,不过PointInPolygon(int pointNumOfPolygon, CPoint tarPolygon[], CPoint testPoint)函数的实现比较复杂,但这个函数也十分实用,在后面的三角剖分中也有使用。
算法描述:
(1)将给定多边形输入;
(2)求出多边形的最小包含矩形;
(3)逐点扫描最小矩形的每一点,并判断是否位于多边形内部,从最小点到最大点一次判断,如果在该多边形内部,则将该点上色;
(4)判断位于多边形内部的方法是,过每一点水平向右作射线,与多边形边界求交点,如果交点个数为奇数,则说明该点在多边形内部,偶数则说明在多边形外部。
效果如下:

实现代码:
//逐点法填充void PointFillpoly(int pNumbers, CPoint *points, CDC *pDC){BoxRect_t polyRect;polyRect = getPolygonRect(pNumbers, points);m_pDC->MoveTo(polyRect.minX, polyRect.minY);m_pDC->LineTo(polyRect.minX, polyRect.maxY);m_pDC->LineTo(polyRect.maxX, polyRect.maxY);m_pDC->LineTo(polyRect.maxX, polyRect.minY);m_pDC->LineTo(polyRect.minX, polyRect.minY);CPoint testPoint;//从最小点到最大点一次判断,如果在该多边形内部,则进行填充for (testPoint.x = polyRect.minX; testPoint.x < polyRect.maxX; testPoint.x++)for (testPoint.y = polyRect.minY; testPoint.y < polyRect.maxY; testPoint.y++) {if (PointInPolygon(m_pNumbers, m_pAccord, testPoint))pDC->SetPixel(testPoint.x, testPoint.y, RGB(255, 255, 255));}}
//得到该多边形的最大、最小的y、x值BoxRect_t getPolygonRect(int pointNumOfPolygon, CPoint tarPolygon[]){BoxRect_t boxRect;boxRect.minX = 50000;boxRect.minY = 50000;boxRect.maxX = -50000;boxRect.maxY = -50000;for (int i = 0; i < pointNumOfPolygon; i++) {if (tarPolygon[i].x < boxRect.minX) boxRect.minX = tarPolygon[i].x;if (tarPolygon[i].y < boxRect.minY) boxRect.minY = tarPolygon[i].y;if (tarPolygon[i].x > boxRect.maxX) boxRect.maxX = tarPolygon[i].x;if (tarPolygon[i].y > boxRect.maxY) boxRect.maxY = tarPolygon[i].y;}return boxRect;}
//判断点是否位于区域内BOOL PointInPolygon(int pointNumOfPolygon, CPoint tarPolygon[], CPoint testPoint){if (pointNumOfPolygon < 3)return false;bool inSide = FALSE;float lineSlope, interSectX;int i = 0, j = pointNumOfPolygon - 1;for (i = 0; i < pointNumOfPolygon; i++) {if ((tarPolygon[i].y < testPoint.y && tarPolygon[j].y >= testPoint.y ||tarPolygon[j].y < testPoint.y && tarPolygon[i].y >= testPoint.y) &&(tarPolygon[i].x <= testPoint.x || tarPolygon[j].x <= testPoint.x)) {if (tarPolygon[j].x != tarPolygon[i].x) {lineSlope = (float)(tarPolygon[j].y - tarPolygon[i].y) / (tarPolygon[j].x - tarPolygon[i].x);interSectX = (int)(tarPolygon[i].x + (testPoint.y - tarPolygon[i].y) / lineSlope);}elseinterSectX = tarPolygon[i].x;if (interSectX < testPoint.x)inSide = !inSide;}j = i;}return inSide;}
2.有序边表法
首先给出有序边表法中定义使用的变量。
int m_Begin, m_End, m_edgeNumbers, m_Scan; //求交边集指针,有效边数,当前扫描位置float m_yMax[N], m_yMin[N], m_Xa[N], m_Dx[N]; //每条边y最大值,y最小值,每条边与扫描线x的交点,每条边斜率倒数
基本思想:用水平扫描线从上到下(或从下到上)扫描由多条首尾相连的线段构成的多边形,每根扫描线与多边形的某些边产生一系列交点。将这些交点按照x坐标排序,将排序后的点两两成对,作为线段的两个端点,以所填的颜色画水平直线。
- 在实现中首先需要对多边形的每一条边进行处理操作,因为是采用水平线扫描填充,所以对于水平线不做处理。对其余边根据端点的y值大小进行排序,保存yMax,yMin,Xa(相对应的x坐标)以及Dx(斜率的倒数)。
- 在进行扫描的过程中,很重要的一部分操作便是求交边集指针的移动。初始状态位0,在扫描线开始向下移动后,调用Include()函数,检查是否有边进入扫描线交集(即判断所有y最大值大于扫描线当前y值的边线),此时将m_End++,即尾指针向后移动。在Include()函数中,也会调整起始点位置,将Dx调整为位移量。
- 之后调用UpdateXvalue()函数,判断是否有边退出求交边集。
- 如果没有边退出,则移动x,并根据x值大小进行排序。
- 有边退出,更新数组,删除该边,m_Begin++,即头指针向后移动。
- 调用pFillScan(pDC)函数,进行填充。
- m_Scan–,回到第二步进行循环,直到m_Begin==m_End。
算法描述:
- 建立边表的方法:
(1)与x轴平行的边不计入;
(2)多边形的顶点分为两大类:一类是局部极值点,另外一类是非极值点。当扫面线与第一类顶点相交时,应看作两个点;而当扫描线与第二类顶点相交时,应视为一个点,对于极值点则要记录两条边;
(3)扫描线按照y轴从低到高顺次记录;
(4)一条边按照y轴的高低记录;
(5)多条边以x轴递增顺序记录;
- 算法流程:
1、根据给出的多边形顶点坐标,建立NET表,求出顶点坐标中最大y值ymax和最小y值ymin。
2、初始化AET表指针,使它为空。
3、执行下列步骤直至NET和AET都为空.
(1)如NET中的第y类非空,则将其中的所有边取出并插入AET中;
(2)如果有新边插入AET,则对AET中各边排序;
(3)对AET中的边两两配对,(1和2为一对,3和4为一对,…),
将每对边中x坐标按规则取整,获得有效的填充区段,再填充.
(4)将当前扫描线纵坐标y值递值1;
(5)如果AET表中某记录的ymax=yj,则删除该记录 (因为每条边被看作下闭上开的);
(6)对AET中剩下的每一条边的x递增dx,即x’ = x+ dx .
效果如下:

实现代码如下:
//有序边表法填充void Fillpolygon(int pNumbers, CPoint* points, CDC* pDC){m_edgeNumbers = 0;pLoadPolygon(pNumbers, points); // Polygon Loading, calculates every edge's m_yMax[],m_yMin[],m_Xa[],m_Dx[]//求交边集范围,因为数组已经根据y值大小进行边的排序,所以end向后移动即代表有边进入,start向后移动,代表有边退出m_Begin = m_End = 0;m_Scan = (int)m_yMax[0]; //从顶向下扫描Include(); //检查是否有边进入扫描线UpdateXvalue(); //检查是否有边退出扫描线while (m_Begin != m_End) {pFillScan(pDC);m_Scan--;Include();UpdateXvalue();}}
void pLoadPolygon(int pNumbers, CPoint* points){float x1, y1, x2, y2;x1 = points[0].x; y1 = points[0].y + 0.5;for (int i = 1; i < pNumbers; i++) {x2 = points[i].x; y2 = points[i].y + 0.5;if (abs(int(y2 - y1)) >= 0) //水平线不做处理{pInsertLine(x1, y1, x2, y2);x1 = x2; y1 = y2;}elsex2 = x1;}}
void pInsertLine(float x1, float y1, float x2, float y2){int i;float Ymax, Ymin;Ymax = (y2 > y1) ? y2 : y1;Ymin = (y2 < y1) ? y2 : y1;i = m_edgeNumbers;//根据y值的大小,进行排序插入,大的在前面while (i != 0 && m_yMax[i - 1] < Ymax) {m_yMax[i] = m_yMax[i - 1];m_yMin[i] = m_yMin[i - 1];m_Xa[i] = m_Xa[i - 1];m_Dx[i] = m_Dx[i - 1];i--;}m_yMax[i] = Ymax;m_yMin[i] = Ymin;if (y2 > y1) m_Xa[i] = x2; //根据y大小确定Xa的值,y大的会先于扫描线相交else m_Xa[i] = x1;m_Dx[i] = (x2 - x1) / (y2 - y1); //斜率的倒数m_edgeNumbers++;}
void Include(){//end向后移动,找出所有边最高点y值大于当前扫描线的边,看是否有新的边进入交集while (m_End < m_edgeNumbers && m_yMax[m_End] >= m_Scan) {//有边进入,调整起始点位置,然后将Dx调整为位移量m_Xa[m_End] = m_Xa[m_End] + (-0.5) * m_Dx[m_End];m_Dx[m_End] = -m_Dx[m_End];m_End++;}}
void UpdateXvalue(){int i, start = m_Begin;for (i = start; i < m_End; i++) {if (m_Scan > m_yMin[i]) {//当前边没有退出,则移动x,然后在进行排序m_Xa[i] += m_Dx[i];pXsort(m_Begin, i);}else {//有边退出,更新数组,然后begin++for (int j = i; j > m_Begin; j--) {m_yMin[j] = m_yMin[j - 1];m_Xa[j] = m_Xa[j - 1];m_Dx[j] = m_Dx[j - 1];}m_Begin++;}}}
void pXsort(int Begin, int i){float temp;while (i > Begin&& m_Xa[i] < m_Xa[i - 1]) {temp = m_Xa[i]; m_Xa[i] = m_Xa[i - 1]; m_Xa[i - 1] = temp;temp = m_Dx[i]; m_Dx[i] = m_Dx[i - 1]; m_Dx[i - 1] = temp;temp = m_yMin[i]; m_yMin[i] = m_yMin[i - 1]; m_yMin[i - 1] = temp;i--;}}
void pFillScan(CDC* pDC){int x, y;FillPolyDoc* pDoc = GetDocument();for (int i = m_Begin; i < m_End; i += 2) {if (pDoc->m_displayMode == 1) {pDC->MoveTo(m_Xa[i], m_Scan);pDC->LineTo(m_Xa[i + 1], m_Scan);}else if (pDoc->m_displayMode == 4) { //图案填充y = m_Scan;for (int x = m_Xa[i]; x < m_Xa[i + 1]; x++)if (m_patternData[y % 12][x % 12])pDC->SetPixel(x, y, RGB(255, 0, 0));}}}
3.种子填充算法
点填充有好几种方法,其中比较简单实现的是四连通泛填充算法。基本思路就是给定种子,然后去填充种子上下左右四个方向的像素点,如果为空,则进行填充。
实现代码如下:
void FloodFill4(int x, int y, int fillColor, int oldColor){int current;current = GetPixel(x,y);if( current == oldColor ){SetPixel(x,y,fillColor);FloodFill4(x+1,y,fillColor,oldColor);FloodFill4(x-1,y,fillColor,oldColor);FloodFill4(x,y+1,fillColor,oldColor);FloodFill4(x,y-1,fillColor,oldColor);}}
不过如果运行这一段代码很容易就会导致栈溢出,,,虽然代码简单,但是没法用。
所以更多的是使用扫描线种子填充算法。
算法描述:
- 种子像素入栈。 当栈非空时,重复执行一下操作。
- 栈顶像素出栈。
- 沿扫描线对出栈像素的左右像素进行填充,直到遇到边界像素为止。
- 将上述区间内的最左、最右像素记为
和
- 在区间[
,
]内检查与当前扫描线相邻的上下两条扫描线是否全为边界像素或已填充的像素,若为非边界和未填充,则把每一区间的最右像素
作为种子像素压入堆栈,重复执行上述操作。
效果如下:

实现代码如下:
//扫描线种子填充int SetRP(int x, int y, COLORREF color, COLORREF mColor, CDC* pDC) {while (pDC->GetPixel(CPoint(x, y)) == mColor) {pDC->SetPixel(x, y, color);x++;}return x - 1;}int SetLP(int x, int y, COLORREF color, COLORREF mColor, CDC* pDC) {while (pDC->GetPixel(CPoint(x - 1, y)) == mColor) {pDC->SetPixel(--x, y, color);}return x + 1;}
void NewLineSeed(std::stack<CPoint>* stk, int lx, int rx, int y, COLORREF color, COLORREF mColor, CDC* pDC) {int x, e, flag = 0;for (x = lx + 1, e = rx + 1; x < e; x++) {//找出每一个区间的最右像素,入栈if (pDC->GetPixel(CPoint(x, y)) != mColor) {if (pDC->GetPixel(CPoint(x - 1, y)) == mColor) {stk->push(CPoint(x - 1, y));flag = !flag;}}}//把rx所在点入栈if (!flag && pDC->GetPixel(CPoint(x - 1, y)) == mColor)stk->push(CPoint(x - 1, y));}
void ScanLineFill4(int x, int y, COLORREF color, CDC* pDC){int pRight, pLeft;std::stack<CPoint> stk;int mColor = pDC->GetPixel(x, y); //给定种子stk.push(CPoint(x, y));while (!stk.empty()) {CPoint p = stk.top(); //栈顶像素出栈stk.pop();pRight = SetRP(p.x, p.y, color, mColor, pDC); //向左向右进行填充pLeft = SetLP(p.x, p.y, color, mColor, pDC);//上下两条扫描线处理NewLineSeed(&stk, pLeft, pRight, p.y + 1, color, mColor, pDC);NewLineSeed(&stk, pLeft, pRight, p.y - 1, color, mColor, pDC);}}
void FloodFill4(int x, int y, int fillColor, int oldColor, CDC* pDC){int current;current = pDC->GetPixel(x, y);if (current == oldColor) {pDC->SetPixel(x, y, fillColor);FloodFill4(x + 1, y, fillColor, oldColor, pDC);FloodFill4(x - 1, y, fillColor, oldColor, pDC);FloodFill4(x, y + 1, fillColor, oldColor, pDC);FloodFill4(x, y - 1, fillColor, oldColor, pDC);}}

